Manage Accounts
What is Manage Accounts settings in Zoho People?
The most vital part of setting up Zoho People for your organization is done here. This involves setting up your account and making preferences that impact the entire organization. It contains the essentials, such as importing and managing users and their logins, defining roles and permissions, managing access to services, defining the organization structure, departments, designations, and so on.
Who is the manage accounts settings aimed at?
Typically, setting up Zoho People is handled by HR administrators, administrative managers, consultants, or designated personnel within the HR department of an organization. They will essentially help setting up Zoho People for your organization and add and manage its users and the various HR processes.
Setting up Zoho People using manage accounts
To setup Zoho People, go to Settings (top-left corner gear icon) > Manage Accounts page.
Organization details
Watch our help video on how to set up organization details and policy:
Here, you will be setting up a few basics and advanced preferences as listed below:
Basics:
- Organization Details - This includes the basic details about your organization, such as the name, website, type, etc.
- Organization Policy - This includes preferences about chat and notifications, employee personal information visibility, search, locale and display formats, and profile picture preferences. Learn more about Organization Policy settings.
Watch our related Help Video on Organization Setup here: - Locations - Add the various geographical locations your organization is operating from.
- Departments - Add the various departments in your organization.
- User Access Control - Define and manage user permissions associated with the various roles (tires of users in Zoho People), ensuring secure and role-based access to specific modules, data, and features within the platform. Learn more about User Access Control.
Advanced:
- Organization Structure - Configure your organization's hierarchy and maintain the data of multiple dependent companies in the same account. Learn more
- Domains and Rebranding - Add your organization's branded domains and verify them. This simplifies adding users directly. Rebranding lets you customize the Zoho People access URL as your own. Learn more about Domains and Rebranding.
Watch our related Help Video on Domains and Rebranding here:
- From Addresses - Manage the from addresses used for the official emails sent from Zoho People.
Watch our related Help Video on From Addresses here:
Users
This space lets you add users (employees with login access to Zoho People) and employee profiles (candidates, temporary staff, contract workers, no login access). You have options to directly import users too.
Please view this table to understand the difference between Users and Employee Profile in Zoho People 5.0:
Users Vs Employee Profiles
| Users | Employee Profiles | |
| Zoho People web access | Yes | No |
| Zoho People mobile access | Yes | No |
| Applicable modules | Access to all modules based on subscription* | Leave, Attendance, Timesheet, Employee Self-Service and custom forms - managed by managers or admins on behalf of employee |
Primary Difference | ||
| An on-role employee in the organization with access to various Zoho People services with permissions based on role | Employee profiles are primarily used to store detailed records on staff, candidates, temporary work, contract workers, etc. | |
| Attendance | ||
| Through web check-in and check-out | Yes | No |
| Through mobile check-in and check-out | Yes | No |
| Through other integrated applications such as Zoho Cliq, Zoho Mail | Yes | No |
| Through biometric ID card | Yes | Yes |
| Through Zoho People Kiosk | Yes | Yes |
| Suitable types of employees | Full-time employees, Part-time employees, Contract employees (all with system access) | Temporary workers, on-site workers (managed by admin or manager on behalf of the employee) |
| Mandatory fields while adding | First name, Last names, Employee ID, Email Address** | Employee ID and First name |
In short, Users
– These are employees who will have an email address and password and will be able to log in to their account. They can access their self-service and perform actions such as applying for leave, submitting timesheets, submitting self-appraisals, etc. First name, last name, employee ID, and email address are mandatory fields for adding a user.
– These are employees who will have an email address and password and will be able to log in to their account. They can access their self-service and perform actions such as applying for leave, submitting timesheets, submitting self-appraisals, etc. First name, last name, employee ID, and email address are mandatory fields for adding a user.
Employee Profiles – These are employees who cannot log in to their account. These employees' details are maintained by the organization in the account. Security staff and contract workers can be examples of such employees. Since these employees cannot log in to their account, based on set permissions, their manager or the admins can apply leave or submit timesheets for them. Employee ID and first name alone are mandatory fields for adding an Employee Profile/ Non-User.
Watch our help video on users and employee profiles here:
Watch our help video on users and employee profiles here:
Watch our help video on employee profile management:
To add new users, Click on Add User(s) button in Settings > Users > Users > All tab. You can also add users from Operations > Employees > Add Employees. To learn more about Adding Users and the various methods of adding users, click here.

"Employees" and "Users" in Zoho People represent the same individuals, with 'Users' denoting those employees who have been granted system access.
To add new Employee Profiles, Click on Add Employee Profile button in Settings > Users > Employee Profiles tab
Watch our related help video on user addition methods:
Importing Users / Migrating Users into Zoho People
You can import multiple employee records into Zoho People using an Excel or CSV file. This is useful when onboarding new employees in bulk or migrating data from another system.
Key Features:
- A Import sample template file is available for download.
- Supports Excel (.xls/.xlsx) and CSV formats.
- Allows you to map your file columns to Zoho People fields.
- Detects duplicate records.
- Enables assignment of roles, departments, and reporting managers during import.
- Generate Employee ID based on rule codes.
Steps to Generate Employee ID During Import in Zoho People
To automatically generate Employee IDs during import, you must first configure Employee ID generation rules. Follow these steps:
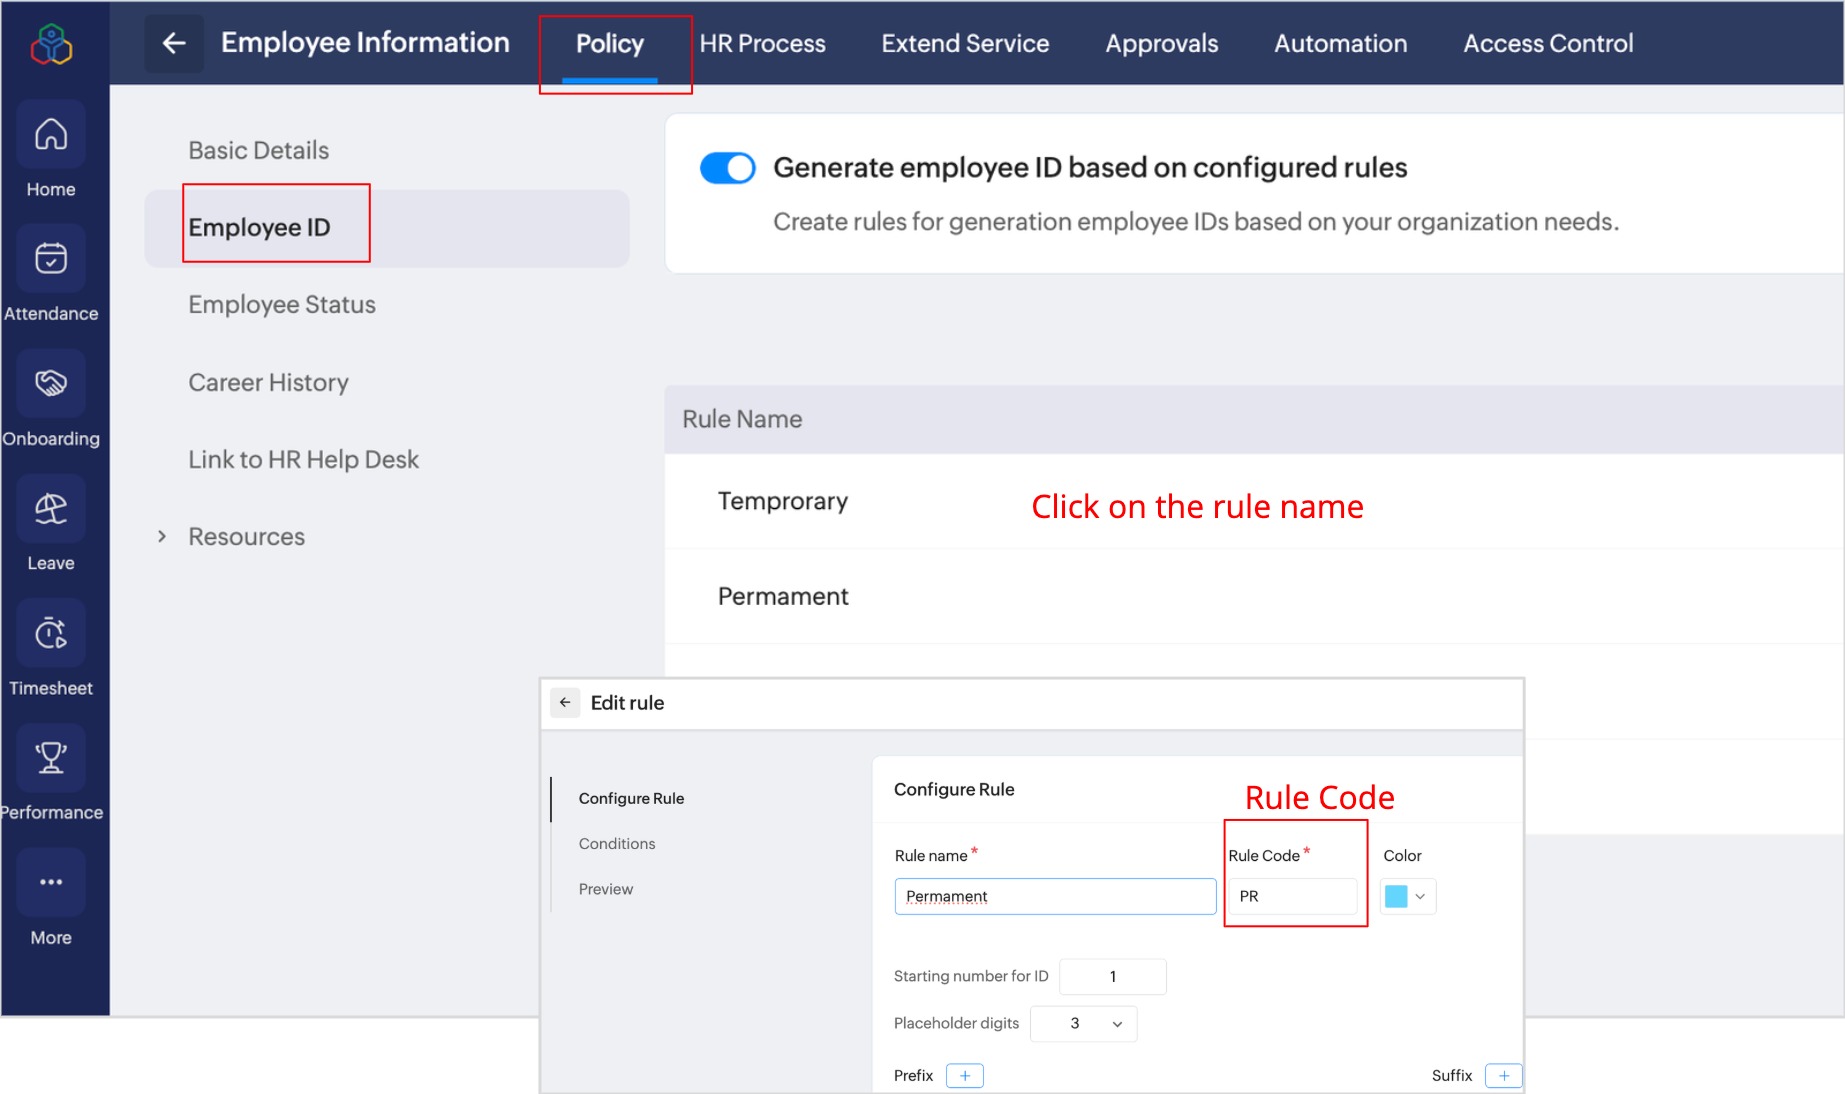
Step 1: Set Up Employee ID Generation Rules, refer to Employee ID Generation.

Define the necessary rule(s) for generating Employee IDs (e.g., prefix, number format).
Note down the Rule Code assigned to each rule.
Step 2: Prepare the Import File
- In the import file, include a column named Employee ID or Employee ID rule.
- Instead of entering actual IDs, input the Rule Code (created in Step 1) for each employee under this column.
Step 3: Import the File
- Go to Settings > Manage Accounts > Users and click Import.
- Upload your xls/xlsx or csv import file and click Next.
- In the map details section, enable Employee ID will generate based on rule code.
- Map the Rule Code column to the Employee ID field (field name in the import file).
- Proceed with the import.
Once imported, Employee IDs will be automatically generated based on the rule codes provided for each employee.
Watch our related help video on migrating users into Zoho People:
User access control
Here, you can add and manage roles. Roles are the different tiers of users in Zoho People, such as Administrators, Managers, and Team Members. New roles can be added, and existing roles can be closed.
The Administrators tab lets you select and add users as administrators for different services offered in Zoho People. To assign service administrators, refer to User Access Control.
Manage service
Here you can enable or disable system and custom services.
Subscription
View details about your subscription and license counts. This page includes a link to manage your paid subscription. Also view your storage and API usage status. Learn more about Zoho People pricing and subscriptions. You can also close your Zoho People organization here. Click here to learn more about organization closure.