Shift Operations
What is Shift Operations?
Shift Operations includes access to shift management, shift mapping, and performing user-specific operations. It is an exclusive space intended for authorized managers or administrators to manage and perform frequent shift related actions.
What can you do in Shift Operations?
- User-Specific Operations
- Manage Shifts
- Adding and editing shifts - Employee Shift Mapping
- Assigning shifts - Map Shift Pattern
- Shift pattern conflicts
- Remove shift pattern mapping - Add and View Shift Groups
User-Specific Shift Operations
To perform employee-specific shift operations, such as viewing and assigning shifts, navigate to Operations > Shifts > User-Specific Operations, search and select a specific employee. Within the selected employee's page, you can view and assign shifts. Additional options to import, export, download, and print shift details are also present.
Manage Shifts
To Manage Shifts, navigate to Operations > Shifts > Manage Shifts tab. As the name suggests, this space allows you to create, delete, edit shifts, and all of its associated preferences.

Shifts can also be managed from Settings > Shift > General > Manage Shift
Adding and Editing Shifts
To add a new shift, click on Add Shift. To edit any added shift, simply click on one of the shifts listed here.
- Enter a shift name and choose an identification color.
- Specify the shift duration.
- If shift times are not too specific in your organization, you can allow employees to check in/check out earlier or later than the shift duration. Enable and adjust the Shift Margin preferences as required. With the settings depicted in the screenshot below, the shift starts at 9:00 AM and ends at 06:00 PM. However, employees can check in as early as 08:00 AM and leave as late as 07:00 PM.
- Enable Auto Check-out for a shift to automatically check out employees. This is useful when employees forget to check out or when check-outs should follow a standard rule. Once enabled, choose how the check-out time is determined:
- Check-out at a fixed time: All employees in this shift are checked out at the same set time each day (for example, 6:30 PM), regardless of when they checked in.
- Check-out after [duration] from check-in time: Each employee is checked out a fixed duration after their own check-in. Enter the duration in HH:mm format (for example, 08:00 for eight hours). The check-out time varies per employee.
- Check-out at shift end time: Employees are checked out automatically when their assigned shift ends, based on the shift's configured end time.
Example:For a General Shift (9:00 AM to 6:00 PM) with Check-out at shift end time selected, any employee still checked in at 6:00 PM is automatically checked out at the shift's end time of 6:00 PM. Only one check-out method can be active per shift at a time. To turn off the feature, clear the Auto Check-out checkbox.
 - Enable and configure Core Working Hours for a shift. These are fixed hours when employees are required to be present at work, even if the shift has flexible start or end times. Once enabled, core working hours are tracked for that shift.Limitations:
- You can add up to 5 core working hours for a shift.
- You cannot configure core working hours that overlap with an existing break configuration. If there is an overlap, an error message will appear and the system will not allow you to save the changes.Example: For a General Shift (9:00 AM to 6:00 PM) with core working hours set from 2:30 PM to 3:00 PM. Employees can start earlier or later, but they must be available during the 2:30–3:00 PM period to support team collaboration and operational efficiency.Configure attendance Grace Period Policy to take actions such as marking as leave or absent if core working hours are deviated. - Enable Restrict breaks during core working hours option if you want to prevent employees from availing manual or automatic breaks during the specified core working hours.Example scenario 1: Restrict breaks during core working hours - Configuring and availing breaks restricted within core working hours
- Choose if weekends are based on location or shifts:
- For location selection, the weekend configuration from the work calendar will be applied based on shift applicable location.
- For shift selection, you can set half working days or half weekends by enabling the corresponding option for this shift. Once enabled, you can choose whether the weekend applies to a full day, the first half, or the second half. You can select any weekend that you have defined as statutory weekend to facilitate different pay.
For example, Sundays can be set as holidays, while the first half of all Saturdays can be set as working day and the second half is considered as weekend.
- If you want to provide an allowance to employees for working on this shift, enable the Provide Shift Allowance option and specify the rate per day. To provide the allowance based on specific conditions, select the Allowance options checkbox and configure the conditions for calculating the allowance based on the employee's clocked hours.
- Full allowance when employee clocks in at least _ hours:
Specify the minimum number of hours an employee must clock in to receive the full shift allowance for the day. Employees who clock in for fewer than the specified hours will not receive the allowance. - Prorate allowance based on hours clocked:Select this option to calculate the allowance proportionally based on the number of hours the employee clocks in. Employees who work fewer hours than the full shift duration will receive a corresponding portion of the daily allowance.Example: Prorated Shift Allowance CalculationEmployees can view their shift allowance in Attendance (left side tab) > My data > Attendance Summary and clicking the list view icon.
Similarly Reporting manager can view their reportees shift allowance data in Team tab
Apply the Month filter to view the shift allowance data for the entire month.
Administrators can view the organization-wide Shift Allowance data in Reports > Organization Reports > Presence Hour Breakup Report.
Employees can view the same for themselves in Reports > My Reports> Presence Hour Breakup Report.
To export all data click on ellipsis icon and include all entries in export - Finally, select the applicable locations for this shift. Use the Add Criteria button to select departments or divisions within the selected location to have precise control over applicability.
- Click Save.
 To customize aspects such as working hours, strict or lenient attendance modes, overtime and deviation calculation, imposing maximum work hours, time round-off, or grace period, check out the Specific Policy feature available through the Attendance service settings.
 Watch our help video on adding shifts in Zoho People:
Employee Shift Mapping
Employee shift mapping, in simple terms, involves assigning specific employees to specific shifts. This process helps effectively manage and complete work on time by ensuring the right resources are allocated to the appropriate shifts at the right time.
To perform employee shift mapping, navigate to Operations > Shifts > Employee Shift Mapping tab.
By default, the weekly shift calendar is displayed, with options to cycle to different weeks. A daily shift calendar view is also available. Additionally, you can use the filter option to list employees belonging to specific departments, location, and other criteria.
To change the shift of one of the employees on a particular date, you can select a record from the list and click on Change Shift.
Assigning Shifts
Shifts can be assigned primarily from Operations and from the Team View (for managers) in the Attendance (user service on the left bar) service.
Let us take a look at two flows for assigning shifts manually:
- Go to Operations > Shifts > Employee Shift Mapping
- Use the Filter icon to list only the employees you are looking to change the shift for. For this example, let us select only the support employees belonging to the IT department. (Furthermore, you can include shift as a criteria in filter options, for example, if you only want to select employees belonging to the general shift)
- Click on Change Shift
- Make any inclusions or exclusions from the employee list, add any criteria if required, select the shift name, applicable date, and enter the reason for change.
- Finally, click Submit
For managers looking to assign shifts for their reportees, they can do so by navigating to Attendance > Team > Shift Schedule
Zoho People also includes a Shift Rotation feature, using which shifts can be automatically assigned to employees and rotated on a speicifed frequency. Click here to learn more about Shift Rotation.
Watch our help video on assigning shifts in Zoho People:z
Map Shift Pattern
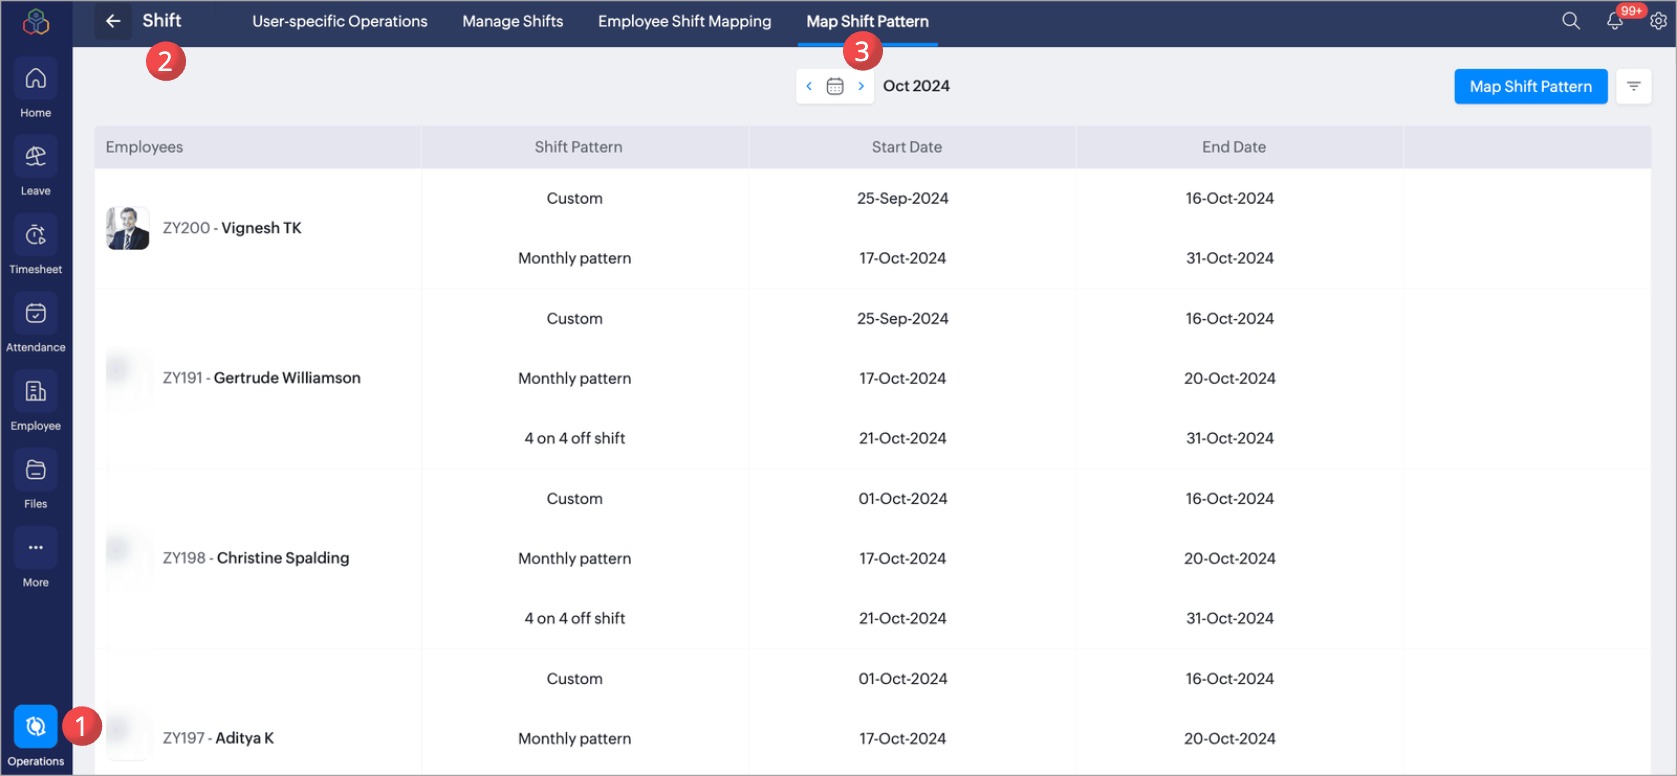
Automate the shift scheduling process for your employees by mapping a shift pattern to them. Employees assigned to a shift pattern are listed in this tab along with the shift pattern details, including effective dates. You can map shift patterns to specific groups, locations, departments, designations, roles, or specific employees. Once mapped, shifts will be automatically scheduled according to the assigned pattern.
To create a new shift pattern, refer to Shift Patterns.
To map a Shift Pattern to your employees:
- From your home page, navigate to Operations > Shift > Map Shift Pattern tab.
- Click Map Shift Pattern.
- Set the applicability criteria. You can map the shift pattern to specific groups, locations, departments, designations, roles, or selected employees.
 The shift pattern applies only to current employees who match the criteria. It will not automatically apply to future employees. To include new employees in the same shift pattern, map the shift pattern to them.
 - Select the required Shift Pattern from the drop down.
- Select the pattern start day if required.If you select Day 5, the shift schedule will start according to the pattern set for the day 5 of the selected pattern and continues from there.
- Define the effective period for shift pattern mapping for the applicable employees.Shifts will be automatically scheduled based on the pattern set for the applicable employees during this period.
- If the effective period includes past days and you want to update the attendance entries according to the new shift schedule, select the Update past days' attendance entries checkbox. This will update overtime, attendance status, payable hours, grace period, compensatory off, credits, absence schedule, and other related data for the applicable employees.Only last two months attendance entries are updated for employees.
- Click Preview Pattern to view a preview of the selected pattern.
- Click Save. The Shift Pattern is mapped to the applicable employees, and scheduling will begin from the effective date.
If there are conflicts in shift pattern assignation, refer to the topic below.
You can view the shift schedule of your employees in the Employee Shift Mapping tab and make changes to specific days' shifts based on your operational needs.
Shift Pattern Conflicts
A conflict in shift patterns occurs when you are trying to assign multiple shift patterns for the same period. To resolve the conflict, you have the following options:
- Hover over the employee's name and click Exclude to remove the employee from the new shift pattern assignment.
- Click Save to overwrite the existing shift pattern with the new one for all the employees except those you have marked as excluded.
The employee will remain in the existing shift pattern until the new one begins. As shown in the image, the new shift pattern takes effect on 21-Oct-2024, and the employee will continue in the existing pattern until that date.
Remove Shift Pattern Mapping
To remove the shift pattern mapping
- Navigate to Operations > Shift > Map Shift Pattern.
A list of employees with mapped shift patterns will be displayed. - Hover over the employee record and click the Delete icon next to the pattern you want to remove.This action will permanently remove the shift pattern for the employee and revert their shift schedule to the previous or default shift assigned before the pattern was applied.
- If the shift pattern removal affects the past days shift schedule and you want to update the attendance entries for those days, select Update past days' attendance entries check box. This will update employee’s attendance records based on the existing or default shift schedule.Only last two months attendance entries are updated for employees.