Managing Hiring Pipelines
Recruitment processes often vary across roles, teams, and regions, making it difficult to manage candidates using a single workflow. Having multiple hiring pipelines help structure these processes by defining stages, organizing workflows, and controlling how records progress for each job.
Creating a Hiring Pipeline
Hiring pipelines allow you to define structured workflows for different roles or hiring processes. Creating separate pipelines helps ensure that each job follows the appropriate evaluation steps.
- Go to Setup > Customization > Hiring Pipeline.
- Click + Create Pipeline.
- In the Create Pipeline pop-up, enter the Pipeline Name, choose an existing pipeline to Clone. You can set this pipeline as the default for all created jobs if you wish by toggling the checkbox. Click Save.
- Add new stages, map statuses and reorder as you see fit. Click Save when you are done.
- The new pipeline will then be saved and can be used for job openings.
Hiring Pipeline Field
The Hiring Pipeline field lets you filter and identify job opening records based on their assigned pipeline. You can use it to create pipeline specific:
- Custom Views
- Filters
- Workflow Rules & more
For accounts without the Applications module
- Navigate to Setup > Customization > Modules.
- Click the Hiring Pipeline sub-tab. You will then see the pipeline configuration page.
- Click Add Stage. Enter a name for the stage, choose a color and click Save.
- To map candidate statuses to a stage, click Map Status.
- Select one or more unmapped candidate statuses.
- Choose the stage you want to map the selected statuses to.
- Click Map.
- To add, edit, or delete candidate statuses, click Manage Status.
- Make the required changes to your candidate statuses.
- Click Save.

Note:
- Each stage must have a unique color. The same color cannot be assigned to multiple stages.
- Mapping or unmapping a status updates the Modified Time field for all records associated with that status.
- A stage appears in the hiring pipeline only if at least one candidate status is mapped to it.
Customizing Stages and Mapping Statuses
Stages and statuses define how candidates or applications are evaluated within a pipeline. Keeping them aligned with your hiring process ensures consistency in tracking, reporting, and automation.
Customize Stages
Stages represent each step in your hiring process and can be updated as your workflow evolves. You can add, edit, reorder, or remove stages to reflect changes in how you evaluate candidates. You can also assign a color to each stage. All statuses mapped to that stage will be displayed in the selected color, making it easier to identify a candidate's progress at a glance.
Map Statuses to Stages
Statuses define the outcome within each stage and help standardize hiring decisions. Properly mapped statuses improve reporting accuracy and ensure workflows trigger as expected.
Note: The Hired, Rejected & Archived stages cannot be removed from your pipelines. The same applies for the Hired, Rejected & Archived statuses mapped under their respective stages.Accessing the Application-specific hiring pipeline
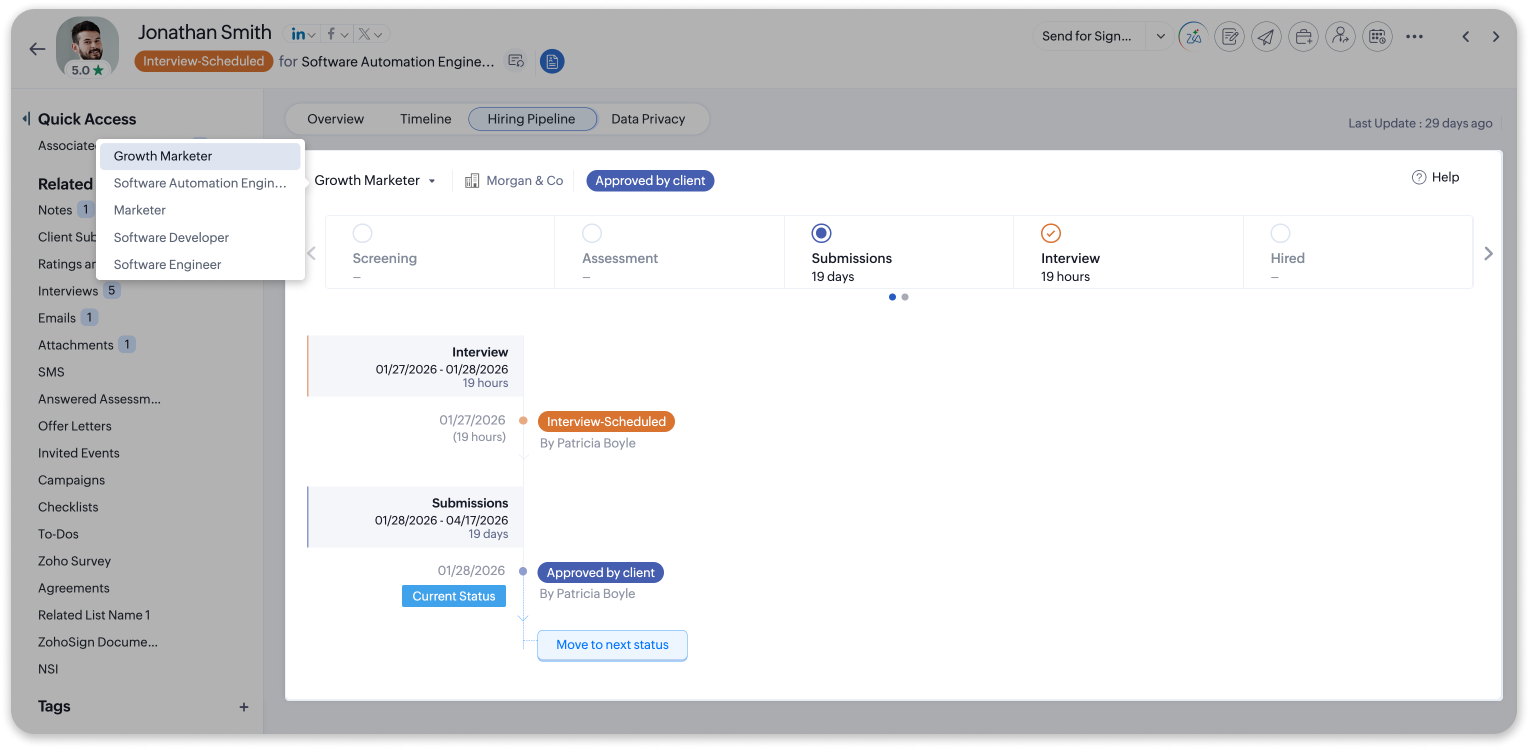
The hiring pipeline can be viewed from within an application record to track it's progress across stages. This displays each stage and status in sequence, along with key details for every update, helping recruiters track progress, identify delays, and review past decisions.
Moving an application to the next pipeline stage
You can update a candidate’s stage or status directly from the pipeline view. This allows you to take action without navigating away from the record. Click Move to next status to progress the candidate through the pipeline.
Each update allows you to:
- Move the record to a different stage
- Select a status
- Add comments for context
The ability to update stages or statuses depends on the associated job opening. Updates are restricted when the job opening is closed or locked, Reopen it if you wish to perform any pipeline related actions.
Note: If the Applications module is not enabled, you can view a candidate's hiring journey from the Hiring Pipeline tab in their Candidate record. This tab displays the candidate's progress across all associated job openings.
Switching Pipelines
Pipelines can be updated for a job opening when hiring requirements change. Switching pipelines allows you to align the hiring process without creating a new job opening.
When a pipeline is changed, existing records will be mapped to the new stages. You can also choose to update past application data to maintain consistency across the hiring process.
- Go to the job opening and click Switch Pipeline.
- Select the pipeline you wish to switch to and click Save.
- Depending on the number of records that need to be processed, this might be instant or take some time. You will be notified when the pipeline transfer is complete.
Deleting Pipelines
Pipelines that are no longer required can be removed to keep your system organized. Before deletion, it is important to ensure that no active job openings or records depend on the pipeline.
- Go to Setup > Customization > Hiring Pipeline and click the More (three dots) icon beside the pipeline you wish to delete.
- Choose the pipeline to which job openings / applications must be transferred and click Save.
- Depending on the number of records that need to be processed, this might be instant or take some time. You will be notified when the pipeline transfer is complete.
Updating past application data
When switching or deleting pipelines, you can choose to update the past application data for candidates associated with the job opening.
This will update the following places with the new pipeline information:
- Reports & Dashboards
- Hiring Pipeline view of the related candidates/applications
- Audit History
Adding pipelines to your Home page dashboard
- While in your Home page, click the More options icon and click Add Component.
- In the Add Component pop-up, select the Others option. Choose Hiring Pipeline under Module and select a Custom View to pull candidates from. Enter a name for the component and click Save.
- The component will then be added to your Home page dashboard.
- You can choose to switch pipelines using the drop-down as shown in the image below.