Setting up a Zobot (chatbot) on your website
There are two ways to set up a chatbot (Zobot) on your website:
- Import a bot: If you already have a chatbot in another SalesIQ portal, you can easily export and import it on your current portal. Learn more here.
- Build from scratch: You can create a new bot from the ground up or use a pre-built template. To get started, navigate Settings > Bots > Zobot > Add.
Platform
- Inside the bot builder, give your bot a Name.
- Then, Choose a platform to structure, configure, and create your bot. These are the available platforms:
SalesIQ Platforms
- Codeless Bot Builder,
- SalesIQ Scripts,
- Zia Skills,
Third-party platforms: If you have chatbots set up in any one of these platforms, you can connect the same bot with SalesIQ.
- Dialogflow,
- Watson Assistant,
- Azure Bot Service.
- Webhooks
- Click Next.
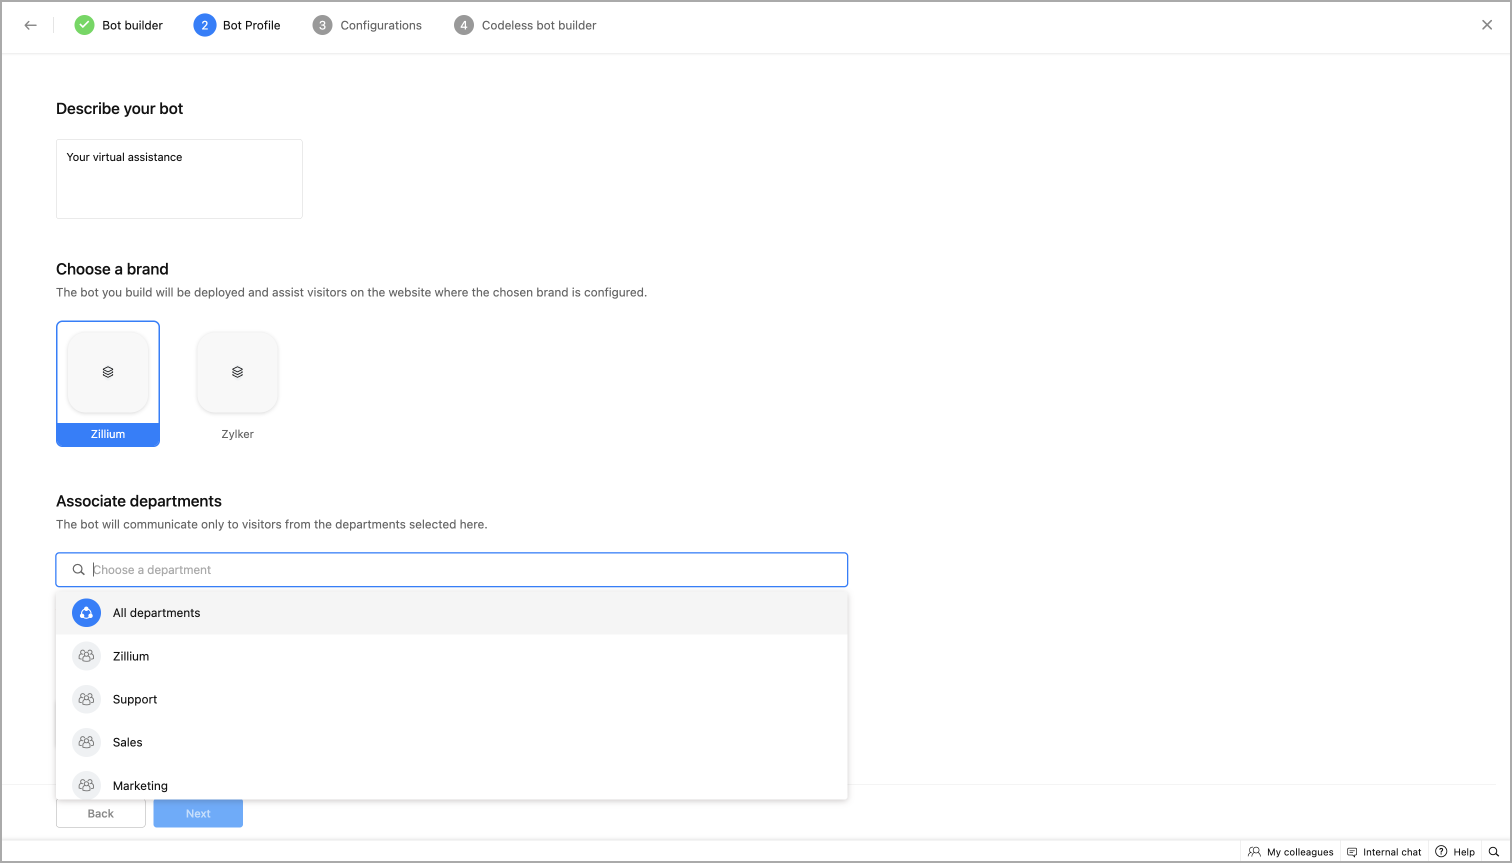
Profile
- Give a description for the bot that will help visitors understand the characteristics of the bot.
- Choose the brand on which you would like to deploy the bot.
Associate departments
- Next, associate the bot with a department. The bot will handle only those chats that are routed to the configured department.
- Select All departments, to allow the bot to handle all incoming chats, regardless of department.
Channels
- Choose the channels where the bot should be active. Currently, the bot can be deployed on websites, mobile SDK, Facebook Messenger, Instagram, WhatsApp, Telegram, and LINE. These works based on the channels you've connected with SalesIQ.
Languages
In the Languages section of your Zobot setup, you’ll configure how the bot handles multilingual conversations. This is applicable only for bots built using the Codeless Bot Builder.
- Supported Languages: Select the languages you want the bot to support from the dropdown. Zoho SalesIQ currently supports 30 different languages.
- Default Language: From the selected supported languages, choose one as the default. This will be used if the visitor’s language isn’t recognized or supported.

Bot content (text, responses, and labels) must be configured separately for each supported language (auto-translation is not currently supported).
Language detection
- The bot automatically detects the language of the visitor’s first message.
- If the detected language is one of the configured supported languages, the bot will use it throughout the conversation, even if proactive engagement is enabled.
- If the detected language is not supported, the bot will fall back to the default language.
Example Scenario
- Let’s say your bot is configured with French, German, and English as supported languages, and English is set as the default.
- If a visitor starts the conversation in French, the bot will respond in French.
- If the visitor’s first message is in Spanish (which isn’t supported), the bot will fall back to English, the default language.

Note: Once a language is selected at the start of a session, the bot will not switch languages mid-conversation.

Working hours
Set Working Hours for your bots to engage.
- The bot's working hours can be chosen based on your business hours and the operator's availability.
- To allow the bot to take up all the chat regardless of business hours or operator or operator's availability, check all the boxex.
- Click, Next.
Configurations
Bot audience for proactive engagement
The bot can be proactive/automatically engage with the visitor based on the audeince configured here. You have the following options,
- All visitors: The bot enagages proactively with all your website visitors.
- Custom visitors: The bot enagages proactively to a selected or targeted audience based on your custom rules.
- To make your bot proactively engage with a specific audience, select Custom Visitor under the audience configuration and click Add Rule to define your targeting criteria.
- For example, if you configure a rule to target visitors on the Payment page, the bot will automatically initiate conversations with those visitors.
- For all other visitors, the bot will remain reactive, it will only respond if the visitor starts the conversation.
- Next, define when the bot should initiate a conversation with visitors. In the previous step, you set the audience criteria for proactive engagement, now you're configuring when that engagement should happen upon visitor satisifying the rules set.
- When visitor lands on your site: The bot will automatically engage after a defined time delay (in seconds, minutes, or hours) once the visitor arrives.
- When visitors click the chat widget: The bot will initiate the conversation only when the visitor manually clicks the live chat widget.
- When visitor performs a custom action: The bot will trigger when the visitor completes a specific action (e.g., clicking a button). This requires tracking the action using a visitor.customaction JavaScript API.

Language detection with proactive engagement:
When both multiple languages and a proactive audience are configured, SalesIQ will first detect the visitor’s website language.
- If the detected language is one of the supported languages configured in the bot, the bot will proactively engage the visitor in that language.
- If the detected language is not supported, the bot will default to the default language for the conversation.
- Then, set the Response interval to bot's reply to provide a natural human-like conversation.
Handle inactive bot chats
Followed by this, you can set up chat inactivity rules to notify the visitor that he has been idle on the website for a considerable amount of time during the chat. Based on the inactivity time set in this section, the bot can send out messages to the visitor and end the corresponding conversation.
- Idle chat handling:
- Set up automated alerts when a visitor remains idle for a specific duration during a chat.
- Define the idle time after which the bot should send a first alert message to the visitor.
- Customize the alert message, with support for multiple languages.
- You can configure multiple alerts to be sent at different intervals.
- Chat timeout
- If the visitor still doesn't respond after the idle alerts:
- Choose how the bot should handle the session,
- End the conversation
- Forward the chat to an operator
- Mark the chat as missed
Handoff to operator
Enable this option to allow visitors to request human assistance at any point during the conversation. A persistent label, such as “Connect with a human?”, will appear at the bottom of the chat widget throughout the chat session.
- When the visitor clicks "Yes", the bot will automatically forward the chat to an available operator.
- You can customize both:
- The label message (e.g., "Need help from a human?")
- The forwarding message shown while connecting the visitor to the operator.
Conversation actions
In addition to the operator handoff, you can enable two more visitor actions, Rollback and Restart. These options will appear persistently at the bottom of the chat widget during the conversation.
- Rollback: Lets the visitor go back to the previous step in the conversation. Useful if they made a typo or want to change their response.
- Restart: Resets the entire chat flow and restarts the bot from the beginning.
 Note: This configuration is only available for the Codeless bot builder.
- Finally, click Create. You will be directed to the bot builder platform that been selected on Profile.
Bot builder
You will be redirected to the bot building platform which is selected in the "Profile".
Prebuilt Templates
If you're creating a bot for the first time, a template selection screen will appear. This includes a range of ready-to-use multilingual templates and an option to start from scratch.
- Hover over a template and click "Show Details" to view its purpose and flow.
- To apply a template, click "Use Template", the flow will be loaded directly into the builder.
- Once applied, you can:
- Click "Test your bot" to preview the flow.
- The template comes with multi-language support. To view and edit content in a different language, click the language dropdown at the top of the bot builder and select the desired language.
- Make changes or edit the bot flow to suit your business requirements.
- A warning icon at the top-left highlights any errors or unresolved issues in the flow. Click it to review and fix them.
- After resolving all issues, click "Publish" to deploy the bot to your live chat.

No changes are needed to your website installation code.
Create a new bot
To build a bot from the Scratch:
- Click "Create from Scratch" in the template screen.
- By default, there will a welcome card, click on it's plus (+) icon to view the card gallery.
- The gallery has many cards, caregorised based on it's usability.
- Drag a card to the plus icon or, click a card that you want to add it to the bot, provide the card contents and click save. The card will appear on the bot builder.
- Next, you can test your bot right here, click on "Test your bot", a preview tab will open, displaying the bot flow you've built thus far.
Useful links
Configure bot for multiple languages
- Initially, set up the bot for the chosen default language in the bot profile.
- The chosen supported languages will appear at the top. Click on them to configure the bot for other languages.
- Next, click “Translate All” to translate content into other supported languages. Translations are generated based on the default language content.

Note: The bot flow/cards can only be created/edited/deleted in the default language. In other supported languages, only the content of the cards can be edited.
- Review the contents and click Publish to deploy the bot on the site.
- Language handling
1. Visitor initiated chat - When the bot is triggered by a visitor message (reactive mode):
- The bot detects the language of the visitor’s first message
- If that language is configured, the bot continues the conversation in that language
- If not, the bot falls back to the default language
Example
- If Spanish is configured and the visitor sends “Hola!”, the bot responds in Spanish.
- If Spanish is not configured, the bot responds in the default language.
2. Language switching during chat - Visitors can change the language at any time using the language dropdown at the beginning of the chat.
- The selected language will be used for all subsequent responses
- The bot will not automatically switch languages based on new messages
- Once a new language is selected, the chat restarts from the beginning in the selected language
Note: If the conversation is in English and the visitor sends a message in Greek, the bot will still respond in English unless the language is changed via the dropdown.
3. Bot initiated chats - When the bot is triggered automatically:
- SalesIQ detects the website’s language
- If that language is configured in the bot, the bot starts in that language
- Otherwise, the bot uses the default language