LINE Chat Integration with Zoho SalesIQ
Integrating LINE chat with brands
If you want to integrate LINE Chat with Zoho SalesIQ, follow the steps below:
Log in to your Zoho SalesIQ account and navigate to Settings > LINE under the Messaging Channels section.
Click the "Add" button. Now, view all your available brands in your Zoho SalesIQ portal. You can add your LINE Chat account to any of the available brands.
Select the brand you want to link your LINE Chat account with. This will open the LINE Chat configuration page.
Paste the LINE Chat Channel ID and Channel Secret in the required input field.
Where do I find my LINE Chat Channel ID and Secret?
There are two methods to obtain your channel ID and secret for your LINE Chat account. You can do this via the LINE Official Account Manager or the LINE Developers Console.
Take a look at how to create a LINE business account by visiting this link: https://www.linebiz.com/jp-en/other/.
Method 1: Via LINE Official Account Manager
Log in to your LINE Official Account Manager in your browser.
If you have multiple LINE Chat business accounts, choose one account from the list.
Click on Settings in the top right corner, and then click on Messaging API on the right-hand side tab.
The Messaging API screen will open. Here, you can find the channel ID and Secret.
To ensure that the chat functions properly, turn off the Chat option in the Response mode in LINE chat settings.
Switch to the Response Mode section and disable the Chat option.
The next step would be to enable Webhook URL. Click on the Webhooks toggle to enable it.
Once the Chat option is turned off and Webhooks is enabled in the LINE chat settings, navigate back to Zoho SalesIQ’s LINE chat config page.
Back in Zoho SalesIQ LINE chat config, check the checkbox in the Response mode step and then click Next.
Check the checkbox in the Webhook URL step and click Next.
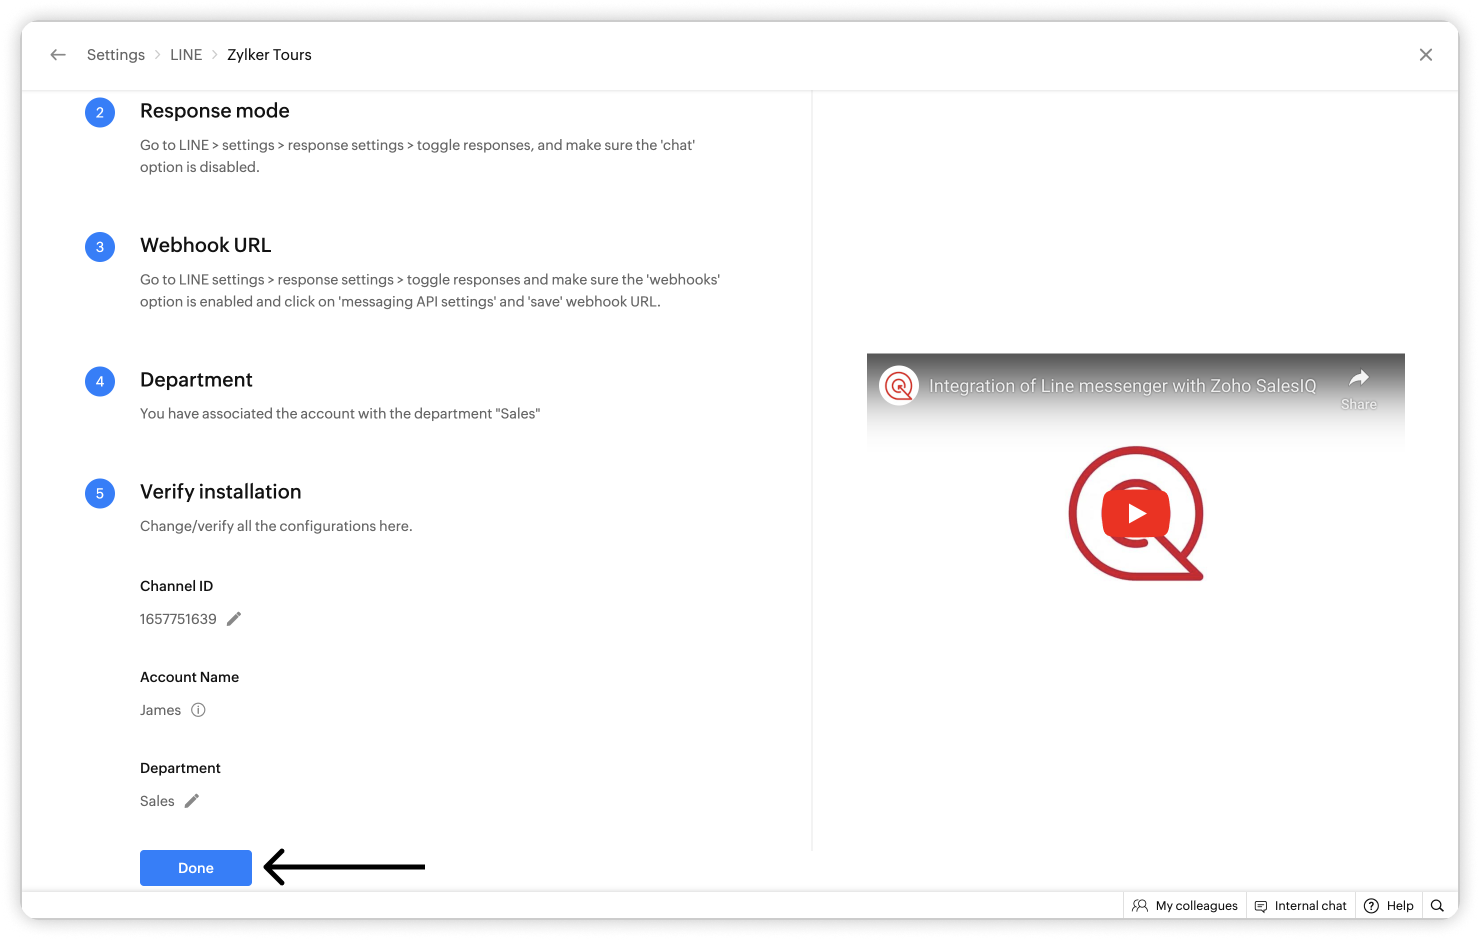
Select the department you want to associate the LINE chat channel with and click Next.
Now, verify the config info and click Done.
That's it! You have successfully integrated LINE Chat with Zoho SalesIQ. Now you can use LINE Chat to communicate with your customers and provide support.
Method 2: Via LINE Developers Console
- Log in to your Zoho SalesIQ account and go to Settings > LINE under the Messaging Channels section.
- Click the "Add" button. Now, view all your available brands in your Zoho SalesIQ portal. You can add your LINE Chat account to any of the available brands.
- Select the brand you want to link your LINE chat account with. This will open the LINE Chat configuration page.
- Login to your LINE Developer Console, and click the Create button to create a provider.
- A pop-up will appear, then enter a name for your Provider and then click Create.
- After creating the provider, create a Messaging API channel. Click on the Create a Messaging API channel and click Ok in the pop-up.
- Enter all the required details of your LINE channel in the form, accept the terms and conditions, and click Create.
- Now that you've successfully created a LINE messaging channel, copy the Channel ID and Secret from the page.
- Back in the Zoho SalesIQ LINE chat config page, paste the Channel ID and Channel Secret in the input field and click Next.
- In your LINE Developer Console, you would have generated a Webhook URL. Enable the Use webhook toggle.
- Back in the Zoho SalesIQ LINE chat config page, check the checkbox in the Response mode step and click Next.
- Check the checkbox in the Webhook URL section and click Next.
- Select the department you want to associate the LINE chat channel with and click Next.
- Now, verify the configurations info and click Done.
 Account Information
- After completing the integration, you will be directed to the Account Info page, where you can view the integration details. If required, you can change the Channel ID or associated department from this page.
- Note: Account name can be changed only on your LINE account.
Attachment types and limit
File Type | File Size Limit | Formats supported |
Image | 10 MB | jpeg, png, jpg |
Audio | 20 MB | ogg, vorbis, mp3 |
Video | 20 MB | 3gp, mp4 |

- In case there is use of offensive language by the user during a LINE chat, the chat will be automatically closed after the abusive word limit is reached.
- This can be set up by navigating to Settings > Brands > Choose your brand > Flow controls > Profanity management.