Format a Text
Text placed on your slide inside a text box, placeholder, shape, or picture can be made to look appealing, legible, and expressive to the eyes of your audience by using a variety of text formatting styles. To emphasize a piece of business jargon, you could apply a bold face; to indicate scientific equations you, you might choose italic face; and to list the advantages or disadvantages of an idea, you could add a numbered list or bulletin list style. Text styles and text effects help to makes your content clear and informative for your audience.
Format Text Properties
Choose a font style
The text on your slide always takes the default font type based on the theme applied to your presentation. However, if you want to use two diverse fonts, such as to differentiate between a "Title head" and the other text in the slide or the text within a shape or picture, then you can choose your favorite text style and provide an instant effect to them using the vast collection of fonts on Zoho Show.
To choose a font style,
- Select the text you want to change on the slide. This will open the FORMAT mode with text formatting options on the right pane.
- From the pane, click the Font dropdown and choose the font style you want from the font gallery. The font gallery is divided into three sections:
Theme Font lists the predefined font based on the theme applied to your presentation.
All Fonts lists all the available fonts on Zoho Show. There are a total of 200 plus fonts available.
Recently Used Fonts lists all the recently used fonts in your presentation. - The chosen font will be applied to your text.
You can also type the font name within the Search Fonts box to locate your favourite font.
To apply the same font throughout your presentation, go to the Master slide in Master View and apply the desired font type to the main master slide. The chosen text type will be applied to every slide in your presentation.
Change the font face
A good option to draw immediate attention and make your text stand out on the slide is to apply different font styes to it. For example, underlining can be useful to differentiate the heading from the body text while utilizing a Bold face will help important features of the presentation stand out.
To change the font face,
- Select the text you want to change face on the slide. You will see the FORMAT mode with text formatting options on the right pane.
- Click on one of the below options to apply:
: To Embolden the selected text.
: To Italicize the selected text.
: To Underline the selected text.
: Draws a line through the middle of the selected text. Used typically to strike through text during reviews of documents so that others can still see the original text.
You can also use keyboard combinations to apply font faces: Press Ctrl+B for Bold text, press Ctrl+I for Italic text and press Ctrl+U for underlined text.
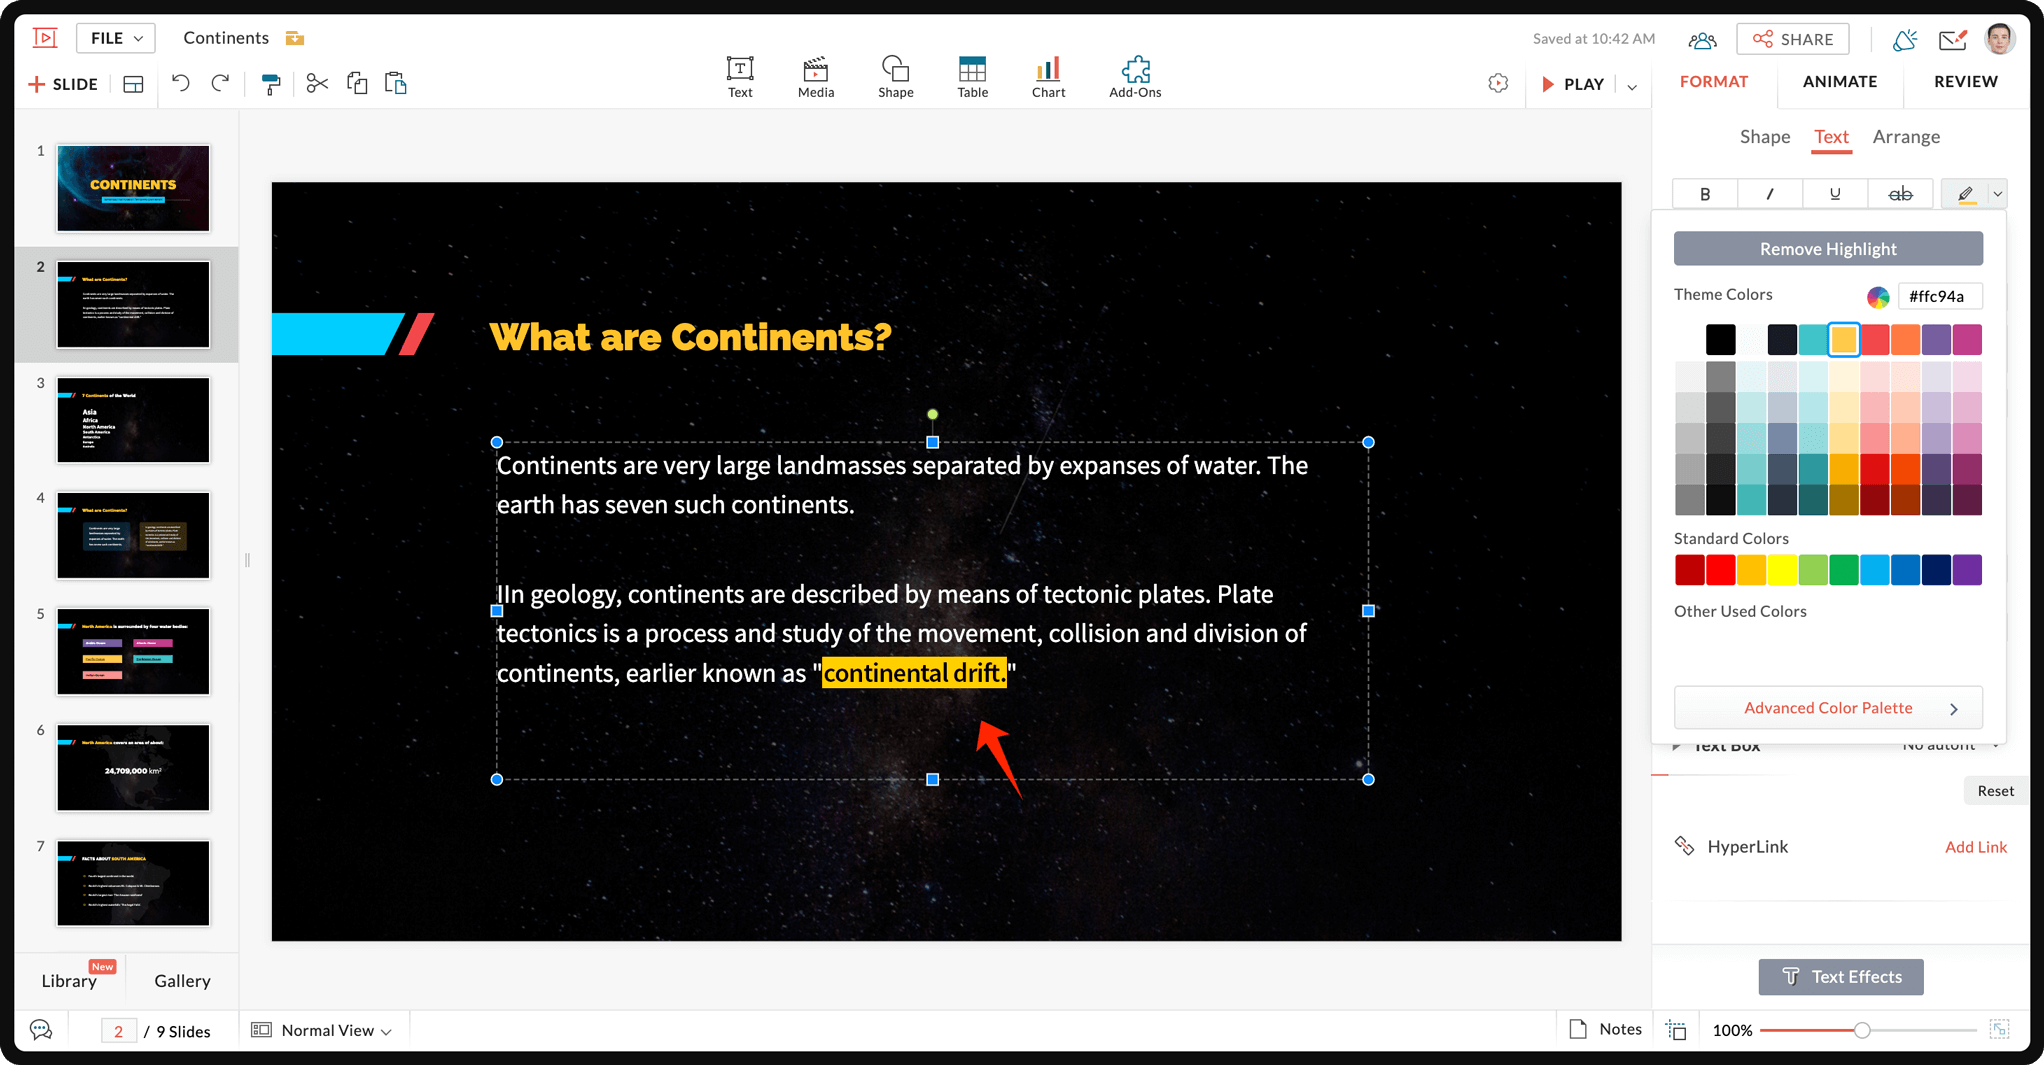
Highlight Text
To emphasize or draw attention to text in your slide you can highlight the text by adding a background color to it.
To apply text highlight,
- Select the text you want to highlight on the slide. You will see the FORMAT mode with text formatting options on the right pane.
-
Click
to select any color from Theme, Standard Colors, Other Used Colors, or Advanced Palette.
 The default color will be applied as the text highlight, however you can click
to change it to a different color.
Change the font color
Colorful text will bring out a vibrant look on your slide and is also a great way to draw attention to your presentation. With the complete set of font colors on Zoho Show, you can enjoy having your favorite hue for any text in your presentation. Adding appropriate font colors will provide a consistent visual for your presentation. For example, adding dark fonts onto light background or light fonts on dark slide background can assist in consistent contrast.
To apply or change the font color,
- Select the text you want to change color on the slide. You will see the FORMAT mode with text formatting options on the right pane.
- Click the Colors drop down
and choose the color you want.
There are four sets of colors available:
- Theme colors contain a set of colors based on the active theme applied to your presentation.
- Standard colors contain a set of 10 colors most widely used by all users.
- Other Used colors contain a set of colors that you have used recently.
- Advanced Color Palette comes with several color schemes that lets you edit the color palette to match your brand and company.
Add superscript and subscript
Superscript and subscript allow you to make smaller notations that are slightly higher or lower than the rest of your text. This format is perhaps best known for their its in formulas, mathematical expressions ({x^y}^z), and specifications of chemical compounds (C6H12O6), but has many other uses as well.
To add a superscript or subscript,
- Select the text/symbol/figure/number on the slide. You will see the FORMAT mode with text formatting options on the right pane.
- Click on one of the below options to apply:
-
: To make the text appear above the baseline.
-
: To make the text appear at or below the baseline.
Change the text case
When copying and pasting text from one source file to another, you may notice that the capitalization of the letters remains consistent. With the case formatting tool, you can control whether the text you're pasting is lowercase, in all caps, or other options. This option can be useful when you need to change large amounts of text, eliminating the need to retype for a different capitalization.
To change the text case,
- Select the text you wish to change case. You will see the FORMAT mode with text formatting options on the right pane.
- Select one of the following options:
: To make the text appear in caps or larger.
: To make the text appear small.
Change the font weight
Its easy to differentiate between the title and the body content in your presentation by looking at the thickness or weight of your font. Making the fonts appear thin or thick is especially useful when the reader wants to quickly skim through the table of contents before starting to read through every slide in the presentation. Adjusting the font weight or thickness will let you understand the organization of the content even before you identify the main topics in your presentation .
To change the font weight,
- Select the text to change weight. You will see the FORMAT mode with text formatting options on the right pane.
- Click the font weight drop down and select one of the below options:
- Light: To make the font/text look lighter than the default weight.
- Normal: To match with the selected font and its default weight.
- Demi-Bold: To make the font/text look average/moderate than the default weight.
-
Bold: To make the font look thicker or bolder than the default weight. Bold font helps you to highlight major areas in a sentence.
-
Heavy: To make the font look as thick and bold as possible. These fonts are ideal for titles and section headers.
Font weight options vary, depending on the selected font style. Not all styles have the same font weight options.
Change the font size
The default size of the title and content on a slide depends on the specific layout applied to them. However, when you add a new text box you may sometimes notice that your text does not fit inside it. In that case, you can increase or decrease the size of text in order to better fit with the other objects arranged on the slide. Changing the font size is beneficial when you want to emphasize or de-emphasize some of the content on the slide by making it appear larger or smaller compared to the rest of the text in your slide.
To change the text size,
- Select the text you wish to edit. This will open FORMAT mode on the right pane. Use the plus and minus buttons to increase or decrease the font size or type the desired size within the size box.
You can apply the required font properties throughout your presentation by adding them to the Master Slide in Master View instead of making changes to individual text object in the slide. This will save you time and also provide a consistent look to text in all the slides.
Format Paragraph Properties
Add bulleted or numbered lists
When creating your slides, you may have key points, ideas, or say a series of procedures that you want to explain to your audience. Using a bulleted or numbered list is the best method to make viewers understand and visualize the concepts you're trying to convey. A bulleted or numbered list presents information in a clear and concise way, avoiding long pages of paragraphs that are a slog for your audience to get through.
To add bulleted or numbered lists,
- Select the text box or specific text to apply the list style. You will see the FORMAT mode with text formatting options on the right pane.
- Click the List Style dropdown and choose the style you want to apply. There are two types of list styles:
- Bulleted list: Bullets are perfect for listing non sequential points or information. Most traditional presentations make use of the bullet feature. You can also add Special Character as your list style from the Shape Gallery window by clicking plus
.
- Numbered List: This list is perfect for sequential items, such as when you want to provide numbered steps.
Choosing NONE removes any bullets and numbers applied from list.
Change the color and size of bullet or number list
Add color to help your lists pop more than the default black and white. Zoho Show offers a variety of color options to choose from for your bullets and numbers. You can also resize the bullets and numbers to help them match the content of the slide.
To change color and size of bullet/number list,
- Select the bulleted or numbered list on the slide. You will see the FORMAT mode with text formatting options on the right pane.
- Click the List Style dropdown to change the list color or size as follows:
To change the color of list style, click the Color dropdown and choose your desired color from the Color gallery.
There are four sets of colors available:
Theme Colors contains a set of colors based on the active theme applied to your presentation.
Standard Colors contains a set of 10 colors most commonly used by other users.
Other Used Colors contains the set of colors you have used most recently.
Advanced Color Palette comes with several color schemes that lets you edit the color palette to match your brand and company.
-
To change the size of the list style, click the Size text box, type in the required list size or use the up/down arrows to increase or decrease the value in percentage.
- To change the starting number for numbered list go to Start at box and enter the desired starting number of the list on the slide, which may be a continuation from your previous slide. By default, the number list count starts from the number 1 on the slide.
Change the text alignment
Sometimes you might want to have a title in the center of the page, while keeping your text to the left. The text alignment tool in Zoho show is a great way to control which way your text is oriented. With this tool, you can align text to the left, center, or right, while maintaining uniformity throughout your presentation.
To adjust text horizontally,
- Select the paragraphs you want to align. You will see the FORMAT mode with text formatting options on the right pane. If you select the entire placeholder, text box, or shape the alignment will apply to the all of the content within the selection.
- Click on one of the below options to align text horizontally:
: Left Align the selected text to the left of the placeholder/text box/shape.
: Center Align aligns the text to the center of the placeholder/text box/shape.
: Right Align aligns the selected text to the right of the placeholder/text box/shape.
Adjust the line spacing
Sometimes the content on your slide may look too congested or close to one another, making it difficult for your audience to read or understand. However, by setting a proper line space between text, you can improve the readability and also help fit more content within the placeholder area on the slide. Adding line spacing adjusts the amount of space between each line in the paragraph.
To adjust the line space,
- Select the paragraph or line you want to adjust the spacing. You will see the FORMAT mode with text formatting options on the right pane.
- Do one of the following:
- To change the line spacing within a paragraph, go to the Line Space option and select the required line space value from the dropdown.
- To change the spacing after or before a paragraph, expand the Line Space dropdown and set the paragraph spacing you need in pixels within the Before Paragraph or After Paragraph box, depending where you would like to place the spacing. You can also type the value inside the box.
Change the text indent
With multilevel bulleted list or long paragraphs, indenting and dividing each section of the list or paragraph into clear first, second, or third level on the slide will help you and the audience to differentiate between the first and subsequent lines of text in the presentation. Text indentation allows you to structure your content in a clear order on the slide.
To change the text indentation,
- Select the bulleted list or paragraph you want to indent. You will see the FORMAT mode with text formatting options on the right pane.
- Go to the Text Indent option in the pane, and do one of the following:
-
Apply left indent or right indent: This will set/adjust the amount of indentation either to the left or right of the selected text/paragraph.
-
Click the Left arrow
to indent the selected paragraph to the right direction
-
Click the Right arrow
to indent the selected paragraph to the left direction
-
Add indent before Text : Adds indentation or changes the amount of indentation before the selected text. To do this, expand the Text Indent option and set or type the required indent space number in the Before Text box.
- Add special indents: Indents lines specifically in a bulleted or numbered list.
The special indent options contains: -
None: Removes any indents from a paragraph/list applied on the slide.
-
First Line Indent: Indents the first line of a paragraph and helps determine the beginning position of the bullet character (or number in a numbered list).
-
Hanging Indent/change the bullet spacing: Adjusts the spacing between the bullet character (or number) and the subsequent paragraphs. Hanging denotes the area between the bullet and the first text character within the bulleted list.
Align Text within Text Box/Shape/Placeholder
Often, text placed within a text box, shape, or placeholder might night not properly or appear squeezed out of the containers, which can produce a poor aesthetic. This could be overcome using the below text alignment options.
To align text within text box/shape/placeholder,
- Select the text box, shape, or placeholder that contains the text. You will see the FORMAT mode with text formatting options on the right pane.
- Do one of the following to align text:
- Align text vertically makes it easy for you to move large amounts of text to various locations within the container box instantly. Click on any of the below options to align text vertically:
: Top - Aligns text at the top of placeholder/text box/shape.
: Middle - Aligns text at the middle of placeholder/text ox/shape.
: Bottom - Aligns text at the bottom of placeholder/text box/shape.
-
Auto-fit/shrink text adjusts or reduces the text to fit within the text box, shape, or placeholder area. Click the Text Box dropdown and choose any of the following:
Shrink text to shape - to reduce the text size to a size that fits within the shape/placeholder/text box.
Resize shape to text - to retain the text size and increase the shape/placeholder/text box size so that the it fits around the text perfectly.
No auto-fit is the default option and it disables the automatic fitting of text within the shape/placeholder/text box.
- Adjust Margin Space adjusts and sets the space around text and margin(left, right, top, and bottom) of shape/placeholder/text box area.
Click the Text Box option and use the up/down arrow to set the margin values for the following positions:
Left box to adjust the distance between the left border of a shape/text box and the text.
Right box to adjust the distance between the right border of a shape/text box and the text.
Top box to adjust the distance between the top border of a shape/text box and the text.
Bottom box to adjust the distance between the bottom border of a shape/text box and the text.
Cut, Copy, or Paste Text
Reuse the same text in different slides of the presentation, cut lengthy/unwanted portions in a paragraph, or move specific text from one slide to another. Instead of retyping a huge section of text every time, which can be time consuming and laborious, you can use the cut, copy, and paste tools to finish your work in no time.
To cut, copy, or paste text,
- Select the text or paragraph you want to cut or copy and right-click on the selected content.
- Do one of the following:
- Choose Cut from the menu list or press "Ctrl+X" on the keyboard to cut/remove the selected text.
- Choose Copy from the menu list or press "Ctrl+C" on the keyboard to copy the selected text.
A pop-up message containing the message "Text Cut" or "Text Copied" will appear at top of the slide area.
To paste the cut/copied content on any slide,
- Place the cursor where you want to insert the text and press Ctrl+V on the keyboard.
Instead of formatting text and its properties one by one in the Normal Slide View, you can add, edit, and format text in the Master View to make them permanent and uneditable in all the slides which follow its layout. Applying text formatting styles in the Master View will save you time and give your presentations a consistent look.