Content Approvals on Zoho Social
When you're a team of marketers trying to push out only the best content on your social media channels, it's helpful to have a Content Approval system in place. Not only can an Approval setup pipeline your content, and get it from Point A to Point B for editing and approval, but it ensures that your content is optimised, and is part of a systematic publishing process. This gives a new dimension to your social media strategy and also saves a lot of time spent going back-and-forth over discussing content.
The Approvals framework within Zoho Social has two key aspects: Roles and Workflow.
Part 1 - Content Approval Roles
The Portal Admin on Zoho Social will be able to add and decide the Roles of all the team members inside each Brand on Zoho Social. During the setup stage, the Portal Admin is given the option to segregate members into the following roles which will decide their Content-level permissions. These are: Admins, Approvers, and Limited Publishers.
1. Admins
A Portal Admin by default will have the "Approver" privileges and can approve, update, and reject posts sent for approval. They can assign other members as Portal Admins or Brand Admins and they will have Approver privileges for either the entire Portal, or the specific Brand, respectively.
2. Approvers
"Approvers" roles are assigned by either Portal or Brand Admins, and they can approve, update, and reject posts that are sent for approval. They have full publishing permission within their designated Brands.

3. Limited Publisher
"Limited Publisher" roles are assigned by Admins for members who's content is to be sent for approval before publishing. Limited publishers cannot schedule or publish content directly, and can only save content as Drafts and send for approval.


You can create your own Roles names and assign customized permissions for each Role anytime from the Settings tab on Zoho Social if you have Admin privileges.
Part 2 - Content Approval Workflow
How to Add team members as Approvers

Only users who have publishing permissions to all connected channels in a brand can be made approvers.
To add members as Approvers, follow the steps given below.
1. Click on the gear icon (Settings) followed by Brand Settings.
2. Now, under Brand Settings click on Publishing.
3. Under Publishing Preferences hit the Add Approver button.
4. Pick team members from the list you want to add as Approvers and finally hit the Add button.
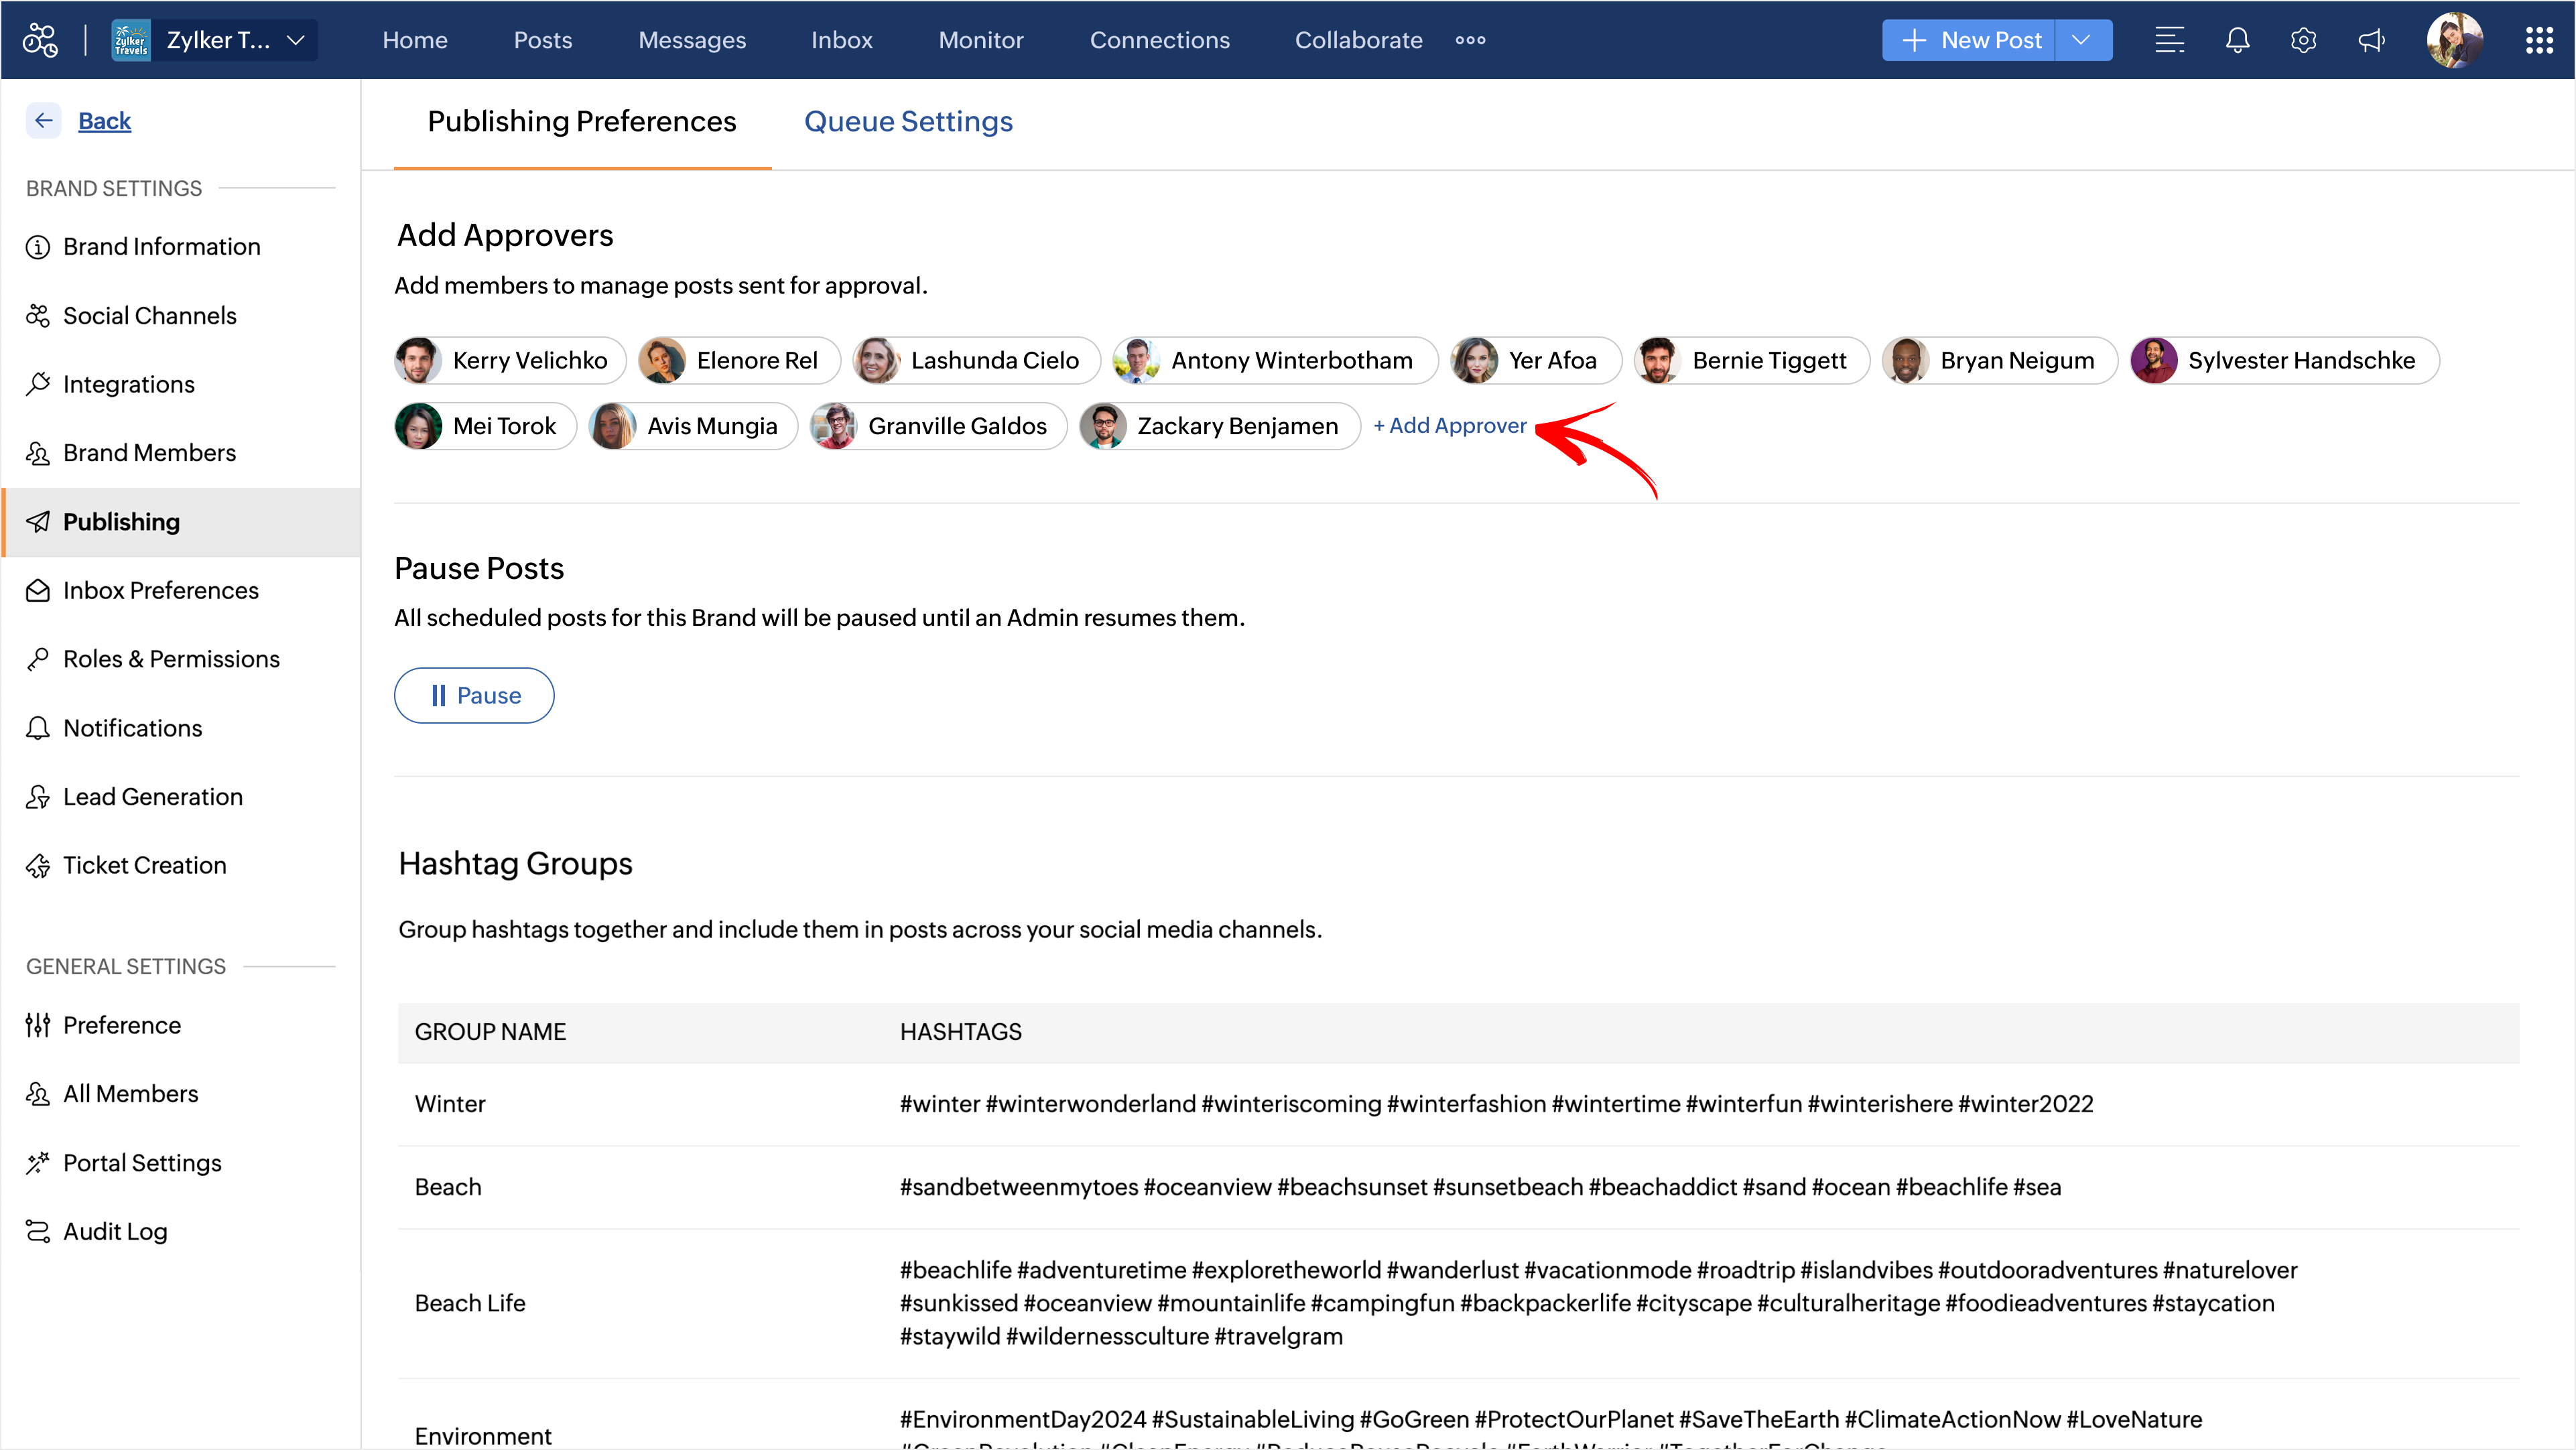

Only a Portal Admin and Brand Admin who has Approver privileges can add another member as an Approver.
How to remove Approver status for team members
If you want to remove Approver status for team members, you can do this anytime from the Settings tab.
1. Head to Brand Members under your Brand Settings, and here you'll see a list of all the team members inside your Zoho Social Brand.
2. Here you simply uncheck the Approver checkbox next to the team members name to remove Approver privileges for them.
3. This will modify their publishing permissions automatically.

Follow the same steps to add a Client as an approver under the Client Members section
Now let's look at how a typical content approval workflow chain happens on Zoho Social.
1. Sending a post for Approval
For Limited Publishers/Users who don't have direct access to publish:
To send a post for approval,
1. Click on the New Post button on your dashboard.
2. Type in the content, and you can choose to schedule it for a specific date and time based on your preference.
3. Finally hit the Send for Approval button on the publishing window.
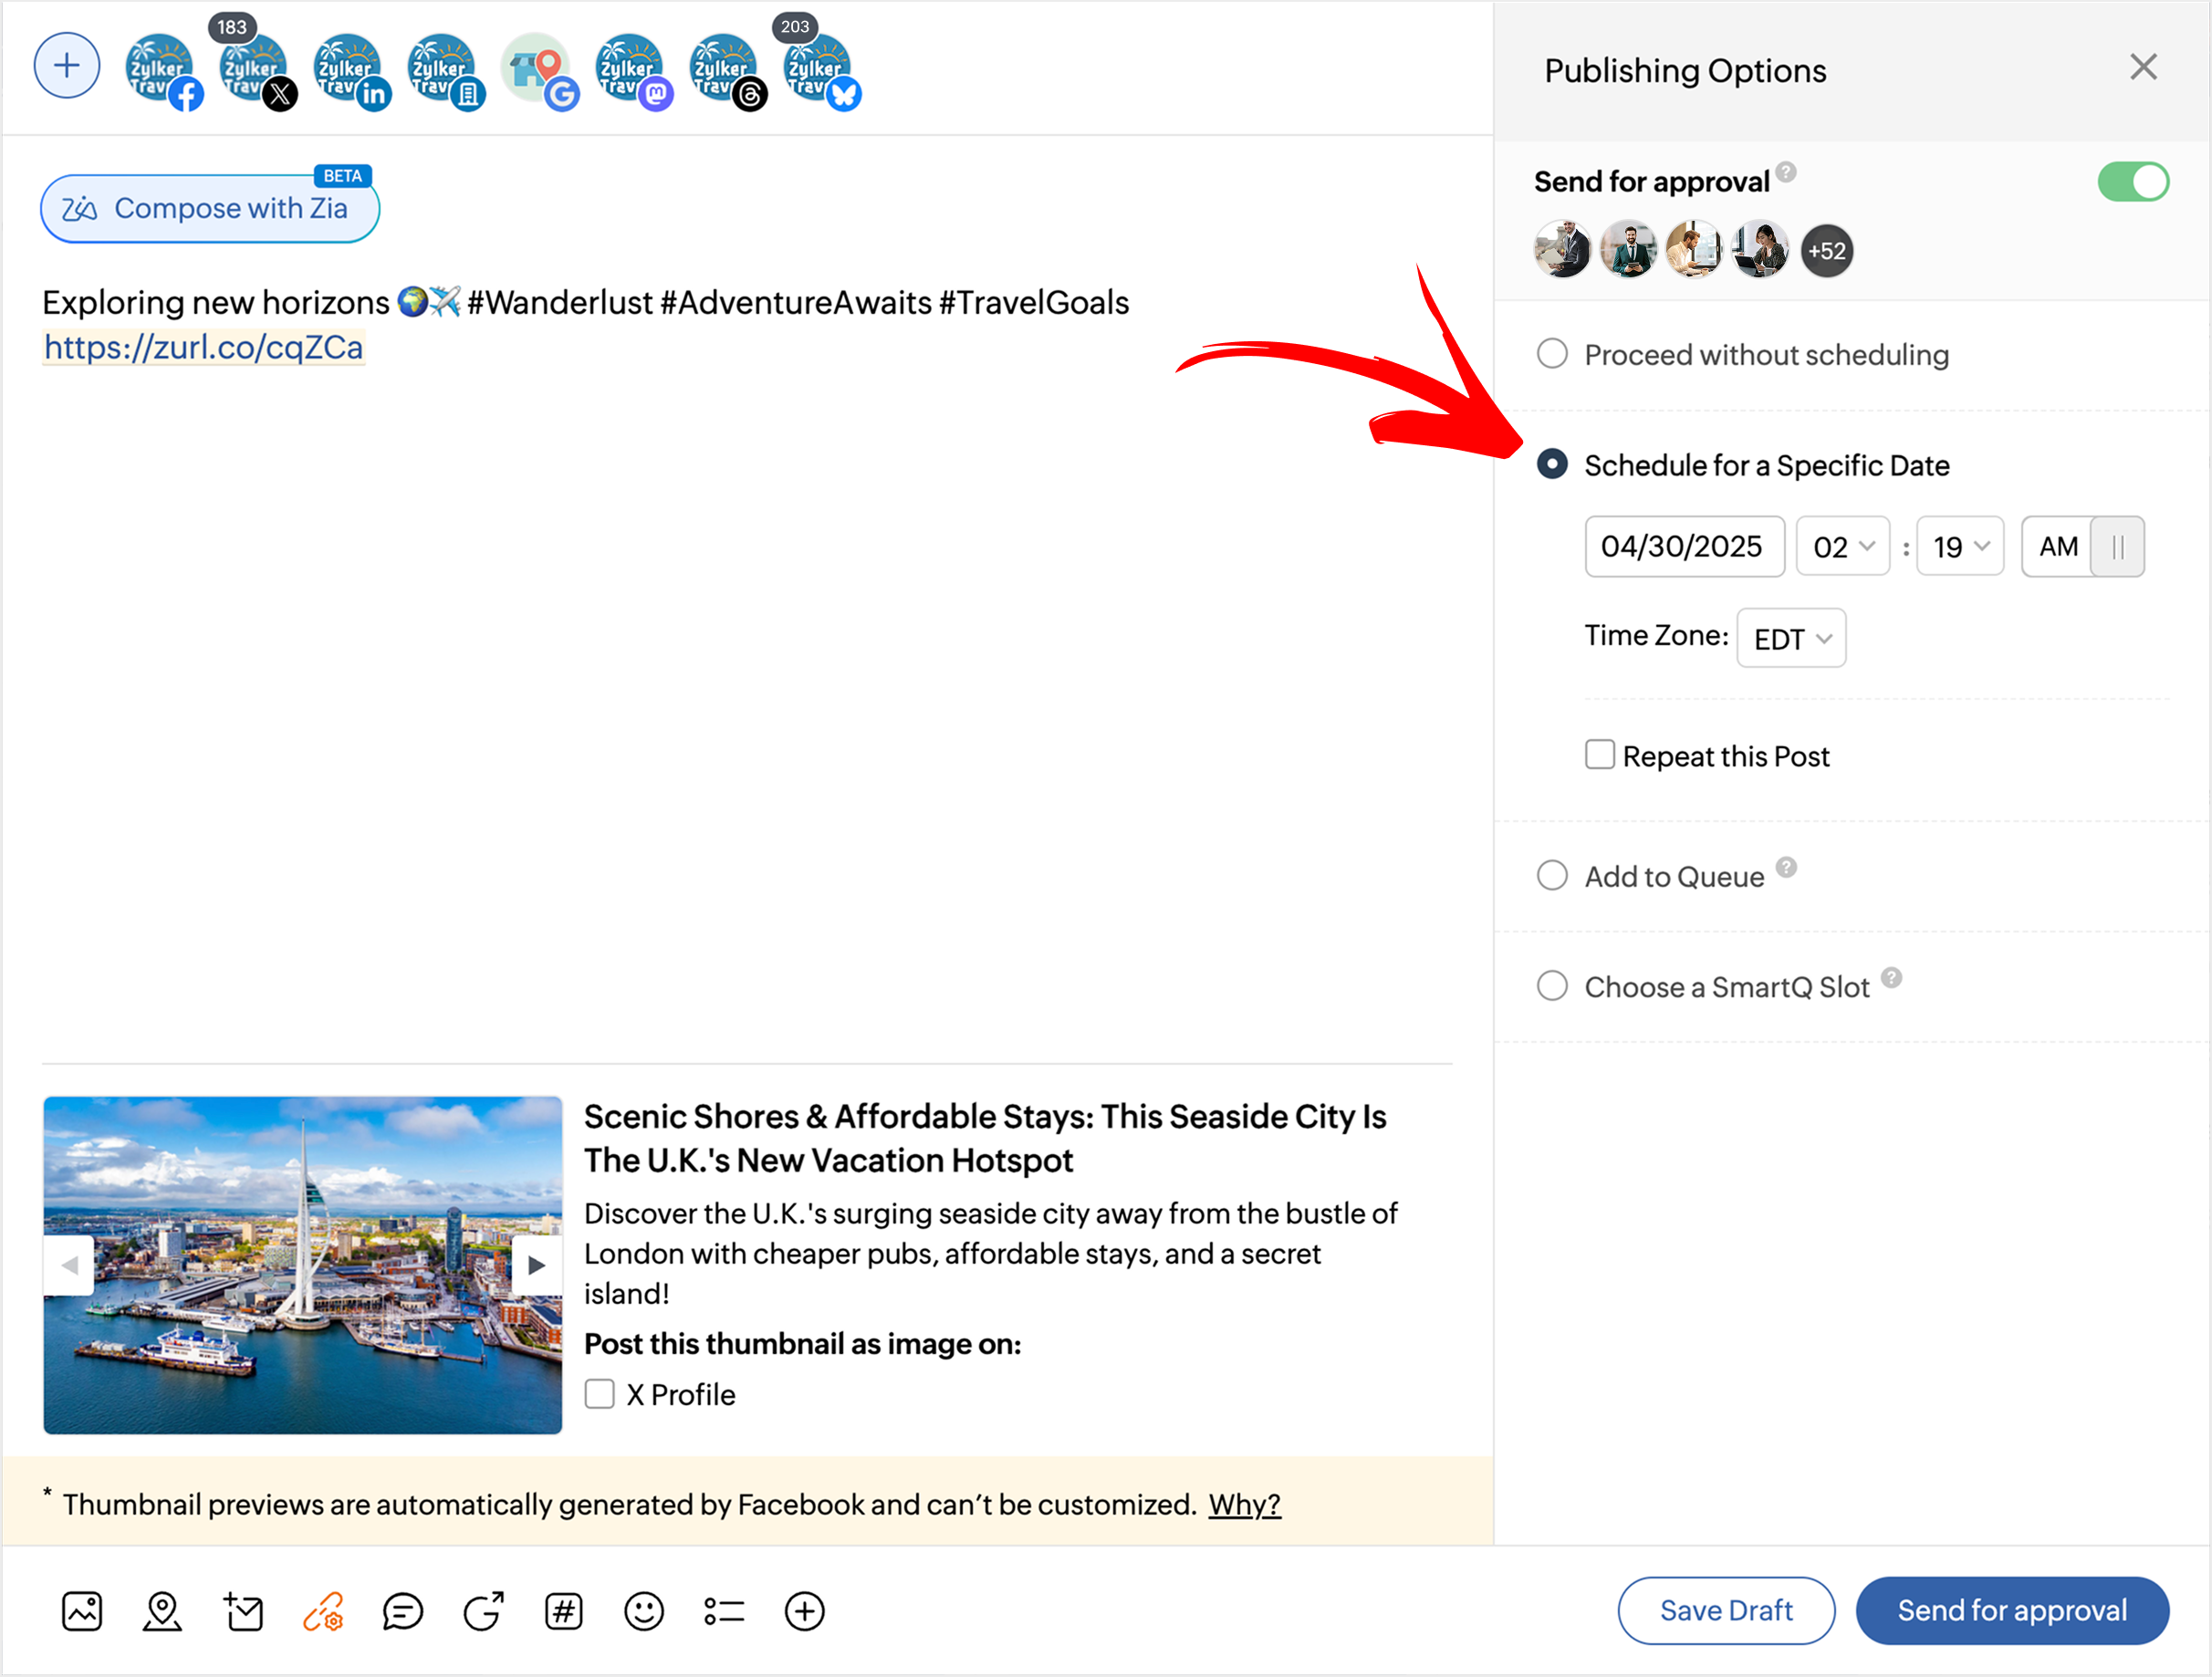

Once a post is sent for approval, an email is sent to all the approvers on the Brand, notifying them of new content awaiting approval.
For Administrators:

A user in any role can send a post for approval. While limited publishers and users without publishing permissions have to get an approval from approvers before they can publish, admins and users in other roles with publishing permissions can either choose to send the post for approval or can publish the post by themselves.
Though portal and brand admins can publish posts on their own without the need for any approval, there might be cases where as admins, you need to cross-verify the content with someone from the team or check for correctness. In such cases, you can also send your posts for approval to other approvers in the same brand by clicking on the toggle next to Send for approval in the compose window.
If there are no approvers listed for the brand, you can add an approver right from the compose window and then proceed to send the post for their approval.

You can send only single-brand posts for approval. If you're posting to multiple brands at the same time, you can't send the post for approval.
2. Monitoring your Approval status
To monitor the status/position of your post sent for approval,
1. Go to the Posts tab on your Dashboard and click on Approvals on the left-hand side menu.
2. Click on the post you want to check the status for. On the "Post Activity" column you can see the following:
-> View if the post you created is sent for approval or not.
-> View the list of comments made by the Approver if any.
-> View the list of any status updates added to your post by the Approver. For instance, feedback added to a post that was sent for approval.
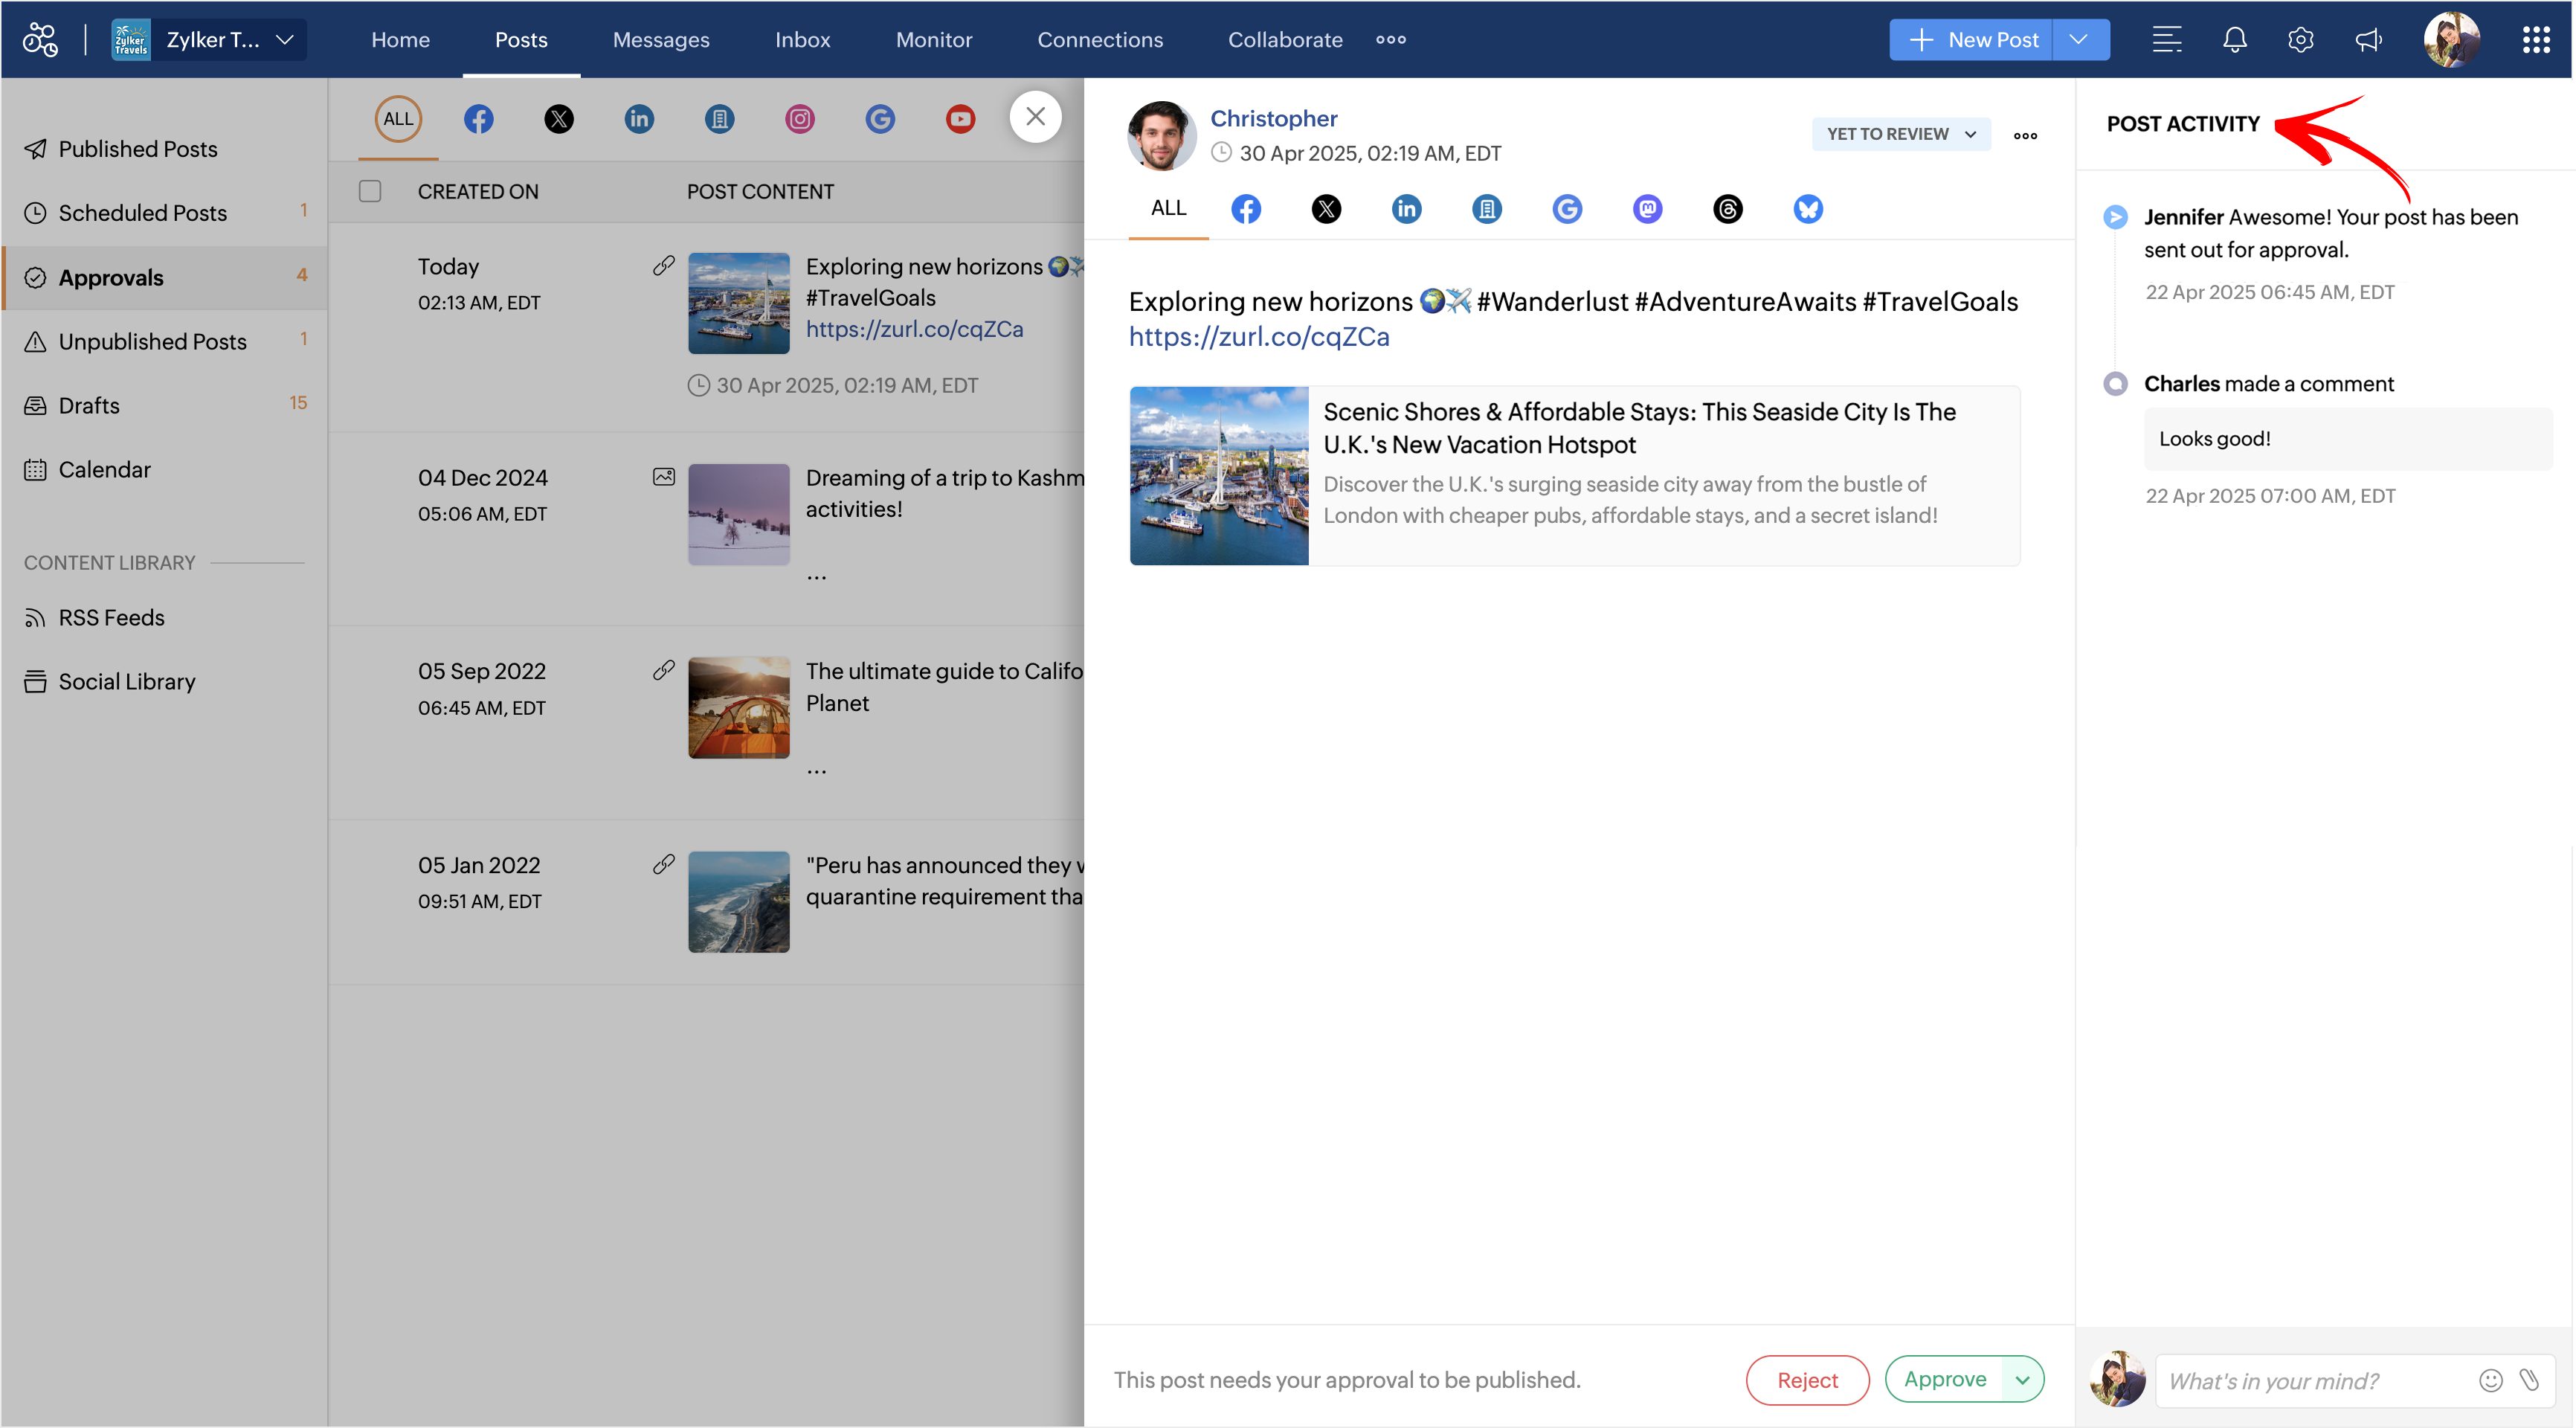

Any comment, update, or change in status will be notified to Limited Publishers through the Dashboard as well as via email (if email notifications are enabled under Settings)
Approval Statuses
Approval status indicates the progress level of a post. These are determined by the Approver for every individual post that they review.
1. Approve - To approve the post a user sends for approval.
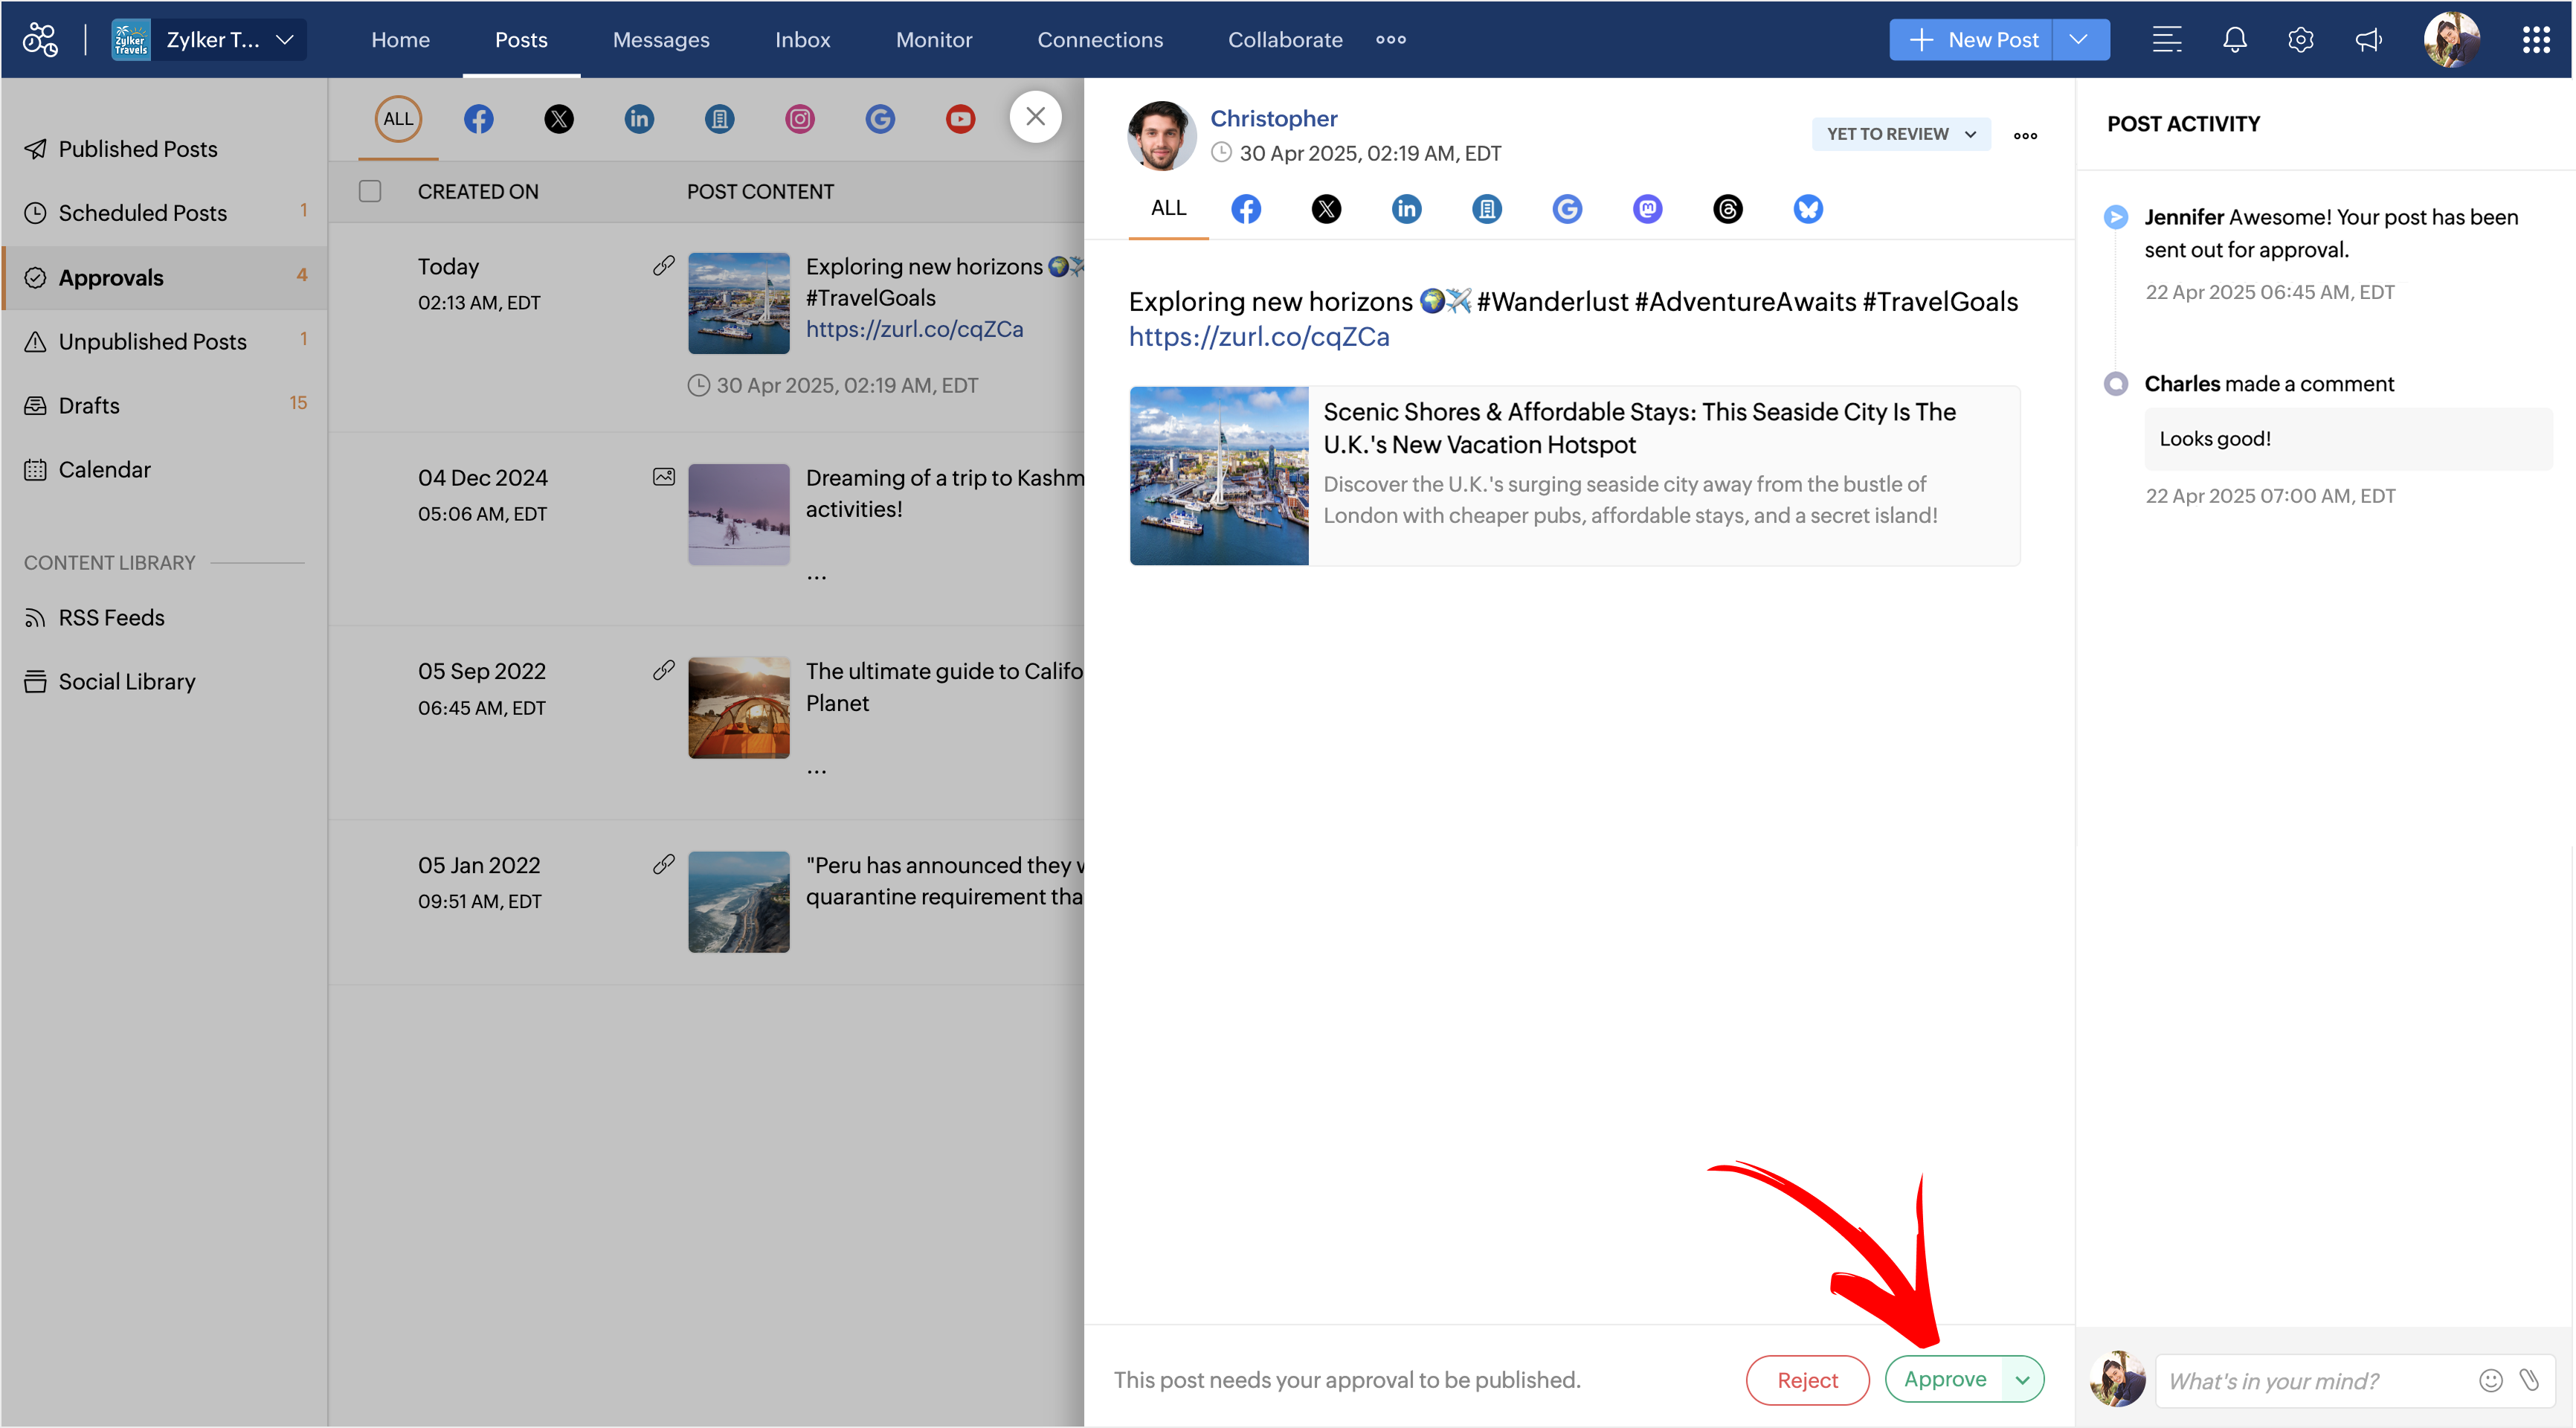
2. Reject- To reject the post a user sends for approval.
->While you click on the Reject option, you will be given an option to specify the reason for the rejection. You can add your feedback or correction here, and hit the Reject button to notify the publisher.

3. Yet to Review- Default status that is assigned to every post that comes in for approval.
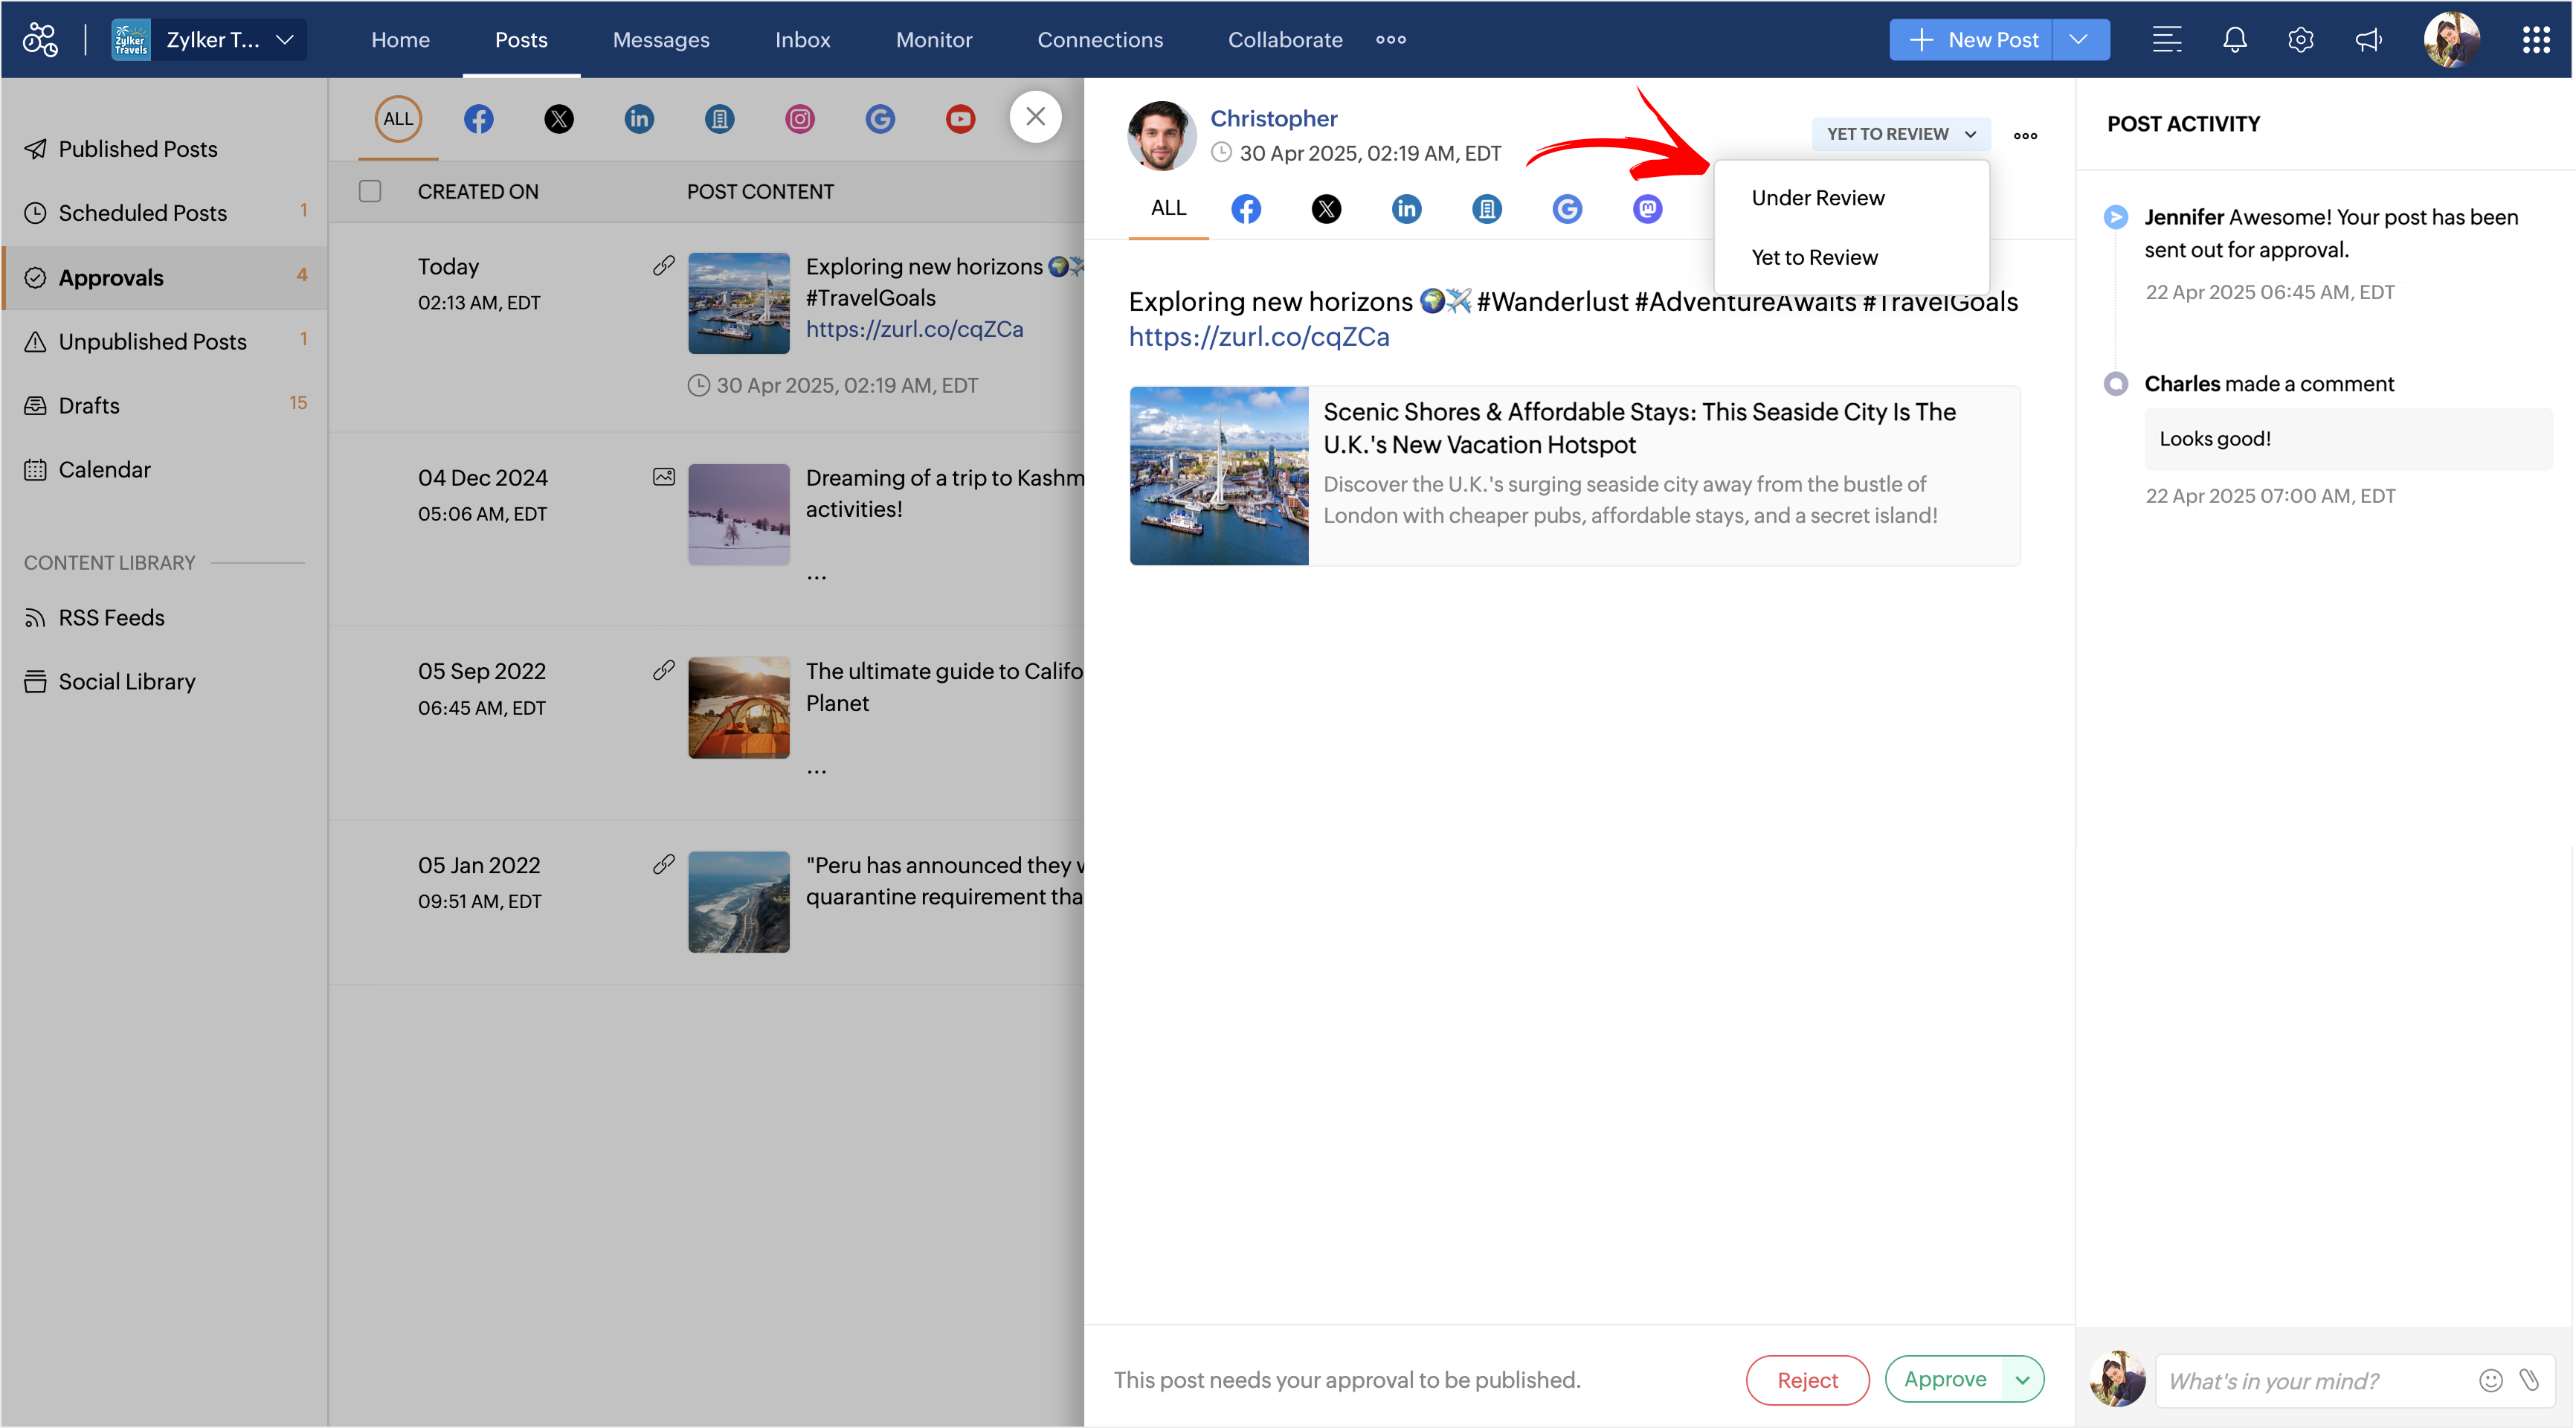
4. Under Review - To imply that the post is still under analysis. This option is used by Approvers to let other Approvers within the Brand know that a particular post has already been looked at, and is awaiting more changes.
5. Time Elapsed- When a post is not approved within the scheduled publishing time, the status of the post automatically updates to 'Time Elapsed'. This content can be retrieved and rescheduled anytime, once it is approved.
3. Managing posts sent for Approval
Once a piece of content has been sent for Approval by a publisher, an Approver can now review it and move it along the publishing pipeline. To do this:
1. Go to the Posts tab and click on the Approvals option from the left menu.
2. From the list of posts displayed, click on the one you want to update the status for (Under Review, Yet to Review, Time Elapsed, and Reject) or simply Approve.
3. Click on the Approve button in the detailed post view to approve the post right away.
Once you click on the Approve button, the status of the post will be changed to Approved. If you click on the drop-down next to the Approve button, you can access two options.
Approve and Publish Now- Use this option if you want to approve and publish the post instantly.
Approve and Add to Queue- Use this option if you want to approve and publish the post immediately, or add it to the next available queue slot.

You can alternatively hit the ellipses button (...) on top of any approved post and click on the Edit button to access all the scheduling options via the Publishing Window.
- It is sufficient for any one of the approvers, among many, to approve or reject a post; it is not necessary for all approvers to approve or reject it.
- Once a post has been approved and published by an Approver an email will be triggered to the publisher notifying them of the change in status.
4. Updating the status of a post sent for Approval
1. Go to the Posts tab and click on the Approval option from the left-hand side menu.
2. Now, click on a post you want to update the status for.

Initially, every post that comes in for approval, will have "Yet to Review" as the default status.
3.. In the detailed post view, click on the drop-down against "Yet to Review" and choose Under Review as your status option or vice versa for the post that was sent for approval.

1. Once you Accept or Reject a post, you will be unable to update the status again. However, you can change the status from Yet to Review to Under Review and vice versa.
2. After the status of a post has been updated by an Approver, a mail will be sent to the publisher notifying them of the change in status.
Zoho CRM Training Programs
Learn how to use the best tools for sales force automation and better customer engagement from Zoho's implementation specialists.
Zoho DataPrep Personalized Demo
If you'd like a personalized walk-through of our data preparation tool, please request a demo and we'll be happy to show you how to get the best out of Zoho DataPrep.
Centralize Knowledge. Transform Learning.
All-in-one knowledge management and training platform for your employees and customers.
New to Zoho Writer?
You are currently viewing the help pages of Qntrl’s earlier version. Click here to view our latest version—Qntrl 3.0's help articles.
Zoho Sheet Resources
Zoho Forms Resources
New to Zoho Sign?
Zoho Sign Resources
New to Zoho TeamInbox?
Zoho TeamInbox Resources
New to Zoho ZeptoMail?
New to Zoho Workerly?
New to Zoho Recruit?
New to Zoho CRM?
New to Zoho Projects?
New to Zoho Sprints?
New to Zoho Assist?
New to Bigin?
Related Articles
Content Approvals on mobile
A content approval workflow plays a crucial role in helping you maintain the brand image and reputation you wish to project through your social media profiles. No matter what role you work in, you might have the need to cross-check your content with ...Approvals - Frequently Asked Questions
How to approve posts sent for approval? On Zoho Social, all Admins and those with Approver privileges can approve content that's been sent by publishers for approval. Contact your admin for Approver privileges. If you are already added as an ...Social Library
Social Library is a file management space that helps you add and manage images, GIFs, and videos to use for your social media posts. With the Social Library, you can upload pictures, videos, and GIFs from your Desktop or Cloud and maintain a ...Can I upload and store images and video on Zoho Social?
Yes, you can upload and store images, videos, and GIFs within Zoho Social's Media Library which is a content repository. You can upload media to the Media Library on Zoho Social directly from your Desktop or using the Cloud Picker tool that lets you ...How to connect a YouTube channel on Zoho Social?
Connecting YouTube channel from the Home tab To connect your YouTube channel from the Brand Health, 1. Click on the Home Tab and tap on Connect Your YouTube Channel option under Brand Health. 2. Now, from the consent window, choose a Google account ...
New to Zoho LandingPage?
Zoho LandingPage Resources


