General Questions in Zoho Survey - Online Help Guide

General

About Questions

To mark a question as mandatory:

Select the Make this question mandatory checkbox. If you want to edit the default error message that displays on skipping a mandatory question, you can remove the message or make necessary edits in the Error message field.

To change the question type:

You can change the question type by clicking the dropdown next to the question type in the question editor. However, the choices for change are related to the question type you have selected. For example, if you selected a multiple-choice question type, you can only change it to its variants available in the list. You can select an option from the drop-down.

To change the alignment of the text in a question:

  1. Click a question (except Full Name and Contact Information). 
  2. Click the paragraph icon  to align the text the way you want. You can align it to the left, right, and centre, and also justify. You can also add and remove indents by using Indent and Outdent respectively.  
  3. Click  Save.  

To add a comments box:

  1. Select a question. 
  2. Select Add 'Comments' field in the Advanced options section. 
  3. If you want to change the name of the field, type in the new field name in the Comments field label box. 


To add Carry forward choices:

Carrying the choices made by a user in a particular question as choices in upcoming questions can make your surveys more interesting. The answers that they choose for a particular question will be provided as choices in the questions that follow.
  1. Select the question for which you need to add the option and select the Carry forward choices from previous questions checkbox below the Individual Text Boxes for Each Choice in the Choices section.
  2. Select the required question in the From dropdown.

  3. Select the required action in the With dropdown. You can select the following options here:
    1. All choices - To display all the choices
    2. Displayed choices - To display only the displayed choices
    3. Not displayed choices - To display the choices that are not displayed
    4. Answered choices - To display the answered choices
    5. Not answered choices - To display the unanswered choices

  4. Click  to add a new question.
  5. Click  to delete an existing question.
  6. Click Save.

Carry forward choices can be passed along from the following question types:

Multiple Choice - one/many answers, Dropdown - one/many answers, Image Selection, Star Rating, Rating Scale, Boolean (labels), Matrix - single/multiple choice answers (rows), Matrix Star Rating (rows), and Matrix Rating Scale (rows).

Carry forward choices feature is supported by the following receiver question types:

Multiple Choice - one/many answers, Dropdown - one/many answers, Image Selection, Multiple Textboxes, Continuous Sum, File Upload, and Boolean.

Carry forward feature is supported in row choices for the below question types:

Matrix choice (one/many answers), Matrix star rating, Matrix Likert rating, Matrix weightage, Ranking, Image star rating  

Carry forward feature is supported in column choices for the below question types:

Matrix choice (one/ many answers)

To add an 'Other' field:

If you want to add an Other/Other Choice field along with your answer choices, select Add 'Other' field. If you want to make changes to the default Field label text that displays, edit the content in the text box. 

To mark a question as 'Not Applicable':  

    If you want to add a Not Applicable field for those who would not find the right answer choice in the options provided, you can select the Add 'Not applicable' option checkbox. When a respondent chooses this option, this response will be excluded while calculating the data statistics for that particular question. For example, it will not be taken into consideration while calculating the mean, frequency, standard deviation and so on.  

    1. Click the question you want to mark as 'Not Applicable'. 
    2. Select the Add 'Not applicable' option checkbox. 
    3. If you want to edit the field label, type the name you want to use in the Option label field. 
    4. Click Save


    Question Personalization

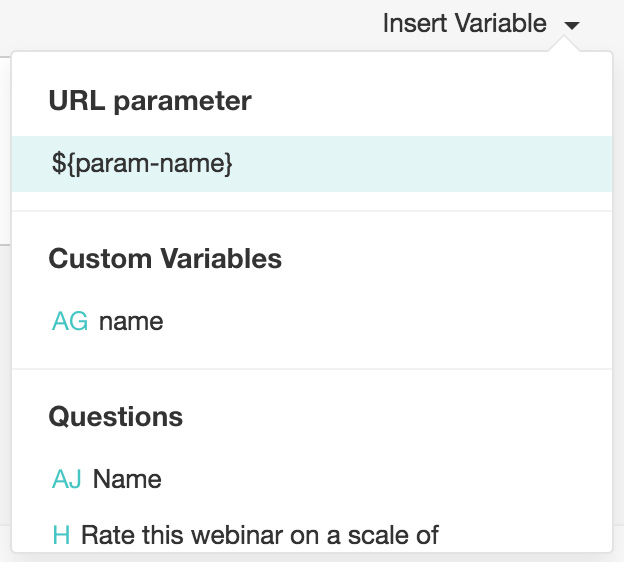
    If you want to pipe in custom variables or variables from previous questions and customize the follow-up questions, click the arrow next to Insert Variable right above the Question box, and select the variable you want to use from the list. Read more on Piping.
    Insert variable feature in survey
    You can also use these custom variables while piping. If you already know the respondent of your survey, for example, you can personalize your survey by removing the Name question, and creating a custom variable instead.

    To add a custom variable with piping:

    1. Create a custom variable, such as a name.
    2. Add the variable name in the text of your question. Read more on piping.
    3. Copy the survey URL in the Launch tab.
    4. Paste the URL into a new tab.
    5. Add ' ?name=<name of the respondent ' to the URL. The question will automatically have the respondent's name filled in. 

    To prepopulate the answers:

    The autofill or prepopulate answer feature allows you to prepopulate single-variable survey responses automatically before sending it to respondents. To prepopulate answers for a known respondent, select Prepopulate answer.


    Randomization

    When you accidentally create an answer pattern in your survey that users detect and follow, there can occur a selection bias that distorts your actual data. Randomization helps minimize selection bias and helps you achieve more accurate data.
    There are two types of randomization:
    1. Question Randomization - Question randomization lets you keep the same question order, change the order for each question, or even change the order for a set of selected questions.
    1. Answer Randomization - Answer randomization allows you to randomize the answer choices and is available for all question types. This prevents people from selecting a choice purely from memory and will result in a more accurate survey.

    To randomize the questions:

    To randomize the answer options:  

    1. Click the question and select  Advanced options
    2. Select Change the order of choices. You can perform the following actions here: 
      1. Randomize for each respondent - To change the order randomly for each respondent 
      2. Flip for each respondent - To show the choices in the opposite order for each respondent 
      3. Rotate for each respondent - To rotate the choices for each respondent 
      4. Ascending sort - To arrange the choices in the ascending order 
      5. Select Don't randomize the last few choices if you want to select the number of choices that needn't be randomized 
    3. Click Save


    Rich Text Editor

    All the rich text editors now let you add attributes to the text and images in the question as well as clear the formatting. Also, to help stay within the character limit, you can now see the number of characters left in the editor box.

    To add bulleted and numbered lists:

    Bulleted and numbered lists have been added to all message boxes that support the rich text editor. This includes all question types except full name and contact information, email messages, custom survey end page, disqualification page, and closed survey messages.


    To insert an image in your question: 

    1. Click a question type (except Full Name and Contact Information). 
    2. Click  to insert an image in the survey question. 
      1. From image gallery - You can drag and drop the image in the box, or click to upload images.    
         
      2. From URL - In the Image Link box, type in or copy/paste the web link of the image.     

    3. To finalize the image selection, click Insert
    4. To make changes to the image selection, click Cancel
    5. Also, for an inserted image, you can add a hover text and an action if the image is clicked. 

    To add an action for the image options: 

    1. Click the image you have inserted. 
    2. Click Image Options.  
    3. Type in a text in the Hover text field. 
    4. Click the Action on click dropdown and select either Full screen zoom, Redirect to a URL, or No action.  
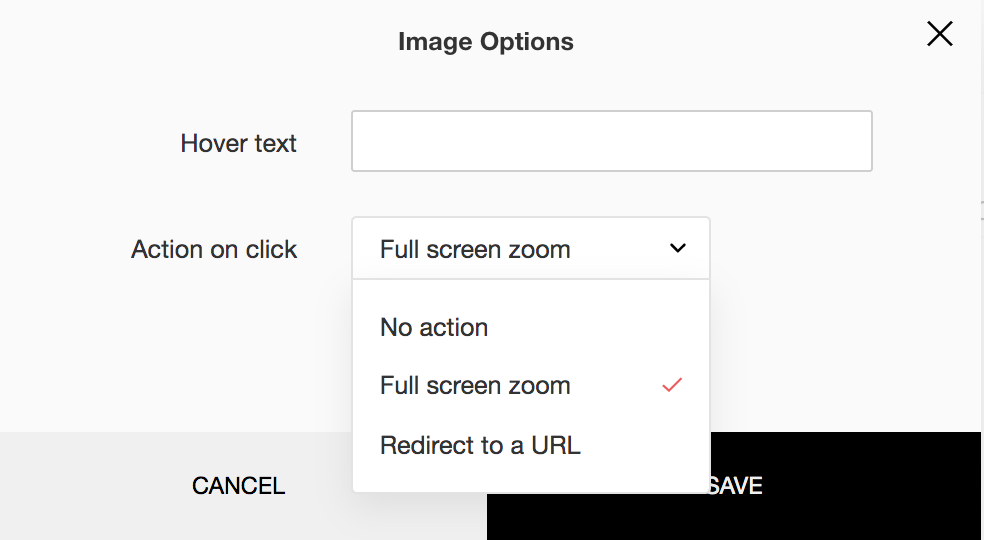
      image options
    1. Click a question type (except Full Name and Contact Information). 
    2. Click   to insert a hyperlink in your survey question. 
      1. Text  
        1. Type the text that has to be selected with the hyperlink in the Selected text field. 
        2. Paste the URL in the URL field. 
      2. Email  
        1. Type the text that has to be selected with the hyperlink in the Selected text field. 
        2. Type the email address in the Email field. 
        3. Type the subject for the email in the Subject field. 
      3. Call  
        1. Type the text that has to be selected with the hyperlink in the Selected text field. 
        2. Type the contact number in the Contact number field.  
    3. Click Insert.  

    1. Click a question type (except Full Name and Contact Information).
    2. Click  to remove the hyperlink.
    3. Click Save.

    To change the font size and colour of a question:

    1. Click a question type (except Full Name and Contact Information).
    2. Click   to apply boldface to the survey question.
    3. Click   to italicize the text.
    4. Click   to underline the text.
    5. Click the font size icon   to increase or decrease the font size.
    6. Click the background colour icon   to apply a background colour to the text.
    7. Click the text colour icon   to apply a colour to your font.
    8. Click Save.

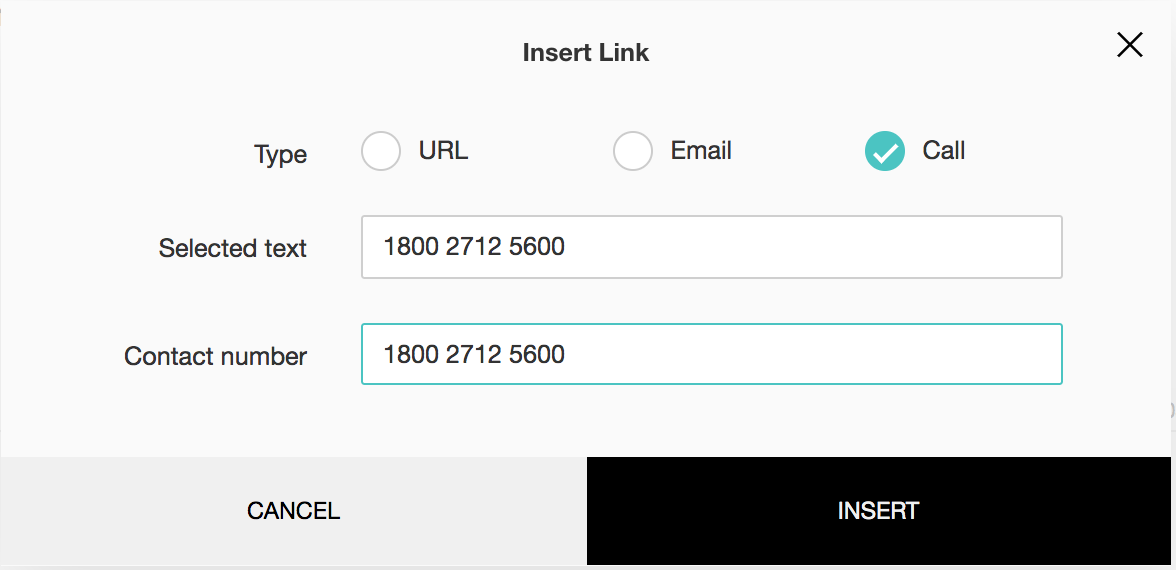
    To insert a call link for contact numbers in your questions:

    1. Click a question type.
    2. Click Insert Link in the formatting options.
    3. Click Call in the Type field.
    4. Either select a text from the question or type in the text you want to be linked.
    5. Type in the contact number.
    6. Click Insert.
    click to call

    To embed a video in your survey question:

    1. Click a question type. 
    2. Click Embed Video in the formatting options for the question.
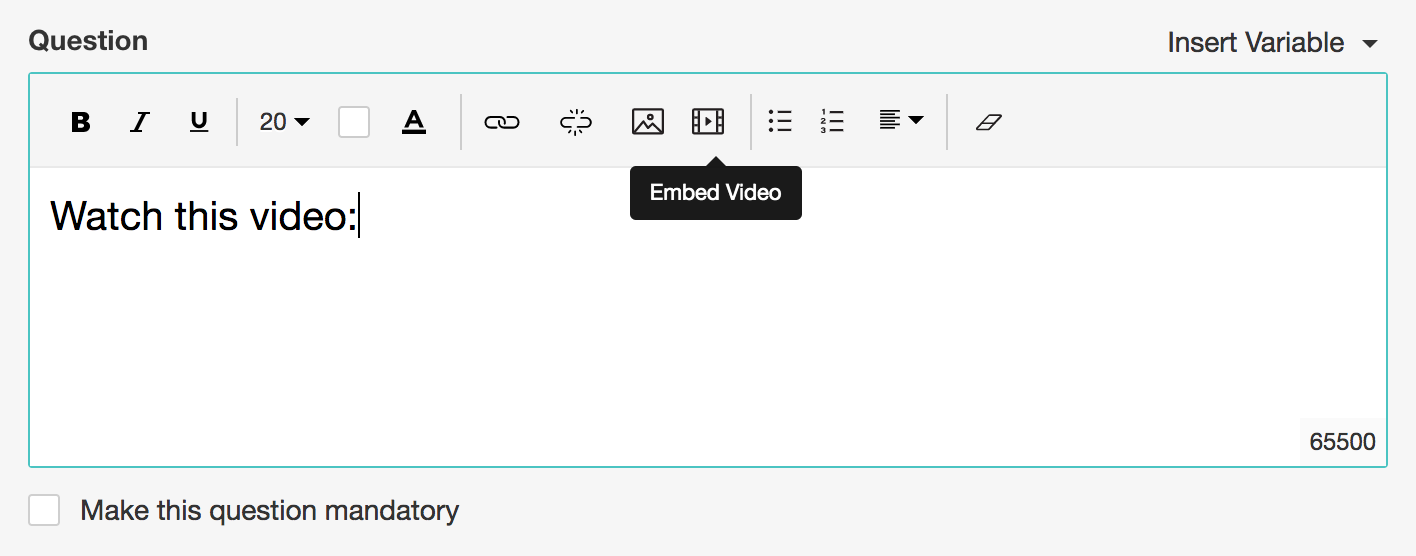
      embed video


    3. Paste the video URL in the Video URL field. 
    4. Adjust the width in pixels and enter the value in the Width in pixels field. 
    5. Click Insert


          Create. Review. Publish.

          Write, edit, collaborate on, and publish documents to different content management platforms.

          Get Started Now


            Access your files securely from anywhere

              Zoho CRM Training Programs

              Learn how to use the best tools for sales force automation and better customer engagement from Zoho's implementation specialists.

              Zoho CRM Training
                Redefine the way you work
                with Zoho Workplace

                  Zoho DataPrep Personalized Demo

                  If you'd like a personalized walk-through of our data preparation tool, please request a demo and we'll be happy to show you how to get the best out of Zoho DataPrep.

                  Zoho CRM Training

                    Create, share, and deliver

                    beautiful slides from anywhere.

                    Get Started Now


                      Zoho Sign now offers specialized one-on-one training for both administrators and developers.

                      BOOK A SESSION


                                  Quick LinksWorkflow AutomationData Collection
                                  Web FormsEnterpriseOnline Data Collection Tool
                                  Embeddable FormsBankingBegin Data Collection
                                  Interactive FormsWorkplaceData Collection App
                                  CRM FormsCustomer ServiceAccessible Forms
                                  Digital FormsMarketingForms for Small Business
                                  HTML FormsEducationForms for Enterprise
                                  Contact FormsE-commerceForms for any business
                                  Lead Generation FormsHealthcareForms for Startups
                                  Wordpress FormsCustomer onboardingForms for Small Business
                                  No Code FormsConstructionRSVP tool for holidays
                                  Free FormsTravelFeatures for Order Forms
                                  Prefill FormsNon-Profit

                                  Intake FormsLegal
                                  Mobile App
                                  Form DesignerHR
                                  Mobile Forms
                                  Card FormsFoodOffline Forms
                                  Assign FormsPhotographyMobile Forms Features
                                  Translate FormsReal EstateKiosk in Mobile Forms
                                  Electronic Forms
                                  Drag & drop form builder

                                  Notification Emails for FormsAlternativesSecurity & Compliance
                                  Holiday FormsGoogle Forms alternative GDPR
                                  Form to PDFJotform alternativeHIPAA Forms
                                  Email FormsFormstack alternativeEncrypted Forms

                                  Wufoo alternativeSecure Forms

                                  TypeformWCAG


                                        All-in-one knowledge management and training platform for your employees and customers.

                                                  Create. Review. Publish.

                                                  Write, edit, collaborate on, and publish documents to different content management platforms.

                                                  Get Started Now


                                                                    You are currently viewing the help pages of Qntrl’s earlier version. Click here to view our latest version—Qntrl 3.0's help articles.


                                                                        Manage your brands on social media


                                                                          • Desk Community Learning Series


                                                                          • Digest


                                                                          • Functions


                                                                          • Meetups


                                                                          • Kbase


                                                                          • Resources


                                                                          • Glossary


                                                                          • Desk Marketplace


                                                                          • MVP Corner


                                                                          • Word of the Day


                                                                          • Ask the Experts


                                                                            Zoho Sheet Resources


                                                                                Zoho Forms Resources


                                                                                  Secure your business
                                                                                  communication with Zoho Mail


                                                                                  Mail on the move with
                                                                                  Zoho Mail mobile application

                                                                                    Stay on top of your schedule
                                                                                    at all times


                                                                                    Carry your calendar with you
                                                                                    Anytime, anywhere


                                                                                          Zoho Sign Resources

                                                                                            Sign, Paperless!

                                                                                            Sign and send business documents on the go!

                                                                                            Get Started Now


                                                                                                    Zoho TeamInbox Resources


                                                                                                              Zoho DataPrep Demo

                                                                                                              Get a personalized demo or POC

                                                                                                              REGISTER NOW


                                                                                                                Design. Discuss. Deliver.

                                                                                                                Create visually engaging stories with Zoho Show.

                                                                                                                Get Started Now


                                                                                                                                    • Related Articles

                                                                                                                                    • General Restrictions

                                                                                                                                      Overview Set restrictions on your survey to specify the maximum responses to collect or when to close your survey. You can also prevent duplicate submissions from the same user. Set an End Date for Your Survey Select the required survey and click the ...
                                                                                                                                    • General Restrictions

                                                                                                                                      Set restrictions on your survey and specify how many responses you want or when to close your survey. You can also prevent the same user from entering multiple responses. To set an end date for your survey: Click General Restrictions in the ...
                                                                                                                                    • Distribute Surveys to Your Zoho Desk Contact Lists

                                                                                                                                      Overview Send surveys to your Zoho Desk contacts and capture responses directly in your support records. How to distribute surveys to your Zoho Desk contact lists Select the survey and click Builder option from the left pane. Go to the Publish tab. ...
                                                                                                                                    • Set Cut Off Date and Time

                                                                                                                                      Specify when the collector should stop accepting responses. How to Set an End Date for Your Collector Select the required survey and click the Builder option from the left pane. Click the Publish tab. Select the required collector or create a new ...
                                                                                                                                    • Disabling an Existing Collector Quota

                                                                                                                                      How to disable an existing collector quota Click the Publish tab, select the collector you want to disable. Click Collector Quota from the left pane. Click the toggle to disable Collector Quota.
                                                                                                                                      Wherever you are is as good as
                                                                                                                                      your workplace

                                                                                                                                        Resources

                                                                                                                                        Videos

                                                                                                                                        Watch comprehensive videos on features and other important topics that will help you master Zoho CRM.


                                                                                                                                        eBooks

                                                                                                                                        Download free eBooks and access a range of topics to get deeper insight on successfully using Zoho CRM.


                                                                                                                                        Webinars

                                                                                                                                        Sign up for our webinars and learn the Zoho CRM basics, from customization to sales force automation and more.


                                                                                                                                        CRM Tips

                                                                                                                                        Make the most of Zoho CRM with these useful tips.


                                                                                                                                          Zoho Show Resources