Zoho Writer for Cliq
US, IN, EU, AU.
Available Plans:All plans.
Available To:| Roles | Entire organization | Team |
| Organizational Admins | ✔ | ✔ |
| Members | ✔ |
How this integration helps
The Zoho Writer for Cliq is a powerful integration that allows you to write, search, attach, share, take quick note, transcribe a chat and more from your Cliq window itself.
- Install Zoho Writer for Cliq extension
- Open writer in a jiff via home tab in Document widget.
- Search, attach, take quick notes, and share documents using commands.
- Transcribe your chats or save them using the message actions.
- Set widget preferences and manage what you want to see.
- Pull your writer document and leverage various actions to have contextual conversation with ease.
What this help page will cover:
- Getting started with Zoho Writer in Cliq
- Zoho Writer Message Actions
- Slash commands in Zoho writer
- Document Widget
- Installation
Getting started with Zoho Writer in Cliq
- Click here to go to Writer extension page in Marketplace. (Or)
- Go to Cliq marketplace (https://marketplace.zoho.com/cliq) --> In the Categories displayed in LHS, select Collaboration --> Zoho Writer for Cliq.
- The Zoho Writer extension page will open. Here, an overview of the extension will be displayed along with screenshots and reviews.
- Click on Install button.
You'll see a connection dialog prompt requesting your permission to access your Zoho Writer account when you interact with any integration component, say when you initially try to execute a command or try to access your documents from the widget. This consent box is to ensure privacy by letting you know how your data will be handled.
Zoho Writer Message Actions
- Save as Document
- Transcribe Chat
Save as Document
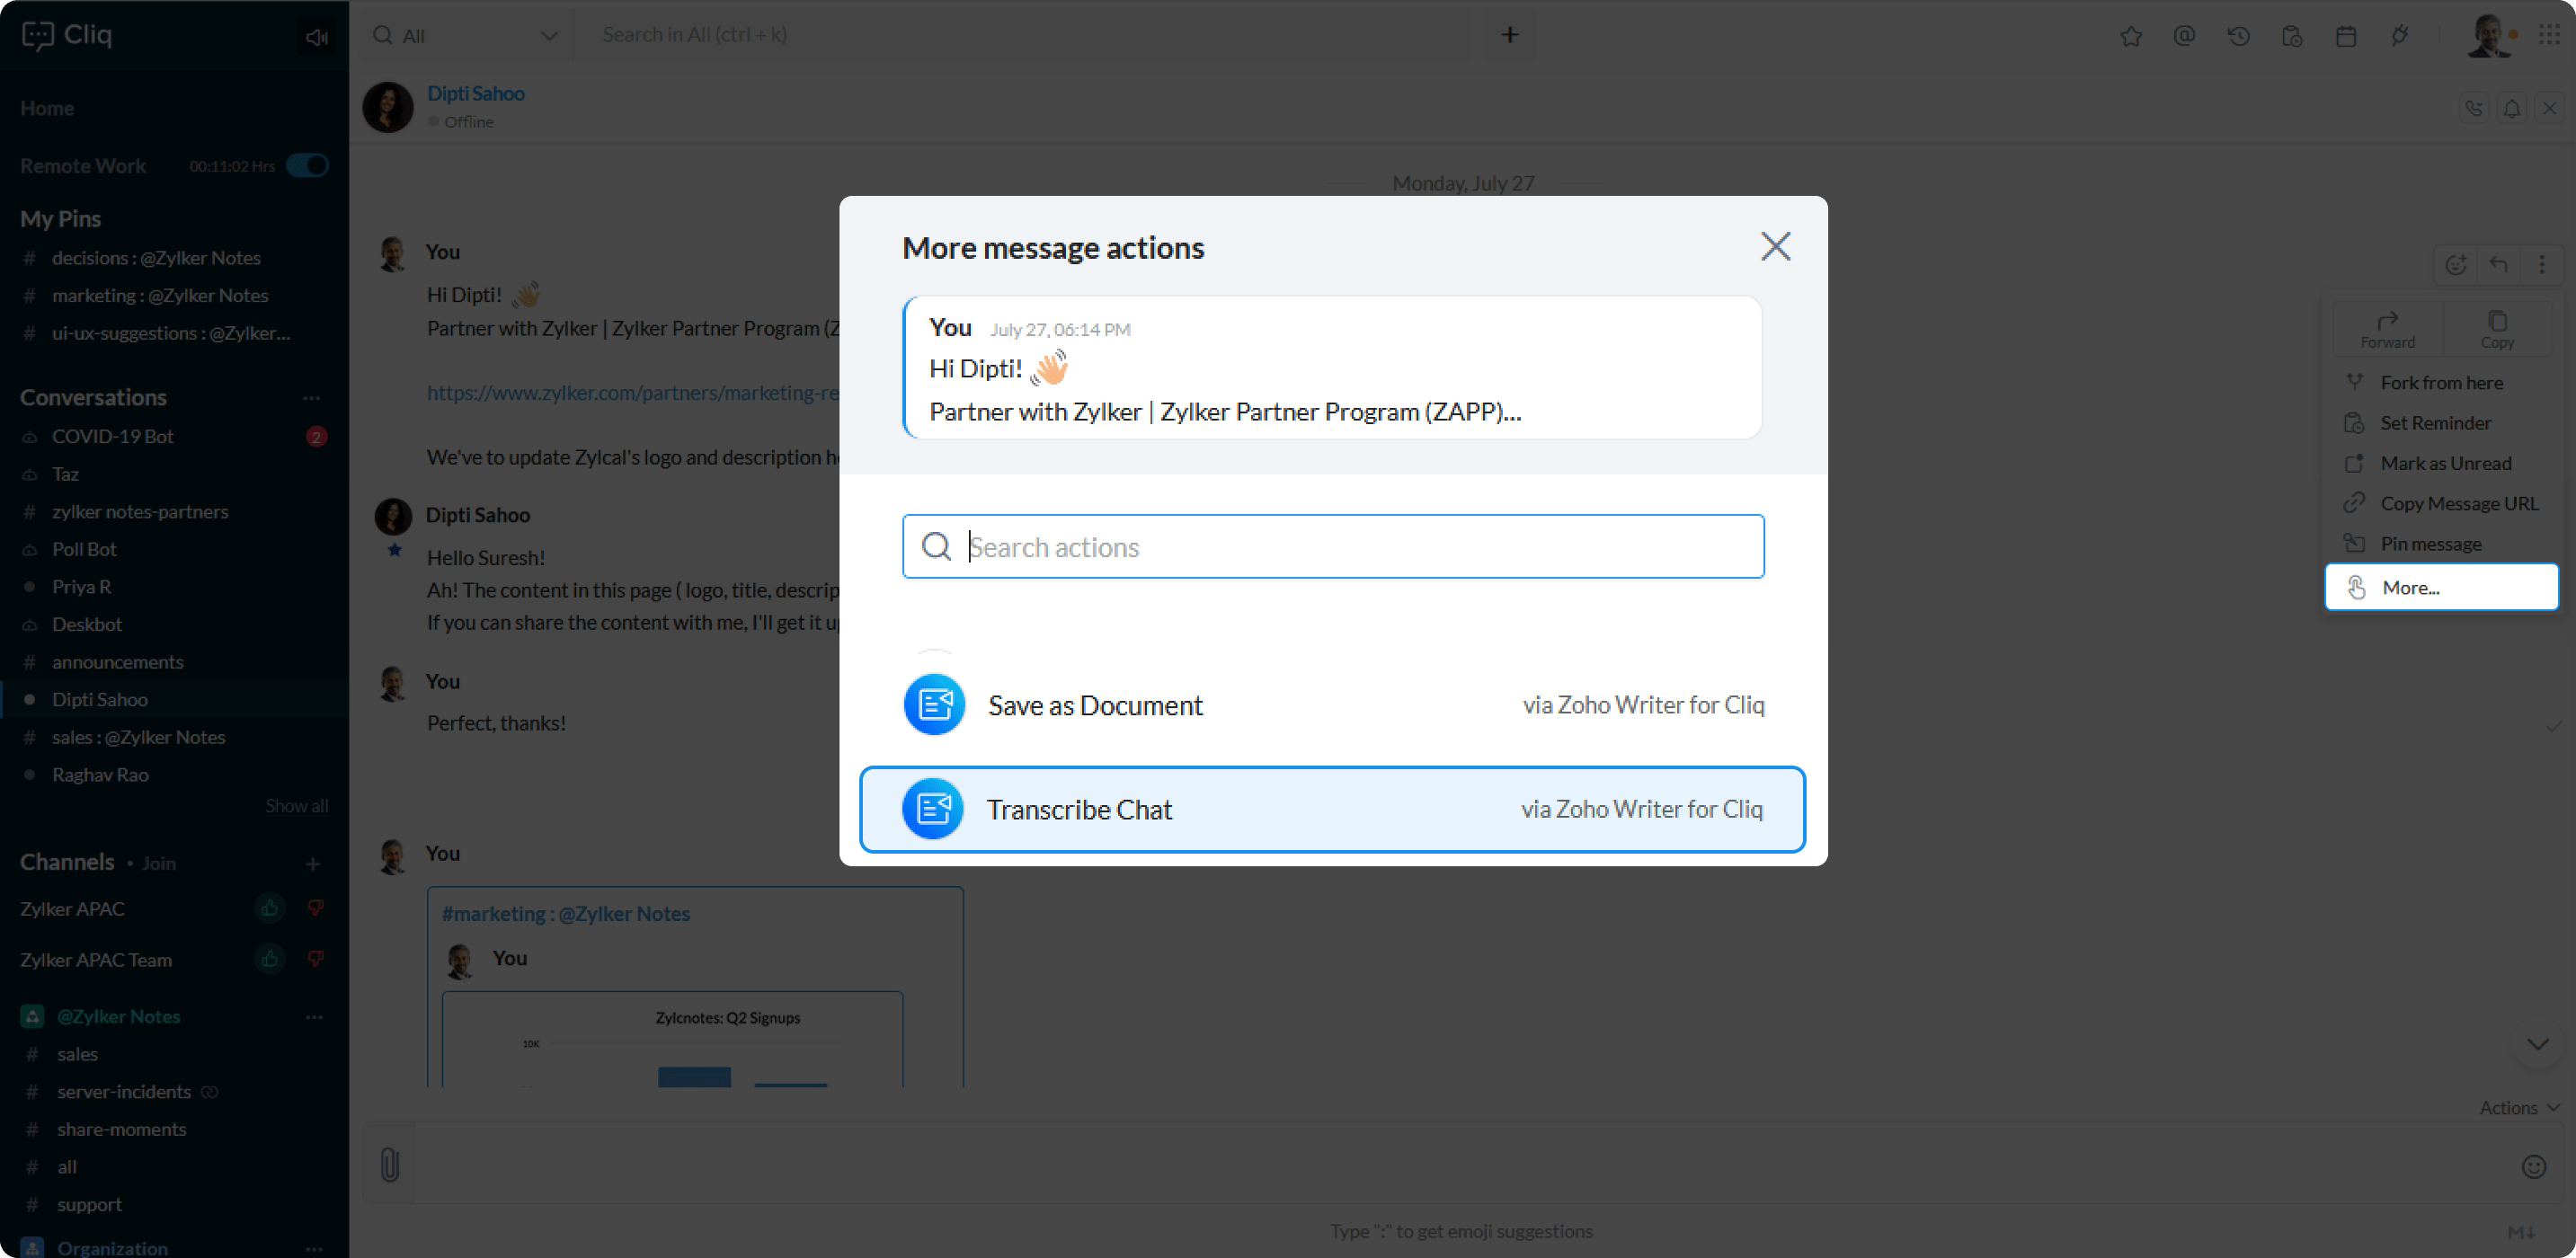
The Save as document option saves your chats as a document file. You can save a chat, images, writer supported file attachments as a Writer document from your chat window by using the message actions, here's how:
Head over to the chat you want to save. Hover on the chat to view the message actions menu.
- Click on the Message menu icon.
- Click More, to open the more message actions view.
- Select Save as document from the list.
To share a saved document:
- Click on the Share button in the dialog box
- Select an access level
- Click on Share.
Transcribe Chat
Transcribing a chat essentially means saving chats with timestamp. In Cliq you can transcribe a chat from your chat window by using the message action, here's how:
- Head over to the chat you want to transcribe. Hover on the chat to view the message actions menu
- Click on the Message menu icon
- Click More, to open the more message actions view
- Select Transcribe Chat from the list.
- Once you've transcribed a chat, it gets saved as a document in Zoho Writer. The document is posted as a message card in your chat window, you can choose to open it directly in your browser or share it to the user.
To share a transcribed chat document:
- Click on the Share button in the dialog box
- Select an access level
- Click on Share.
Note
A maximum of 100 messages form the message you select to transcribe will be backed up in the Writer Document.
Slash commands in Zoho Writer
The below are the slash commands available in Zoho Writer for Cliq.
- /quicknote
- /sharedoc
- /attachdoc
- /searchdoc
/quicknote
- Enter /quicknote command in any chatbox.
- Enter your notes in the chat box.
- Press enter on your keyboard.
- A popup appears, by default the current date, time of when then document was created is saved as the name of the document. However, you can choose to edit and change the name of your document thru Writer.
- Click on Save.
Once you have saved your chat, a message card is posted with Open and Share options. Clicking on the Open button will open the document in the browser and to share a document follow the below steps.
- Click on the Share button in the dialog box
- Select an access level
- Click on Share.

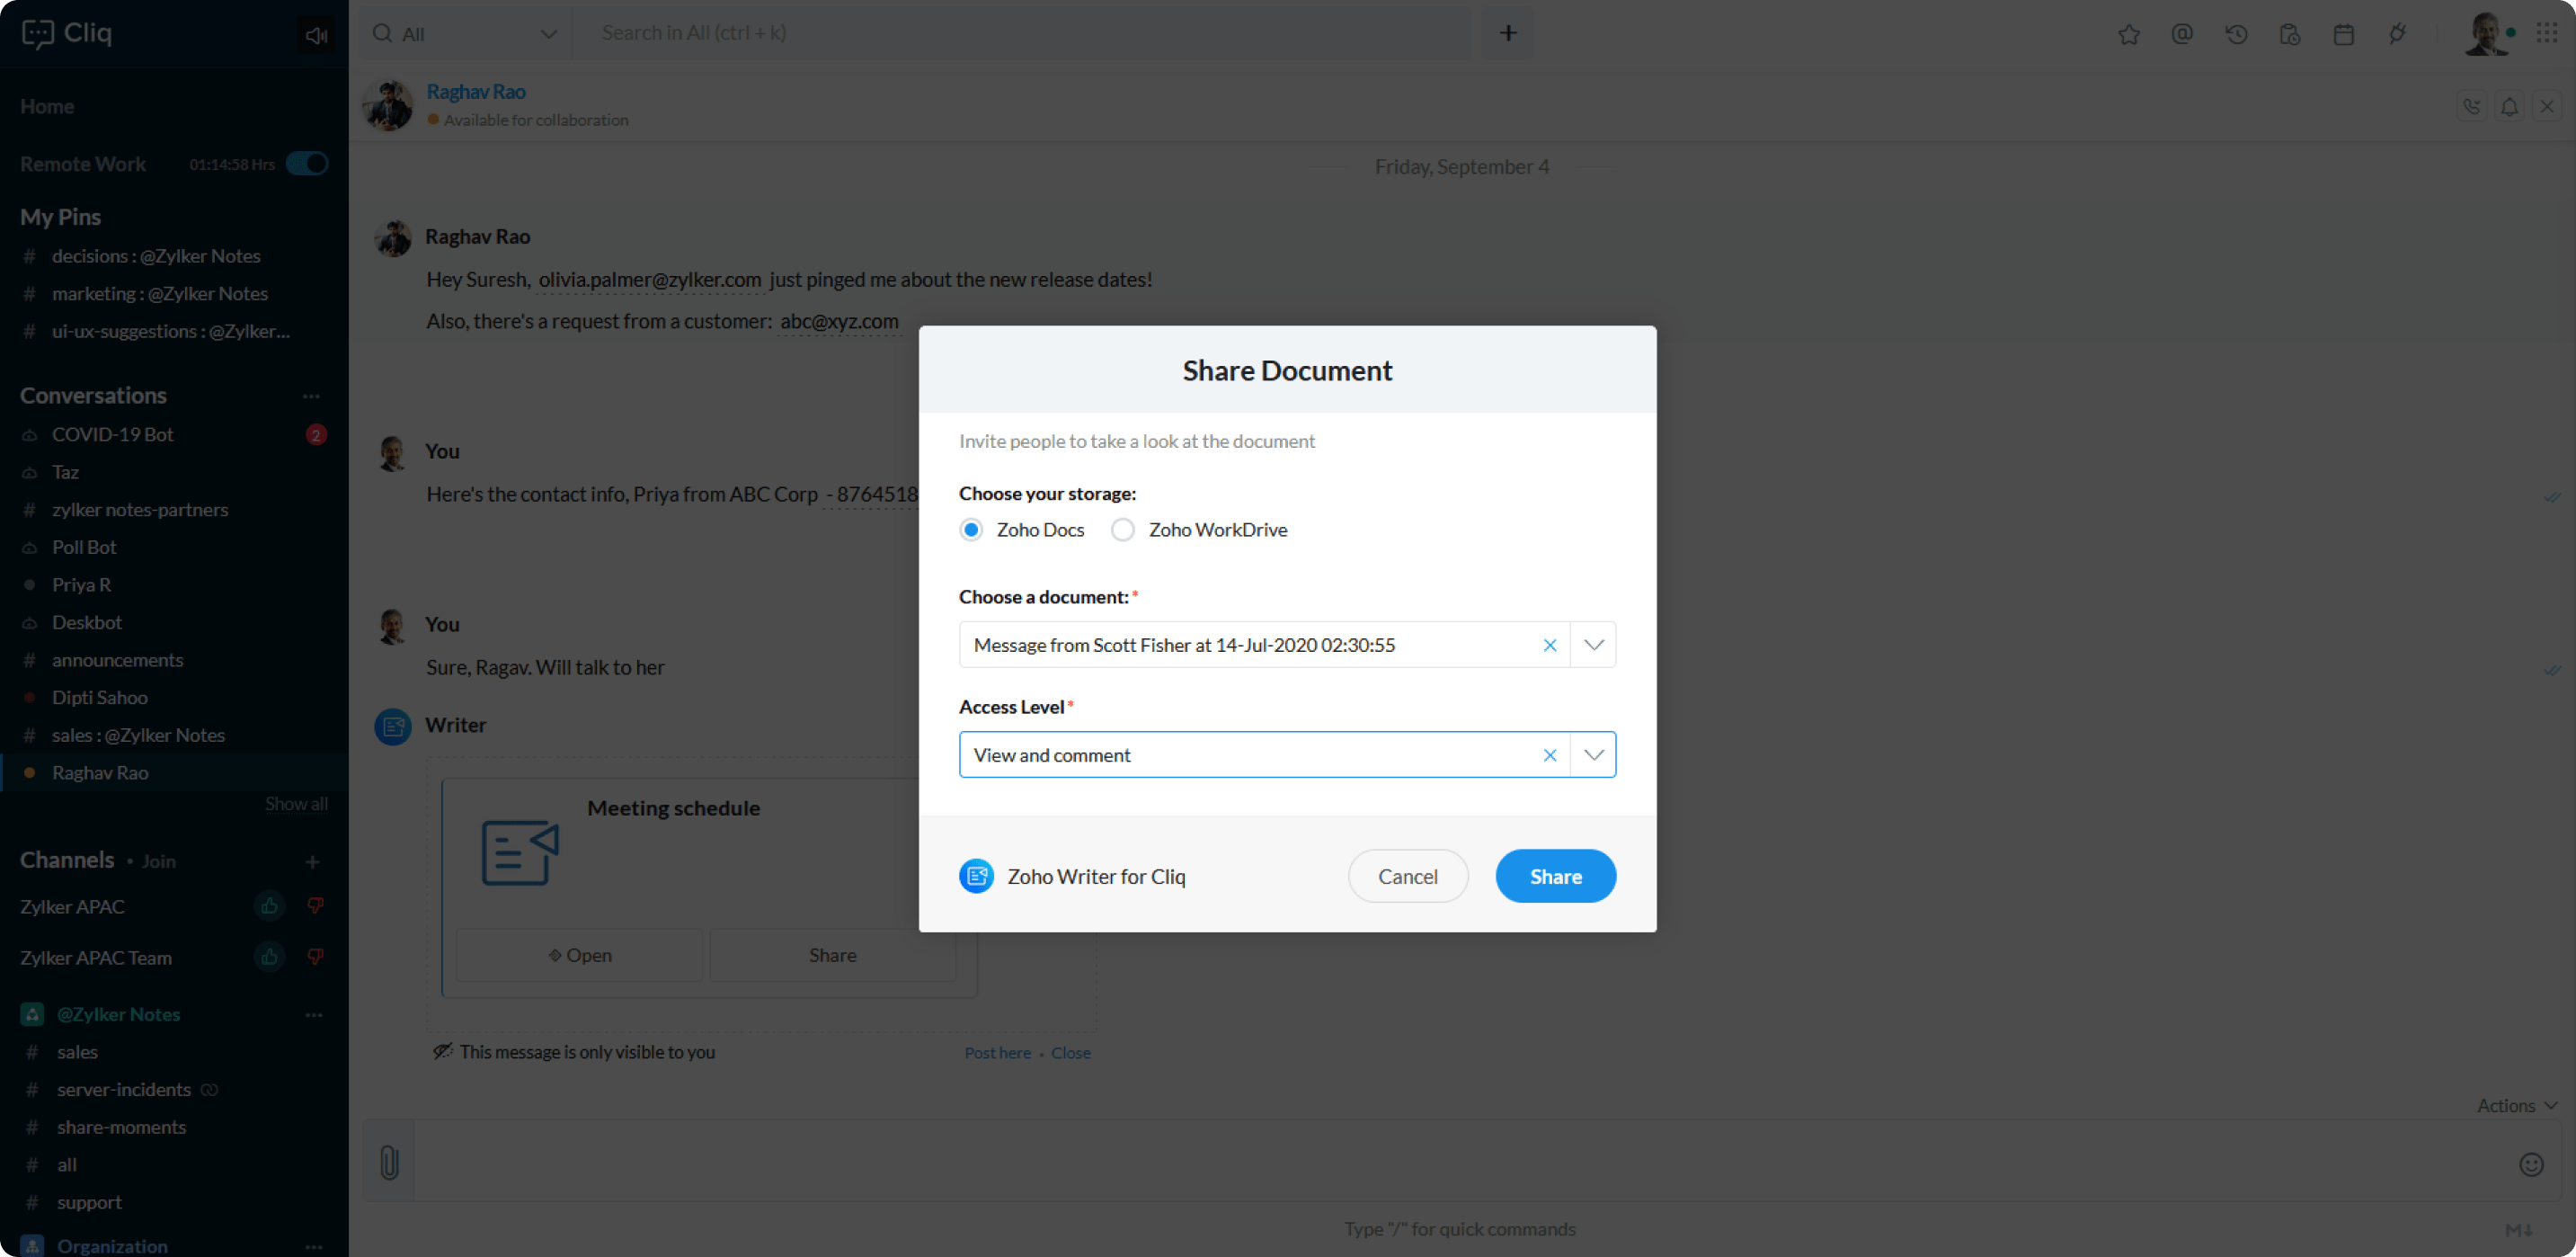
/sharedoc
- Enter /sharedoc dialog in any chat
- Share Document dialog appears,
- Choose a storage option: there are two options made available for you to choose from (This option appears only when you have an account in both Zoho Docs and Zoho Work Drive).
- Zoho Docs
- Zoho Work Drive
- Search and choose a document from the Choose a document dropdown.
- Choose an access level
- Click on Share
Here's how the command will work in each scenario:
Direct Message
The document is shared with that particular user.
Channel
- If you are choosing to share to all the members in the channel
- Enter the command in the channel you want to share your file in
- Share document dialog appears.
- Choose a storage option: here you have two options to choose from (This option appears only when you have an account in both Zoho Docs and Zoho Work Drive)
- Zoho Docs
- Zoho Work Drive
- Search and choose a document from the Choose a document dropdown.
- You can choose to share your document with all members in the channel or can choose to customize.
If you are choosing to share with all the members of the channel:
- Select All members of this channel option in Share to.
- Select an access level.
- Click on Share.
- OR choose customize.
- Share document to option appears.
- Search and select recipients you want to send the document to.
- Select an access level.
- Click on share.
Note A document can be shared with a maximum of 1000 members at a time in a channel. ie: you will not be able to share a document in a channel that has more than 1000 participants in it.
Taz
- Enter the command in TAZ, Share Document dialog appears.
- Choose a storage option: there are two options made available for you to choose from (This option appears only when you have an account in both Zoho Docs and Zoho Work Drive)
- Zoho Docs
- Zoho Work Drive
- Search and choose a document from the Choose a document dropdown.
- Share document to
- Choose an access level
- Click on Share
Note
A document can be shared with a maximum of 1000 members at a time in a channel. Say you choose a number of channels in the Share document section of Share Document dialog, if your chosen number of channels cumulatively exceeds 1000 members as a whole then the channels are sorted in ascending order, and the channel with maximum members is removed.
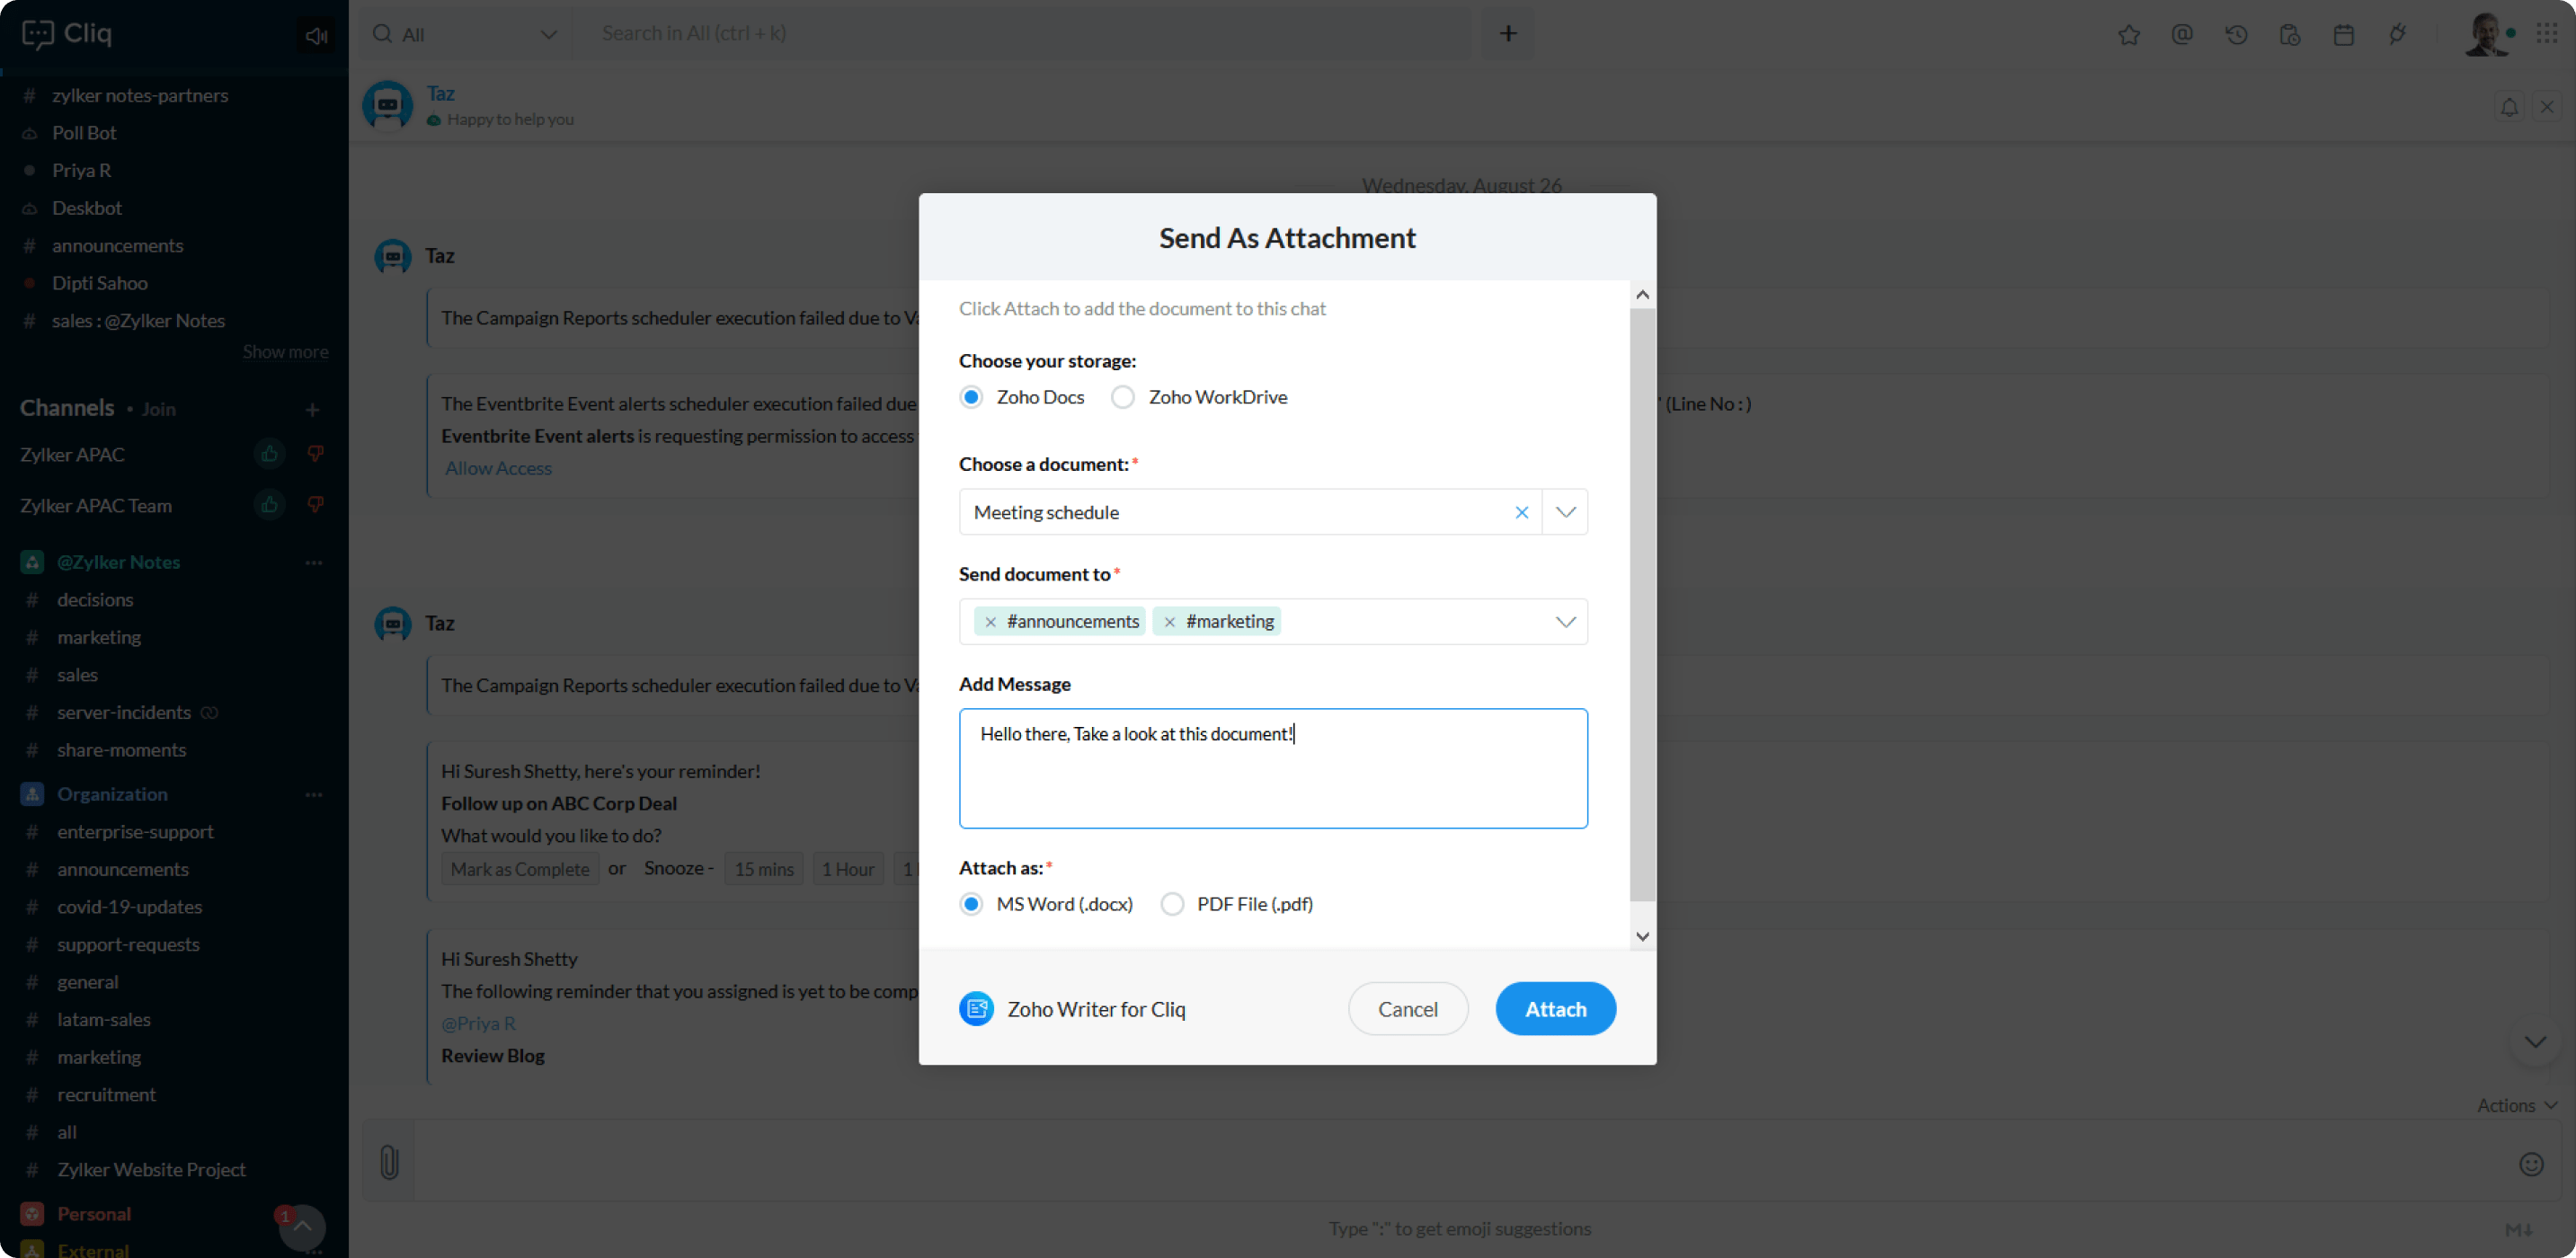
/attachdoc
- Enter /attachdoc command in any chat.
- Send as Attachment dialog appears.
- Choose a storage option: here you have two options to choose from (This option appears only when you have an account in both Zoho Docs and Zoho Work Drive)
- Zoho Docs
- Zoho Work Drive
- Search and choose a document from the Choose a document dropdown.
- Enter the message you want to send along with the attachment in the Add Message text field.
- Select the format you would like to send your file in. There are two formats made available here:
- MS Word (.docx)
- PDF File (.pdf)
- Click on Attach.
If you choose to invoke /attachdoc command via Taz you can see Send document to option appear additionally , you can use this option to search and select the recipient you want to send the document to. Also please note that your file can be attached to maximum of 2 recipients.
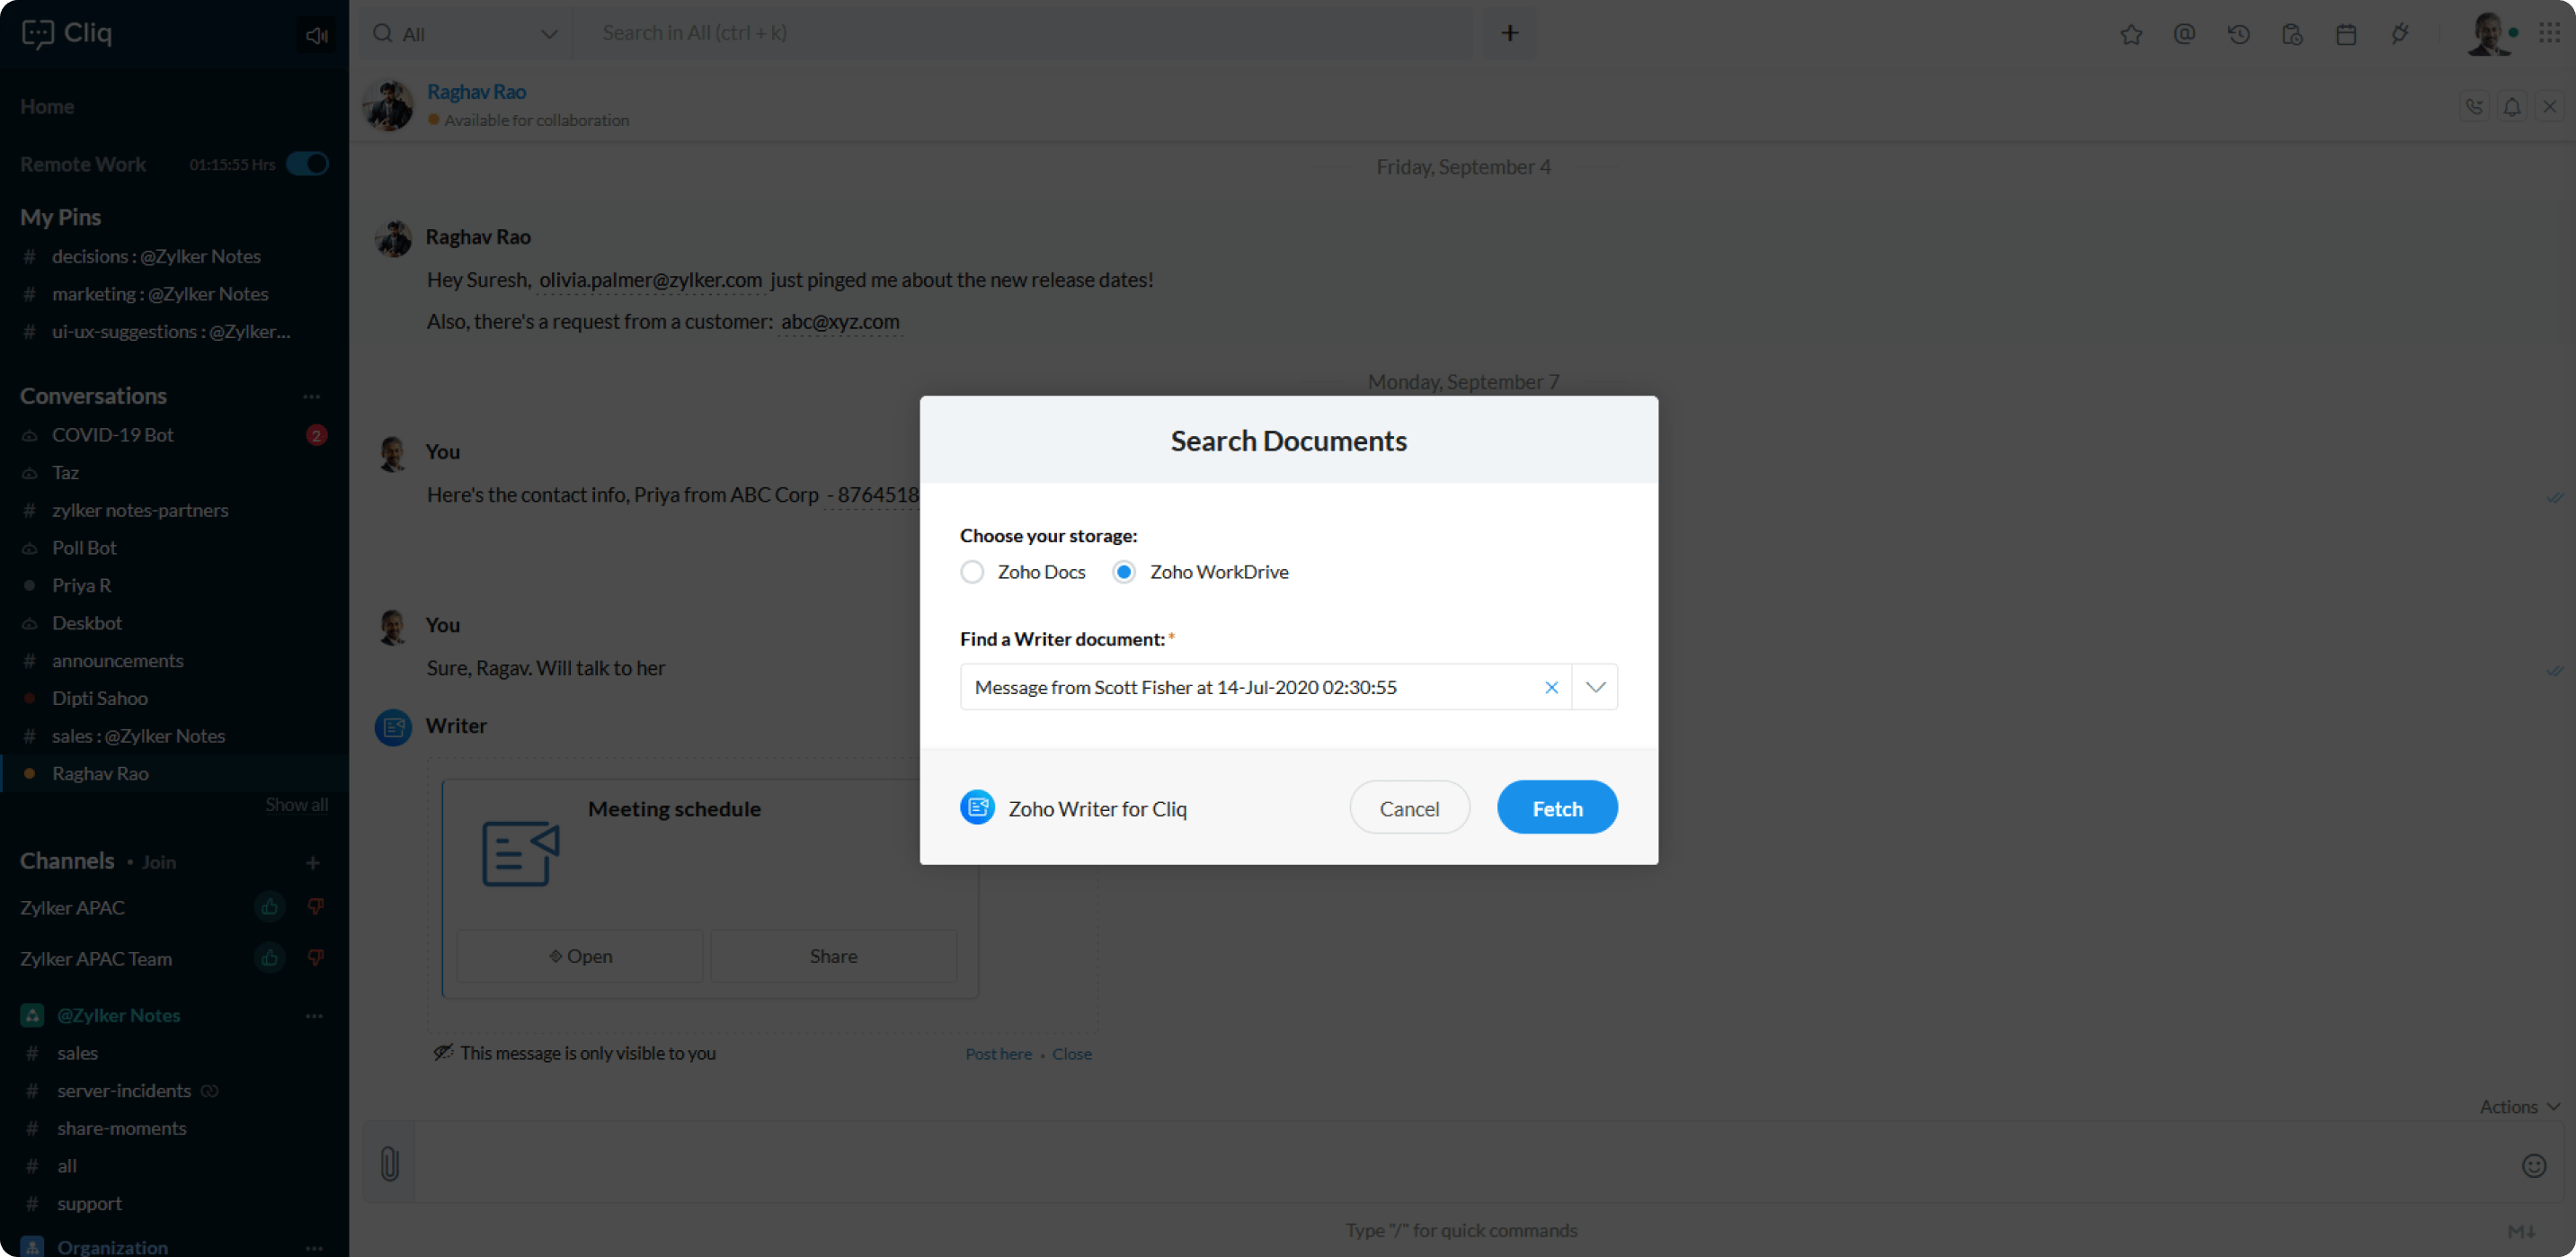
/searchdoc
- Enter /searchdoc command in any chat.
Search document dialog appears.
- Choose a storage option: there are two options made available for you to choose from (This option appears only when you have an account in both Zoho Docs and Zoho Work Drive).
- Zoho Docs
- Zoho Work Drive
- Search and choose a document from the Choose a document dropdown.
- Click Fetch.
The document fetched is posted as a message card. From the message card you can:
- Choose to share the file as a permalink ,read-only link or can download it to your computer.
- Click on the Share button on the message card to share your document
- Click on the Attach button to send your document as an attachment to the desired recipient.
When you click on the 3 dots in the message card you will be able to view Edit properties and the Publish Settings and Unpublish options.
Edit Properties
Here's how you can configure Edit properties to fit your document preferences.
- Navigate to Document widget > Home >click on ⓘ icon below your document > Edit Properties.
- Edit Document Properties dialog will open.
- Enter document name
- Document description
- Choose the desired option from the below options
- Mark As Favorite
- Mark the document as Final
- Lock the content of the document
- Click Save
Note The options available in Edit Properties will be based on the Access level granted to the document, so please note that you may or may not have all the above available steps and options listed above.
Publish
Publishing a document will create a web page like version of the document for others to view.
To publish a document navigate to Document widget > Home >click on ⓘ icon below your document > Edit Properties
- Click on the 3 dots in the message card
- Select Publish, a Publish Document dialog opens.
Here, you can select how you would like others to view the document by selecting one of the below options.
- Within your organization
- Public on the web
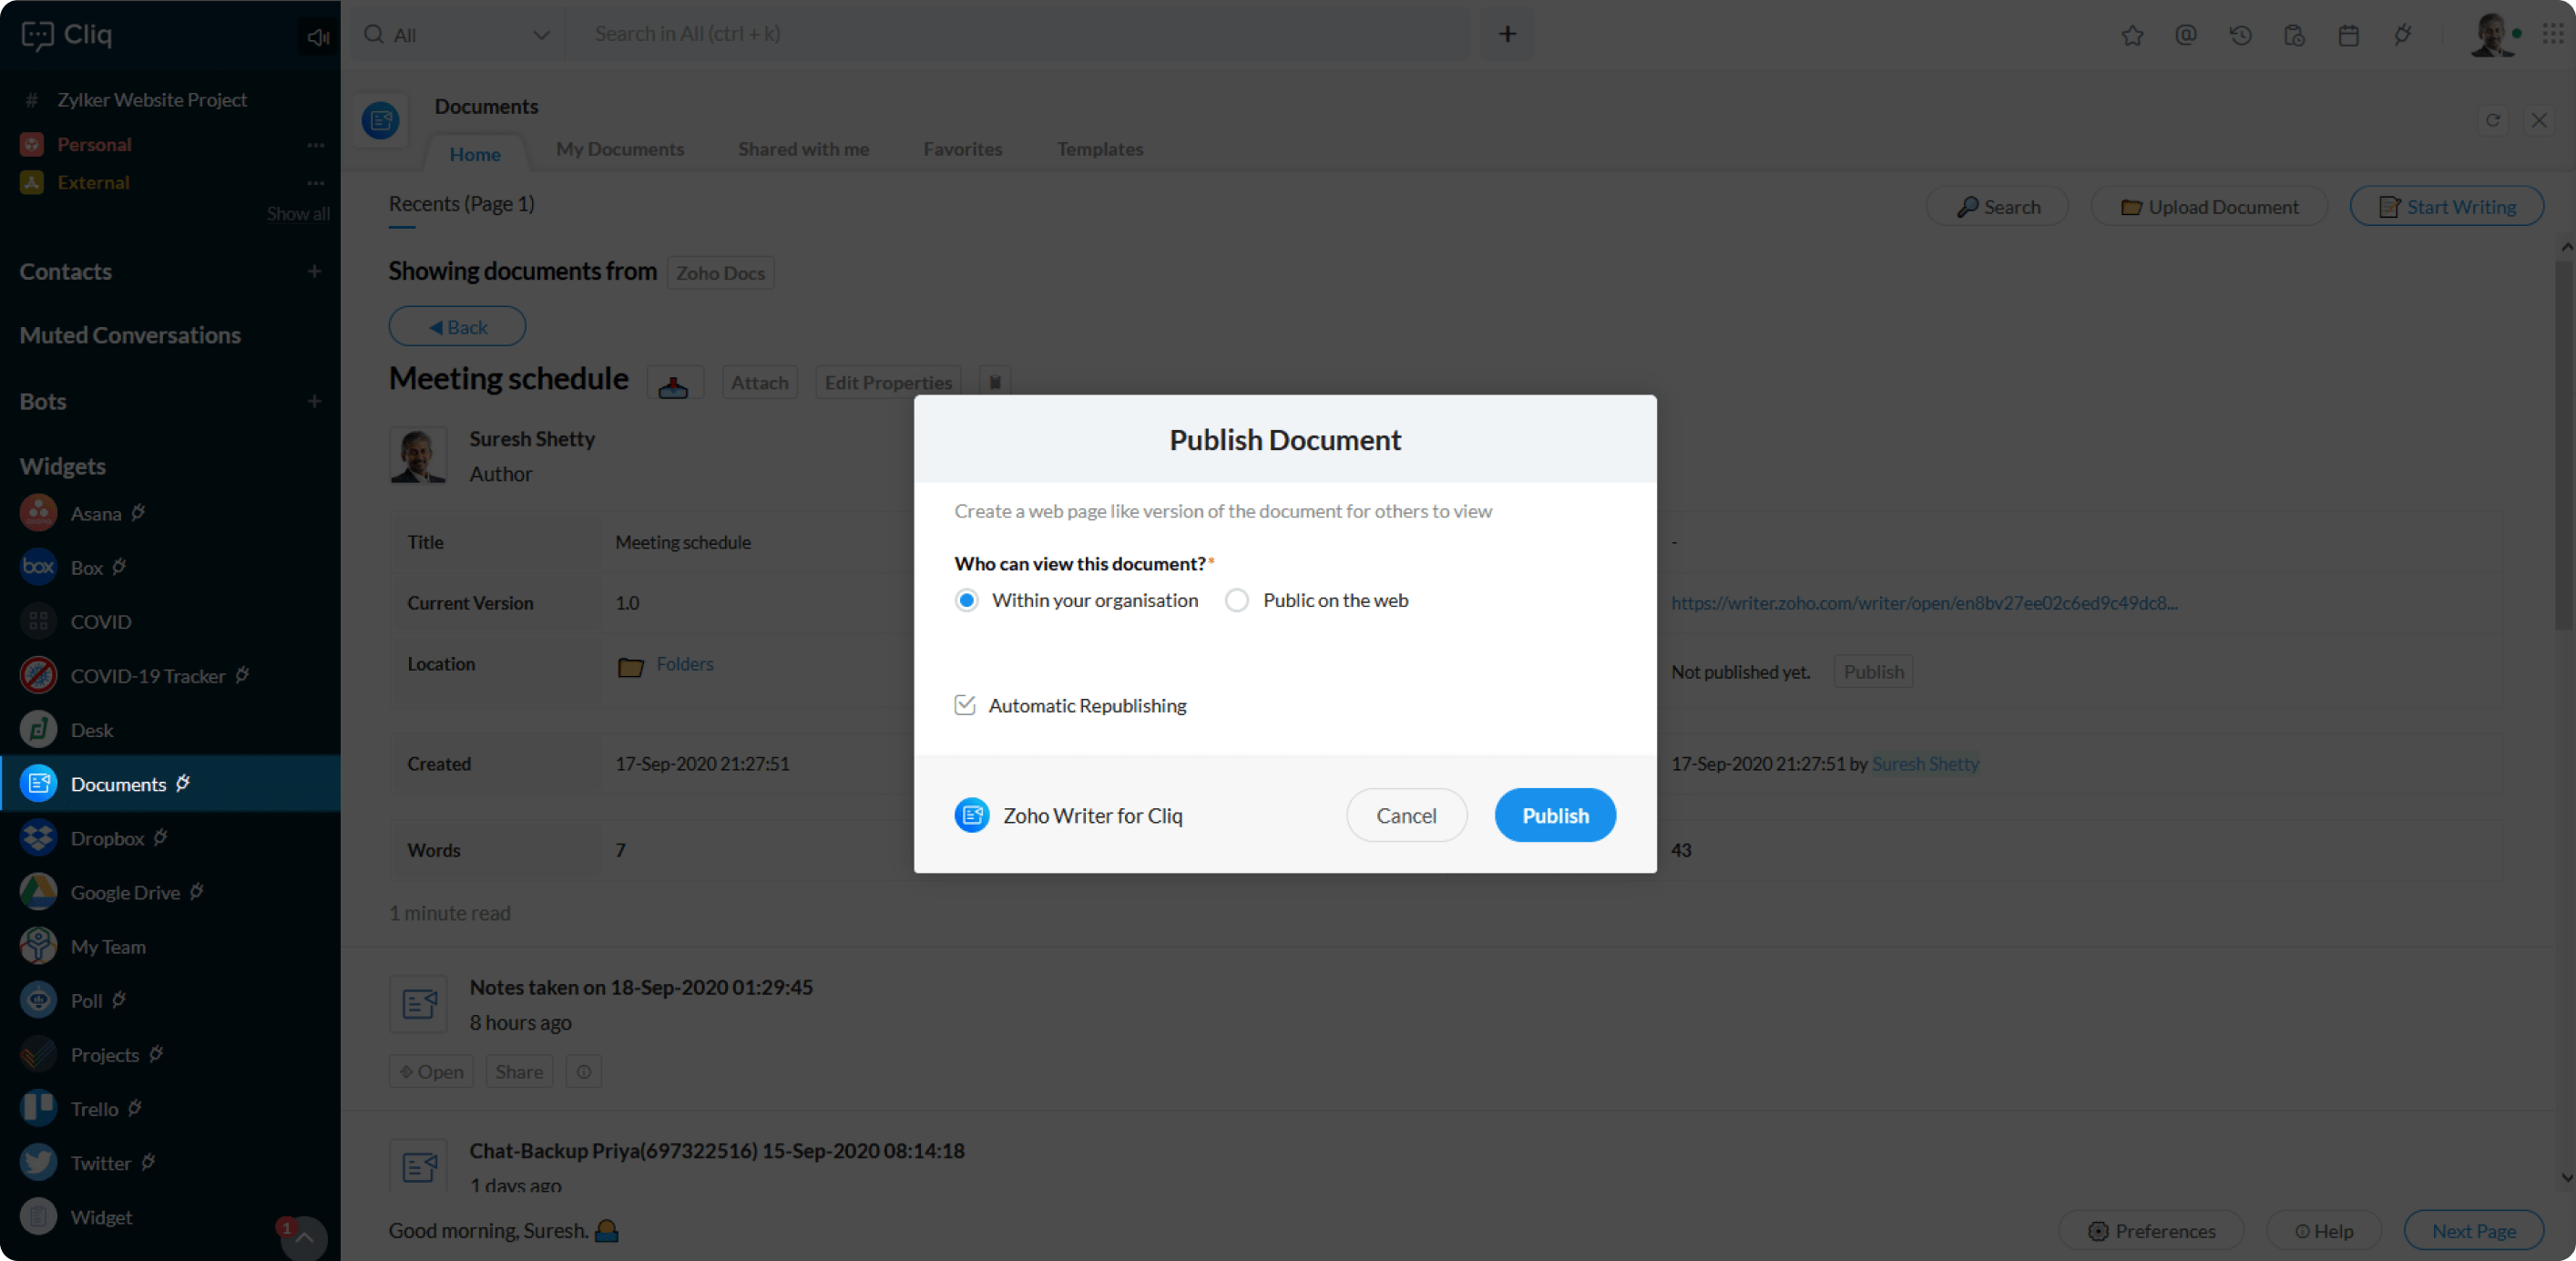
Automatic Republishing
Automatic republishing essentially means that any changes you make in your document will be updated automatically in the live version. You will see this option to be present in the Publish Document dialog. By default, this option is enabled for all.
Unpublish a document
When you unpublish a document it will be removed from both on the web and within your organization based on the scope, you have chosen.
To unpublish a document via widget, navigate to Document widget > Home > click on ⓘ the icon below your document > Click on the Unpublish button present in the published column.
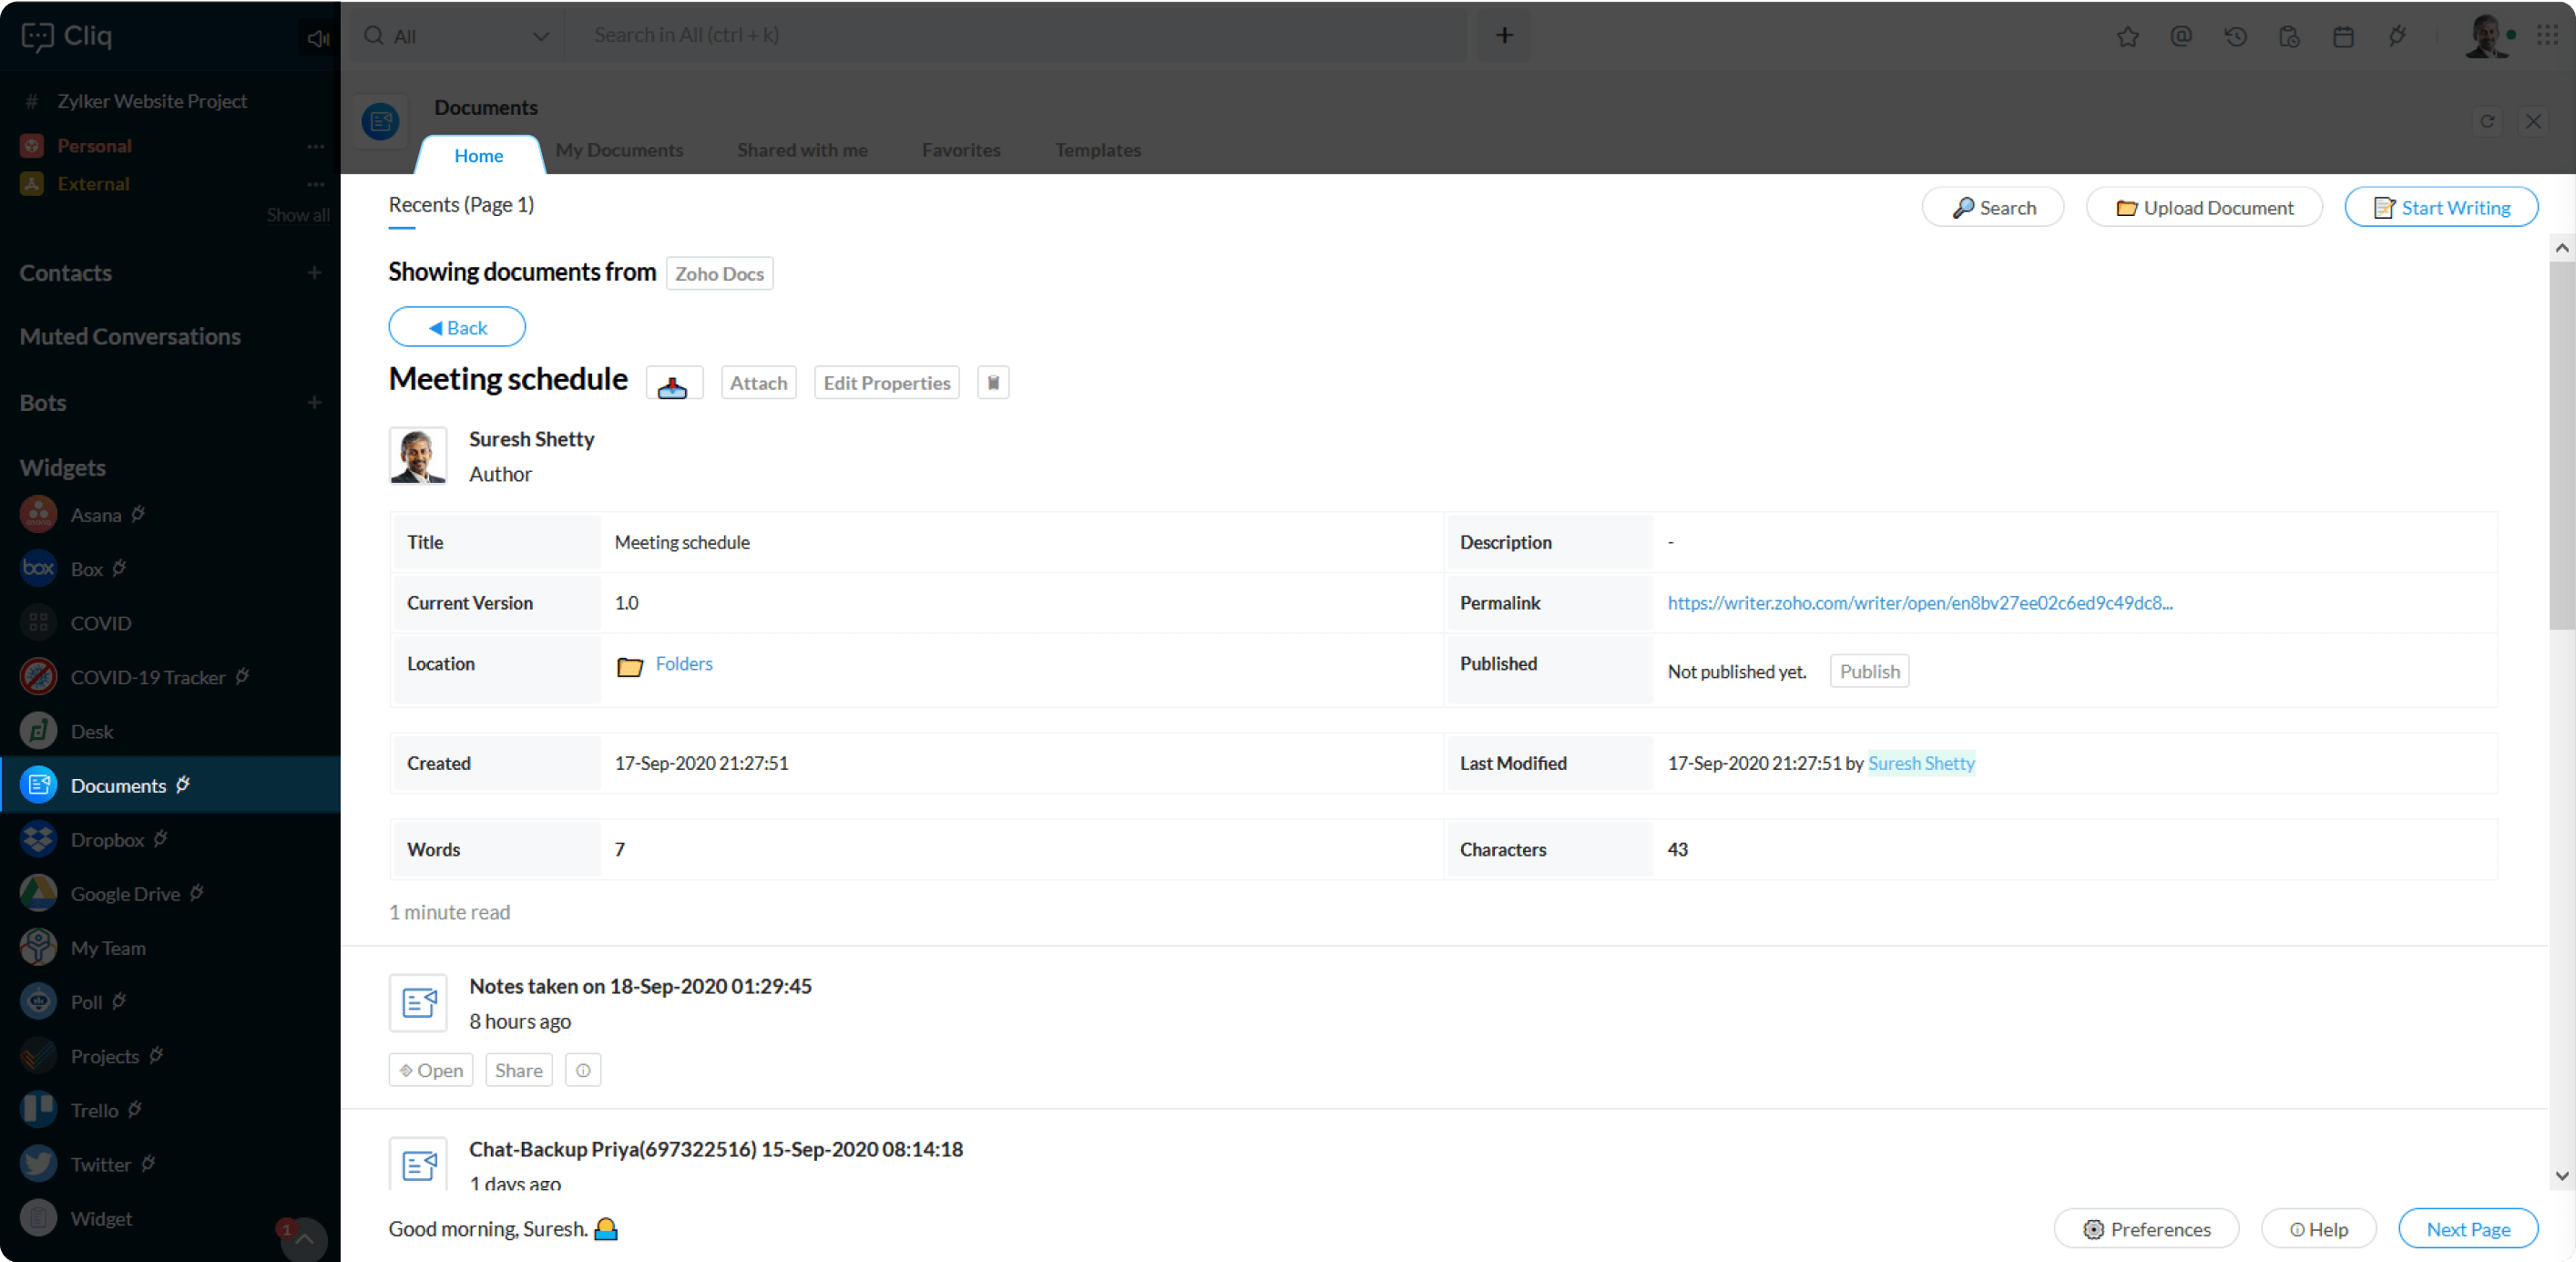
Home
The home page lists out all the documents in your Zoho Writer application.
Below each document, you have the capabilities to open, share your documents. Clicking on the ⓘ icon will show you a detailed overview of your document properties. such as the:
- Document title
- Current version of the document
- Location of the document
- Date of creation
- Number of words in the document
- Number of characters present in the document
- Document description
- Permalink of the document
- Publishing capabilities
- Last modified date
- Approximate reading time
Here's what you can do from the home tab:
- Configure Storage in Home
- Search a document from Home
- Upload a document from Home
- Start Writing in Zoho Writer from Home
- Setting preferences
- Help
Configure Storage in Home
- You can choose to fetch/get/view/ store your documents from in Zoho Docs or Zoho WorkDrive
- To configure storage, click on Zoho Docs button.
- Configure your Storage dialog appears
- Select a location you want to save your file in
- Click Submit
Search a document from Home
- Click on the Search button present in the RHS of the Cliq panel.
- Search Documents dialog appears.
- Choose a location you want to search the file from.
- Enter the name of the document you are searching for and select the document from the Find a Writer document Choose a document dropdown.
- Click Fetch.
Upload a document from Home
You can upload a document right from the home tab by clicking on the Upload Document Button present in the RHS of the Cliq panel. The document can be uploaded from your computer or via a link.
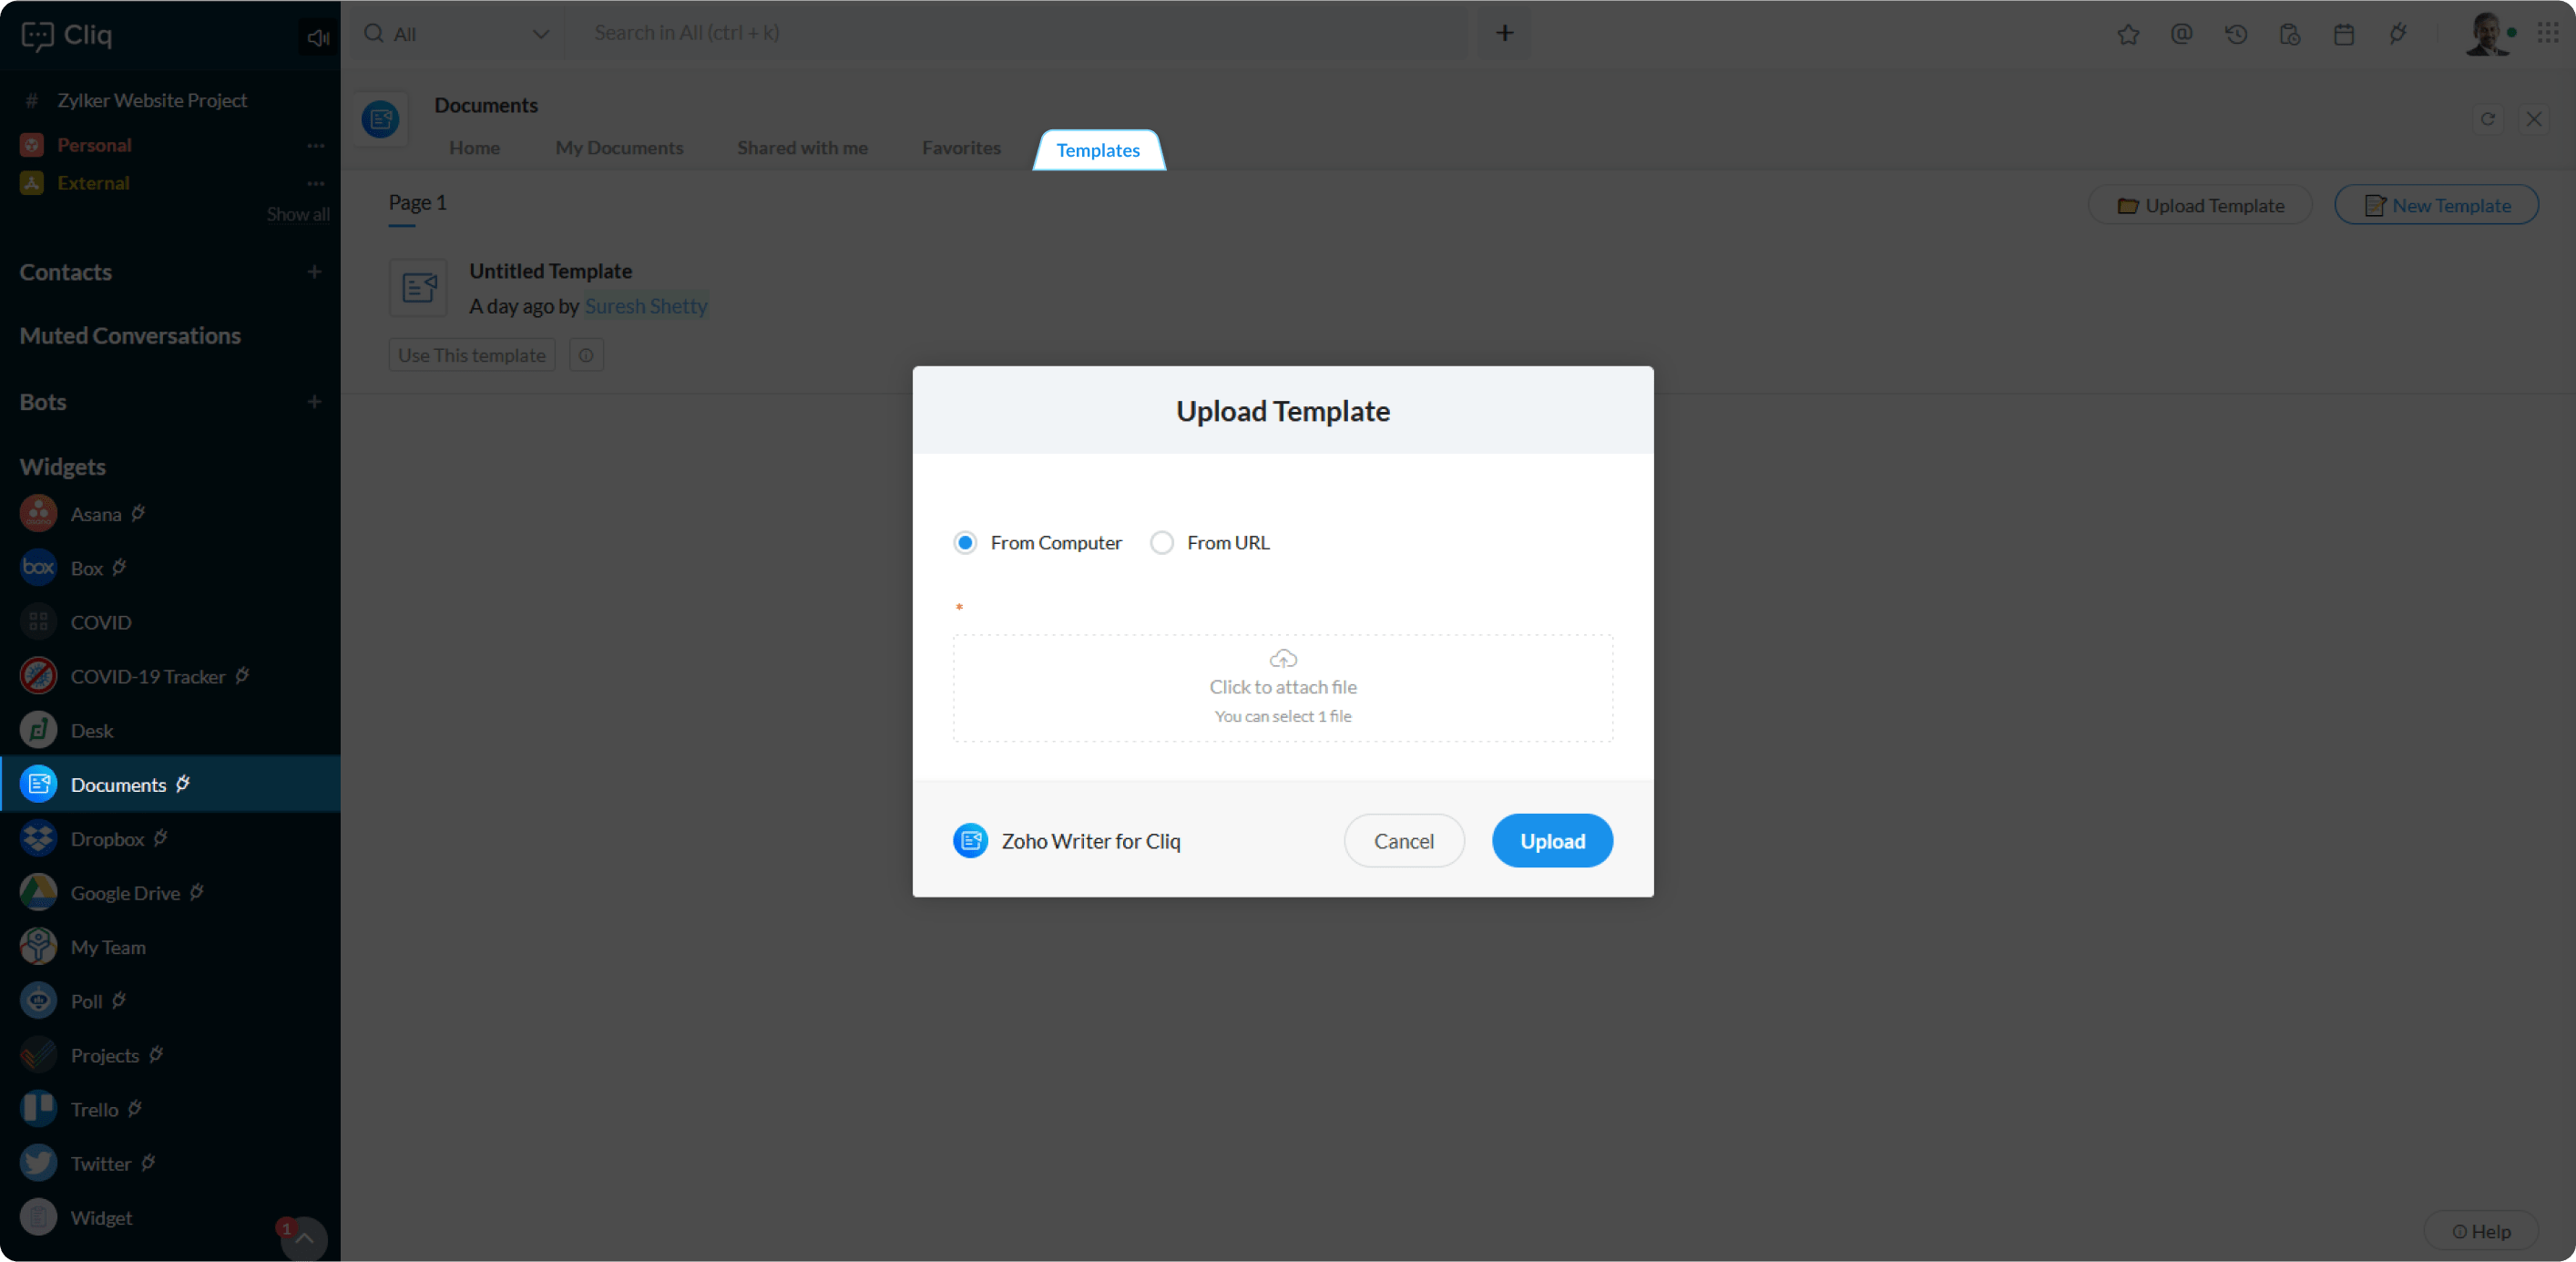
Uploading a document from a computer:
- Click on From Computer option.
- Click on Click to attach file.
- Select the desired file from your computer.
- Click Upload.
Note
Writer document supported formats: docx, .doc, .docm, .dot, .dotm, .dotx, .rtf, .odt, .txt, .html, .htm, .tex
Uploading a document via the link:
- Click on from URL option.
- Enter the website URL.
- Name the document if needed.
- Click Upload.
Start Writing in Zoho Writer from Home
You can open Zoho Writer and start writing in a jiff by clicking on the Start Writing button present in the RHS of the Cliq panel.
Setting preferences
You can set your preferences to choose what you would like to see when you open the widget.
To set preferences click on the preferences button present at the bottom left corner.
- Choose what you would like to see when you open the widget
- Number of documents to be shown.
- Show/Hide ⓘ Help button in widget
To set preferences click on the preferences button present at the bottom left corner.
Help
When you click on the Help button present in the bottom right corner of the Cliq panel, you will be navigated to the following tabs.
- Help
- Skip Tour
Help
The help tab in the document widget explains you about the various capabilities available in the document widget.
Skip Tour
Skip Tour provides you with new useful tips on how you can put the extension to good use.
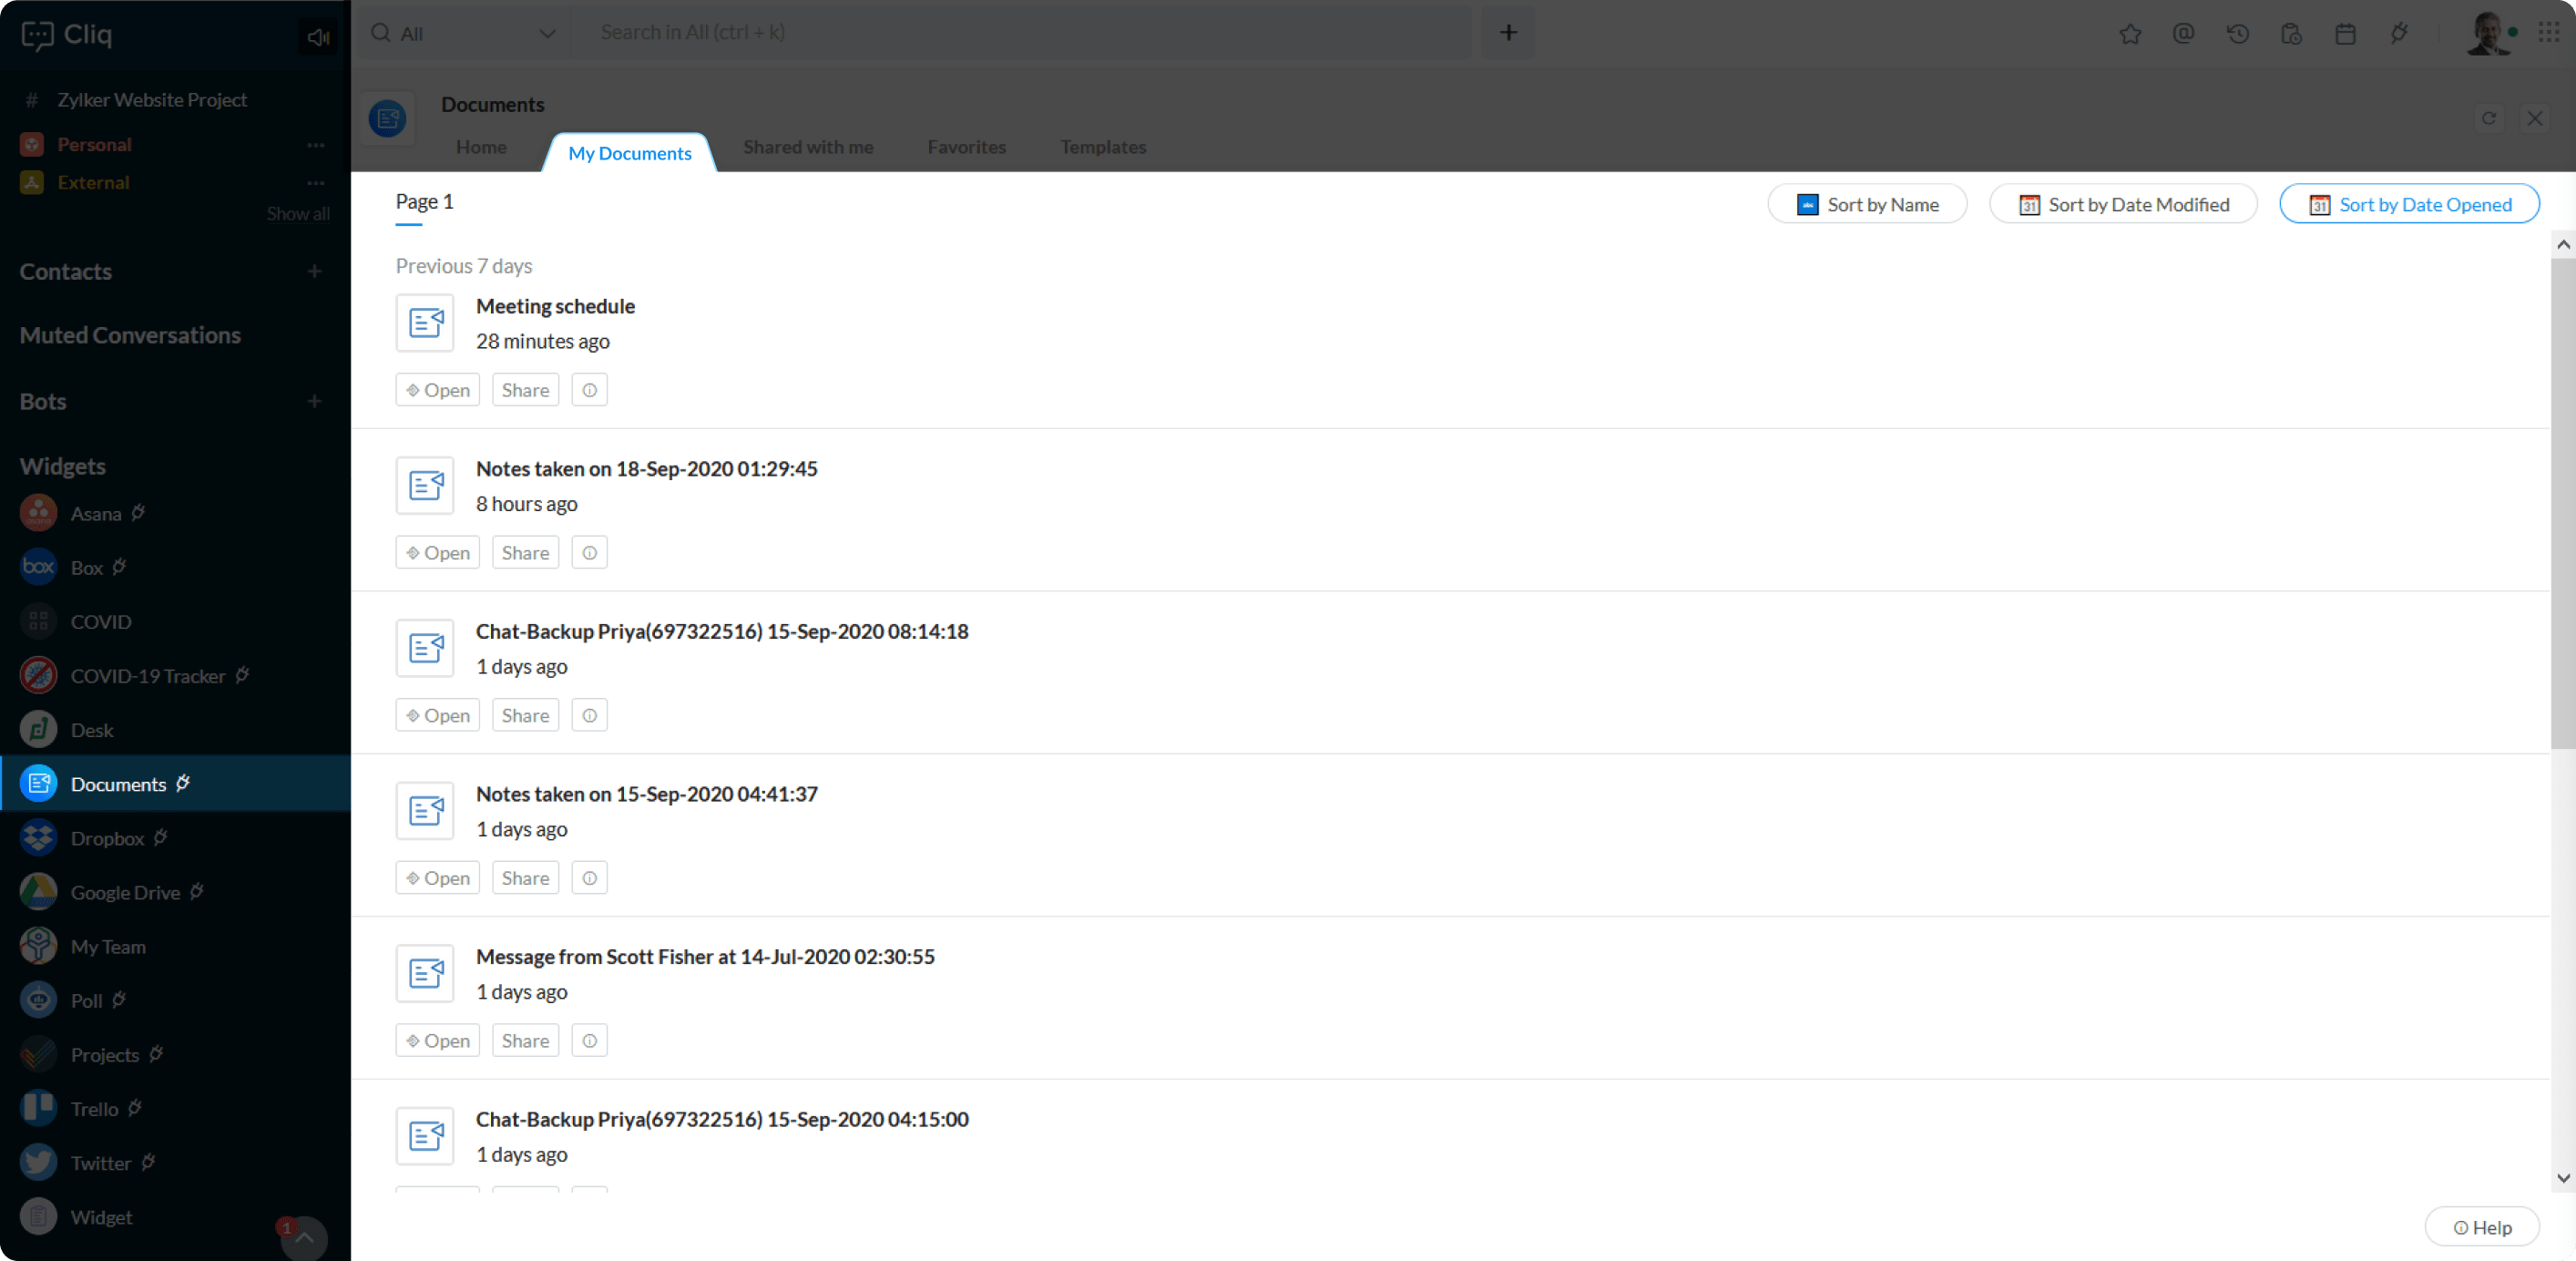
My Document
The My Document tab shows you a list all your documents. Below each document you have the capabilities to open, share and view detailed information about the document.
The My Document tab is also equipped with the following listing options to help you navigate and access your document with ease.
- Sort by Name
- Sort by Date Modified
- Sort by Date Opened
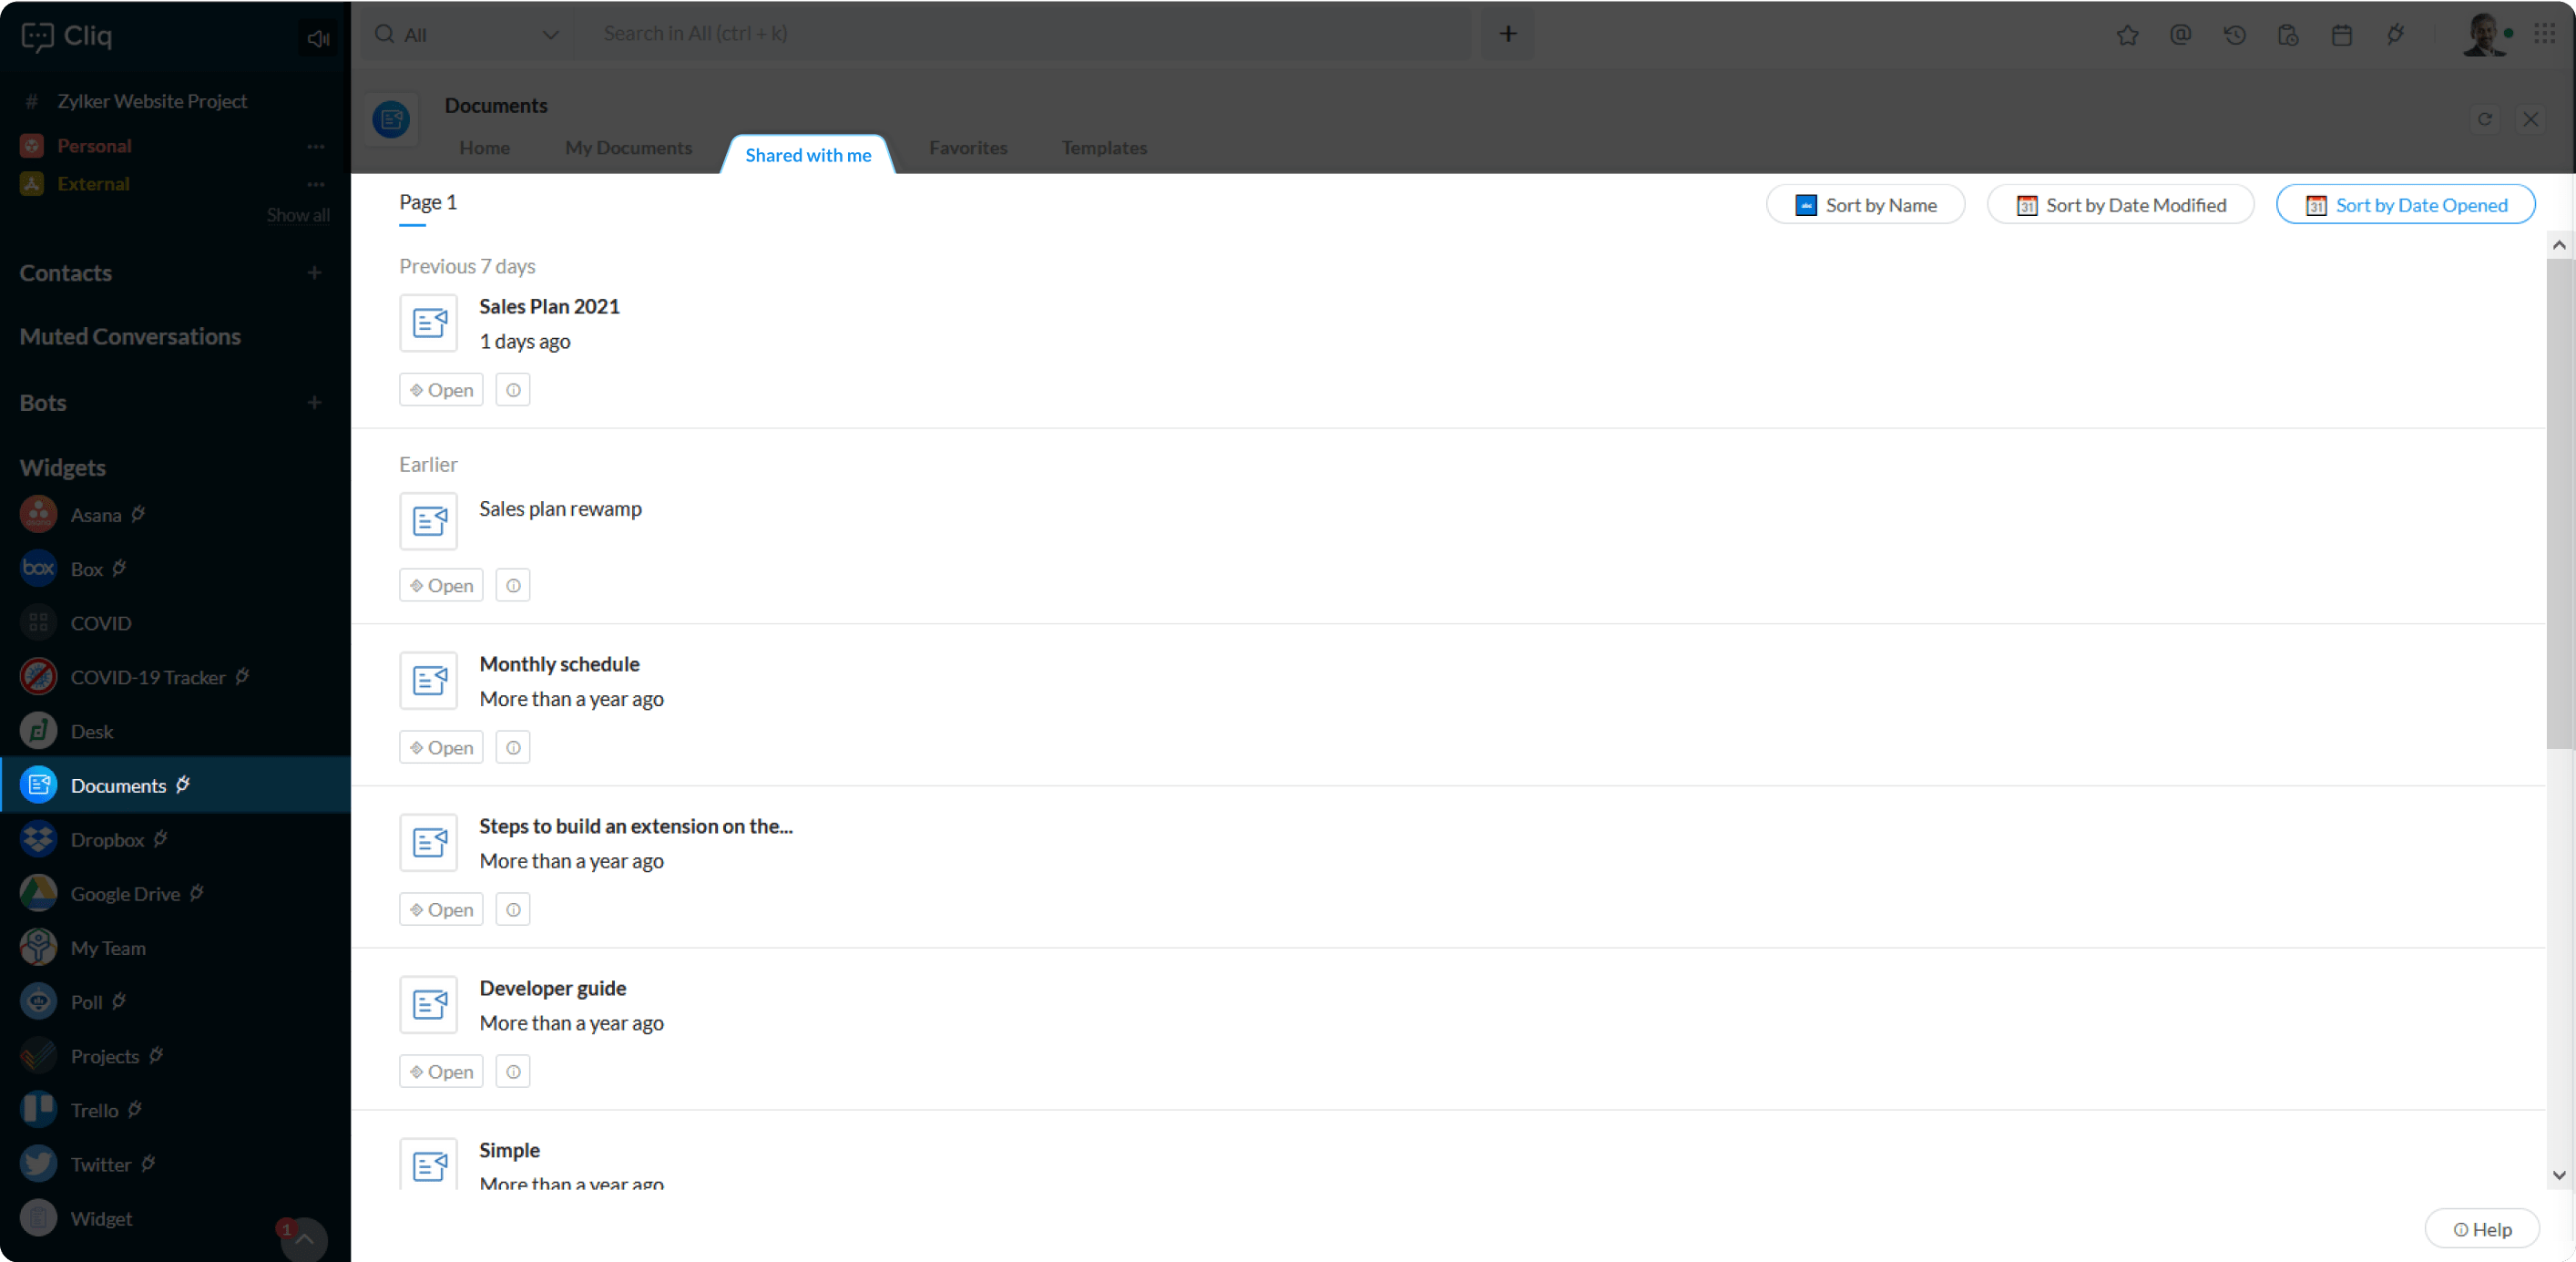
Shared with me
The Shared with me tab show the list of documents that you have shared. Below each document you have the capabilities to open and view detailed information and edit document properties.
Shared with me tab is also equipped with the following listing options to help you navigate and access your document with ease.
- Sort by Name
- Sort by Date Modified
- Sort by Date Opened
Favorites
To favorite a document, navigate to
- Document widget
- Click on the Home tab
- Click on the ⓘ icon present below the document you want to favorite
- Click on the Edit properties button
- Click on the mark as favorite

Templates
You can choose to create or upload a template. You can create a template by clicking on the New Template button or can upload a template by clicking on the Upload Template button.
| Action | Various ways by which you can ways to perform the action |
| Attach a document | 1. Enter the /attachdoc command in any chat 2. Navigate to Document widget > My Documents > Click on ⓘ icon > Attach button 3. Enter /searchdoc > response message card gets posted > Click on ⓘ icon > Attach button |
| Search a document | 1. Enter the /searchdoc command in any chat 2. Navigate to Document widget > My Documents > Search button 3. Enter /searchdoc > response message card gets posted in chat/channel > Attach button |
| Share a document | 1. Enter the /sharedoc command in any chat 2. Navigate to Document widget > My Documents > Attach button 3. Enter /sharedoc > response message card gets posted in chat/channel > Attach button |
| Upload a document | 1. Navigate to Document widget > Home > Upload Document |
| Favorite a document | 1. Navigate to Document widget > Home > click on ⓘ icon below your document > Edit Properties > Mark As Favourite. 2. Enter /searchdoc > response message card gets posted in chat/channel > hover over 3 dots and click on Edit Properties > select Mark as favourite. ( only applicable if you have the necessary permission) |
| Upload a template | 1. Navigate to Document widget > Template tab > click Upload Template button |
| Publishing a document | 1. Navigate to Document widget> Home Tab> Click on Publish button |
| Unpublishing a document | 1. Navigate to Document widget > Home > click on ⓘ icon below your document > Published > Unpublish. 2. Enter /searchdoc > response message card gets posted in chat/channel > hover over 3 dots and click on Unpublish. |
| Change publishing scope | 1. Navigate to Document widget > Home > click on ⓘ icon below your document > Published > Publish Settings. 2. Enter /searchdoc > response message card gets posted in chat/channel > hover over 3 dots and click on Publish Settings. |
| Edit file properties | 1. Navigate to Document widget > Home >click on ⓘ icon below your document > Edit Properties 2. Enter /searchdoc > response message card gets posted in chat/channel > hover over 3 dots and click on Edit Properties. |