Workflow Rules in Vertical Solutions
Workflow Rules automate actions such as sending email notifications, assigning tasks, and updating record fields based on specified conditions. This feature simplifies processes by automating tasks when certain criteria are met.
Key Components of a Workflow Rule
- Basic Information: Define the record type, rule name, and description.
- Trigger Criteria: Specify when the rule should be activated. Options include:
- Record Actions: Trigger actions when records are created, edited, or deleted.
- Date Field Values: Trigger actions monthly or yearly based on the selected date field's value for records that meet the rule criteria.
- Notes: Trigger actions based on the creation, modification, or deletion of notes.
- Workflow Conditions: You can set up the workflow rule to apply to all records, only to those that meet specific criteria, or to those that do not satisfy the criteria. Multiple conditions can be set up to define these criteria. When multiple conditions are present, records will be validated against each condition in sequence.
- Actions : Define the actions that should be taken when conditions are met:
- Instant Actions: These include sending emails, creating tasks, updating fields, invoking webhooks, running custom functions, creating records, and sending notifications via integrated communication tools like Cliq, Slack, or Cisco Webex.
- Scheduled Actions: Set these actions to occur at a specified time after the trigger conditions are met.
Create Workflow Rules
Step 1: Basic Information
- Log in to Zoho Developer Console and click Vertical Solutions.
- Select the application you would like to modify and click Edit.
- Click Automate in the left pane and select Workflow.
- In the Rules tab, click + Create Rule.
- Specify the basic information for the workflow rule.
- Select the Module to which you want to apply the rule.
- Specify a Rule Name.
- Give a description for the workflow rule.
- Click Next to proceed to the next screen, where you will define the trigger criteria.

Note:
- When you add more fields to a meeting or call layout, those fields become mandatory. You will not be able to save the action unless you assign a value to each required field.
- The option to schedule a call as an instant action is only available for rules that are created for the Leads and Contacts modules.
Step 2: Define Trigger Criteria
There are four options for triggering a workflow. In this step, define when you want the workflow to be triggered and set the conditions for selecting the records to which the rule will apply.
2a. Record action
You can trigger the workflow based on specific actions performed on records. For example, you might want to send an email when a record is created or deleted, or send a notification when a particular field is updated. This option allows you to automate tasks when records are created, edited, or deleted.
Choose one of the options based on your requirements:
- Create : Execute the rule whenever a new record is created in the selected module
- Create or Edit : Execute the rule whenever a new rule is created, or an existing rule is updated. If you want to repeat the workflow every time the record is modified, check the Repeat this workflow whenever a Deal is edited option.
- Edit : Execute the rule when existing records are modified. You can configure the workflow to trigger when any field in the record is changed or when specific fields are updated. If you want to repeat the workflow every time the record is modified, check the Repeat this workflow whenever a Deal is edited option.
- Any field gets modified : Select this option if you want to trigger the workflow whenever an existing record is modified, regardless of which field value is updated. Click Next.
- Specific field(s) gets modified : Execute the rule when the values of the specified fields are modified in a record. You can add up to five fields for this condition. Choose the field and the modification condition for each. You can also choose whether to trigger the workflow if all or any of the given conditions are satisfied. Click Next.
- Any field in a specific section gets modified : For Leads, Contacts, Accounts, Deals, and custom modules, you can choose to trigger the workflow when any field in the specified sections gets modified. You can choose any system or custom sections from the system or custom layouts.
NOTE : If a section is linked to a workflow rule, you need to delete the workflow rule before you can remove the section from the layout. Also, if the section includes fields such as Multiselect Lookup or File Upload, any changes made to these fields will not trigger the workflow rule. - Delete : Executes the rule when certain records are deleted. Only Email Notifications, Webhook and Functions can be associated with such a rule.
2b. Date/Time field
There may be situations where you might want to schedule an email notification to customers a few days after a service has been completed, or send reminders for upcoming maintenance or warranty expirations. This trigger is based on the value of a date field, allowing you to automate actions without requiring records to be created or edited.
For instance, you can set up an activity to recur annually on the anniversary of a customer’s purchase, or schedule follow-up tasks a month after a project’s completion. When using this option, note that up to 5,000 records can be processed every 10 minutes. If the number exceeds 5,000 within that time, the remaining records will be processed in the subsequent 10-minute interval.
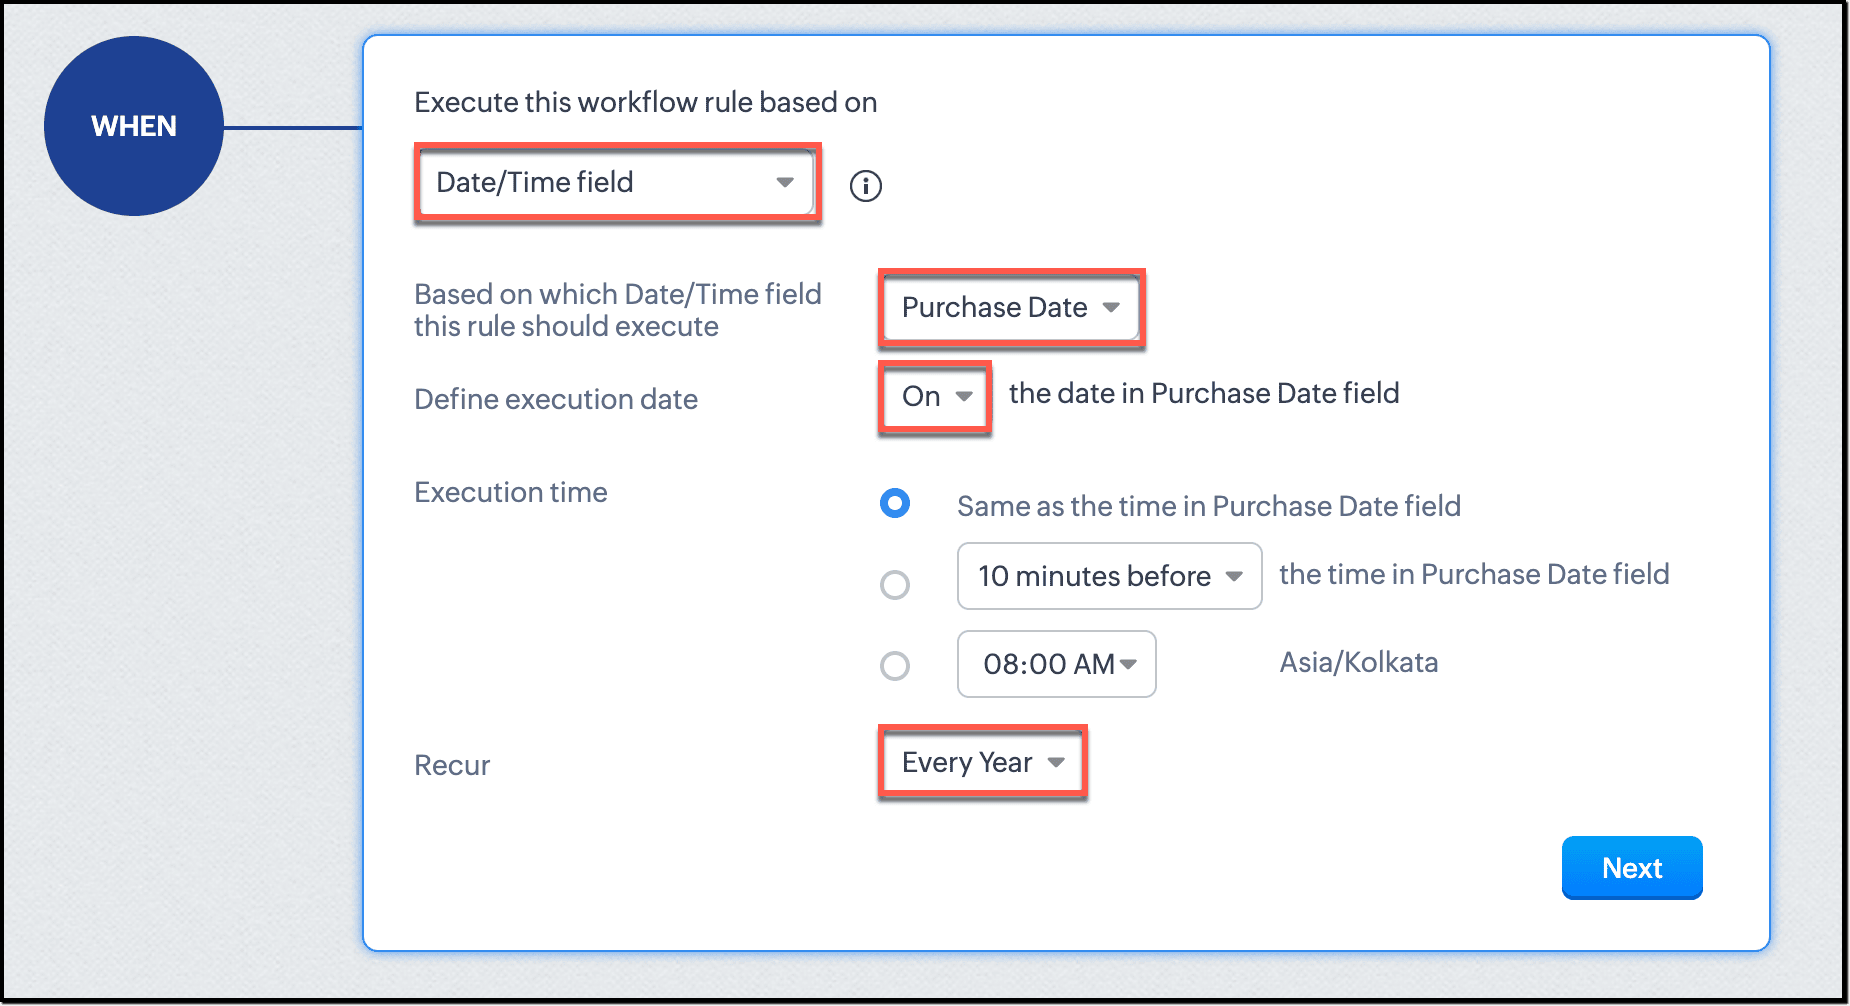
- Select the Date/Time field from the available options, based on which you want to trigger the workflow.
- Define the execution date.
- Select the execution time.
- Select the recurrence interval. You can choose to recur this Date/Time field based workflow once, every month, or every year.
2c. Record Notes
You can configure to trigger actions when notes are added, modified, or deleted.
For each action, you can further set additional conditions to segregate specific notes for triggering the rule. You can select whether the rule should be triggered for all records in the module or specific records meeting certain conditions.
Each note comes with certain attributes like created by, created time, note content, etc. You can either choose to trigger the workflow for all notes for the chosen records, or you could set up conditions based on the note attributes to select specific notes.
Step 3: Set Conditions
Irrespective of WHEN you have chosen to execute the workflow, you can define specific conditions under which the workflow should be triggered. You can set up multiple conditions to ensure that your workflow targets exactly the records you want, based on the criteria you specify.
You can configure conditions using filters based on record attributes. For instance, you might want the workflow to trigger only those records that meet a certain criteria, such as when a customer’s total purchase amount exceeds a certain threshold or when a support ticket's priority is set to High.
When setting up these conditions, you can:
- Apply the rule to all records, regardless of criteria.
- Apply the rule to all records that meet the specified criteria.
Once you have chosen WHEN to execute the rule,
- Choose whether to apply the rule to All records, or Records matching certain criteria.
- If you have selected the latter, select the field, the comparator, and the field value for your condition.
- Click + to add more conditions. The default logical operator for multiple conditions is AND. You can change it by clicking on the logical operator.
- If required, you can edit the criteria pattern by clicking on the Edit Pattern text. Use round brackets ( ) to group conditions, along with AND/OR operators to define the logical relationship between criteria. Use criteria row numbers to specify which criteria to include in the pattern.
- Click Done.
Consider you want to automate follow-ups for leads that have recently engaged with your company and show high potential. You can set up the following conditions:
- Condition 1: The lead’s purchase date is within the past 90 days.
- Condition 2: The lead’s annual revenue exceeds $500,000.
- Condition 3: The lead status is Pre-Qualified.
You can configure the workflow to trigger based on these conditions:
- All conditions must be met: The workflow is triggered when the lead’s purchase date is within the last 90 days and their annual revenue is greater than $500,000 and their status is Pre-Qualified. This ensures that the workflow targets only those leads who have recently made a purchase, are high-value, and are already pre-qualified.
- Any condition can be met: The workflow is triggered if the lead’s purchase date is within the last 90 days or their annual revenue exceeds $500,000 or their status is Pre-Qualified. This approach allows the workflow to be executed for leads that meet at least one of the criteria.
Criteria Pattern:
You can create advanced filters using logical operators like AND and OR to fine-tune your criteria.
Key Points:
- Maximum Criteria: You can define up to 25 criteria for a list view.
- Mandatory Criteria: If you are applying a conversion action (an instant action) to the rule, defining criteria is required.
- Lookup Fields: You can include up to 5 lookup fields in your criteria.
To Edit Criteria Patterns:
- Navigate to Automation > Workflow Rules.
- In the Workflow Rules page, select the rule you wish to edit.
- Click on Edit Rule.
- In the Edit Rule page, review your current criteria and click on the Change Pattern link.
- In the Pattern Editor box, adjust your filters as needed. Use round brackets ( ) to group conditions, along with AND/OR operators to define the logical relationship between criteria. Use criteria row numbers to specify which criteria to include in the pattern.
- Click Save.
Step 4 - Define and add instant and scheduled actions
In the previous steps, you have:
- Selected the Module: Selected the module to which the workflow rule will be applied.
- Set the Trigger Conditions: Defined when the rule should be executed, such as based on record creation, updates, or other specified triggers.
- Defined Record Criteria: Specified which records the rule should apply to based on specific conditions.
In this step, you can set up the actions that will occur when the workflow rule is triggered. You can choose between instant actions and scheduled actions to automate your processes effectively. These actions, once created, can be associated with many rules. You can either associate existing actions, or create one and associate with the workflow.
Instant Actions: These actions are executed immediately when the workflow rule is triggered.
To add an instant action, click on Instant Actions, select the action you want to add, add the required details, and click on Save and Associate. For more information on adding each available instant action, please refer to the next section.
Scheduled Actions: These actions are set to occur at a specified time after the rule is triggered.
To add a Scheduled action,
- Click on Scheduled Actions
- Select the time at which you want the action to be performed.
- From the list, select the action you want to add.
- Add the required details
- Click on Save and Associate.
For more information on adding each available Scheduled action, please refer to the next section.

NOTE:
- For a workflow rule, only those actions specific to the module will be listed. For instance, if the rule is for Leads, only actions created for Leads will be available for association.
- If records are deleted via Workflow, their information cannot be retrieved using the get API as the records have already been deleted.
- Edit or delete triggers do not function when records are auto-merged; these triggers will work if records are manually merged.
- Only one set of instant actions can be created, which may include email notifications, tasks, meetings, calls, etc.
- A maximum of 5 email notifications, 5 tasks, 5 field updates, 1 custom function, 1 webhook, and 1 create record action can be associated with the instant action.
- The actions will execute in the following order: Field Update > Tags > Email Notification > Task > Webhook, Custom Function, and Create Record (executed in parallel).
- Workflow rules execute an action the minute they are triggered. When a large volume of records that meet the trigger condition enters the system, the workflow may require some time to process the actions sequentially.
Add and associate actions to Rules
4.1 Field Update
The Field Update feature allows you to automatically modify specific field values in records whenever the associated workflow rule is activated. This can be configured as either an instant action or a scheduled action.
To add a Field Update action:
- Click on Instant Actions/Scheduled Actions
- Select Field Updates.
- If you have pre-defined Field Update actions for the selected module, they will be listed. Select the one you wish to associate and click on Associate.
- If you have no Field Update actions defined, create a new one by specifying the following details, and click on Save and Associate.
- Name: Enter a name for the Field Update action.
- Field: Select the field you want to update.
- New Value: Specify the new value for the selected field.
- Click on Save to save the workflow rule.
Please note that once actions are added, they will be available to be associated with other workflow rules as well.
4.2 Tags
You can add or remove tags from a record when a workflow rule is executed. This can be configured as either an instant action or a scheduled action.You can either use existing tags or create new ones during configuration.
To add tags:
- Click on Instant Actions or Scheduled Actions.
- Select Tags > Add Tags.
- Select from the list of available tags, or add new tags.
- Specify whether to overwrite any existing tags in the selected records with the new tags.
- Click Save.
To remove tags:
- Click on Instant Actions or Scheduled Actions.
- Select Tags > Remove Tags.
- Choose the tags you want to remove from the record.
- Click Save.
4.3 Email Notification
You can configure email notifications as instant or scheduled actions in a workflow rule. These notifications send alerts, updates, or information to leads, contacts, or internal users. By linking an email notification to a workflow, the system automatically sends the selected email to the designated recipients once the specified conditions are met.
To configure an email notification:
- Click on Instant Actions or Scheduled Actions.
- Select Email Notification.
- If you want to use one of the pre-defined Email Notification actions, select one from the list, and click on Associate.
- If you want to create a new Email Notification action and associate with the workflow, click + Create Email Notification.
- In the New Email Notification page:
- Provide a name for the alert.
- Choose the email recipients and click Save. The associated people will be displayed. If you select Roles/Groups/Territories/Subordinates, the email will be sent to users in the selected category.
- Link an existing email template from the module's template folder, or create a new one if needed.
- Specify email addresses in the From and Reply To fields. You can choose from the following options:
- Your account email address
- Organization email address
- Record owner's email address
- Current user's email address
- Another user's email address
- Click Save and Associate.
- Click Save to save the workflow.
4.4 Activities : Add Tasks, Meetings, or Schedule Calls
Once you have set up the trigger and conditions for the workflow rule, you can add different activities as actions. Meetings and calls can be added as Instant actions, while tasks can be added either as instant actions or scheduled for later. This allows you to choose whether to handle tasks, meetings, or calls right away or plan them for a specific time, depending on your workflow needs.
Add a Task
A task assigns an activity to a user. When you link a task to the workflow rule, the system assigns it to the specified user once the rule is triggered for records that meet the criteria. You can add a task in both instant actions and schedules actions.
To create a workflow task:
- Depending on whether you want an instant or scheduled action, click on Instant Actions > Activities > Add Task or Scheduled Actions > Task.
- If you want to associate an already defined task, select the task and click on Associate.
- If you want to create a new task and associate it with the workflow, Click + New Task.
- In the New Task window, follow these steps:
- Enter a Subject for the task. Insert merge fields (#) to create dynamic task subjects.
- Specify the Due Date for completing the task.
- Choose the Status of the task from the drop-down list.
- Set the task Priority from the drop-down list.
- Assign the task to a user by selecting from the Assigned To lookup list.
- Check the Notify Assignee box to send an email notification to the task owner.
- Check the Remind Assignee box to send a reminder to the task owner.
- Enter the task Description.
- Click Save and Associate.
- Click Save to save the workflow.
Add a Meeting
- Navigate to Instant Actions and choose Activities > Add Meeting.
- On the Add Meeting page:
- Enter a title for the meeting.
- Set the meeting time and duration by selecting the desired start time and interval in the From field.
- Choose the duration and specify whether it is in minutes or hours.
- If the meeting will last all day, check the All day option.
- In the Host field, assign a user to lead the meeting.
- If there's a chance the host might be unavailable, you can check the If the host is unavailable box to either create a task or assign the meeting to the record owner.
- If additional information needs to be included in the meeting invite:
- Click the Add more fields button.
- Select any additional fields you want to include, such as participants, location, contact names, participant reminders, and meeting agenda.
- Click Save.
Schedule a Call
- Navigate to Instant Actions and choose Activities > Schedule a Call.
- On the Schedule a Call page, specify the following:
- Call Start Time and interval for scheduling.
- Assign the Call Owner.
- Select the reason for the call from the Call Purpose picklist.
- Describe the Call Agenda.
- For additional details, click on Add more fields to include information like the subject or to add a reminder.
- Click Save.
4.5 Create a Record
You can set up instant or scheduled actions to create records based on specific conditions. For instance:
- Automatically generate a purchase order when the vendor status changes to approved.
- Create a follow-up task three days after a customer service request is logged.
You can create records in both standard and custom modules. Supported standard modules include Orders, Vendors, Accounts, Invoices, and Support Tickets. The action can be triggered by a record update or based on a specified Date/Time field.
When configuring the rule:
- Select the module where the new record should be created.
- Select the layout in which the new record should be created.
- Choose the record owner, either the logged-in user or another user in the system. You can also assign the record to a user referenced by a lookup field in the layout. For example, if the Vendors module includes a user lookup for Accounts or Support Teams, you can assign the record owner from these related modules. Custom user fields can also be used as long as they are single-user fields.
- Provide values for fields such as order number, total amount, etc. These values will be pre-filled in the new record. By default, mandatory fields from the layout will appear here, but you can add more fields and input values as needed, either manually or using merge fields. For example, you can use merge fields to populate the email address automatically.
- Click Save.
Only one Create Record action can be defined per condition. When additional fields are added to the Create Record action, those fields will be required to complete the action.
4.6 Webhook
Webhooks enable integration with external applications by sending real-time web notifications, along with relevant data, whenever specified events occur. You can either associate an existing webhook to the workflow rule, or create a new one and associate with the rule.
To associate a webhook action:
- Navigate to Instant Actions or Scheduled Actions and choose Webhook.
- If you want to associate an already existing webhook, select from the list, and click Associate.
- If you want to add a new webhook and associate it with the workflow rule,
- Click on + New Webhook
- Specify a Name for the webhook.
- Add a description.
- Choose the method as POST, GET, PUT or DELETE.
- Specify the notification URL.
- If required, add Module Parameters and/or Custom Parameters.
- Select the body type and specify the body.
- Click on Save and Associate.
- Save the workflow rule.
4.7 Function
You can trigger a function when a workflow rule is executed. Functions allow you to automate complex tasks, such as updating data in related modules or integrating with third-party applications. When a record meets the criteria set in the workflow, the function is automatically executed to update the relevant records. These functions are created using Deluge Script, Zoho's scripting language, enabling you to automate a wide range of business processes.
To add and associate a function:
- Navigate to Instant Actions or Scheduled Actions and choose Function.
- If you want to associate an existing function, choose the function and click on Associate.
- If you want to add a new function and associate it with the workflow rule:
- Specify the Function Name.
- Specify a Display Name.
- Give a description for your function and click Create.
- In the function editor, add your function code, and click on Save.
- Click Save to save the workflow rule.
- You can create up to 5 scheduled actions for a single workflow rule. Each of these actions can include a maximum of five email notifications, five tasks, five field updates, five custom functions, and five webhooks.
- For each workflow rule, you can associate a total of six custom functions and six webhooks—1 as an instant action and 5 as scheduled actions.
- If the Email Opt-Out option is enabled, emails will not be sent to customers. If the daily email limit is reached, any remaining emails scheduled for that day will not be sent.
- Scheduled actions may experience a brief delay of a few minutes before they are triggered, especially if the calculated execution time is in the past.
- Actions scheduled for a record will appear under the Upcoming Actions section on the record's details page.
- You cannot save scheduled actions until you assign values to all mandatory fields within a meeting or call layout.
Instances When Scheduled Actions Will Be Deleted or Not Rescheduled:
- When the execution criteria for a rule are set to Edit or Create or Edit, and a record no longer meets the criteria after an edit, the previously scheduled actions will not be rescheduled.
- If a record is deleted, all scheduled actions for that record will be removed as well. If the deleted record is later restored, the scheduled actions will not be rescheduled.
Instances When Scheduled Actions Will Not Be Executed:
- If an event is cancelled, any scheduled actions linked to that event will not be executed.
- When a lead is converted, any scheduled actions associated with that lead will not be executed.
Lock Workflows
You can lock a workflow rule when you want to make sure no more changes are made to the rule. Once a rule is locked, one has to unlock the rule to edit it again. A locked rule sends out the message to fellow administrators that it is not meant to be edited unless absolutely required. A workflow rule can be locked after it has been created.
Note: For workflow rules published from the developer console, the lock workflow feature does not directly affect the subscriber, as they cannot edit the workflow. However, for workflows created by the subscriber, the lock feature functions as intended.
To lock a workflow rule:
- Log in to Zoho Developer Console and click Vertical Solutions.
- Select the application you would like to modify and click Edit.
- Click Automate in the left pane and select Workflow.
- Select the workflow rule you want to lock.
- Click on the lock icon near the rule name in the workflow rule page.
- Give a brief description of why you want to lock the rule.
- Click on Lock.
To unlock a locked workflow rule, click on the lock icon near the rule name.
Packaged Workflows
Packaged Workflows are workflows that are created in the console by a developer and deployed to the subscriber orgs during signup or through upgrade. The following content explains how these workflows behave in subscriber orgs.
Tip: To know more about packaging, please refer to our help guide : Components Packaging in Zoho Solutions Platform.
The table outlines the behaviour of packaged Workflows.
Property | Upgrade Type | Modify Access |
Workflow Rule(Includes it's trigger, conditions, and actions) | Upgradable | Developer Editable |
Workflow Status | Not Upgradable | Developer and Subscriber Editable |
Order of WorkFlows* | Not Upgradable | Developer and Subscriber Editable |
*Workflows in the subscriber org are ordered based on their Created Time, with the earliest created workflows appearing at the top and executed in sequence. For packaged workflows, they follow the same sequence as they were in the developer console.
Note:
The 'locked status' of Workflows cannot be packaged. By default, all workflows are deployed in the subscriber org in an unlocked, read-only mode.
Changes and Impacts
When a packaged Workflow Rule is modified, published, and pushed as an upgrade to the subscribers' accounts, the impacts to the existing records in their orgs, such as leads, contacts, etc, are as follows:
- Adding a new Workflow Rule: The newly added workflow rule will be replicated in the subscriber's account. Both existing and new records that meet the trigger conditions will have these workflows executed.
- Editing a Workflow Rule: Any changes made to the workflow rule will be reflected in the subscriber's account. If the criteria are updated, only records that meet the revised criteria will have the workflow executed.
- Deleting a Workflow Rule: The workflow rule will be removed from the subscriber's account. Records that previously met the conditions will no longer trigger the workflow.