Setting Up Zoho Voice
To start receiving and making calls, you will need to:
- Buy voice credits from our store.
- Purchase a phone number.
- Assign phone numbers to your agents directly, or route calls to specific agents using call queue or IVR flow.
- Add all your contacts to the Contacts page.
- Use the Zoho Voice dial pad to initiate or receive calls.
All the configurations related to the phone numbers and users in your Zoho Voice account need to be made from your Zoho Voice web app.
Adding Credits
Zoho Voice uses voice credits as a payment source for:
- Phone number purchase and monthly rental (Based on the type of number, and country)
- Inbound calls (Based on which country number you use. Incoming is free for Personal numbers)
- Outbound calls (Based on which destination you call)
- Missed calls and Voicemail (Per minute incoming charge for that number)
- Forwarded calls (Based on destination number to which call is forwarded)
- Call recording (0.0025 credits/min)
- Storage (0.0005 credits/min/month)
- Voicemail transcription (0.05 credits/min)
Your credit balance will be $0 when you open your account, please click the 'Ask Free Credits' button for us to enable it from our end.
Your credit balance is displayed in the top-right corner of the Zoho Voice app. To top up your credit balance:
- Log in to your Zoho Voice account.
- Go to Settings > Subscription, and then Buy credits.
- Enter the number of credits you want to purchase and click the Buy Credits button. This will take you to Zoho Payments page.
- Enter the required details such as name, billing address, and credit card details and complete the purchase process.
- The selected number of credits will be added to your Zoho Voice account.

While you're on the Trial, you can only use the free credits to make outbound test calls. To purchase credits and numbers, you need to be on the Solo plan or any other paid plans. To start with Solo plan, please select the Solo plan in the store and then buy credits from the add-on section.

Only the Admins can purchase phone numbers and voice credits.
Low Credit Notifications
You can set a reminder to notify you when the credit balance is low.
Zoho Voice sends you 3 reminders. You can choose when you want to get notified.
To configure low credit notifications:
- Go to My Profile.
- Turn on Low Credit Notification.
- Enter the credit balances in descending order.
- You will receive notifications when your credit balance hits the defined 3 values.
All 3 values are mandatory. Reminders can be configured only for a credit balance of 100 or less.
Buying a Number
The next step after adding users to your account is to purchase a number to receive and make calls. Zoho Voice offers three types of phone numbers:
- Personal numbers
- Local numbers
- Toll-free numbers
Read more about the different types of numbers and their capabilities
HERE.
To purchase a number:
- Go to the Numbers page.
- Select the type of number you want, and select the country the number is associated with.
- Click Search . A list of available numbers will be displayed.
- Click Buy Number to buy the number you want.
- Enter a Display Name for the number for easy identification.
- Select the agents for whom you want to assign this number as the default outgoing number.
- Click Buy and complete the payment using credits.
You can purchase as many phone numbers as you want.
You cannot purchase numbers while on a Trial using the free credits.
Adding Agents
Once you buy a number, you will have to assign agents who WILL make and receive calls from that number. Agents are users in Zoho Voice. Once you add users to your Zoho Voice account, they will be automatically listed in the Users page under Zoho Voice .
Editing or Deleting an Agent
You can edit an agent's details by clicking the Edit button. You can also delete a user from your list of agents by clicking the Menu > Delete button.
Once an agent is added to the Zoho Voice service, their status will be Completed. You can also send the email verification email again, if the user hasn't verified their email yet.
Agent Status Customization
You can manually or automatically change your status and the status of your agents.
Manual Update
You can manually change your status when you're unavailable to pick calls. This can be done in the Zoho Voice dial pad.
The different status available are:
- Available
- On Break
- Busy
- Offline
You can mark your status accordingly. When you're on a call, Zoho Voice shows your status as 'On a Call'. This cannot be manually changed.
You can also manually change the status of your agents on-demand. Go to Users page and click on the status and change it to the desired status.
Auto Update
1. Maximum Unanswered Calls Limit
You can automatically change the status of an agent to 'On break' if the agent fails to answer a defined number of calls.
To set a limit to the maximum number of unanswered calls before changing the status:
- Go to Users tab.
- Select the agent and click Edit.
- Under Agent Status Customization, set a number for Max Unanswered Calls.
You can set the max number of unanswered calls ranging from a minimum of 1 min to a maximum of 10 mins.
This setting is applicable only to queue calls. It is not applicable to unanswered calls that are directly assigned to the agent.
2. Call Wrap Up Time
You can allot a certain time period for the agent to wrap up all the activities related to the last call, and be ready for the next call.
To set up call wrap up time:
- Go to Users tab.
- Select the agent and click Edit.
- Under Agent Status Customization, set a time period for Call Wrap Up Time.
You can set a call wrap up time ranging from a minimum of 1 min to a maximum of 10 mins.
This setting is applicable only to queue calls. It is not applicable to unanswered calls that are directly assigned to the agent.
Agent-to-Agent Calling
You can call other users in your account by searching their name in the dial pad and then clicking the call button. This call will be a VoIP call, not a PSTN call. Agent-to-agent calling is free.
Call Config: Enabling Incoming and Outgoing Services
Zoho Voice provides incoming and outgoing calls as separate services. You can enable or disable these services separately from the Config page.
Log in to your account and go to the Config page.
Click on the number and then click the +Edit Phone Config button in the top-right corner.
Click the Incoming Calls tab. This shows whether incoming service is enabled or not, and allows you to enable or disable it
Follow the same process for outgoing service by clicking the Outgoing Calls tab.
If you disable a service for a particular number, the agents assigned to that number will not be able to use it.
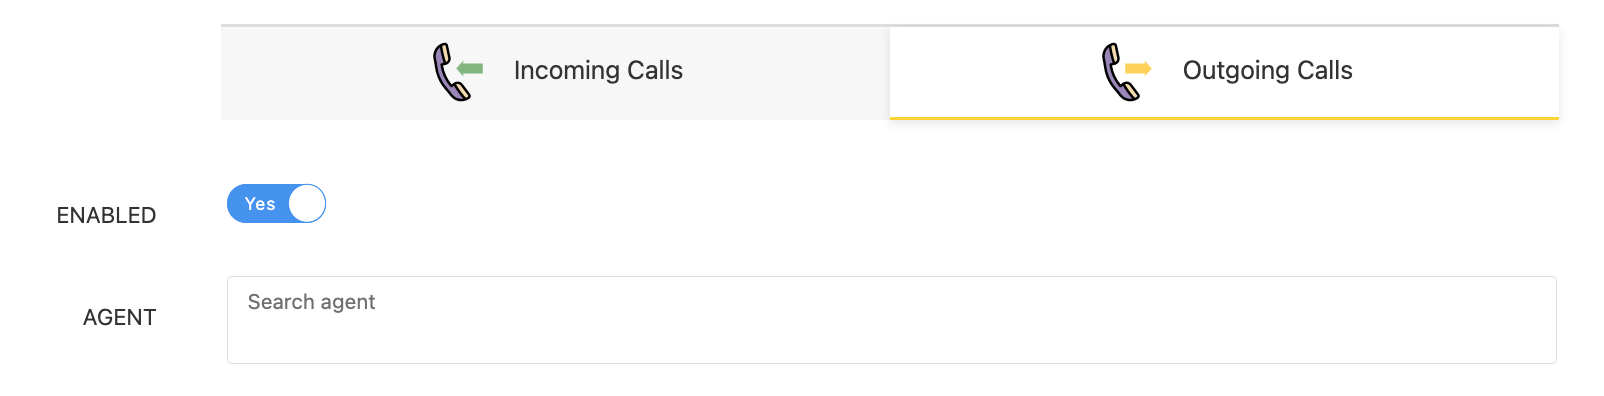
Configuring Outgoing Service
You can assign a phone number to an agent so they can make outbound calls using it.
To assign a number:
- Go to Call Config page.
- Select the Outgoing tab.
- Enable outgoing calls for this number.
- Select the agents to whom you want to assign this number for outgoing calls.
- Click Save.
 Outgoing configuration
Local numbers and Toll-Free numbers are assigned to the Super Admin and all Admins by default. You don't have to select them under the agent selection section.
Configuring Incoming Calls
You can assign incoming calls to a number in the following ways - Agent, IVR, Queue, Extension Dialing, and Call Forwarding.
1. Directly to an Agent
- Go to Call Config and select the number you want to configure.
- In the incoming tab, select the drop-down menu under Mode.
- Select Agent as the Mode and select the agent you want to assign to that number.
- This agent will receive calls made to this number.
2. IVR for Incoming Calls
Zoho Voice allows you to configure IVR (Interactive Voice Response) for a phone number and respond to your callers with a pre-recorded audio file. Callers can use the menu to select their required service and calls will be assigned to the right agents.
How to Create IVRs
- Go to the Call Config page and click the Edit Config button for the required number.
- Select IVR as the Mode.
- Click Create New IVR.
- Enter a name for the IVR configuration and then type in the announcement message that your callers will hear when they call this number.
- Create the required IVR menu using the IVR creator. You can use text or audio to configure IVRs.
- If you have already created an IVR that you want to use for this number, click Clone From Existing and select the number associated with that IVR configuration.
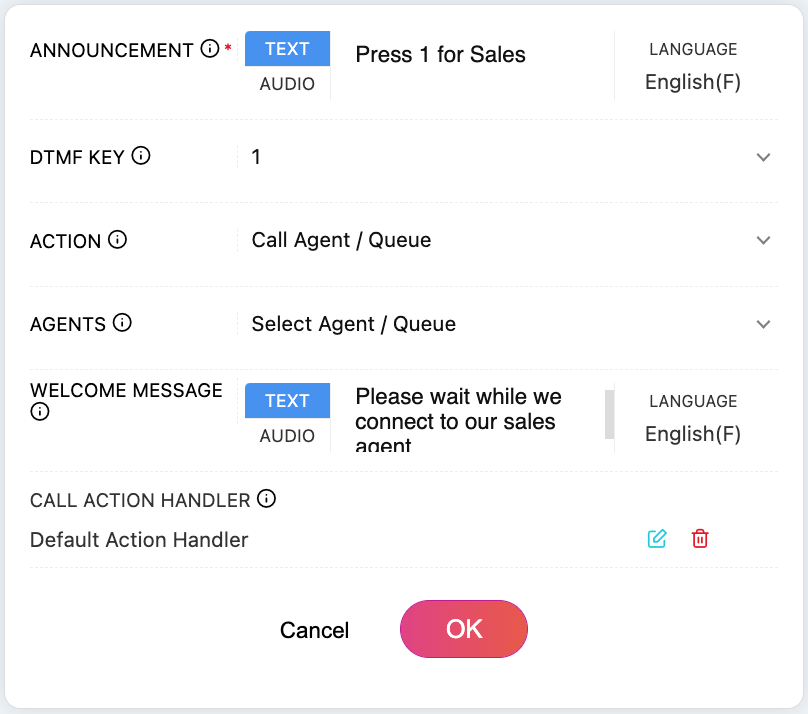
IVR
Announcement
This is the announcement message for that particular IVR level.
Key
Select a key for the menu. Key can be a number from 0 to 9, ' *', or '#'.
Action
The selected key can be assigned to an IVR menu or you can route the call directly to an agent or a group of agents using call queues when callers press that key. You can also forward calls to a different number.In later levels of configuration, you can assign a key to get back to the previous menu or the main menu.
Message
This is the message that the caller will hear after they click the key to select this menu.
Multi-level IVR
You can add multiple levels of IVR if required. Select the Play IVR option in the first level to direct the callers to the next level of IVR.
Assigning Calls
In the final level, when you need to route the calls to agents, select Call Agent/Queue as the Type and then select the agent or queue to receive the calls.
If you select a queue consisting of agents who are not assigned to the relevant phone number, they will still be able to receive calls assigned to them in the IVR.
Call Action Handler
You can use the Call Action Handler to define what to do when an agent is busy or offline. You can divert the call to sub-agents or ask the caller to leave a voicemail.
Sub-agents: If an agent is busy or offline, the substitute agent selected in this section will receive the call.
Voicemail: If this is selected, the caller will be asked to leave a voicemail if an agent is busy or offline.
IVR Profile: Cloning
You can clone an IVR profile you have already configured for a number and use it for a different number.
- Go to the Config page and edit a number.
- Select IVR under Mode
- Click Clone IVR in the IVR Profile section and select the required IVR configuration to be used for the number.
When cloning an IVR, even if there are agents or queues in the IVR who the new number is not assigned to, they will still be able to answer the calls assigned to them in that IVR.
3. Call Queues
Zoho Voice allows you to group your agents by creating call queues, so that calls can be routed to the relevant team.
Adding a Queue
- Log in to your account and go to Queues.
- Click +Add Queue in the top-right corner.
- Enter a Queue Name.
- Enter a Queue Email Address. This should be a group email address with all the members of the queue included in it.
- Choose if you want to be notified for all missed calls or just the missed calls with voicemails. You can also choose not to get notified. Notifications will be sent to the Queue email address.
- Upload a queue hold music, or choose from the already uploaded files.
- Create a new Queue audio profile for this queue. (Queue audio profile configuration is explained in the section below.)
- Choose the Max wait time, Ring type, and the Agents in the queue.
- Click Save to create the queue with the selected agents.
- You can edit or delete a queue by clicking the buttons next to the queue in the list.
Queue music on hold and queue audio profile configuration are available only in the Enterprise Telephony edition (Basic, Standard, and Contact Center)
Max Waiting Time (Queue)
You can choose how long a caller should wait in the call queue when the agents in the queue are unavailable (on a break, in a call, etc). After the specified time, the call will be transferred to the sub-agents or voicemail according to the call action handler configured.
Max Waiting Time (Agents Offline)
You can choose how long a caller should wait in the call queue when the agents in the queue are offline. After the specified time, the call will be transferred to the sub-agents or voicemail according to the call action handler configured.
Ring Selector
You can select how you want to route the calls inside the queue. The order in which you select the agents in the Agents selection box is the order followed for the ringing type you select.
1. Top down
The call is always routed to the agent in position 1. If the agent rejects or does not answer, the call is then routed to the agent in the next position, and so on.
2. Ring progressively
The call is first routed to the agent in position 1. After 10 seconds, if the agent does not attend the call, the call is routed to the agent in position 2, but for the agent in position 1 the ringing still continues. The ringing proceeds progressively until it is ringing for all agents or one of the agents attends the call.

Note: For every agent, the call rings for 30 seconds, then there is a 20-second break, and then it rings again for 30 seconds. This cycle repeats until someone picks up the call. If an agent rejects the call, the ringing stops immediately, then there is a 20-second break, and then it rings again for that agent.
3. Round Robin
The calls are routed to the agents in a round robin fashion. The first call is routed to the agent in position 1, the next call is routed to the agent in position 2, and so on.
4. Simultaneous
All agents receive the call simultaneously. The ringing continues for all agents until one of them attends the call.
Queue Music on Hold
You can choose what audio your callers have to listen to when they're waiting in the queue. You can upload a new audio file or choose from already uploaded files.
Queue Audio Profile
To manage the announcement messages for a queue, you need to create a Queue Audio Profile. You can create a queue audio profile and assign it to multiple queues.
Welcome Greetings
This message is played when the caller enters a call queue. You can configure a text-to-speech message or upload an audio file to be played to greet the callers.
Custom Announcement
While callers wait in the queue, if you need to play any custom announcements about your business or any current offers, you can configure it here. Custom announcement is repeated in configured time intervals.
Interval
This is the time interval between the greeting message, the custom announcement, status announcement, and queue breakout prompt message. The same time interval is followed for announcement repetitions.
Status Announcement
This is the announcement you make about the status of the call. You can configure separate message to announce if all agents are offline or busy. You can also announce it when the call gets connected to a particular agent so the caller will be ready for the call.
Queue Breakout Prompt
You can ask callers if they want to leave the call queue by pressing hash (#) in case they've been waiting in the queue for too long. This message text should contain the symbol # in it. Once they exit the queue, they will be directed to sub-agents or voicemail according to the Call Action Handler you configure. So, you need to enter the message accordingly.
Assigning Calls to Queues
You can only assign Queues to pick the incoming calls made to a Local or Toll-Free number. You cannot assign a queue to a Personal number since Personal numbers can be assigned to only one agent.
You can assign queues directly to a phone number or you can select a queue to attend calls in any of the IVR branches you configure.
To assign queues directly to a number:
- Go to Call Config page and select the phone number.
- Select Queues as the Mode.
- Select the Queue to which you want to assign calls received by this number.
- Click Save
To assign queues inside IVR:
- Go to Call Config page and select the phone number.
- Select IVR as the Mode.
- Create a new IVR.
- While configuring a the last level, select Agents/Queues.
- Select the required queue.
4. Extension Dialing
To set an extension number for an agent, click the Edit button and add the extension number. Extension numbers can be used to land the incoming calls to a particular agent.
To enable Extension Dialing:
1. Go to Call Config page and select the number for which you want to enable extension calling.
2. In the incoming tab, click the drop-down menu under Mode.
3. Select Dial Extension.
4. Click Save.
Now, if a caller calls this particular number, they will be asked to dial in an extension number. Upon entering, the call will be automatically routed to the respective agent.
Please make sure that your callers know in advance the extension number of the required agent.
5. Call Forwarding
You can forward calls you receive on a Zoho Voice number to another phone number. This number can be a mobile number, landline number, or even another Zoho Voice number.
How to forward calls to another number?
1. Go to Call Config and select the Zoho Voice number for which you want to configure call forwarding.
2. In the incoming tab, select the drop-down menu under Mode.
3. Select Forward.
4. Enter the phone number to which you want to forward calls that are made to this number.
5. Click Save.
How is a forwarded call charged?
Forwarded calls are considered as outbound calls. So, in addition to the incoming charges for the Zoho Voice number, outgoing charges are applicable according to the number to which the call is forwarded.
Let's say, you have an US number in Zoho Voice, and you have configured calls to be forwarded to an US mobile number. Now, the per min charges will be 0.0085+0.0125=0.021 credits/min, in which 0.0085/min is the receiving charges for a Zoho Voice US number and 0.0125/min is the outgoing charges to a US mobile number.
You can forward calls from Zoho Voice Personal, Local, and Toll-free numbers to any mobile number, landline number, or another Zoho Voice number.
When you forward a call from a Zoho Voice number to another Zoho Voice number, you will be charged thrice.
i) Receiving the call using Number-1
ii) Making an outgoing call from Number-1 to Number-2
iii) Receiving the call using Number-2
You can also set up call forwarding inside Call Action Handler and forward calls only when agents are unavailable.
While configuring Business Hours, you can create an Off-Duty Call Action Handler and forward calls to another number during off-duty hours.
Text and Audio Messages
Zoho Voice allows you to add text-to speech messages or upload an audio files to be played for all the announcements you need to play to your callers.
1. Welcome Message
Configure a welcome message using text-to-speech or upload a custom audio file to be played when callers call a number. Greet them with a warm message.
When you configure an IVR, welcome message will be played first and then the announcement message of the first level of IVR will be played. Enter the message appropriately.
2. Good Bye Message
Configure a good bye message to play after you disconnect the call. You can use text-to-speech or upload an audio file to configure messages.
3. Feedback Message
Configure a message to be played requesting your caller to give a feedback about the quality of service provided.
4. Call Recording Notification Message
You can configure a message to notify your callers or recipients that you will be recording the call for quality purposes. Some countries mandate this notification. Please configure accordingly.
5. Off-Duty Hour Message
You can configure an off-duty message to be played when this number receives a call during off-duty hours.
6. Holiday Message
Configure a message to be played when you receive calls on a holiday. This message is specific to each holiday. See detailed steps to configure Holidays in the Holidays section below.
Text-To-Speech Mode
You can configure all the messages in Zoho Voice using text-to-speech or by uploading an audio file. To configure your messages using our text-to-speech engine, simply type the text in the text box and select the language and voice. The messages will be played based on the configurations.
Language Selection
Zoho Voice supports text-to-speech in 16 languages. Enter your message in English, Chinese, Danish, Dutch, Finnish, French, German, Italian, Japanese, Norwegian, Polish, Portuguese, Russian, Spanish, Swedish, or Turkish. Make sure you select the correct language from the language selection box.
Voice Selection
You can select between a Male and Female voice for your text-to-speech messages.
Audio Mode
You can record a custom audio and upload that audio file in Zoho Voice to configure all the messages including welcome, goodbye, feedback, call recording notification, off-duty hours, holidays, and IVR messages.
You can also play the uploaded audio using the play button.
All the uploaded audio files will be present in Settings > Audio Files. You can delete or download the audio file from this page.
The audio file you upload in a specific level of IVR will be used for all the menus in that particular level. You don't have to upload separate audio files for every announcement message in a single level of IVR. Eg: You can have menu announcements "Press 1 for support. Press 2 for Sales. Press 3 for Billing" in the same audio file.
Zoho Voice supports only .mp3 and .wav audio formats.
Business Hours
Define timezone-specific working hours for each phone number and route calls only during business hours. You can add new business hour configuration or select an already configured business hours.
To configure business hours:
- Go to Call Config page and select the phone number
- Under Business Hours, you can choose the default business hours (24x7) or create new.
- Click Create New to configure a new business hour config for this number.
- Enter a name for the config.
- Select the timezone for the business hours.
- Select the on-duty days and select the working hours.
- You can add breaks by clicking the Add Hours.
Holidays
You can also select the holidays and route calls accordingly.
- To add holidays:
- Open the business hours configuration.
- Click Add Holiday under Holidays.
- Zoho Voice shows a list of Regional Holidays for you to choose from. Eg: US Holidays.
- Select a holiday list. This shows all the holidays in that selected list. Eg: Flag Day, Father's Day, etc.
- Click Add+ if you want to add a particular holiday to your holiday list.
- Enter a message to be played when users call you on holidays.
- Click Save.
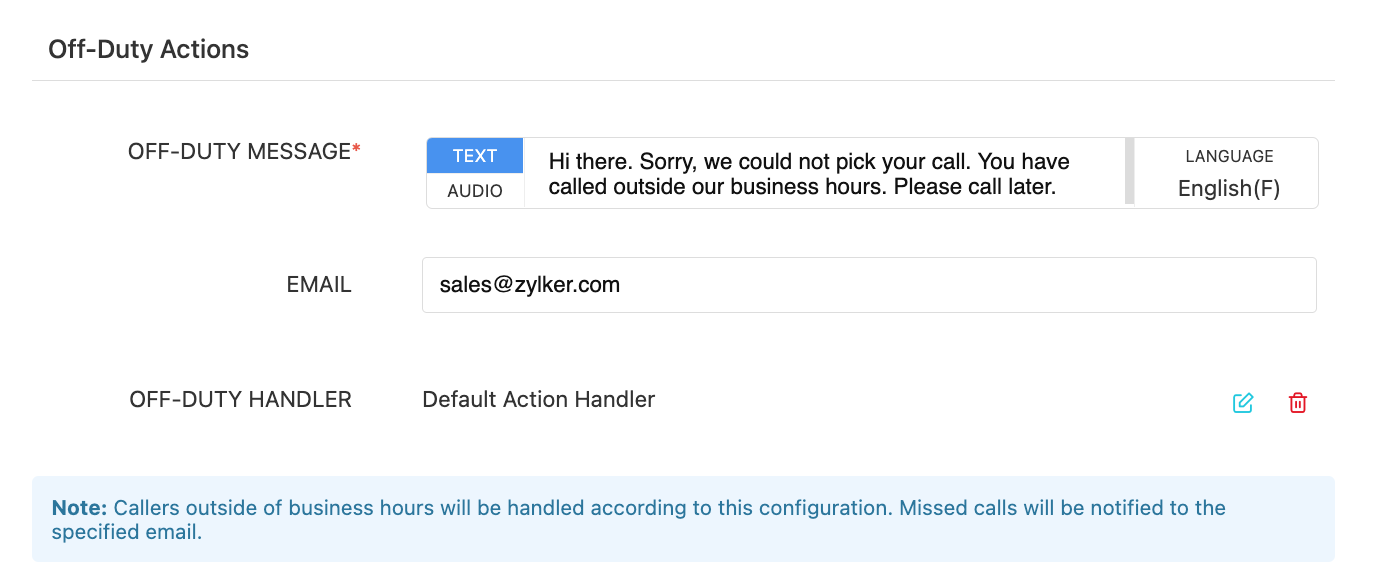
Off-Duty Hour Settings
You can configure an off-duty message to be played when this number receives a call during off-duty hours.
Missed call notifications and voicemails will be sent to the email address you configure here.
You can also set up a Call Action Handler to divert the calls to sub-agents, forward to another phone number, or ask your callers to leave a voicemail.
Call Action Handler
Call Action Handler allows you to perform various actions when agents are busy or unavailable to pick up the call. The three actions you can perform are:
Leave Voicemail
When an agent/queue is unavailable to pick a call, you can direct the call to voicemail. Enter a message requesting your callers to leave a voicemail.
Transfer to Sub-Agents
When an agent/queue is unavailable to pick a call, you can direct the call to another sub-agent/queue. In case, the sub-agent is also busy, you can ask the caller to leave a voicemail.
1. When calls are assigned directly to an agent, you can select only another sub-agent to pick the call when primary agent is unavailable. You cannot choose a queue.
2. When calls are assigned to a queue/IVR, you can select a sub-agent or a sub-queue to attend the call when the agents in the primary queue or the IVR are unavailable.
Forward Calls to Another Number
Configure a landline, mobile, or Zoho Voice number and forward calls to that number when the primary agent/queue is unavailable to pick the call.
Call Action Handler can be configured for the following:
1. Phone Numbers - To handle calls when they are directly assigned to Agent, Queues, or Extensions, and the agent/queue is unavailable.
2. Inside IVRs - To handle calls when agents/queues inside the IVR are unavailable.
3. Off-Duty Hours - To handle calls when callers call during off-duty hours.
The Zoho Voice Contacts module allows you to add your contacts to your account so you can make calls to them easily.
Contacts can be added by uploading from an existing contact list in CSV format, or by adding new contacts in the Contacts page.
1. Go to Contacts > Add
2. Enter the contact details and click Save. Mark the contact as Favourite if you want to add the contact to the Favourites list.
3. You can also add the contact to the Contacts list and then mark it as Favourite .
4. If it is a spam contact, add it to the Spam list by marking the contact as spam as shown below.
You can import contact from an existing CSV file containing all your contacts. You can import data only in CSV format with file size less than 2 MB. First row of the given file will be treated as field names.
1. Go to Contacts > Import
2. Click the Upload your File button and select the file you want to upload.
3. You can also download a sample CSV file from that page and use it to properly format the file you want to upload.
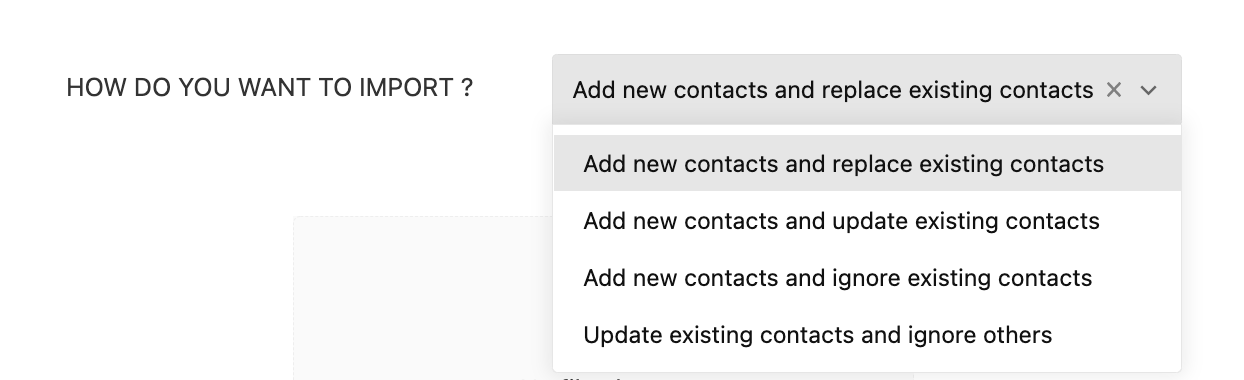
4. While importing, you have 4 options
- Add all the new contacts and replace the existing contacts. Existing contacts will be replaced with the new contact entries found in the CSV file.
- Add all the new contacts and update the existing contacts. If an existing contact's details are different, it will be updated.
- Add all the new contacts and ignore the existing contacts. No changes will be made to the existing contacts.
- Update existing contacts and ignore others. Only the existing contacts will be updated. No new contacts will be added.
5. Once you have added all your contacts, you can initiate a call from the contacts page by clicking on the call button next to the phone number.
6. You can check out the recent call logs of a contact. Click the contact, then go to Recent Logs and check the logs.
ZDialer & Zoho Voice Dial pad
You can use Zoho Voice's dial pad and perform the actions mentioned in this section. If you want to use the ZDialer browser extension to perform these actions from any webpage, install the ZDialer browser extension for the browser that you use.
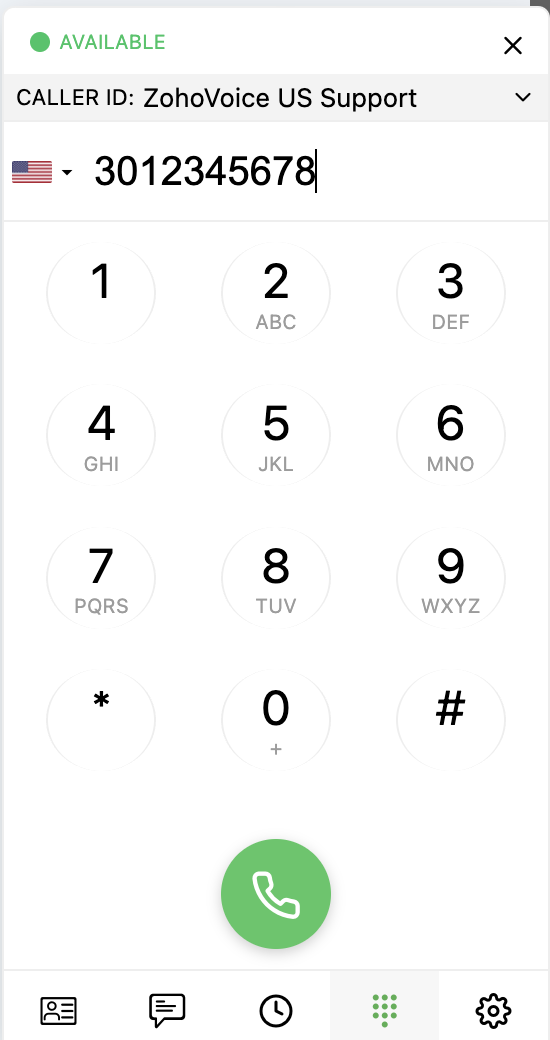
Dial pad - Making calls
You can make calls in Zoho Voice using the dial pad present at the bottom right corner. Click on the widget to open the dial pad. If you're using the browser extension, click on the widget icon in the webpage to open the dialer.
Select the caller ID from the list of purchased numbers, enter the country code, dial the number you want to call, and click the green button to initiate a call.
 dial pad
The dial pad and ZDialer have 4 menus - Contacts, SMS, Logs, and Settings.
This tab shows all your Zoho Voice contacts saved in Contacts page. You can click on a contact to initiate a call or send an SMS.
Dialer - SMS
This tab shows a minimized SMS inbox. You can view all your conversations, send and receive messages, and also initiate new conversations from this tab.
Dialer - Logs
This tab shows all the call logs historically. You can also switch to the Voicemail sub-tab to listen to your voicemails.
Dialer - Settings
You can configure your dialer settings from this tab.
Audio device: Choose your audio input and output devices, and test your audio to make sure that your devices are working properly.
Dark theme: If you want to have a dark themed dialer, enable the dark theme here.
Call stats report: Enable call stats to get reports on the latest call you made. This report has details on packet loss, jitter, and round trip time (RTT).
Debug logs: Enable debug logs if you want to send us the logs to diagnose any issues.
Integrations
Zoho Voice offers integrations with other Zoho apps such as Zoho CRM, Zoho Desk, Bigin, and Zoho One.
There are 2 modes of integrations:
Native Integrations
This is a type of integration where Zoho Voice directly integrates with CRM, Desk, and Bigin. Calls are managed using ZDialer.
Zoho Telephony(PhoneBridge) Integration
Zoho Telephony or PhoneBridge is an integration platform using which you can integrate any cloud-based phone system with other Zoho apps. You can choose your cloud telephony provider from a list of pre-integrated telephony providers. You can choose Zoho Voice as your cloud telephony provider and integrate it with other Zoho apps including Zoho One.
Power Dialer
Power dialer is a special feature offered by Zoho Voice, that allows you to automate outbound calls and help your agents reach more customers in a given time. It streamlines your outbound call campaigns, increases outbound call quota and boosts your agents' productivity by removing the wait time between calls to prospects.
To setup a Power Dialer in Zoho Voice:
- Go to the Power Dialer page and create a new campaign by clicking on Add New Campaign button.
- Create a Dial Group for the campaign either by uploading new contacts from a CSV file or choosing the existing contacts from Zoho Voice. Only a maximum of 1000 contacts are allowed to be uploaded in a Dial Group. If the number of contacts exceeds hundred, the list will not be loaded.
- Name the campaign and assign the campaign a specific snooze interval between 10 seconds to 300 seconds. By default 10 seconds is defined as the snooze interval for all the campaigns. The snooze timer starts counting down after the end of every call.
- Click Save to save the campaign. The campaign will be added to the list of campaigns in the Power Dialer page.
- On the Power Dialer page, click on the campaign name to get into the specific campaign.
- Inside the specific campaign page, click on the Start Campaign button to initiate the campaign.
- Select the specific outgoing phone number with which you want to make calls or choose Auto Select. Selecting Auto Select option during number selection, automatically chooses an outgoing number assigned to the agent that matches the country code of each of the prospects' phone numbers in the Dial Group. For contacts with no matching dialing numbers with the same country code, the calls are handled via a random number from the list of available dialing numbers.
- Once selected, you will receive an incoming call with the campaign name as caller ID. The incoming call is mainly triggered to confirm the device.
- Accept the call to initiate the campaign.
- You can pause or stop the campaign as per your requirements.
On clicking Pause Campaign or Stop Campaign, the current call of the campaign stays undisturbed until its termination and only then the campaign is paused or stopped. If the campaign is paused or stopped during the snooze time, the campaign is immediately paused or halted. Only the user who created the campaign can start the campaign. A campaign once started can be paused or stopped by the creator of the campaign, the Superadmin or Admins.
Power Dialer feature is included in the Contact Center plan. Users in other plans can add it as a feature add-on.
You can choose to add feature add-ons only for the users who need it.
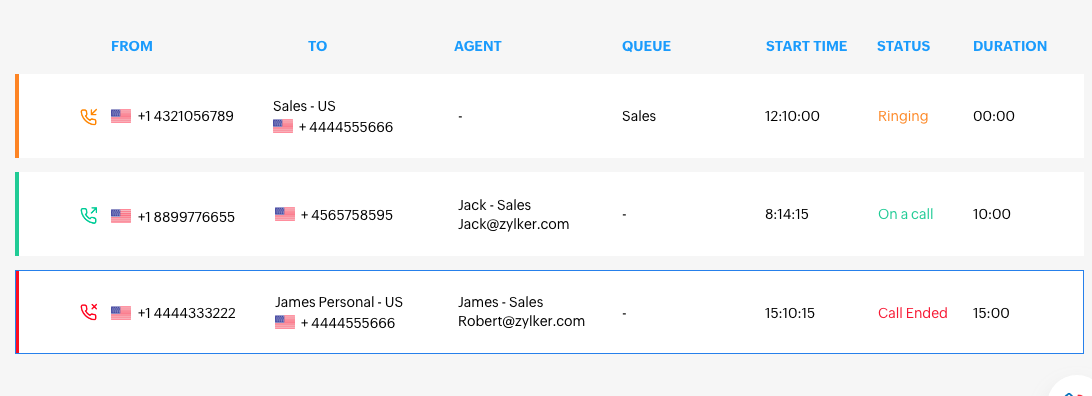
Live Call Monitoring
You can keep track of all the live calls in Zoho Voice. Go to the Live Calls page to see the following information:
The number the call is coming from, and number which received the call
Which agent placed or answered the call
Queue details
What time the call was made
Status of the call: ringing, on call, or hanging up
Call duration
 Live call monitoring
Call Barging: Listen, Whisper, and Takeover
Zoho Voice offers intuitive call monitoring with three modes to directly supervise your agents: Call Listening, Call Whispering, and Call Takeover (three-way conferencing). Admins and supervisors can intervene in real time and silently monitor conversations, coach and guide agents behind the scenes, and participate in the conversation with both the agent and the customer.
Listen: You can barge and silently listen to calls using the Call Barging (listen only) button available on the Live Calls page. Once the call is barged, an exclusive dial pad pops up with further options for the supervisor to whisper or initiate a three-way call with the agent and caller.
Whisper: When a live call is barged in Zoho Voice, the supervisor can choose to whisper essential details to the agent through a one-way conversation by clicking the Whisper button on the dial pad. This un-mutes the supervisor's line, enabling them to give audio instructions and hints exclusively to the agent. The agent can listen to the supervisor but cannot respond back. The customer is not even aware of the supervisor's whispers.
Takeover: The Call Takeover (three-way conferencing) mode, helps the supervisor intervene and participate in an ongoing live call making the agent-customer conversation into an ad-hoc conference, giving way to three-way interactions.
Call Barging feature is included in the Contact Center plan. Users in Basic and Standard plan can add Call Barging as a feature add-on.
You can choose to add feature add-ons only for the users who need it. For instance, admins and supervisors.
Call Transfer
Zoho Voice allows you to transfer calls to another agent if you need help with a customer's request. Attend the call from the caller, and then click the Transfer button and search for the Agent to whom you want to transfer the call and click to connect.
During this time the initial caller's call will be on hold. So, please mention this to the caller before you put them on hold. You can now talk to the agent and explain them about the request.
Once you have explained the request to your agent, you can put the caller back on the call and tell them that the other agent will take over.
Now, the call will be transferred and you will be disconnected. This can be seen in the Live Calls page.
The Logs page shows the details about the transferred calls.
Spam Number Blocking
Zoho Voice allows you to block spam numbers and add them to a Blocked List, so you don't receive calls from those numbers again.
To block numbers:
- Go to Settings > Number Blocking.
- Enter the phone number you want to block.
- Specify a reason why you want to block this number.
- Click Save.
You can also block a number from the logs page by clicking the Add to Blocklist button next to the number.
Call Recording
Zoho Voice has an option to record calls. You can choose to record incoming calls, outgoing calls, or both. To enable call recording:
Go to the Call Config module in the left sidebar menu of your Zoho Voice account.
In the Active tab, click the Edit Config icon next to the number you want to configure for incoming calls.
In the Incoming Calls tab, scroll down to the Call Recording Profile field.
To configure call recording profile:
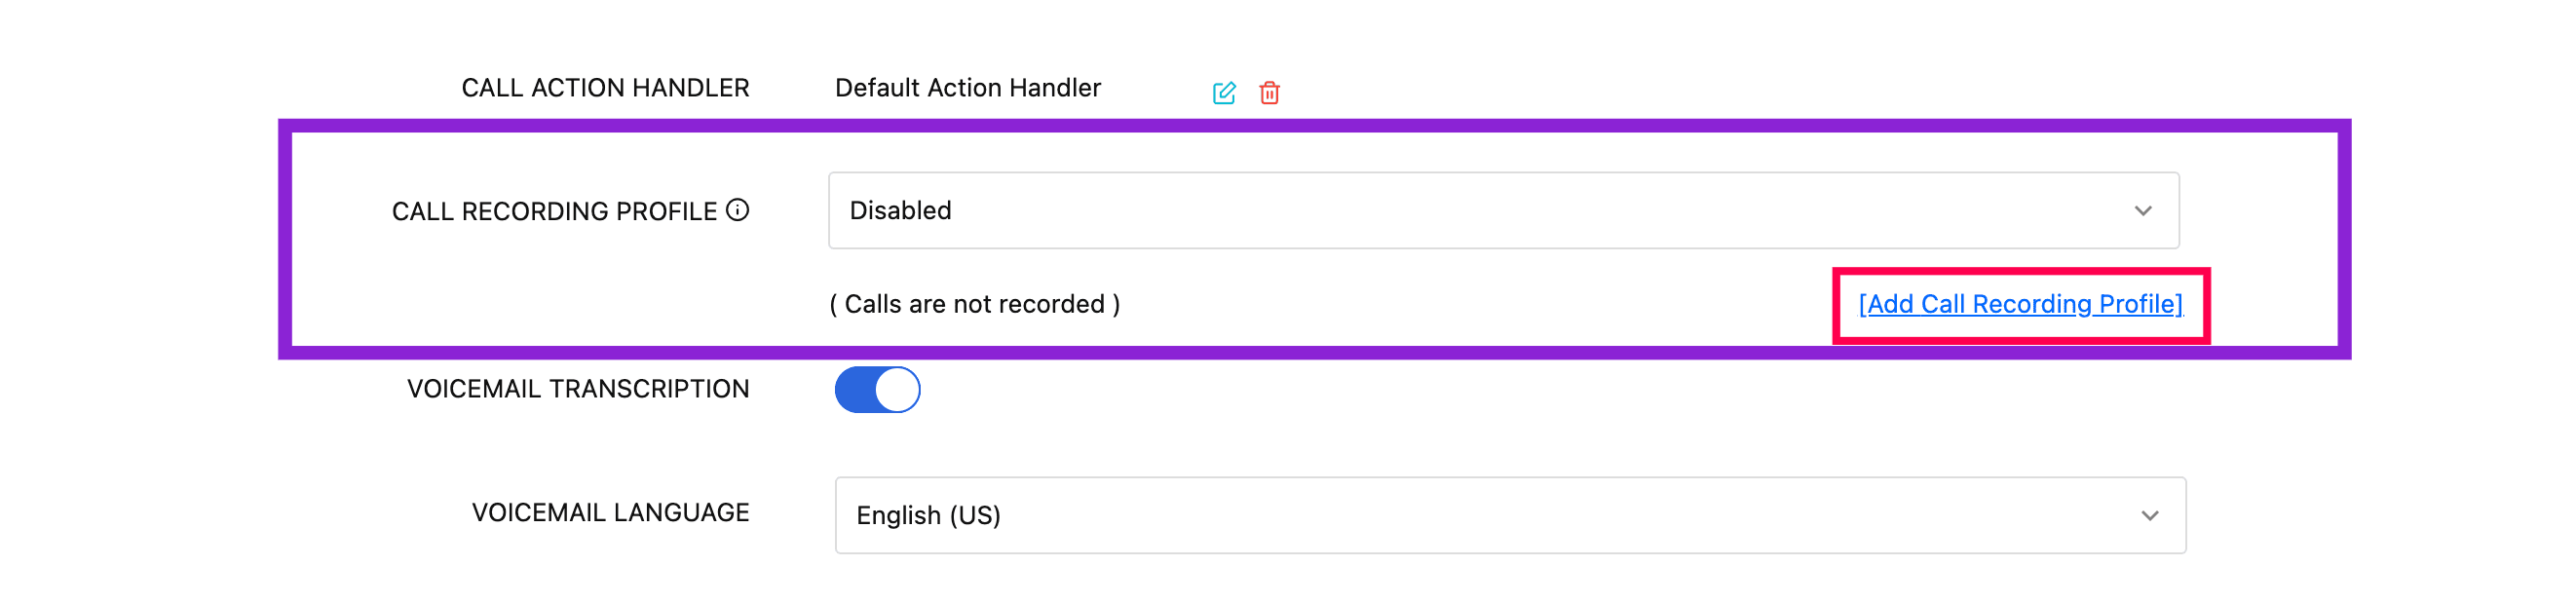
Note: Recording charges of 0.0025 credits/min and storage charges of 0.0005 credits/min/month applicable if recording is enabled.
This charge is not applicable for unlimited plans.
To create a call recording profile:
Note: This setting applies only if the Always configuration is selected.
Recording Message: This message will be played for callers before recording is initiated. You can choose either text or audio:
□ Text: Enter the message in the language selected for the configuration.
□ Audio: Click the Audio tab and select a file from the drop-down list. These are pre-uploaded files from Settings → Audio File page. If the required audio is not available, click the upload icon, name the file, and upload your audio. The created audio profile will be available in the drop-down for future use.
Note: Supported Audio files are mp3, wav, and channel is mono.
Note: When Restrict pause/resume is enabled, this option cannot be used.
Repeat Notification: Notify about call recording with repeated beeps or announcements or can opt-out.
Repeat Interval (sec): Set the interval at which the beep or notification must be repeated.
Channel: Select the type, either stereo or mono.
Note: Please make sure the configured notification messages are in line with the local regulations on call recording, notification, and consent.
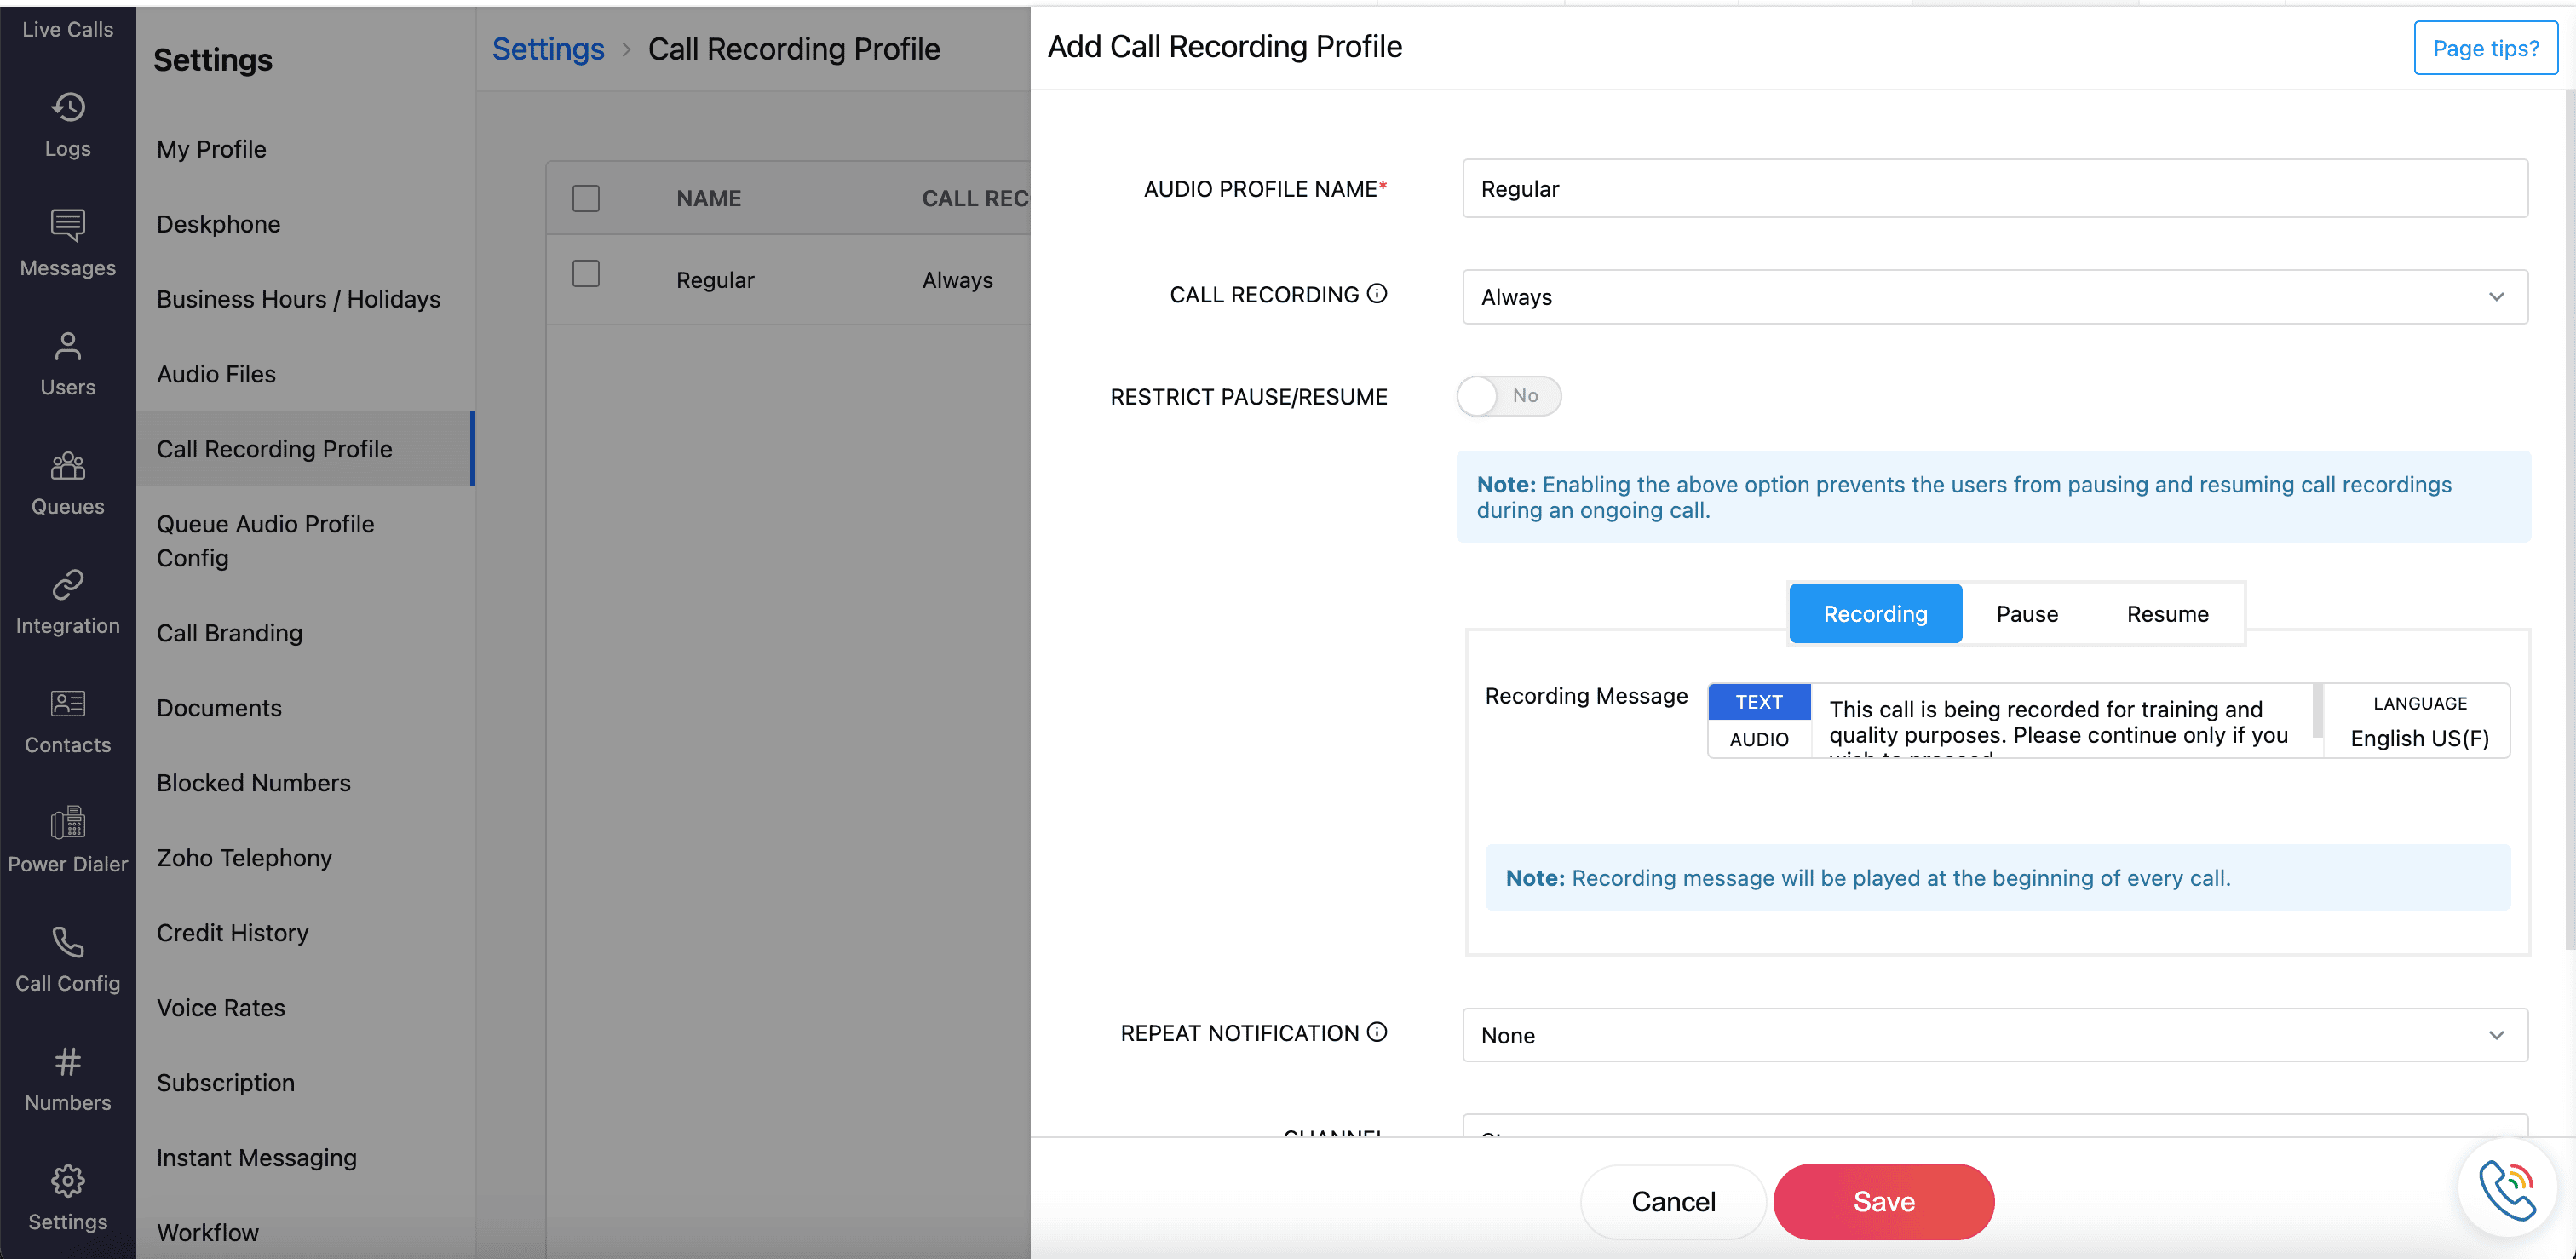
Click Save, once the required fields are mentioned.
Select the created profile from the dropdown.
Follow the same steps for outgoing calls.
You can also create multiple call recording profiles in advance in the Settings → Call Recording Profile page.

Admins can access all recordings from all numbers. Supervisors will only be able to access the recordings of technicians who are assigned to them. Technicians will only be able to access the recordings of calls placed or received from numbers that are assigned to them.
To comply with privacy laws, make sure you include a message telling your callers that the call is being recorded.
Voicemails
Zoho Voice allows you to request your callers to send voicemails. Voicemails can be configured using Call Action Handler.
You can check the voicemails in the Logs page, or you can receive email notifications for missed calls with the voicemails attached to the emails.
You can play or download the voicemail, listen to what your caller has to say, and then call them back using the call back button. You can also manually transcribe the voicemails using the Transcription option.
Email Notifications - Missed Calls/Voicemails
You can choose whether you want to receive email notifications for missed calls.
Email notifications can be configured:
- Only for missed calls with voicemail.
- For all missed calls irrespective of voicemail.
- No notifications for any missed call.
To configure missed call notifications:
- Go to Settings > My Profile.
- Under Email Notifications, select the notification preference.
Voicemail Transcription
Using Voicemail Transcription, you can instantly transcribe your voicemails into text, and reduce continuous audio into easily understandable textual data.
To configure voicemail transcription:
- Go to the Call Config page.
- Edit the number configuration and turn on Voicemail Transcription.
- Select the language in which your callers would speak in the voicemail.
- Voicemails will be transcribed to the language selected, and transcribed text will be in the same language.
When voicemail transcription is enabled, your agents automatically receive the voicemail audio and text via their respective email addresses or the specific queue email they have associations with—or they can access it directly from the Logs page.
On-Demand Transcription
You can also transcribe a voicemail on-demand by accessing it from the logs page and clicking the Transcribe button.
Supported Languages
Zoho Voice supports voicemail transcription in the following languages.
- English - US
- English - UK
- French - France
- Japanese
- Portuguese
- Spanish
Voicemail transcription charges of 0.05 credits/min is charged for transcribing a voicemail. If you delete a transcript and transcribe the same voicemail again, transcription charges will be charged again.
Voicemail Drop
The Voicemail Drop feature enables your agents to drop prerecorded voicemails when an outbound call is directed to the voicemail.
To drop a prerecorded voicemail:
- Make an outbound call.
- Wait till it directs you to the voicemail.
- Click the VM Drop button on the dial pad.
- Choose the desired voicemail from the list of prerecorded voicemails that you’ve already uploaded.
- The chosen voicemail is then dropped into the recipient’s voicemail box and the call is terminated.
How to upload an audio file for Voicemail Drop
- Go to Settings and select the Audio Files menu.
- Click on the Voicemail Drop tab.
- Click the +Upload Audio button to upload the required audio file.
- Enter a suitable name for the file.
- Click Upload.
Call Logs
You can search, view, and export call logs as PDF and CSV files to keep a record of your call logs.
Call logs can be filtered based:
Date
Caller number
Recipient number
Agent
Type of call: incoming, outgoing, or missed
Once the required log is displayed, click the Export dropdown button and select PDF or CSV to generate the report.
Admins can view and edit all logs of all numbers. Supervisors will only be able to view the logs for the technicians who are assigned to them. Technicians will only be able to view the logs for the numbers that are assigned to them.
Call recordings and voicemails for the calls can be played or downloaded from the Logs page.
Dashboard
Zoho Voice dashboard shows different metrics including:
-
Number of incoming, outgoing, and missed calls
Number of users
Total duration of calls
Call, agent, and number stats
You can select and view stats related to a particular number or all numbers. You can also choose the time frame you want to see stats for.
The dashboard can be set to auto-refresh so that the stats are updated live.
Zoho Voice offers the Queue Performance Metrics to render an effective oversight of the live queue calls and agents' activities in the queue.
It is a special analytic feature that helps your supervisors to have real-time visibility of various aspects of the queue and lets them closely monitor the calling patterns, trends, performance of various agent teams by measuring and analyzing performance of each team in your organization. This feature presents the required analytical data in a consolidated list view for the supervisors to draw effective actionable insights out of the real time queue data just from a single window.
For each queue the following KPIs are measured and analyzed:
Agent with most number of missed calls
Displays the agent who had missed most of the queue calls. This easily helps the supervisor to spot the most inert agent in the queue and evaluate the agent's performance in terms of their efficiency and skills.
Agent with most number of answered calls
Displays the agent who had answered most of the queue calls. This easily helps the supervisor to identify the best performing agent in the queue and helps the supervisor to take actions towards distributing the calls evenly across the queue.
Answered Calls
Displays the total number of calls successfully connected and answered by the agents in the queue
Timed Out Calls
Displays the number of calls that were disconnected after ringing throughout the allocated waiting time limit of the queue, without successfully connecting to an agent.
Abandoned Calls
Displays the number of calls that were disconnected by the caller before successfully connecting to an agent in the queue
Total Calls
Displays the total number of calls that successfully entered the particular queue regardless of the end status of the calls.
No. of active agents in the queue
Quantifies the accurate number of active agents in the queue.
No. of active calls in the queue
Enables the supervisor to visually gather the number of ongoing live queue calls within the queue. The supervisor can barge the ongoing calls only via the Live Calls page, the Live calls displayed inside the Queue page is only for monitoring the queue activities visually.
Response Time Metrics (MM:SS) and Call Duration (HH:MM)
Response time is the time taken for agents to respond to a call. Call duration is the total duration of a call.
These metrics are measured separately for each queue as well as for the all the queues grouped together, depending on the role and access permissions allocated for the monitoring supervisor who reviews the performance of the queues.
Generally, the Superadmin and the Admin are free to create, edit, monitor, and view analytics for all the queues in the organization. The Supervisor Plus can edit, monitor, and view analytics for only those queues constituting the agents associated with them. Supervisor, Technician and the Telephony Agent can only view a queue but cannot edit, configure or monitor any aspect of the queue.
Average response time
Estimates and presents the average amount of time taken by the agents in a specific queue to respond to the calls that arrive into the queue, for a specific time window. This helps the supervisor to gauge and rank the queues based on availability and efficiency.
Max response time
Presents the longest amount of time taken by the agents in a specific queue to respond to the calls that arrive into the queue, for a specific time window. This helps the supervisor to enquire and resolve the cause behind the lags or idle time associated with the queue.
Average Call Duration
Shows the average amount of talk time taken by the agents in a specific queue to answer and close the calls that arrive into the queue, for a specific period of time.
Total Call Duration
Presents the total amount of talk-time taken by each of the agents in a specific queue to answer and close the calls that arrive into the queue, for a specific period of time.
Queue Performance Metrics also lets the Superadmin, Admin, or the Supervisor Plus to view Grouped Analytics regarding all the queues they have access to in the organization.
Queue with most number of missed calls
Displays the queue that has missed most number of incoming calls among the group of queues that the Superadmin, Admin, or the Supervisor Plus are directly associated within the organization. The grouping also includes the queues that the Superadmin, Admin, or the Supervisor Plus are not connected with but constituting the agents directly associated to them.
Queue with most number of answered calls
Displays the queue that has answered most number of incoming calls among the group of queues that the Superadmin, Admin, or the Supervisor Plus are directly associated within the organization. The grouping also includes the queues that the Superadmin, Admin, or the Supervisor plus are not connected with but constituting the agents directly associated to them.
The Queue Performance feature offers Segmented Analytics across a time slice for each Agent's performance in a specific Queue:
Answered Calls
Displays the total number of calls successfully connected and answered by the agent for the specific queue selected.
Missed Calls
Displays the total number of calls missed by the agent in the queue for the specific queue selected.
Average Response Time
Calculates and presents each agent's average time to respond to calls, taking into account all the calls answered by the agent for the specific queue selected.
Average Time Per Call
Calculates and presents each agent's average talk time per call, taking into account all the calls answered by the agent for the specific queue selected.
Queue Performance Metrics feature is included in the Contact Center plan. Users in other plans can add it as a feature add-on.
You can choose to add feature add-ons only for the users who need it. For instance, admins and supervisors.
Notification Center inside Zoho Voice allows you to see an overview of all the alerts and notifications from Zoho Voice. You can also view the history of notifications and take appropriate actions when necessary.
Zoho Voice notifies you of any actions performed and the result of those actions. On clicking the notifications, you will see a pop-up where you can see the configurations or perform any further actions.
You can open the Notification Center by clicking the "Bell" icon at the top right of your screen. New notifications will mark the bell icon with a red circle with a number representing the number of unread notifications.
Currently Zoho Voice has the following notifications:
Missed call notification:
Receive notifications for both missed calls and missed calls with voicemail.
Sample:
1. You have missed a call from +1312xxxx789.
2. You have missed a call from +1312xxxx789. Voicemail has been attached.
Low credit notification:
Receive notifications when your credit balance is low.
Sample:
1. Please top up your balance by purchasing voice credits from our store, and enjoy a hassle-free service.
Monthly credit deduction:
We'll send a notification when your monthly credit deduction is due in 2 days, and we'll another notification when it is successfully deducted.
Sample:
1. Monthly deduction of credits from your Zoho Voice account for number rental and storage of call recordings is due in 2 days.
2. Successfully deducted credits from your voice credit balance towards monthly number rental and storage of recordings.
Business hour changes:
We'll notify you if there is any change in the timings of the business hour configuration associated to a number that is assigned to you.
Sample:
Business hours for the configuration " Business Hour Name" has been modified.
Number purchase and number association notifications:
Receive notifications when the number you purchased is approved or rejected after the review. Agents will receive notifications if a number is associated to them or unassociated from them.
Sample:
1. The number you purchased(+1 312XXXX789) has been approved and is ready to use.
2. The number you purchased(+1 312XXXX789) has been rejected.
3. One or more numbers have been associated to you.
4. One or more numbers have been unassociated from you.
Queue changes notifications:
Agents will be notified if they are assigned to a call queue or removed from a queue.
Sample:
1.You have been added as an agent in the queue "queue name", and will receive calls assigned to that queue.
2.You have been removed the queue "queue name", and will no longer receive calls assigned to that queue.
Notification center is present only in the web app for now.
My Profile
If you need to change your name, mobile number, time zone, language, or company name in Zoho Voice, you can do it in My Profile .
Log in to your Zoho Voice account.
Go to Settings and then My Profile.
Edit the required fields and click Update.
Daily Reports
Zoho Voice can send daily call reports to you via email. You can enable daily reports in the My Profile page and set the time you want to receive this report. The report contains the call statistics for the last 24 hours prior to the time the report is generated. The reporting time will use the time zone you have selected in My Profile .
The super admin, admins, supervisors, and technicians must enable the daily reports separately in their accounts so that they receive daily reports to their email address. Users will receive reports with call stats for the numbers that are assigned to them.