Kaizen 238 Fetching Employee Data from Microsoft SQL Server into Zoho CRM Using Queries

Hello everyone!
Welcome back to the Kaizen series!
Many organizations manage workforce data such as employee designations, contact details, salary bands, and joining dates in an HRMS backed by Microsoft SQL Server, while their sales teams work in Zoho CRM. When a deal needs an assigned pre-sales engineer or a CSM hand off, reps must leave CRM, open the HR portal, and manually look up the right person.
This post shows how to use the Queries feature in Zoho CRM to connect to a Microsoft SQL Server database, fetch employee records with a parameterized SQL query, and display them directly on a Deal Canvas without leaving CRM. We will cover source creation, SSL and Read-Only configuration, writing the query, serializing the response, and a brief overview of how the same query can be reused across Canvas, Custom Related List, and Kiosk.
Prerequisites
- Zoho CRM Enterprise or Ultimate edition (SQL sources require Enterprise or above)
- A running Microsoft SQL Server instance with a database user that has SELECT privileges on the EMPLOYEE table
- The SQL Server instance must be reachable from Zoho CRM either publicly or Zoho CRM IP ranges must be whitelisted in the firewall rules
- The SQL Server hostname must be added to Trusted Domains in Zoho CRM (Setup > Developer Hub > Trusted Domains) if using a DNS hostname
- Developer role or System Administrator access in Zoho CRM
- A custom "Employee ID" field (Single Line) on the relevant CRM module (e.g., Deals or Contacts) to store the external employee reference if passing a single employee ID as a variable. Not required if the query fetches the full list (no variable).
Use Case
Sales reps at a professional services firm need to assign internal team members (solutions engineers, CSMs) to deals, but employee contact and designation data lives only in a Microsoft SQL Server HRMS requiring a manual lookup outside CRM every time.
Solution
Connect Zoho CRM Queries to the HRMS database. A parameterized SELECT on the EMPLOYEE table filtered by {{EMP_ID}}, resolved from a custom field on the Deal record, fetches the assigned employee's profile and displays it on the Deal Canvas in real time.
Follow the steps to implement this solution.
Step 1: Whitelist Zoho CRM IPs in SQL Server Firewall
Before creating the source in Zoho CRM, ensure the SQL Server instance can accept inbound connections from Zoho CRM's servers.
- The SQL Server instance must be accessible over the internet on port 1433 (SQL Server default).
- Zoho CRM's IP ranges must be whitelisted in the firewall rules governing the SQL Server. Refer to the Zoho CRM IP Whitelist guide for the full list of IP ranges for your data center.
- Ensure SQL Server Browser service is running and TCP/IP is enabled in SQL Server Configuration Manager.
- If the SQL Server uses a DNS hostname, also add it to Setup > Developer Hub > Trusted Domains in Zoho CRM.
Step 2: Create a Dedicated Read-Only SQL Server Login
On your SQL Server instance, create a login with the minimum permissions needed.
Do not use 'sa' (SQL Server's built-in System Administrator login) or any admin account. 'System Administrator login has unrestricted access to all databases and server settings.
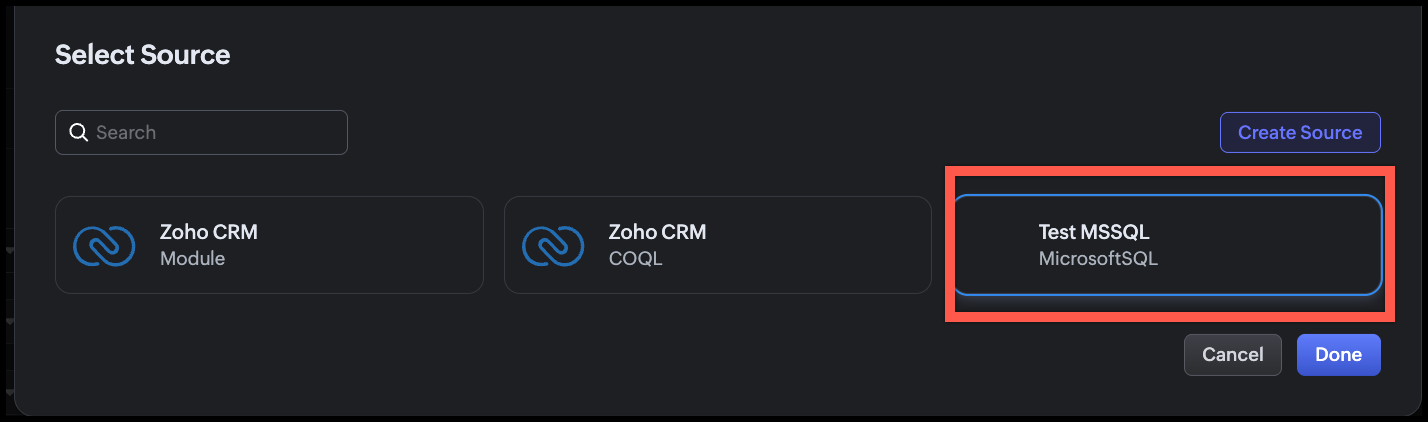
Step 3: Add Microsoft SQL Server as a Database Source
- In Zoho CRM, go to Setup > Developer Hub > Queries.
- Click the Sources tab.
- Click Add Source.
- From the list of source types, select Database.
- From the available database options, choose MicrosoftSQL.
- Fill in the source configuration as shown in the following image.

Step 4: Configure Advanced Settings
Expand the Advanced configuration section before saving.
Use SSL
Enable the Use SSL toggle. This action,
- Encrypts the connection between Zoho CRM and SQL Server using TLS.
- When a DNS hostname is used, the system also validates the server certificate and hostname match before establishing the connection.
- SQL Server supports SSL/TLS natively. Ensure the SQL Server instance has a valid TLS certificate configured or that the certificate is trusted by the host.

Note
- The SSL setting is IMMUTABLE after the source is successfully created. If your SSL configuration needs to change, you must delete and recreate the source.
- If you add the hostname to Trusted Domains, the system bypasses certificate and hostname verification. Only add genuinely trusted hosts.
Read Only
Enable the Read Only toggle. This action,
- Restricts this source to only SELECT operations at the Zoho CRM level.
- Blocks INSERT, UPDATE, and DELETE queries even if the zoho_crm_reader SQL login is later granted write permissions at the database level.
Since this source is used purely to display employee information in CRM views, you must enable Read-Only.
You can change this setting after the source is created, unlike SSL.
Time Zone
Set Time Zone to match the time zone of your SQL Server instance (e.g., UTC, or the server's local time zone).
The DATE_OF_JOIN and MODIFIED_ON columns are stored as DATETIME in SQL Server (without time zone information). Setting the correct source time zone allows Zoho CRM to convert these values to each viewing user's local time zone for accurate display.
Example: If the server stores MODIFIED_ON = 2026-04-15T18:30:00 in IST, a user in UTC will see 2026-04-15 13:00.
Connection Timeout
Set Connection timeout to 10 seconds. This action defines how long Zoho CRM waits for the SQL Server to accept the connection before giving up.
10 seconds accommodates typical network latency while preventing the CRM UI from hanging indefinitely during server downtime or network issues.

Click Validate and Save.
Zoho CRM tests the connection. On success, the source is saved and available for queries.
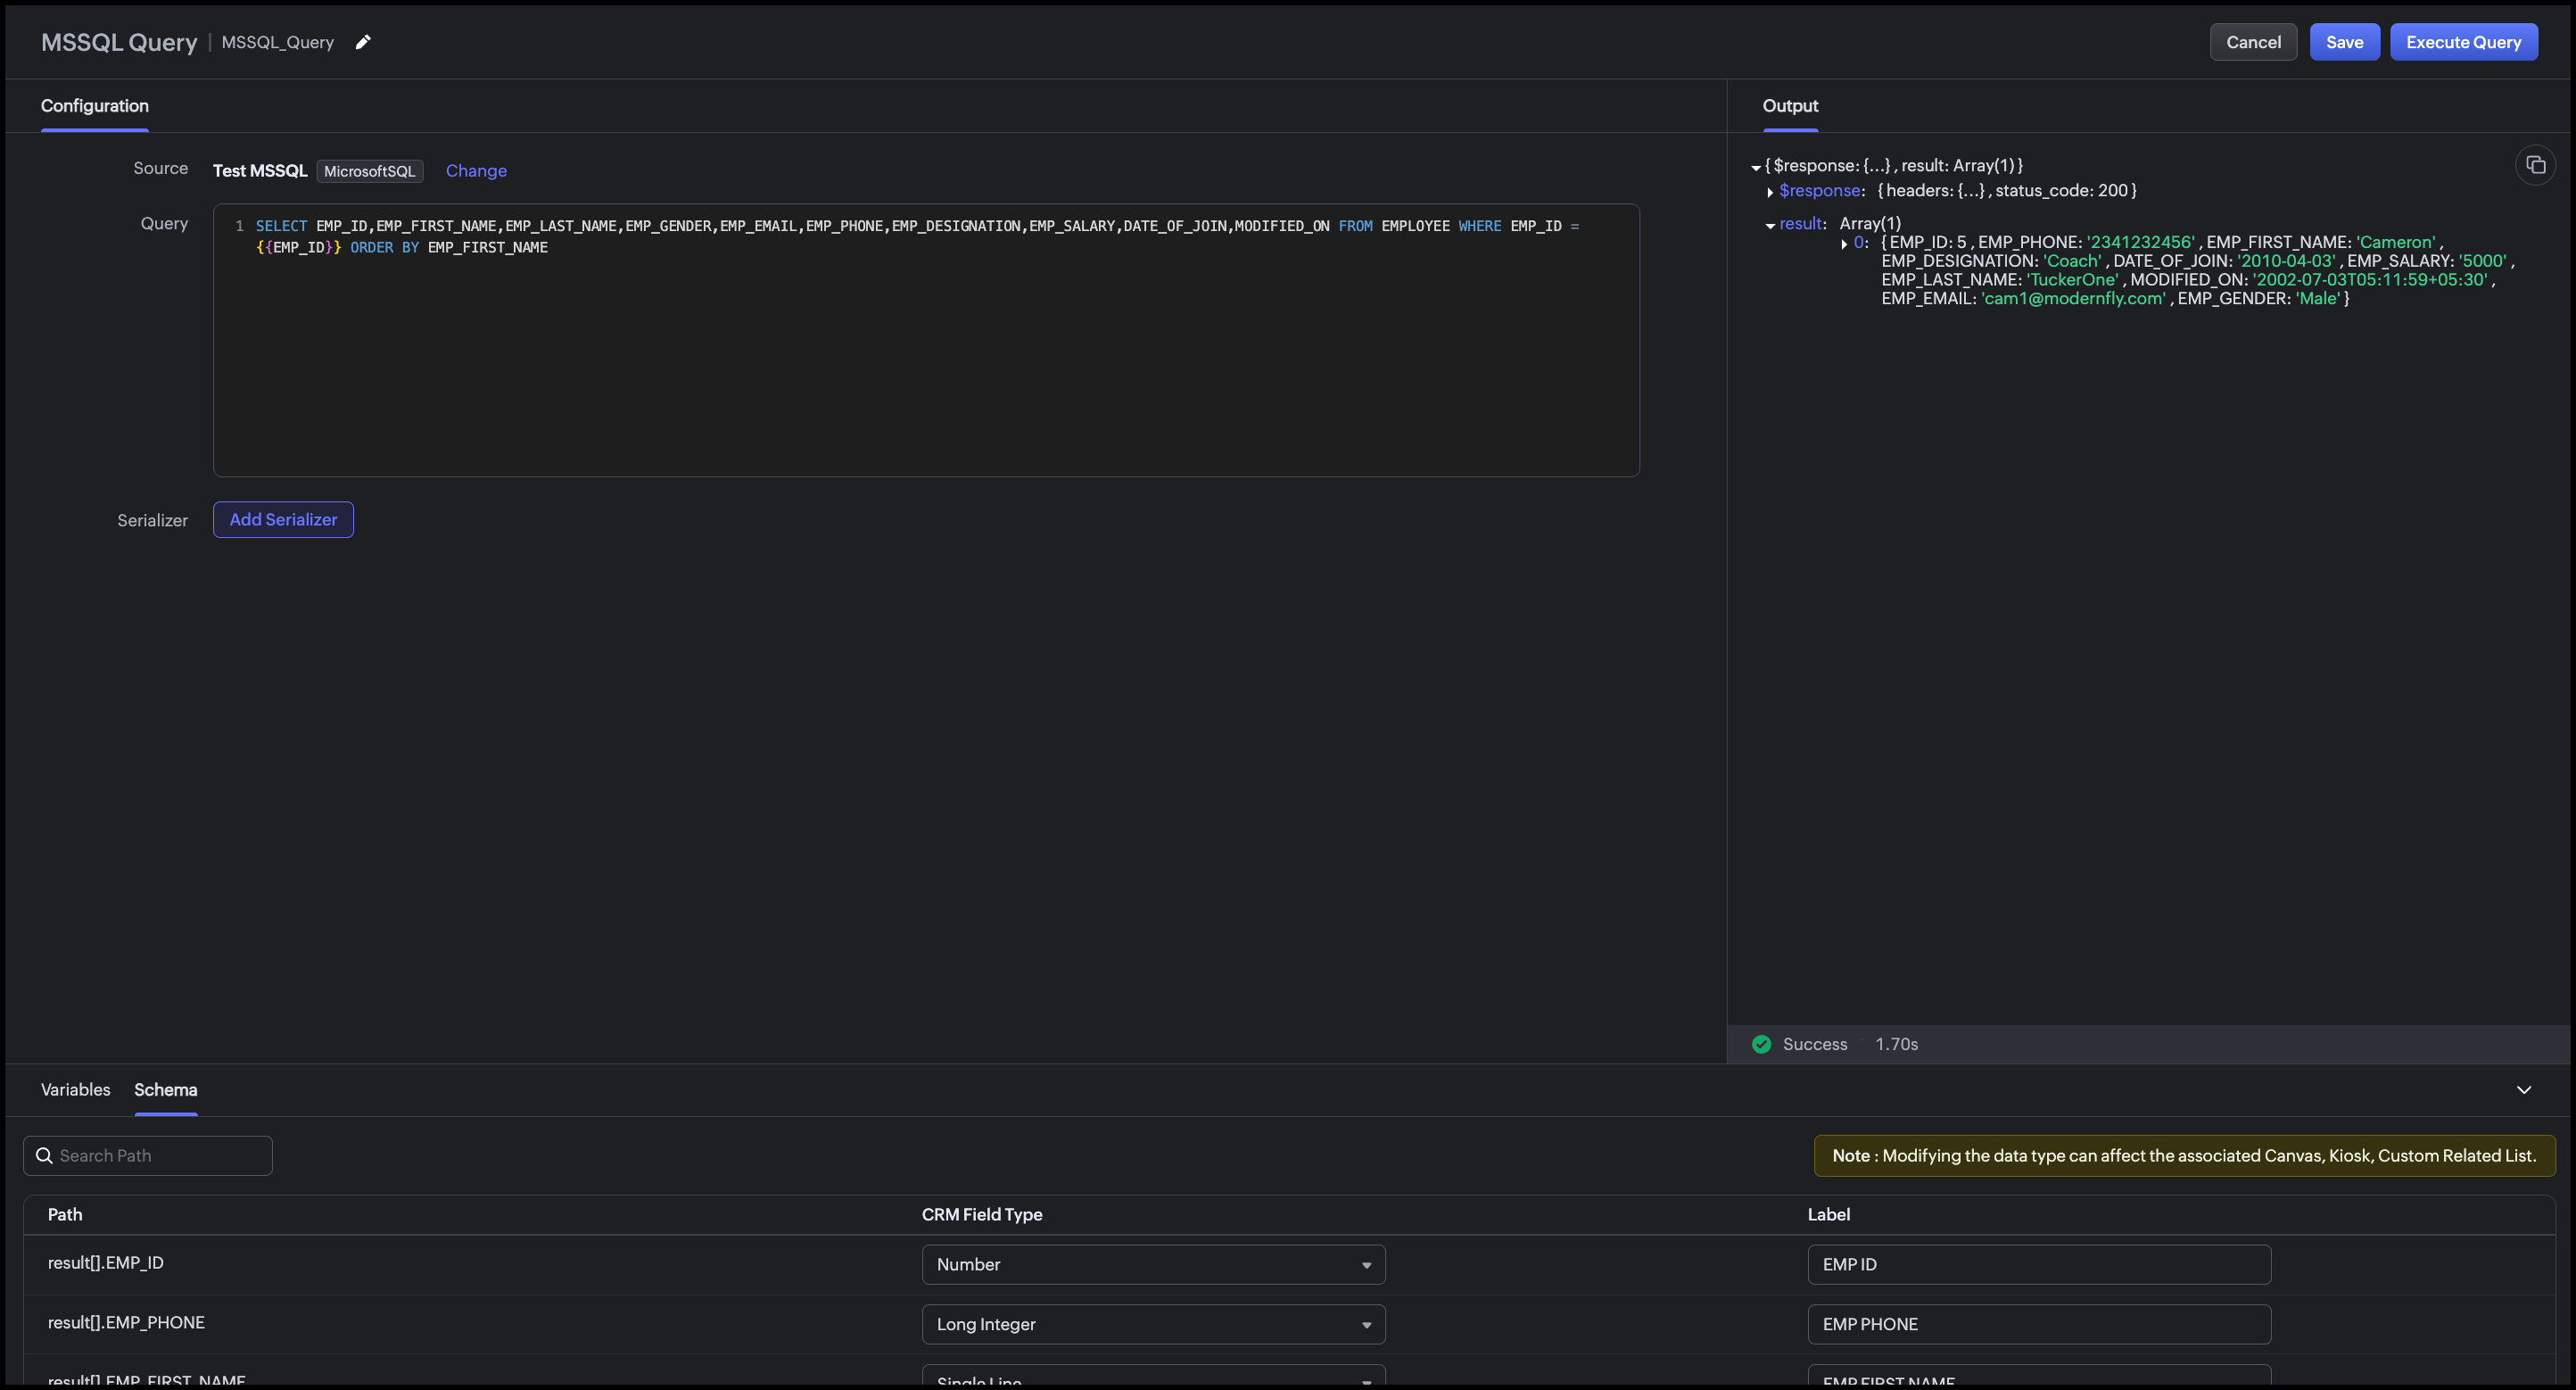
Step 5: Create the Query
- Go to Setup > Developer Hub > Queries.
- Click Create Query.
- In the dialog box enter the name of the query.
- Click Next.
- Under Configuration, click Change and select the source we added.
- Click Done.
Step 6: Write the SQL Query
In the query editor, enter the following query.
SELECT EMP_ID,EMP_FIRST_NAME,EMP_LAST_NAME,EMP_GENDER,EMP_EMAIL,EMP_PHONE,EMP_DESIGNATION,EMP_SALARY,DATE_OF_JOIN,MODIFIED_ON FROM EMPLOYEE WHERE EMP_ID = {{EMP_ID}} ORDER BY EMP_FIRST_NAME |
Zoho CRM automatically detects {{EMP_ID}} as a query variable. At runtime, the value of the "Employee ID" custom field on the Deal record is passed to this variable.
Step 7: Execute and Validate the Query
- Click Execute Query.
- Enter a valid employee ID from your SQL Server database.
- Click Next.
- Review the raw response.
- Review the Schema panel and verify CRM Field Type mapping.
Step 8: Add a Serializer
The serializer combines the first and last name, formats dates, and computes the employee's tenure.
- Click Add Serializer.
- Enter the following JavaScript.return result.map(record => {// Compute tenure in years from DATE_OF_JOINconst joinDate = new Date(record.DATE_OF_JOIN);const today = new Date();const tenureYears = Math.floor((today - joinDate) / (1000 * 60 * 60 * 24 * 365));return {emp_id: record.EMP_ID,full_name: record.EMP_FIRST_NAME + " " + record.EMP_LAST_NAME,gender: record.EMP_GENDER,email: record.EMP_EMAIL,phone: record.EMP_PHONE,designation: record.EMP_DESIGNATION,date_of_join: record.DATE_OF_JOIN? String(record.DATE_OF_JOIN).split("T")[0]: "N/A",tenure: tenureYears + (tenureYears === 1 ? " year" : " years"),last_modified: record.MODIFIED_ON? String(record.MODIFIED_ON).split("T")[0] + " " + String(record.MODIFIED_ON).split("T")[1].slice(0, 5): "N/A"};});
This serializer:
- Combines EMP_FIRST_NAME and EMP_LAST_NAME into a single full_name field
- Computes tenure in years from DATE_OF_JOIN to today, a derived field not stored in the database
- Formats date_of_join as YYYY-MM-DD (strips the time component)
- Formats last_modified as YYYY-MM-DD HH:MM.
Click Execute Query again to preview the serialized output.

Click Save to save the query.
Conclusion
The Queries feature in Zoho CRM makes it straightforward to surface employee records from an external Microsoft SQL Server HRMS directly within CRM without any middleware, scheduled sync, or manual copy-paste. The advanced configuration options (SSL, Read-Only, Time Zone, Connection Timeout) ensure the connection is secure, non-destructive, and accurate across time zones.
With a single parameterized query and a lightweight serializer, sales reps can see the full profile of an assigned employee such as designation, contact info, tenure etc., right on the Deal Canvas when they need it most. The same query can be reused across multiple CRM UI components for different team workflows.
This approach is best suited when:
- The employee data is authoritative in an external HRMS and should not be duplicated into CRM fields.
- Real-time accuracy matters (recently onboarded or transferred employees are immediately visible).
- The organization wants to avoid building and maintaining a custom sync integration.
Associating the query with CRM's UI components
You can associate a query with multiple UI components such as Canvas, Kiosk, Custom Related Lists based on the workflow.
Canvas List View
Associate the query with the Canvas List View of the Deals (or Contacts) module.
Map {{EMP_ID}} to the "Employee ID" custom field on the record. When a sales rep opens a Deal, the assigned employee's full profile, including name, designation, phone, email, tenure etc., appears as an "Assigned Employee" panel on the canvas. Refer to our Kaizen post for associating a query with Canvas List View.
Kiosk
Associate the query with a Kiosk Decision component to build an internal lookup screen, say a self-service screen, where a sales rep types an Employee ID, and the Kiosk fetches and displays that employee's profile from the HRMS. The Decision component evaluates the query response (e.g., checking if EMP_DESIGNATION matches a required role) and branches the Kiosk flow accordingly.
Map {{EMP_ID}} to a Kiosk input variable collected in a preceding Screen component.
For more details, refer to our Kaizen post on Handling Query variables in Zoho CRM and associating it in Kiosk.
Custom Related List
Use a modified version of the query (filtered by ACCOUNT_ID instead of EMP_ID) to display a related list of all employees assigned to a given account on the Account record. This is useful when multiple internal team members like solutions engineers, CSMs, support contacts, are mapped to an account in the HRMS.
Map {{ACCOUNT_ID}} to the Account record's identifier during association, and the related list will show all employees assigned to that account, updated automatically as the HRMS changes.
For step-by-step instructions on associating a query with a Custom Related List, refer to this Kaizen post.
We hope you found this post useful.
Cheers!
=================================================================================

See Also