Customize your SalesIQ live chat with Custom CSS and blend it with your website design
Building your CSS
Where do I place the CSS code?
There are 2 methods to carry out Custom CSS on SalesIQ. Both methods are used for varying circumstances.
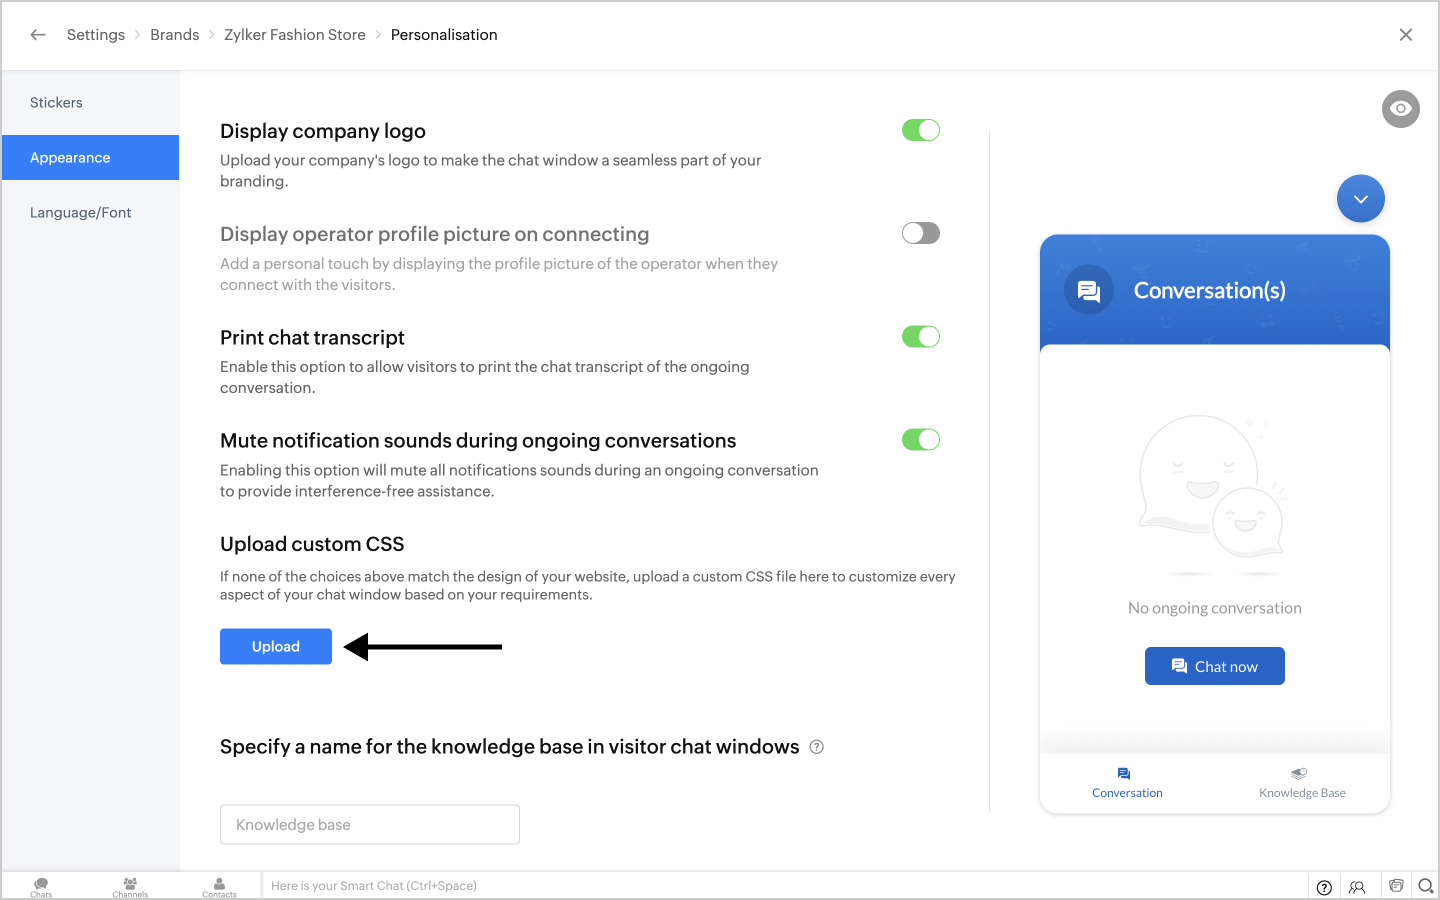
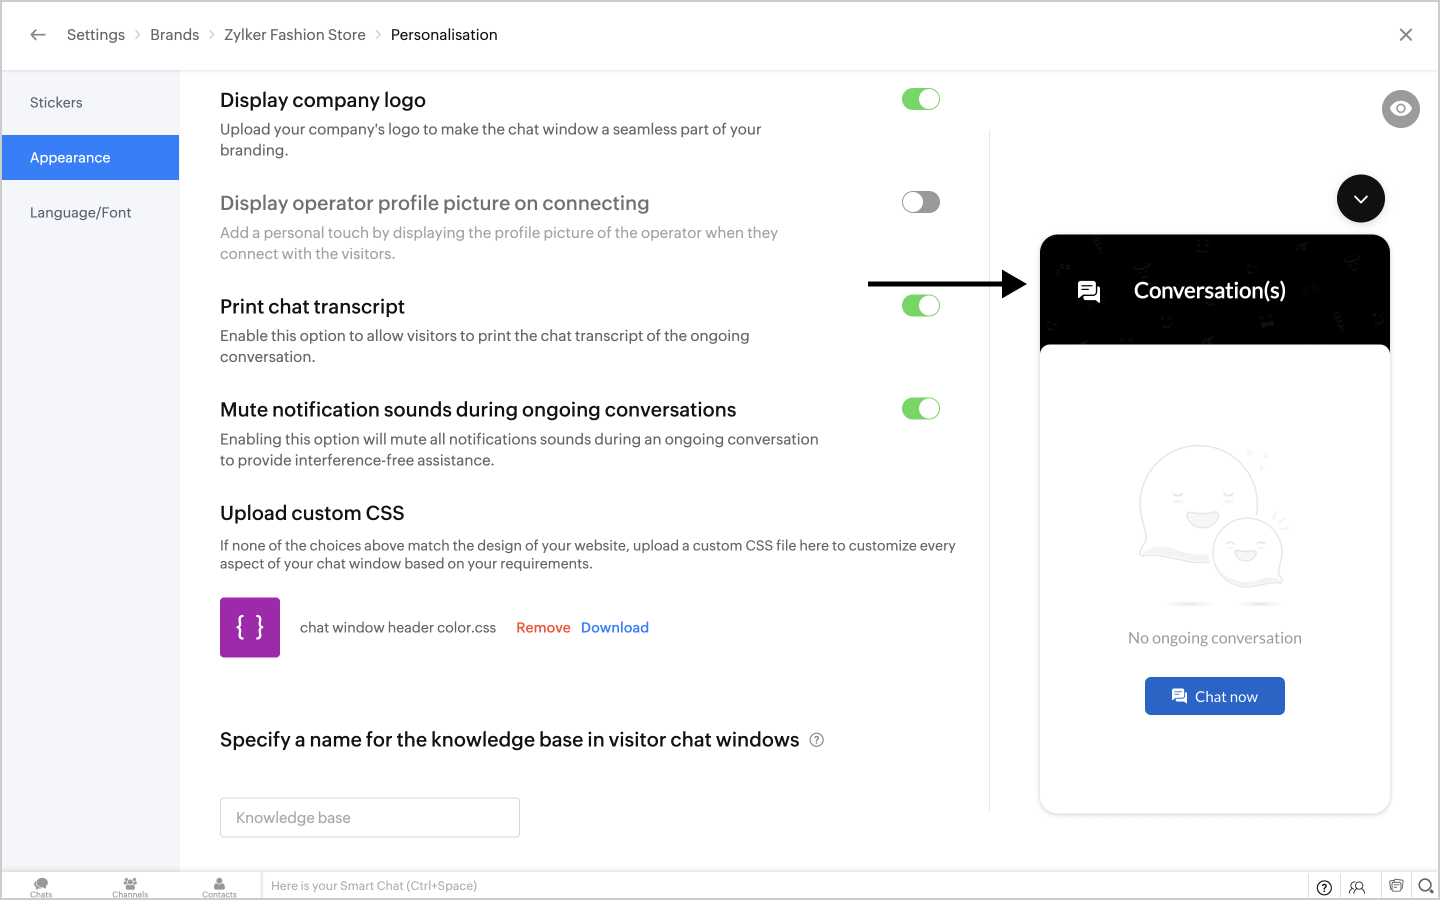
- Brand Personalization - The first method is by uploading the Custom CSS file in the Personalization area of the chat widget. This method is to be used when changes/modifications are to be made on the elements within the chat window. For example, changes in the messaging area, font used within the chat window, colour changes for the header or minimize button etc.
For this,
- Navigate to Settings > Brands > Personalization > Appearance tab.
- Scroll down to Upload custom CSS and click on Upload.

- Choose the required CSS file from the list.
- The preview window on the right will immediately display the result of adding your Custom CSS code to SalesIQ.

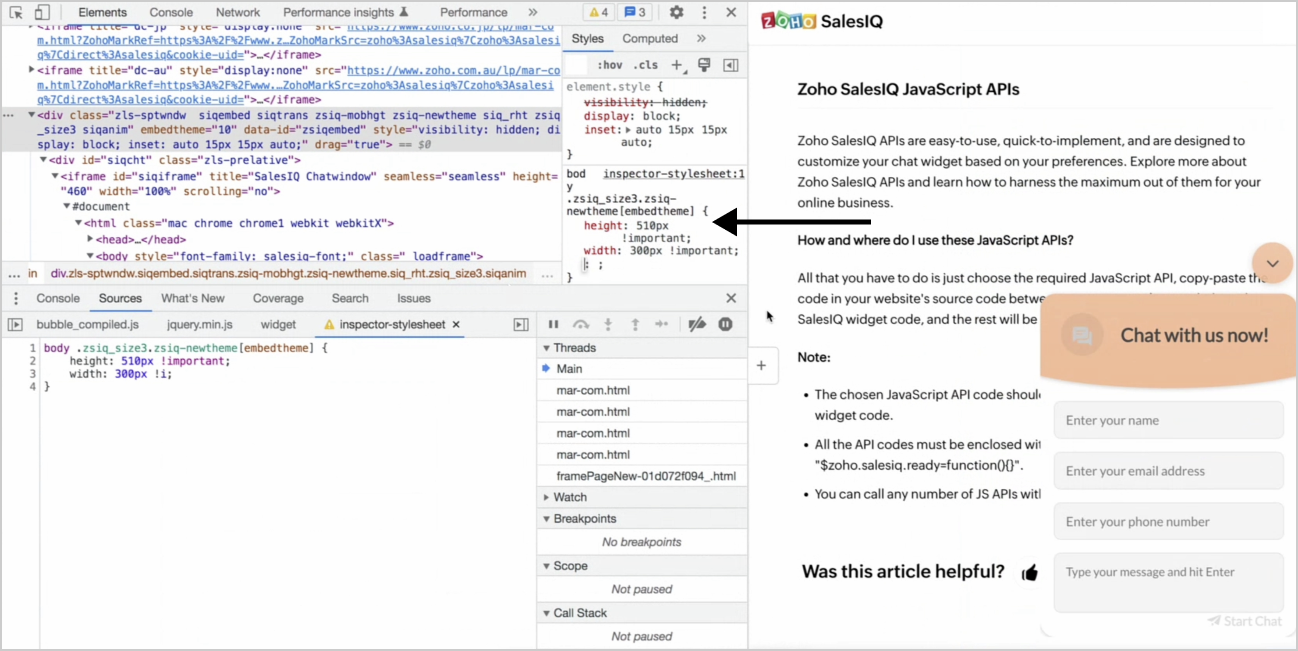
Website Style sheet

In this case, a Custom CSS for changing the height and width of the chat window has been added to the style sheet.
Tips for writing Custom CSS
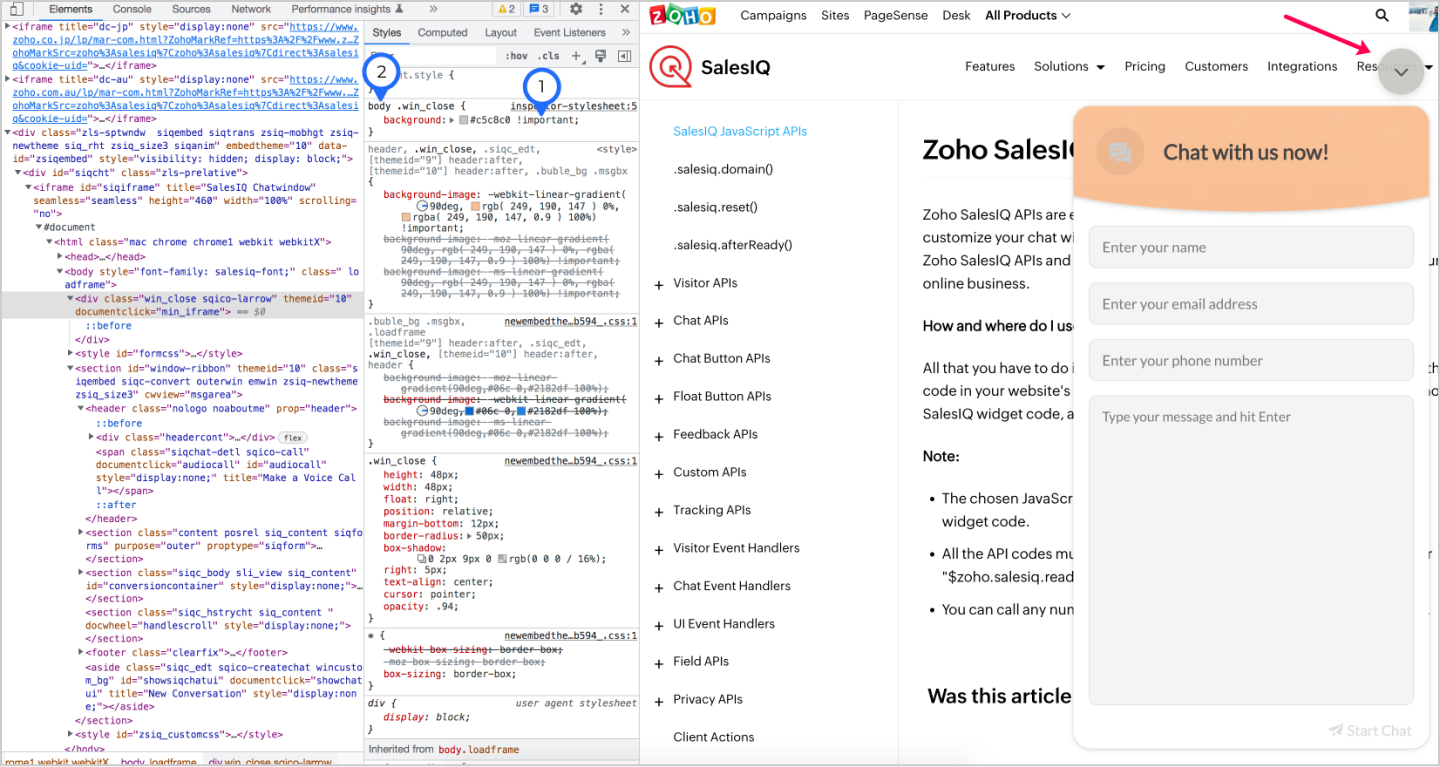
The !important rule in CSS can be used to add more weightage to a property and override other previously added styling rules.
Extra CSS weightage can be added with a body tag, which will be another way to override all previous styling rules for the element.

Frequently asked CSS formats
We have taken note of some of the frequently asked queries and provided the custom CSS code here for your reference.
To change the header colour of the chat window.
- body header {
- background: #e2bb3c !important;
- }
To change the chat window dimensions on website.
- body .zsiq-newtheme.siqembed.zls-sptwndw {
- height: 500px !important;
- width: 400px !important;
- }
To change the chat widget colour.
- body .zsiq_flt_rel {
- background-color: #e2bb3c !important;
- }
To change the chat window dimensions on mobile alone.
- @media only screen and (min-width: 100px) and (max-width: 555px)
- {
- body .zsiq-newtheme.zsiq-mobhgt.siqembed {
- height: 80% !important;
- width: 80% !important;
- }
- }
To move the position of the chat widget.
- body .zsiq_floatmain {
- right: 40px !important;
- bottom: 40px !important;
- }
Topic Participants
Hameetha Nasreen
Oby
Sasidar Thandapani
Enrique Masias
Dov Levy
Sticky Posts
Let customers reach you easily with the Zoho SalesIQ - Telegram IM Channel Integration
We are now living in the era of instant messaging where every single person around us will have at least two instant messaging apps on their mobile phones. And that very well includes your customers. It is important for businesses to be able to communicateWhy should you integrate Zoho SalesIQ with Google Analytics?
Hello everyone. Greetings from Zoho SalesIQ! Today, we are going to take a detailed look at the possibilities and outcomes when integrating SalesIQ with Google Analytics. Some of us may have lingering questions on this topic and here we are, with a
Recent Topics
Ensure Consistent Service Delivery with Comprehensive Job Sheets
We are elated to announce that one of the most requested features is now live: Job Sheets. They are customizable, reusable forms that serve as a checklist for the services that technicians need to carry out and as a tool for data collection. While onAny update on adding New Customer Payment Providers who support in store terminal devices?
Currently there is only one Customer payment provider listed for terminal devices in USA- Everyware. They charge a monthly fee of almost $149 minimum. Will you add other providers - like Zoho Payments or Stripe or Worldpay that would allow integratedGetting Subform Fields to Display Top to Bottom
I have a form where the fields are all in one column. I want to insert a subform where the fields are stacked in one column as well. I have built both the form and subform but the subform displays the fields from left to right instead of a stacked column. This will cause a problem displaying the subform correctly on mobile apps. How can I do this please?' Here is my form with subform now. As you can see the subform "Follow Up Activity" is displaying the fields left to right. I need them to go topHow do i move multiple tickets to a different department?
Hello, i have several tickets that have been assigned to the wrong department. I am talking about hundreds of automatically generated ones that come from a separate system. How can i select them all at once to move them to another department in one go? I can select them in "unsassigned open tickets view" but i can't find a "move to another department" option. I also can't seem to assign multiple tickets to the same agent in that same view. Could somebody advice?Zoho CRM Layouts
I have customised all our modules, Leads, Contacts and deals, and within them, I have created lots of different layouts depending on the type of Lead or contact, for example. Since the new Zoho UI came out, they have all disappeared. I have gone intoHow to Convert NSF to PST Format Effortlessly? - SYSessential
It is highly recommended to obtain the error-free solution of the SYSessential NSF to PST converter to convert NSF files from Lotus Notes. Using this professional software, it becomes easier to convert all NSF database items, including emails, journals,Can't connect to POP and SMTP over VPN
I use Thunderbird to access Zoho Mail via POP and SMTP. I have configured an app-specific password for Thunderbird to use. Everything is properly configured and works correctly — until I enable my VPN. I'm using a paid commercial VPN service (Mullvad).my zoho mail is hacked
my email is sending my username and password to people i dont knowSuministrar accesos
Asunto: Enable UPLOAD_RULE for API Attachments Mensaje: Hola, Necesito habilitar la capacidad de subir attachments vía API en Zoho Mail. Actualmente recibo el error: "UPLOAD_RULE_NOT_CONFIGURED" al usar el endpoint: POST /api/accounts/{accountId}/messages/attachmentshow to change the page signers see after signing a document in zoho sign
Hello, How can I please change the page a signer sees after signing a document in Zoho Sign? I cannot seem to find it. As it is now, it shows a default landing page "return to Zoho Sign Home". Thanks!Introducing real-time document commenting and collaboration in Zoho Sign
Hi, there! We are delighted to introduce Document commenting, a feature that helps you communicate with your recipients more efficiently for a streamlined document signing process. Some key benefits include: Collaborate with your recipients easily withoutPolish signer experience to compete with docusign
I would like to suggest that someone spend the little bit of time to polish the signer experience, and the email templates to more of a modern professional feel. They are currently very early 2000s and with some simple changes could vastly improve theTicket Loop from Auto Responce
We’re seeing an issue where a client’s help desk triggers a ticket loop. When they email us, our system creates a ticket and sends the acknowledgement. Their system then creates a ticket from that acknowledgement and sends one back to us, which createsvalidation rules doesn't work in Blueprint when it is validated using function?
I have tried to create a validation rule in the deal module. it works if I try to create a deal manually or if I try to update the empty field inside a deal. but when I try to update the field via the blueprint mandatory field, it seems the validationHow to make rule to filter out some emails from receiving the notification "Receiving a new ticket"?
Good Morning, We are currently using the "Receiving a new ticket" notification rule to provide that auto reply template to a customer that emails us for support. However, there are some emails we don't want to receive this auto-reply. Where can I setZoho Signatures Missing
In the past after collecting signatures from two different PDFs I would merge them by calling an api and the signatures would appear in the combined PDF. Recently the signatures have disappeared whenever I combine the PDFs together. Why did this randomlyStop the Workarounds: We Need Native Multi-Step Forms
After over 17 years of community requests, I'm hoping the Zoho team can finally address the lack of native multi-page form support in Zoho Creator. This has been one of the longest-standing feature requests in the community, with threads spanning nearlyMetadata API Access to Functions
I think it would be incredibly helpful to have api access to every function's code. Our team primarily uses deluge functions to update fields across modules according to business logic. I would like to create a visual dependancy model for our CRM, butFilter button in the Zoho Sheet Android App doesn't toggle on
I am a new Zoho Sheets user and experiencing a specific issue with the filter functionality in the Android mobile application. Detailed Issue Description: The filter icon appears correctly in the toolbar. Upon tapping the filter icon/button, the toggleAutomate pushing Zoho CRM backups into Zoho WorkDrive
Through our Zoho One subscription we have both Zoho CRM and Zoho WorkDrive. We have regular backups setup in Zoho CRM. Once the backup is created, we are notified. Since we want to keep these backups for more than 7 days, we manually download them. TheyExciting Updates to the Kiosk Studio Feature in Zoho CRM!
Hello Everyone, We are here again with a series of new enhancements to Kiosk Studio, designed to elevate your experience and bring even greater efficiency to your business processes. These updates build upon our ongoing commitment to making Kiosk a powerfulReply to Email for SO/PO
Hello, We are new to Zoho Books and running into an issue. Our support@ email is our integration user. When our team is sending out PO/SO's we are updating the sender email, but for some reason many of our responses are coming back to our support@ emailNew activity options for workflows
Greetings, We are excited to announce the addition of two new dynamic actions to our workflow functionality: Create Event and Schedule Call. These actions have been thoughtfully designed to enhance your workflow processes and bring more efficiency toRemove the “One Migration Per User” Limitation in Zoho WorkDrive
Hi Zoho WorkDrive Team, Hope you are doing well. We would like to raise a critical feature request regarding the Google Drive → Zoho WorkDrive migration process. Current Limitation: Zoho WorkDrive currently enforces a hard limitation: A Zoho WorkDriveEnrich your contact and company details automatically using the Data Enrichment topping
Greetings, I hope you're all doing well. We're happy to announce the latest topping we've added to Bigin: The Data Enrichment topping, powered by WebAmigo. This topping helps you automatically enhance your contact and company records in Bigin. By leveragingImportant Update: Google Ads & YouTube Ads API Migration
To maintain platform performance and align with Google's newest requirements, we are updating the Google Ads and YouTube Ads integrations by migrating from API v19 to the newer v22, before the official deprecation of v19 on February 11, 2026. Reference:Enhancements for Currencies in Zoho CRM: Automatic exchange rate updates, options to update record exchange rates, and more
The multi-currency feature helps you track currencies region-wise. This can apply to Sales, CTC, or any other currency-related data. You can record amounts in a customer’s local currency, while the CRM automatically converts them to your home currencyKaizen #228 - Process Large-Scale Migrated Data Using Catalyst Solutions
Howdy, tech wizards! This week’s Kaizen explores how Catalyst Solutions in the Zoho CRM Developer Hub help import large volumes of data into Zoho CRM while improving data quality and simplifying the migration process. Why Catalyst Solutions? CatalystZoho Expense Import Reports Won't Work Because Default Accounts Already Exist
Im trying to import reports from another Zoho expense account to mine and im getting errors that won't allow the import to happen The account name that you've entered 'Ground Transportation' already exists. Enter another name for the account and try again.zInactive License for free account.
I recently upgraded my Cliq subscription not my team (on the free version), are unable to login to their accounts. The error message received is Inactive License Looks like you have not been covered under the current free plan of users. Please contact2026 Product Roadmap and Upcoming Features
This is your guide to what is coming in Zoho Vertical Studio throughout 2026. We’ll update this post throughout the year as items move from development to release, and as and when new initiatives are added. Once a feature is released, it will be reflectedPlease, make writer into a content creation tool
I'm tired of relying on Google Docs. I'm actually considering moving to ClickUp, but if Writer were a good content creation tool instead of just a word processor, I would finally be able to move all my development within the Zoho ecosystem, rather thanSyncing zoho books into zoho crm
I was wondering how I can use zoho books in crm as I have been using them separately and would like to sync the two. Is this possible and if so, how? ThanksRelease Notes | January 2026
We have rolled out a set of powerful new enhancements across Zoho Vertical Studio that bring several long-awaited capabilities to your applications. These updates focus on deeper customization, smarter automation, better reporting, and improved usabilityLive Chat for user
Hi everyone, I’m new to Zoho Creator and wanted to ask if it’s possible to add a live chat option for all logged-in portal users so they can chat internally. I’m trying to create a customer portal similar to a service desk, but for vehicle breakdowns,Power up your Kiosk Studio with Real-Time Data Capture, Client Scripts & More!
Hello Everyone, We’re thrilled to announce a powerful set of enhancements to Kiosk Studio in Zoho CRM. These new updates give you more flexibility, faster record handling, and real-time data capture, making your Kiosk flows smarter and more efficientAnnouncing new features in Trident for Mac (1.34.0)
Hello everyone! We’re excited to introduce the latest updates to Trident, which are designed to take workplace communication to the next level. Let’s take a quick look at what’s new. Connect with customers using Zoho Voice integration. You can now easilyMassive Zoho Books failure
We have not received any communication or notification from Zoho, but we have detected that Zoho Books is not working for all our users. We cannot access or use Zoho Books. This is critical. We are trying to contact Zoho on the Spain telephone number,The Social Wall: January 2026
Hello everyone, We’re back with the first edition of The Social Wall of 2026. There’s a lot planned for the year ahead, and we’re starting with a few useful features and improvements released in January to help you get started. Create a GBP in SocialHow to block whole domain?
I am getting at least 50-75sometimes over 100 spams emails a day. I see a lot of the spam is coming from .eu domains. I would like to block /reject all email coming for the .eu domain. I do not have any need for email from .EU domains. Why won't the BlackListNext Page