Managing approvals in Zoho CRM
Approval process help seek and provision record approvals in Zoho CRM. Based on your configuration, records qualified for approval will take its course. They will be
- Locked from making further edits.
- Queued for approvers’ queue for approval.
- The designated approver can approve, delegate, or reject from the Approvals queue in the My Jobs module.
- The approver can also explore each record and respond from within the record’s interface.
- If required, the approver can also modify all or selected fields before approving.
- Meanwhile, the record owner or any authorized user waiting on the approvals, can
- View the approval status and the approvers that are assigned for this record
- Recall approvals, if required
- Modify authorized field values upon rejection
- Resubmit
Let’s explore each of these actions!
Approvers actions from the My Jobs module
In Zoho CRM, approvers get a consolidated view under the My Jobs module.

Permissions required to approve records:
- Users designated as approvers in the Approval process configuration can view, approve, delegate, and reject records sent for their approval.
- Administrators can view the records queued for their approvals, as well as others' approvals in the My Jobs module.
Approving/Delegating/ Rejecting records
- Go to the My Jobs module in your Zoho CRM.
- Select the Approvals tab. By default, all the records that are queued for your approval will be listed under the view called My Approvals.
- Click on a record to view the following details:
- Details of the record - You can view the field and field value that needs your approval. This is the field upon which the approval automation was created.
- Criteria and other settings - You can look at other configuration details about the approval rule, if you have access to the approval process.
- User details and approval history- You can see the record owner, their contact information and their approval history.
- You can also contact the user right from within the record details view to converse in context.
- After evaluating, you can act on the approval request, by choosing to Approve, Delegate, or Reject.
- To approve a request,
- Click on the Approve button to provide your consent to the requested record.
- A popup named Approve <Module name> ? will be displayed.
- Provide the optional approval comments. This comment will be displayed as part of approval response of the record. The record owner or any authorized user can view these approver comments to understand the approvers’ point of view.
- If you’d like to put the approval comments for further use like triggering automation or even to take reference, you can choose to add the comments as a Note in the record.
- Click Approve to confirm your approval.
Note: In cases where multiple levels of approvals are required, this addition of comments to a record would be of great help to keep track. - Once approved, the request detail page will be updated with the
✓ Approved badge in place of the action buttons to signify your decision. You cannot change your decision after this point and the record will be removed from your approval queue. - Based on the record’s approval stage, the record will be approved, unlocked, and all the actions configured upon approval will be executed.
- To delegate a request,
- Click on the Delegate button. A popup named Delegate <Module name>? will be displayed.
- Choose the user to whom you’d like to delegate this approval request to and add your comments for the user. Note that this step is optional and adding so will offer more information to the delegated user and help understand your opinion on the approval.
- Like approval, you can also choose to add this comment as a note in the record.
- Click Delegate.
- After you have delegated, the approval request details page will display to whom the request has been delegated to with their contact information.
- The approval request will also be moved from your approval queue to the queue of the delegated user.
Remember, the record still is in the approval course and the record will be locked even if delegated. - To reject a request,
- Click on the Reject button from the request details page.
- In the popup named Reject <Module name>?, add your comments for rejection.
Remember, adding comments is optional. You can also save this comment as a note to the record. - Click Reject.
- After rejecting, the request details page will display a Rejected badge, curtailing further approval decisions and the record will be removed from your queue and the record will be unlocked.
- Based on your configuration after rejection, the approval process will execute the actions.
Convenient approver actions from the Approvals tab in My Jobs module
As approvals in an organization are always a long list, the Approvals tab in the My Jobs module offers you the following convenience:
- View your requests and other approvals by means a of a view switcher.
- Respond to each approval request right from the list view. You need not click-open the request to act.
- Select multiple requests and respond to them in bulk, at once.
- Quickly find records in the approvers queue using advanced filters.
- Manage columns by adding desired fields to display, clip-wrap texts, and sort requests for easy approvals.
- View overall Approval history. All the requests submitted, approved, delegated, and rejected are captured as logs with their timelines.
Approver actions from each record
The designated approver can view the approval requests from the MyJobs module. Based on their profile and permissions, the approver can further view the record, edit the record despite the record’s lock status, and respond to the approval request right from the record.
See also: Record modification in approval process.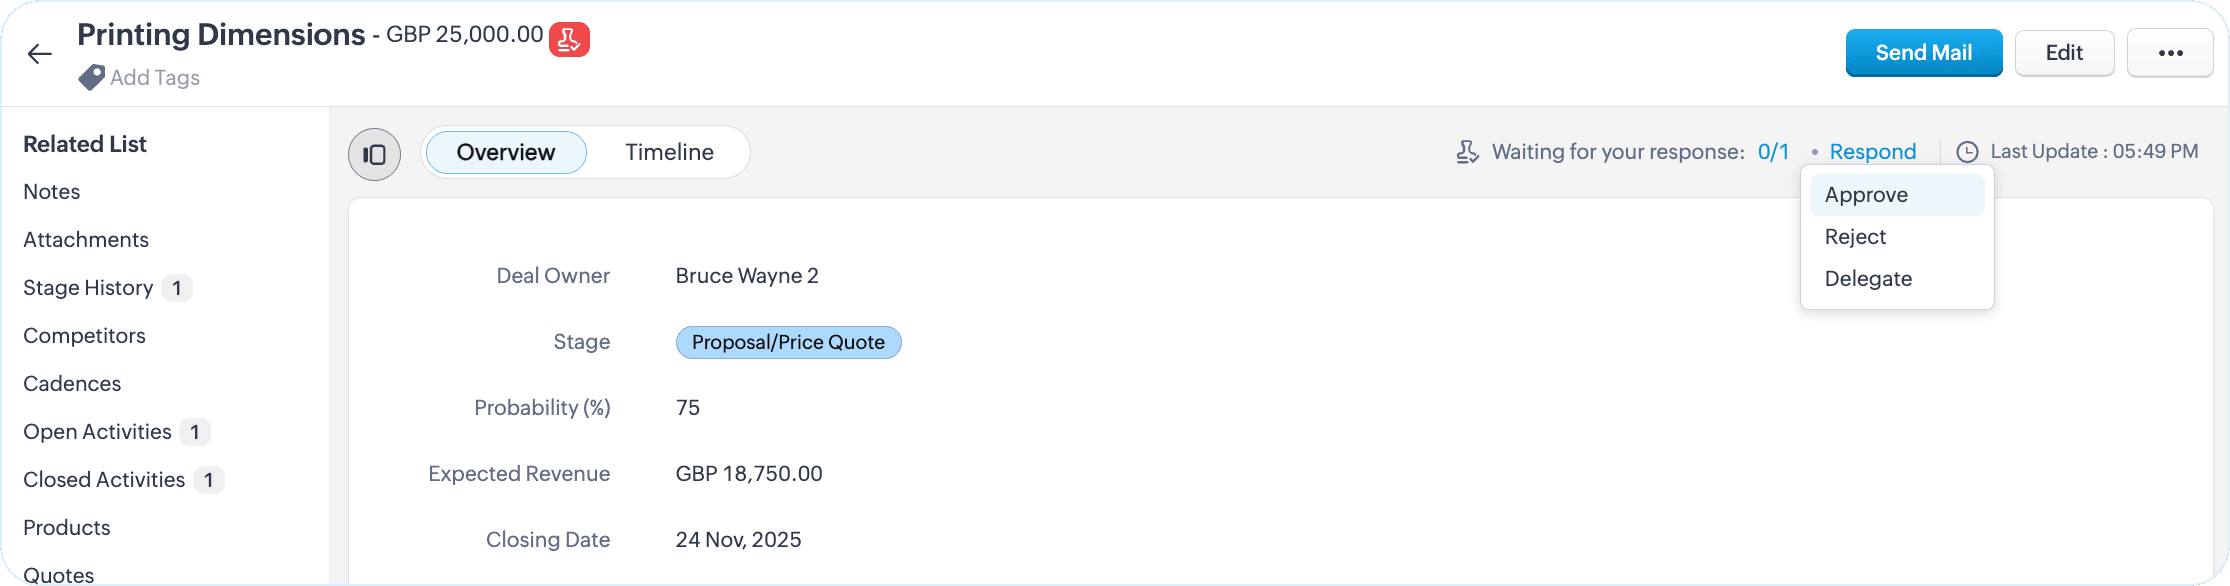
See also: Record modification in approval process.
- For multi-level approvals, as an approver, you can check for the status by clicking on the pending status icon.
- Respond to the request by clicking on the Respond button. You can approve, delegate, and reject.
- In addition to adding approval comments, you can also choose to notify other approvers in the configuration about your approval via an email.
Requestor actions from each record
So far, we saw the role and actions of approvers in the approval process. The requestors submitting these records for approvals also enjoy a set of actions.
A requestor can recall a record from approval and resubmit a record upon rejection.
Recall functionality is in the early access phase and will be enabled on request. To have it enabled for your account, pleadse contact support by mentioning your Org ID.
Recalling a record
A record sent for approval will be locked from edits. If you have any changes to it that affects the approval parameters, with the Recall option in place, you can summon the record back to the previous stage, make the changes and resubmit.
To recall a record from approval.
- Access the record you want to recall.
- Under the approval status, click Recall available under the list of approvers this record is pend for.
- Provide an optional comment and click Recall.
- The record will be recalled and be returned to the pre-submisison stage.
- After making necessary changes, you can resubmit the record back to the approval process.

Note: You can view the latest reason of why you have recalled the record for your reference. However, if you have recalled more than once, you can view the respective reasons from the timeline of the record.
Alternatively, if you are a record owner whose record is queued for approval and also happened to be a user with an administrator profile, you can recall your records from other approvals view from the My Jobs module.
Resubmitting a rejected record
After a record is rejected, the record will be unlocked. Rejection comments or any field changes the approver made to the record in the approval process will be retained. If as a requestor, you’d like to re-enroll the record back to the approval process, you can resubmit the record after making necessary changes.
To resubmit, click on the Resubmit button you see on top of the record.
See also: