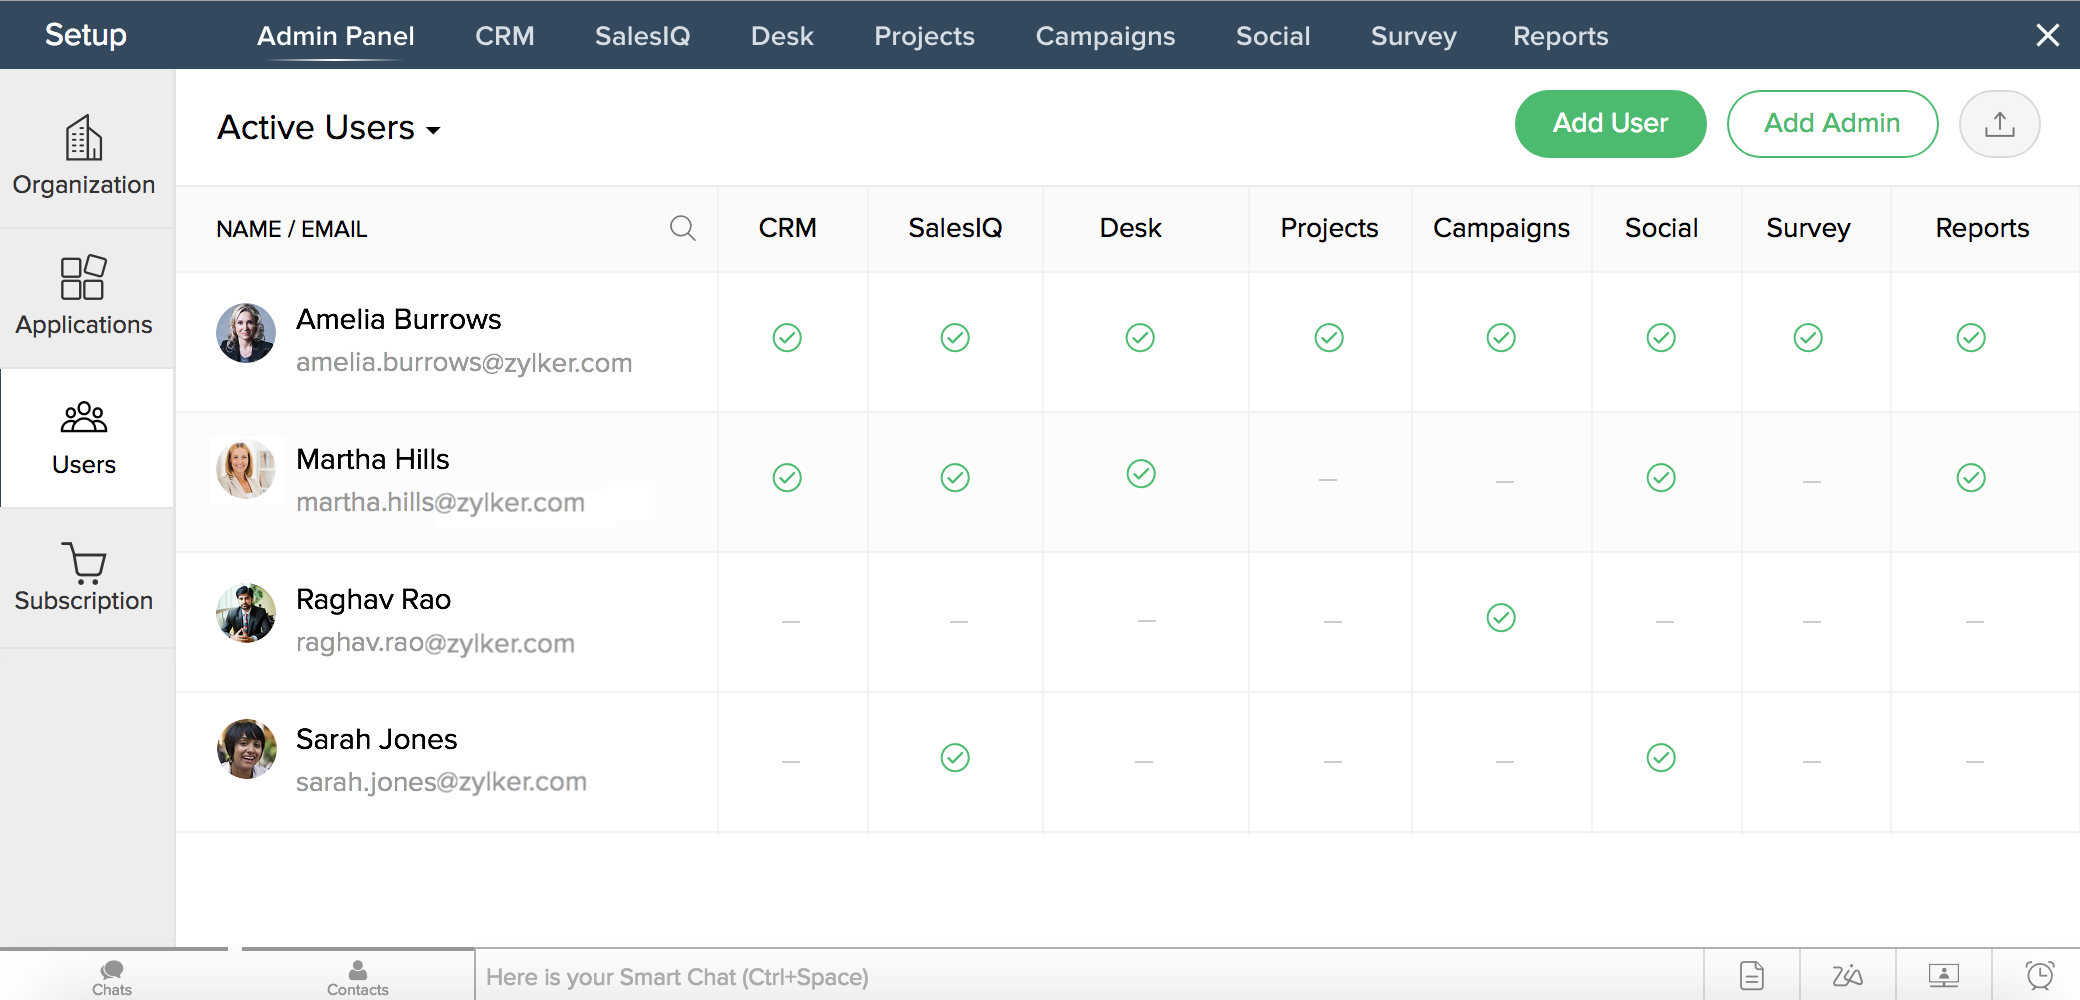
Manage users and assign access to applications
You can add users to your organization and grant them access to individual applications in Zoho CRM Plus. This allows you to manage users and their application access to Zoho CRM Plus's features and functions, making it easy to limit who has access to the different types of data within your organization.
For example, customer support personnel may need access to Zoho Desk and Projects, but not Campaigns or Social.
CRM Plus Administrators or users with user management permissions in the Admin Panel are responsible for managing user access for your organization. They can perform the following actions in the Users page.
- Add Users
- Assign Applications to Users
- View Applications Assigned to Users
- Update Application Access for Users
- Disable or Enable Application Access for Users
- Resend Invitation to Users
In addition, CRM Plus Administrators can also perform the following actions:
- Assign CRM Plus Administrators
- De-activate or Activate a User
- Export Users Data
- Delete User Accounts
- Revoke Administrative Privileges for a User in CRM Plus.
Note: The total number of users you can add depends on the number of user licenses you have purchased. For example, if you purchase 40 licenses, you can add a total of 40 unique users to Zoho CRM Plus, regardless of how many applications each user has access to.
You can also delete users if they no longer require access to Zoho CRM Plus. To delete users, you must be a CRM Plus Administrator or an Owner.
When you try to delete a user, you will receive a message that the user will be deleted permanently and you cannot undo the action. If you confirm deletion, the user will be permanently deleted from your CRM Plus account.
Notes:
- The data managed or associated with the user will not be deleted from the respective applications.
- If you want to add the same user again later, you can add them as a new user in CRM Plus.
Customizing mandatory fields: The following table lists the applications in CRM Plus, fields that must be assigned in each application when users are granted access, and how to customize the details displayed in these mandatory fields.
| Application | Fields to be Assigned | Customization |
CRM | Roles, Profiles, Reporting Manager (Optional) | To learn more about creating roles, profiles, and users, click Security Management. Click here to learn more about hierarchy preferences. |
Desk | Roles, Permissions, Departments | To learn more about creating roles, permissions, and departments, click this link. |
Campaigns | Roles | Select the standard roles defined in Zoho Campaigns. Users can be assigned roles such as User or Admin. You can assign the following privileges to provide users with different access levels.
|
Survey | Departments, Department Roles | To learn more about creating departments and roles, click this link. |
Projects | Roles, Profiles, Projects | Create roles, profiles, set up permission sets, portal owner and admin permissions, and manage your portal and project users and client users in Projects. |
SalesIQ | Roles, Departments | To learn more about customizing roles click Adding Operators and Assigning Roles in Zoho SalesIQ. To customize departments, click How to Associate the Operator's to Departments. |
Social | Roles, Brands, Brand Roles | |
Reports | Roles | In Zoho Reports, a user can be an Administrator, Database Owner, or User. To learn more, click Managing Users in Zoho Reports. |
Adding Users to Projects and the Desk Application
When you add users to CRM Plus, you can add unlimited users to Projects in different roles and add them to Desk with Light Agent role. Users who are only assigned to Projects and/or as Light Agents in Desk are called Light Users.
If you assign a Light User to any other application, the user will be counted against the number of user licenses you have purchased. For example, you want to add SalesIQ or Campaigns for a user who is already assigned as a Light Agent in Desk. You'll be able to add this user only if you have user license available in Zoho CRM Plus.
After you add and grant access to users, you can disable access to specific applications for them. The access privileges available for each application will differ based on the user's status. For example, if a user with the 'pending' status is assigned access to Campaigns, you'll find Edit and Unassign options displayed when you hover the cursor below the Campaigns column for that username in the Users page. But if the user status is 'active', you'll see the Edit, Enable, or Disable options. You can click Edit to update application access, or click Disable or Unassign to remove application access for that user.
The following table lists the applications and access privileges for each application for pending and active users.
| Application Name | Access Privileges for Pending Users | Access Privileges for Active Users |
CRM | Edit, Enable, or Disable | Edit, Enable, or Disable |
Campaigns | Edit, Unassign | Edit, Enable, or Disable |
Desk | Edit, Enable, or Disable | Edit, Enable, or Disable |
SalesIQ | Edit, Enable, or Disable | Edit, Enable, or Disable |
Survey | Edit, Unassign | Edit, Enable, or Disable |
Social | Edit, Unassign | Edit, Enable, or Disable |
Projects | Edit, Unassign | Edit, Enable, or Disable |
Reports | Enable Access, Disable | Enable Access, or Disable |
Motivator | None | Edit, Enable, or Disable |
To add a user:
- Access the Admin Panel. The Users tab will be selected by default with the Users page displayed on the right side of the page.
- Click Add User. You'll see the Add User page.

- Enter the new user's Email Address in the text box.
- Select the checkboxes corresponding to the applications you'd like that user to have access to. You will only see applications for which you have administrative privileges.
- Fill in the required application fields for all applications you would like to assign.
- Click Add. An invitation will be sent to the user.
Note: If Zoho Motivator is configured for your CRM Plus account, when you select CRM for a user, the user will be automatically added to Motivator as well.
Assign CRM Plus administrators
To add users as CRM Plus Administrators:
- Click the Users tab displayed to the left of the page. You will see the list of users with the applications assigned to them.
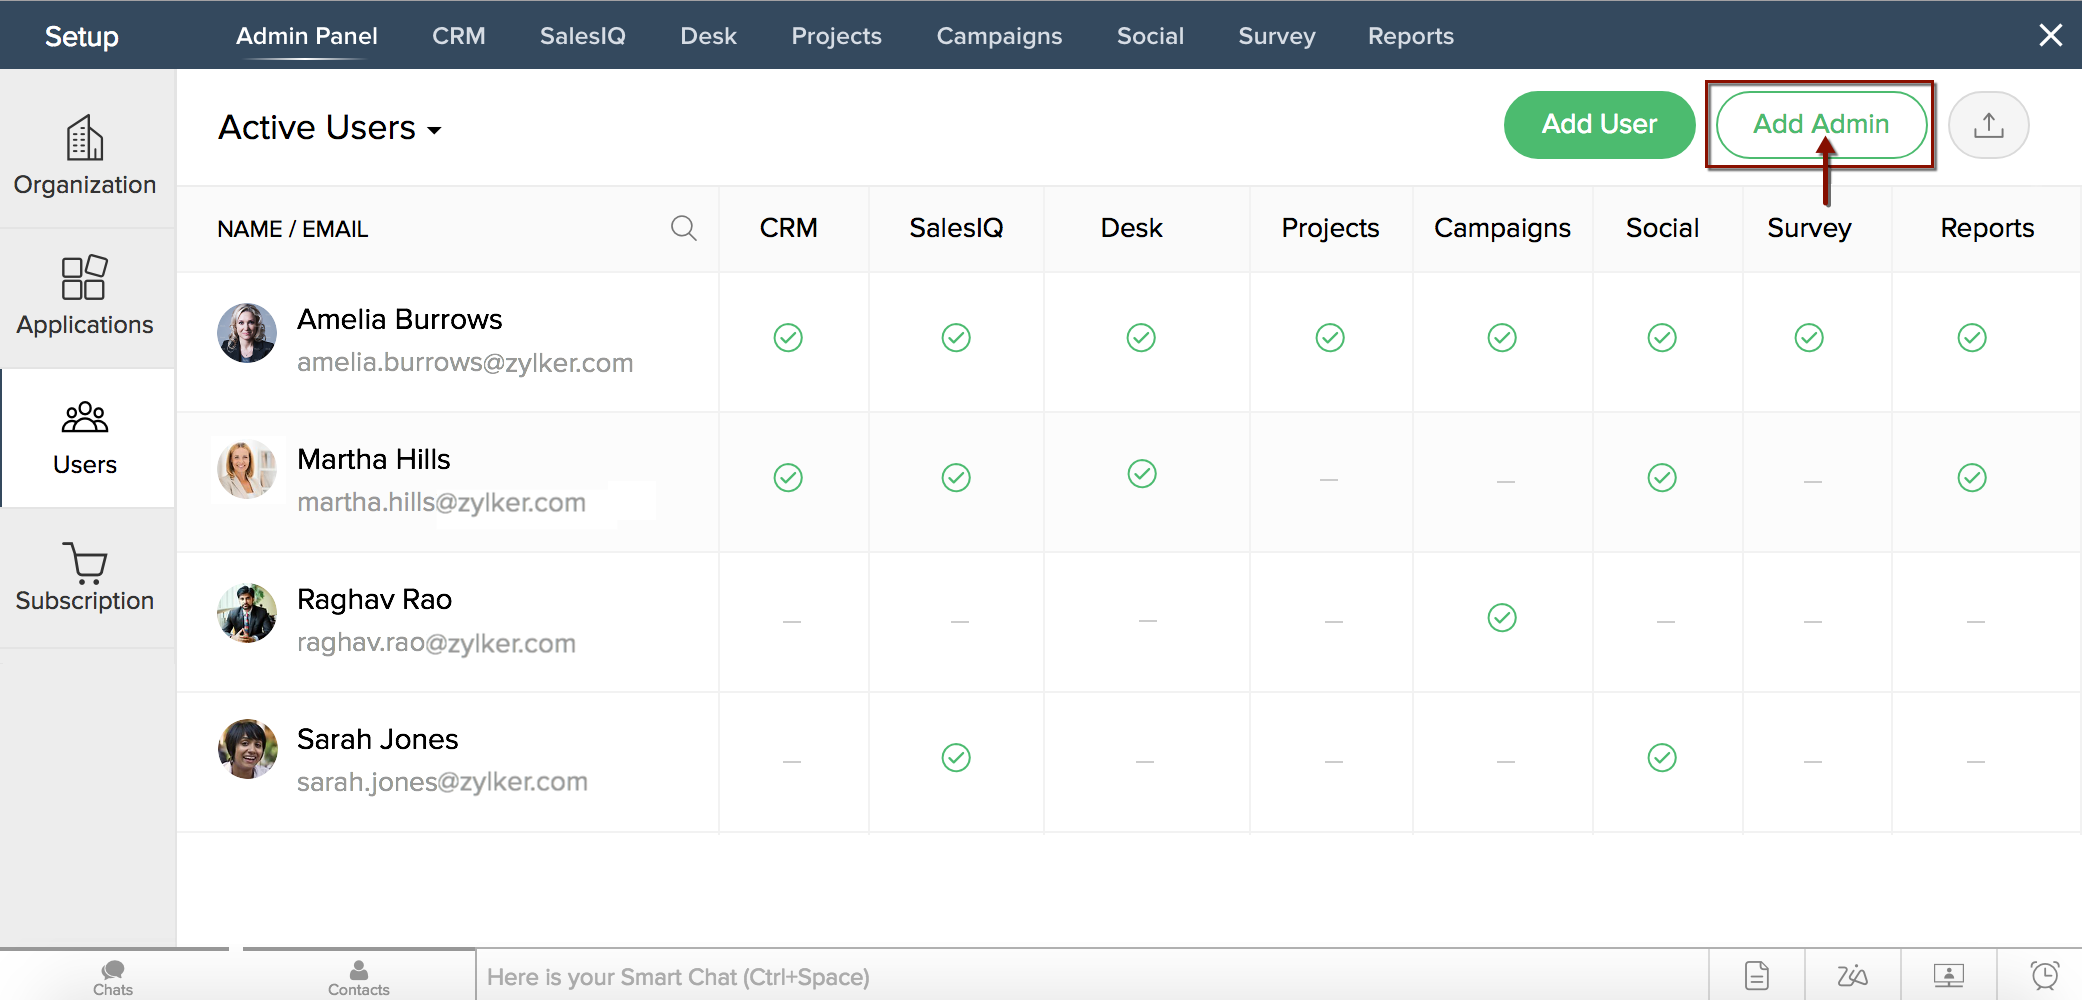
- Click Add Admin. The Add Admin pop-up window is displayed.
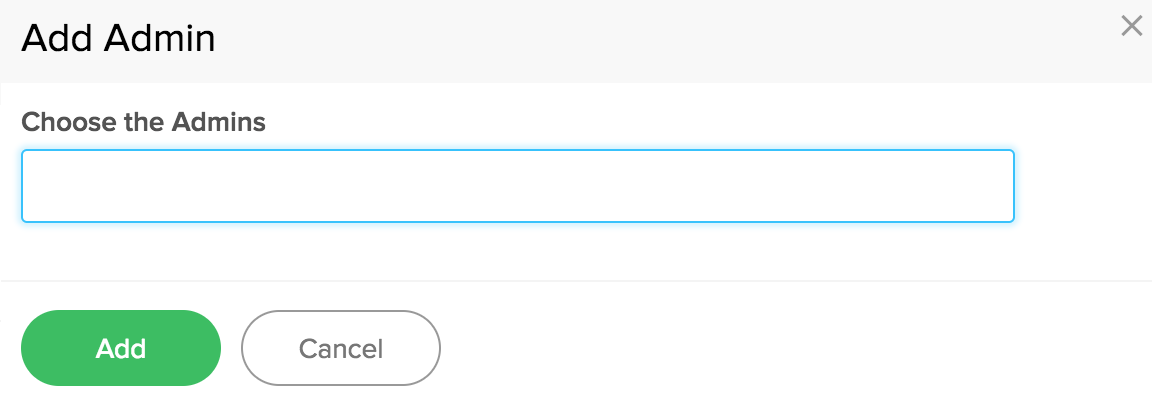
- Click inside the text box in the Add Admin pop-up window and enter the user's name or email address. A dropdown list will appear, displaying any matching user names for the text or email address entered.
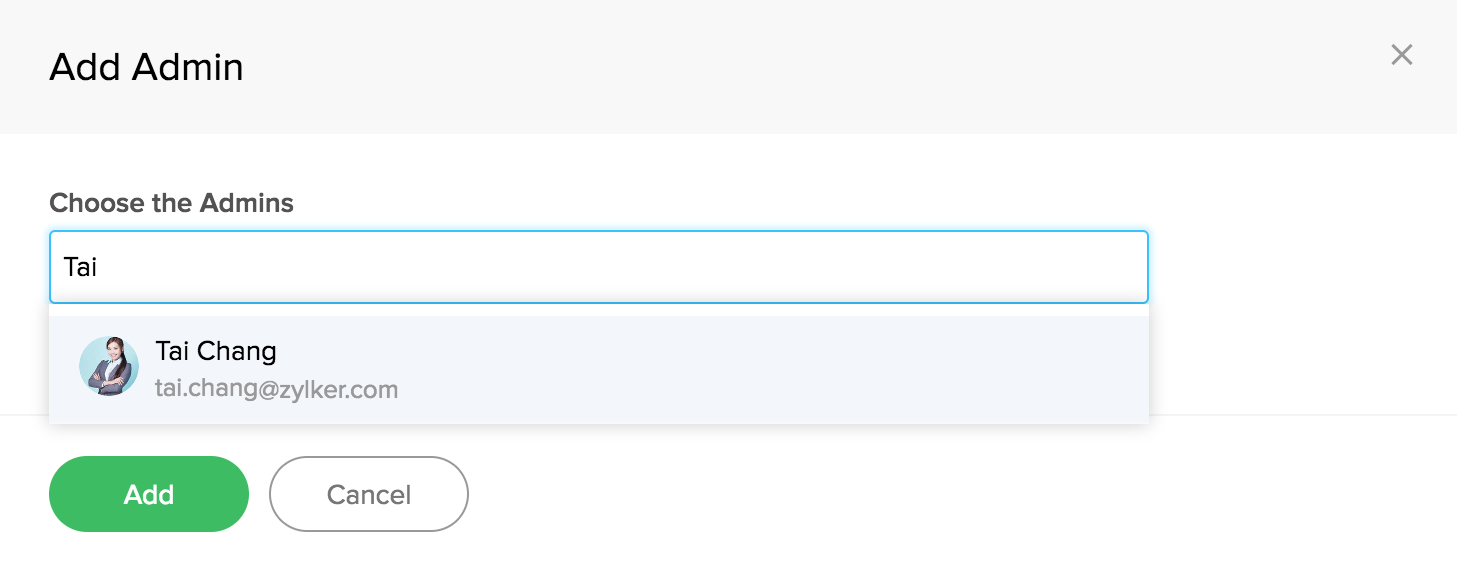
- Select the username. Their user's profile and name will be displayed in the text box. Repeat steps 3 and 4 to add more users as administrators if required.
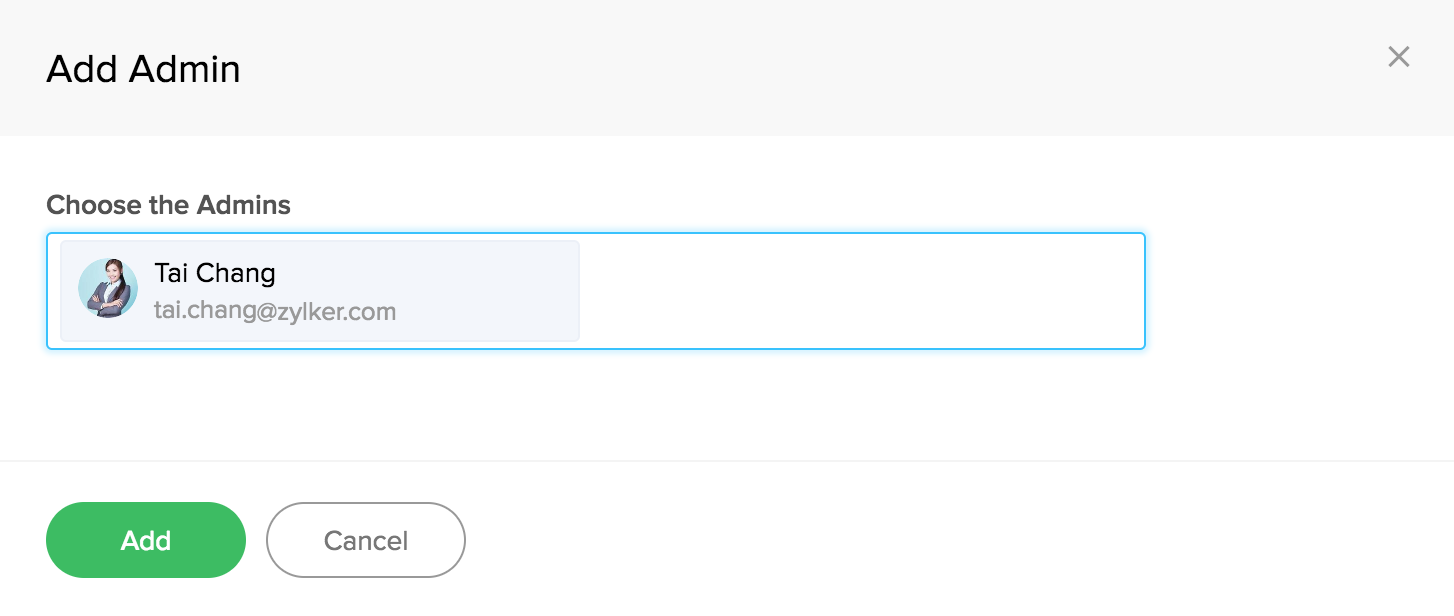
- Click Add.
Notes:
- Only Zoho CRM Plus administrators can assign users as CRM Plus Admins.
- You can add only active users as CRM Plus Administrators.
Assign applications to users
To assign applications to a user:
- In the Users page, hover the cursor over the column displayed below an application name corresponding to a user's name.
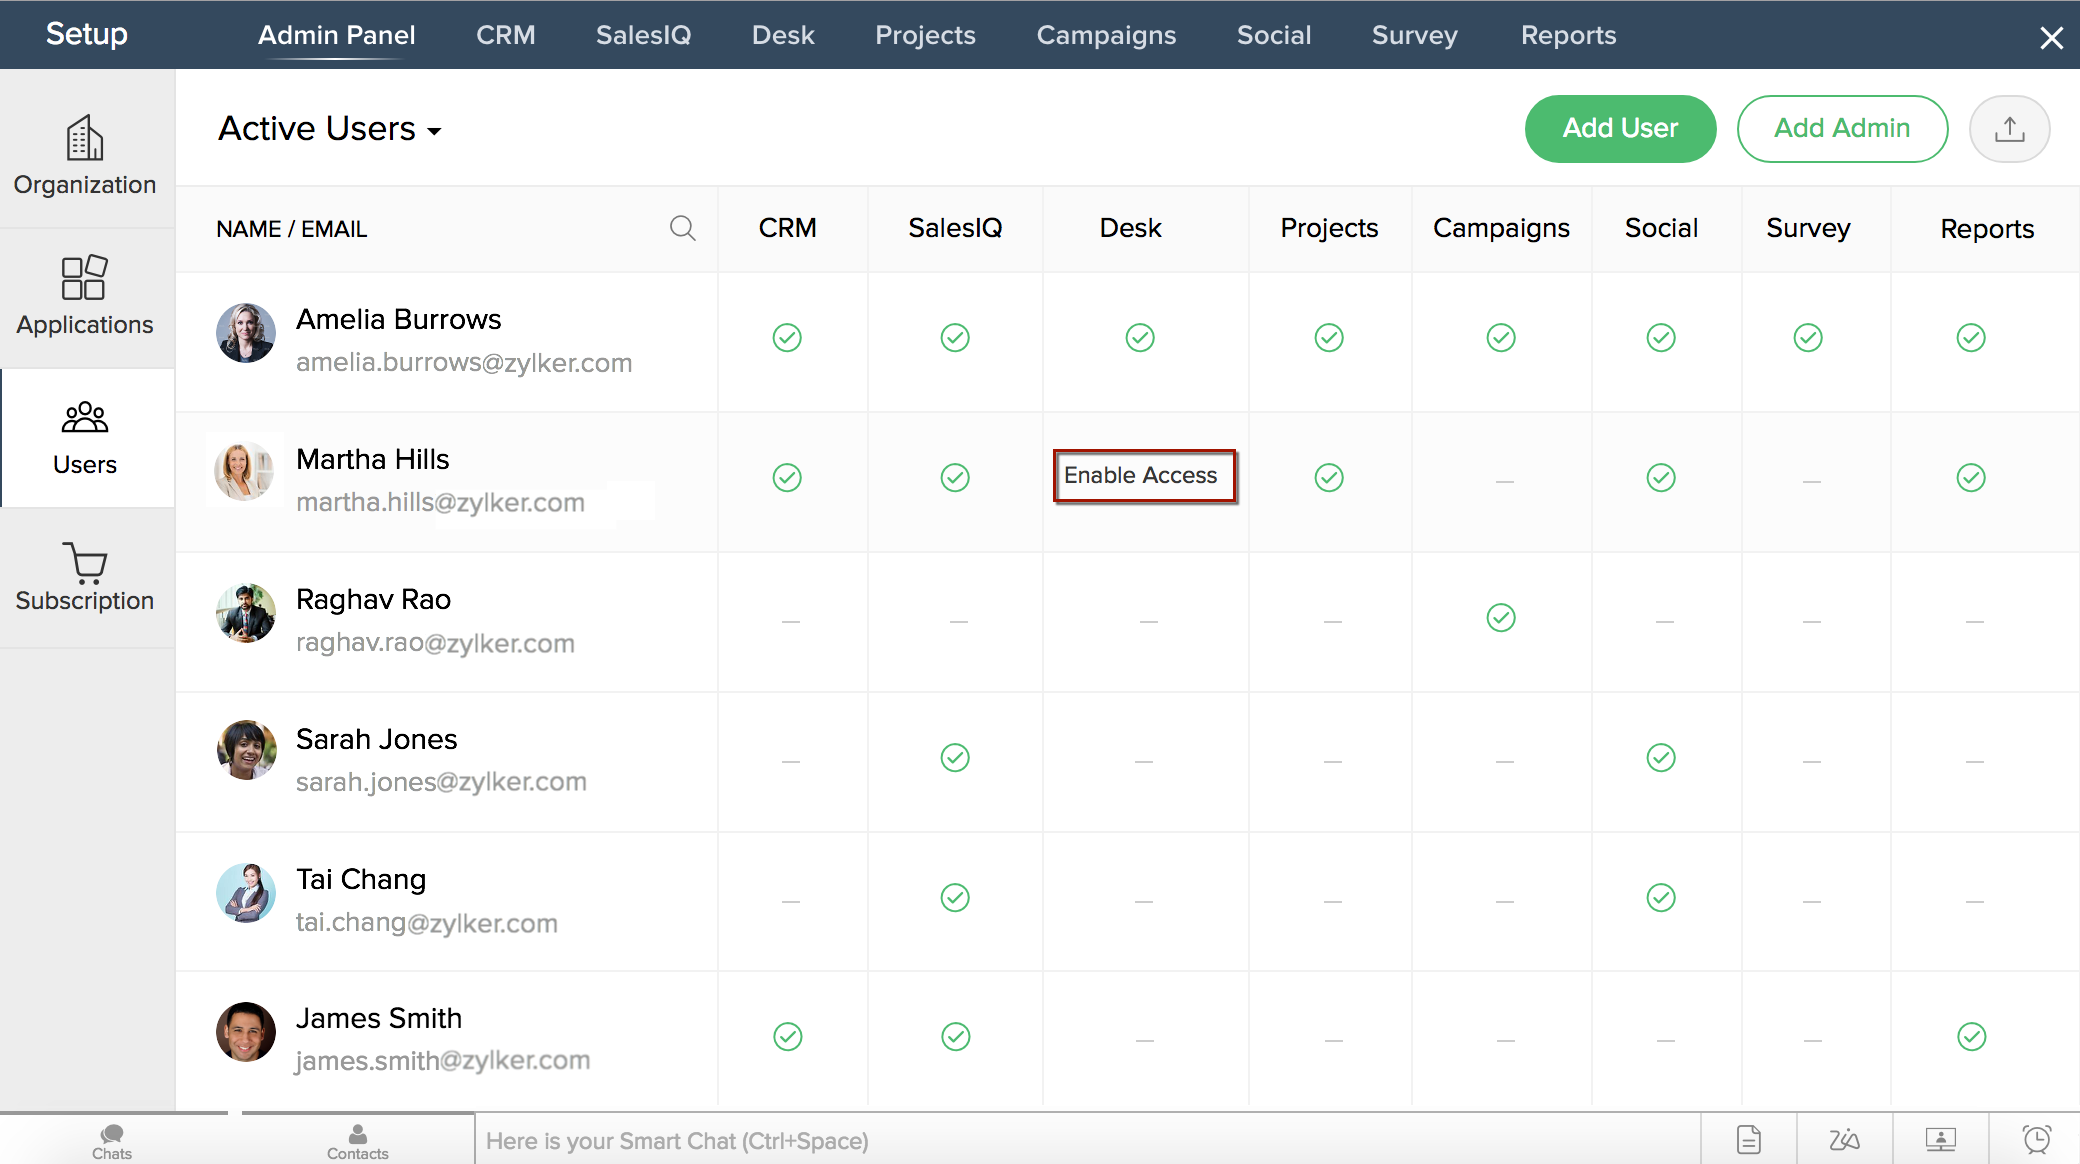
- Click Enable Access. The Assign Applications pop-up window will appear.
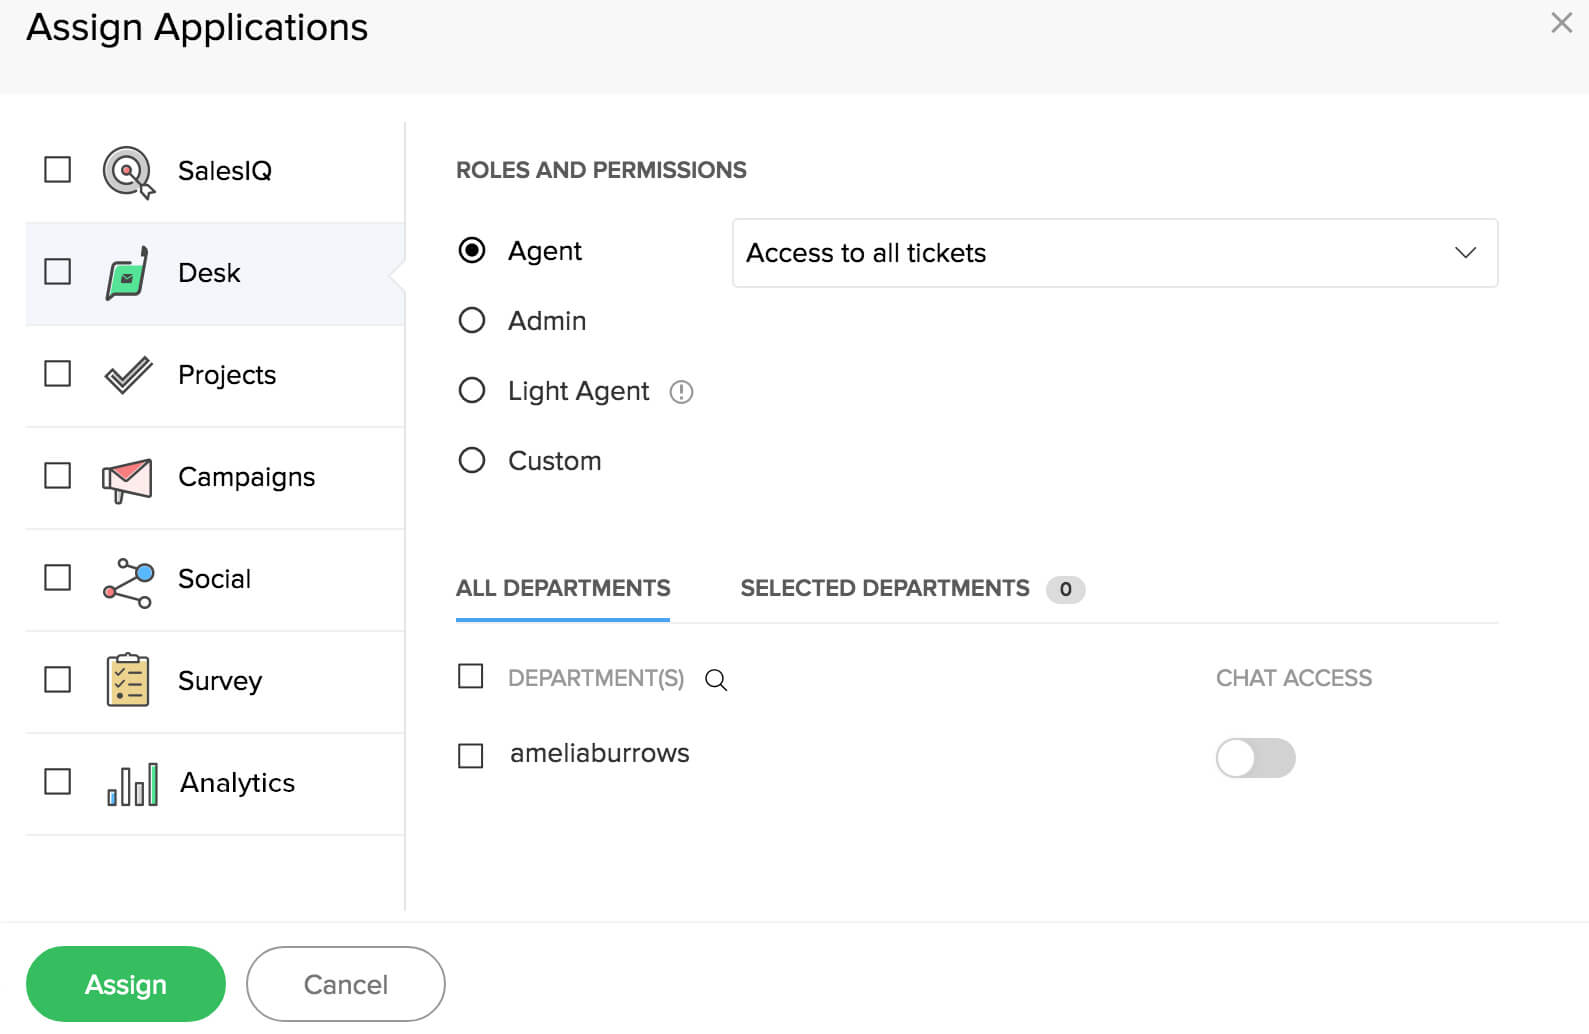
- Select the checkboxes for the applications you'd like to add. You will only see applications for which you have administrative privileges.
- Fill in the required application fields for all applications you would like to assign.
- Click Assign.
Notes:
- Click a username to the left of the Users page. A panel will slide in on the right of the page. Click +Add next to the Applications section in the sliding panel. The Assign Applications pop-up window will appear with a list of applications based on your privileges. Select the checkboxes for the applications you'd like to add. Fill in the required fields, then click Assign. The application assigned to the user will be displayed in the sliding panel.
- You can also assign applications to users from the Applications tab. Navigate to the Applications page, hover the cursor over an application name and click the +Add User link. The Add User pop-up window will display a range of fields based on the application selected. Enter the email address of users you want to add, fill in the required fields, then click Add User to assign the users.
View applications assigned to users
To view applications assigned to a user:
- Navigate to the Users page. You'll see the list of users and applications assigned to them.
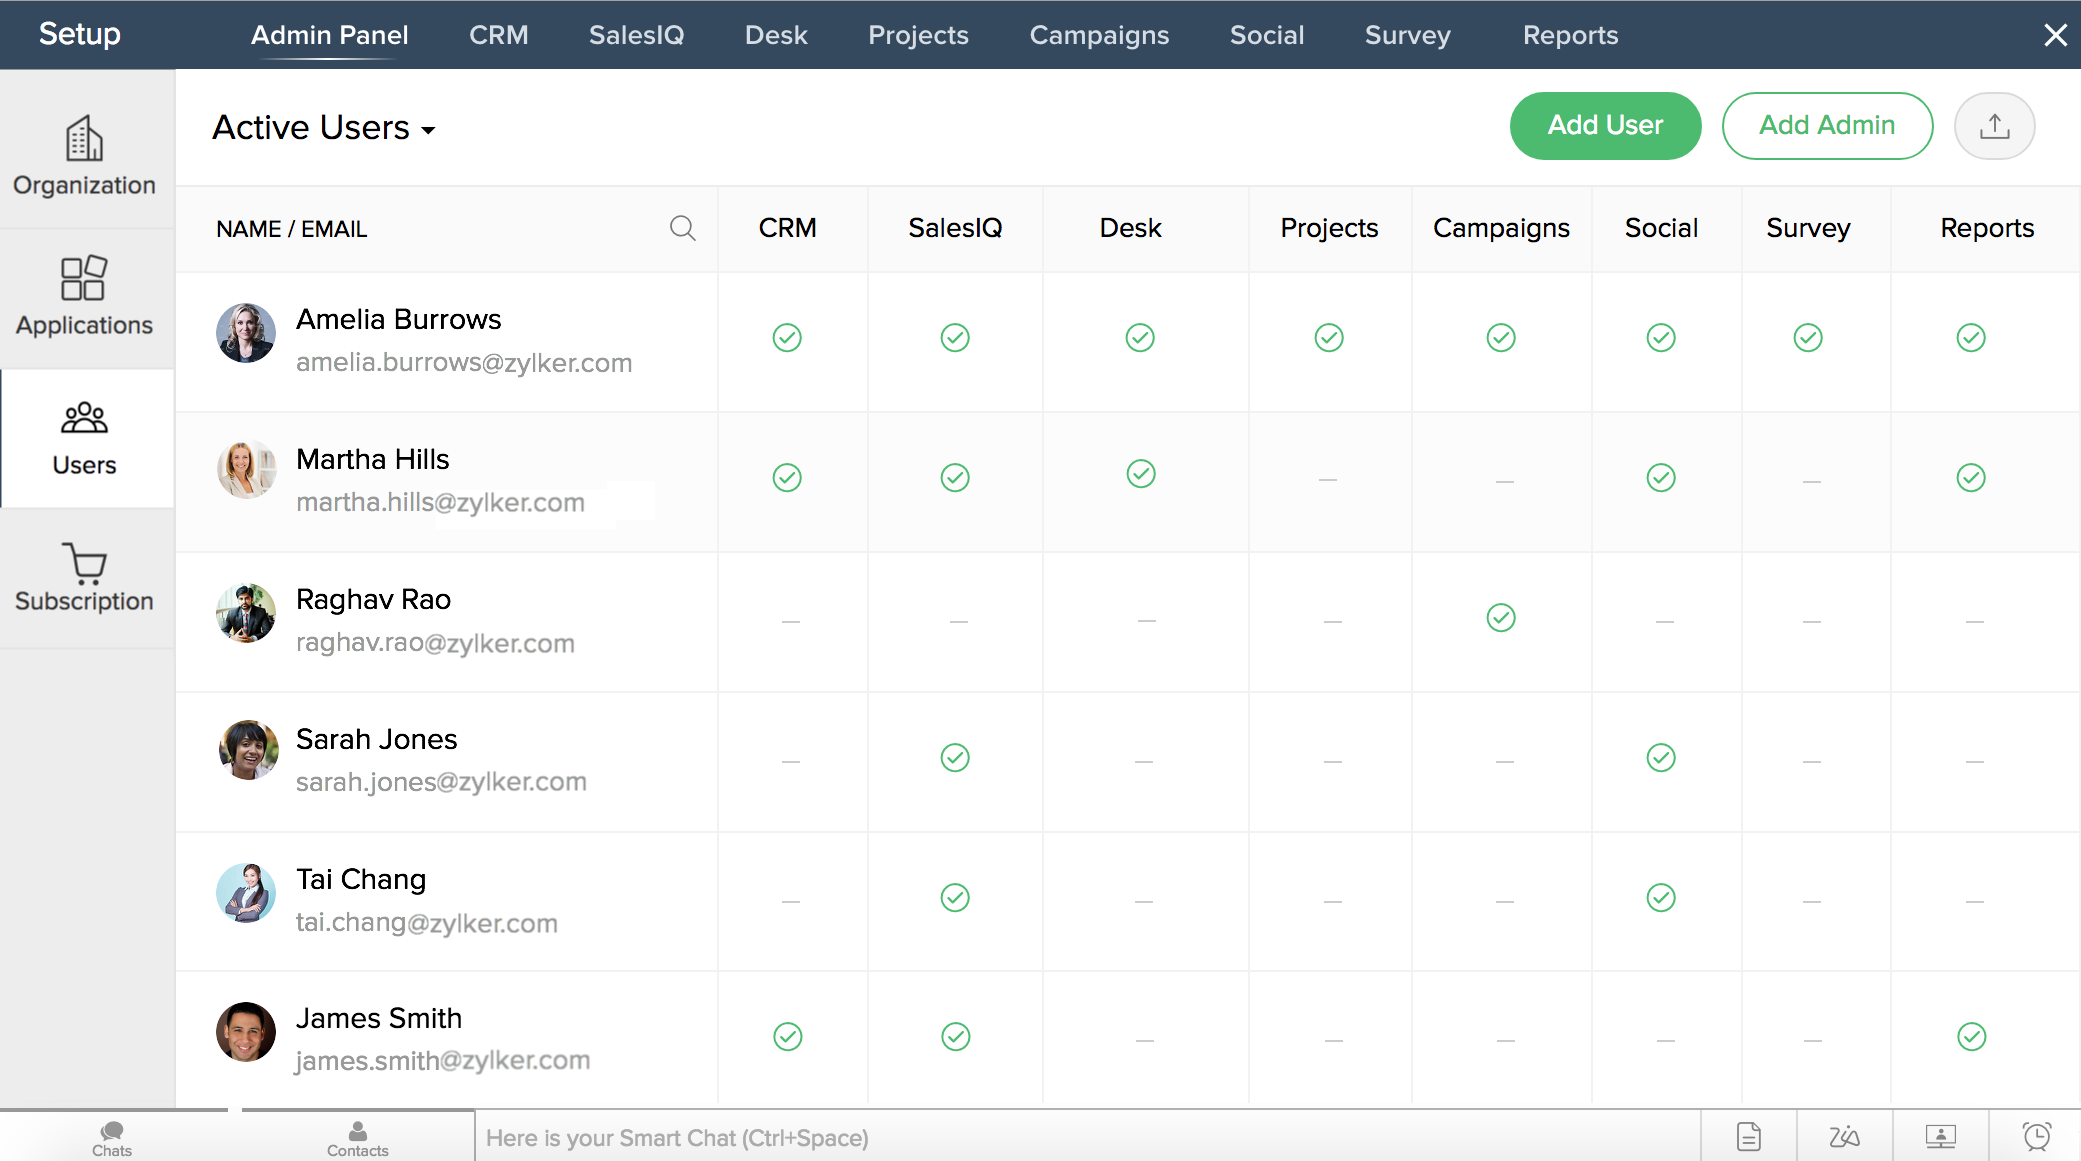
You can also choose to view All, Active, Inactive, Pending, Light, or Admin users by clicking the arrow button next to Active Users. When you click the down arrow, a dropdown menu will appear, allowing you to select the type of users you'd like to view. - If you want to view the roles and permissions assigned to a user, click the username to the left of the Users page. You'll see a panel slide in on the right of the page with the user name, email address, list of applications, and the role and profile assigned to that user in each application.
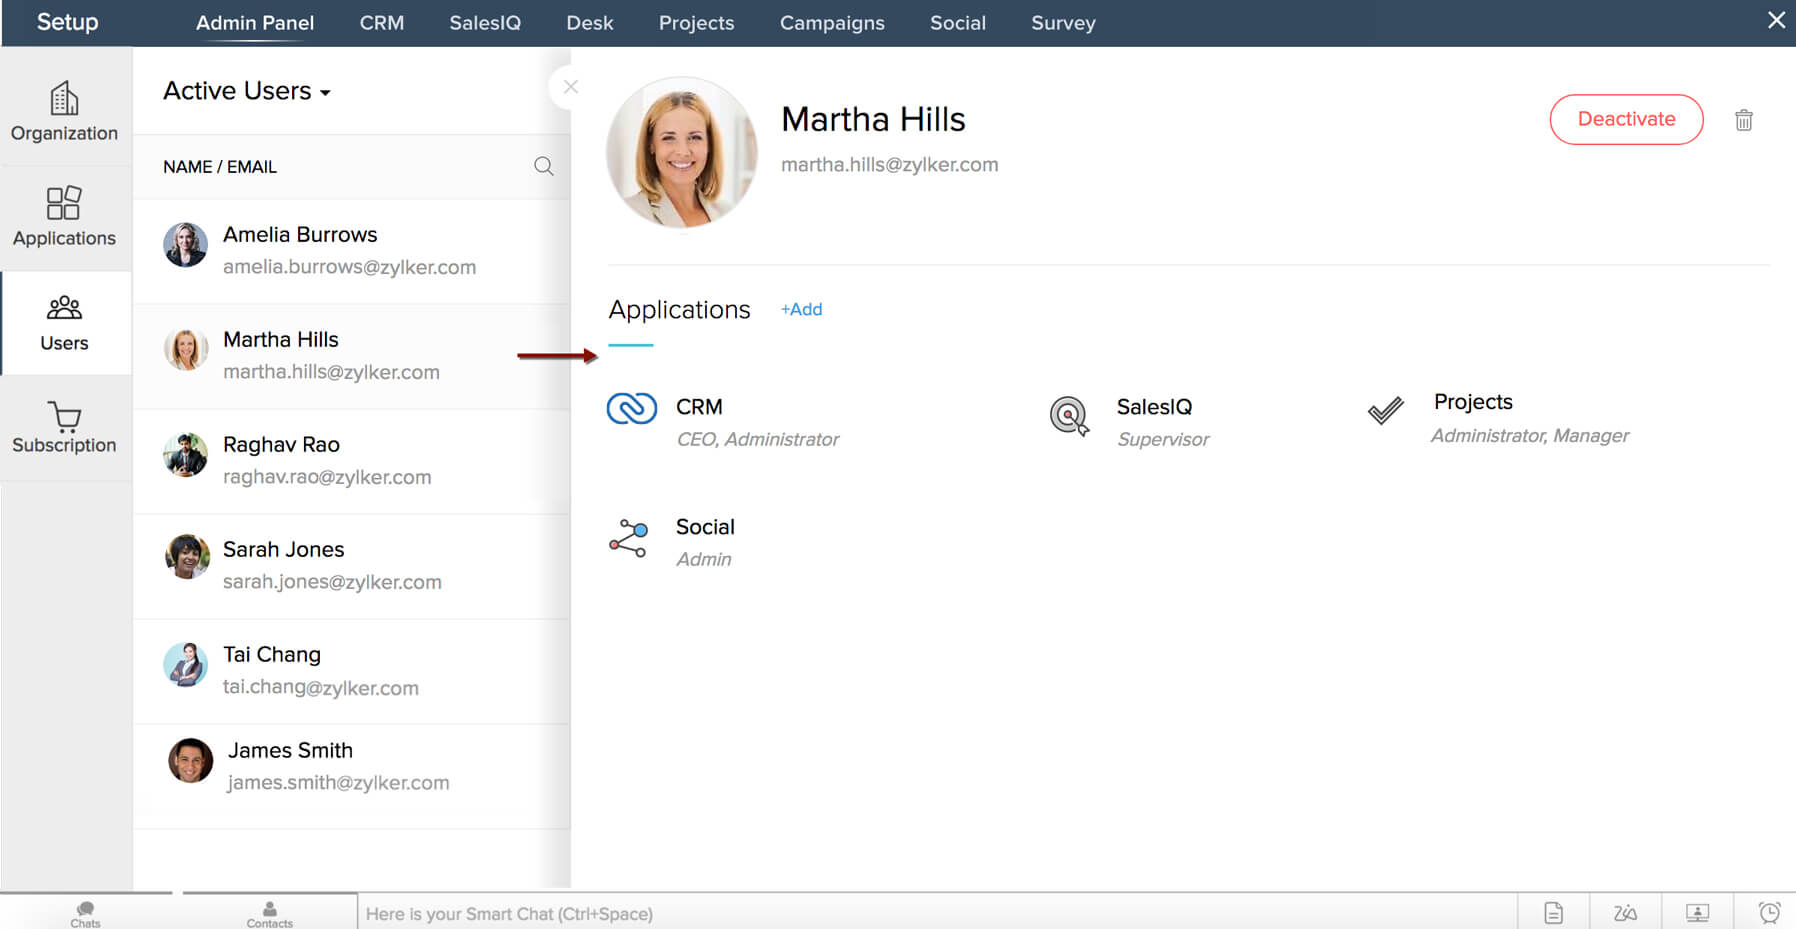
- Click (
 ) to close the sliding panel.
Note: Click the Delete icon (![]() ) if you want to delete the user. When you click this button, you will receive a message that the user will be deleted permanently and you cannot undo the action. If you confirm deletion, the user will be permanently deleted from your CRM Plus account.
) if you want to delete the user. When you click this button, you will receive a message that the user will be deleted permanently and you cannot undo the action. If you confirm deletion, the user will be permanently deleted from your CRM Plus account.
If you are a Zoho CRM Plus Administrator, you can deactivate or activate a user in CRM Plus.
To deactivate or activate a user:
- Click the username to the left of the Users page. A panel will slide in on the right of the page with the user's profile and the list of applications assigned to the user.
- Click Activate or Deactivate to change the status of the user.
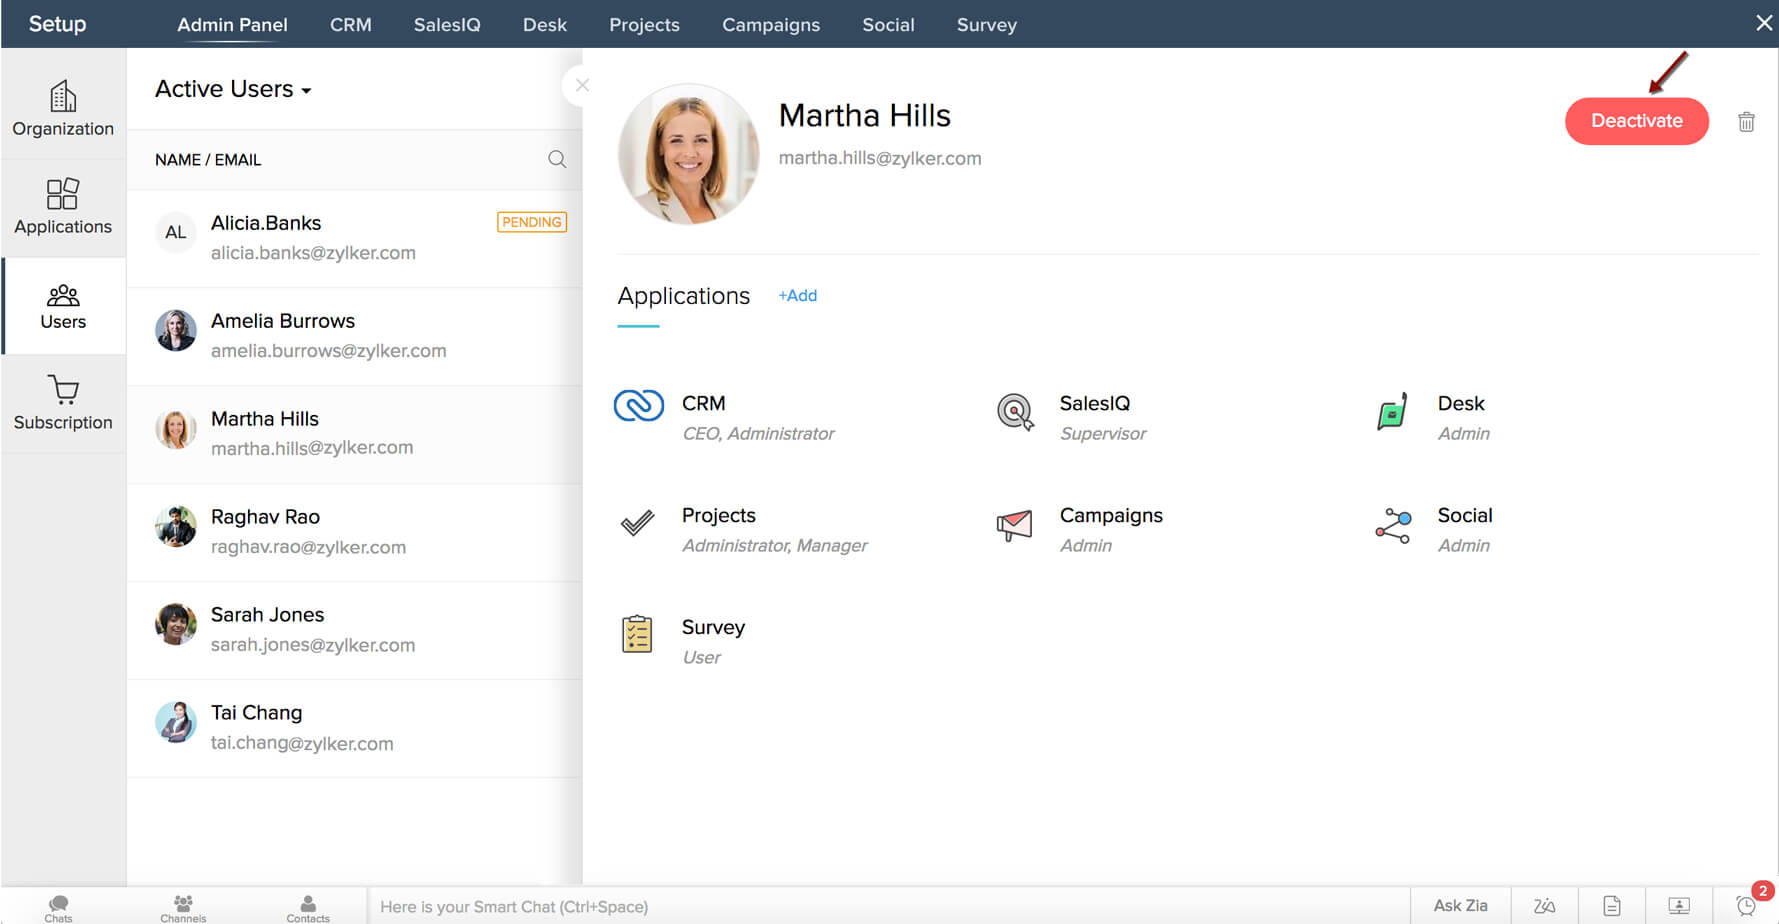
- Click () to close the sliding panel.
Notes:
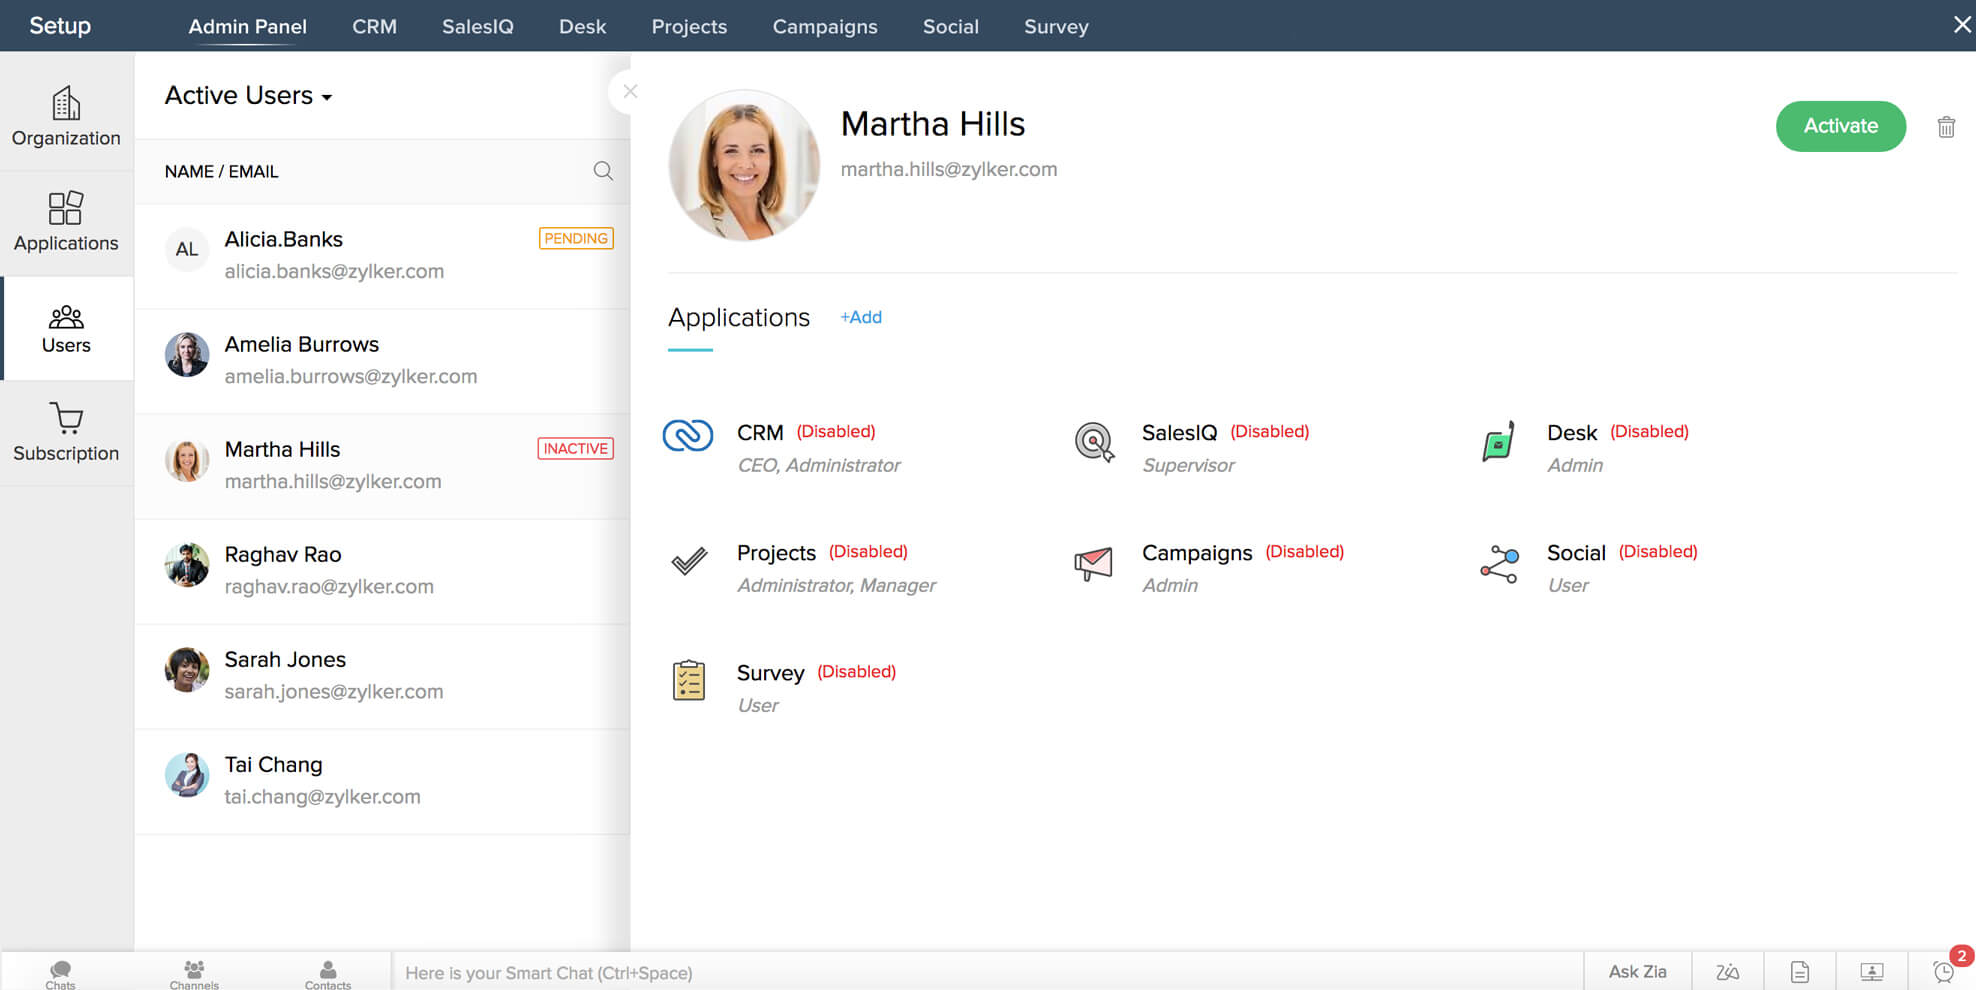
- If you deactivate a user's status and click Activate, the Assign Applications pop-up window will be displayed for you to assign applications as well as access privileges for the user.
- Hover the cursor over an application name in the Applications section and click Enable Access. The Update User pop-up window will open. You can activate the user's status as well as enable application access for the user in this window.
- Click the Delete icon (
 ) if you want to delete the user. When you click this button, you will receive a message that the user will be deleted permanently and you cannot undo the action. If you confirm deletion, the user will be permanently deleted from your CRM Plus account.
To update application access for a user:
- In the Users page, hover the cursor over a column displayed below the application name corresponding to a username. If the user is already assigned to that particular application, options to Edit, Disable or Enable, or Unassign application access will appear, depending on the user's status and applications assigned to the user.
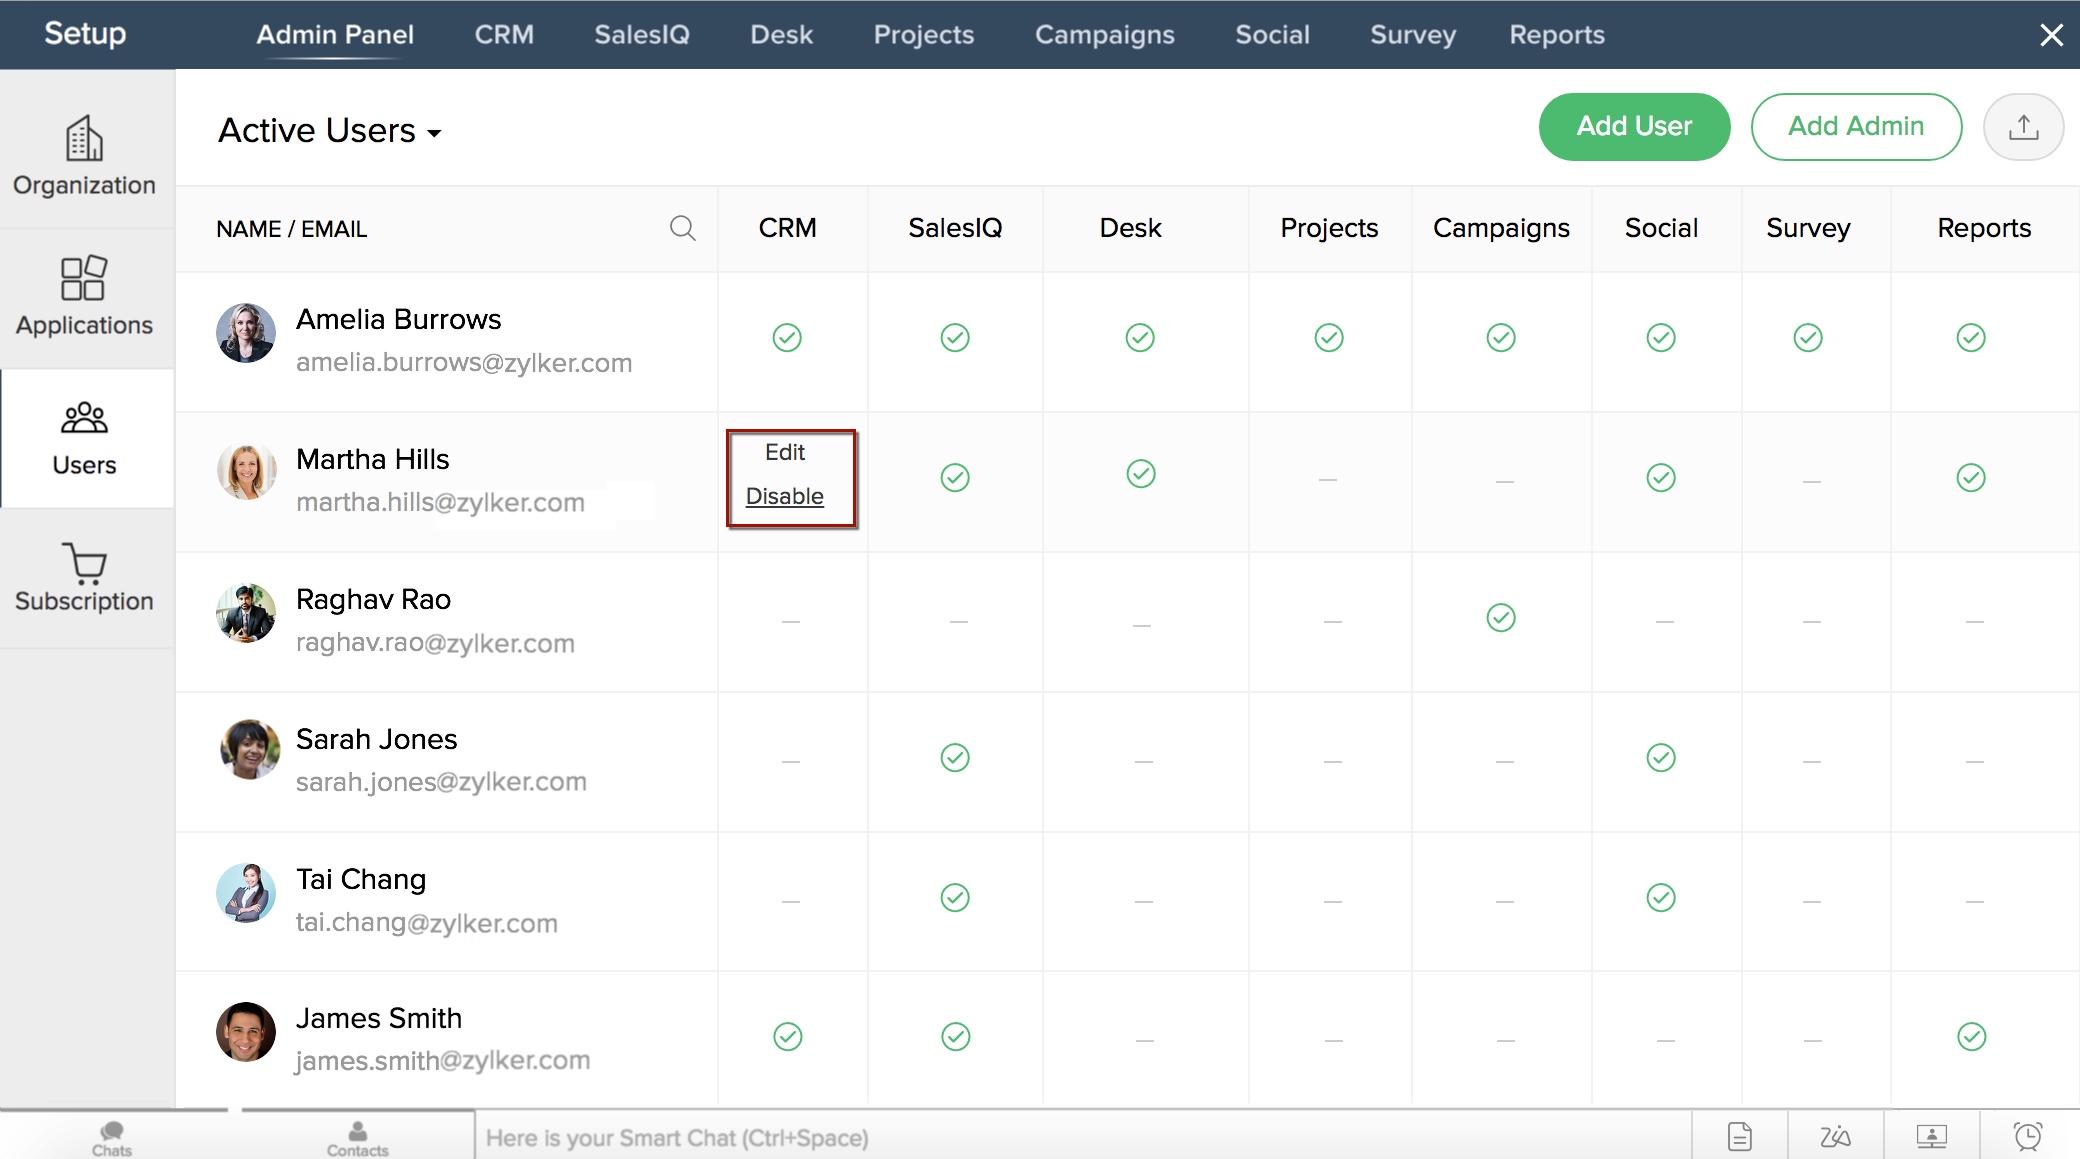
- Click Edit and make whatever changes you need in the Update User pop-up window and then click Update.
Note: You can also click a username to the left of the Users page. A panel will slide in on the right of the page. Navigate to the Applications section and hover the cursor over an application name. There will be options to Edit, Disable or Enable, or Unassign the application. Click Edit and make changes in the Update User pop-up window and then click Update.
To disable or enable application access for a user:
- In the Users page, hover the cursor over a column displayed below the application name corresponding to a user's name. Options to Edit, Disable or Enable, or Unassign access will appear based on the user's status and the applications assigned to them.
- Click Disable or Unassign to remove application access for that user. You will see a message that the user is deactivated.
- To reenable access, hover the cursor over the disabled application and click Enable Access. The Update User pop-up window will open. Assign role and access privileges for the user in the application and click Update. You'll see a message that application access is activated for that user.
Notes:
- Click a username from the list on the left of the Users page. A panel will slide in on the right of the page. Hover the cursor over an application name displayed in the Applications section in the sliding panel. Options to Edit, Disable or Enable, or Unassign will appear. Click Disable or Unassign to remove application access for that user. To reenable access, hover the cursor over the disabled application and click Enable Access. Assign role and access privileges for the user in the Update User pop-up window and click Update.
- If Zoho Motivator is configured for the user, when the user's access to CRM is disabled, the user will be automatically removed from Motivator as well. If application access is enabled for the user in CRM again, the user will be active in CRM as well as Motivator.
If you are a CRM Plus Owner or Administrator, you can export your users data. To export user data:
- In the Users page, click the Export Users icon (
 ). The users data is exported and downloaded in .CSV format.
 - Open the CSV file to view the data.
To resend an invitation to a user:
- In the Users page, click a username whose status is 'pending' from the left of the page. You will see a panel slide in on the right with the user's profile and list of applications assigned to that user with Deactivate or Activate and Resend Invitation buttons, and the Delete icon on the top-right corner of the sliding panel.
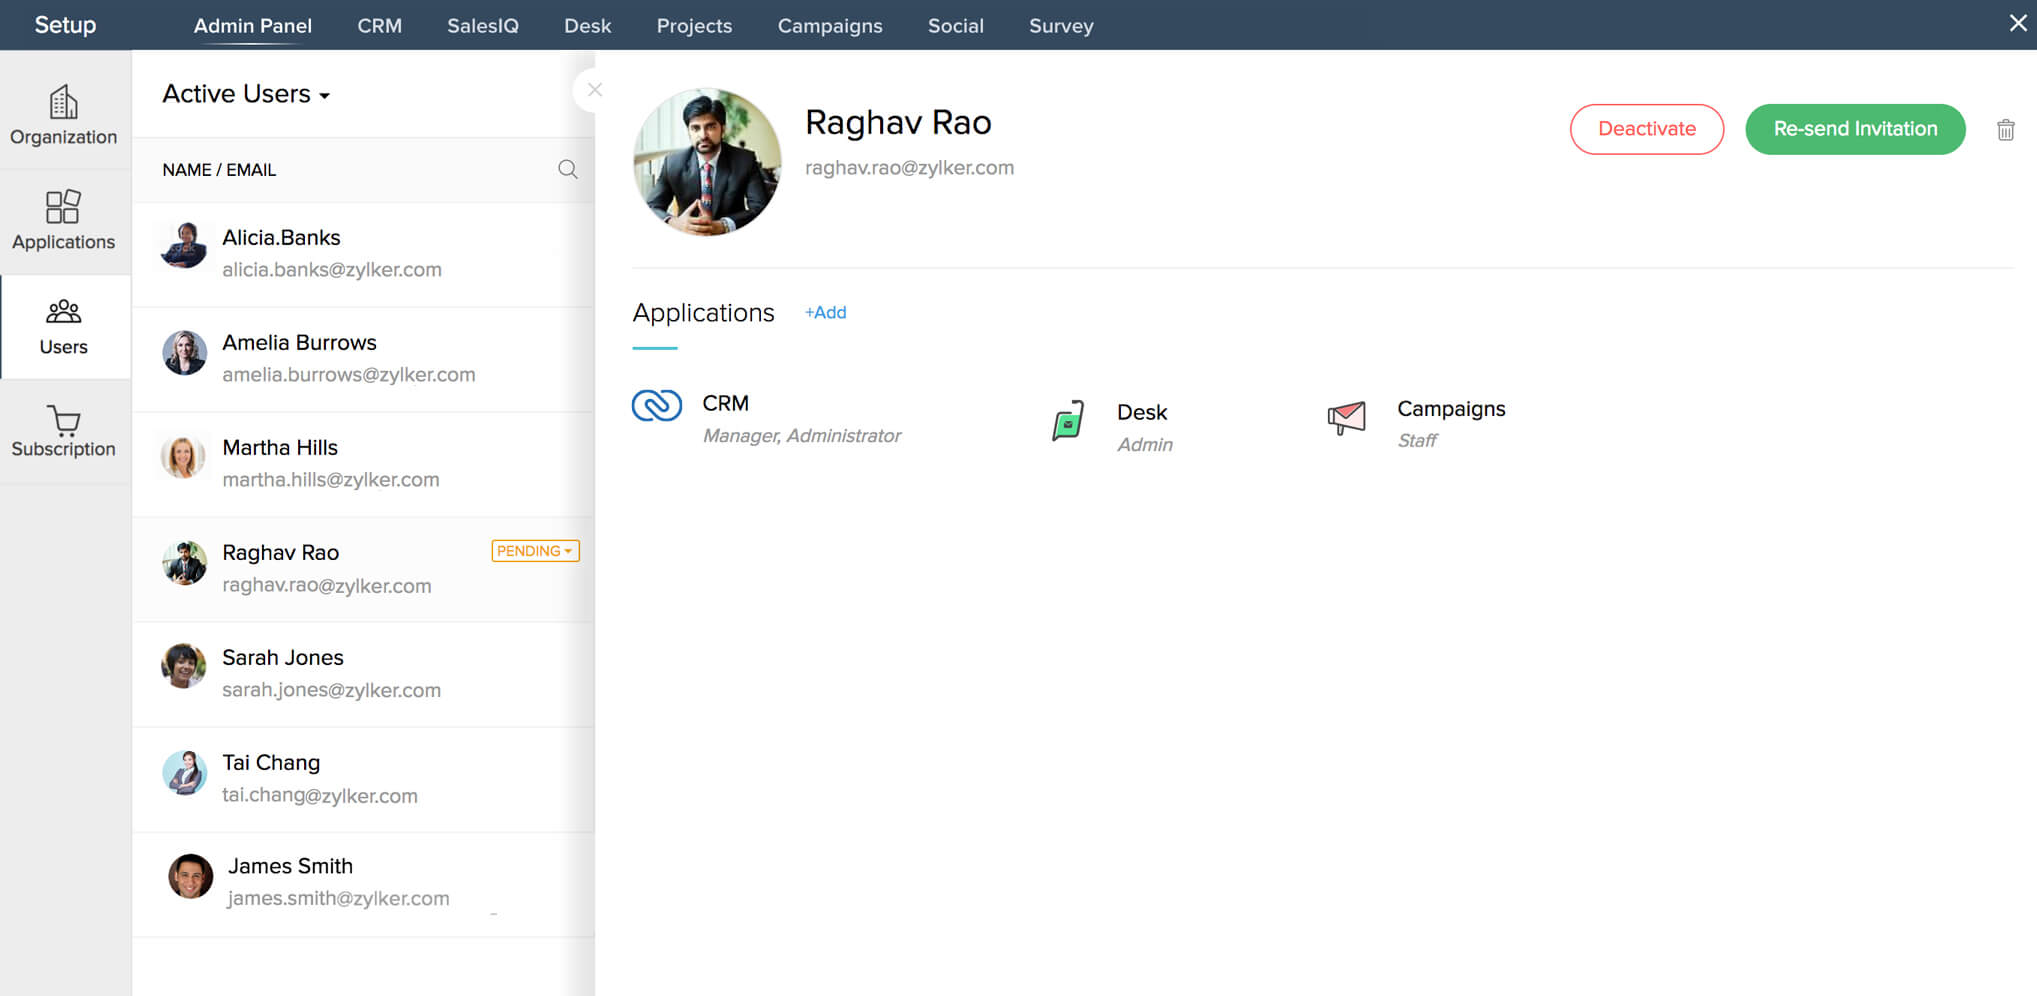
- Click Resend Invitation. You will be notified that an invitation has been sent to the user.
- Click () to close the sliding panel.
Notes:
- If you are an Administrator in Zoho CRM Plus or a user with user management permissions, you can resend invitation to pending users.
- Click the Delete icon () if you want to delete the user. When you click this button, you will receive a message that the user will be deleted permanently and you cannot undo the action. If you confirm deletion, the user will be permanently deleted from your CRM Plus account.
You can delete users if you are a CRM Plus Administrator or an Owner of Zoho CRM Plus.
To delete a user:
- In the Users page, click a user you want to delete from the left of the page. You will see the user's profile and the list of applications assigned to that user with the Deactivate or Activate, or Re-send Invitation button displayed based on the user's status, and the Delete icon in the sliding panel on the right.
- Click the Delete icon (). A confirmation message for deletion will be displayed and you will be notified that the user will be permanently deleted and you cannot undo this action.
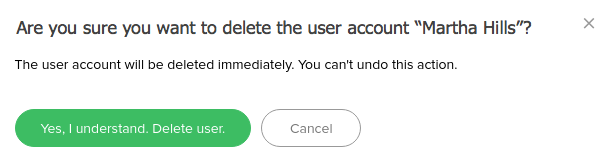
- Click Yes, I understand. Delete user to delete the user. The user's name will be deleted from the Users page.
If you are a CRM Plus Administrator or an Owner, you can revoke administrative privileges for users. To do so:
- In the Users page, click the down-arrow button displayed next to Active Users and select Admin Users from the dropdown menu. You'll see the list of administrators displayed on the left.
- Select an administrator's name. A panel will slide in on the right of the page with the details of the user and list of applications assigned to them.
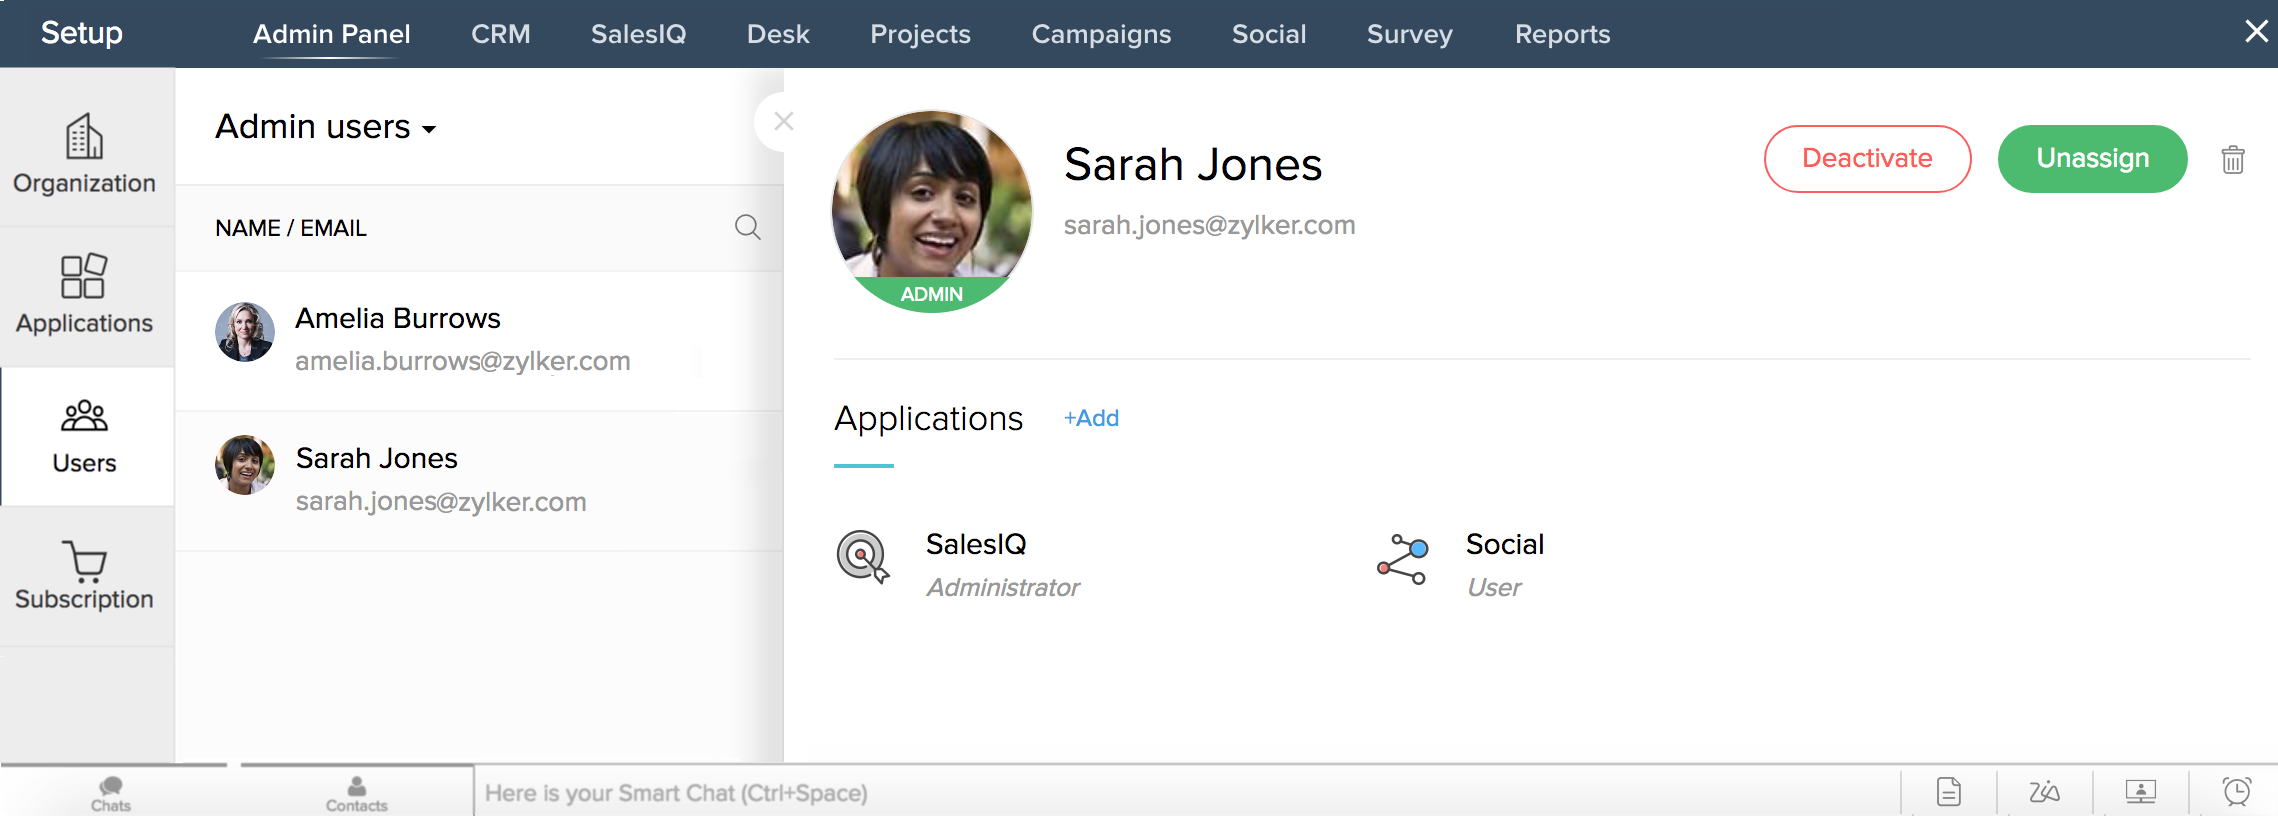
- Click Unassign. You will see a message that the administrative privileges have been revoked for this user in CRM Plus.
- Click () to close the sliding panel.
Note: Click the Delete icon (![]() ) if you want to delete the user. When you click this button, you will receive a message that the user will be deleted permanently and you cannot undo the action. If you confirm deletion, the user will be permanently deleted from your CRM Plus account.
) if you want to delete the user. When you click this button, you will receive a message that the user will be deleted permanently and you cannot undo the action. If you confirm deletion, the user will be permanently deleted from your CRM Plus account.
Related Topics