Working with Custom Fields
In Zoho CRM, you can add new fields as per your requirements. These fields will be available to all the users added to your organization's CRM account.
- Customize Zoho Defined Fields: You can edit, delete and hide some of Zoho defined fields, but note that there are some fields that you cannot delete, remove, rename or change from mandatory settings. These Zoho defined fields are mandatory in Zoho CRM. For example, Last Name in Leads, Subject in Tasks etc.
- Set Field Access Permissions: You can hide the fields for users in a specific profile or mark the fields as Read Only.

- The maximum number of fields that you can create in each Edition varies. Similarly, there is also a maximum limit for each type of field that you create. See Also Custom Field Limits
- You can rename the custom fields but you cannot change Field Type (eg. Text, Integer, Date, etc.) of the custom fields.
For instance, if you create a Text field, you cannot change the same to Integer field.
Custom Fields
For almost all of the fields that you create, you need to specify the following:
- Label: Specify a name for the field.
- Field Properties: Specify properties of the field such as description, field values and so on.
Other specifications required for each type of field:
| Field Type |
Other Details |
| Text |
Length: Maximum 255 characters are allowed. |
| Integer |
Length: Maximum 9 digits are allowed. |
| Decimal |
Length: Maximum 16 digits (including decimal places) are allowed. |
| Percent |
Label: Specify the field name |
| Currency |
Length: Maximum 16 digits are allowed. Rounding Option: Specify the rounding option Decimal Places: Specify the number of decimal places Precision: Specify the rounding precision |
| Date |
Format: YYYY/MM/DD Note:Date format will be changed according to user's time zone settings. |
| Date & Time |
Format: YYYY/MM/DD HH:MM Note:Date format will be changed according to user's time zone settings. |
| Email |
Specify a valid email address |
| Phone |
Specify a valid phone number |
| Pick list |
Pick List Values: Specify the pick list values |
| Multi-select Pick list |
Pick List Values: Specify the pick list values |
| URL |
- |
| Text Area |
Specify the Character limit: Small is 2000 characters, Large is 32000 characters. Text Area Large will not be available while adding criteria in any feature. Both Text Area Large and Small cannot be used for sorting records in ascending or descending order. |
| Checkbox |
- |
| Auto Number |
Prefix: Specify the prefix of the auto-number sequence Starting Number: Specify the starting number of the sequence Suffix: Specify the suffix of the auto-number sequence Existing Records: Select the checkbox to apply auto-number to existing records. |
| Lookup |
Lookup Type: Select the module for which you like to establish relationship Related List Label: It is the name you give to the entity that will be created under the record's details. For example, Attachments, Contact Roles etc. (Available in Paid Editions of Zoho CRM except the Standard Edition) |
| Long Integer |
Maximum 18 characters are allowed (Available in Paid Editions of Zoho CRM except the Standard Edition) |
Custom Field Limits
There is a limit to the total number of fields that you can create in you account and also a limit to the type of fields that you create. This varies based on your Zoho CRM Edition. Refer the following link to check the field limits: Custom Field Limits

- Custom fields are not available in the Free edition of Zoho CRM.
- Lookup and Formula fields are not available in the Standard Edition of Zoho CRM.
Custom Field Settings
On adding or editing a custom field, you will be able to accomplish a bunch of actions on it. For example, you can edit a field's basic properties, mark it as required, make it a unique field and so on. Following are the various custom field settings that are available in Zoho CRM.
- Add Custom Fields
- Edit Custom Fields
- Set Field Permission
- Mark a Field as Required
- Mark a Field as Unique
- Set External Field
- Remove/Delete Custom Fields
- Map Dependency Fields
Add Custom Fields
In each module, you can add custom fields to capture important data specific to your business requirements by specifying some field-related information.
To create new custom fields
- Log in to your Zoho CRM account with Administrative privileges.
- Go to Setup > Customization > Modules and Fields.
Module refers to the Leads, Accounts, Contacts, etc. tabs. - Click the desired module to open the layout editor.
- From the New Fields Tray on the left, drag and drop the required field type into the desired module section on the right.
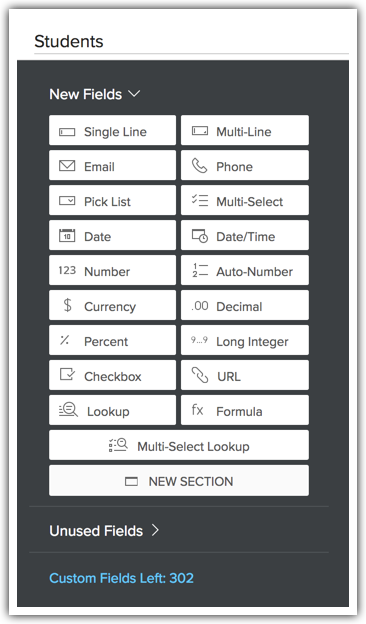
- Name the field and define the Field Properties as required for the field.
- Click Save Layout.

- The [Module] Name field of a custom module can be renamed whereas the [Module] Name field of a pre-defined module cannot be renamed.
- In the case of the Name field for a custom module, the user can choose between the field types, Text and Auto Number. Once chosen, the default Name field type cannot be changed.
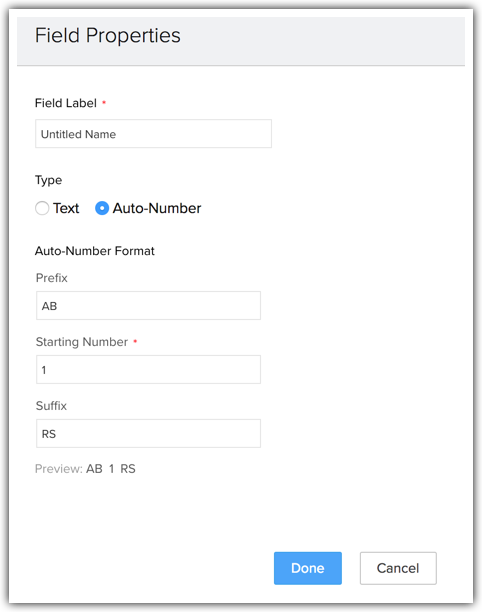
Also, if the Name field of the custom module is an Auto Number field, the respective module cannot have any other Auto Number field as only one Auto Number field is allowed per custom module.
Existing custom modules cannot have the Auto Number as the default Name field. So a work-around would be to create a new custom module and choose Auto Number as the Name field type and then import the existing records. - Once the field is created, you cannot change the 'data type' of the field. For example, an Integer (digits) field cannot be changed into a Currency field.
- You can edit the custom fields to change the length of the following types of fields. - Currency, Text, Number (Integer), Decimal, Phone, Long Integer and URL.
- You cannot add custom fields in the Log a Call page. However, you can customize the existing fields using page layout customization.
- The Also create for Accounts, Contacts, Deals option will be available only while creating fields for Leads.
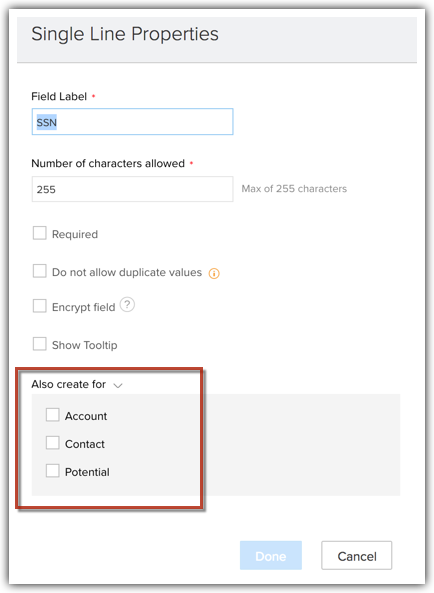
- The Also create for Sales Orders, Invoices option will be available only while creating fields for Quotes.
- In the picklist field type, you can enable the history tracking of a particular field. See also: Picklist Tracking History
- In case the picklist field value is translated, you can use the Reference Values to define the custom functions, merge fields, formula fields, and so on. Learn more about reference values in Translations
- In the Picklist field for Meetings module, you can associate color to each picklist value. These colors will be shown across calendar, related lists, reminders, home page, list view etc.. Read more about Pick List Fields
Edit Custom Fields
To edit custom fields
- Log in to your Zoho CRM account with Administrative privileges.
- Go to Setup > Customization > Modules and Fields.
Module refers to the Leads, Accounts, Contacts, etc. tabs. - Click the desired module to open the layout editor.
- Go to the field you want to edit and rename the field or edit the Field Properties.
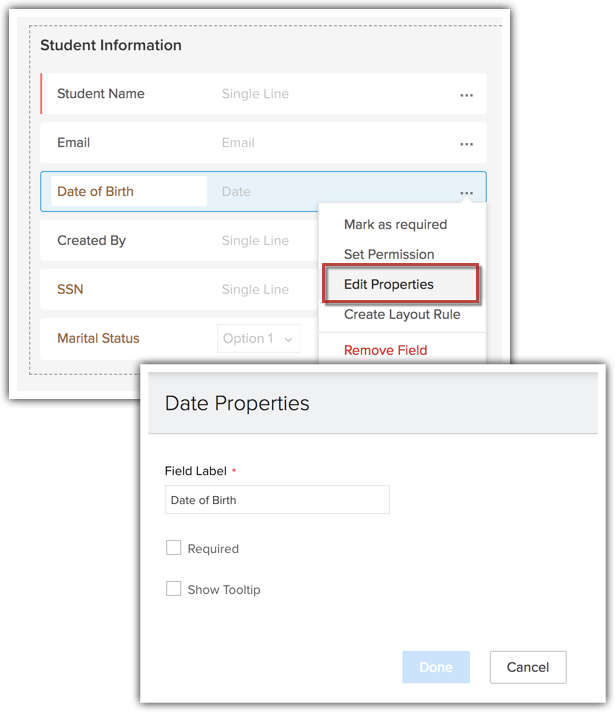
-
Click Save Layout.
Set Field Permission
 Note: Field permissions are available in the Professional edition of Zoho CRM and above.
 - Log in to your Zoho CRM account with Administrative privileges.
- Go to Setup > Customization > Modules and Fields.
Module refers to the Leads, Accounts, Contacts, etc. tabs. - Click the desired module to open the layout editor.
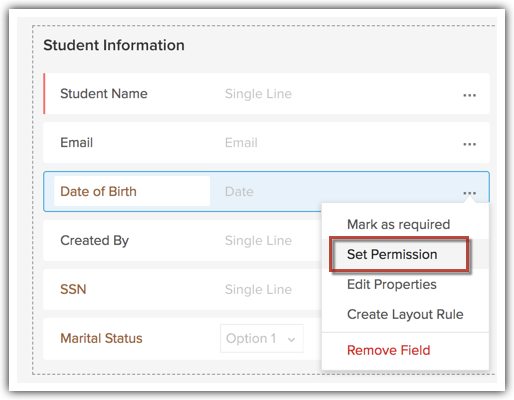
- Go to the required field, click the Settings icon and select Set Permission.
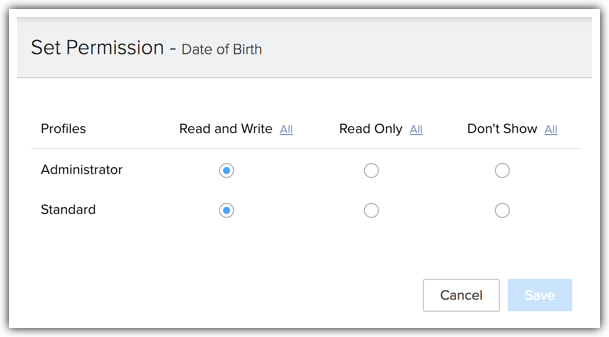
- In the Set Permission popup, define the permissions for each profile.
- Click Save.
-
Click Save Layout.
Mark a Field as Required
To mark a field as a required field
- Log in to your Zoho CRM account with Administrative privileges.
- Go to Setup > Customization > Modules and Fields.
Module refers to the Leads, Accounts, Contacts, etc. tabs. - Click the desired module to open the layout editor.
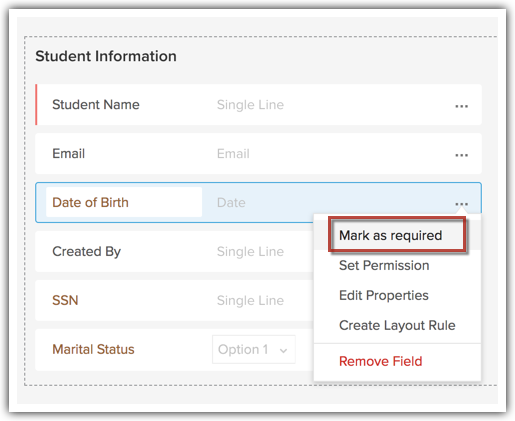
- Go to the field you wish to edit, click the Settings icon and select Mark as required.
Mark a Field as Unique
A unique field is that field in a record whose value makes the record unique. Email addresses of people are good examples of unique fields because clearly, two people cannot have the same Email address. It is a very unique attribute. Other examples include Social Security Numbers, Passport Numbers, Product codes and the like. In Zoho CRM, you can mark a field from any module as "Unique". Once marked as "Unique", these fields play a vital role in managing duplicate records in Zoho CRM in various instances including manual creation of records as well as records created via import, APIs, lead/sales order/quote coversion.
To mark a field as unique
- Log in to your Zoho CRM account with Administrative privileges.
- Go to Setup > Customization > Modules and Fields.
Module refers to the Leads, Accounts, Contacts, etc. tabs. - Click the desired module to open the layout editor.
- Click the Settings icon on the field that you wish to mark as unique.
- Select the Do not allow duplicate values option from the Settings drop-down list.
This option is applicable if the field that you want to mark as unique is a predefined field.
Marking the Primary Email field for the Leads/Contacts module as unique will ensure email duplication check for the selected module.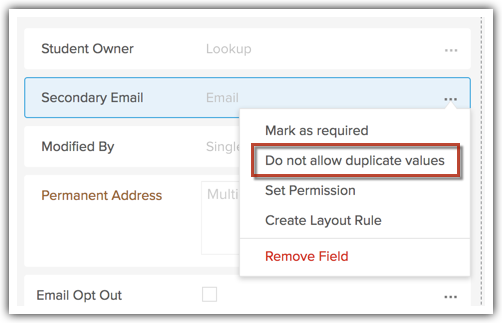
If the field you wish to mark as unique is a custom field, then select Field Properties from the Settings drop-down list.
In the Field Properties popup, select the Do not allow duplicate values checkbox.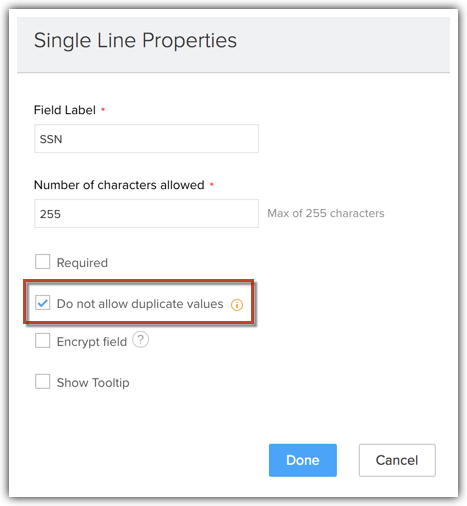
- Click Save Layout.
In the Fields List View page, under the Data Type column, the field for which you have selected the Do not allow duplicate values option will be indicated as a Unique field. For example, Text (Unique).

- The Unique Fields feature is available only in the paid editions of Zoho CRM.
- Only users who have the Customize Zoho CRM Permission enabled in their profiles will be able to mark a field as unique.
- A module in Zoho CRM can have 2 unique fields. Following are exceptions to this condition, as they can have 3 unique fields.
- Leads/Contacts/Custom modules (Email address + 2 fields)
- Products module (Product Code + 2 fields).
- Only Text, Email, Phone, Integer, Long Integer, URL fields can be marked as unique across all modules. The Twitterfield can be marked as unique for the Leads/Contacts module.
- The unique fields are NOT case sensitive. That is, if the incoming unique field's value is "ABC" and in the existing record, it is "abc", Zoho CRM will still identify this as a match.
- Once a field has been marked as unique, it may take a little while for Zoho CRM to index this change in the database. That is, after marking a field as unique, if you immediately create a record in the module with the same value, Zoho CRM may not recognize the unique field value. It may allow the duplicate to be created, because the change has still not been indexed. In such a case please try after a few minutes.
- Task, Calls and Meetings (Activities) modules cannot have a unique field.
- In Zoho CRM, unique fields are supported for records that are created manually and via imports, APIs and leads/quotes/sales orders conversion.
- Unique fields are not supported for records that are created via CRM migration, MS Outlook and Google synchronization, restoration from the Recycle Bin.
- Unique fields are not supported for records in the Zoho Sheet View.
- When you mark a field as unique in the Leads module, you will see an option to enable duplication check for converted leads as well.
Consider a scenario. You have followed up with and converted a lead called James. Now James is record in the Contacts module. Another sales rep in your team adds the same lead (James), without knowing that the lead has already been followed up with. In that case, there is no need for James to be added as a lead again - it will simply be a duplicate entry.
In this case, you can stop the creation of the same lead by enabling duplication check for converted leads. Once you have enabled this, whenever a duplicate entry is added in Leads, CRM will check existing leads as well as converted leads for matches.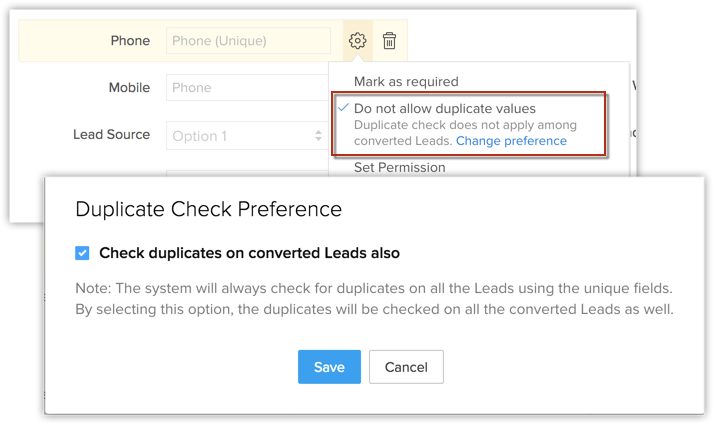
To enable Duplication check for Converted Leads, click the Change Preference link, which appears when you mark a field as unique. In the Duplicate Check Preference popup, select the Check duplicates on converted Leads alsocheckbox and click Save. You can always change this setting later.
You can also enable duplication check from Settings > Setup > Customization > Modules > Leads. Click the More icon on Leads > Duplicate Check Preference..
Set External Field
- User based: A different external ID will be generated for each user. For example, if a contact is managed by two different users in the org, each one will have his own external ID for the same contact.
- Organization based: All the users in the org will have a common external ID.
- In the module builder, drag and drop the single line field.
- Click Edit Properties and select Set External Field.
- In External Field Type select Organization or User.
- Select Field visibility as Show or Hide.
- Click Done.

- While performing Find and Merge action, the external ID of the master record will be retained, that is the external ID of other duplicate records will be overwritten.
- When a record is cloned the external ID will not be copied to the new record. You can later update the value in the field (external ID) through API.
- During the conversion of a record such as lead, orders, quotes etc. you will be allowed to map an external field only with another external field present in the subsequent module.
- During data import any field present in the .CSV file can be mapped with an external field present in the CRM module. The value of the external ID field can be updated only through API.
Remove/Delete Custom Fields
The fields that you have created can be removed, in case you do not need them. When you remove a custom field, it is moved to the Unused Fields section. This means that it is only removed from the layout and not the CRM itself.
To delete the field permanently from the CRM, you must delete it again from the Unused Fields section.
To remove custom fields from the layout
- Log in to your Zoho CRM account with Administrative privileges.
- Go to Setup > Customization > Modules and Fields.
Module refers to the Leads, Accounts, Contacts, etc. tabs. - Click the desired module to open the layout editor.
- Click the More icon and select Remove Field.
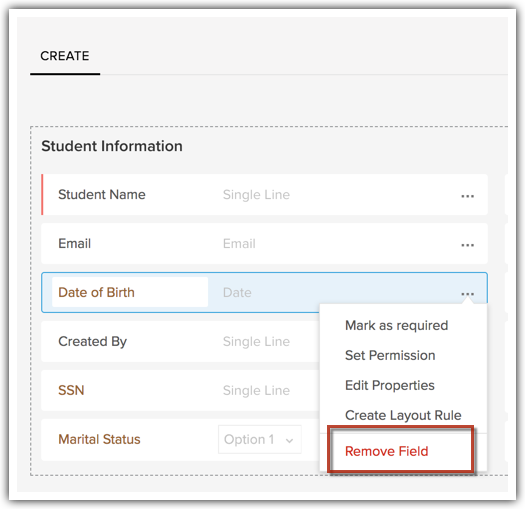
- Make sure to read the instructions in the pop-up box and then click Yes, move to unused fields to remove the field.
The removed fields are pushed to the Unused Fields section.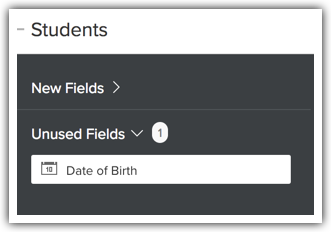

- When a custom field is moved to the Unused Fields section, it is only removed from the module's layout and not Zoho CRM. As long as the removed field is in the Unused Fields section, you can restore it by dragging and dropping it back in the required section.
- Restoring a field from the Unused Fields section restores its associated data as well.
- When a removed field is in the Unused Fields section, it is still part of the database. Therefore the total number of fields allowed for your Zoho CRM Edition includes the fields in the Unused Fields section.
- To delete a custom field permanently from Zoho CRM, you must delete it again from the Unused Fields section.
- Once deleted from the Unused Fields section you cannot bring back the custom field and its associated data.
- Standard fields that are provided in Zoho CRM by default can be moved to the Unused Fields section but cannot be deleted permanently.
Map Dependency Fields

Map Dependency is available for the picklist fields present in the Subforms too.
 Note: The parent and child fields will display all the picklist fields present in the layout and subform.
To map field dependencies
- Log in to your Zoho CRM account with Administrative privileges.
- Go to Setup > Customization > Modules and Fields.
Module refers to the Leads, Accounts, Contacts, etc. tabs. - Click the desired module to open the layout editor.
- Click the Settings icon and select Map Dependency Fields.
-
In the Map Dependency Fields page for the selected module, click New.
- Select the Parent Field from the drop-down list.
- Select the Child Field from the drop-down list.
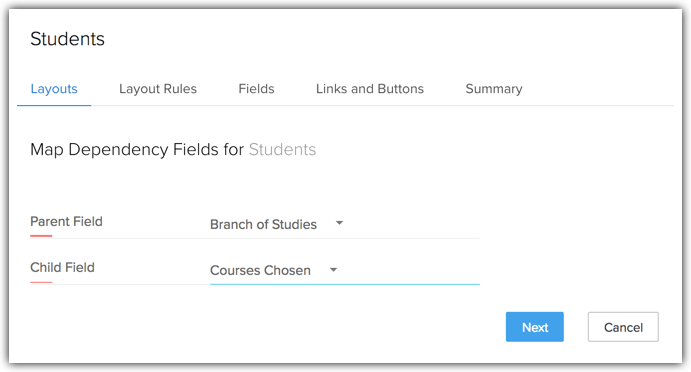
- Click Next.
- Select the values for each parent field value.
- For example, if the parent field is Branch of Studies, then, select the Courses relevant for the selected branch.
- Click the Previous or Next links, if required, to map the all the Parent field values to the Child field values.
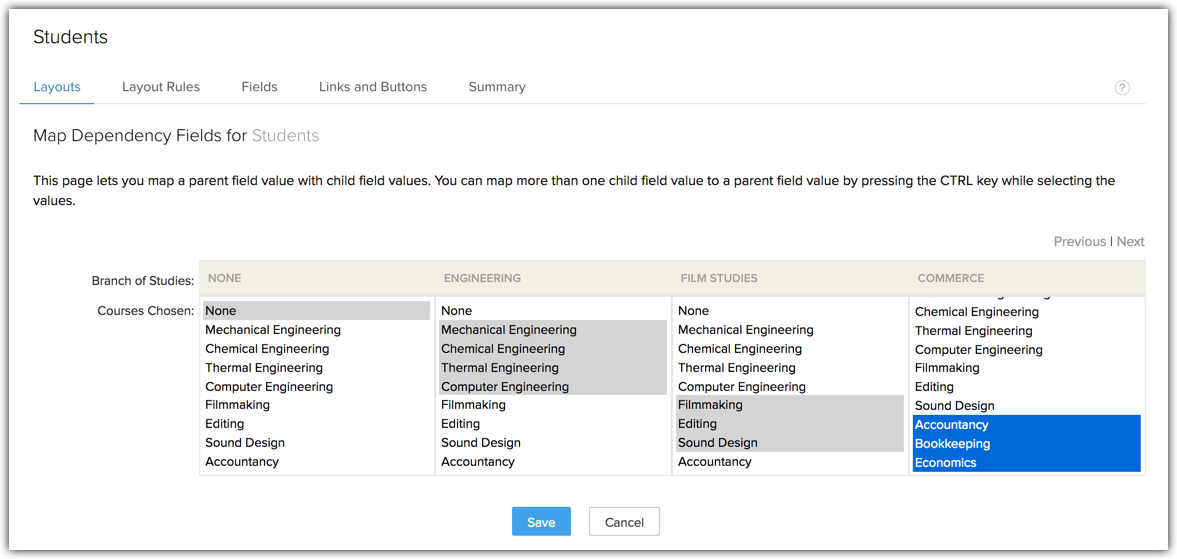
- Select the Parent Field from the drop-down list.
- Click Save.
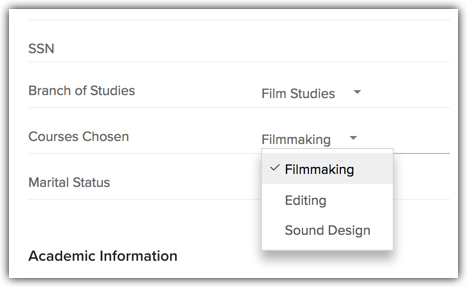
Now when you create a new record in the module, the values on the child field differ based on the value chosen for the Parent field.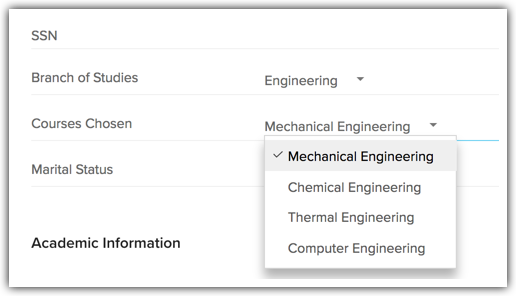
Zoho CRM Training Programs
Learn how to use the best tools for sales force automation and better customer engagement from Zoho's implementation specialists.
Zoho DataPrep Personalized Demo
If you'd like a personalized walk-through of our data preparation tool, please request a demo and we'll be happy to show you how to get the best out of Zoho DataPrep.
All-in-one knowledge management and training platform for your employees and customers.
You are currently viewing the help pages of Qntrl’s earlier version. Click here to view our latest version—Qntrl 3.0's help articles.
Zoho Sheet Resources
Zoho Forms Resources
Zoho Sign Resources
Zoho TeamInbox Resources
Related Articles
Working with Translations
Overview Many companies nowadays have a global presence, and to serve their customers better their employees are often stationed locally. With a CRM system, they can effectively manage to store sales and customer information in a common database, ...Types of Custom Fields
In Zoho CRM, you can add different types of custom fields as per your requirements. These fields will be available to all the users added to your organization's CRM account. Customize Zoho Defined Fields : You can edit, delete and hide some of Zoho ...Using Custom Buttons
Customization is the most powerful way to build a flexible CRM system. In Zoho CRM, you can customize modules, fields, pages, links, and a lot of other elements. In addition to these elements, Zoho CRM now allows you to create new button actions with ...FAQs: Team Module
Why is there a need of CRM for Everyone? Providing a smooth customer experience is crucial for business success in today's competitive market. The sales process involves multiple stakeholders and teams working together to secure a customer deal and ...Working with Kiosk Studio
Looking for more ideas? Please check out (and follow) our Kiosk Studio Session posts in the Zoho community! Session #1 covers how to view customers from the same industry. Session #2 covers how to build a call script kiosk. Session #3 looks at ...


