Kaizen #187 - Building a Timer and Worklog Widget (Part 1)

Howdy Tech Wizards!
Welcome back to a fresh week of Kaizen!
This time, we are diving into a two-part series where you will learn how to build a Timer and Worklog Widget for Zoho CRM. This widget helps track active work time and log multitasking sessions using Zoho CRM APIs, Client Script, Functions, and Workflows.
Why It Matters?
Zoho CRM effectively captures stage/status transitions, like tracking when a case moves from Open to In Progress or On Hold. However, in dynamic work environments, employees juggle multiple work items and engage in impromptu tasks or conversations.
Let’s take the On Hold status as an example.
While it can be used to indicate pauses in progress, it does not always align with real-world workflows. Consider these scenarios:
Not all interruptions justify a status change
Moving the case to On Hold for every minor detour (to clarify something with a colleague or respond to another emergency work item) would be impractical and could lead to under reporting actual work hours. Over time, this untracked effort adds up, creating a gap in visibility.
Frequent status changes may dilute their meaning
In many teams, On Hold signifies a legitimate blocker like waiting on customer input or an external dependency. Using it frequently to reflect quick shifts in attention could compromise that clarity.
A timer widget solves this by:
- Capturing hands-on work items.
- Logging context switches (unrelated tasks) with descriptive entries.
- Feeding structured entries into a custom module for reporting and subform sync.
Business Scenario: IT Service Desk & Ticket Resolution
A tech support team uses the Cases module to resolve customer issues. Some tickets are straightforward; others require follow-ups, escalations, or cross-team coordination. While CRM timestamps (like stage transitions or picklist tracking) track when changes happen, they do not reflect how long someone actively worked on a case.
This Timer Widget can be the ultimate solution to track down the active time spent on each case through out the day.
What are we Building?
By the end of this two-part guide, you will know how to:
- Build a timer widget to track time per task or any CRM record.
- Log work sessions into a custom module every time the timer is started/stopped.
- Automatically populate a subform in the corresponding record module using workflows and Deluge functions.
- Leverage the Reports module to analyze work patterns, SLA adherence, and productivity trends.
In Part I, we will focus on:
-> Building and configuring the Timer Widget.
-> Capturing each timed session as a record in a custom module.
Prerequisites
1. Create a Custom Module
Create a custom module named Timer Entries to log work details and generate reports from the Reports module. A new record will be added to this module each time a timer is started.
Set up the following custom fields in the Timer Entries module:
Custom Fields | Data Type |
Start Time | DateTime |
End Time | DateTime |
Total Duration (in mins.) | Formula DateBetween(${Timer Entries.Start Time},${Timer Entries.End Time},'Minutes') |
Related to Case | Lookup to Cases module |
Work Description | Multi Line |

2. Add a custom picklist option
Add a custom picklist option called In Progress to the Status picklist field in the Cases module for precisely identifying the status of the cases.
Follow this Add/Remove Picklist Values help section for more details.

3. Setup Custom Views for Contextual Filtering
To streamline the widget experience and ensure users only see relevant records to associate while tracking time, set up two smart custom views—one in the Cases module and another in the Timer Entries module.
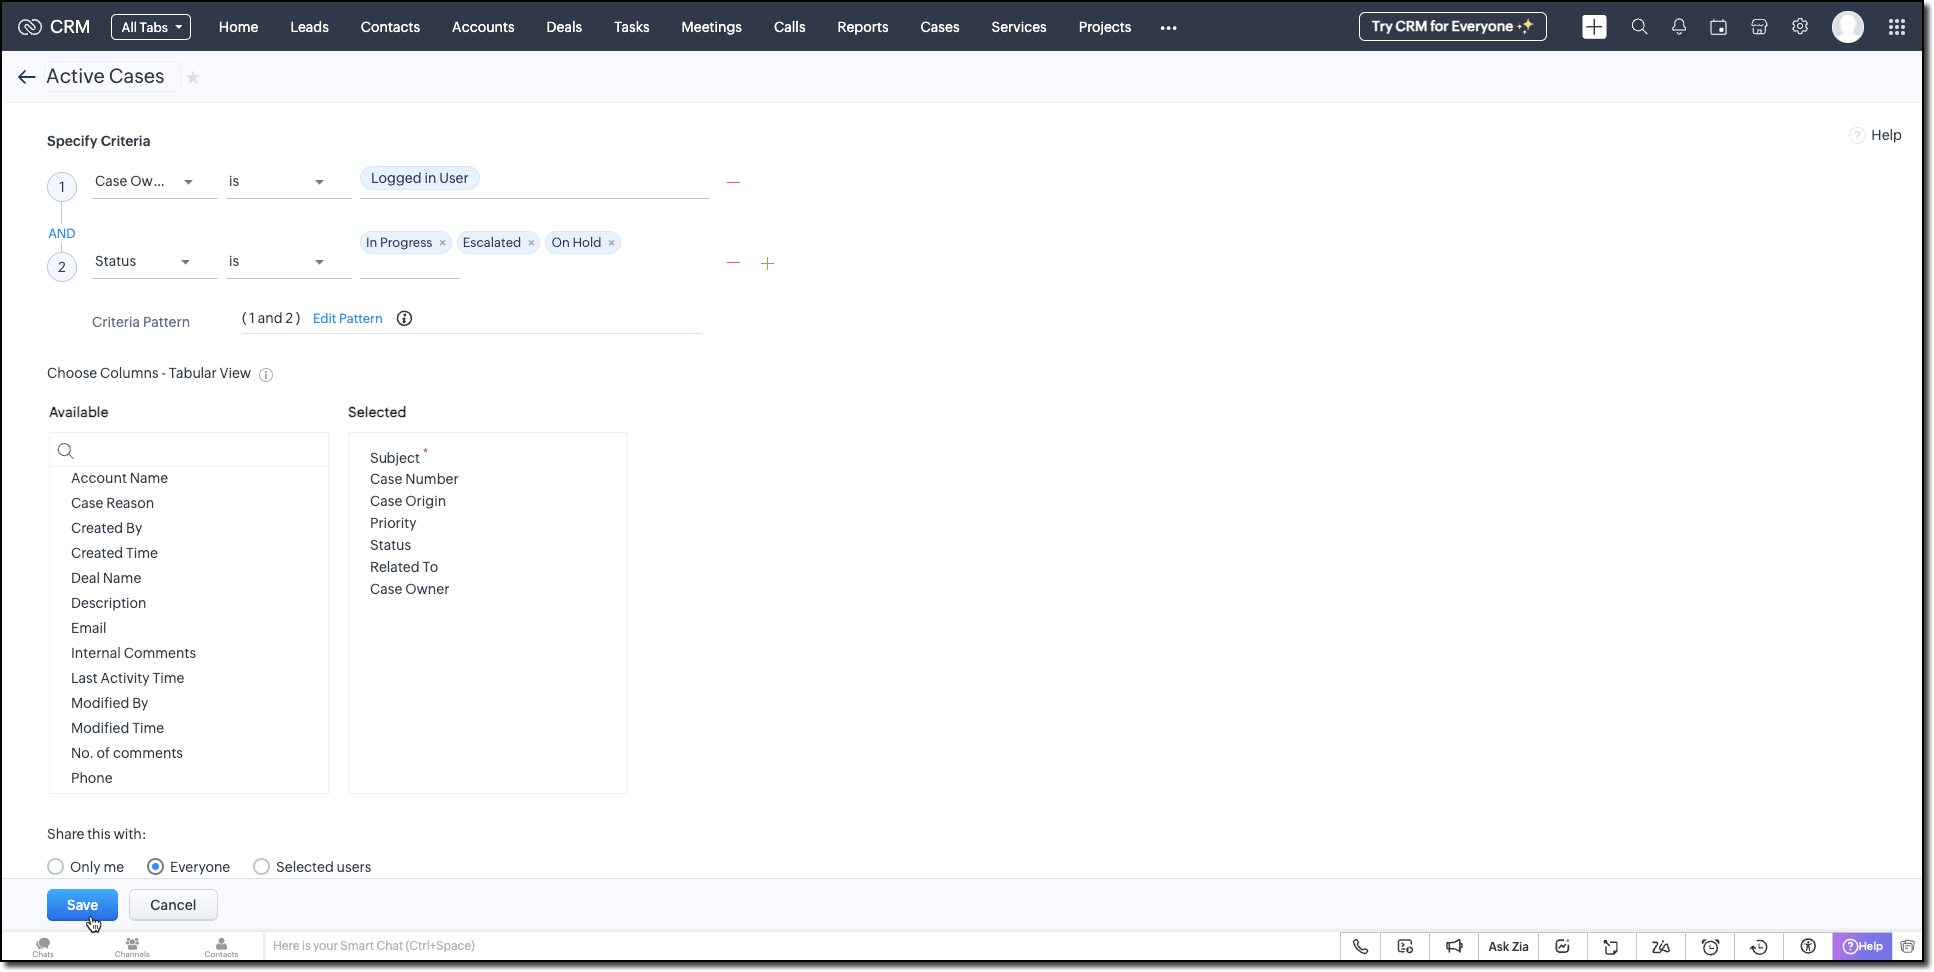
Active Cases View (Cases Module)
Create a custom view in the Cases module to list only the active tickets the logged-in user is working on. Use the following criteria tips:
- Use the Status field to filter records with values like In Progress, On Hold, or Escalated.
- Use the Case Owner field to show records that are assigned only to the currently logged-in user.
This view powers the drop-down inside the widget where users select the case they want to start the timer for.
Active Timers View (Timer Entries Module)
Set up a second custom view in the Timer Entries module to track entries where the timer has been started but not yet stopped. These represent active timers. Use the following logic for criteria:
- The End Time field is empty (i.e., timer still running).
- Timer Entry owner field matches the logged-in user.
This view is used internally by the widget to detect if a timer is already running and update the same entry once the timer is stopped.
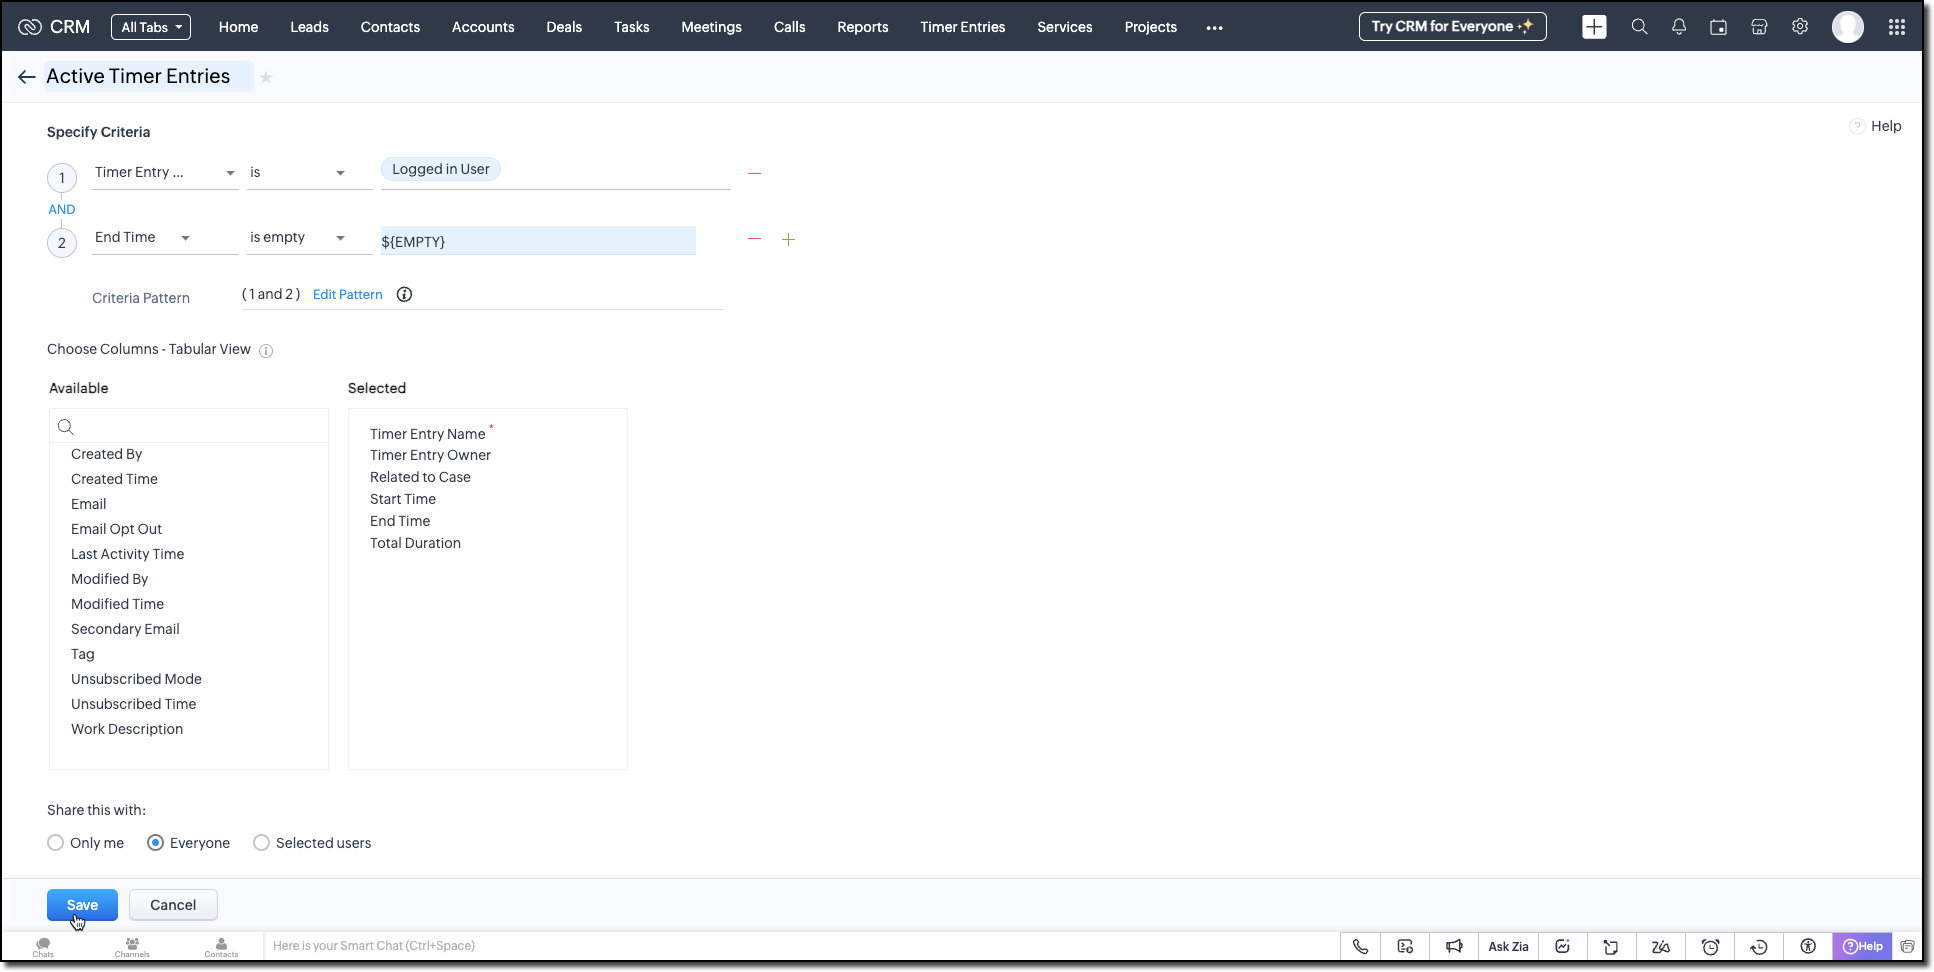
Follow the Managing List View help page and use the specifications shown in the following image.
Building the Timer Widget
Step -1: Review Basics
Refer to our earlier Kaizen on CLI Installation, Creating a Widget Project, and Internal hosting of the same.
Step 2 - Develop the Widget
After initializing your widget project using CLI, implement the timer logic:
Fetching Active Cases
On page load, the populateRecordsDropdown function initiates a Get Records API call to the Cases module, using the Active Cases custom view ID. This fetches all active case records assigned to the logged-in user.
These records are then listed in a dropdown, allowing users to quickly select the relevant case they are about to work on.
async function populateRecordsDropdown() { const recordsDropdown = document.getElementById("moduleRecords"); recordsDropdown.innerHTML = ""; try { const recordsResponse = await ZOHO.CRM.API.getAllRecords({ Entity: casesModule, cvid: casesCVID, per_page: 10 }); if (recordsResponse.data && recordsResponse.data.length > 0) { recordsResponse.data.forEach(record => { const option = document.createElement("option"); option.value = record.id; option.textContent = record.Subject || "Unnamed Record"; recordsDropdown.appendChild(option); }); } else { const placeholderOption = document.createElement("option"); placeholderOption.value = ""; placeholderOption.textContent = "No records found"; placeholderOption.disabled = true; placeholderOption.selected = true; recordsDropdown.appendChild(placeholderOption); } } catch (error) { console.error("Error fetching records:", error); } } |
Starting the Timer and Creating an Entry
Once the user starts the timer, The createRecord function triggers a Create Record API call to log the session in the Timer Entries custom module. The record captures the start time and the related case and description (if provided).
Even if no details are entered or case is selected, a timer entry is still created with the start time. This ensures that spontaneous work sessions are tracked and not lost.
async function createRecord(startTime) { try { const workDescription = document.getElementById("workDescription").value; const selectedRecordId = document.getElementById("moduleRecords").value; const selectedRecordText = document.getElementById("moduleRecords").options[ document.getElementById("moduleRecords").selectedIndex ].text; const data = { Start_Time: startTime, Owner: currentUserId, Work_Description: workDescription, Related_to_Case: selectedRecordId, Name: selectedRecordText }; const response = await ZOHO.CRM.API.insertRecord({ Entity: timerModule, APIData: data }); console.log("Start time recorded successfully"); } catch (error) { console.error("Error creating record:", error); } } |
Stopping the Timer and Updating the Entry
When the timer is stopped, the widget uses the Active Timer Entry custom view to locate the most recent Timer Entry record created by the logged-in user that does not have an end time.
The updateRecord is then triggered to update that active entry using the Update Record API call. It updates the End time of the session and the related case, descriptions, if it was not already provided when the timer was started.
async function updateRecord(endTime) { try { const workDescription = document.getElementById("workDescription").value; const selectedRecordId = document.getElementById("moduleRecords").value; const response = await ZOHO.CRM.API.getAllRecords({ Entity: timerModule, cvid: timerEntriesCVID, per_page: 1 }); const latestRecord = response.data[0]; if (latestRecord) { const recordId = latestRecord.id; const data = { id: recordId, End_Time: endTime, Work_Description: workDescription, Related_to_Case: selectedRecordId }; await ZOHO.CRM.API.updateRecord({ Entity: timerModule, APIData: data, RecordID: recordId }); console.log("End time updated successfully"); } } catch (error) { console.error("Error updating record:", error); } } |
Step 3 - Validate and Pack the Widget
- Follow the steps given in the Widget help page to validate and package the widget.
- Go to Zoho CRM > Setup > Developer Hub > Widgets and click Create New Widget.
- Fill in the required details as shown in this image and ensure to select Button as the widget type.

Step 4 - Associate it with Flyout
- Go to Setup > Developer Space > Client Script. Click New Script.
- Enter a name and description for the script. Choose Command type in Category.

- Create a Flyout and render a widget within it using its details like the API name of the widget, title, size, and animation type. You can get the Widget API name from the widget's detail page.
let allowedUserEmails = []; allowedUserEmails.push('user1_email_address'); allowedUserEmails.push('user2_email_address'); allowedUserEmails.push('user3_email_address'); let currentUserEmail = $Crm.user.email; if (allowedUserEmails.indexOf(currentUserEmail) == -1) { ZDK.Client.showMessage('Command access resticted', { type: 'error' }); return false; } ZDK.Client.createFlyout('myFlyout', {header: 'Timer', animation_type: 4, height: '600px', width: '500px', top: '10px', left: '10px', bottom: '10px', right: '10px' }); ZDK.Client.getFlyout('myFlyout').open({ api_name: 'Timer', type: 'widget' }); return true; |
Refer to Creating a Client Script help page for more details.
Try It Out!
A complete working code sample of this widget is attached to this post.
Now, let us see how this Timer widget works:
1. Start the Timer
Open the widget and select an active case from the dropdown. As soon as you start the timer, a new record will be automatically created in the Timer Entries module to capture the session.

2. Stop the Timer
When the task is complete, provide a description of the work you have done and stop the timer. The same Timer Entry record (created when the timer was started) will be updated automatically with the end time and your work description.
This forms the foundation for accurate time tracking at the record level.
In Part 2, we will show how to:
-> Use a workflow and Deluge function to transfer these entries into the Work Log subform inside the relevant Cases record.
-> Use CRM Reports to slice and dice work time for better SLA and productivity insights.
In the meantime, would you like us to address any of your pain-points or have a topic to discuss? Let us know in the comments or reach out to us via support@zohocrm.com.
Until next time, Happy Coding!
-----------------------------------------------------------------------------------------------------------------
Related Reading
- Custom Fields - Working with Custom Fields and Working with Picklist Field
- Widget - An Overview, CLI Installation, Working with Widgets, JS SDKs, Mobile Compatibility of Widgets and Kaizens
- Core APIs - GET Records, POST Records and UPDATE Records
- Client Script - An Overview, Creating a Client Script, Best Practices and Troubleshooting
-----------------------------------------------------------------------------------------------------------------

Previous Kaizen: Client Script Support for Subforms | Kaizen Collection: Directory
Topic Participants
Kiruthiga G
Sticky Posts
Kaizen #210 - Answering your Questions | Event Management System using ZDK CLI
Hello Everyone, Welcome back to yet another post in the Kaizen Series! As you already may know, for the Kaizen #200 milestone, we asked for your feedback and many of you suggested topics for us to discuss. We have been writing on these topics over theKaizen #152 - Client Script Support for the new Canvas Record Forms
Hello everyone! Have you ever wanted to trigger actions on click of a canvas button, icon, or text mandatory forms in Create/Edit and Clone Pages? Have you ever wanted to control how elements behave on the new Canvas Record Forms? This can be achievedKaizen #197: Frequently Asked Questions on GraphQL APIs
🎊 Nearing 200th Kaizen Post – We want to hear from you! Do you have any questions, suggestions, or topics you would like us to cover in future posts? Your insights and suggestions help us shape future content and make this series better for everyone.Kaizen #198: Using Client Script for Custom Validation in Blueprint
Nearing 200th Kaizen Post – 1 More to the Big Two-Oh-Oh! Do you have any questions, suggestions, or topics you would like us to cover in future posts? Your insights and suggestions help us shape future content and make this series better for everyone.Celebrating 200 posts of Kaizen! Share your ideas for the milestone post
Hello Developers, We launched the Kaizen series in 2019 to share helpful content to support your Zoho CRM development journey. Staying true to its spirit—Kaizen Series: Continuous Improvement for Developer Experience—we've shared everything from FAQs
Recent Topics
How can I restore all the deleted Time entries of a Task in Zoho Projects
How can I restore all the deleted Time entries of a Task in Zoho Projects? Query: In Zoho Projects, I cloned a task and deleted the time entries from the cloned task. However, this also deleted the time entries from the original task. How can I restoreIs there a way to make an account inactive in ZoHo Desk
We have a few Clients "Accounts" that we no longer do business with. It would be beneficial for them to not show up in lists. However, we want to go back and view tickets, time, etc.How to set the value of the Phone field importing contacts in Zoho Desk
Hi everyone, i'm new in Zoho Desk, we're setting up the environment and i'm importing contacts from another CRM using a file CSV and i'm getting a problem with phone numbers (italian): the leading zero is cut away, also if the value is inside double quotes.Set Custom Icon for Custom Modules in new Zoho CRM UI
Deprecation Notice: OpenAI Assistants API will be shut down on August 26, 2026
I recieved this email from openAI what does it means for us that are using the integration and what should we do? Earlier this year, we shared our plan to deprecate the Assistants API once the Responses API reached feature parity. With the launch of Conversations,How to center a field inside a section?
I’ve been trying to center a field inside a section in Zoho Canvas. When I align it visually, it looks centered in the editor, but after clicking Save, the field appears misaligned on the actual canvas. I also tried setting the field to full width, butKaizen #192 - Implementing Custom Token Persistence in Python SDK
Welcome back to another week of Kaizen! Last week, we discussed how to implement Login with Zoho using OAuth 2.0 and saw how to bring it to life in a real-world application with the Zoho CRM Python SDK. We also discussed how Zylker Academy built a customShowing the map along with mileage expense
When you use the GPS to track mileage, it shows you the map of the actual path travelled. It would be very useful and practical to save that map with the mileage expense, so that when the report is created, it provides a map of each mileage expense associatedEnable Validation Rule for Multi-Select Picklist Field
Zoho, Please allow validation rules for multi-select fields.File Upload field not showing in workflow
Hi, I have added a field on Zoho CRM. I want to use it in a workflow where that particular field is updated based on another field, however it is not showing up in the field list to select it in the workflow. Why is this please?CRM Custom function updating a module record shows the Super Admin user as the record modifier
Dear Zoho CRM Team, Is there any way to update this so that when a custom function has updated a record the Super Admin user doesn't become the modifier? This happens on the record as a modifier and shows up in the audit logs. It would be more usefulBest practice importing items and matching assemblies
Hi, I was wondering what would be the best practice to import items and composite items (assemblies) From my backup, what should I import first? The items or the composite items? I am on Zoho one, using inventory and books. Kind regards, SabineBest way to fetch employee names from Zoho People into Zoho Creator Inventory Stock Form field Employee Name Lookup
Hi Team, I have a requirement in my Zoho Creator application (Inventory Stock Adjustment) where I need to fetch employee names from Zoho People and use them as a lookup in a form. Currently, I am considering using an integration field to fetch this dataget file api is returning Junk data
I am working on extension development where at one point I need to retrieve attachments on records I found out I can use only invokeconnection and not invokeurl in extension development The invoke connection returns the image in raw binary format. WhenNeed help with message box
End user updates many records at once. Each have unique serial number. They want a confirmation box that says starting number, ending number and qty. Is there any way to do this? I been searching and asking support but seems like no great solution.[Webinar] The Transformative Power of Gen BI
Traditional decision-making tools are no longer enough. The integration of generative AI into business intelligence (BI) is proving to be a true game changer—enabling businesses to make faster, smarter, and better informed decisions. Early adopters ofBackorder process review - Automating Removal of Sales Order from "On Hold" When PO is Received
Hello Zoho Inventory Team, Currently, sales orders in On Hold status are released only when the bill for the purchase order is created. In our workflow, it would be much more efficient if the sales order could automatically move out of On Hold as soonHow to access the saved Query using API?
I have created a query in setting. Is it possible to access it from a API? What's the endpoint? I tried /v8/queries/important_deals but didnt' work.création d'une base de données
base de donnee d'un lycéeUser Session variables to recall after form submit & redirect to menu
Hey, Forgive me if this is a simple answer I have overlooked. I have built a big onboarding process for my SAAS platform which is built and managed by an external Dev team. I am hoping to embed my new creator app on the SAAS platform. I have a menu pageZoho Writer Merge Template with data from Zoho Analytics Views
Hello, Is there any way to pull information from Zoho Analytics and put it into a Merge Template? I am trying to create a bulk export of one report that filters on a field to create a single document for each of the filter fields.Having to enter bill before stock shows as available.
Hi, Am I right in thinking you must create a bill from the purchase order receipt before the goods are available for shipping?Agent Availability Report
From data to decisions: A deep dive into ticketing system reports Businesses need to track when their support agents check in and check out from work. This report, titled Agent Availability, is one of the static reports that helps managers track the numberWriting by Hand in "Write" Notes
Hi there! I just downloaded this app a few moments ago, and I was wondering if there was a way to write things by hand in "Write" mode instead of just typing in the keyboard. It would make things a bit more efficient for me in this moment. Thanks!AI-driven construction analytics using Zoho Projects Plus
Construction projects thrive on timelines; if a project is completed on or before the expected time, it makes headlines, but if it gets delayed, the company’s credibility will be at risk. Such projects require precise planning and constant monitoring,Canadian payroll
Hello ZOHO, is any updates on when payroll for Canada will be available?Unified customer view: Bringing product intelligence into your CRM data
For businesses today, applications and digital interfaces are the main touch points in the customer journey. While Zoho CRM data already tells who your customers are and what they buy, Zoho Apptics tells you how they interact and engage with your product.Zoho Creator SaaS app with multiple client AND multiple users
I am close to finalizing a Zoho Creator app that will be used by different companies to manage sale info, and each company can have multiple users using the app. Things were going perfectly until I tried a search on a report. I use a database field in each table to separate the data for each company, which works great. BUT when I do a search, I get to see ALL the data. This means that Company A could easily see the data from Companies B and C via the built-in search. Is there a way to set up theProject Change Orders and Additions
We are in the process of migrating from QuickBooks Online to Zoho Books. We have Zoho One and like the ability to sync all of our data across everything. And I like that projects work in a way that's less dumb than QuickBooks. I'm trying to figure outTrack online, in-office, and client location meetings separately with the new meeting venue option
Hello everyone! We’re excited to announce meeting enhancements in Zoho CRM that bring more clarity and structure to how meetings are categorized. You can now specify the meeting venue to clearly indicate whether a meeting is being held online, at thePossible to send Zoom AI Companion transcripts and summaries to contacts in CRM?
Title says it all. Is it possible to send Zoom AI Companion transcripts and summaries to contacts in Zoho CRM?How do I edit the Calendar Invite notifications for Interviews in Recruit?
I'm setting up the Zoho Recruit Interview Calendar system but there's some notifications I don't have any control over. I've turned off all Workflows and Automations related to the Calendar Scheduling and it seems that it's the notification that is sentPosibility to add Emoticons on the Email Subject of Templates
Hi I´ve tried to add Emoticons on the Subject line of Email templates, the emoticon image does show up before saving the template or if I add the Emoticon while sending an Individual email and placing it manually on the subject line. Emoticons also showClarity on extended contract status
Clarity on “extended” status- How does Zoho “extend” a contract? E.g. if client extends by 1 month, can the “end date” be adjusted accordingly in Zoho and tagged as “Extended” with a clear audit trail that also captures the client’s email? Note- EmailCustomizing contract status
Can we customize/add/remove status on Zoho contracts ourselves or does Zoho needs to do this? Context- There is a long list of status on Zoho but not all of them are relevant for us . There are few status which are missing and needs to be added. E.g-Set Custom Business Calendars and Holidays for Global Teams
Managing a project across diverse teams means accounting for more than just tasks and deadlines; it means acknowledging how and when each team actually works. Users might follow different working days or observe region-specific holidays that cannot be[Integration edition] Deluge learning series - Integrations between Zoho apps and Third-party services with Deluge | 28 August 2025
We’re excited to welcome you to the Deluge learning series: Integration edition! The Integration edition will run for three months: Session 1 – Integrating Zoho Apps with Deluge using inbuilt integration tasks Session 2 – Integrating Zoho Apps with DelugeCritical Vulnerability in all major password manager plugins - is Zoho Vault affected?
Hi Zoho, a security researcher found a critical clickjacking vulnerability in all major browser password managers: DOM-based Extension Clickjacking: Your Password Manager Data at Risk | Marek Tóth Is Zoho Vault affected as well? Apparently the Vault extensionIntroducing SecureForms in Zoho Vault
Hey everyone, Let’s face it—asking someone to send over a password or other sensitive data is rarely straightforward. You wait. You nudge. You follow up once, twice—maybe more. And when the information finally arrives, it shows up in the worst possibleTables from ZohoSheets remove images when updated from source
I have a few tables from a ZohoSheet in a ZohoWriter document that will remove the images in the cells when I refresh from the source. The source still has the images in the table when I go to refresh. After updating from the source, as you can see theNext Page