Leverage layout rules to customize workflow
 Layout rules in Zoho Sprints primarily aim to customize the field layout of your creation forms to meet complex requirements. But it doesn't stop there. Its customization can push the boundaries of how your fields behave, how data is gathered, how processes are branched out, and how workflow is channeled.
Based on conditions, you can tailor field behavior, direct the life cycle of an item, mandate specific actions, restrict the field options, or auto-assign users. The possibilities are aplenty.
We've tried to provide a few sample scenarios that help you automate your data collection and progress tracking flow. If you have any specific requirements, please state them in the comments, and we'll find out if layout rules can help you.
Use case 1: Restricting item statuses based on work item types
With layout rules, each item type can have its own workflow. This means it can have its own unique set of statuses that align with its specific lifecycle.
Let's assume you have three item types: Bug, Story, and Task.
Each type follows its own lifecycle, represented by the following statuses.
- Bug goes through the To Do, In Progress, Bug Fixing, Bug Testing, and Done statuses.
- Story has To Do, Ideation, In Progress, Development, Review, and Done.
- And Task moves through a simple To Do, In Progress, and Done.
To align with these flows, certain statuses should not be available to specific item types. For instance, a story or a task should not be moved to the Bug Fixing status. Similarly, a bug or a task should not be moved to the Development status.
To enforce this, we can create layout rules that control which statuses are available based on the item type.
So, we'll create three conditions with each item type as the primary field.
- If the item type is Bug, specify the condition with the trigger action to restrict the status pick list to To Do, In Progress, Bug Fixing, Bug Testing, and Done.
- If the item type is Story, specify the condition with the trigger action to restrict the status pick list to To Do, Ideation, In Progress, Development, Review, and Done.
- If the item type is Task, specify the condition with the trigger action to restrict the status pick list to To Do, In Progress, and Done.
Together, these conditions control the status progression for each item type. So, when you create a bug, it will only progress into the statuses that belong to the Bug lifecycle.

Use Case 2: Restricting future statuses based on the item's current status
When your team requires a pre-defined strict workflow where an item can be moved from a specific status to only a few statuses, layout rules can help implement this. For example, an item in the Bug Fixing status should only move to Bug Testing, and no other status. This way, each status controls the next status in the workflow.
To ensure this, create layout rules specifying conditions for each of the item status:
- If the status is To do, specify the condition with the trigger action to restrict the status pick list to In progress and Rejected.
- If the status is In progress, specify the condition with the trigger action to restrict the status pick list to In progress and Development.
- If the status is Development, specify the condition with the trigger action to restrict the status pick list to Review Level 1.
- If the status is Review Level 1, specify the condition with the trigger action to restrict the status pick list to Reopen and Review Level 2.
- If the status is Reopen, specify the condition with the trigger action to restrict the status pick list to In progress.

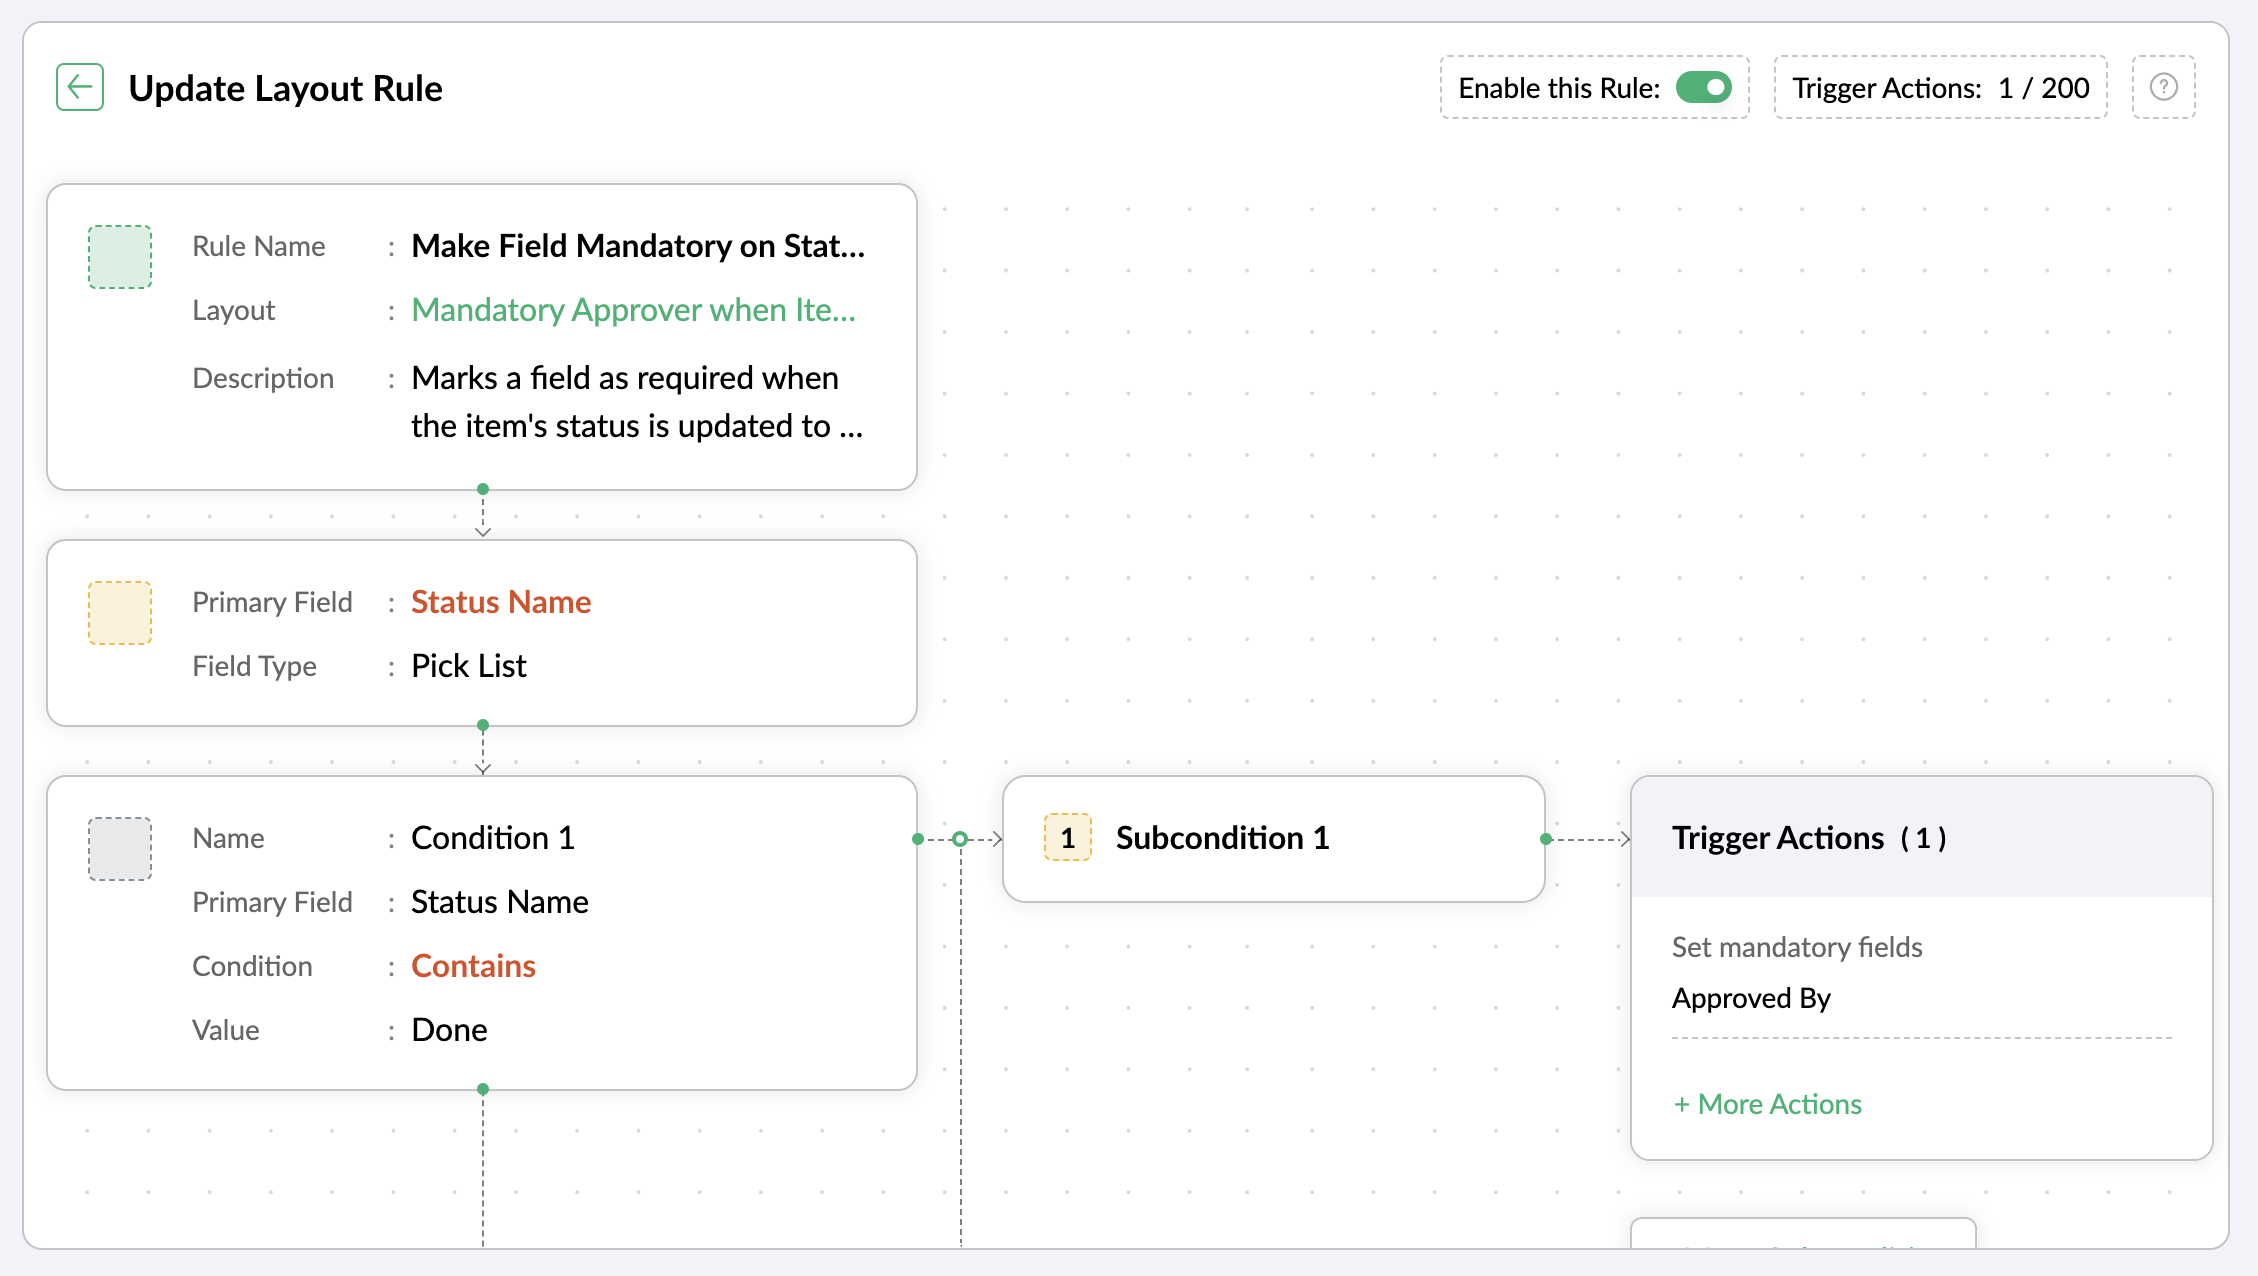
Use case 3: Making a field mandatory based on item status or item type
Let's assume you want a field to be made mandatory only when the item is moved to one particular status. Which implies the field will remain non-mandatory during other statuses and will be mandatory only at that particular status. So, the progress to that status must be allowed only when the mandatory field is updated.
For instance, when an item is moved to the Done status, the Approver field must become mandatory to record completion approval. To ensure that this process is executed, you can create a layout rule where the primary field is the Status Name. If the status field is updated to Done, specify the condition with the trigger action to set the Approver field as mandatory.
Use case 4: Showing or hiding a section or field based on item types
Layout rules enable you to show or hide fields or sections based on item type conditions.
Let's say a section with fields related to a new feature should only be visible when the item type is New Feature.
Similarly, when the item type is Security Issue, the section with fields related to Security issue must be visible.
To achieve this, create a layout rule with Item Type as the primary field.
- Create a condition for the New Feature item type with a trigger action to show the New Feature Details section.
- Create a condition for the Security Issue item type with a trigger action to show the Security Issue Details section.

Use case 5: Selecting specific assignees for item types and priorities
Layout rules can help you assign users based on the item type and priority. Let's say your team has a group of developers with varied levels of experience and expertise. You want to assign the high priority items to a more experienced member like John, while assigning low priority items to a novice like Peter.
If the item type is Bug and the priority level is Critical, you can assign the bug to John. If the priority level is High, it goes to Peter.
To meet this requirement, you can create a layout rule with Item Type as the primary field.
- Create a condition for the item type Bug with a subcondition where the priority level is Critical and the trigger action has the Set Field Value Assignee as John.
- For the same condition, add a subcondition where the priority level is High and the trigger action has the Set Field Value Assignee as Peter.
Similarly, say you want the Task item type with a medium priority level to go to Helen, and a low priority level should go to James.
- Create a condition for the item type Task with a subcondition where the priority level is Medium and the trigger action has the Set Field Value Assignee as Helen.
- For the same condition, add a subcondition where the priority level is Low and the trigger action has the Set Field Value Assignee as James.

These are just a few examples of how layout rules can streamline your project management. Do you have any particular scenario that needs resolution? Please share it with us.
Thanks,
Zoho Sprints Team
Topic Participants
Neethinila R
Sticky Posts
Tip #28 - Plan less and deliver more using WIP limit in Zoho Sprints
Hello, It's been a while since we met with a quick, interesting tip. As the saying goes, "Too much of anything is good for nothing", today the focus is on delivering your outcomes with the right amount of planning. Your plan should be practical, calculative, and achievable for driving a qualitative success. Laura's plan Laura has a habit of planning her project deliverables before assigning work to her team-mates. Once the plan is finalized, she schedules a general meeting with her team andTip # 3- Working on the Scrum board
Continuing from our Tip #2 on leading to a sprint, let's see how to manage the work items on the Scrum board. Once you start the sprint your work items are automatically displayed on the Scrum board where you will actually manage the work items. It is a snapshot of the backlog items identified for the current sprint. The layout of the Scrum board Simply put, the scrum board is just like a physical board with sticky notes on which the work items of the active sprint are displayed. The scrum boardTip#2- Leading you to a Sprint
Product Backlog After the user stories are written and finalized, they are sorted to create the Product Backlog for the project during the Backlog Grooming meeting. This is a master list of all the work items that have been identified for the project and sorted by priority. Requirements are not constant during this period.The Product Backlog is dynamic and is an ongoing process. Every user story in the Product Backlog is customer centric. The Product Backlog includes: User centric stories based onTip #1- Why swimlanes?
Lanes define a clear path to reach your destination. In Agile, swimlane is one such concept that sets a simple and clear process of the work that you do. The concept of swimlane can be related to the pool, where the swimmers gather in their respective lanes to start off. Similar to the pool, work items are grouped in different categories. Each category is referred as a lane and is displayed in horizontal format. Swimlanes are effective in categorizing the work items with respective to specific
Recent Topics
Unknown table or alias 'A1'
I would like to create a subquery but i am getting the following error: Unknown table or alias 'A1' used in select query. This is the sql statement: SELECT A1.active_paying_customers, A1.active_trial_customers, A1.new_paying_signup, date(A1.date_active_customers),in the Zoho creator i have address field based the customer lookup im selecting the addresss , some times the customer address getting as null i want to show as blank
in the Zoho creator i have address field based the customer lookup im selecting the addresss , some times the customer address getting as null ,i want to show as blank instead of showing null. input.Billing_Address.address_line_1 = ifNUll(input.Customers_Name.Address.address_line_1,"");Question about upgrade and storage space Zoho Notebook
After upgarding my Zoho Notebook plan, I am running into the following issue. I just upgraded from a free Zoho Notebook subscription to Pro Lite after I got a notification in my Window Zoho Notebook desktop app saying that I had run out of space. However,Printing to a brother label maker
I see allot of really old unanswered posts asking how to print to a label maker from a zoho creator app. Has their been any progress on providing the capability to create a customized height & width page or print template or whatever to print labels?Sync desktop folders instantly with WorkDrive TrueSync (Beta)
Keeping your important files backed up and accessible has never been easier! With WorkDrive desktop app (TrueSync), you can now automatically sync specific desktop folders to WorkDrive Web, ensuring seamless, real-time updates across devices. Important:Track online, in-office, and client location meetings separately with the new meeting venue option
Hello everyone! We’re excited to announce meeting enhancements in Zoho CRM that bring more clarity and structure to how meetings are categorized. You can now specify the meeting venue to clearly indicate whether a meeting is being held online, at theAnnouncing new features in Trident for Mac (1.32.0)
Hello everyone! We’re excited to introduce the latest updates to Trident, which are designed to reinforce email security and protect your inbox from evolving threats. Let’s take a quick look at what’s new. Deliver quarantined emails. Organization adminsMarketing Tip #5: Improve store speed with optimized images
Slow-loading websites can turn visitors away. One of the biggest culprits? Large, uncompressed images. By optimizing your images, your store loads faster and creates a smoother shopping experience leading to higher sales. It also indirectly improves SEO.SMS to customers from within Bigin
Hi All, Is there anyone else crying out for Bigin SMS capability to send an SMS to customers directly from the Bigin interface? We have inbuilt telephony already with call recordings which works well. What's lacking is the ability to send and receiveAdmins cannot see each others' Scheduled Reports?!
Very frustrating that as an admin I cannot see what my reports my fellow admins have created and scheduled. After asking about this on the help chat, I was told the issue is trust and security. By giving someone Admin status, it means we trust them with those responsibilities. Please change this, it is not a good process to have to bother other users to change a report or change users within a report.Writer update results in BitDefender blocking it as malware
After updating Writer to latest update, Bitdefender blocked the app and writer no longer runs.Missing Import Options
Hello, do I miss something or is there no space import option inside of this application? In ClickUp, you can import from every common application. We don't want to go through every page and export them one by one. That wastes time. We want to centralizeZoho CRM Portal Field Level Permission Issue
Hi Support Team, I am using the Zoho CRM Portal and configuring field-level editing permissions. However, we are unable to restrict portal users from editing certain fields. We have created a portal and provided View and Edit (Shared Only) access forCustom Fonts in Zoho CRM Template Builder
Hi, I am currently creating a new template for our quotes using the Zoho CRM template builder. However, I noticed that there is no option to add custom fonts to the template builder. It would greatly enhance the flexibility and branding capabilities ifCollaboration with customers made easy with Zoom Meeting and Zoho Desk integration
Hello everyone! We are happy to announce that you can now integrate your Zoho Desk account with Zoom Meeting. The integration bridges the gap between digital communication and human connection, empowering teams to deliver timely support when it mattersCRM Canvas - Upload Attachments
I am in the process of changing my screens to Canvas. On one screen, I have tabs with related lists, one of which is attachments. There doesn't appear to be a way to upload documents though. Am I missing something really obvious? Does anyone haveTrueSync regularly filling up my local disk
Seems that WorkDrive's TrueSync randomly starts filling up my local hard drive space. None of the folders have been set as "Make Offline" but still it seems to randomly start making file offline. The settings of the app is so minimal and is of no realKaizen #194 : Trigger Client Script via Custom buttons
Hello everyone! Welcome back to another interesting and useful Kaizen post. We know that Client Scripts can be triggered with Canvas buttons and we discussed this with a use case in Kaizen#180. Today, let us discuss how to trigger Client Script when aPicklist field shows "none" as default
Hello, Is there an option to avoid showing "none" as the default value in a picklist field? I also don't want to see any option displayed. My expectation is to have a blank bar, and then when I display the drop-down list, I can choose whichever I waStage-probability mapping feature in custom module
Hi, I'm building a custom module for manage projects. I would like to implement the stage-probability feature that Potentials has. Is this possible?Field Description is very small
Hello, The field Description in the activity is very small. Why don't try open a new window, or a bigger popup, or increase the width of the "popup". Example:StatusIQ
Please add StatusIQ to data sources. We using site24x7 and StatusIQ together and site24x7 integration is already there. Thanks and regards, TorstenIn Zoho People, the Operations buttons are frequently not visible or do not appear consistently.
In Zoho People, the Operations buttons are frequently not visible or do not appear consistently. We request you to please investigate and address this issue, as it is affecting daily HR operations and user access.Marketing Tip #14: Increase cart value with product bundles
Bundling products is a great way to increase average order value while giving customers more convenience. Think “camera + tripod + memory card” or “soap + lotion + bath salts.” Bundles make shopping easier and feel like a better deal. It’s a win-win forProblem with Workdrive folders
I'm having a problem a problem accessing files in a Zoho work drive folder when using the Zoho writer app. The problem folder appears grayed out in the Zoho work drive window in both the online and writer application. However I can open the folder inPre-orders at Zoho Commerce
We plan to have regular producs that are avaliable for purchase now and we plan to have products that will be avaliable in 2-4 weeks. How we can take the pre-orders for these products? We need to take the money for the product now, but the delivery willCan multiple agents be assigned to one ticket on purpose?
Is it possible to assign one ticket to two or more agents at a time? I would like the option to have multiple people working on one ticket so that the same ticket is viewable for those agents on their list of pending tickets. Is something like this currentlyEdit default "We are here to help you" text in chat SalesIQ widget
Does anyone know how this text can be edited? I can't find it anywhere in settings. Thanks!Feature Request: Sync Leave Tracker to Zoho Mail / Calendar or provide option to download information
Zoho Leave Tracker offers the option to sync the leave Calendar to Microsoft 365 and Google Calendar. Adding an option to sync to Zoho-Mail Calendar would avoid duplication and add significant value for users. An alternative would be to allow users toMultiple currencies - doesn’t seem to work for site visitors / customers
I am trying to understand how the multiple currency feature works from the perspective of the website visitor who is shopping on my Zoho Commerce site. My site’s base currency is US Dollars (USD) but my store is for customers in Costa Rica and I wouldArchiving Contacts
How do I archive a list of contacts, or individual contacts?How do people handle using Outlook and Zoho Project calendar at the same time?
We have an ongoing problem in our organisation where we use Zoho Projects to plan all of our projects tasks and that also allows us to look forward using the workload report to see which of our consultants are overstretched etc and which are available.10GB Email Storage Limits in Zoho CRM
We’ve had Zoho One for almost 5 years and have always synced our emails from Gmail via IMAP… As of late, we’ve run into issues with our emails not syncing, due to being over the 10GB storage cap… What’s very odd is that we haven’t changed a thing? I knowHow to set page defaults in zoho writer?
hi, everytime i open the zoho writer i have to change the default page settings to - A4 from letter, margins to narrow and header and footer to 0. I cannot set this as default as that option is grayed out! so I am unable to click it. I saved the documentEnable History Tracking for Picklist Values Not Available
When I create a custom picklist field in Deals, the "Enable History Tracking for Picklist Values" option is not available in the Edit Properties area of the picklist. When I create a picklist in any other Module, that option is available. Is there a specific reason why this isn't available for fields in the Deals Module?Vault crashes on Android Devices
Vault is continuously closing after entering the master password on my Android device. After several attempts I get a system message that says there is a bug in the app. I've uninstalled and reinstalled the app, and cleared the app cache, but nothing¿Cómo puedo configurar las contraseñas creadas bajo una directiva para que nunca caduquen y no aparezcan como caducadas en los informes?
¿Cómo puedo configurar las contraseñas creadas bajo una directiva para que nunca caduquen y no aparezcan como caducadas en los informes? La razón por la cual contraseña estas no deben caducar es porque su actualización depende de mi cliente y no de mí.Camera access
My picture doesn't appear in a group discussion. (The audio is fine.) The guide says "Click the lock icon on address bar," but I can't find it. Advise, pleaseAre static links available
I'm still using Zoho Meeting in trial mode. My previous webinar software provided a static link, and I made the mistaken assumption that I could send out my link and start a meeting later. Mass confusion, but my fault. With a paid version do you get aWhy is Zoho Meeting quality so poor?
I've just moved from Office 365 to Zoho Workplace and have been generally really positive about the new platform -- nicely integrated, nice GUI, good and easy-to-understand control and customisation, and at a reasonable price. However, what is going onNext Page