Automation#34 : Automate Email threading for Ticket notification
Hello Everyone,
It's been a while since we've presented an automation. However, our community has been buzzing with ideas, use cases, and discussions with our community experts and Ask the Experts session.
So, here we are again, presenting an automation focused on threading ticket notification emails.
Let's see how this automation helped our folks at Zylker Techfix.
Zylker Techfix, a gadget service company, has grown significantly and now serves a large customer base. The support team receives tickets from various customers, some of whom send multiple emails regarding servicing multiple gadgets. With their expanding customer base, Zylker Techfix wanted to effectively track notification emails sent to customers for each respective ticket.
Additionally, Zylker Techfix aimed to inform customers about the engineer assigned to support them with their submitted gadget, helping establish a stronger connection with their customers.
In this post, let's explore how we can adopt Zylker Techfix's customization.
Notify Customers when a ticket is created
The notification rule has an option to notify your customers when a ticket is created.
You can add the details of the ticket owner within the Email template so customers will know the support executive who will be handling the ticket.
How to include Ticket Owner details within the Email template?
You could create a New Email template or use the Existing email template.
Create an Email template
You can either create a New Email template or edit an existing Email template.
To Add a New Template : Go to Setup (S) >> Customization >> Email Templates >> Select the required Department >> Click on Add >> New Template >> Select the Tickets module >> Enter Name > Select Folder, From Address, Enter Reply to address if required, Add Subject and desired description.
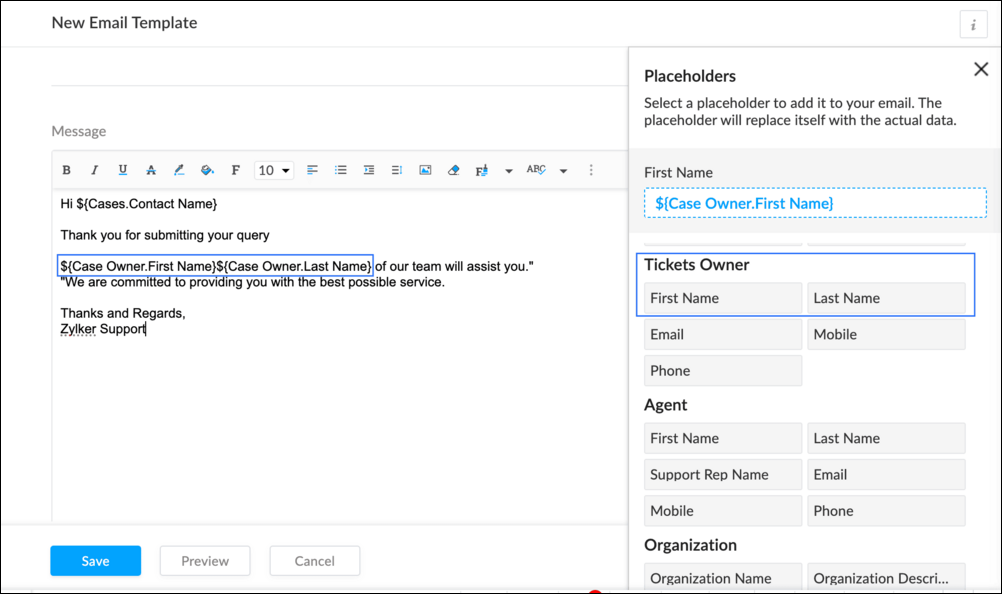
To add Ticket owner's name, insert the placeholders First Name and Last Name (if required) ${Case Owner.First Name}${Case Owner.Last Name}, under Ticket Owner.
To Edit an Existing Email
To edit an existing Email, Go to Setup (S) >> Customization >> Email Templates >> Select the required Department >> Click on the Edit icon for the existing template or select the existing Template >> Edit description. To insert Ticket owner's name, insert the placeholders for first name and last name (if required) ${Case Owner.First Name}${Case Owner.Last Name}, under Ticket Owner.
Create a connection
1.1 Go to Setup(S) and choose Connections under Developer Space.
1.2 Click Create Connection.
1.3 Select Zoho Desk under Default Services.
1.4 Set the connection name as zohodeskconnection.
1.5 Under Choose Scopes, choose the below scope values:
1.5 Under Choose Scopes, choose the below scope values:
Desk.settings.ALLDesk.tickets.UPDATE
1.6 Click Create and Connect.
1.7 Click Connect.
1.8 Choose the Desk's organization to connect with Deluge, and click Submit.
1.9 Click Accept.
Connection is created successfully.
Configure Custom Function within the Workflow Rule
1. Go to Setup, choose Workflows under Automation.
2. Under Workflows, click Create Rule.
3. Under Basic Information, choose Tickets under Module, give a Rule Name and Description.
4. Click on the Active checkbox to activate the rule once created. Click Next.
5. Under Execute on, select Create.
6. Add Criteria, if required.
7. Under Actions, click on the drop-down in the + icon and select Custom Functions >> New.
7.1 Under Basic Information, enter Name and Description. Choose Tickets under Module.
7.2 Under Argument Mapping, give a desired Method Name. Map the arguments as below:
7.2.1 In the Argument Name field, type ticketId and select Ticket Id in the Tickets Section.
7.2.2 In the Argument Name field, type contactEmail and select Email in the Contacts Section.
7.2.3 In the Argument Name field, type fromEmailAddress, click on Specify Custom Value and type the verified From Address of your department.

7.3 In the script window, insert the Custom Function given below:
- //<<<< User Inputs Section >>>>----
- // Replace ".com" with appropriate domain extension based on customer's location/DC
- deskURL = "https://desk.zoho.com";
- templateId = "xxxxxxtemplateIdxxxxx";
- //<<<< Initial Configs >>>>----
- logs = Map();
- template = invokeurl
- [
- url :deskURL + "/api/v1/templates/" + templateId + "/render?entityId=" + ticketId
- type :POST
- connection:"deskconnection"
- ];
- if(template != null && template.containsKey("body"))
- {
- logs.put("template",template);
- emailContent = template.get("body");
- emailReplyParams = {"channel":"EMAIL","to":contactEmail,"fromEmailAddress":fromEmailAddress,"content":emailContent,"contentType":"html"};
- logs.put("emailReplyParams",emailReplyParams);
- sendReply = invokeurl
- [
- url :deskURL + "/api/v1/tickets/" + ticketId + "/sendReply"
- type :POST
- parameters:emailReplyParams + ""
- connection:"deskconnection"
- ];
- logs.put("sendReply",sendReply);
- }
- info logs;

Note
a. In Line 3, replace .com in the address with .in/.eu/.ca based on your DC.
b.In Line 4, enter the template id within " " of the Email template you created or edited.
To fetch Template id, go to Setup (S) >> select Email Templates under Customization >> click on the Email template and on the Address bar, copy the numeric value at the end of the URL.
8. Click Save to save the custom function.
9. Click Save again to save the workflow.
Now, along with your ticket conversations, you can also track the emails sent as notifications within your ticket conversations.
Until the next post,
Lydia | Zoho Desk