Automation#34 : Automate Email threading for Ticket notification
Hello Everyone,
It's been a while since we've presented an automation. However, our community has been buzzing with ideas, use cases, and discussions with our community experts and Ask the Experts session.
So, here we are again, presenting an automation focused on threading ticket notification emails.
Let's see how this automation helped our folks at Zylker Techfix.
Zylker Techfix, a gadget service company, has grown significantly and now serves a large customer base. The support team receives tickets from various customers, some of whom send multiple emails regarding servicing multiple gadgets. With their expanding customer base, Zylker Techfix wanted to effectively track notification emails sent to customers for each respective ticket.
Additionally, Zylker Techfix aimed to inform customers about the engineer assigned to support them with their submitted gadget, helping establish a stronger connection with their customers.
In this post, let's explore how we can adopt Zylker Techfix's customization.
Notify Customers when a ticket is created
The notification rule has an option to notify your customers when a ticket is created.
You can add the details of the ticket owner within the Email template so customers will know the support executive who will be handling the ticket.
How to include Ticket Owner details within the Email template?
You could create a New Email template or use the Existing email template.
Create an Email template
You can either create a New Email template or edit an existing Email template.
To Add a New Template : Go to Setup (S) >> Customization >> Email Templates >> Select the required Department >> Click on Add >> New Template >> Select the Tickets module >> Enter Name > Select Folder, From Address, Enter Reply to address if required, Add Subject and desired description.
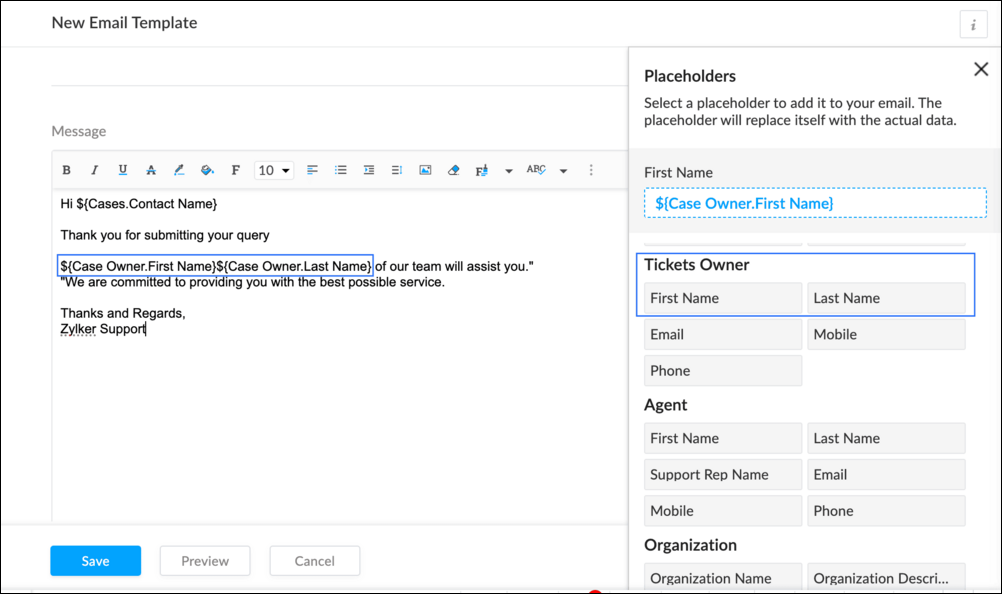
To add Ticket owner's name, insert the placeholders First Name and Last Name (if required) ${Case Owner.First Name}${Case Owner.Last Name}, under Ticket Owner.
To Edit an Existing Email
To edit an existing Email, Go to Setup (S) >> Customization >> Email Templates >> Select the required Department >> Click on the Edit icon for the existing template or select the existing Template >> Edit description. To insert Ticket owner's name, insert the placeholders for first name and last name (if required) ${Case Owner.First Name}${Case Owner.Last Name}, under Ticket Owner.
Create a connection
1.1 Go to Setup(S) and choose Connections under Developer Space.
1.2 Click Create Connection.
1.3 Select Zoho Desk under Default Services.
1.4 Set the connection name as zohodeskconnection.
1.5 Under Choose Scopes, choose the below scope values:
1.5 Under Choose Scopes, choose the below scope values:
Desk.settings.ALLDesk.tickets.UPDATE
1.6 Click Create and Connect.
1.7 Click Connect.
1.8 Choose the Desk's organization to connect with Deluge, and click Submit.
1.9 Click Accept.
Connection is created successfully.
Configure Custom Function within the Workflow Rule
1. Go to Setup, choose Workflows under Automation.
2. Under Workflows, click Create Rule.
3. Under Basic Information, choose Tickets under Module, give a Rule Name and Description.
4. Click on the Active checkbox to activate the rule once created. Click Next.
5. Under Execute on, select Create.
6. Add Criteria, if required.
7. Under Actions, click on the drop-down in the + icon and select Custom Functions >> New.
7.1 Under Basic Information, enter Name and Description. Choose Tickets under Module.
7.2 Under Argument Mapping, give a desired Method Name. Map the arguments as below:
7.2.1 In the Argument Name field, type ticketId and select Ticket Id in the Tickets Section.
7.2.2 In the Argument Name field, type contactEmail and select Email in the Contacts Section.
7.2.3 In the Argument Name field, type fromEmailAddress, click on Specify Custom Value and type the verified From Address of your department.

7.3 In the script window, insert the Custom Function given below:
- //<<<< User Inputs Section >>>>----
- // Replace ".com" with appropriate domain extension based on customer's location/DC
- deskURL = "https://desk.zoho.com";
- templateId = "xxxxxxtemplateIdxxxxx";
- //<<<< Initial Configs >>>>----
- logs = Map();
- template = invokeurl
- [
- url :deskURL + "/api/v1/templates/" + templateId + "/render?entityId=" + ticketId
- type :POST
- connection:"deskconnection"
- ];
- if(template != null && template.containsKey("body"))
- {
- logs.put("template",template);
- emailContent = template.get("body");
- emailReplyParams = {"channel":"EMAIL","to":contactEmail,"fromEmailAddress":fromEmailAddress,"content":emailContent,"contentType":"html"};
- logs.put("emailReplyParams",emailReplyParams);
- sendReply = invokeurl
- [
- url :deskURL + "/api/v1/tickets/" + ticketId + "/sendReply"
- type :POST
- parameters:emailReplyParams + ""
- connection:"deskconnection"
- ];
- logs.put("sendReply",sendReply);
- }
- info logs;

Note
a. In Line 3, replace .com in the address with .in/.eu/.ca based on your DC.
b.In Line 4, enter the template id within " " of the Email template you created or edited.
To fetch Template id, go to Setup (S) >> select Email Templates under Customization >> click on the Email template and on the Address bar, copy the numeric value at the end of the URL.
8. Click Save to save the custom function.
9. Click Save again to save the workflow.
Now, along with your ticket conversations, you can also track the emails sent as notifications within your ticket conversations.
Until the next post,
Lydia | Zoho Desk
Topic Participants
Lydia | Zoho Desk
Sticky Posts
Register for Zoho Desk Beta Community
With the start of the year, we have decided to take a small step in making the life of our customers a little easier. We now have easy access to all our upcoming features and a faster way to request for beta access. We open betas for some of our featuresShare your Zoho Desk story with us!
Tell us how you use Zoho Desk for your business and inspire others with your story. Be it a simple workflow rule that helps you navigate complex processes or a macro that saves your team a lot of time; share it here and help the community learn and grow with shared knowledge.Tip #1: Learn to pick the right channels
Mail, live chat, telephony, social media, web forms—there are so many support channels out there. Trying to pick the right channels to offer your customers can get pretty confusing. Emails are most useful when the customer wants to put things on record. However, escalated or complicated issues should not be resolved over email because it's slow and impersonal. When you need immediate responses, live chat is more suitable. It's also quick and convenient, so it's the go-to channel for small issues.Welcome to Zoho Desk Community - Say hello here!
Hello everyone! Though we have been here for a while, it’s time to formally establish the Zoho Desk Community; we’re really happy to have you all here! This can be the place where you take a moment to introduce yourself to the rest of the community. We’d love to hear all about you, what you do, what company or industry you work for, how you use Zoho Desk and anything else that you will like to share! Here’s a little about me. I am Chinmayee. I have been associated with Zoho since 2014. I joined hereWebinar 1: Blueprint for Customer Service
With the launch of a host of new features in Zoho Desk, we thought it’ll be great to have a few webinars to help our customers make the most of them. We’re starting off with our most talked about feature, Blueprint in Zoho Desk. You can register for the Blueprint webinar here: The webinar will be delivered by our in-house product experts. This is a good opportunity to ask questions to our experts and understand how Blueprint can help you automate your service processes. We look forward to seeing
Recent Topics
Deluge scripts
Why is there not a search function to make it easier to find the script of interest when modifications are required.Social media simplified with Zoho Social: Why should brands have a Threads profile?
Just over a year ago, Instagram launched Threads, the all new social media app primarily focusing on sharing text online. It was welcomed by people worldwide with more than 10 million users in just seven hours, and it currently has over 175 million activeAuto tracking URL generation based on Carrier
Hi, While creating a shipment order for a package in Zoho Books, I have a requirement that for example, if the carrier is Delhivery and tracking number is 1234, then can automatically the tracking link/URL be generated as www.delhivery.com/1234. Similary,New Beginnings with Zoho Desk mobile app best practices: Part 3
In focus: Scaling consistency, intelligence, and customization In our third installment, we'd like to share tips to help you elevate your customer experience as you handle support operations seamlessly on mobile. Let's reconnect with Omniserve, the fieldHighlights of 2025: Milestones and moments
Hey everyone! As we step into 2026, it’s a great time to look back at everything 2025 brought to Zoho Social. This year was big, packed with powerful new features, smart enhancements, exciting events, and a major milestone: a whole decade of Zoho Social.Introducing the sandbox environment in Zoho Sign
Hey there! Customer and partners across the globe have been requesting a testing environment—also called a sandbox—for quite some time. Sandboxes help you try out document workflows before using them in your production setup. This new year, we are excitedCan I share the drive with another Windows user?
We use the WorkDrive Sync application on a server with several remote desktop users. Our question is: Can the drive created by WorkDrive Sync be shared from one of these remote users with the other users so they can access the files, or do we need toSyncing Bills in Zoho Books to Zoho CRM
Is there any way to sync the Bills in Zoho Books in Zoho CRMAuto CheckOut Based On Shift.
This Deluge script runs on a scheduled basis to automatically set the 'Actual_Check_Out' time for employees who haven't manually checked out. If the current time is past their scheduled 'Shift_End_Time', the script updates the check-out time to matchERROR: Product type cannot be changed for Items having transactions.
I have mistakenly added a product type as goods for an item that was a digital service. Now when HSN/SAC became mandatory, this brought my attention to this error I did. So I tried changing the product type but it displayed this error message ProductBoost your CRM accuracy with smart Data Enrichment
Hello all! In this post let's look at data enrichment from a holistic perspective to gain more clarity on how you can use it. So, here's a quick recap of what data enrichment is and how you set it up it to enhance your existing module data! What is dataIs it possible to set a region lookup table so that my deal country can lookup this lookup table
Hi there, I would like to be able to add a data lookup table with the following fields: Country, Region. And then in my deal report, i can then lookup this table to fish out the region in my report. This will be important for my sales process to categoriseTest Emails Show Sent "via zcsend.net" in My Gmail Account
I noticed the following info... However, a few email service providers such as Outlook and Gmail will display that the email was sent by zcsend.net (Zoho campaigns’ server) on your behalf instead of just your from email address. In order to prevent this, you can go for either of these options: Do not select the check box meant for DomainKey Signature which is listed under Unverified sender domains. Include our mail servers by advanced authentication method such as SPF/ Sender ID and DomainKey/ DKIM.'UnAuthenticated Connection: zbooks_connection'
I have a zoho connection in Zoho Books, the link name es zbooks_connection, but I like to validate if exist, by example if I use this line in my code: response=zoho.books.getTemplates("", "","zbooks_connection"); But I don't have the connection I likeCalling the new 'Custom API' feature from within a Custom Widget
From what I've learned it is not possible to call an endpoint from the new "Custom API" feature within a Creator Widget. The SDK's doesn't support it yet, when calling it natively you end up with CORS issues or at least I couldn't get it working evenCannot post to Instagram. I get the error: Insufficient permission to publish on this page. Check with your page Admin to update permissions.
We had another admin that left the company. Since he left, we get this error when posting to Instagram.Zoho desk desktop application
does zoho desk has a destop applicaion?Ability to re-order Workflow Rules
We really need the ability to re-order workflow rules within departments. Either the ability to drag/drop them into a different order or something.Create an article template
I have a question concern the Knolwedge Database from Zoho Desk. There is any possibility to create an article template ? Exemple of what I research : TODAY : I want to create a lot af articles with the same baseline > I create one article > I copy/pasteChange of Blog Author
Hi, I am creating the blog post on behalf of my colleague. When I publish the post, it is showing my name as author of the post which is not intended and needs to be changed to my colleague's name. How can I change the name of the author in the blogs?? Thanks, RamananZoho FSM API Delete Record
Hi FSM Team, It would be great if you could delete a record via API. Thank you,Instant Messaging Update | Now migrate your WhatsApp Business phonenumber from another BSP to Zoho Desk | Dec'23
Hi All, Everything seems to move at lightning speed these days, and time is certainly flying by for the IM team. But we are delighted at how much ground we covered this year. 🚀 For one, we enabled WhatsApp business phone number migration so that youUpload ticket attachments via Drag-&-Drop
Hello, if you want to upload a file to the ticket attachment you need to click the button and use the file browser to select and upload the desired file. In many cases, it would be much more efficient if you could simply drag the file to the browser window...Can we disable add to cart in Zoho Commerce?
Hello, Our sales happen on the phone. During the call the customer is directed to our website to inspect the products together with the sales rep. So we need a way to present our inventory. I figured Zoho Commerce is a good fit for this use case. HoweverIntroducing WhatsApp integration in Bigin
Greetings! In today's business landscape, messaging apps play a significant role in customer operations. Customers can engage with businesses, seek support, ask questions, receive personalized recommendations, read reviews, and even make purchases—allZoho One account closure vs deactivation
I wonder what are the best practices and guidelines around deactivating vs deleting Zoho accounts in organisations? Any practical considerations?Global Search placement in the new UI
Having a hard time with the global search placement in the UI redesign. Surely I can't be the only one. Previously global search placement was perfect. A bar at the top/center of the page. Exactly where you would expect it to be. Since the new UI hasSchedule Zoho CRM reports only on Business Days
Hello, Is it possible to schedule reports only on business days ? We currently get daily sales reports on weekend which has no value since the sales team doesn't work on weekends. ThanksHow to install Widget in inventory module
Hi, I am trying to install a app into Sales Order Module related list, however there is no button allow me to do that. May I ask how to install widget to inventory module related list?How to track a contact or customer's past product purchases in Bigin Premiere?
Hello there. I am the sole user of Bigin for a small company (chess club), and would like to track current and past purchases made by a contact (player) or company (family which includes the player). Players may register for multiple tournaments, takeLENTITUD EN RECIBIR MAIL
Buenas tardes, Estamos experimentando lentitud en la recepción de correos electrónicos.Items should display under specific warehouse
I have configured the multi warehouse but it show all the items under all warehouse which is not correct according to our business logic, so i want that items should only display under that specific warehouse not under all the warehouses not even with zero quantity. Some items should be common but not all so is there any option for that purpose so i can specific the items to its warehouse. RegardsPartial refunds
I am trying to process refund for a one item invoice, however the refund is partial: i am getting this error while creating credit note, can anyone share some wisdom about thisBest practice importing items and matching assemblies
Hi, I was wondering what would be the best practice to import items and composite items (assemblies) From my backup, what should I import first? The items or the composite items? I am on Zoho one, using inventory and books. Kind regards, SabineBulk Fill In & Edit PO/Bill/SO/Invoice
Hello, I am adding stock in bulk on a PO, the system is automatically populating the Rate (price) and Tax from the item data. Problem is that the bill rate is different from the rate on the item data, so I have to manually erase each and enter the price.Separate Items & Services
Hi, please separate items and services into different categories. Thank youItems Below Reorder Point Report?
Is there a way to run a report of Items that are below the Reorder Point? I don't see this as a specific report, nor can I figure out how to customize any of the other stock reports to give me this information. Please tell me I'm missing something sCancelled Transfer order problem
Hello, We've canceled a transfer order, and we can't add the related items to a new Transfer Order. The system tells us that the bin doesn't have the required quantity, but when we check the item, it indicates that there are 2 units in the bin. It alsoCreating a Chart from a Report
In Zoho Analytics, is it possible to create a chart from a Pivot View report? We are looking to use Zoho Analytics to replace Excel for Sales reports and would like to be able to show both the table and the chart together.Client Portal ZOHO ONE
Dear Zoho one is fantastic option for companies but it seems to me that it is still an aggregation of aps let me explain I have zoho books with client portal so client access their invoice then I have zoho project with client portal so they can access their project but not their invoice without another URL another LOGIN Are you planning in creating a beautiful UI portal for client so we can control access to client in one location to multiple aps at least unify project and invoice aps that wouldNext Page