What's New in Zoho Inventory | January - March 2025
Hello users,
We are back with exciting new enhancements in Zoho Inventory to make managing your inventory smoother than ever! Check out the latest features for the first quarter of 2025. Watch out for this space for even more updates.
Email Insights for Sales Orders
We have introduced the Email Insights feature for Sales Orders in Zoho Inventory. With this feature, you can track emails sent for Sales Orders and view when the email was opened. The 'Client Viewed' filter allows you to find Sales Orders that have been viewed via email by the recipient.

Stock Availability Filter in Stock Counts
We have added a Stock Availability Filter to Stock Counts. This filter allows you to filter and add items to a stock count based on their stock availability, making the counting process more efficient.
View and Customize Stock Status in Transactions
When creating a transaction, you can now see both the Stock on Hand and the Available for Sale quantity for each item. The displayed quantity will depend on the selected View option.

Export Bin Locations Report
You can now export the Bin Locations Details Report and Bin Location Transaction Summary Report in your preferred format such as PDF, XLS, or XLSX. This enhancement makes it easier to analyze your bin-level inventory data.
To export a bin locations report, go to Reports > Bin Locations Details Report under Inventory
Add Dropshipping Address in Sales Orders
You can now add a dropship address in your Sales Orders. This address is used exclusively for the specific transaction and will not be saved to the customer's additional address list. You can also view and copy addresses from existing customers when setting the dropship address.
To add a dropshipping address, go to Sales > Sales Orders, edit/create a sales order, and click + Dropshipping Address.

New & Improved Zoho Inventory Reports
Introducing enhancements to Inventory reports for better control and visibility. The Stock Summary Report now supports custom reports, amount columns, and a stock tracking mode filter. Bulk export is available for up to 500,000 records (based on your plan) for key reports like Inventory Summary and FIFO Cost Lot Tracking. Purchase Order Reports now offer detailed columns such as Quantity Ordered, Received, In Transit, and Late By Date. Custom reports, Show/Hide Columns, and advanced filters are now supported across various reports including Inventory Aging, ABC Classification, Committed Stock, Product Sales, Valuation, Landed Cost, and Active Purchase Orders. The Sales by Item Report adds a Report Basis filter, while the Sales Return History Report gets a complete revamp with status tracking, return reasons, grouping, customizations, and scheduled exports. The Inventory Valuation Summary includes a new Stock Account column with filters, and you can now exclude transfer orders in Inventory and Stock Summary reports. These changes will provide a more flexible and insightful reporting experience.
Display Type for Lookup Custom Fields
We now support different display types for lookup custom fields. You can choose between a List view and a Dropdown view. This feature is currently available for specific lookup modules, like items, vendors, purchase orders, and customers.
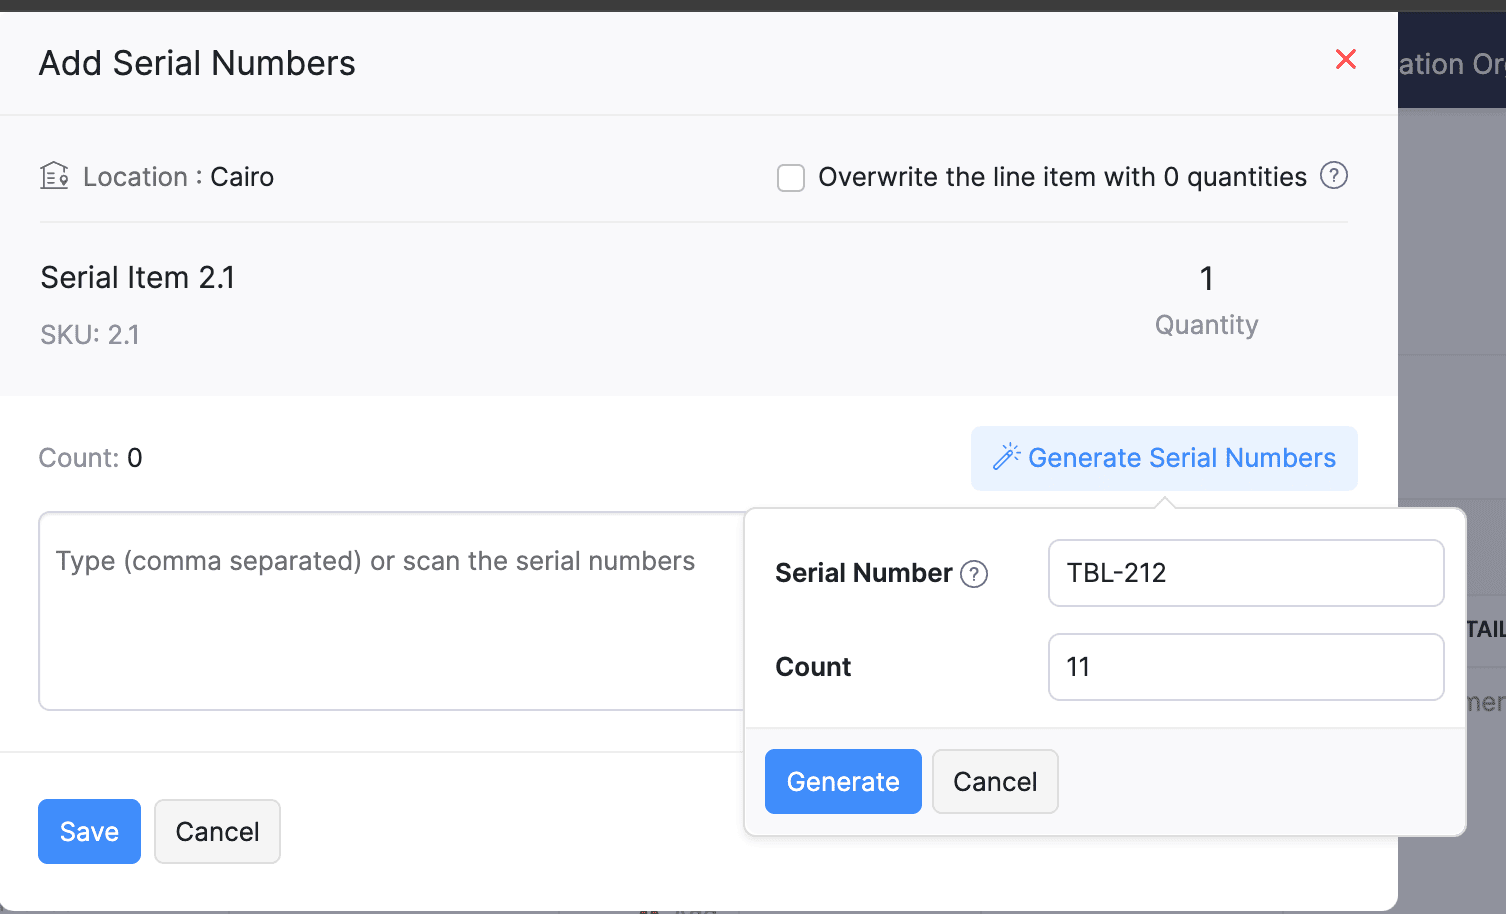
Generate Serial Numbers in Inward Transactions
Introducing support serial number generation for inward transactions. You can set a starting serial number and specify the required count to ensure precise inventory tracking and save time.
Note: The starting serial number must always end with a numeric value.
To generate serial numbers, select an item from the item table, click Add Serial Numbers, then select Generate Serial Numbers. Enter the starting value and count, then click Generate.
Note: The starting serial number must always end with a numeric value.
To generate serial numbers, select an item from the item table, click Add Serial Numbers, then select Generate Serial Numbers. Enter the starting value and count, then click Generate.
Batch Tracking Enhancements
Batch Tracking just got more powerful and flexible with some major enhancements. You can now create and edit batches directly from the item details page, making management easier. A new return option allows items to be returned to the same sold batch, improving stock accuracy. You can also use the same batch across multiple line items in purchase transactions. Batch status control lets you mark batches as Inactive, keeping them out of transactions while retaining them for reports. Plus, all batch activity including creation, edits, restocks, and transfers is now visible in the Audit Trail report.
Item Description for UPS Line Items
We have improved the UPS Paperless Invoice feature by introducing the ability to add and edit item descriptions and unit prices individually for each line item within a package. Previously, a single description was applied to all items in a package, limiting the level of detail you could provide. With this update, you now have more control and flexibility.

Enhanced Shopify Integration
We have improved the shopify integration. You can now set sync frequency and mapping options for each store separately. Item sync runs every 24 hours by default, but you can also set it up manually if needed. Non-taxable items are now created with the correct tax exemption. When setting up Sales Order sync, you’ll pick a start date and can set how often it runs. Each store can now sync independently. You can also decide if sales orders should be fetched to Zoho Inventory under a single customer or create new customers using fields like email or name. Now, sync history includes filters for sync type and status, making it easier to show both successful and failed sync.
To integrate Shopify with Zoho Inventory, go to Settings > Integrations & Marketplaces > Shopify
Pin Columns in Transaction List Page
You can now pin up to two columns in the transaction list page in both default and custom views to keep key information visible while scrolling. This feature is available when a view contains more than eight columns.
To pin columns, go to any module, click the Customize Columns icon, hover over the fields, click the Pin icon, and then click Save.

Edit Etsy Orders
You can now edit orders fetched from Etsy with ease. Previously, Etsy orders were imported with non-editable details and tax. Now, you can edit these orders and override the tax applied based on the tax rate configured at your organization level.
To integrate Etsy, go to Settings > Integrations & Marketplaces > Etsy
Clone Delivery Challans
You can now duplicate delivery challans by cloning the existing ones, thereby saving time.
To clone a delivery challan, go to Delivery Challans, select a challan, click the More icon, and select Clone from the dropdown.

Enhanced Export and Print Preferences for Reports
We have added new customization options for report exports and print preferences. You can now set custom file names for exported reports, display column headers on each PDF page, and organize report data into separate pages based on the group by field.
Multi-Factor Authentication (MFA) for Portals
We are improving security by adding Multi-Factor Authentication (MFA) to both Customer and Vendor Portals. This extra security step requires users to enter a Time-Based One-Time Password (TOTP) along with their login credentials.
Admins can turn on MFA in the Customer Portal settings, making it mandatory for customers and vendors to set it up using an authenticator app. Once enabled, users will need to enter a TOTP code each time they log in. If needed, admins can reset MFA for users.
Note that even if MFA is disabled later, users that have already set it up will still need to enter the TOTP code. If they lose access to their authenticator app, they should contact an admin for a reset.
To enable multi-factor authentication for your customers and vendors, go to Settings > Preferences > Customer Portal. Check the Enable multi-factor authentication (MFA) option.

Import Move Orders and Putaways
We have introduced import option for the Move Orders and PutAway modules. You can now seamlessly import data for these, making bulk updates and record creation faster and more efficient.
To import move orders and putaways, go to Transfer Orders/Putaways under Inventory > Click More in the top right corner > Import Transfer Orders/Putaways.
Attach Documents in Purchase Receives
You can now upload, attach, and manage documents directly from the Purchase Receive creation and edit page.
To attach a document in purchase receive, go to Purchases > Purchase Receives > + New > Upload File.

Print & PDF Support for Purchase Receives
You can now generate and print or download your purchase receives. We have also supported a standard template with which you can view the PDF of your purchase receives to simplify record-keeping.
To print or download a purchase receive, go to Purchases > Purchase Receives. Select the purchase receive and click PDF/Print.
To view the PDF of a purchase receive, go to Purchases > Purchase Receives. Select the purchase receive and enable the Show PDF View option on its details page.

Filter Lookup Custom Fields
You can now filter your lookup custom fields by using custom views and setting criteria. The records will be shown based on the chosen custom view and the rules set by you, making sure all the conditions are met.

Leave Organization Option
We have introduced the option to leave an organization from the Manage Organizations page. However, if you are the admin who created the organization or the only admin, you will need to delete the organization instead. Additionally, before you leave, ensure the integrations are disabled, if any.

That's all for now, folks! Try these new features and share your feedback. If you need assistance, reach out to us at support@zohoinventory.com.
Best Regards,
The Zoho Inventory Team