Working with Zoho Creator for Claude Code
 Note: This feature is currently in its beta phase. Early access will be available soon.
What does this page cover
This guide covers everything you need to get started with Zoho Creator for Claude Code, from installing the plugin to building and deploying your first application. Once set up, you describe the app you want in the Claude Code chat, and the plugin handles generation and compilation. When you are ready, ask Claude to upload it to your Zoho Creator account.
Availability
-
Available for all paid plans of Zoho Creator.
-
Super Admins can install and use Zoho Creator for Claude Code to build and modify applications.
-
Available only in the Claude Code desktop app. The web version of Claude Code is currently not supported.
1. Install the plugin in Claude Code
- Contact Zoho Creator support to get the plugin .zip file.
- Open Claude Code and go to Settings -> Plugins.
- Click Add -> Upload plugin and select the .zip file you received.
- Once installed, the Zoho Creator plugin will be available in your Claude Code projects.
2. Build with Zoho Creator for Claude Code
The Zoho Creator plugin works exclusively within Claude Code. To get started, switch to Code using the option at the top-left corner of the app (Home is selected by default).
To build Zoho Creator applications with Claude Code, make sure to mention Zoho Creator in your prompt. Claude Code uses this to identify that the request is for a Creator application and invokes the plugin accordingly.
2.1. Set your working directory
Before starting, set the folder where your app's .ds files will be stored. Click the folder selector in the chat bar and choose a directory on your machine. Each Zoho Creator app you work on will be stored as a subfolder here.
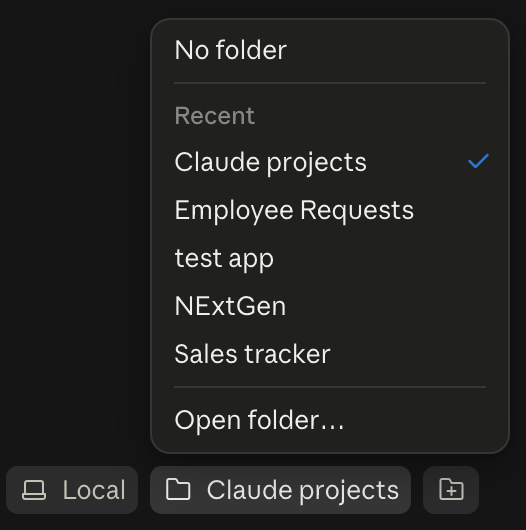
2.2. Pick your starting point
You have three ways to get started:
- Build a new app from scratch: Open a new chat in Claude Code, set your working directory, and describe the application you want to build. You can also attach supporting files such as a BRD or a flowchart, Claude will read them and use them as the basis for what it builds.
- Work on an existing app from Zoho Creator: Ask Claude to import an app from your account.
- Work on a local app: Set your working directory to a folder that already contains .ds files and describe the changes you want to make.
2.3. Build with your prompt
Once you enter your prompt, the plugin reads the Zoho Creator documentation and begins building your app.
What you can include in your prompt:
- A plain-language description of the app you want to build
- Specific requirements such as user roles, workflows, data fields, and business rules
- Attachments like BRD documents, wireframes, flowcharts, or images. Claude Code reads them and uses them as the basis for what it builds
The more specific your prompt, the closer the output will be to what you need.
When submitted, Claude will:
- Generate an implementation plan and save it as a README.md file in your working directory. The plan is also displayed in a side panel, showing the components it intends to build (forms, reports, pages, workflows, and permissions).
- Build the app by generating and writing the .ds files to your working directory. Progress is shown in the chat as each component is completed.
- Compile the generated .ds files and makes the app is ready for upload to your Zoho Creator account.
- Once the build is complete, you can continue refining by entering a new prompt to extend, modify, or fix any part of the output.
2.4. Deploy to Zoho Creator
When you are ready to deploy:
- In the chat, ask Claude to upload to Zoho Creator.
- If this is your first time, Claude will prompt you to sign in. A browser window will open asking you to log in to your Zoho Creator account and authorize access.
- If your account has multiple workspaces, you will be prompted to select one.
- Claude uploads the app to your Zoho Creator account directly from the .ds files in your working directory. If the upload encounters an error, Claude automatically diagnoses and resolves it before attempting the upload again. For errors that cannot be resolved automatically, it will stop and suggest raising a support ticket with Zoho Creator support.
- Once the upload is complete, open your Zoho Creator account to access and test the app.
Note: The upload prompt will upload all changes in your local app folder. We recommend enabling Environments to test the app thoroughly before pushing to production.
3. Best practices
- Be specific in your prompts: The more detail you provide, the closer the output will be to what you need. Include information about the type of users, key workflows, data fields, and any business rules.
4. Token consumption & performance
- Tokens are consumed from your Claude Code account based on your active plan.
- Larger and more complex apps consume more tokens per session.
- Attaching files or providing detailed inline requirements will enhance the accuracy of output but increases token usage .
- Rate limits and response times depend on your Claude Code plan and Anthropic's API availability at the time of the request.