Working with Projects in Teamspaces
Introduction
Teams using Teamspaces in Zoho CRM often manage work that involves multiple elements records in CRM modules, internal collaboration, and project execution. To help teams manage these activities more efficiently, Zoho Projects can now be added directly inside Teamspaces.
Previously, projects associated with Zoho Projects were typically accessed from record detail pages, such as from the Accounts or Contacts modules. With this enhancement, teams can bring projects directly into their Teamspace and work on them alongside the modules already present in the workspace.
When these projects are added to a Teamspace:
- Teams can monitor project progress from their workspace
- Project tasks and activities remain connected to the associated CRM records
- Collaboration becomes easier for teams working with customer implementations or deliveries
Example Scenario: Managing Campaign Execution in a Marketing Teamspace
A marketing team may use a Teamspace to manage modules such as:
- Campaigns
- Case Studies
- Influencer Outreach
- Customer Feedback
When planning a Product Launch Campaign, the team may need to coordinate tasks such as campaign planning, content creation, ad deployment, and partner outreach.
Instead of switching between CRM modules and Zoho Projects separately, the team can add the Product Launch Campaign project directly into the Teamspace. This allows them to track campaign records and manage project execution from the same workspace.
Key Capabilities
Access Projects from the Teamspace
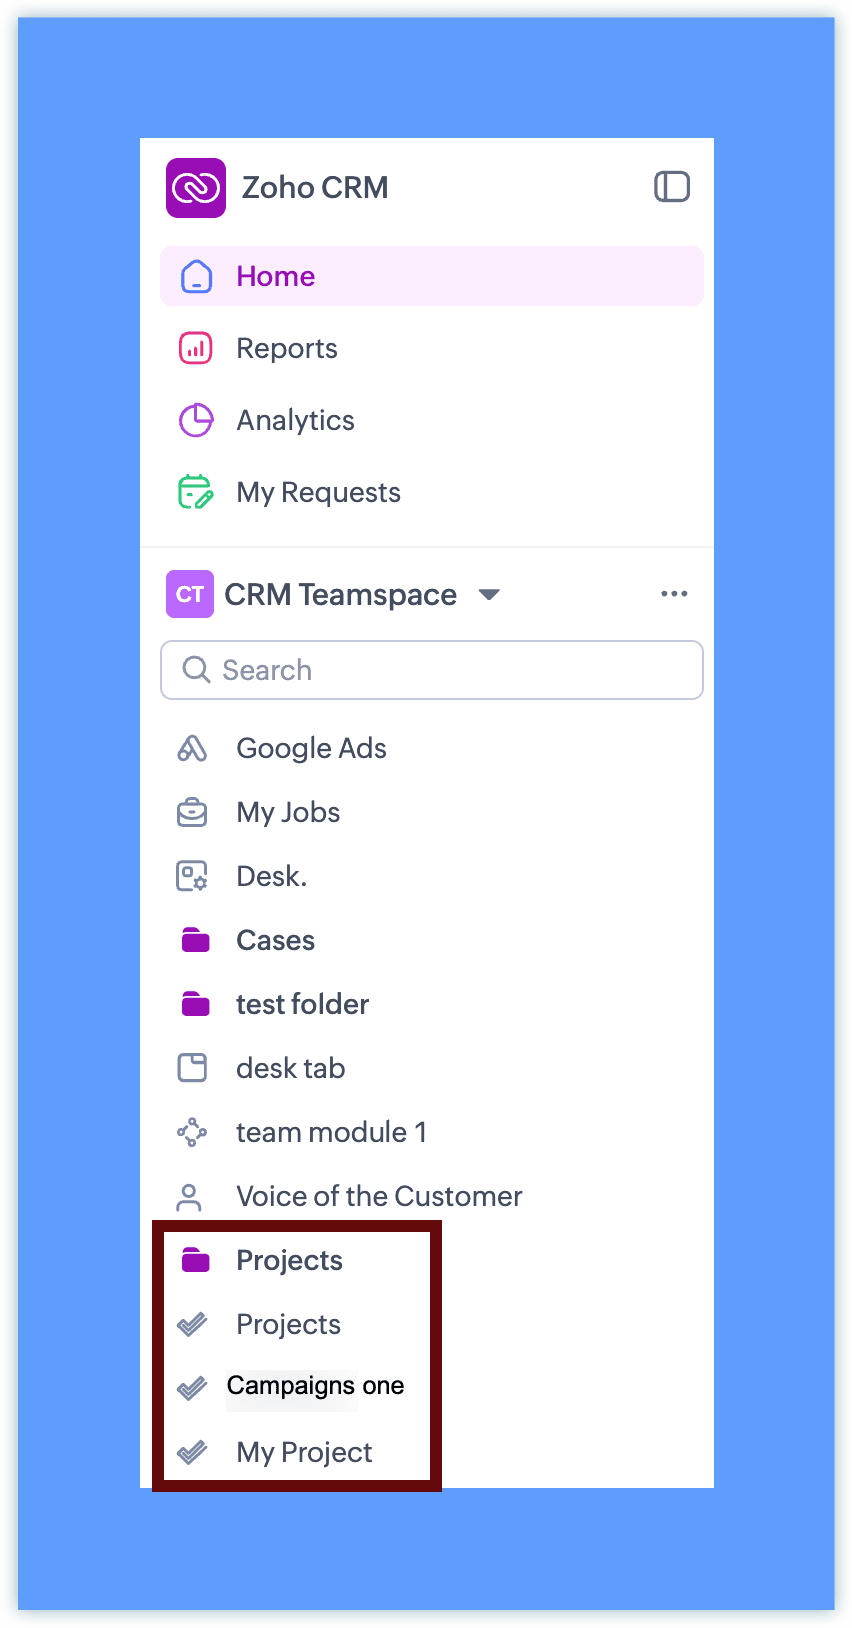
Projects added to a Teamspace appear in the Teamspace navigation panel, making them easily accessible alongside the modules already present in the space.
Once a project is available inside the Teamspace, team members can access project details, track milestones, and collaborate on tasks without navigating away from CRM.
Create Internal Projects for Team Collaboration
Teams can also create internal projects that are not associated with any CRM record. These are useful when a team needs to coordinate work that is entirely internal not tied to any specific customer or client.
For example, a product team may use an Internal Project to track the development of a new feature. The project manager can create tasks for design, development, and testing, assign them to team members, and monitor progress, all without linking the project to any CRM record. Since this work happens within the Teamspace, the team stays aligned without needing to switch between tools.
Teams commonly use internal projects for initiatives such as:
- Feature development tracking
- Documentation or knowledge base creation
- Marketing campaign planning
- Operational improvement initiatives
Internal projects allow teams to coordinate internal work directly within the Teamspace.
Availability
Projects in Teamspaces require Zoho Projects to be integrated for the CRM account.
If Zoho Projects is not already integrated, you can set it up directly from the Teamspace in a single step, click the + (Add) icon in the top bar, select Projects, and then fill the portal name you want to create.
Once available, Teamspace admins can add projects to the Teamspace and team members can access them based on their Zoho Projects permissions.
When Zoho Projects integration is not already configured, setting it up directly from the Teamspace will create a new Zoho Projects portal in Trial version. During the trial, up to 3 projects and 10 users are supported. Once the trial period ends, existing projects remain accessible but no new projects can be created.
 Note: For more information about configuring Zoho Projects with Zoho CRM, refer to the Zoho Projects integration help documentation.
 Project behavior inside Teamspaces
Projects added to Teamspaces continue to follow the existing Zoho Projects behavior.
- Projects remain managed through Zoho Projects
- CRM surfaces the project interface inside the Teamspace
- Client projects retain their association with CRM records
- Internal projects can be created without selecting a client
This ensures teams can continue using familiar project capabilities while accessing them directly from their Teamspace.
Types of Projects in Teamspaces
Projects added to a Teamspace can be of two types:
- Client Projects: Projects associated with CRM records such as Accounts or Contacts.
- Teams can monitor project progress directly from the Teamspace
- The project remains associated with the related CRM record
- Team members can collaborate on implementation, delivery, or customer-specific work from the same workspace
- This is particularly useful for teams managing onboarding, implementation, or delivery projects for important customers.
- Internal Projects: Projects created for internal collaboration that are not linked to any CRM record.
- Teams typically use internal projects for initiatives such as:
- Feature development tracking
- Documentation or knowledge base creation
- Marketing campaign planning
- Operational improvement initiatives
Adding Projects to a Teamspace
Add Projects to a Teamspace :
- Click the + (Add) icon in the top bar.
- Under Projects, Select Project.
- Choose one of the following:
- + Create New
- Associate Existing
- + Create New Project
- Choose the project type :
- Client Project
- Team Project
- Create a Client Project
- In Client Selection, choose the module (Accounts or Contacts) and select the client record.
- In New Project, select the project layout from the drop-down.
- Enter the project details:
- Project Title
- Owner
- Template (optional)
- Start Date and End Date
- Project Group
- (Optional) Enable:
- Add project to Zoho Sprints
- Make this a strict project
- Select a WorkDrive Folder option:
- Clone Team Folder/Folder
- Link Team Folder/Folder
- None
- Add Description, Business Hours, Task Layout, and Tags if required.
Additionally, if there are any custom fields available in the Projects Layout, those will be listed here. - (Optional) Enable Roll-up to aggregate task and subtask data to the project.
- Under Project Access, choose:
- Private – Only project users can access the project.
- Public – Portal users can view and follow the project.
- Click Next.
- Choose who can access the project:
- Project Users
- Selected Users
- All users in this Teamspace
Note: When All Users in this Teamspace is selected:
- Any new user added to the Teamspace will automatically be granted access to the project, and any user removed from the Teamspace will have their access revoked.
- If the Zoho Projects user license limit is exceeded, the additional users will be added as deactivated users in Zoho Projects. These users can request the Admin to activate their account.
Client User
Choose the root folder where you want this project to be nested.
Click Save.
The project is created and added to the Teamspace.
Note: A maximum of 30 projects can be added per Teamspace, with an overall limit of 500 projects across all Teamspaces.
Create a Team Project
The steps to create a Team Project are the same as creating a Client Project, with two differences:
- There is no Client Selection step, as Team Projects are created for internal use and are not linked to any CRM record.
- The Client User option is not available when managing project access.
Refer to the Create a Client Project steps above and skip the Client Selection screen.
Associate an Existing Project
- Click the + (Add) icon in the top bar.
- Under Projects, Select Project.
- Choose Associate Existing Project.
- Choose from Team Project and Client Project
- Select the Project Name from the dropdown
- Choose the access level:
- Selected Users
- All users in this Teamspace
- Select the required users.
- Choose the root folder where you want this project to be nested.
- Click Save.
The project will be added to the Teamspace.
Access and collaboration
Once projects are added to a Teamspace:
- Teamspace admins can manage which projects appear in the space
- Project visibility follows Zoho Projects user permissions
- Team members can collaborate on tasks, track progress, and monitor milestones directly from the Teamspace
Teamspace Visibility in Zoho Projects
When a project is added to a Teamspace, the Teamspace name is also displayed within the respective project in the Zoho Projects portal.
When project access is set to All Users in this Teamspace, the Teamspace users are added as a team in the Zoho Projects portal under the Teamspace name.
Note that:
- This team is non-editable within Zoho Projects
- Team membership stays automatically in sync with the Teamspace, users added to or removed from the Teamspace are reflected in the team accordingly
This allows teams to manage project execution alongside their CRM work in a unified workspace.