In a nutshell
In test automation, scripts need to identify elements on a web page before performing actions on them. Element locator strategies in Zoho QEngine define how these elements are identified during test execution. QEngine supports ID, Name Attribute, CSS Selectors, and XPath, each suited to different element structures in the HTML. Choosing the right strategy improves test stability and reduces the risk of failures when the UI changes.
1. Overview
Every visible component on a web page, be it buttons, text fields, images, or sections, is an HTML element. To interact with these elements in test automation, we rely on locators, helping scripts identify elements precisely. Common locator types include ID, Name, Class Name, Tag Name, CSS Selectors, and XPath, each with its own use case depending on how the element is defined in the HTML.
In Zoho QEngine, elements can be identified using various locator strategies. It supports ID, Name Attribute, CSS Selectors, and XPath. QEngine parses these locators during test execution to locate the corresponding elements in the DOM. This flexibility allows you to choose the locator that best matches the structure and stability of your target element. For more on how to configure locator strategies in QEngine, refer to Configure locator strategies in the elements page.
Each supported locator serves a specific purpose. For instance, use ID when it’s unique and available. Name works well for form fields. CSS Selectors offer flexible targeting based on classes, attributes, or structure. XPath is best for deeply nested elements or when other attributes aren’t reliable.This document explains how to fetch and manually write locators efficiently.
1.1 HTML Element structure
Every locator you use ultimately points to an HTML element consisting of a tag name and a set of attributes that define its identity and behavior.
This is an example of an HTML element structure:
- <input type="email" id="userEmail" name="email" data-value="emailField" class="form-control">
Here, the element can be targeted using multiple locator strategies: by ID, name, class, or even its position in the DOM via XPATH or CSS Selectors.
While multiple locators may exist for an element, choosing a unique and stable locator improves test reliability.
2. Finding locators for elements
Identifying the right element locator is a fundamental step in building reliable test scripts. Zoho QEngine offers two primary methods for retrieving these locators:
2.1 QEngine Recorder
2.2 Manual inspection
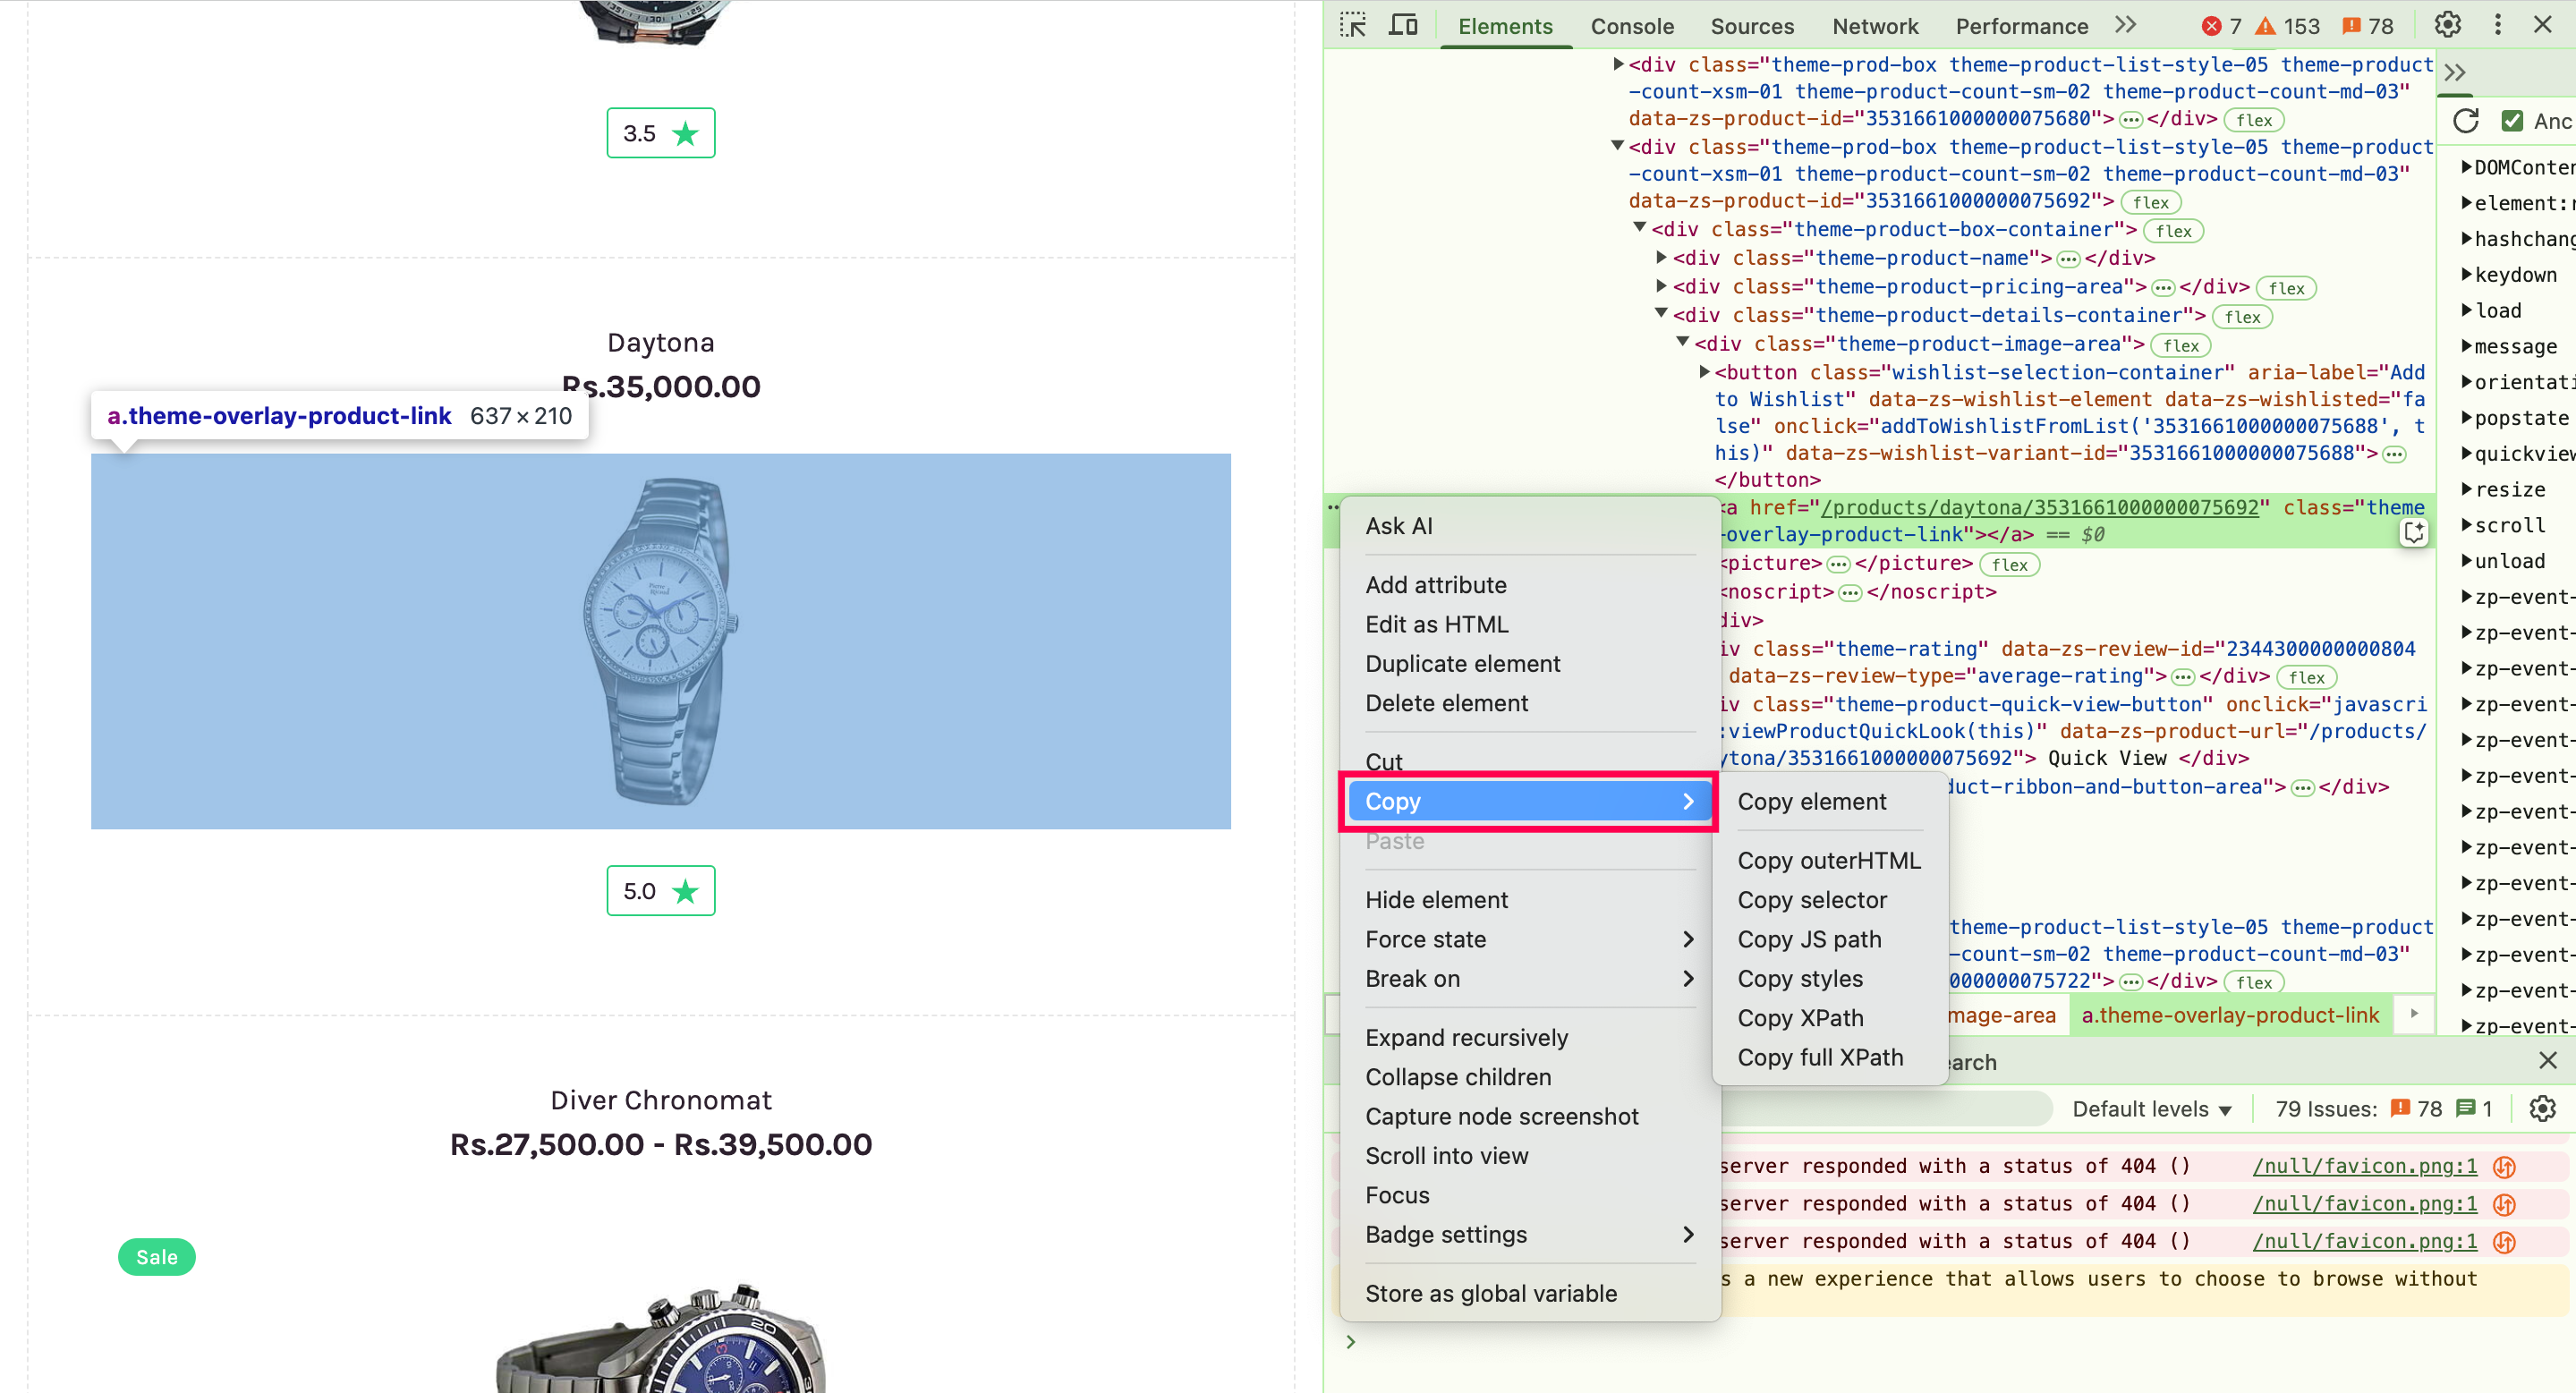
In manual inspection, testers use browser developer tools to inspect elements and attributes, such as ID, name, or class, which can then be used to extract locators manually.
To inspect elements manually:
Navigate to the web service or application.
Right-click on any element in the webpage and choose Inspect.
The Elements tab will display the HTML structure of the page, where you can see all the tags and attributes.
Hover over the HTML tags in the elements panel to highlight the corresponding element on the webpage. This helps you visually connect the HTML code with the page layout.
Right-click the element in the Elements tab and use the Copy option to extract the relevant locator.
3. Types of locators in Zoho QEngine
Zoho QEngine supports several locator strategies for their web platform. The following locator types are available:
- ID
- Name Attribute
- Xpath
- CSS Selectors
Now, let's see how each one is used in practice and when they can be applied effectively.
1. ID
An ID attribute is one of the most reliable locators because it’s unique to each element on a webpage. It's especially useful for high-priority elements like login buttons or key form fields, where accuracy and performance are critical.
Example:
- <input id="username" type="text" name="user" placeholder="Enter your username">
In this case, the input field has a unique identifier: "username". QEngine will recognize and use this as #username to locate the element in the scripts.
If you're manually inspecting and writing the test script, follow this format:
#<id_value>
Parameter | Description | Example |
<id_value> | The value assigned to the id attribute in the HTML code. This is what you'll use in your locator. | "username" |
Why use ID
- Stable across UI changes – ID are less likely to change compared to other attributes like class names or positions, making them more resistant to minor design updates.
- Optimized for speed – Browsers can locate elements by ID faster then with other strategies, which helps improve overall test execution time.
2. Name Attribute
The name attribute is used to assign a name to form elements like text fields, radio buttons, and checkboxes. It helps identify the element and ensures its value is included when the form is submitted. The name attribute is essential for submitting data to a server because it groups the form elements together under a common name.
The name attribute is useful when the id is unavailable or when multiple elements share similar identifiers, but each one has a distinct name attribute.
Example:
- <input name="username" type="text" placeholder="Enter your username">
In this case, the input field has a name attribute of username. QEngine will recognize this and use the name attribute to locate the element.
If you're manually inspecting and writing the test script, follow this format:
input[name=<value>] (for e.g., input[name=username])
Parameter | Description | Example |
input | Refers to the HTML <input> tag, which is used to create fields where users can enter data, such as text boxes for usernames, passwords, and so on. In this example, it identifies a text field where the user will input their username. | <input name="username" type="text"> |
name | Refers to the name attribute of the HTML element. This value is used to identify the element in locators. | <input name="username"> |
<value>
| The value assigned to the name attribute in the HTML code. This is what you'll use in your locator. | "username" |
Why use Name
- Common for form fields - Many form elements, especially in HTML forms, use the name attribute. It’s a great fallback when the id isn’t available.
- Targeting form elements - If multiple form elements have the same name attribute, they are often treated as a group (e.g., radio buttons or checkboxes). You can use the name attribute to interact with this group.
- Simple and reliable - Like IDs, name attributes are stable and often won’t change unless the element’s function changes.
3. XPATH
XPath (XML Path Language) is a powerful locator strategy that allows you to navigate through an element's position in the DOM (Document Object Model). Developers use XPath expressions to locate elements based on their attributes, such as ID, name, class, or custom-defined attributes. It's especially helpful when other attributes like ID or Name are missing, or when elements are deeply nested.
Example:
- <div id="loginForm">
- <input type="text" name="username" placeholder="Enter your username" data-input="Username">
- </div>
To locate the input field using XPath, you could write:
//div[@id='loginForm']//input[@data-input='Username']
This expression starts at the div with the ID loginForm and finds an input element inside it with the name username. This also shows how XPath can target custom attributes like data-input.
Parameter | Description | Example |
//tag[@attr='value'] | Locates a tag with a specific attribute-value pair | //input[@data-input='Username'] |
//tag[text()='Text'] | Locates an element by its visible text | //button[text()='Submit'] |
//parent//child | Locates a child element nested within a parent | //div[@id='container']//span[@class='label'] |
[n] or position() | Locates elements by index or order among siblings | (//input[@type='text'])[2] |
Why use XPATH
Handles complex hierarchies - XPath is ideal when elements are deeply nested or lack unique attributes like ID or Name.
Flexible - XPath can locate elements even if they don’t have unique IDs or names, using combinations of tags, attributes, text, and hierarchy.
Precise targeting - You can locate elements based on partial matches, index, or even logical conditions, which is useful in dynamic UIs.
4. CSS Selectors
CSS Selectors are locator strategies that use CSS rules to quickly and flexibly target elements based on attributes, classes, IDs, or DOM structure. They allow you to target elements using class names, IDs, tag names, attributes, or even hierarchical relationships like parent-child or sibling elements. QEngine supports a wide range of CSS selector patterns, giving you flexibility and precision when other locators aren’t sufficient.
Example:
- <div class="form-field">
- <input type="text" class="field username" placeholder="Enter your username">
- </div>
In this case, you can locate the input field using its class: .field.username
You can also locate it by its tag and class combination: input.field.username
You can also combine attributes if needed: input[placeholder="Enter your username"]
Selector Type | Description | Example |
.class | Targets elements with a specific class name. | .username |
#id | Targets an element by its ID. (Same as ID locator) | #submitBtn |
tag[attr=value] | Targets an element by its tag and a matching attribute. | input[placeholder="Enter name"] |
parent child | Targets a child element within a specific parent. | .form-field input.username |
Why use CSS Selectors
Flexible and powerful - CSS selectors allow you to target elements using tag names, classes, attributes, and structure, giving you more control when other attributes like ID or Name aren’t available.
Widely supported - CSS selector syntax is supported across modern browsers and automation tools like QEngine, making it a reliable and standard approach.
Readable and concise - Compared to long XPath expressions, CSS selectors can be easier to read and maintain, especially when using simple class or attribute matches.
In addition to the standard locators, Zoho QEngine also supports custom attributes, such as user-defined values like data-testid. These attributes offer a flexible and stable way to identify elements, especially in cases where standard options like ID or Name are unavailable. Incorporating custom attributes into your locator strategy can enhance both the stability and maintainability of your QEngine test scripts. Learn more about custom attributes
4. Use cases to understand locator strategies
Choosing the right locator depends on how the element is defined in the HTML, how often the UI changes, and how critical the element is to the test flow. The following practical use cases can help you decide which locator strategy works best in different scenarios:
Case 1: If you need to navigate a complex or nested DOM structure, use relative XPath instead of long, absolute paths. This is because absolute XPath starts from the root of the document and follows the entire path to the element.
Absolute XPath:
- /html/body/div[2]/div[1]/form/input[3]
Whereas, relative XPath starts from a stable or unique element somewhere in the middle of the DOM and uses attributes or relationships to reach the target.
Relative XPath:
- //form[@id='loginForm']//input[@name='username']
So, in complex or frequently changing layouts, relative XPath gives you flexibility. They focus on the content and relationships rather than rigid positions in the HTML hierarchy.
Case 2: When you're working with elements styled through classes or placed inside a structured layout, CSS selectors offer cleaner and faster targeting. They are often more readable than XPath, especially when targeting elements based on class names or parent-child relationships. CSS selectors also let you define the element's properties or location in the hierarchy using simple, straightforward expressions.
- .form-field input.username
XPath can also be used for these cases, but it often results in more complex and less maintainable expressions.
- //div[@class='form-container']//button[@class='submit-button']
Case 3: When elements lack unique IDs or names, you might encounter or need to use complex CSS selectors involving:
Custom tags (e.g., lyte-exptable-td, crm-menu)
Pseudo-classes like :nth-of-type(n) – for selecting elements by position within their parent
Attribute selectors (e.g., div[data-value='Leads'])
Hierarchical relationships using > – to navigate parent-child structures
These selectors offer precision, but can be fragile. Even a minor UI change like adding a new div or reordering elements can break them. Use them only when simpler locators like ID, Name, or stable attributes aren’t available.
5. Points to note
- If an element doesn't have a unique ID, use the name attribute, but only if it is guaranteed to be unique.
- When an element has a stable ID, always use it since it's the most reliable and efficient locator.
- If name is not available or duplicates exist, consider using other locators like ID XPath, or CSS Selector.
- If an attribute like ID or class is dynamically generated, avoid using it and look for stable alternatives like data-testid or aria-label.
- For elements that are deeply nested, avoid brittle locators; instead, simplify the XPath or CSS selector using parent-child or sibling relationships.
- If you need to locate an element by partial text or attribute value, use XPath functions like contains() or text().
- When you're unsure if a locator is stable, test it across multiple sessions or environments to ensure it remains consistent.
- Elements
7. What's next
Next Step
Now that you know how to use locators, the next step is to understand how to create and manage elements in Zoho QEngine
After that, you'll learn how to solve locator errors by identifying why an element isn’t found and how to choose the most suitable locator based on the element’s attributes and structure. Read more