Elements
In a nutshell
Elements are UI components like buttons, forms, or input fields, used in automated testing. Each has a locator (ID, XPath, etc.) that enables reliable interaction during test execution. Zoho QEngine lets you inspect, capture, and manage these locators for streamlining test script creation, improving automation stability, and reducing maintenance when UI changes occur.
1. Overview
Elements are fundamental building blocks in developing visually appealing and easy-to-use websites and web and mobile applications. They include interactive elements, such as buttons, menus, forms, and more. Testing these elements facilitates better user engagement and results in enhanced interaction and overall usability.
Every element has a unique identifier called a Locator, which helps in identifying and interacting with the elements. Some of the identified locators are ID, name, class, tag name, XPath, and CSS selector. Learn more about locator strategies in Zoho QEngine to understand how each strategies work, when to use them, and how to write them effectively.
Zoho QEngine provides the ability to examine elements on a web page or mobile application, offering valuable information, such as element type and attributes. This data aids in comprehending element properties and facilitates the selection of suitable locators for automation. They allow users to record elements using the recorder or inspect the testing environment manually and save the element locators. Once recorded or saved, these locators are used within test cases to write test scripts efficiently, ensuring thorough verification of the application's functionality and behavior.
For example, when testing the registration functionality of a website, testers can identify the web elements associated with the registration form, including input fields, drop-downs, and buttons, using their ID or class name. By interacting with these form elements, testers can perform actions like entering data into input fields, selecting options from drop-downs, and clicking the submit button. This enables the verification of whether the registration process is functioning as intended, or if any issues need to be addressed.
The Elements feature in Zoho QEngine lets you:
- Add multiple locators for an element, and also group them under their corresponding page name
- Save frequently used components like submit buttons and search bars
- Reference a web component or locators using its identifier any place in the test script
- Avoid test script rewrite when an element, its locator value, or locator type changes
2. Creating Elements
Let's look at how to create elements and use them inside test cases to write test scripts.
Using the recorder
The recorder captures the interacted elements and aids in generating locators for web and mobile elements. Zoho QEngine automatically creates elements along with their respective locators based on the recorded actions.
Let's look at how to efficiently create elements using the recorder:
- After recording the test case, the Add Element pop-up lists all the interactive web or mobile elements, along with their locators.
- The recorder saves the page name, locator type, and the locators. Uncheck the elements that are not required.
- Page Name - For webpages, the default name of the page is determined by the <title> tag, while for mobile apps, it is referred from its screens, with each having a unique identifier used by the app's code. All the elements of the corresponding page will be accessed under this attribute.
- Element Name - This attribute is used to refer the element inside a test case. You can configure how the element should be named using the Configure Locator Strategies.
- Type - Specifies the nature of the recorded web or mobile elements, such as Button, Check, Date, Dropdown, Email, File, Generic Element, Image, Input, Label, Number, Password, Radio, Select, Span, Submit, Table, Text, Textarea, a, div, li, ol, td, th, and ul.
- Locator Type - A method used to identify and locate a specific element within a webpage or mobile app. A single element can store multiple locators. Set up element recording strategies through the Configure Locator Strategies option. Supported locator types for web include: Xpath, ID, Name, and CSS Selector, while for Android and iOS: Xpath, ID, Text, CSS Selector, Accessibility ID, and Class Name.
- Locator - Stores the value of the locators for an element, provided they are available in the HTML DOM.
- You can edit these fields, if necessary.
- Click on the edit icon near the page name to rename it. Click on the save icon to save the changes.
To make changes to the elements:
- From the drop-down, hover on the required element and click the edit icon to make changes to the element name, element type, locator type, and locators. Click on the save icon to save the changes.
 Note: Additionally, you can perform edit actions on elements by accessing Settings > Elements.
- After making the necessary changes and selecting the required locators for the interacted elements, click Save.
Configure Locator Strategies
Zoho QEngine records web and mobile elements, allows prioritization of their utilization, and facilitate recording strategies for them. Attributes provide information that aids in uniquely identifying elements within a web or mobile application. You can use the predefined attributes or generate custom ones. Predefined attributes for Element Locators include Name, ID, CSS Selectors, and Xpath, while for Element Name include Name, Placeholder, Title, Text, ID, and Tag Name. If the webpage, web, or mobile applications have attributes other than the predefined ones, you can create custom ones to assign strategies. The order of the attributes inside Configure Locator Strategies, decide what type of locators will be recorded first and how to name them.
Inside the configure option, use the toggle on/off switches to enable or disable the attributes.
The following image shows the Element Locator section, that allows you to set the order of the attributes that decide how the element locators should be recorded.
- To set the order, rearrange the locator attributes.
- Use the toggle on/off switches to enable or disable the locator attributes.
- Click Done to save the changes.
To add new custom attributes for locators:
- Click on +Add Custom Attribute and provide the name for your custom locator attribute. Click Save.
- Set the order by rearranging the locator attributes.
- When you're finished making changes, click Done.
Edit and Delete
To delete or edit the added custom attribute:
- Hover over the locator you wish to make changes to, then click either the edit or delete icon.
- Click Done to update all the changes.
Similarly, the Element Name section allows you to set the order of attributes that decide how to name the locators while recording.
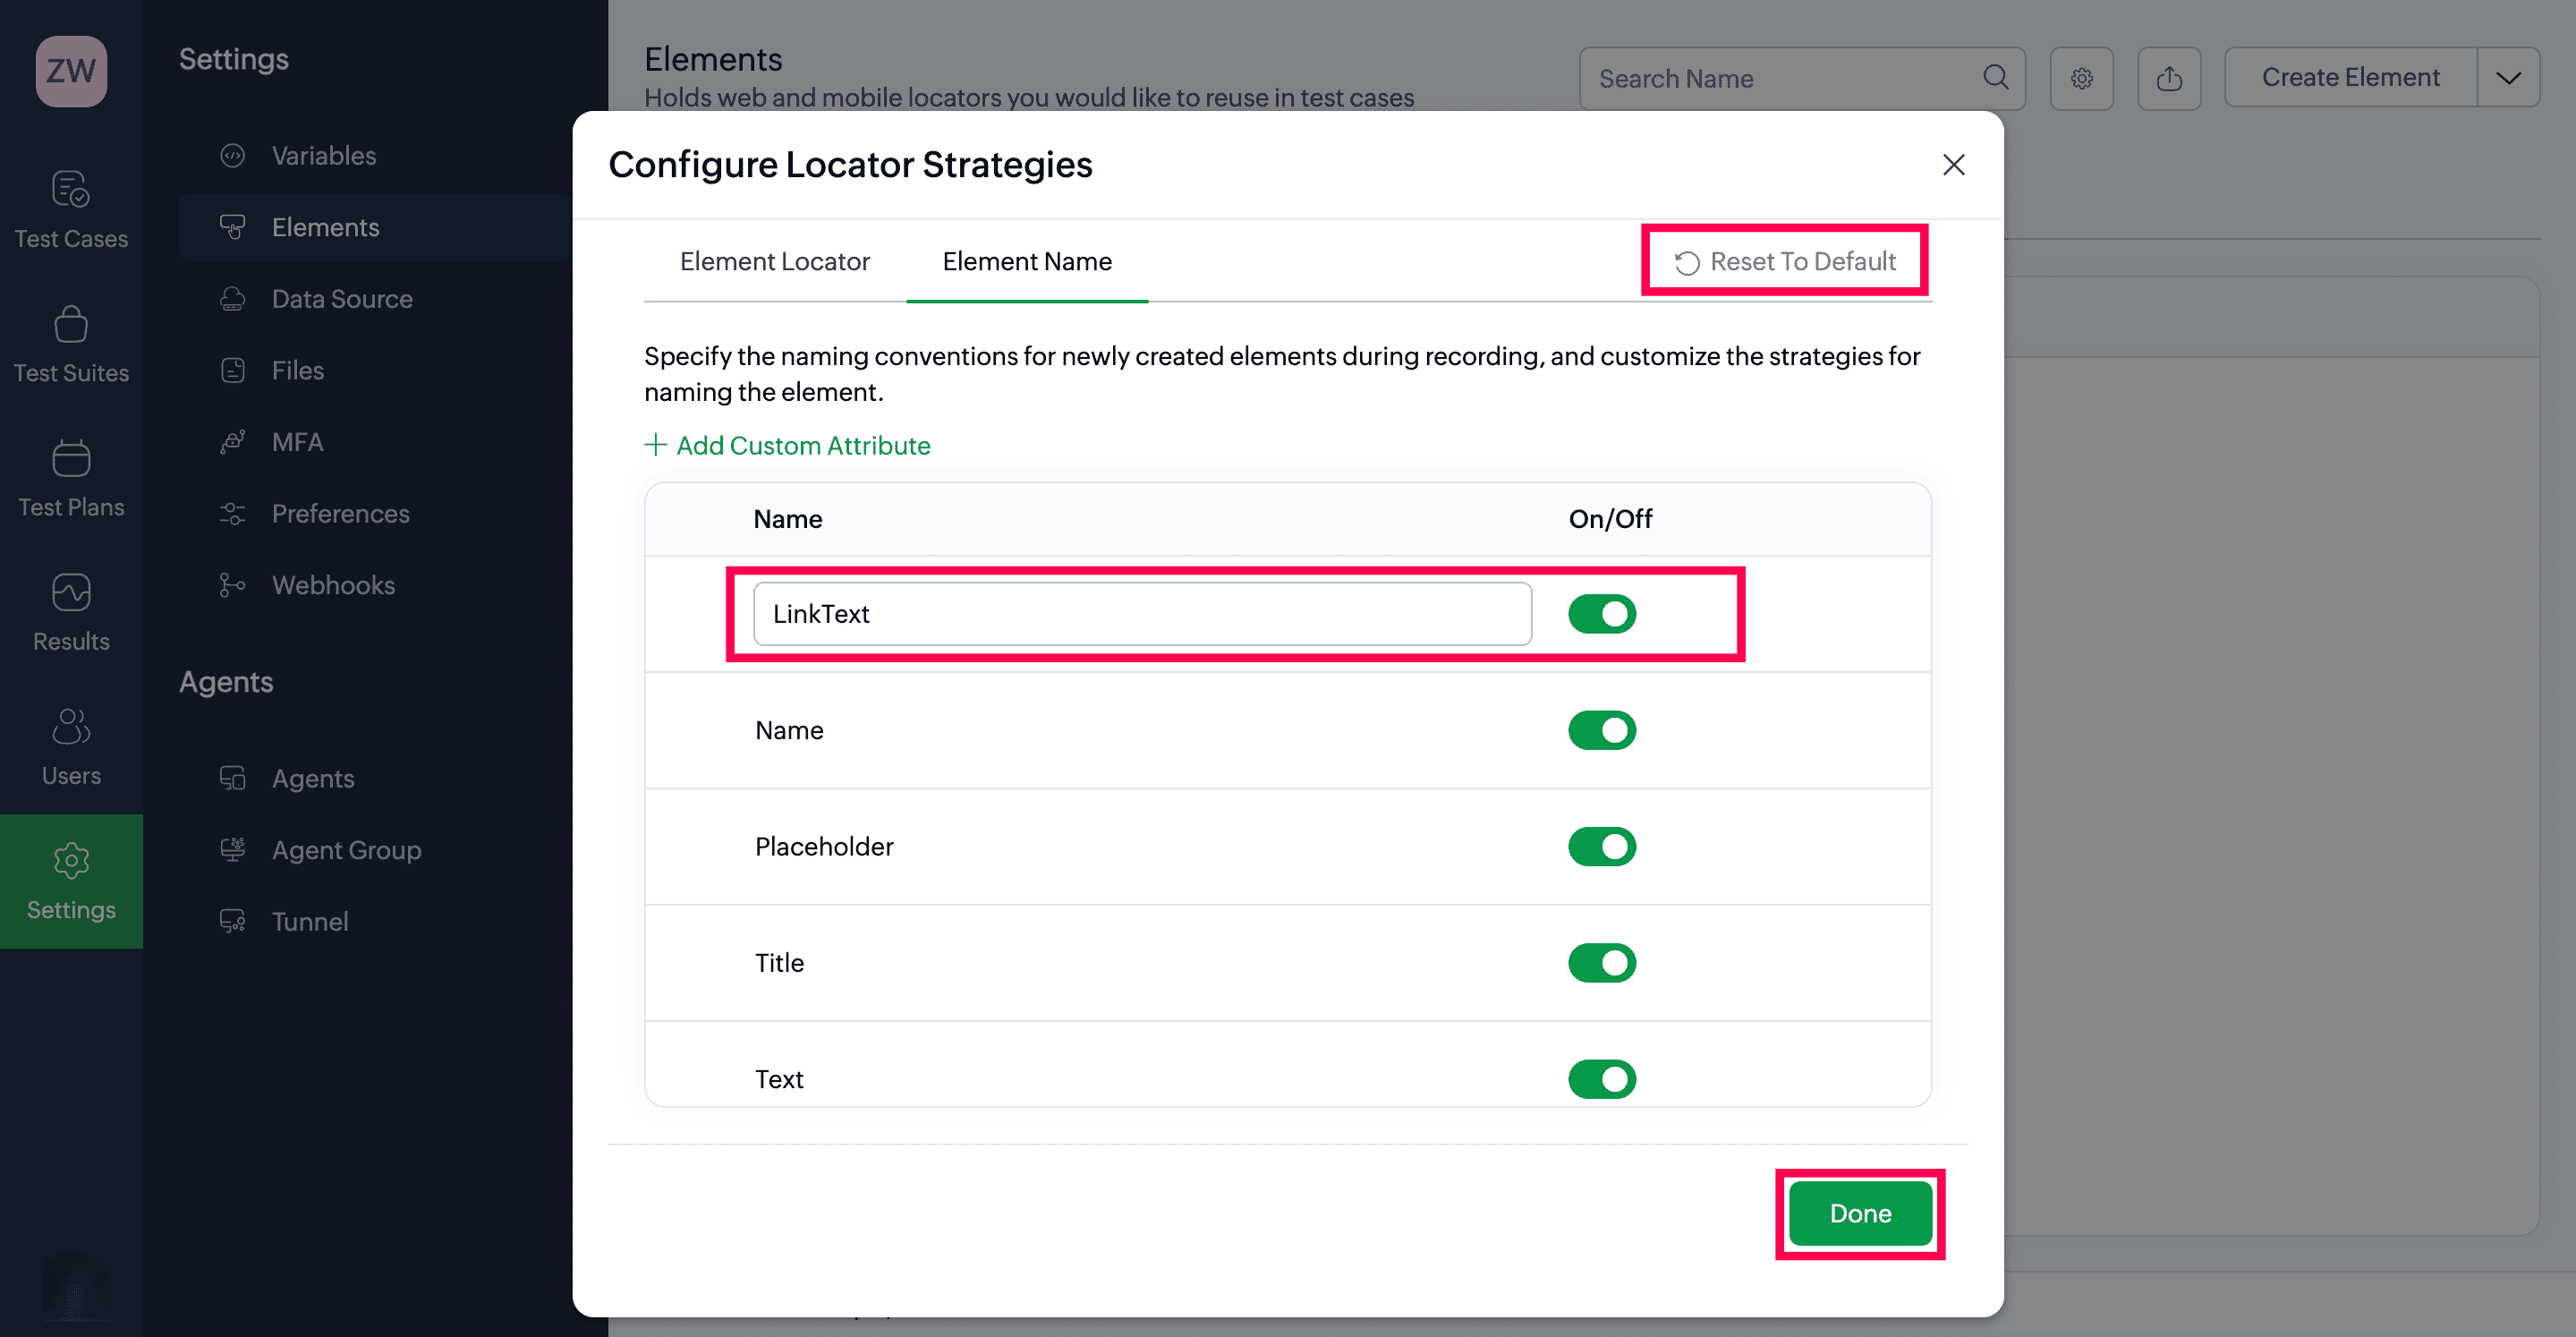
To retrieve the old configurations for both the sections, click Reset to Default.
Manual Entry
You can create elements by manually inspecting web pages, web or mobile applications. This approach ensures storage of custom elements and their locators as well. Let's get started and learn how to create elements from the Settings option.
- Navigate to Settings > Elements.
- Click +Create Element. In the popup that appears, enter the relevant details:
- Page Name - A suitable name to categorize elements based on the web pages or mobile application screens they belong to. All the elements of the corresponding page will be accessible under this attribute.
- Element Name - This attribute can be used to refer the element inside a test case. The element name should be unique within web, Android, and iOS platforms.Note: Element Name only allows the use of underscore (_). Spaces and other special characters are not allowed. They can't have more than 30 characters.
- Type - Specifies the nature of the recorded web or mobile elements, such as Button, Check, Date, Dropdown, Email, File, Generic Element, Image, Input, Label, Number, Password, Radio, Select, Span, Submit, Table, Text, Textarea, a, div, li, ol, td, th, and ul. Choose the desired type from the drop-down.
- Locator Type - Method used to locate a specific element within a webpage or mobile app. Mention the locator type to be used for that element from the drop-down, and one element can store multiple locators. For web, the locator types supported are: Xpath, ID, Name, CSS Selector. For Android and iOS, the locator types supported are: Xpath, ID, Text, CSS Selector, Accessibility ID, Class Name.
- Locator - The value of the web components or locators for an element, provided are available in the HTML DOM.
- Fill all the fields and click Create.
Note: Switch between tabs to manually enter or access elements on Android and iOS platforms.
Using Refer Elements
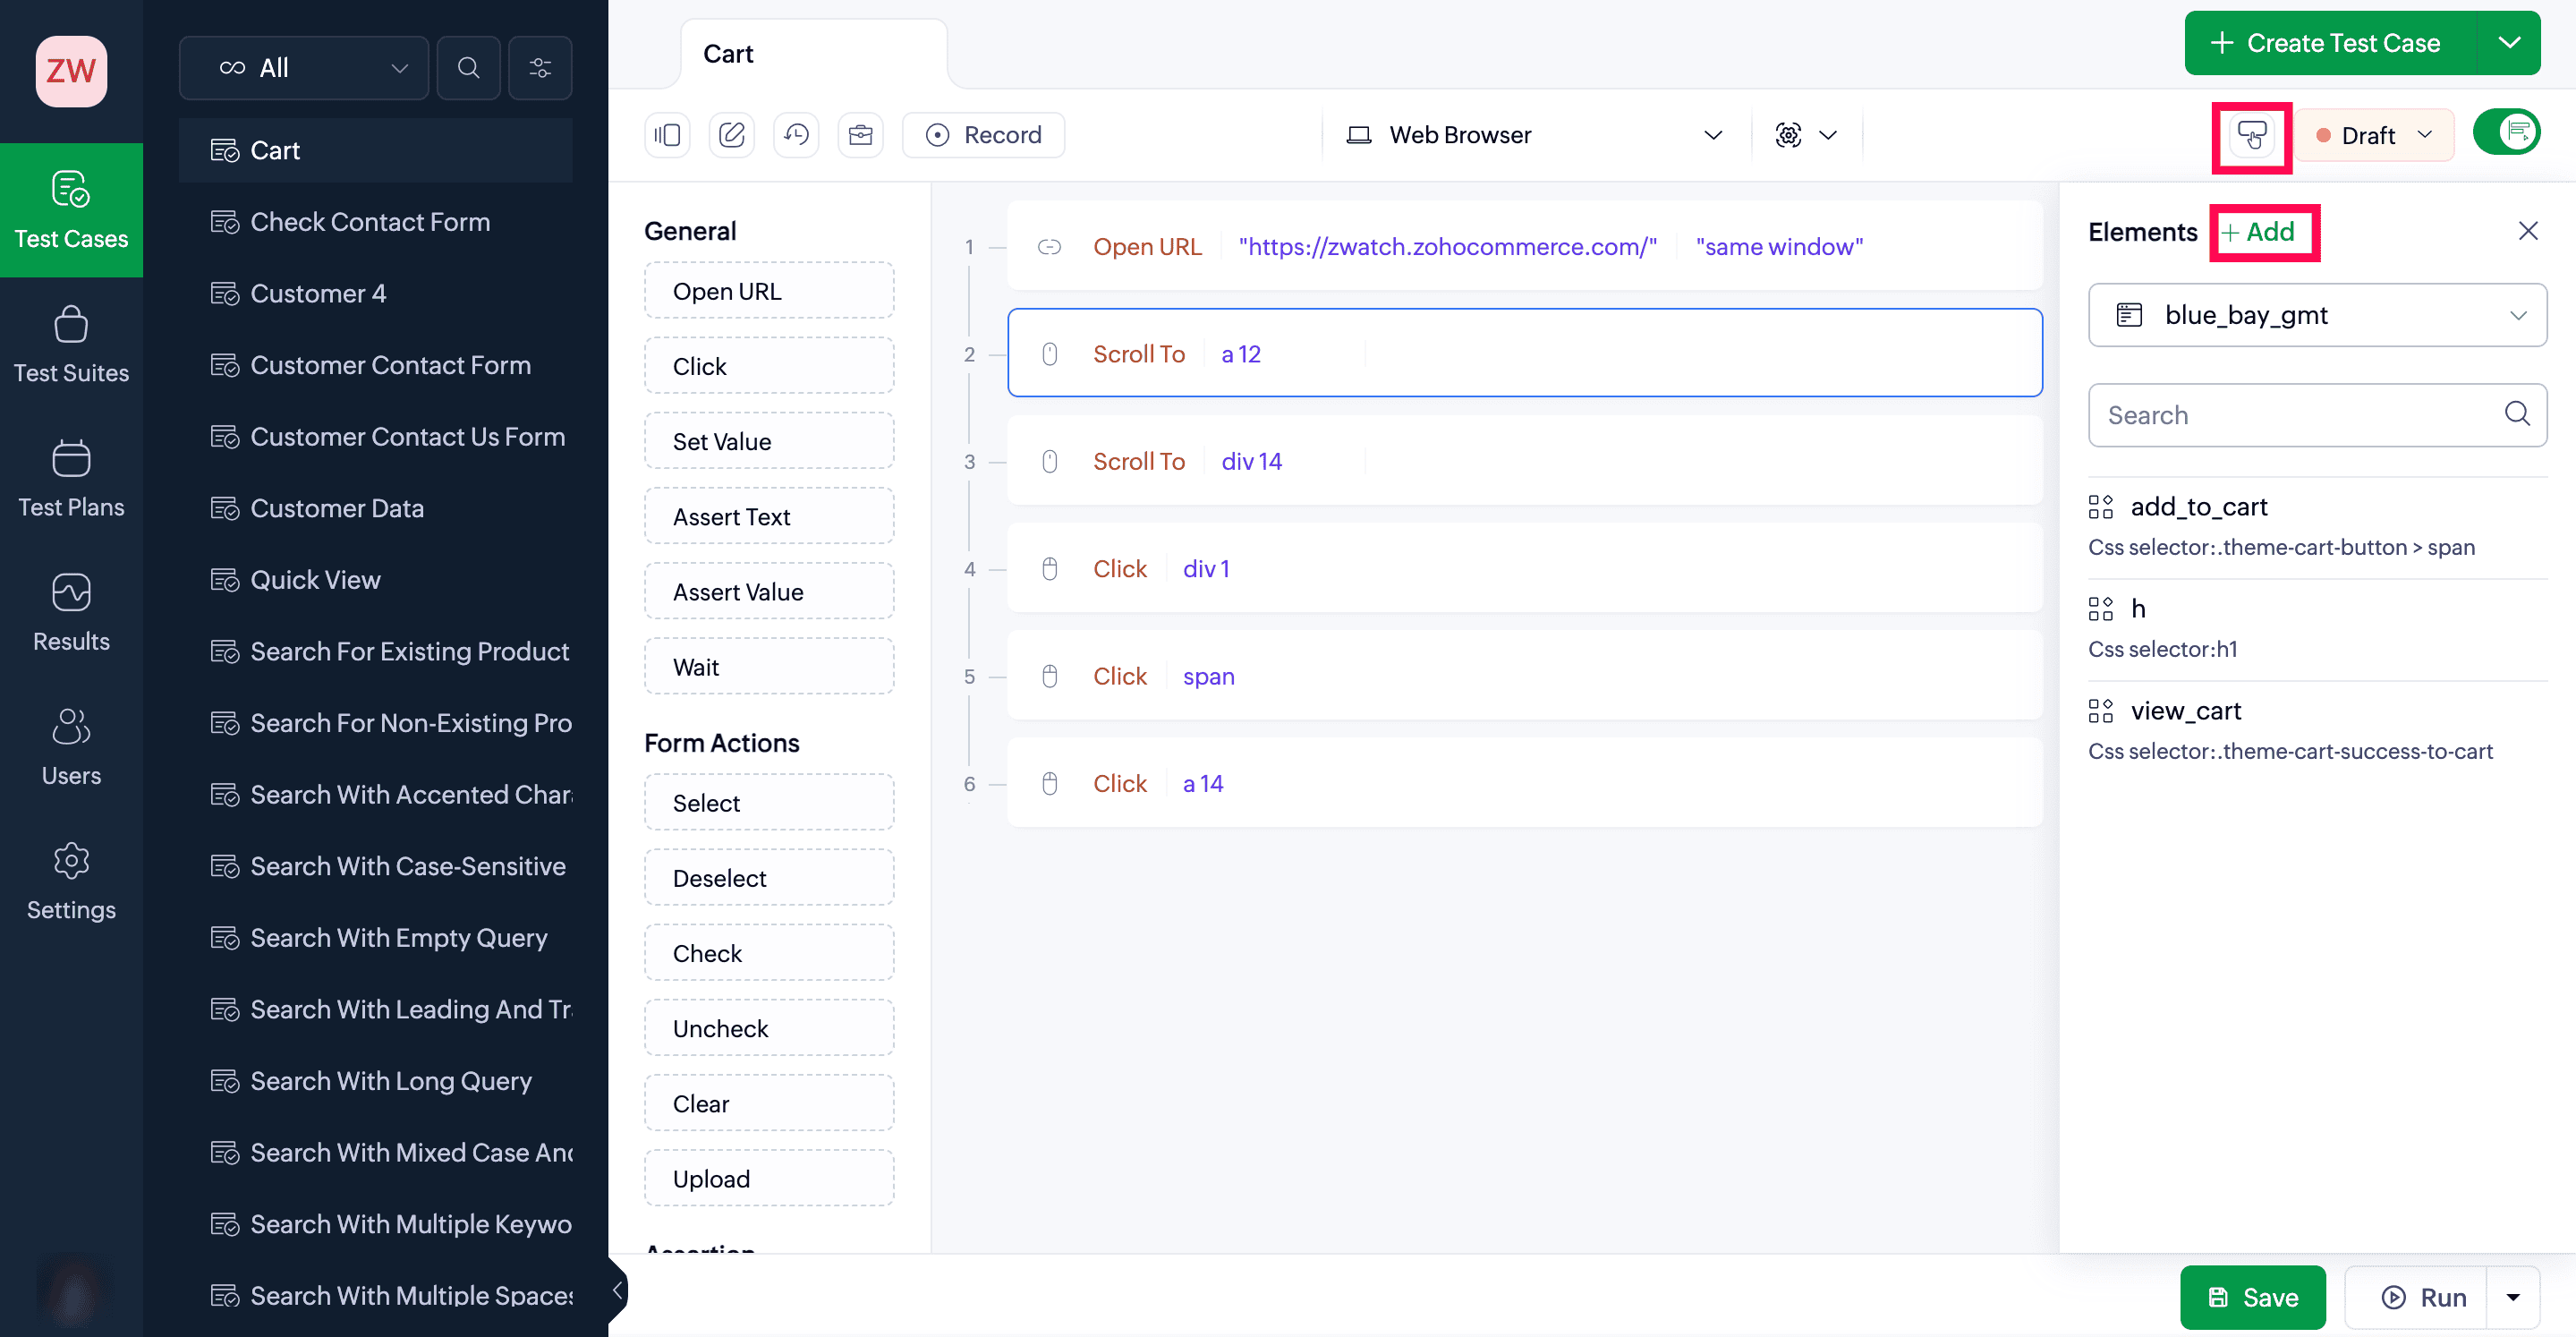
In addition to using the Settings page, you can create new elements using the Refer Elements feature. To create a new element, click +Add inside the Refer Elements option on the test case editor page. You'll get access to the Create Element pop-up, in which you need to perform the same steps as in manual entry. Once the required elements are created, access them inside Refer Elements.
3. Using Elements
Elements can be used inside the test case by manually inspecting the elements from the webpages, web, or mobile applications and hard coding their locators, such as IDs or CSS selectors, inside the respective tasks used to write test cases. This method offers more control over element interactions but can be less flexible and requires frequent test case modifications for changes.
In addition to this method, you can use the stored elements inside the test case using the two modes: Editor and Builder.
Editor mode
Inside Editor mode, the elements are referred using the format ui.<page_name>.<element_name>. As you type the ui. keyword, the auto-suggestion will prompt with the list of all the pages and elements saved under that project.
To use elements inside tasks with the Editor mode:
- Inside Editor mode, select the task you want to use to interact with the element, such as "Click", "Set Value", and so on.
- To refer to elements inside the tasks, type in the keyword ui. , then select the required page and element from the suggested list.
- Click Save once the test script is created.
Additionally, you can use Refer Elements to gain easier access to the saved elements. You can perform actions like copy, edit, and also, create new elements. Learn more.
Builder mode
In Builder mode, use the set expression pop up, to use elements inside the tasks. The Elements section inside the pop-up contains the list of all the elements created for that project.
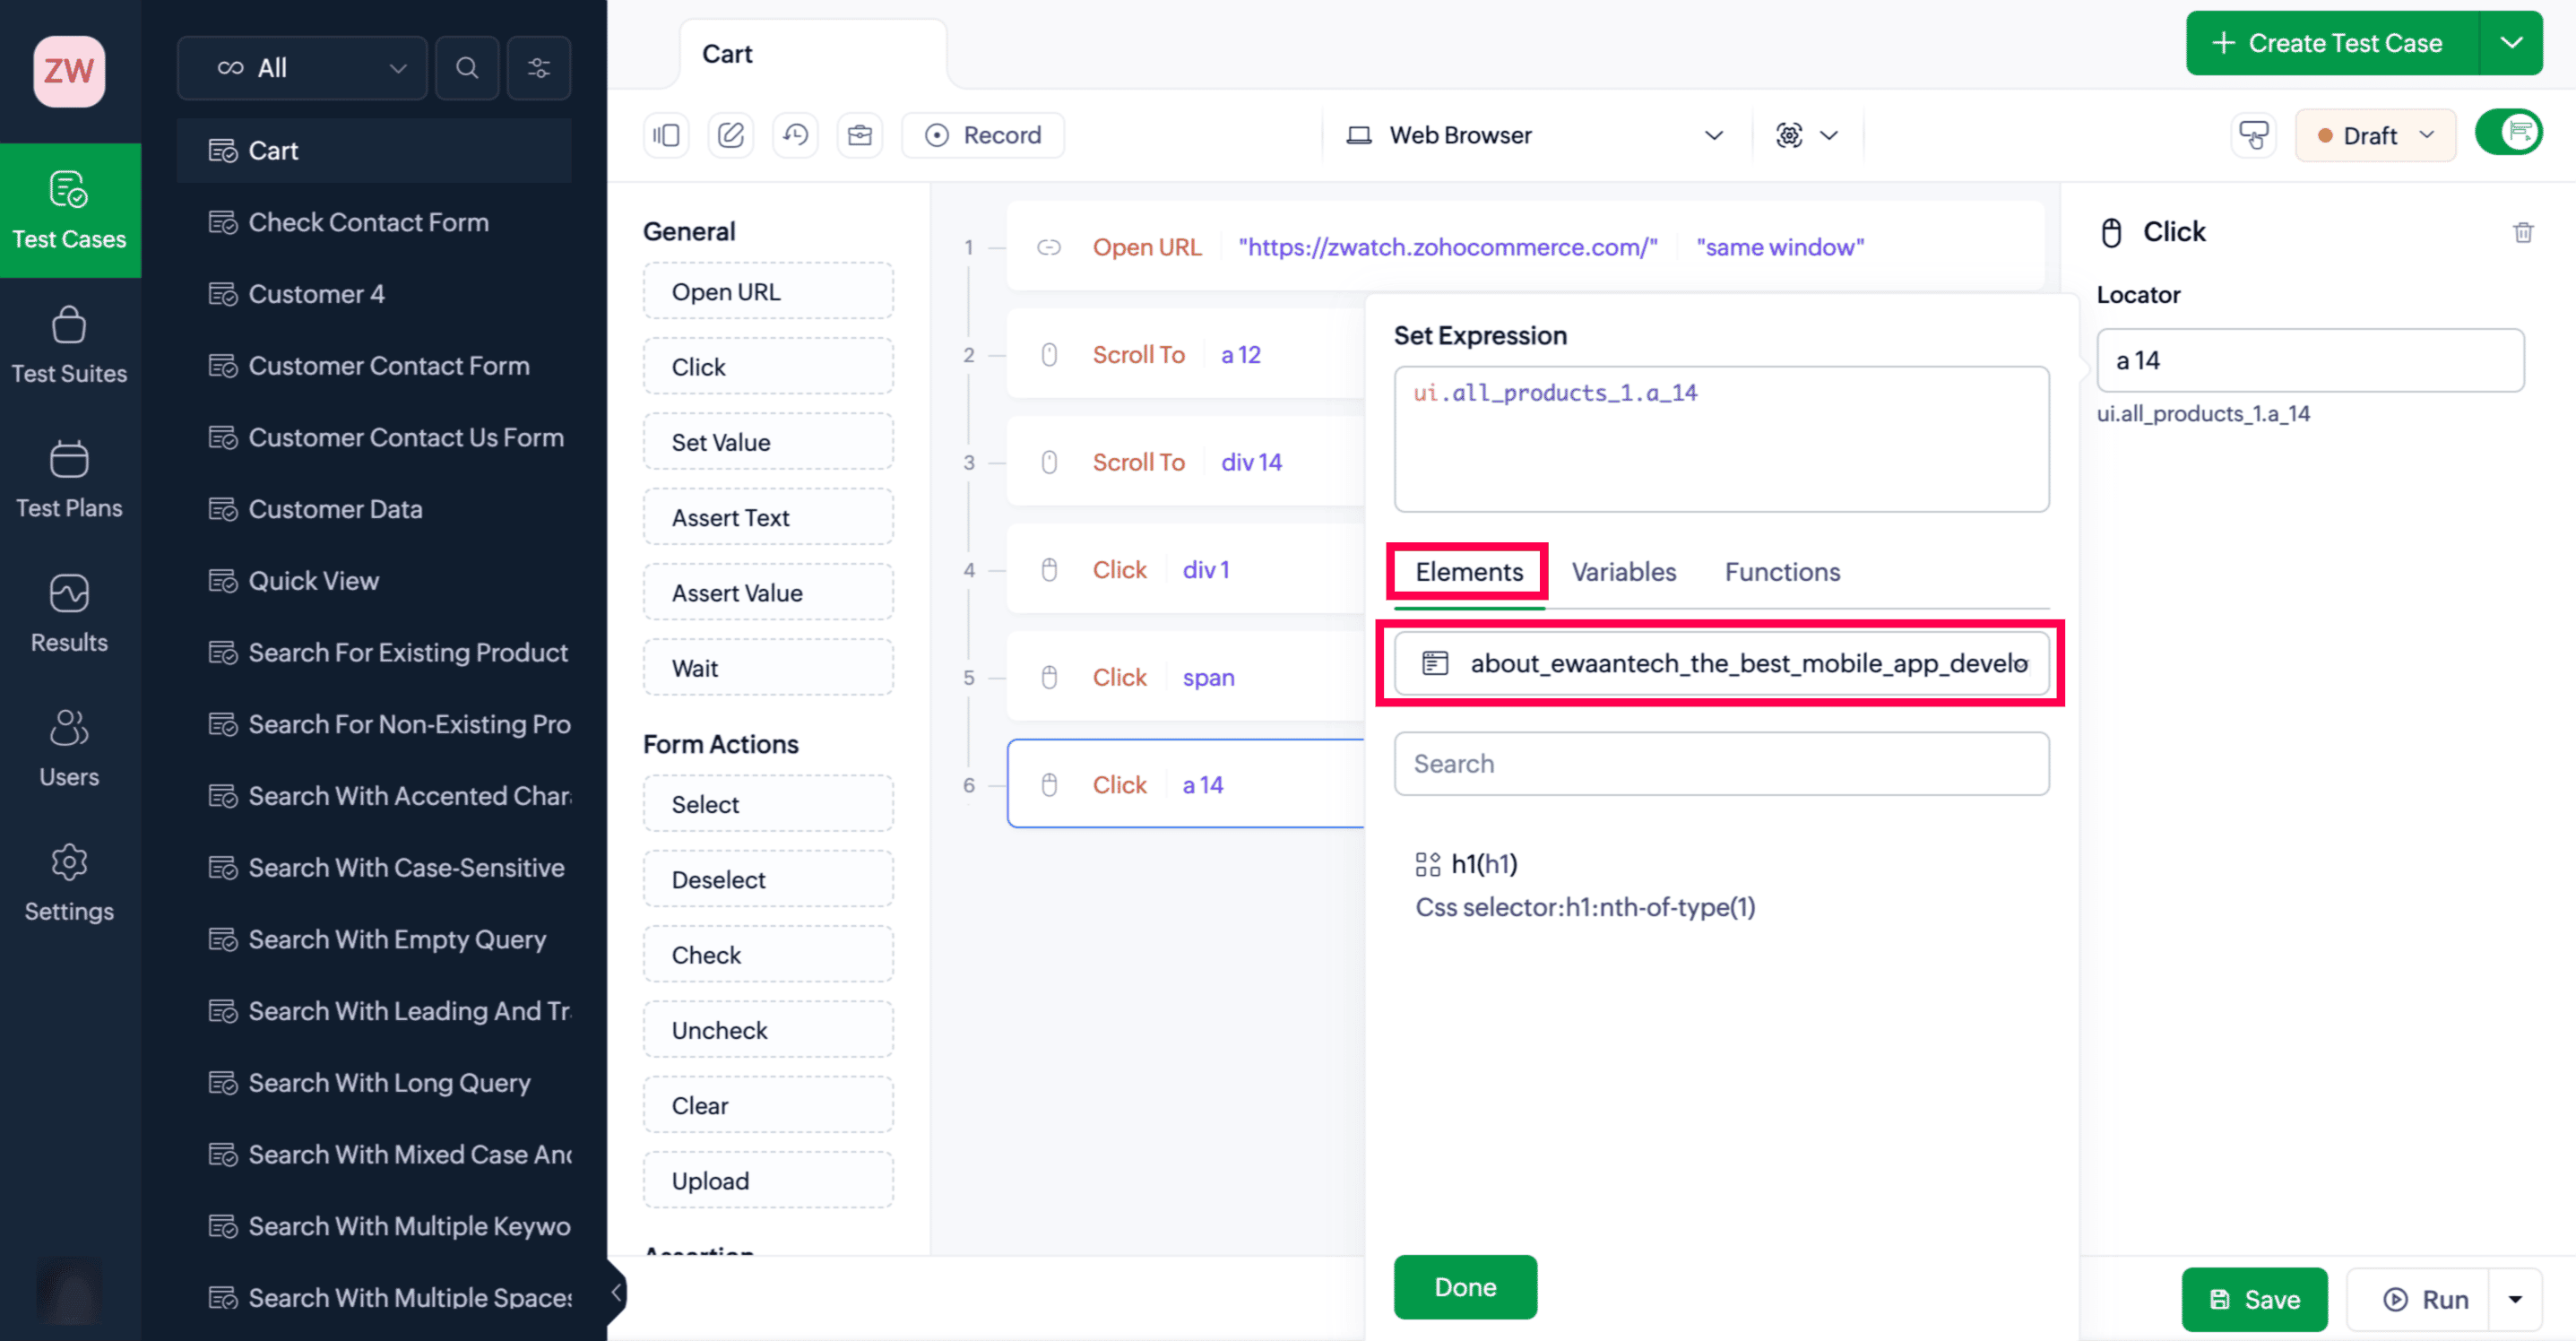
To use elements inside tasks with the Builder mode:
- Select the task you want to use to interact with the element, such as "Click", "Set Value", and so on.
- For the tasks, pass the arguments in the panel on the right side. As you click on the placeholder for the arguments, the set expression pop-up will be accessed.
- Select the required element from the list inside the element section. The set expression input field will be auto populated with the selected element, in the format ui.<page_name>.<element_name>.Note: Alternatively, you can hard code the element locators to be used inside the respective tasks, using the set expression input field. Input the locator in the format ui.<page_name>.<element_name> or use the Refer Elements option to copy the element locator to be used.
- Click Done to save the changes.
4. Managing Elements
Add new elements through import, or manage existing ones with edit, delete, and export options in Zoho QEngine.
4.1 Editing and Deleting Elements
To perform edit or delete on created elements:
- Navigate to Settings > Elements. You'll see the list of all saved elements.
- Hover over the required element and click the edit or delete icon.
- To perform the edit action:
The Edit Element pop-up allows you to edit or create a new page name and edit the element name and its type, locators and their type.
To edit the page name alone, hover over the page name and click the edit icon. To delete all the elements saved under the selected page name, click the delete icon.
To make changes to locators:
To delete individual element locators, hover over it and click the delete icon. Additionally, to add new locators, click the {+} icon to add a new row, and reorder them however required.
- To perform the delete action:
Click on the delete icon. Then, click Delete to remove the element.
- To confirm the changes, click Update.
Alternatively, using the Refer Elements option inside the test case editor, you can edit, copy, and create elements for the test cases. Learn More.
Note: If the locator you tried deleting is referred to inside any of the test cases, remove its usage in the respective test cases, then continue to perform the deletion.
4.2 Importing elements
QEngine allows you to import elements into your project from another QEngine project, by uploading an .json file.
Click the dropdown next to +Create Element, then click Import Elements.
Upload your JSON file that contains the elements you want to import.
 Note: The import file must be in JSON format and cannot exceed 250 MB in size.
- Select the target platform from the following options: All Platforms, Web, Android, and iOS. If your JSON file includes elements for multiple platforms, you can select the platform to which the elements should be uploaded.
- Choose how to handle duplicate elements. If you select ignore duplicates, your existing elements remain unchanged, and any duplicates in the import file are not added. If you select overwrite, your existing elements are replaced with the versions from the import file.
Click Import.
Note: If your import didn’t succeed, it may be due to one of the following reasons:
- The uploaded file isn't in JSON format.
- The JSON file is missing required fields such as element name, element type, locator type, and locator values, such as ID, Name, XPATH, and so on.
- The JSON file contains elements that are not compatible with the selected platform. For example, the file may have required elements for the Android platform, but is uploaded with the target platform set to iOS, the upload will fail.
4.3 Exporting elements
You can export existing elements in any platform for backup, migration, or sharing purposes.
- Click Export in the Elements tab.
- Select the target platform from the following options: All Platforms, Web, Android, or iOS.
- Click Export to download the file. The downloaded JSON file will include the elements from the selected platform.
4.4 Reference
This allows you to view where a particular element is used across your project, ensuring that you understand the impact of modifying or deleting it.
- Locate the element for which you want to view references, then click the Reference icon {
} next to the element name.
- In the References pop-up window, you can view:
- Element Name – Displayed above the list of test cases and functions.
- Functions – All functions where the element is used, with their status (Ready, Draft) and platform type (Web, Android, or iOS).
- Test Cases – All test cases where the element is used, with their status and platform type.
- Click OK.
5. Related links
6. What's next
Next step
Previous step
Next step
Once you’ve created elements, the next step is to use them in your test cases. Elements are reusable components that help define user interactions in a consistent and maintainable way. These can be referred to while writing test cases across platforms such as Web, Android, or iOS.
Previous step
Before creating and organizing elements, ensure that you've captured accurate and stable locators for your application under test. Understanding different locator strategies will help you define elements that remain reliable even as the UI evolves.