Now Zobot can log your appointments with Zoho Bookings!
Hi everyone, good to see you!
Here's a simple yet efficient Zobot for organizing and scheduling appointments via Zoho Bookings. This Zobot can start a proactive conversation, schedule appointments/bookings with your website visitors on their preferred date & time, and makes the job easier for both operator and visitor. You can do slight customization to the script given here according to your business needs and use it on your website instantly.
How does this Zobot work?
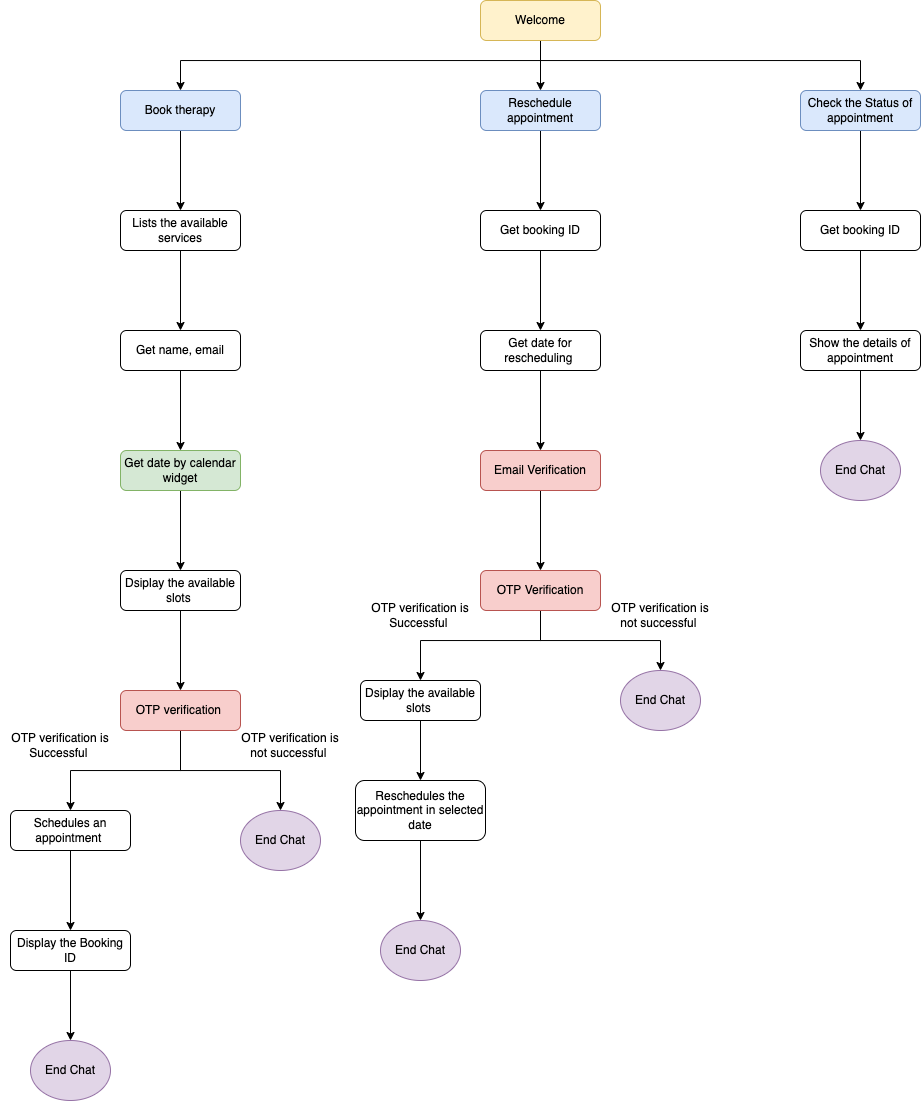
This bot is integrated with Zoho bookings. It can engage visitors, list the available services, and schedule a booking on available slots only after verifying via email OTP .
- Schedule bookings: The Bot collects email, preferred date and time by calender widget and schedules a booking in available slots.
- Track bookings: The Bot assists in checking the status of bookings by simply receiving a booking ID from the user.
- Verify email: The Bot is programmed to verify the email by sending OTP, only verified visitors will be allowed to do further process.
- Reschedule bookings: The Bot can reschedule an appointment on the available slots by simply receiving a booking ID.
Zobot flow:

How to integrate Zobot and Zoho Bookings?
To use
Zoho booking built-in
functions:
- In the Zoho SalesIQ dashboard, navigate to Settings > Zobot > Add . Provide the necessary information and choose SalesIQ Scripts platform.
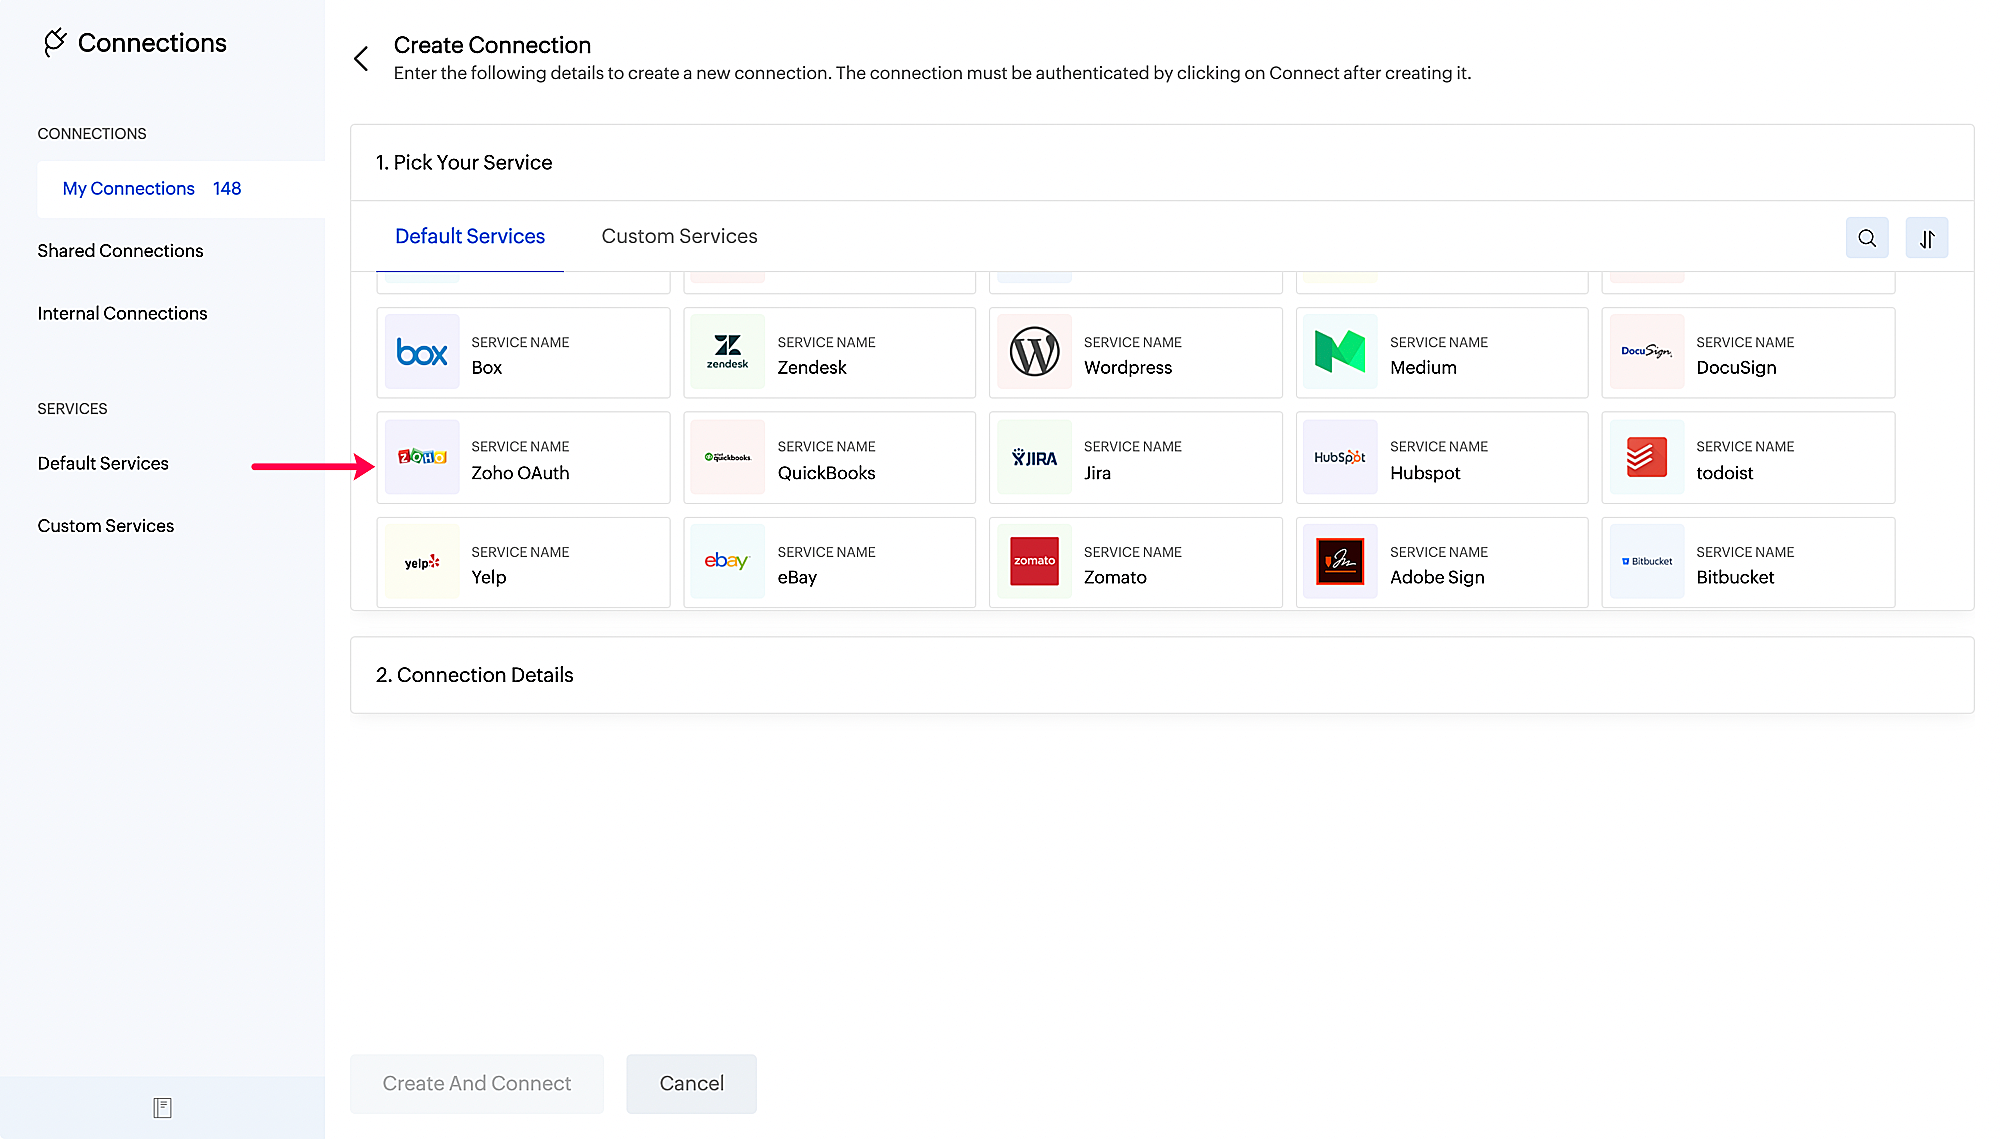
- Click on Connection at the left bottom. You will be redirected to the connection page.
- Click on Create connection at the top right corner.
- Under Default connection , select Zoho OAuth .

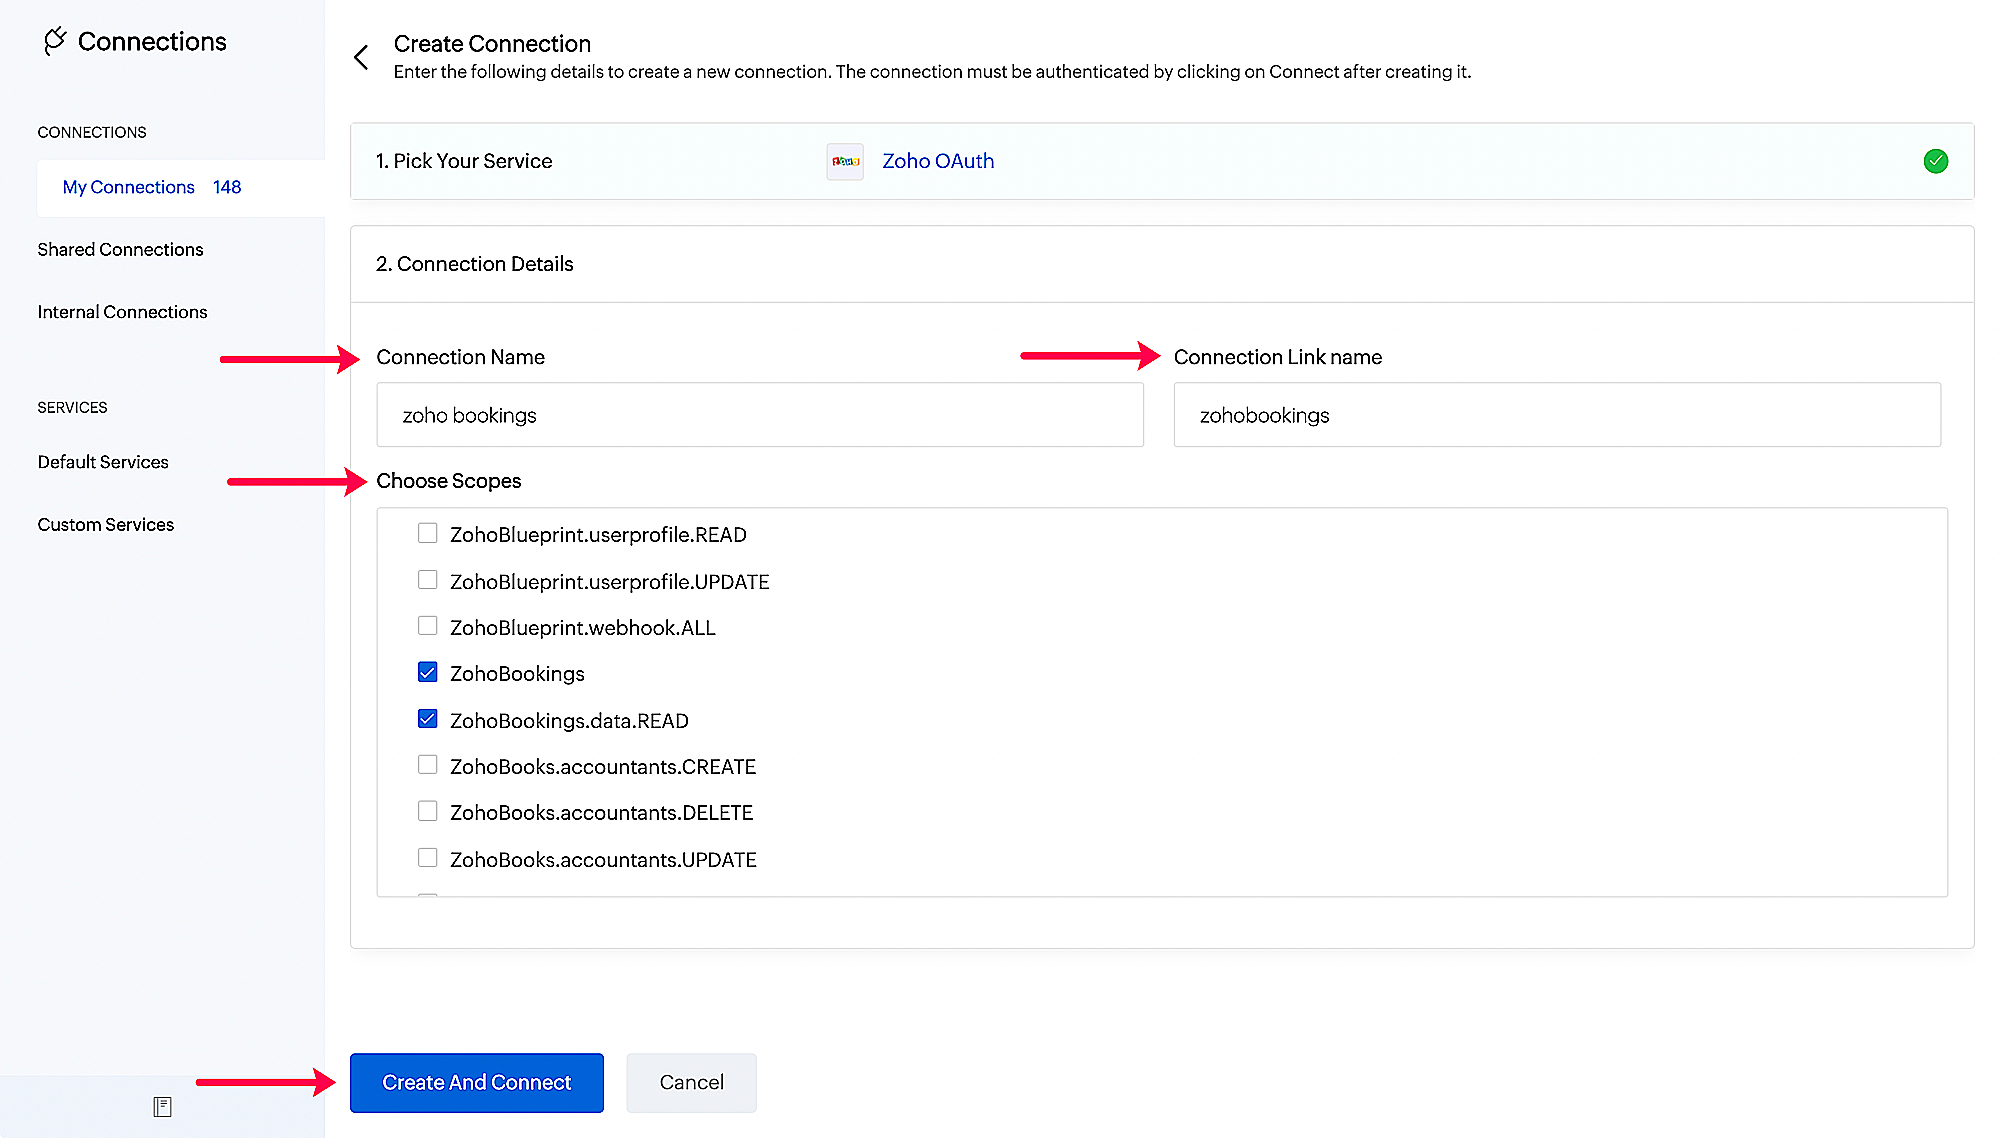
- Then, give your connection a name , connection link name and choose scopes.

- Click on Create And Connect . Upon successful authentication, Zoho SalesIQ and Zoho Bookings will be connected.
Note
: The Connection Link Name will be used in scripts to invoke URL tasks.
To
invoke URL
:
- Register a Client using OAuth .
- Generate an access token and perform API tasks.
How to create this Zobot?
- In the Zoho SalesIQ dashboard, navigate to Settings > Zobot > Add. Provide the necessary information and choose SalesIQ Scripts platform.
-
Copy and paste the attached code and make the following changes.
- To get
available slots/create appointment
(built-in function):
- available = zoho.bookings.getAvailableSlots( 4302354000000026055 , 4302354000000026073 ,date," bookings ");
- response = zoho.bookings.createAppointment( 4302354000000026055 ,date1,customerDetails, 4302354000000026073 ,"Asia/Calcutta",true,"bookings");
- // bookings - Connection link name.
- // 4302354000000026055 - Replace with your service ID
- // 4302354000000026073 - Replace with your staff ID associated to respective service.
- To generate access token to reschedule appointments and check status of appointment:
-
//Create a map to store the values of parameter
- params = Map();
- params.put("client_id"," <paste your client id> ");
-
params.put("client_secret","
<paste your client secret>
");
-
params.put("grant_type","refresh_token");
- params.put("redirect_uri"," https://deluge.zoho.com/delugeauth/callback");
- params.put("refresh_token"," <paste your refresh token> ");
- header = Map();
- get_appoit_access_token = invokeurl
- [
- url :" https://accounts.zoho.com/oauth/v2/token"
- type :POST
- parameters:params
- headers:header
- ];
Head's Up:
- We also have sample scripts for different use cases.
- Learn more about Zoho its built-in integrations here .
To know more about the features of zobot, kindly visit our
Resources Section
.
Happy Zoboting!
Regards,
Regards,
Sasidar Thandapani
Topic Participants
Sasidar Thandapani
Jon Porreca
Ricardo
Sticky Posts
Plug Sample #4: Improve your customer interacting experience by letting Zobot remember your website visitor name!
Hi Everyone! In our Plug sample series, we have another simple yet efficient plug for your Codeless bot builder. Before that, I have a question. Let's say you go to the same coffee shop everyday for your morning coffee. Wouldn't you be happy if the waiter
Recent Topics
Advance PDF creation from CRM data
I'm trying to create a PDF export of data in the CRM. My problem is I want a pretty complicated format for the data. I'm trying to export multiple modules worth of data, with nested one-to-many relationships between the modules. Along with that, I wanthow to disable staff selection Zoho Booking integrated to SalesIQ?
currently there is only one Consultant in my Zoho Bookings like this I integrate Zoho Bookings into Zoho SalesIQ to create a chatbot. Unfortunately, even though I only have one consultant for a consultation, the user have to pick the consultant. It willHow to change the text in WhatsApp Zobot integrated to Zoho Booking?
I have integrated Zoho Bookings into Zoho SalesIQ, I want to change the text in WhatsApp when creating a booking in Zobot how to change those text?how to differentiate if whatsapp comes from certain landing page?
I create a Zobot in SalesIQ to create a Whatsapp bot to capture the lead. I have 2 landing pages, one is SEO optimized and the other want is optimized for leads comes from Google Ads. I want to know from which landing page this lead came through WhatsAppIntroducing Profile Summary: Faster Candidate Insights with Zia
We’re excited to launch Profile Summary, a powerful new feature in Zoho Recruit that transforms how you review candidate profiles. What used to take minutes of resume scanning can now be assessed in seconds—thanks to Zia. A Quick Example Say you’re hiringUpdating Subform Record from other Form
Just wanted to ask how to properly approach this. I have 2 forms and would like to trigger an auto update on the subform once record submitted. block below only updates 1 row for each recordRow in input.AV_System { AssetRecord = Site_Asset_Services[SOR_Nowhen I email a invoice how can i see it was sent and also were i can go to see all emails sent
when I email a invoice how can i see it was sent and also were i can go to see all emails sent?Problem with Email an invoice with multiple attachments using API
I have an invoice with 3 attachments. When I send an email manually using the UI, everything works correctly. I receive an email with three attachments. The problem occurs when I try to initiate sending an email using the API. The email comes with onlyModifying Three Dot Menu Options
Is there a way to modify the three dot menu options that display in a Report header? They currently display: Show As (List, Calendar, Timeline), Print, Import, Export. I'd like to remove the Show As and Print options, since they aren't applicable forRequest for Light/Dark Mode
Would love the ability to switch between Light and Dark mode similar to Zoho CRM. https://help.zoho.com/portal/en/community/topic/introducing-dark-mode-light-mode-a-new-look-for-your-crmHelp - Zoho CRM notification on mobile (IOS/Android)
Hello Community! Can I get the IOS/Andoid CRM app to notify me of events, calls, etc. due as I can with MANY other apps? I am running the free Zoho I would like this to be native to the Zoho CRM app. I do not want to write a sep. mobile appZoho Books - Hide Convert to Sales Order if it can't be used.
Hi Books team, I noticed that it is not possible to convert a Quote to a Sales Order when a Quote is not yet marked as accepted. My idea is to not show the Convert to Sales Order button when it is not possible to use it, or show it in a grey inactiveHide Inactive Social Sign-In Providers from Login Screen
Hello Zoho Team, We hope you are doing well. Currently, Zoho One allows admins to configure security policies and enable or disable Social Sign-In options for third-party providers such as Apple, Google, Microsoft, LinkedIn, Yahoo, Twitter, Facebook,How do I bulk archive my projects in ZOHO projects
Hi, I want to archive 50 Projects in one go. Can you please help me out , How can I do this? Thanks kapilCross-Data Center Collaboration and / Or allowing users to choose DC
Dear Zoho Cliq Support Team, We are writing to request a significant enhancement to Zoho Cliq that would greatly benefit our geographically dispersed development team. Current Challenge: Currently, Zoho Cliq automatically routes users to specific dataZoho Flow - Update record in Trackvia
Hello, I have a Flow that executes correctly but I only want it to execute once when a particular field on a record is updated in TrackVia. I have the trigger filters setup correctly and I want to add an "update record" action at the end of the flow toNew Mandatory One-Click Unsubscribe Link Overshadowing Custom Unsubscribe Link
I was recently informed by Zoho CRM Support that they are now mandated by the large email service providers like Google and Yahoo to provide a one-click unsubscribe option in the header (not the body) of all mass emails. I have a custom unsubscribe linkQuestion about custom fields using Pivot Tables.
I have created a pivot table showing annual revenue of a client and how much payment that client is paying my company. Is there a way using pivot table to add an additional field that subtracts those to fields / shows me a percentage of that difference?Supervisor Rules - Zoho Desk
Hi, I have set up a Supervisor Rule in Zoho Desk to send an email alert when a ticket has been on hold for 48 hours. Is there a way to change it so that the alert only sends once and not on an hourly basis? Thank you LauraKaizen #190 - Queries in Custom Related Lists
Hello everyone! Welcome back to another week of Kaizen! This week, we will discuss yet another interesting enhancement to Queries. As you all know, Queries allow you to dynamically retrieve data from CRM as well as third-party services directly withinAre there default/pre-built dashboards in Zoho Desk?
Hi, I am looking for some pre-built dashboard templates in Zoho Desk, similar to what we can find in CRM/Projects, etc Thank youSimplified Call Logging
Our organization would like to start logging calls in our CRM; however, with 13 fields that can't be removed, our team is finding it extremely cumbersome. For our use case, we only need to record that a call happened theirfor would only need the followingSend / Send & Close keyboard shortcuts
Hello! My team is so close to using Zoho Desk with just the keyboard. Keyboard shortcuts really help us to be more efficient -- saving a second or two over thousands of tickets adds up quickly. It seems like the keyboard shortcuts in Desk are only forJourney Email - Ignored Contacts
I have a journey setup which simply sends a string of emails over time. For some reason I am getting large amounts of the contacts who enter the first email being ignored and I can't find anywhere in reports or audit logs why these contacts are notZadarma + Zoho CRM Integration – Missed Calls Saved as Contacts Instead of Leads
Hello everyone, I’m looking for input from anyone with experience using the Zadarma + Zoho CRM integration. Currently, I’m seeing that missed calls are automatically being created as Contacts instead of Leads. From a CRM perspective, this doesn’t makeIs it possible to register webhooks in Zoho CRM using API?
Hello, I am trying to register a webhook in Zoho CRM programmatically (using the API). Specifically, I want to register a webhook that is fired when new Contacts are created in the CRM. I was able to setup a webhook using the UI, by creating a rule thatIs it possible to hide fields in a Subform?
Since layout rules cannot be used with Subforms, is there another way, or is it even possible, to hide fields in a subform based on a picklist fields within said subform? For example, if the Service Provided is Internet, then I do not want to see theCalls where the local audio is shared, have echo
When another user is sharing their screen with audio, I get echo from my own voice. We tested this with multiple users, with different audio setups, and there's no obvious way to fix it. Is this a bug you could look into, or are we missing something?Power of Automation :: Automatic removal of project users once the project status is changed.
A custom function is a software code that can be used to automate a process and this allows you to automate a notification, call a webhook, or perform logic immediately after a workflow rule is triggered. This feature helps to automate complex tasks andSystematic SPF alignment issues with Zoho subdomains
Analysis Period: August 19 - September 1, 2025 PROBLEM SUMMARY Multiple Zoho services are causing systematic SPF authentication failures in DMARC reports from major email providers (Google, Microsoft, Zoho). While emails are successfully delivered dueCannot update Recurring_Activity on Tasks – RRULE not accepted
Hello, I am trying to update Tasks in Zoho CRM to make them recurring yearly, but I cannot find the correct recurrence pattern or way to update the Recurring_Activity field via API or Deluge. I have tried: Sending a string like "RRULE:FREQ=YEARLY;INTERVAL=1"Update application by uploading an updated DS file
Is it possible? I have been working with AI on my desktop improving my application, and I have to keep copy pasting stuff... Would it be possible to import the DS file on top of an existing application to update the app accordingly?Minimise chat when user navigates to new page
When the user is in an active chat (chatbot) and is provide with an internal link, when they click the link to go to the internal page the chat opens again. This is not a good user experience. They have been sent the link to read what is on the page.Image Upload Field | Zoho Canvas
I'm working on making a custom view for one of our team's modules. It's an image upload field (Placement Photo) that would allow our sales reps to upload a picture of the house their working on. However, I don't see that field as a opinion when buildingReports: Custom Search Function Fields
Hi Zoho, Hope you'll add this into your roadmap. Issue: For the past 2yrs our global team been complaining and was brought to our attention recently that it's a time consuming process looking/scrolling down. Use-case: This form is a service report withZoho Projects app update: Voice notes for Tasks and Bugs module
Hello everyone! In the latest version(v3.9.37) of the Zoho Projects Android app update, we have introduced voice notes for the Tasks and Bugs module. The voice notes can be added as an attachment or can be transcribed into text. Recording and attachingzurl URL shortener Not working in Zoho social
zurl URL shortener Not working in while creating a post in Zoho socialIn the Zoho CRM Module I have TRN Field I should contain 15 digit Number , If it Contain less than 15 digit Then show Alert message on save of the button , If it not contain any number not want to sh
Hi In the Zoho CRM Module I have TRN Field I should contain 15 digit Number , If it Contain less than 15 digit Then show Alert message on save of the button , If it not contain any number not want to show alert. How We can achive in Zoho CRm Using customPower of Automation::Streamline log hours to work hours upon task completion.
Hello Everyone, A Custom Function is a user-written set of code to achieve a specific requirement. Set the required conditions needed as to when to trigger using the Workflow rules (be it Tasks / Project) and associate the custom function to it. Requirement:-Zoho Bookings know-how: A hands-on workshop series
Hello! We’re conducting a hands-on workshop series to help simplify appointment scheduling for your business with Zoho Bookings. We’ll be covering various functionalities and showing how you can leverage them for your business across five different sessions.Next Page