Kaizen #187 - Building a Timer and Worklog Widget (Part 1)

Howdy Tech Wizards!
Welcome back to a fresh week of Kaizen!
This time, we are diving into a two-part series where you will learn how to build a Timer and Worklog Widget for Zoho CRM. This widget helps track active work time and log multitasking sessions using Zoho CRM APIs, Client Script, Functions, and Workflows.
Why It Matters?
Zoho CRM effectively captures stage/status transitions, like tracking when a case moves from Open to In Progress or On Hold. However, in dynamic work environments, employees juggle multiple work items and engage in impromptu tasks or conversations.
Let’s take the On Hold status as an example.
While it can be used to indicate pauses in progress, it does not always align with real-world workflows. Consider these scenarios:
Not all interruptions justify a status change
Moving the case to On Hold for every minor detour (to clarify something with a colleague or respond to another emergency work item) would be impractical and could lead to under reporting actual work hours. Over time, this untracked effort adds up, creating a gap in visibility.
Frequent status changes may dilute their meaning
In many teams, On Hold signifies a legitimate blocker like waiting on customer input or an external dependency. Using it frequently to reflect quick shifts in attention could compromise that clarity.
A timer widget solves this by:
- Capturing hands-on work items.
- Logging context switches (unrelated tasks) with descriptive entries.
- Feeding structured entries into a custom module for reporting and subform sync.
Business Scenario: IT Service Desk & Ticket Resolution
A tech support team uses the Cases module to resolve customer issues. Some tickets are straightforward; others require follow-ups, escalations, or cross-team coordination. While CRM timestamps (like stage transitions or picklist tracking) track when changes happen, they do not reflect how long someone actively worked on a case.
This Timer Widget can be the ultimate solution to track down the active time spent on each case through out the day.
What are we Building?
By the end of this two-part guide, you will know how to:
- Build a timer widget to track time per task or any CRM record.
- Log work sessions into a custom module every time the timer is started/stopped.
- Automatically populate a subform in the corresponding record module using workflows and Deluge functions.
- Leverage the Reports module to analyze work patterns, SLA adherence, and productivity trends.
In Part I, we will focus on:
-> Building and configuring the Timer Widget.
-> Capturing each timed session as a record in a custom module.
Prerequisites
1. Create a Custom Module
Create a custom module named Timer Entries to log work details and generate reports from the Reports module. A new record will be added to this module each time a timer is started.
Set up the following custom fields in the Timer Entries module:
Custom Fields | Data Type |
Start Time | DateTime |
End Time | DateTime |
Total Duration (in mins.) | Formula DateBetween(${Timer Entries.Start Time},${Timer Entries.End Time},'Minutes') |
Related to Case | Lookup to Cases module |
Work Description | Multi Line |

2. Add a custom picklist option
Add a custom picklist option called In Progress to the Status picklist field in the Cases module for precisely identifying the status of the cases.
Follow this Add/Remove Picklist Values help section for more details.

3. Setup Custom Views for Contextual Filtering
To streamline the widget experience and ensure users only see relevant records to associate while tracking time, set up two smart custom views—one in the Cases module and another in the Timer Entries module.
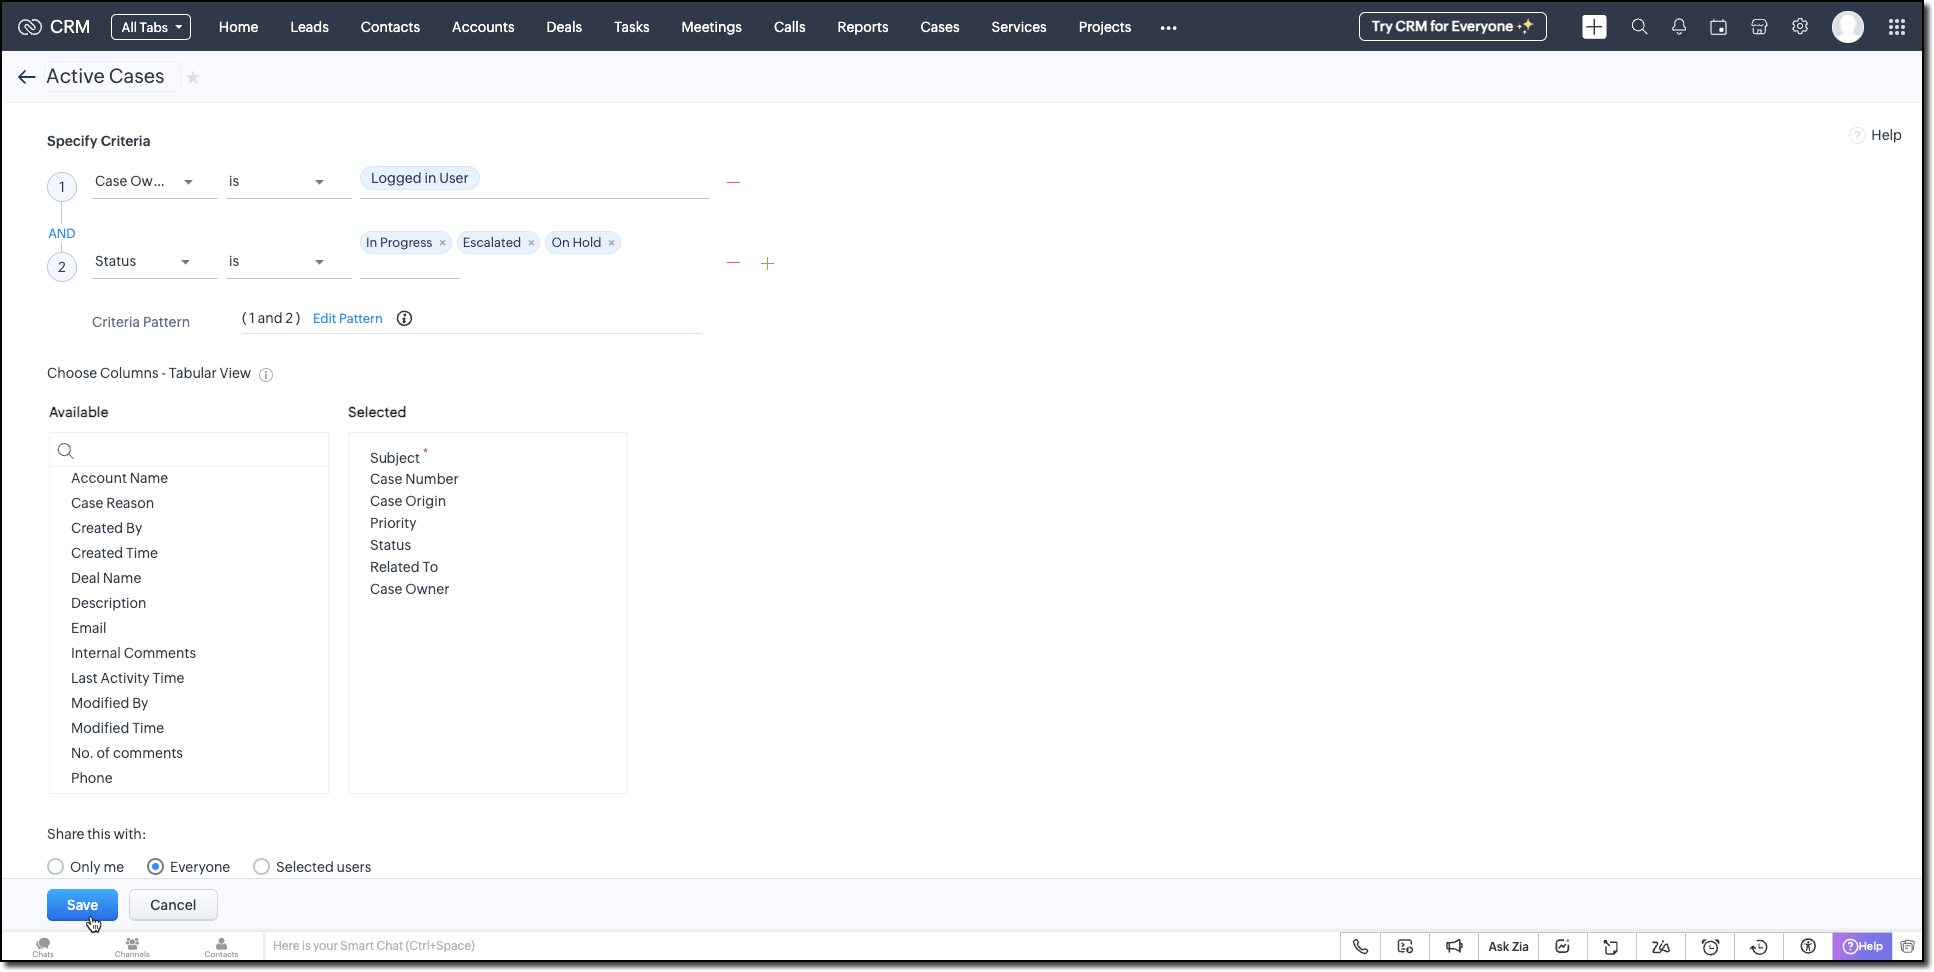
Active Cases View (Cases Module)
Create a custom view in the Cases module to list only the active tickets the logged-in user is working on. Use the following criteria tips:
- Use the Status field to filter records with values like In Progress, On Hold, or Escalated.
- Use the Case Owner field to show records that are assigned only to the currently logged-in user.
This view powers the drop-down inside the widget where users select the case they want to start the timer for.
Active Timers View (Timer Entries Module)
Set up a second custom view in the Timer Entries module to track entries where the timer has been started but not yet stopped. These represent active timers. Use the following logic for criteria:
- The End Time field is empty (i.e., timer still running).
- Timer Entry owner field matches the logged-in user.
This view is used internally by the widget to detect if a timer is already running and update the same entry once the timer is stopped.
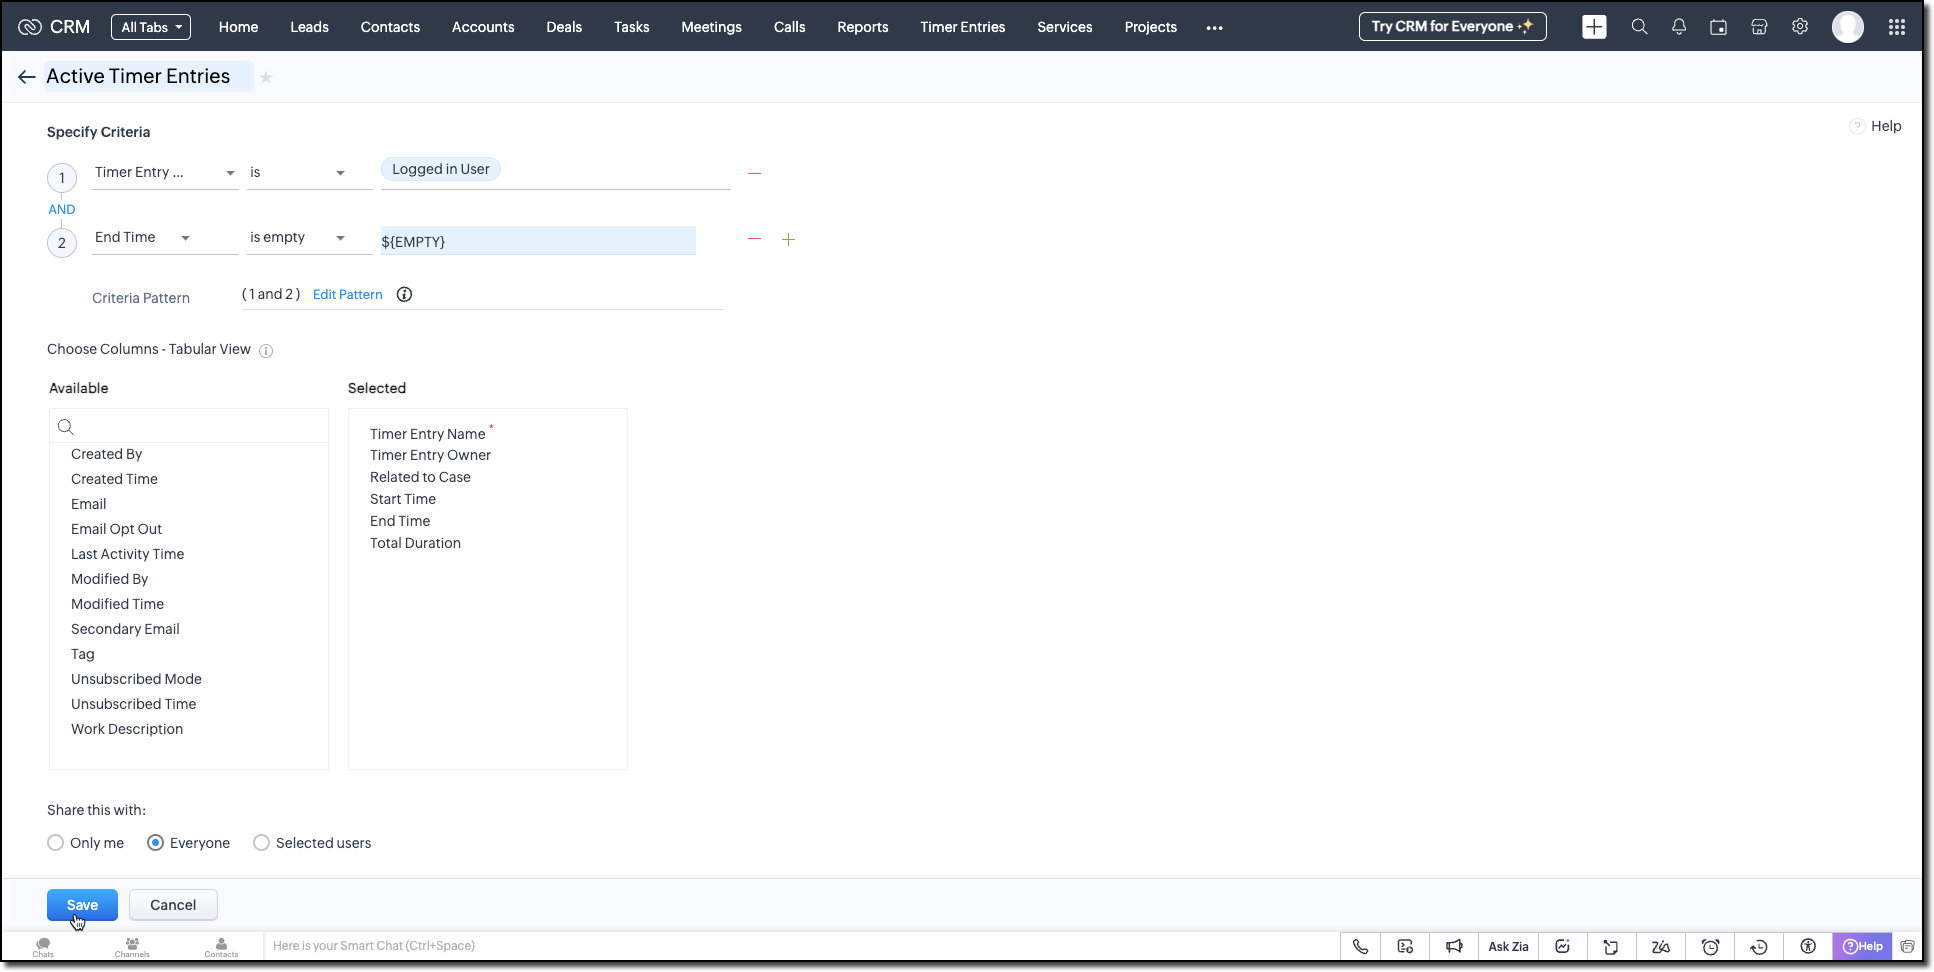
Follow the Managing List View help page and use the specifications shown in the following image.
Building the Timer Widget
Step -1: Review Basics
Refer to our earlier Kaizen on CLI Installation, Creating a Widget Project, and Internal hosting of the same.
Step 2 - Develop the Widget
After initializing your widget project using CLI, implement the timer logic:
Fetching Active Cases
On page load, the populateRecordsDropdown function initiates a Get Records API call to the Cases module, using the Active Cases custom view ID. This fetches all active case records assigned to the logged-in user.
These records are then listed in a dropdown, allowing users to quickly select the relevant case they are about to work on.
async function populateRecordsDropdown() { const recordsDropdown = document.getElementById("moduleRecords"); recordsDropdown.innerHTML = ""; try { const recordsResponse = await ZOHO.CRM.API.getAllRecords({ Entity: casesModule, cvid: casesCVID, per_page: 10 }); if (recordsResponse.data && recordsResponse.data.length > 0) { recordsResponse.data.forEach(record => { const option = document.createElement("option"); option.value = record.id; option.textContent = record.Subject || "Unnamed Record"; recordsDropdown.appendChild(option); }); } else { const placeholderOption = document.createElement("option"); placeholderOption.value = ""; placeholderOption.textContent = "No records found"; placeholderOption.disabled = true; placeholderOption.selected = true; recordsDropdown.appendChild(placeholderOption); } } catch (error) { console.error("Error fetching records:", error); } } |
Starting the Timer and Creating an Entry
Once the user starts the timer, The createRecord function triggers a Create Record API call to log the session in the Timer Entries custom module. The record captures the start time and the related case and description (if provided).
Even if no details are entered or case is selected, a timer entry is still created with the start time. This ensures that spontaneous work sessions are tracked and not lost.
async function createRecord(startTime) { try { const workDescription = document.getElementById("workDescription").value; const selectedRecordId = document.getElementById("moduleRecords").value; const selectedRecordText = document.getElementById("moduleRecords").options[ document.getElementById("moduleRecords").selectedIndex ].text; const data = { Start_Time: startTime, Owner: currentUserId, Work_Description: workDescription, Related_to_Case: selectedRecordId, Name: selectedRecordText }; const response = await ZOHO.CRM.API.insertRecord({ Entity: timerModule, APIData: data }); console.log("Start time recorded successfully"); } catch (error) { console.error("Error creating record:", error); } } |
Stopping the Timer and Updating the Entry
When the timer is stopped, the widget uses the Active Timer Entry custom view to locate the most recent Timer Entry record created by the logged-in user that does not have an end time.
The updateRecord is then triggered to update that active entry using the Update Record API call. It updates the End time of the session and the related case, descriptions, if it was not already provided when the timer was started.
async function updateRecord(endTime) { try { const workDescription = document.getElementById("workDescription").value; const selectedRecordId = document.getElementById("moduleRecords").value; const response = await ZOHO.CRM.API.getAllRecords({ Entity: timerModule, cvid: timerEntriesCVID, per_page: 1 }); const latestRecord = response.data[0]; if (latestRecord) { const recordId = latestRecord.id; const data = { id: recordId, End_Time: endTime, Work_Description: workDescription, Related_to_Case: selectedRecordId }; await ZOHO.CRM.API.updateRecord({ Entity: timerModule, APIData: data, RecordID: recordId }); console.log("End time updated successfully"); } } catch (error) { console.error("Error updating record:", error); } } |
Step 3 - Validate and Pack the Widget
- Follow the steps given in the Widget help page to validate and package the widget.
- Go to Zoho CRM > Setup > Developer Hub > Widgets and click Create New Widget.
- Fill in the required details as shown in this image and ensure to select Button as the widget type.

Step 4 - Associate it with Flyout
- Go to Setup > Developer Space > Client Script. Click New Script.
- Enter a name and description for the script. Choose Command type in Category.

- Create a Flyout and render a widget within it using its details like the API name of the widget, title, size, and animation type. You can get the Widget API name from the widget's detail page.
let allowedUserEmails = []; allowedUserEmails.push('user1_email_address'); allowedUserEmails.push('user2_email_address'); allowedUserEmails.push('user3_email_address'); let currentUserEmail = $Crm.user.email; if (allowedUserEmails.indexOf(currentUserEmail) == -1) { ZDK.Client.showMessage('Command access resticted', { type: 'error' }); return false; } ZDK.Client.createFlyout('myFlyout', {header: 'Timer', animation_type: 4, height: '600px', width: '500px', top: '10px', left: '10px', bottom: '10px', right: '10px' }); ZDK.Client.getFlyout('myFlyout').open({ api_name: 'Timer', type: 'widget' }); return true; |
Refer to Creating a Client Script help page for more details.
Try It Out!
A complete working code sample of this widget is attached to this post.
Now, let us see how this Timer widget works:
1. Start the Timer
Open the widget and select an active case from the dropdown. As soon as you start the timer, a new record will be automatically created in the Timer Entries module to capture the session.

2. Stop the Timer
When the task is complete, provide a description of the work you have done and stop the timer. The same Timer Entry record (created when the timer was started) will be updated automatically with the end time and your work description.
This forms the foundation for accurate time tracking at the record level.
In Part 2, we will show how to:
-> Use a workflow and Deluge function to transfer these entries into the Work Log subform inside the relevant Cases record.
-> Use CRM Reports to slice and dice work time for better SLA and productivity insights.
In the meantime, would you like us to address any of your pain-points or have a topic to discuss? Let us know in the comments or reach out to us via support@zohocrm.com.
Until next time, Happy Coding!
-----------------------------------------------------------------------------------------------------------------
Related Reading
- Custom Fields - Working with Custom Fields and Working with Picklist Field
- Widget - An Overview, CLI Installation, Working with Widgets, JS SDKs, Mobile Compatibility of Widgets and Kaizens
- Core APIs - GET Records, POST Records and UPDATE Records
- Client Script - An Overview, Creating a Client Script, Best Practices and Troubleshooting
-----------------------------------------------------------------------------------------------------------------

Previous Kaizen: Client Script Support for Subforms | Kaizen Collection: Directory