Kaizen #205 - Answering Your Questions | Managing Picklists and Enabling History Tracking via Zoho CRM APIs
Hello everyone!
Welcome back to another post in our Kaizen series.
In this post, we will look at how you can manage picklist fields in Zoho CRM using APIs. This topic was raised as feedback to Kaizen #200, so we are taking it up here with more details.

In this post, we will cover the following:
- What is a picklist field in Zoho CRM?
- Picklist vs Multi-select Picklist
- Working with picklist fields via APIs
- Creating a picklist field using the Create Custom Field Metadata API
- Updating a picklist field using the Update Custom Field Metadata API
- Assigning picklist values when creating records using the Insert Records API
- Updating picklist values in existing records using the Update Records API
- History tracking for picklists
- What is history tracking for picklists in Zoho CRM?
- Use case
- Enabling history tracking for a picklist using the Create Custom Fields API
What is a picklist field in Zoho CRM?
A Picklist field is a drop-down field in Zoho CRM that contains a predefined list of values. While creating or updating a record, you can select one value from this list instead of entering it manually. This helps you avoid typing errors.
Example :
A Region field with values East, West, North, and South.
If a lead is from the East, the user simply selects East from the picklist instead of typing it manually.
Picklist vs Multi-select Picklist
Picklist | Multi-select Picklist |
Users can select only one value from the list. | Users can select multiple values at once. |
A standard Region picklist works when a record belongs to only one region. Example : East | A Multi-select Region picklist works when a record spans multiple regions. Example : East, North |
Global picklist / Global set : User can create a picklist in common and associate the created picklist across the modules to maintain accuracy. Refer to Kaizen #161: Global Sets using Zoho CRM APIs for more details.
Working with picklist fields via APIs
Creating a picklist field using the Create Custom Field API
You can create a new Picklist field in a module by calling the Create Custom Field Metadata API. For example, you can create a picklist field named Region with the values: East, West, North, South.
Request URL : {{api-domain}}/crm/v8/settings/fields?module=Leads
Request Method : POST
Sample Input
When creating a picklist field, set its data type as picklist and provide the list of options, each with a mandatory display_value. You can also configure additional properties such as actual_value, lexical sorting, and color coding.
{ "fields": [ { "field_label": "Select Region", "data_type": "picklist", // Specify the data type as picklist "tooltip": { "name": "info_icon", "value": "Select your region here" }, "profiles": [ { "id": "5725767000000026011", "permission_type": "read_write" } ], "pick_list_values": [ { "display_value": "East", //The unique display value for the picklist, which will be displayed in the CRM UI. Use the display_value in API requests during create, update, and upsert operations. "actual_value": "IN_East" //The unique reference value associated with the particular option. }, { "display_value": "West", "actual_value": "IN_West" }, { "display_value": "North", "actual_value": "IN_North" }, { "display_value": "South", "actual_value": "IN_South" } ], "pick_list_values_sorted_lexically": true, //Sorts options alphabetically. Default value is false. "enable_colour_code": true //Allows color coding for picklist options. Default value is false. } ] } |
Note : To create a multi-select picklist field, set the data_type key to multiselectpicklist in the request body ("data_type": "multiselectpicklist").
Sample Response
{ "fields": [ { "code": "SUCCESS", "details": { "id": "5725767000007613005" }, "message": "field created", "status": "success" } ] } |
Updating a picklist field using the Update Custom Field API
The PATCH - Field Metadata API lets you modify an existing Picklist field. Use the Get Fields Metadata API to get your picklist field ID.
You can:
- Add new options
- Update the picklist
- Remove existing options using Update Custom Layout API
Here is a sample request that updates the Select Region dropdown field in the Leads module.
Request URL : {{api-domain}}/crm/v8/settings/fields/5725767000007613005?module=Leads
Request Method : PATCH
Adding a new option to the existing picklist field
Sample Input
{ "fields": [ { "pick_list_values": [ { "display_value": "Central", //adding a new option to the existing picklist field "actual_value": "IN_Central" } ], } ] } |
Updating picklist
{ "fields": [ { "profiles": [ { "id": "5725767000000026011", "permission_type": "read_only" //updating the permission_type } ], "pick_list_values": [ { "display_value": "South Region", //updating the display field's value "id": "5725767000007613010" //unique ID of the option } ], "enable_colour_code": false //disabling color code for the options } ] } |
Note : Use the actual_value or unique ID of a picklist option to update its display value. Use the Get Fields Metadata API or Get Layouts Metadata API to get the details.
Removing existing options using Update Custom Layout API
To remove picklist values, keep only the required options in your input. Any options not included in the request will automatically move to the unused section.
First, fetch the required layout, section, field, and option IDs using the Get Layouts Metadata API. Then, in your request body, specify only the picklist values you want to retain.
Request URL : {{api-domain}}/crm/v8/settings/layouts/5725767000000091055?module=Leads
Request Method : PATCH
Sample Input
{ "layouts": [ { "id": "5725767000000091055", //layout id "sections": [ { "id": "5725767000000209001", //section id "fields": [ { "id": "5725767000007613005", //field id "pick_list_values": [ { "display_value": "Central", "id": "5725767000007626001" }, { "display_value": "East", "id": "5725767000007613004" } ] } ] } ] } ] } |
Here, Central and East regions remain as active picklist options, and West, North, and South regions are moved to the unused section.
Updated response
Use the Get Fields Metadata API to check the updated response. The Central and East are still active options (type: used), and North, South, and West are inactive options (type: unused)
{ "fields": [ . . . { "field_label": "Select Region", "id": "5725767000007613005", "api_name": "Select_Region", "pick_list_values": [ { "display_value": "-None-", "sequence_number": 1, "reference_value": "-None-", "colour_code": null, "actual_value": "-None-", "id": "5725767000007613013", "type": "used" //default option }, { "display_value": "Central", "sequence_number": 6, "reference_value": "Central", "colour_code": null, "actual_value": "IN_Central", "id": "5725767000007626001", "type": "used" }, { "display_value": "East", "sequence_number": 2, "reference_value": "East", "colour_code": null, "actual_value": "IN_East", "id": "5725767000007613004", "type": "used" }, { "display_value": "North", "sequence_number": 4, "reference_value": "North", "colour_code": null, "actual_value": "IN_North", "id": "5725767000007613008", "type": "unused" }, { "display_value": "South", "sequence_number": 5, "reference_value": "South", "colour_code": null, "actual_value": "IN_South", "id": "5725767000007613010", "type": "unused" }, { "display_value": "West", "sequence_number": 3, "reference_value": "West", "colour_code": null, "actual_value": "IN_West", "id": "5725767000007613006", "type": "unused" } ], "data_type": "picklist" } ] } |
Assigning picklist values using the Insert Records API
When you insert a record, you can directly pass the picklist option’s display value (not the ID) in the request body.
Request URL : {api-domain}/crm/v8/{module_api_name}
Request Method : POST
Sample Input
{ "data": [ { "Company": "Zylker", "Last_Name": "David", "Select_Region": "Central" // Picklist value to assign } ] } |
Note:
- When creating, updating, or upserting records,
- You can either pass an existing picklist value or add a new one, through the API. Please note that the new value will only be stored in that record, and will not be added to the picklist field’s metadata.
- In the UI, you can only select from the available dropdown options.
- Always use the display_value of the picklist option, not the picklist option’s ID.
- You can also assign the default option (-None-). In this case, the picklist field’s value will be stored as null ("Select_Region": null)
Sample Response
{ "data": [ { "code": "SUCCESS", "details": { "Modified_Time": "2025-08-23T04:51:39-07:00", "Modified_By": { "name": "Patricia Boyle", "id": "5725767000000411001" }, "Created_Time": "2025-08-23T04:51:39-07:00", "id": "5725767000007623017", "Created_By": { "name": "Patricia Boyle", "id": "5725767000000411001" } }, "message": "record added", "status": "success" } ] } |
Updating picklist values in existing records using the Update Records API
When updating, you also use the picklist display value in the field.
Request URL : {api-domain}/crm/v8/Leads/5725767000007628002
Request Method : PUT
Sample Input
{ "data": [ { "Select_Region": "West" // New picklist value } ] } |
This will replace the existing picklist value with West.
History tracking for picklists
What is history tracking for picklists in Zoho CRM?
You can enable history tracking for a picklist field using the Create Custom Field API. Once enabled, Zoho CRM automatically creates a related list for the tracked picklist and a separate module.
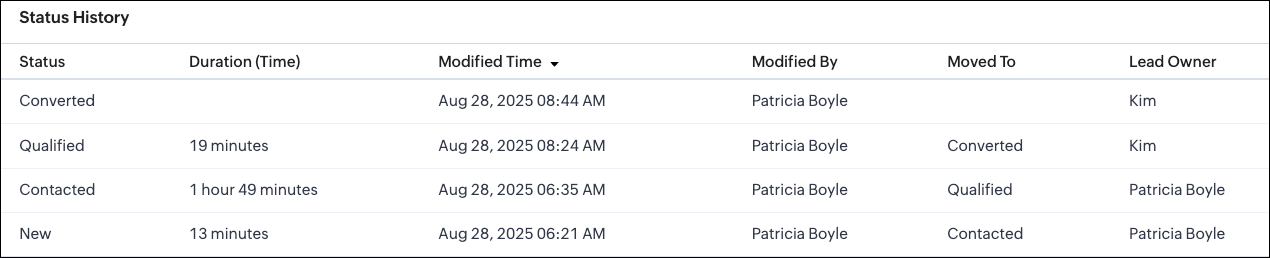
Every time the picklist value changes, Zoho CRM creates a new entry in this related list. Each entry shows the old value, the new value, who made the change, and when it was made, and how long the record stayed in the previous value before moving to the next one.
Use case
Zylker's sales team tracks lead progress through the statuses such as New, Contacted, Qualified, and Converted. The team wants to know how long a lead remains in each status and identify if follow-ups are delayed or leads are not progressing.
You can achieve this by enabling history tracking on the Status picklist. You can also monitor every status change, who made it, and how long the lead stayed in the previous status. This helps the team monitor, identify delays, and improve the follow-up process.
The log stores:
- New Value - updated region in the Moved_To__s key.
- Changed By - user who made the update in the Modified_By key.
- Changed On - date and time when the region was changed in the Last_Activity_Time key.
- Duration - how long the record stayed in the previous value before the change in the Duration_Time and Duration_Days keys.
Enabling history tracking for a picklist using the Create Custom Fields API
Request URL : {{api-domain}}/crm/v8/settings/fields?module=Leads
Request Method : POST
Sample Input
{ "fields": [ { "field_label": "Status", "data_type": "picklist", "pick_list_values": [ { "display_value": "New", "actual_value": "New" }, { "display_value": "Contacted", "actual_value": "Contacted" }, { "display_value": "Qualified", "actual_value": "Qualified" }, { "display_value": "Converted", "actual_value": "Converted" } ], "history_tracking_enabled": true, //(mandatory) Enables history tracking for the picklist "history_tracking": { "related_list_name": "Status History", //Lets you give a custom name to the history related list that CRM creates. "duration_configuration": "time", //Decides how to track the timing of changes: days - History is tracked by days and time - History is tracked by time. Note : Before specifying the time value, enable the duration customization feature in your organization by contacting support@zohocrm.com. "followed_fields": [ // The followed_fields lets you retrieve additional field values whenever the picklist value changes. { "api_name": "Owner" } ] } } ] } |
Sample Response in UI
Sample Response via API
Whenever a picklist option changes, the system creates a new record in the related list module. In this example, Status History is the related list module. The sample response below shows how a particular change looks when retrieved using the Get Records API.
Request URL : {{api-domain}}/crm/v8/Status_History/5725767000007739323
Request Method : GET
Sample Response
{ "data": [ { "Status": "Contacted", "$approval": { "delegate": false, "takeover": false, "approve": false, "reject": false, "resubmit": false }, "Modified_Time": "2025-08-28T06:35:15-07:00", "$currency_symbol": "$", "$field_states": null, "$review_process": null, "$editable": true, "Duration_Time": "6568847", //The system stores the duration in milliseconds. "$sharing_permission": "full_access", "Lead_Owner": { "name": "Patricia Boyle", "id": "5725767000000411001" }, "Moved_To__s": "Qualified", "$orchestration": false, "Last_Activity_Time": "2025-08-28T08:24:44-07:00", "Full_Name": { "name": "Zylker", "id": "5725767000007735001" }, "Modified_By": { "name": "Patricia Boyle", "id": "5725767000000411001", }, "$review": null, "$process_flow": false, "$in_merge": false, "id": "5725767000007739350", "$approval_state": "approved", "$pathfinder": false, "$zia_visions": null } ] } |
Note :
- You can select up to 10 fields in total, with a maximum of 5 user fields for all modules except Deals.
- Encrypted fields cannot be specified.
- In the Deals module,
- History tracking is enabled by default for the Stage picklist field.
- You cannot enable history tracking for any other picklist field in the Deals module.
- You can only update the existing Stage picklist field using the Update Custom Field API.
- You can add up to 6 followed fields, with a maximum of 5 user fields.
We hope this post helps you confidently manage picklists and track their history in Zoho CRM. Try it out, and let us know your experience in the comment section or reach out to us at support@zohocrm.com
Stay tuned for more insights in our upcoming Kaizen posts!
Cheers!

Previous Kaizen : Kaizen# 204 - Answering Your Questions - Perform Field Updates before Blueprint transition via Client Script | Kaizen Directory : Home
Related Links :
Topic Participants
Subramanian K
Sticky Posts
Kaizen #198: Using Client Script for Custom Validation in Blueprint
Nearing 200th Kaizen Post – 1 More to the Big Two-Oh-Oh! Do you have any questions, suggestions, or topics you would like us to cover in future posts? Your insights and suggestions help us shape future content and make this series better for everyone.Kaizen #226: Using ZRC in Client Script
Hello everyone! Welcome to another week of Kaizen. In today's post, lets see what is ZRC (Zoho Request Client) and how we can use ZRC methods in Client Script to get inputs from a Salesperson and update the Lead status with a single button click. In thisKaizen #222 - Client Script Support for Notes Related List
Hello everyone! Welcome to another week of Kaizen. The final Kaizen post of the year 2025 is here! With the new Client Script support for the Notes Related List, you can validate, enrich, and manage notes across modules. In this post, we’ll explore howKaizen #217 - Actions APIs : Tasks
Welcome to another week of Kaizen! In last week's post we discussed Email Notifications APIs which act as the link between your Workflow automations and you. We have discussed how Zylker Cloud Services uses Email Notifications API in their custom dashboard.Kaizen #216 - Actions APIs : Email Notifications
Welcome to another week of Kaizen! For the last three weeks, we have been discussing Zylker's workflows. We successfully updated a dormant workflow, built a new one from the ground up and more. But our work is not finished—these automated processes are
Recent Topics
Zoho email
I cannot send email to mail.ru【参加無料】東京 Zoho ユーザ交流会 NEXUS ー CRMで始めるマーケティング事例 / AI活用法(Zia Agents)
ユーザーの皆さま、こんにちは。コミュニティチームの藤澤です。 3月27日(金)に東京、新橋で東京 Zoho ユーザー交流会 NEXUS を開催します! 昨年度までより、さらにパワーアップして戻ってきました! ユーザー活用事例は、2人のユーザーさんからお話しいただきます。Zoho サービスの活用の幅を広げたい方や、他のユーザーの利用法を気軽に知りたい方など、多くの方にとって学びのあるセッションになること間違いなしです✨ また今年は、これまで以上に、AI機能にも焦点を当てて行く予定です。 初回として、Zoho社員からZohoIssue Exporting Data – CSRF Token Invalid Error
Dear Zoho Team, We are experiencing an issue when exporting data from our Analytics workspace. Whenever we attempt to export data from our analytical pool, the system displays the following alert message: Alert Message: The CSRF token is invalid. It couldDeluge Learning Series – Client functions in Deluge | January 2026
We’re excited to kick-start the first session of the 2026 Deluge Learning Series (DLS) with Client functions in Deluge. For those who are new to DLS, here’s a quick overview of what the series is all about: The Deluge Learning Series takes place on theZoho Mail 505 error I can not send email
Hi, I’m having issues sending emails from my custom domain email address. When I send emails to Outlook addresses, I receive an “Undeliverable 505” error. However, emails send and receive correctly when I use Gmail. This is important for my business,Multiple MFA Methods
With SMS-based MFA methods being discontinued, there is now no way to have mutliple MFA methods. I'd like to add my zoho account on two seperate phones using the Google Authenticator app. In the https://accounts.zoho.com/home#multiTFA/modes you can onlyReuse Standalone Function
I noticed that there's a missing information in documentation to reuse a standalone function and it is because the parameters require an argument. Here is my code and it is working. response = invokeurl [ url: "https://people.zoho.com/api/v3/function/sample/execute"Domain renewals
Need to know how hoe to renew the domainMX shopify problem
hello, i added all MX values in my shopify DNS - it shows those values on the shopify panel + your toolkit. I tried to send some email and it works, however on my gmail it says they cant verify this email. When i try to answer into my domain's email -Best Way to Manage Email Notifications While Running a Strategy Website
I am currently managing a content-based website, and I use Zoho Mail for handling contact forms, user queries, and collaboration emails. One challenge I am facing is organizing incoming emails efficiently, especially when messages come from differentWhat is the maximum email domains ?
I help manage about 20 associations and I'm looking for a way to centralize them in one place. Does Zoho Mail pro or enterprise support 20-30 domains for 3-5 users each?Add to Workdrive filter
I'm trying to create a filter that will upload attachments in emails and the e-mail body to a folder in workdrive. I am able to do one or the other (attachment, or e-mail content), but not both. I first tried it using the "Email (EML) + attachment" option.Forgot my admin Panel Id and password
Sir, I have an account , where a domain mycityestate.in is added for Zoho email , now it is hard for me to manage email because i have forgotten the Email account and password registered with Admin Panel of Zoho. Just need email name which is registeredMCP no longer works with Claude
Anyone else notice Zoho MCP no longer works with Claude? I'm unable to turn this on in the claude chat. When I try to toggle it on, it just does nothing at all. I've tried in incognito, new browsers, etc. - nothing seems to work.Knowledgebase SEO
We have a custom-domain mapped help center that is not restricted via login. I have some questions: a) will a robots.txt file still allow us to control indexing? b) do we have the ability to edit the sitemap? c) do category URLs get indexed by searchProblem with CRM Connection not Refreshing Token
I've setup a connection with Zoom in the CRM. I'm using this connection to automate some registrations, so my team doesn't have to manually create them in both the CRM and Zoom. Connection works great in my function until the token expires. It does not refresh and I have to manually revoke the connection and connect it again. I've chatted with Zoho about this and after emailing me that it couldn't be done I asked for specifics on why and they responded. "The connection is CRM is not a feature toNew Features: Repeat Last Action, Insert Cut/Copied Rows/Columns and Hyperlink
You might have noticed the constant updates to Zoho Sheet of late. Here are 3 more features that have been added to Zoho Sheet recently: F4 - Repeat Last Action Insert Cut/Copied Rows and Columns Insert Hyperlink Here is a screen cast demonstrating each of these features. Read further below to learn more about these new features. F4 - Repeat Last Action: You can now repeat the last action you made on your spreadsheet by using the keyboard shortcut, F4. It is quite handy and helps you get your workNeed help getting my mail on iPhone and Tablet
I need to access my Zoho mail via the iPhone Mail app. I have entered the login name, password and the incoming and outgoing servers, which my Mail Settings page says are imappro.zoho.com and smtppro.zoho.com. The iPhone keeps saying it cannot authenticate.Add an background image to an email template in CRM
Hi all, We wants to put an background image behind all our email templates. Is there a way to import this thru html. If i put the option background image in <body style="background-image:...</body> and i look to the preview it shows our background, butIs there a way to show contact emails in the Account?
I know I can see the emails I have sent and received on a Contact detail view, but I want to be able to see all the emails that have been sent and received between all an Accounts Contacts on the Account Detail view. That way when I see the Account detailHow do I bulk archive my projects in ZOHO projects
Hi, I want to archive 50 Projects in one go. Can you please help me out , How can I do this? Thanks kapilCopy contents of File Upload Field into Workdrive
Hello, I have set up our CRM so that a Workdrive folder is automatically created for each Deal via workflow, this adds the id of the folder into a dedicated field. We also have a field on each Deal called 'Approved Layout', which is a file upload field.Deleting a memorized email address
How can I delete a memorized email address? Even though the address has been deleted from Contacts, Zoho mail still auto suggests the address when typing it into the TO field. Thanks!ZeptoMail API
Hello Since today, we experience issues with the ZeptoMail API. When trying to send e-mails using: https://api.zeptomail.eu/v1.1/email we receive the error: (503) Site unavailable due to a traffic surge. Please try again shortly. I kindly ask you to identify553 Relaying disallowed. Invalid Domain - gzkcompany.ro
Hi there, Can you please assist me in getting the right domain settings? I just renewed my domain subscription, after expired and i got error: 553 Relaying disallowed. Invalid Domain - gzkcompany.ro Zoho mail can receive emails, but its impossible toNot able to receive emails for a while
I am not able to receive emails for a while now.Confirmation requested: eligibility and process to downgrade to Forever Free — tenant bigbanghawking.com
Thank you for your reply. I am testing Zoho Mail from Brazil with the tenant bigbanghawking.com (endpoint: mail.zoho.com) and we are currently on the Premium trial that expires 21/01/2026. Before deciding whether to pay or cancel, I need written confirmationZoho API v2.0 - get ALL users from ALL projects
Hello, I've been trying to work on an automatization project lately and I find it difficult to work with this strict structure. To be more explicit, if i would like to get all users participating in a project i would need to get all projects first. Same thing with projects. If i want to get all projects, I would need to get all portals first. The problem with this aproach is that it consumes a lot of time and resources. I want to ask if there is another way of gettingالموقع لا يقوم بالسداد
السلام عليكم ورحمة الله وبركاته وبعد من أمس وانا احاول السداد للدومين YELLOWLIGHT ولا اتمكن من السداد اقوم بتعبئة جميع البيانات ولكن دون جدوى يطلع لى حدث خطأ ماNew in Office Integrator: Enhanced document navigation with captions and cross references
Hi users, We're pleased to introduce captions, table of tables and figures, and cross-references in the document editor in Zoho Office Integrator. This allows you to structure documents efficiently and simplify document navigation for your readers fromWhere Do I set 24h time format in Cliq?
Where Do I set 24h time format? Thanks🎉 ¡Seguimos trayendo novedades a Español Zoho Community! 🎉 Confirmada la agenda y ubicación para los Workshops Certificados
Si todavía no te has hecho con tu entrada para nuestros Workshops Certificados del próximo 26 y 27 de marzo o, por el contrario, estabas esperando que confirmáramos dónde los celebraremos, ¡este post es para ti! 📍¿Dónde nos vemos?📍 Nuestros WorkshopsUser is already present in another account error in assigning users to marketing automation
Hello everyone Greeting, I had a problem in assigning user in marketing automation, when I try to add it I see this error: (User is already present in another account error) what should I do?How do I get complete email addresses to show?
I opened a free personal Zoho email account and am concerned that when I enter an email address in the "To", "CC", fields, it changes to a simple first name. This might work well for most people however I do need to see the actual email addresses showingWhat's New in Zoho POS - January 2026
Hello everyone, Welcome to Zoho POS’s monthly updates, where we share our latest feature updates, enhancements, events, and more. Let’s take a look at how January went. Sort and resolve conflicts Conflicts are issues that may arise when registers andOutlook is blocking incoming mail
Outlook is blocking all emails sent from the Zoho server. ERROR CODE :550 - 5.7.1 Unfortunately, messages from [136.143.169.51] weren't sent. Please contact your Internet service provider since part of their network is on our block list (S3150). It looksNot receiving email from customers and suppliers
I am getting error . most of the customers tell me not able to send me email please check i have attached screenshotCreate user
Hello I want to create user, but i get this error Unusual activity detected from this IP. Please try again after some time.File emails in Shared email folder
Hi, I am unable to allow users to collaborate in Shared email folders: User 1 shares a folder let's say "SharedTopic" with full permissions Users 2 and 3 can see this folder but are unable to add emails to this folder or search in this folder. For example,Consolidated report for multi-organisation
I'm hoping to see this feature to be available but couldn't locate in anywhere in the trial version. Is this supported? The main aim to go to ERP is to have visibility of the multi-organisation in once place. I'm hopeful for this.Next Page