Verify your domain's DNS records
Have you ever wondered why your legitimate emails are landing in the recipient’s spam folder? Or been surprised to see emails sent from your registered domain getting rejected by recipient email servers?
Why does this happen?
In most cases, this happens because your domain’s DNS records are not configured or verified properly with the domain service provider.
What are DNS records?
When you register your domain with a DNS service provider such as GoDaddy, Cloudflare, or BigRock, the DNS records of the email services that you use to send emails must be added and verified to ensure smooth email delivery and proper authentication.
The DNS records include:
MX (Mail Exchange) records: To ensure your emails are delivered to correct email servers (i.e., where incoming emails for your domain should be received).
SPF (Sender Policy Framework) record: To prevent email spoofing by specifying who is allowed to send email on behalf of your domain.
DKIM (Domain Keys Identified Mail) record: To ensure email authenticity and integrity by adding a digital signature, confirming that the email content was not tampered with during transit.
DMARC (Domain-based Message Authentication, Reporting & Conformance): This works together with SPF and DKIM and tells recipient servers what action to take if an email fails authentication (no action, quarantine, or reject).
How to configure DNS records from Zoho Mail Admin Console?
Log in to Zoho Mail Admin Console and navigate to the Domains section.
Select the domain for which you need to add the DNS records.
Click MX under Email Configuration.
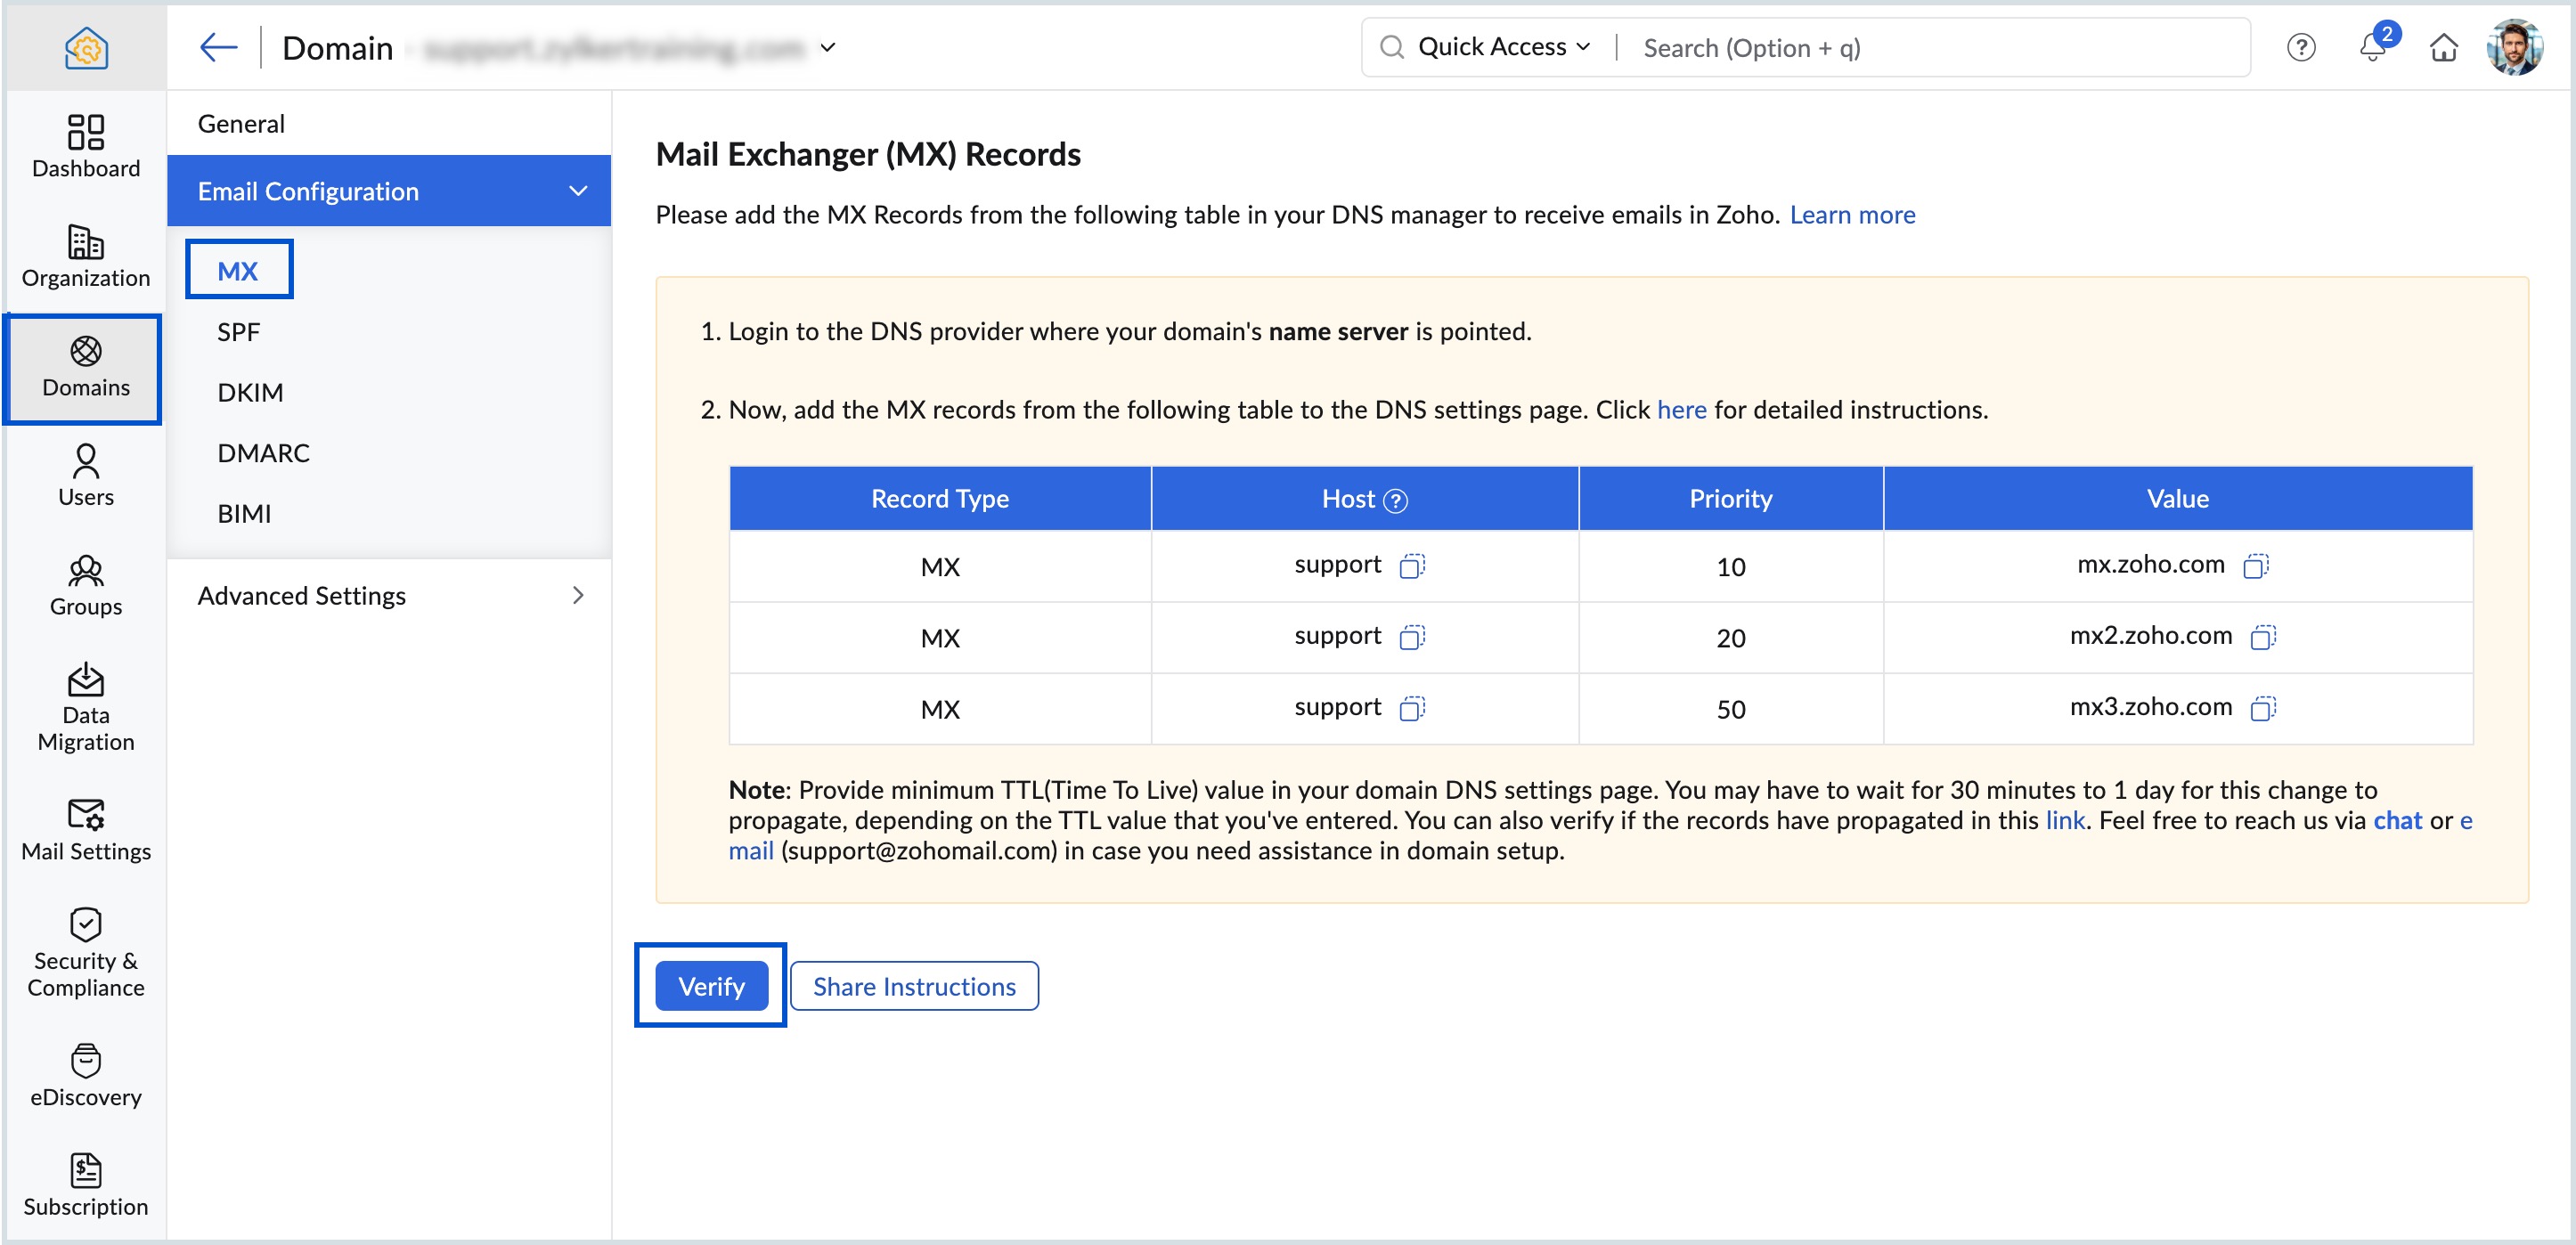
Enter these values in the Manage DNS records section of your domain providers page.
Once the values are propagated, click Verify under Admin Console.
Repeat the same steps to configure SPF records.
Topic Participants
Saranya A
Sticky Posts
Maintain steady traffic to your domain: How Domain Aliasing helps
Consider this scenario: An organization has its primary domain as administrator.com. Now it wants to shorten its domain to admin.com because it's simpler and easier to remember. However, changing the domain completely can cause the following problems:Facing email delivery issues? Verify your domain's DNS records
Have you ever wondered why your legitimate emails are landing in the recipient’s spam folder? Or been surprised to see emails sent from your registered domain getting rejected by recipient email servers? Why does this happen? In most cases, this happensEmail Administrators! Join our tips & troubleshooting series
Greetings to all the admins out there! This announcement is exclusively for you. As we step into the New Year, we’re excited to start a dedicated series of admin-specific tips curated to support you. These posts will help you overcome everyday challengesImportant update! Re-authentication mandated for sensitive admin operations in Admin Console.
Dear Zoho Mail Community, Hope you're all doing good and staying safe! As we strive to provide you with better security for your business email needs, an additional measure has been taken to ensure more security to the sensitive Admin Operations performedImportant announcement: IPv6 support in Inbound gateway
Greetings from Zoho Mail team. We are happy to announce the support of IPv6 support for receiving emails in Zoho Mail. This post mainly addresses the admins who have configured inbound gateway for their organisation. As a part of the changes related to
Recent Topics
Which WhatsApp API works seamlessly with Zoho CRM?
I’m exploring WhatsApp API solutions that integrate seamlessly with Zoho CRM for customer communication, lead nurturing, and automation. I would love to hear insights from those who have successfully implemented WhatsApp within Zoho CRM. My Requirements:Allow people to sign a zoho form by using esign or scanned signature
Allow people to sign a zoho form by using esign or scanned signatureButton to Reapply Filters on Sheet(s)
I wrote a macro that I attached to a button to reapply the filters on all my sheets and it says it works, but it doesn't actually do anything. What is wrong with it? Is there another way? Or even make it work for one sheet? Sub UniversalFilterRefresh()Integrate Multiple ZohoBooks organization with zoho projects
We have successfully connected our Zoho Books with Zoho Projects for synronizing timesheet data. Our Business specialty is, that the staff of the Main company (A) is working on several projects, but the Clients are sometimes contracted and paying to aZoho OAuth Connector Deprecation and Its Impact on Zoho Desk
Hello everyone, Zoho believes in continuously refining its integrations to uphold the highest standards of security, reliability, and compliance. As part of this ongoing improvement, the Zoho OAuth default connector will be deprecated for all Zoho servicesFlexible Partial-Use Coupons (Stored Value Credits)
Subject: Feature Request: Ability for users to apply partial coupon balances per transaction Problem Statement Currently, our coupons are "one-and-done." If a user has a $50 coupon but only spends $30, they either lose the remaining $20 or are forcedUnable to Assign Multiple Categories to a Single Product in Zoho Commerce
Hello Zoho Commerce Support Team, I am facing an issue while assigning categories to products in Zoho Commerce. I want to assign multiple categories to a single product, but in the Item edit page, the Category field allows selecting only one categoryHow do I add todays date to merge field
I don't see any selection of todays date when creating a letter. Surely the date option of printing is standard? JohnTracking Emails sent through Outlook
All of our sales team have their Outlook 365 accounts setup with IMAP integration. We're trying to track their email activity that occurs outside the CRM. I can see the email exchanges between the sales people and the clients in the contact module. ButWhats that
Price?The same Contact associated to multiple Companies - Deals
Hi, I would like to know if there is an option to associate the same contact with multiple companies (two or more) deals, using the same contact details for all. This is because we have contacts who are linked to different companies or branches of thePortals-Adjust Column Sizes
I am trying to adjust the column widths in Portals tabs. Columns that don't need to be wide are wide and longer ones are very short. I thought adding more to the digits box in Edit would widen them, but it doesn't. Anyone know how to adjust these?Add link/button to open approved record from approval list and detail views?
Hi, How do I allow users to click on an approval record and open that submission? For example, userA submits a quotation then userB approves/rejects. They both can see the quotation on "completed task" list & detail views, but there's no way for themrecord submitted from creator and invoice is creating in books , but the workflow of books is not tiggering on create of record in books
record submitted from creator and invoice is creating in books , but the workflow of books is not tiggering on create of record in books headermap = Map(); headermap.put("X-ZOHO-Execute-CustomFunction","true"); response_inv = invokeurl [ url :"https://www.zohoapis.com/books/v3/invoices/fromsalesorder?salesorder_id="Prevent editing of a record after getting approved/rejectedr
Hi, I'd like to block any user from editing a record after it was approved or rejected, how can I do that?Formula Field/Campo de Fórmula
Hello everyone, I have a purchase requisition form in which each department submits a request, and the request is automatically routed to the person responsible for that department. In this form, I have several fields with the following link names: Quantidade1,Formatting Problem | Export to Zoho Sheet View
When I export data to Zoho Sheet View, ID columns are automatically formatted as scientific notation. Reformatting them to text changes the actual ID values. For example, 6557000335603071 becomes 6557000335603070. I have attached screenshots showing thisFeature Request - The Ability to Link A Customer with a Vendor
Hi Finance Suite Team, Many businesses buy and sell products from the same companies or individuals. For example, a car sales business may buy a car from a member of the public, and that member of the public may also buy a new car from us. This makesLong table name (sync from Zoho Creator)
Dears, How can I remove the suffix in parentheses? These tables are synced from Zoho Creator and are treated as system tables, so their names cannot be changed. This issue makes the aggregation formulas look awful.[Free Webinar] Learning Table Series - Streamlining incident management process with Zoho Creator
Hello everyone, We’re excited to invite you to another edition of the Learning Table Series webinar. As you may already know, we've moved to a purpose-based approach in the Learning Table Series this year. Each session now focuses on how a Zoho CreatorUnattended - Silent
How can I hide the tray icon / pop up window during unattended remote access for silent unattended remote access?Importing into Multiselect Picklist
Hi, We just completed a trade show and one of the bits of information we collect is tool style. The application supplied by the show set this up as individual questions. For example, if the customer used Thick Turret and Trumpf style but not Thin Turret,Text snippet
There is a nice feature in Zoho Desk called Text Snippet. It allows you to insert a bit of text anywhere in a reply that you are typing. That would be nice to have that option in Zoho CRM as well when we compose an email. Moderation Update: We agree thatMarketing Tip #18: Make your online store mobile-friendly to improve traffic
Most online shoppers browse on their phones first. If your store is hard to read, slow to load, or tricky to navigate on mobile, they’ll bounce fast. A mobile-friendly store doesn’t just look nice; it improves engagement, reduces drop-offs, and helps[Need help] Form closed. Please contact your form administrator for further assistance.
https://forms.zohopublic.com/cceinfoifly1/form/CCE2025CCEFocusGroupRegistrationForm2025Fall/formperma/s_8XcLETTbFxZ_TAS4r_W6W5UBl8o5oxEnIX35IBKg4 I checked we didn't exceed the usage limit and form availability is enabled, Please help us enable this formZoho People. Updating TabularData
I am trying to update tabular data in the record. I always have the same response. I have checked many times. Section ID is correct. May be something wrong with request structure itself. Can someone help me. Body content type: form urlencoded query paramsAutomatically CC an address using Zoho CRM Email Templates
Hi all - have searched but can't see a definitive answer. We have built multiple email templates in CRM. Every time we send this we want it to CC a particular address (the same address for every email sent) so that it populates the reply back into ourUnable to Send Different Email Templates for Different Documents in Zoho Sign
Hello Zoho Community, I am facing a limitation with Zoho Sign regarding email notifications sent to customers when a document is sent for signing. Currently, whenever I send any template/document for signing, the email notification that goes to the customerReminder needs 0 minute choice
I most use 0 minute reminders. Every other calender service has this choice. If I create an event in my Android calendar with 0 minute reminder it will change to 5 minute. Please ad 0 as a reminder choice, this should be a 5 minute fix. Thanks.Customer ticket creation via Microsoft Teams
Hi all, I'm looking to see if someone could point me in the right direction. I'd love to make it so my customers/ end users can make tickets, see responses and respond within microsoft teams. As Admin and an Agent i've installed the zoho assist app withinIs there a way to update all the start and end dates of tasks of a project after a calendar change?
Hi! Here's my situation. I've built a complete project planning. All its tasks have start dates and due dates. After completing the planning, I've realized that the project calendar was not the right one. So I changed the project calendar. I now haveHow to update task start date when project start date changes?
Hi there, When the start date of a project changes, it's important to update the start dates of the tasks associated with that project to reflect the new timeline. Is there a way to shift the start date of all project tasks when the start date of a projectIssue with Picklist Dropdown Not Opening on Mobile
Hello I am experiencing an issue with picklist values on mobile. While the arrow is visible, the dropdown to scroll through the available values often does not open. This issue occurs sporadically, it has worked occasionally, but it is very rare and quiteusing the client script based on the look up filed i wnat to fetch the record details like service number , service rate
based on selected service look up field iwant to fetch the service serial number in the serice form how i achive using client script also how i get the current date in the date field in the on load of the formZoho Books/Square integration, using 2 Square 'locations' with new Books 'locations'?
Hello! I saw some old threads about this but wasn't sure if there were any updates. Is there a way to integrate the Square locations feature with the Books locations feature? As in, transactions from separate Books locations go to separate Square locationsZoho Commerce - How To Change Blog Published Date and Author
Hi Commerce Team, I'm discussing a project with a client who wants to move from Woo Commerce / Wordpress to Zoho Commerce. They have around 620 blog posts which will need to be migrated. I am now aware of the blog import feature and I have run some tests.Does zoho inventory need Enterprise or Premium subsrciption to make Widgets.
We have Zoho One Enterprise and yet we can't create widgets on inventory.ZMA shows as already connected to Zoho CRM, but integration not working
When I try to connect ZMA with Zoho CRM, it shows as already connected, but the integration doesn’t seem to be working. I’ve attached the screen recording for reference.Automatic Email Alerts for Errors in Zoho Creator Logs
Hello, We would like to request a feature enhancement in Zoho Creator regarding error notifications. Currently, Zoho Creator allows users to view logs and errors for each application by navigating to Zoho Creator > Operations > Logs. However, there isIs there a way to delete workspaces?
I want to remove one of the workspaces in my Campaigns account. I don't see any obvious way to do this. Am I missing something?Next Page