Action Required: Update Microsoft SQL Server Security Settings Before February 2026
Dear Users,
We recently deployed security updates in Zoho Analytics that inadvertently caused connection failures for a few customers using Microsoft (MS) SQL Server hosted on older Windows versions (Windows Server 2012, 2012 R2, and 2014).
To restore connectivity, we have temporarily reverted these updates. However, these security changes are mandatory for long-term protection and compliance, and they will be permanently enforced by the end of February 2026.
If you are using MS SQL Server on the affected Windows versions, action is required to ensure uninterrupted connectivity once the security standards are re-applied.
Who Is Affected
This applies only to customers who:
- Use MS SQL Server as a data source in Zoho Analytics, and
- Host MS SQL Server on:
- Windows Server 2012
- Windows Server 2012 R2
- Windows Server 2014
If you are not using these operating systems, no action is required.
 Note: This update applies only to SQL Server Cloud DB imports.
It does not affect local database imports configured using Zoho Databridge.
Issue Description
When modern security standards are enforced, applications connecting to MS SQL Server hosted on older Operating Systems (Windows Server 2012 / 2012 R2 / 2014) will fail with the following error:

Root Cause
- Upcoming Security Standard:
Modern security protocols require Forward Secrecy. Legacy TLS_RSA cipher suites are being deprecated industry-wide. - OS Limitation:
Older Windows Servers rely on these deprecated ciphers by default. They do not offer modern Elliptic Curve (ECDHE) ciphers unless explicitly configured. - The Impact:
Without the configuration below, your database will reject secure connections once we re-enable the security update.
Required Configuration: Enabling Modern Cipher Suites
To prepare your server, you must add the following modern cipher suites to the TOP of your Windows Server's configuration.
Implementation Methods
You can use one of the following methods.
Option A: GUI Method (Recommended)
Step 1: Download the Tool
Download IIS Crypto (GUI) from Nartac Software.
Note: This is a portable utility and does not require installation.Step 2: Launch the Tool
- Copy IISCrypto.exe to the database server.
- Right-click the executable and select Run as Administrator.
Step 3: Configure TLS Protocols
- Open the Schannel tab.
- Ensure TLS 1.2 is enabled (checked).
- Verify that deprecated protocols (SSL, TLS 1.0, TLS 1.1) remain disabled in accordance with security policy.

Step 4: Prioritize Cipher Suites
- Navigate to the Cipher Suites list in the left-hand panel.
- Identify the following ECDHE cipher suites:
- TLS_ECDHE_RSA_WITH_AES_256_GCM_SHA384
- TLS_ECDHE_RSA_WITH_AES_128_GCM_SHA256
- TLS_ECDHE_RSA_WITH_AES_256_CBC_SHA384_P384
- TLS_ECDHE_RSA_WITH_AES_128_CBC_SHA256_P256
- TLS_ECDHE_RSA_WITH_AES_256_CBC_SHA_P384
- TLS_ECDHE_RSA_WITH_AES_128_CBC_SHA_P256
- Use the Up Arrow control to move these ECDHE cipher suites to the top of the list to ensure they are prioritized during TLS negotiation.
- Ensure that older TLS_RSA_* cipher suites remain enabled only for backward compatibility and are positioned below the ECDHE cipher suites with the lowest priority.
Step 5: Apply Configuration
- Click Apply to save the changes.
Step 6: Reboot
- Restart the Windows Server to ensure the changes take effect.

Option B: Group Policy Method (Native Windows)
Step 1: Open Group Policy Editor
- Press Win + R, type gpedit.msc, and press Enter.
Step 2: Navigate to SSL Configuration Settings
Go to: Computer Configuration→ Administrative Templates→ Network→ SSL Configuration Settings
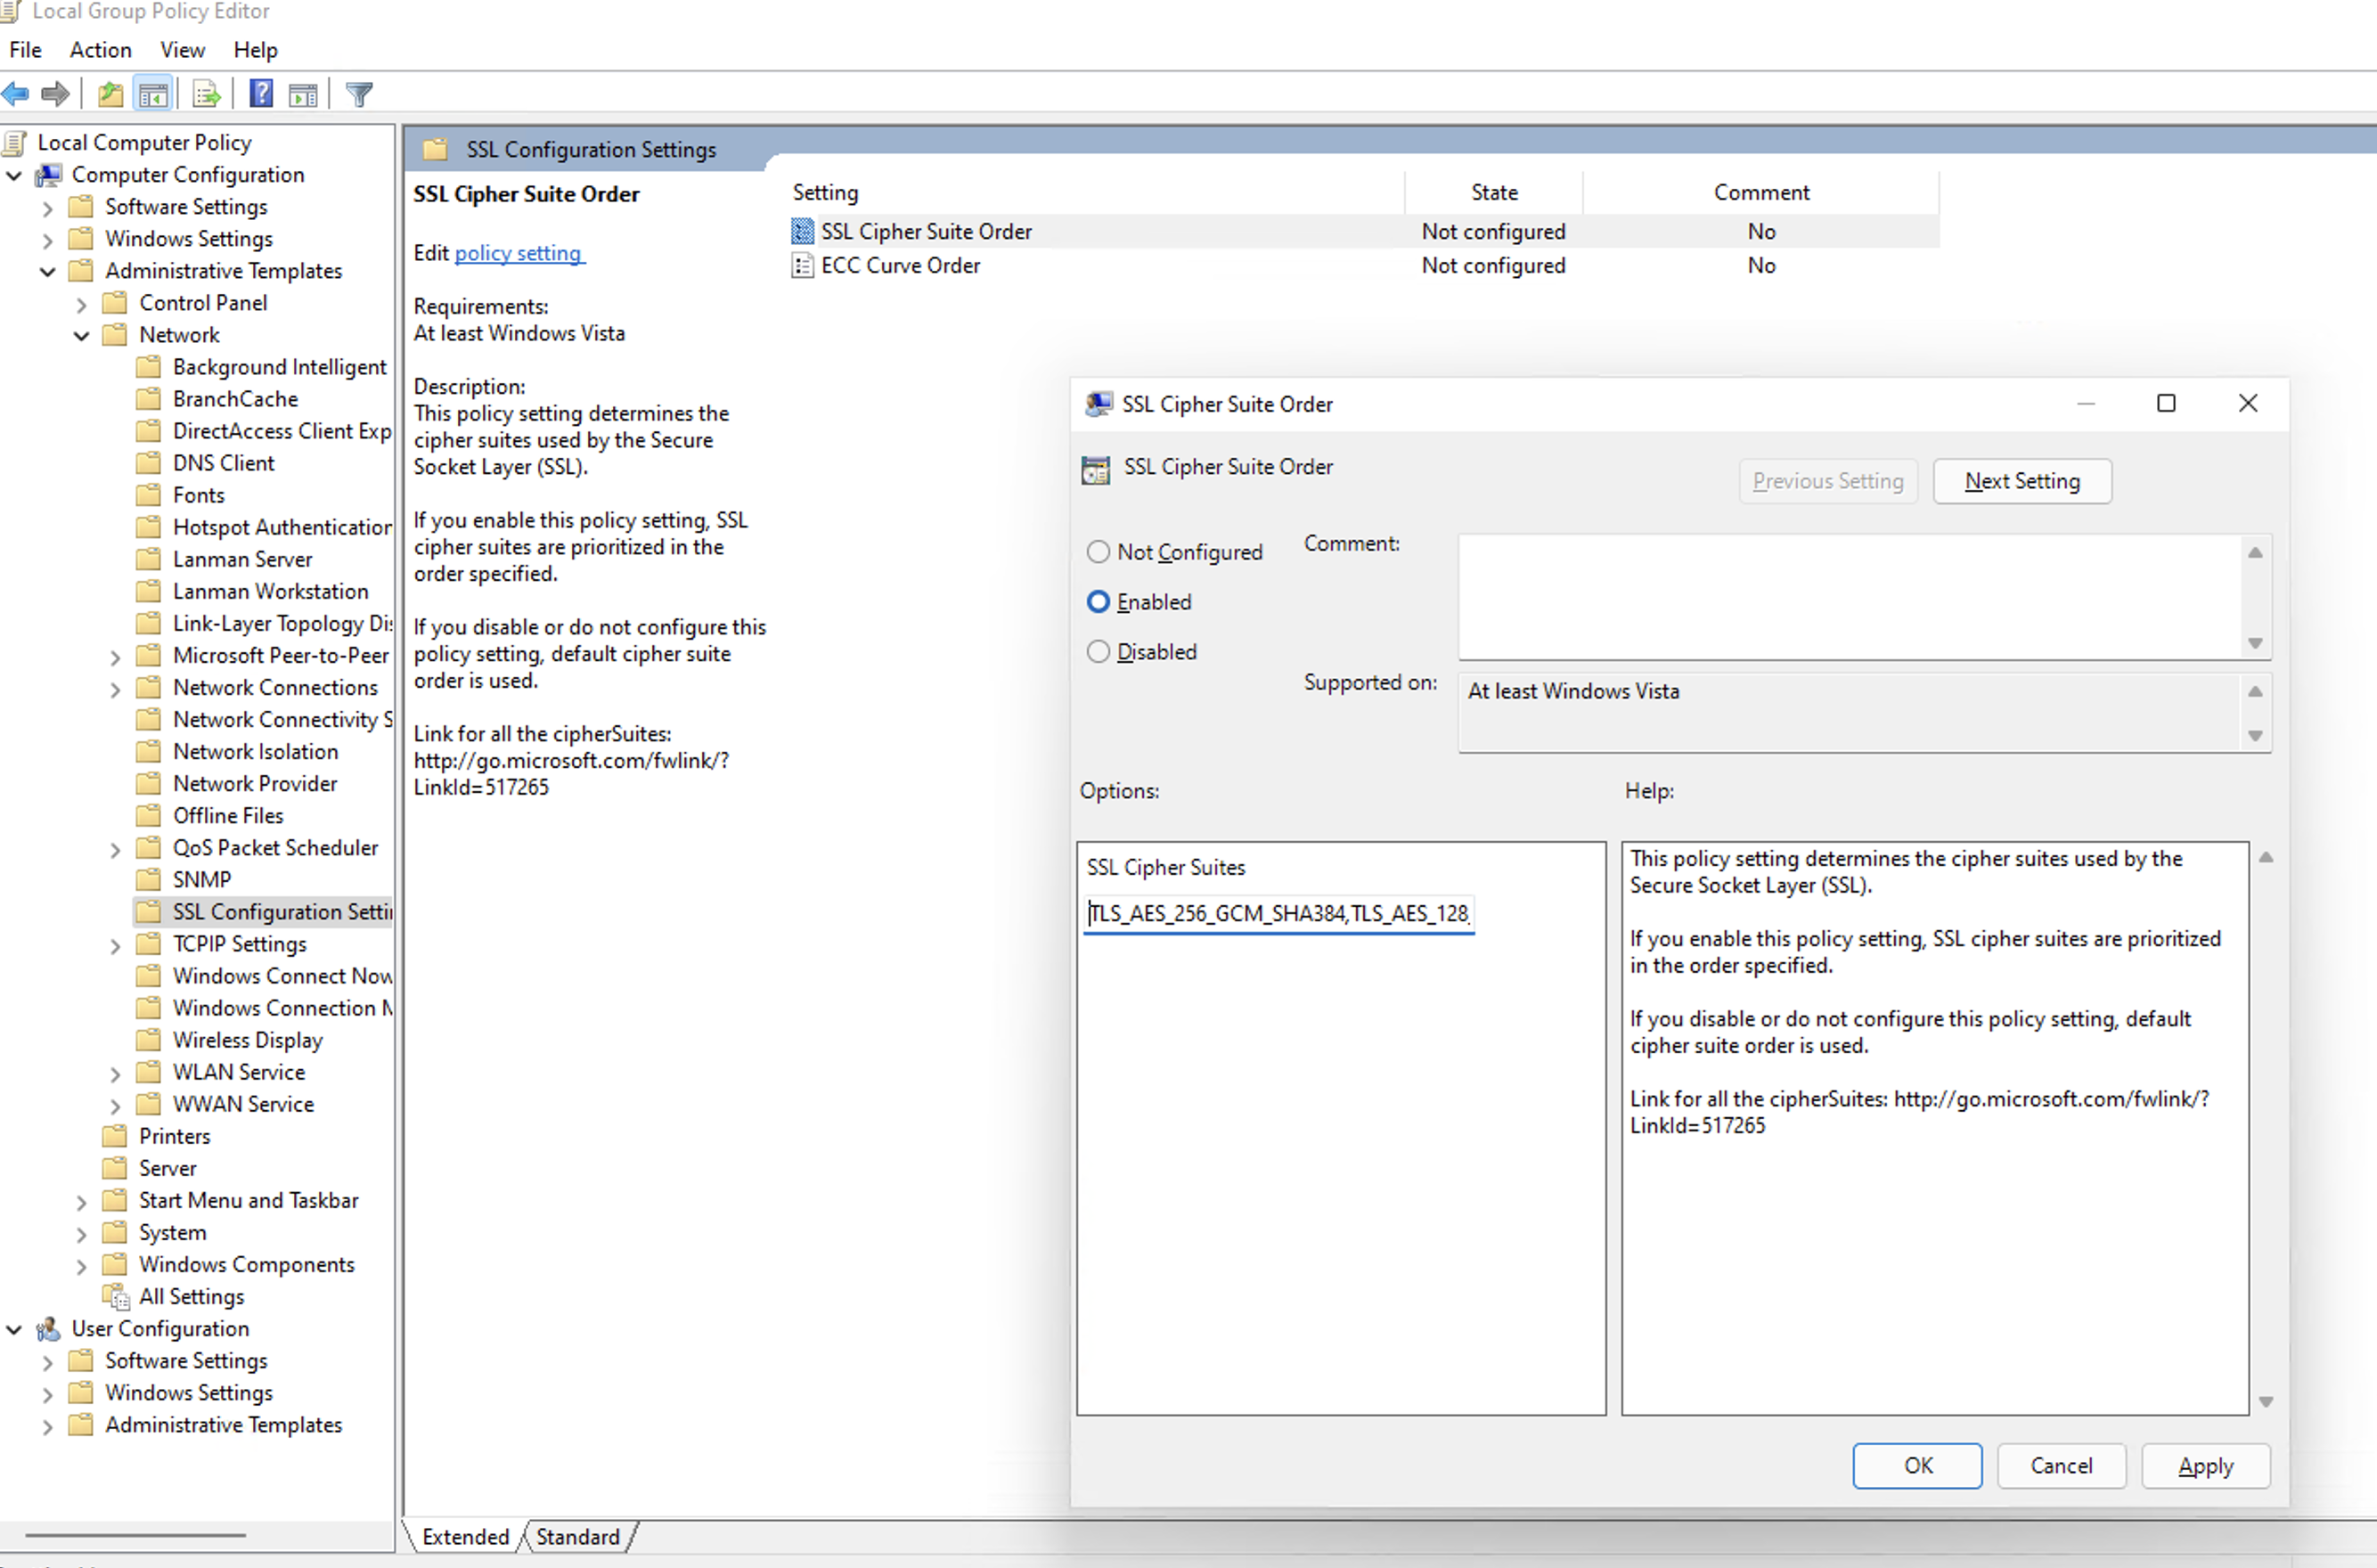
Step 3: Edit Cipher Suite Order
- Double-click SSL Cipher Suite Order.
- Select Enabled.
Step 4: Prepend Secure Cipher Suites (Critical Step)
- Locate the SSL Cipher Suites text box.
- Do not delete the existing cipher list, as this may impact legacy application compatibility.
- Place the cursor at the very beginning (far left) of the text box.
- Paste the following cipher list before the existing entries:
TLS_ECDHE_RSA_WITH_AES_256_GCM_SHA384,TLS_ECDHE_RSA_WITH_AES_128_GCM_SHA256,TLS_ECDHE_RSA_WITH_AES_256_CBC_SHA384_P384,TLS_ECDHE_RSA_WITH_AES_128_CBC_SHA256_P256,TLS_ECDHE_RSA_WITH_AES_256_CBC_SHA_P384,TLS_ECDHE_RSA_WITH_AES_128_CBC_SHA_P256,
- Ensure there is a comma separating the newly added cipher block from the existing cipher list.
Step 5: Apply Configuration
Click OK to save the policy changes.
Step 6: Reboot
Restart the Windows Server for the Group Policy changes to take effect.
Verification: How to Install & Run Nmap
To confirm the server is ready for the future update, use the network scanning tool Nmap.
Step 1: Install Nmap
For Windows Users:
- Download the Latest Stable Installer (.exe) from the Official Nmap Download Page.
- Run the installer.
- Critical Step: During installation, check the box for Install Npcap. This driver is required for the scan to work.
- Finish the installation.
For Linux Users:
- Ubuntu/Debian: Run "sudo apt-get install nmap -y"
- RHEL/CentOS: Run "sudo yum install nmap -y"
Step 2: Run the Scan
Open your Command Prompt (Windows) or Terminal (Linux) and run:
nmap --script ssl-enum-ciphers -p 1433 <YOUR_DB_IP_ADDRESS>(Replace 1433 with your specific SQL port if different).
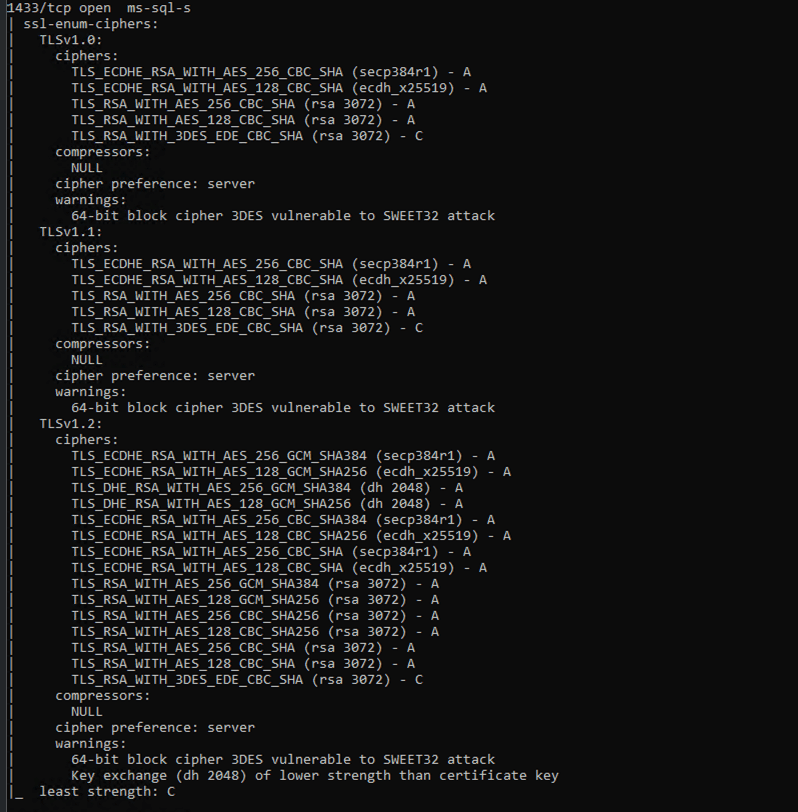
Step 3: Interpret Results
- Look for the TLSv1.2 section in the output. Ensure TLS_ECDHE_... cipher suites appear at the top of the cipher list with Grade A.
- TLS_RSA_... cipher suites must not be removed, but should be kept only as fallback and configured with the lowest priority to avoid regression after re-applying the update.
Example of Successful Output:
What Happens If You Skip This Configuration?
If modern ciphers are not enabled before the security update is permanently enforced:
- Scheduled syncs will fail.
- You won't be able to add or manage existing connections/sources/tables.
Enforcement Timeline
These security standards will be permanently enforced by the end of February 2026.
Servers that do not meet the required cipher configuration will experience connection failures once enforcement begins.
Need Assistance?
If you need help with the configuration, contact us at support@zohoanalytics.com.
To help us resolve your issue faster, include the following details in your email:
- Windows Server version
- SQL Server version
- SQL port number
- Nmap scan output (if available)
- Screenshot of your cipher configuration (if applicable)
Providing this information upfront will help us diagnose and assist you more efficiently.
Topic Participants
Pradeepkumar R
Sticky Posts
What's New in Zoho Analytics - January 2026
Hello Users! We are starting the year with a strong lineup of updates, marking the beginning of many improvements planned to enhance your analytics experience. Explore the latest improvements built to boost performance, simplify analysis, and help youWhat's New in Zoho Analytics - November 2025
We're thrilled to announce a significant update focused on expanding your data connectivity, enhancing visualization capabilities, and delivering a more powerful, intuitive, and performant analytics experience. Here’s a look at what’s new. Explore What'sWhat's New in Zoho Analytics - October 2025
Hello Users! We're are back with a fresh set of updates and enhancements to make data analysis faster and more insightful. Take a quick look at what’s new and see how these updates can power up your reports and dashboards. Explore What's New! ExtremeWhat’s New in Zoho Analytics – September 2025
Hello Users!! In this month’s update, we’re raising the bar across multiple touchpoints, from how you bring in data, plan and track projects to how you design and brand your dashboards. We’ve added the all-new Gantt chart for project visualization, expandedAnnouncing Agentic AI - Ask Zia!
We are delighted to roll out the new agentic AI capabilities in Ask Zia, where every stage of the BI workflow is assisted by AI. With a human-in-the-loop approach, Ask Zia ensures that you’re in command of the decision, while AI handles the complexity.
Recent Topics
Auto tagging
Some of the articles I enter into Notebook get there when I enter them in Raindrop.io and IFTTT copies the articles in Notebook. When this happens the notes are tagged but instead of useful one word tags with topic the tag pertains to the specific articleHow do I save audio files to my PC that I record into Zoho Notebook from my phone?
I was thinking of using Zoho Notebook as a way to store composition ideas, as well as for other things if it can handle this. For this to be useful for me though, I need to be able to have an easy way to download those audio files to my PC, either individuallySearch mails in shared mailbox
Hi everyone, is there a way to search mails in shared mailbox's? Search in streams or mail doesn't return anything from mails in shared mailboxes. Thanks! RafalKaizen #186 : Client Script Support for Subforms
Hello everyone! Welcome back to another exciting Kaizen post on Client Script! In this edition, we’re taking a closer look at Client Script Support for Subforms with the help of the following scenario. " Zylker, a manufacturing company, uses the "Orders"Writing SQL Queries - After Comma Auto Suggesting Column
When writing SQL Queries, does anyone else get super annoyed that after you type a comma and try to return to a new line it is automatically suggest a new column, so hitting return just inputs this suggested column instead of going to a new line? AnyoneIntroducing Multiple Sandbox Types and Support for Module's Data Population
Register here for the upcoming Focus Group webinar on Multiple Sandbox | Help documentation to learn more about the new enhancements Hello everyone, Sandbox in CRM is a testing environment for users to create and test new configurations like workflowConvert invoice from zoho to xml with all details
How to convert an Invoice to XML format with all detailsImporting into the 'file upload' field
Can you import attachments into the file upload field. I would expect it to work the same way as attachments do, But can't seem to get it to work.Sync your Products Module for better context.
In customer support, context is everything. The integration between Zoho Desk and Zoho CRM helps your sales and support teams function as one, delivering better customer experiences. With the latest update to this integration, you can now sync the Product module in your Zoho CRM with your Zoho Desk portal. This feature enables products from Zoho CRM to reflect in the "product" field in Zoho Desk. This can save your support team valuable time and effort. Some things to note when syncing the two:Where is the desktop app for Zoho Projects???
As a project manager, I need a desktop app for the projects I manage. Yes, there's the web app, which is AWESOME for cross browser and platform compatibility... but I need a real desktop app for Projects that allow me to enter offline information whereCRM verify details pop-up
Was there a UI change recently that involves the Verify Details pop-up when changing the Stage of a Deal to certain things? I can't for the life of me find a workflow or function, blueprint, validation rule, layout rule ect that would randomly make itDoes Zoho Writer have Dropdowns
I want to add a drop down field in Zoho writer. Is this possible?Optimum CRM setup for new B2B business
Can some advise the most common way to setup Zoho CRM to handle sales for a B2B company? Specifically in how to handle inbound/outbound emails. I have spent hours researching online and can't seem to find an accepted approach, or even a tutorial. I haveMultiple header in the quote table???
Hello, Is it possible in Zoho CRM to add multiple headers or sections within the Quote product table, so that when the quote is printed it shows separate sections (for example “Products” and “Services”)? To clarify, I’m asking because: This does not appearopenUrl in blueprints
My customer wants to open a URL at the end of a blueprint transition. Seems this isn't possible right now but it would be very useful. In this thread, https://help.zoho.com/portal/en/community/topic/openurl-not-working the Zoho agent said that it's logicallyDropshipping Address - Does Not Show on Invoice Correctly
When a dropshipping address is used for a customer, the correct ship-to address does not seem to show on the Invoice. It shows correctly on the Sales Order, Shipment Order, and Package, just not the Invoice. This is a problem, because the company beingPrepayment of a sales order
How does everyone handle this common (at least it is common for us!) situation? We require all our orders to be fully prepaid before shipment since we manufacture made to order, custom products. Since ZOHO does not allow a sales order to be prepaid, we are forced to create an invoice at the time an order is placed to allow the customer to pay it. Our sales category is therefore skewed, since the sale was actually booked at the time an order was placed, rather then at the time it is shipped, whichAccess to Specific Zoho Desk layout for external parties
Hi, We have a partner who handles for us sales requests from specific markets. He is not a Zoho Desk user. But we want him to b part of a specific Zoho Desk layout to handle inquiries. How to achieve it in the easiest way possible?Deposit on a Sales Order
Good day, 100% of my business is preorders, no inventory. I am trying to run away from QB for one of my businesses, but I require two options that I don't seem to find with Zoho Books. 1 - If there is a way to apply a deposit on a sales order, as withHow Does Knowledge Base Search and Article Recommendation Work?
Hello, I would like to understand how the Knowledge Base search engine works. Specifically, does it search based on: The article title only? The full article content? Both, the article and the content? Keywords? Tags? Also, how does the system determinevalidation rules doesn't work in Blueprint when it is validated using function?
I have tried to create a validation rule in the deal module. it works if I try to create a deal manually or if I try to update the empty field inside a deal. but when I try to update the field via the blueprint mandatory field, it seems the validationBulk Delete Attachments
Is there a way to bulk delete attachments on the form entries? our storage is full and deleting files one by one is pain taking process.How do I sync multiple Google calendars?
I'm brand new to Zoho and I figured out how to sync my business Google calendar but I would also like to sync my personal Google calendar. How can I do this so that, at the very least, when I have personal engagements like doctor's appointments, I canAbility to Disable System Banner Messages in Chat Flow Control
Dear Zoho SalesIQ Team, Greetings, We would like to request an enhancement related to the system banner messages in Zoho SalesIQ chat flow control. Current Behavior: SalesIQ allows configuring various automatic banner/system messages such as: WaitingHow do you do ticket add ons in Backstage?
Hi Everyone, If you wanted to have general admin tickets and allow for add ons, like camping, or car or Carbon offset. What would you do? Peace RobinIdle Chat Reminders for Agent-Handled Conversations
Dear Zoho SalesIQ Team, Greetings, We would like to request an enhancement to the Idle Chat Handling functionality in Zoho SalesIQ—specifically for chats that are handled by human agents after a bot-to-agent transfer. Current Behavior: In Zobot settings,Layout Adjustment.
Hello Latha, Hope you are doing well. I wanted to check with you about adjusting the layout columns in the Service Report from the backend, as currently there is no capability for us to customize the layout from our end. Below is the output that I amSnapchat
Are there any plans to add Snapchat to Zoho Social or is there any API that we can use to integrate into Zoho.Admin asked me for Backend Details when I wanted to verify my ZeptoMail Account
Please provide the backend details where you will be adding the SMTP/API information of ZeptoMail Who knows what this means?Zoho Sign "An unexpected error occured" when clients trying to sign documents
We are unable to have clients sign our documents. When attempting to complete the process an error appears saying "an unexpected error occured" and in the document history just shows "signing failure." We are at a complete standstill with no response¡Vuelven los Workshops Certificados de Zoho a España!
¡Hola usuarios de Español Zoho Community! Hace ya unos días que hemos dado la bienvenida al 2026, y promete ser un año de lo más emocionante. Y es que nos gustaría haceros nuestro particular regalo de Reyes, aunque lleguemos un poco tarde. 🎁 ¡Nos gustaríaCancel Subscription
Hi , Im want to cancel my account but without success please help me to do itDeprecation Notice: OpenAI Assistants API will be shut down on August 26, 2026
I recieved this email from openAI what does it means for us that are using the integration and what should we do? Earlier this year, we shared our plan to deprecate the Assistants API once the Responses API reached feature parity. With the launch of Conversations,How to list services on quote instead of products
I need to create a customer facing estimate that displays our services. The default quote layout only allows products to be listed. Is there a way to correct this?Making an email campaign into a Template
I used a Zoho Campaign Template to create an email. Now I want to use this email and make it a new template, but this seems to be not possible. Am I missing something?Syncing calendar with Google Calendar doesn't work when events are sent to auto repeat
Hi... The ZOHO CRM -- GOOGLE CALENDAR sync is broken. If I create a single event on either side, sync works, but if I create an event with auto repeat on either side it doesn't work. Furthermore, events created before the sync don't show up in the calendar.Invoice status on write-off is "Paid" - how do I change this to "Written off"
HI guys, I want to write off a couple of outstanding invoices, but when I do this, the status of the invoices shows as "Paid". Clearly this is not the case and I need to be able to see that they are written off in the customer's history. Is there a wayZoho Books - France
L’équipe de Zoho France reçoit régulièrement des questions sur la conformité de ses applications de finances (Zoho Books/ Zoho Invoice) pour le marché français. Voici quelques points pour clarifier la question : Zoho Books est un logiciel de comptabilitéCRM gets location smart with the all new Map View: visualize records, locate records within any radius, and more
Hello all, We've introduced a new way to work with location data in Zoho CRM: the Map View. Instead of scrolling through endless lists, your records now appear as pins on a map. Built on top of the all-new address field and powered by Mappls (MapMyIndia),Creating meetings from an email
Hi. Similar to Outlook, it would be helpful if a meeting can be scheduled from an email so that the attendees need not be manually entered every time it's created.Next Page