Bidirectional sync between Zoho Bookings and Zoho CRM - Part 1
Hey, community members!
The default integration between Zoho CRM and Zoho Bookings is unidirectional, which means that any appointments booked, rescheduled, or deleted in Zoho Bookings will be reflected in Zoho CRM. However, any modifications made to events in Zoho CRM that originated from Zoho Bookings will not be reflected back in Zoho Bookings. Hence, as we're announcing in this community post, we've made the sync bidirectional.
This community post will cover the process of configuring appointment bookings from Zoho CRM in Zoho Bookings, as well as managing appointment statuses such as Canceled, No Show and Completed. We have addressed the rescheduling action in a separate post. To view it, please click on the following link: Reschedule Action
This community post will be beneficial for active Zoho CRM users who handle all their meetings within Zoho CRM. Additionally, you can use this community post as a reference to explore various automation possibilities tailored to your business requirements. For instance, with this post's guidance, when you update a booking's status field to "Completed" in Zoho CRM, it will automatically sync with Zoho Bookings and trigger an automated "Mark as completed" email to customers. This enhancement will improve your Zoho Bookings and Zoho CRM synchronization experience, making appointment management easier.
Prerequisites of bidirectional sync:
- Zoho Bookings Premium subscription
- Zoho CRM paid subscription
- Enable Zoho CRM integration within Zoho Bookings
The purpose of enabling the Zoho CRM integration within Zoho Bookings is to transfer booking details from Zoho Bookings to Zoho CRM. In this configuration, the mandatory field is the Booking ID, which is passed from Zoho Bookings to Zoho CRM through the integration. Whenever an appointment is booked, customer details will be sent to the designated CRM module, and a corresponding record will be created in the Meetings module within Zoho CRM, which will help in automating the workflow.
Here's the complete demo video that covers all the configurations discussed in the community post below:
Timestamps for your reference:
0:35 - Purpose of this community post
Here's the complete demo video that covers all the configurations discussed in the community post below:
Timestamps for your reference:
0:35 - Purpose of this community post
1:26 - Zoho CRM plugin installation
4:43 - Custom field creation
7:20 - Function creation
9:22 - Connection creation
10:24 - Configuring arguments
11:06 - Workflow creation
13:33 - Argument mapping
14:41 - Output verification
17:41 - Conclusion
How we're approaching this bidirectional sync
1. Booking an appointment from Zoho CRM
Install the Zoho Bookings for Zoho CRM plugin within your Zoho CRM application. This plugin enables the creation of a "New Appointment" button within the Zoho CRM Leads and Contacts module, which enables you to select the desired booking page you wish to open. You can choose from various workspace, service, or staff booking pages. After configuration, you can initiate the process of scheduling bookings directly from within your Zoho CRM account.
- Guide on Zoho Bookings and Zoho CRM plugin installation: Booking page selection for Zoho CRM plugin
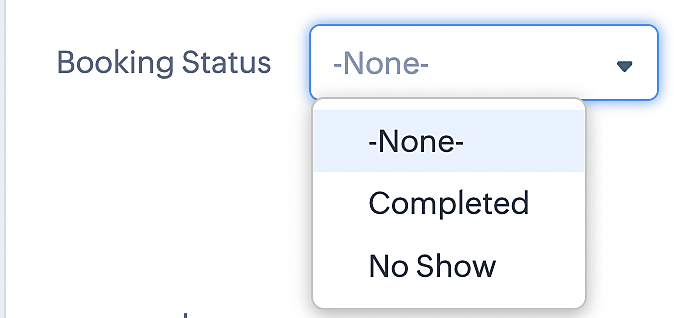
2. Booking status: Completed or No Show
To update a booking's status (Completed or No Show), we've added a new picklist properties field named "Booking Status" in the Meetings module and configured it with two options: "completed" and "no show". Depending on the booking status chosen, the corresponding booking in Zoho Bookings will be updated.
- Details on how to add a custom field to the Meetings module : Customizing modules
- Here's a video that demonstrates how to add a field to a module in Zoho CRM: Adding fields
Reference:
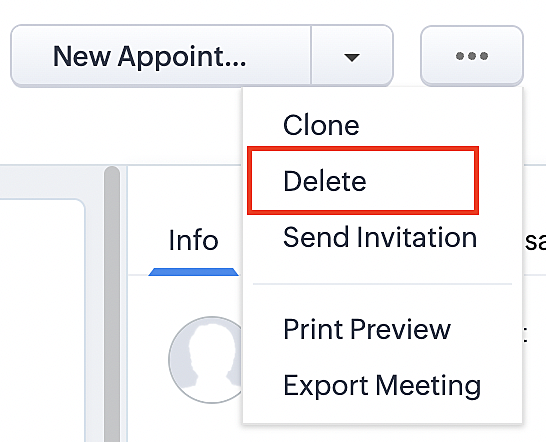
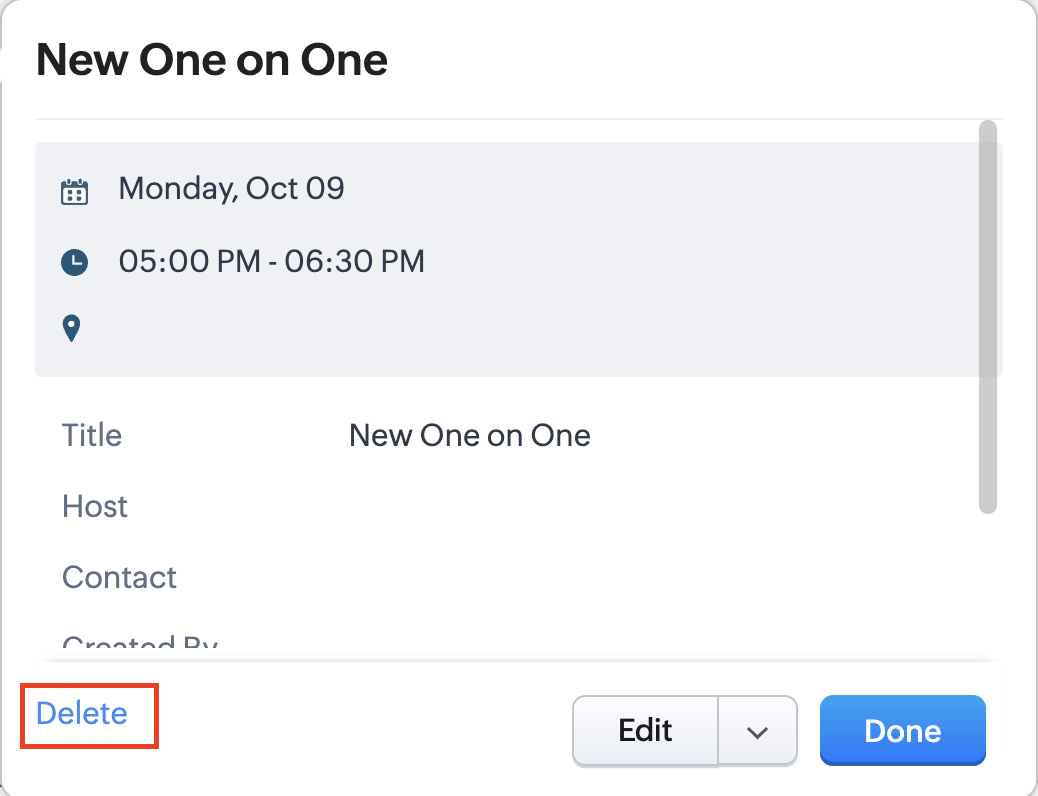
3. Booking status: Canceled
Whenever a meeting is deleted from the Meetings module, the corresponding booking in the Zoho Bookings app will also be canceled automatically. The meeting can be deleted either from the Meetings module or directly from the calendar.
To enable bidirectional sync between Zoho CRM and Zoho Bookings
Complete these steps in Zoho CRM.
Step 1: Creating connections
You first need to establish a connection between Zoho CRM and Zoho Bookings. Zoho Bookings is listed as one of the default connections in Zoho CRM, making it simple to set up. Select the Zoho Bookings connection, define the connection name and scope, and you'll be all set. This connection will enable you to link both applications and facilitate the seamless transfer of data.
Read here for more details on how to create connection in Zoho CRM: Connections
Step 2: Creating functions
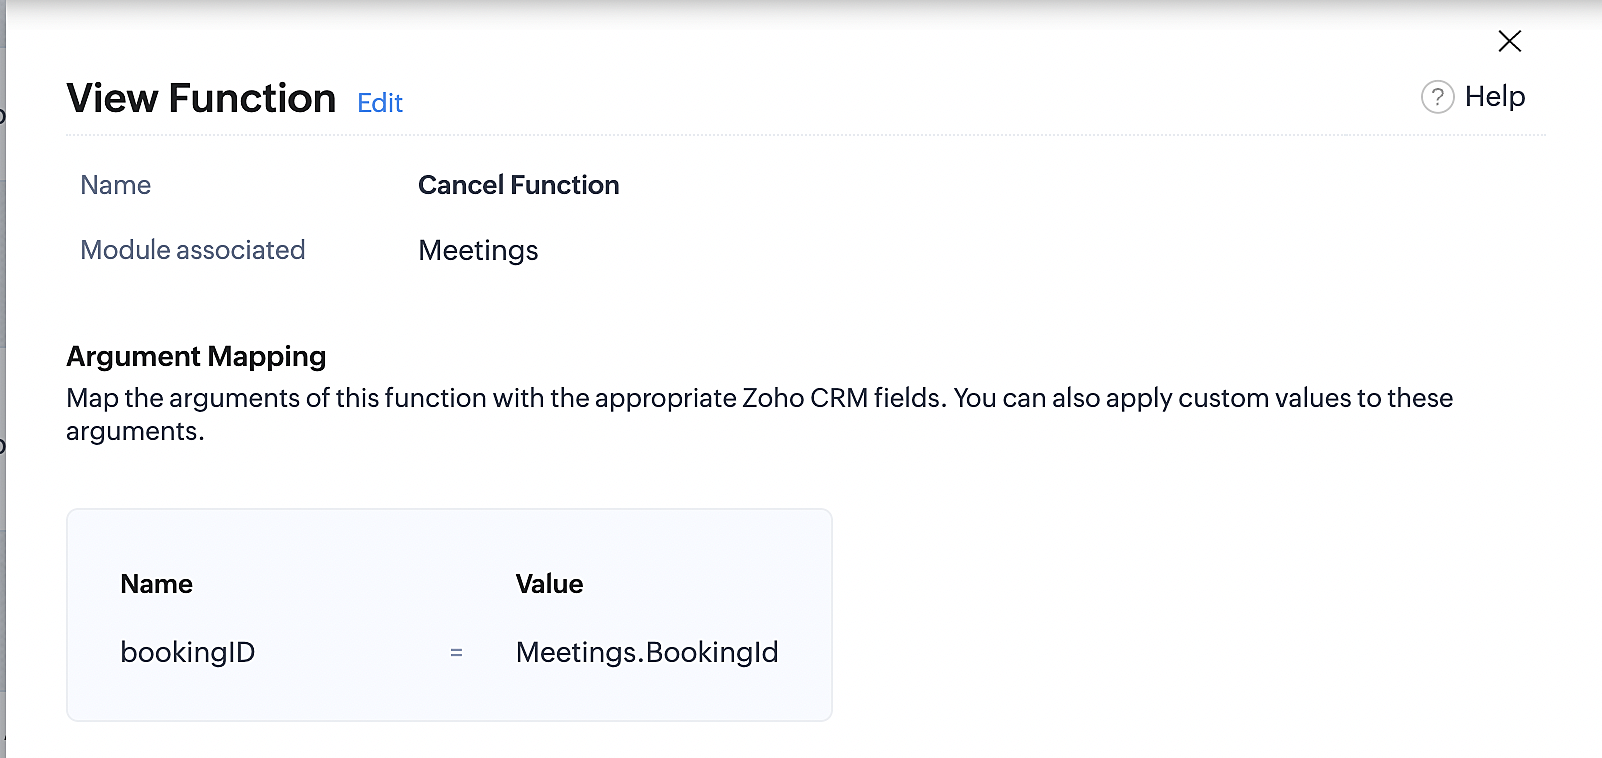
In this context, we'll be creating three functions: one for marking appointments as completed, another for canceling appointments, a third for marking appointments as no shows, and a fourth for rescheduling appointments. For each function, we must also configure arguments, which pass values or data into a function when making a call. Here, we'll pass the booking ID to the function as an argument to update the necessary booking status.
i. To create a function for marking appointments as completed:
1. Go to Setup > Developer Space > Functions.
2. In the Functions page, click + Create New Function.

3. Configure the function name, display name, and description.
4. Set the category as automation.
This opens the Deluge script page.
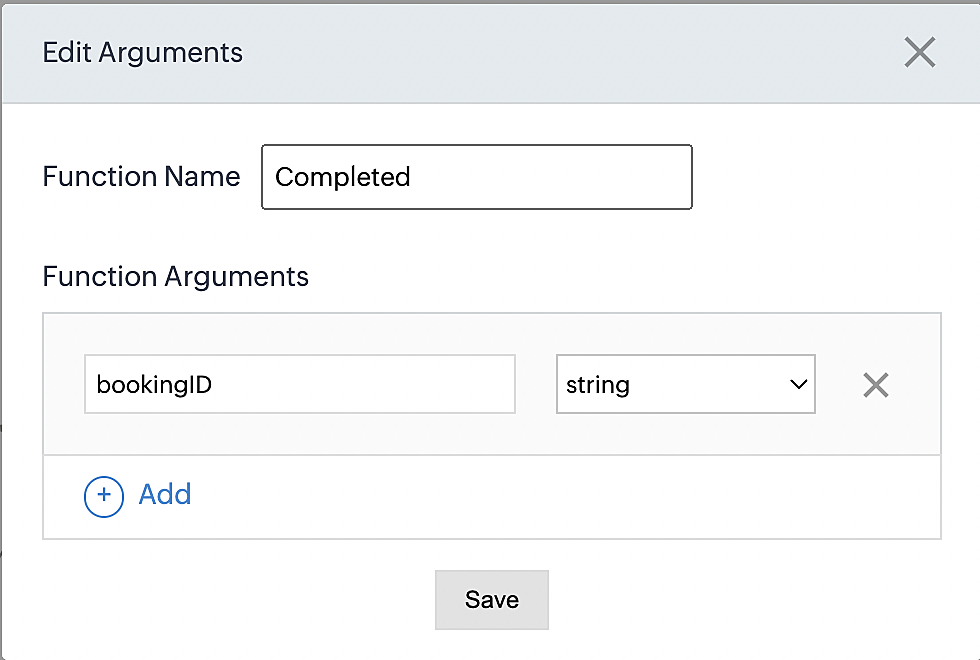
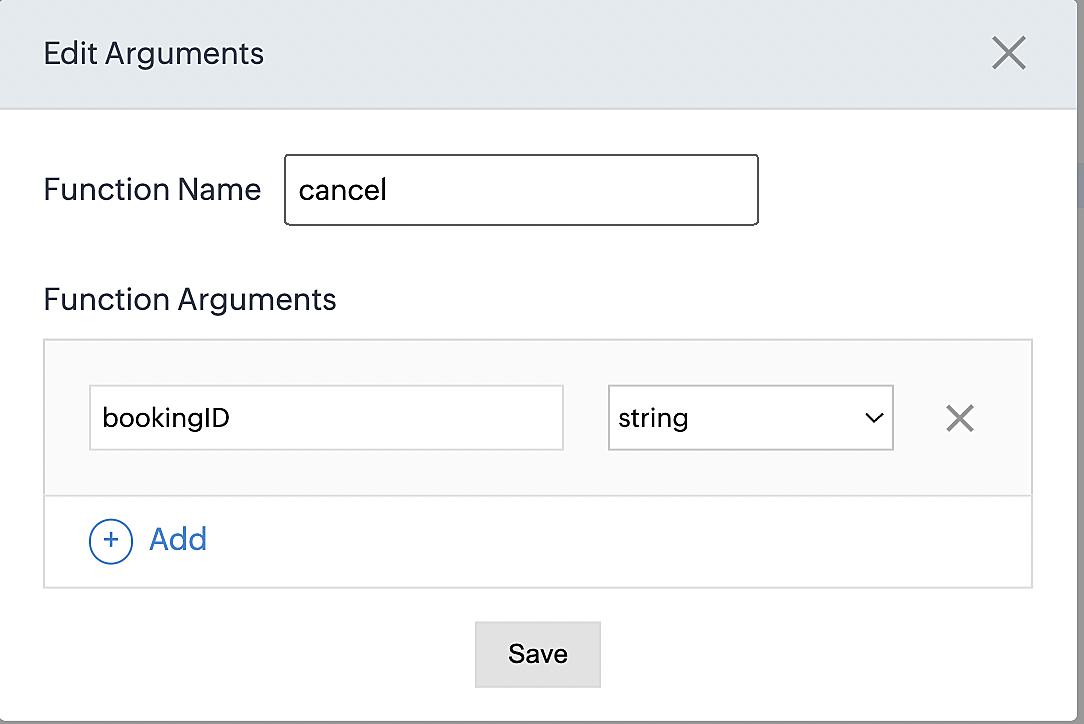
5. Next, configure the function's arguments:
A. Click on Edit Arguments on the Deluge script page.

B. Set the Parameter Name as bookingID. (Please note that the "bookingID" value is case sensitive and must match
the term used in the code).
C. Set the type as string.
Reference:
Please configure the below code in the Deluge script page.
By completing these steps, we've configured a function that will mark appointments as completed.
ii. To create a function for marking appointments as no shows
1. Go to Setup > Developer Space > Functions.
2. In the Functions page, click + Create New Function.

3. Configure the function name, display name, and description.
4. Set the category as automation.
This opens the Deluge script page.
5. Next, configure the function's arguments:
A. Click on Edit Arguments on the Deluge script page.

B. Set the Parameter Name as bookingID. (Please note that the "bookingID" value is case sensitive and must match
the term used in the code).
C. Set the type as string.
Reference:

Please configure the below code on the Deluge script page.
Code link: No show

By completing these steps, we've configured a function that marks appointments as no shows.
iii. To create a function for marking appointments as canceled
1. Go to Setup > Developer Space > Functions.
2. In the Functions page, click + Create New Function.

3. Configure the function name, display name, and description.
4. Set the category as automation.
This opens the Deluge script page.
5. Next, configure the function's arguments:
A. Click on Edit Arguments on the Deluge script page.

B. Set the Parameter Name as bookingID. (Please note that the "bookingID" value is case sensitive and must match
the term used in the code).
C. Set the type as string.
Reference
Please configure the below code on the Deluge script page.
By completing these steps, we've configured a function that marks appointments as canceled.
Code explanation
Below is an explanation of the code that covers all the configurations present in the three functions mentioned above (cancel, mark as completed, and mark as no show).
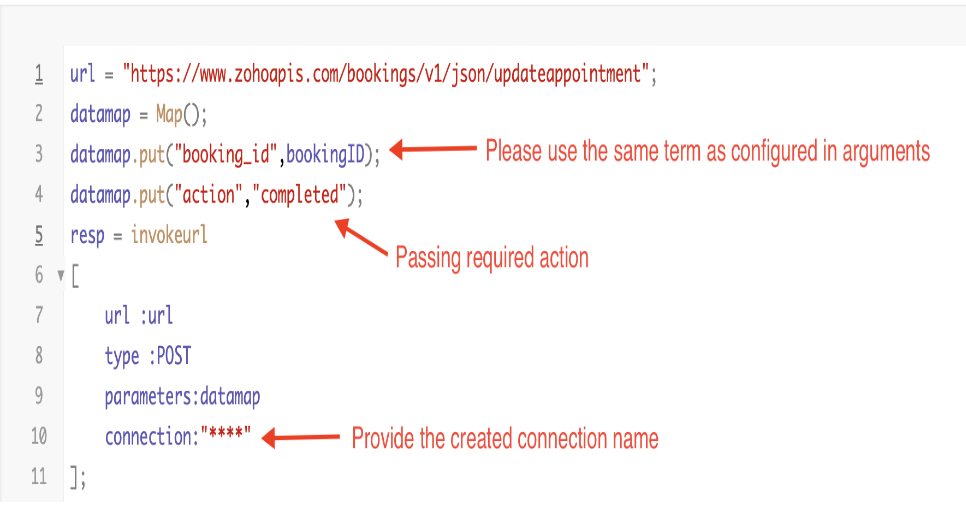
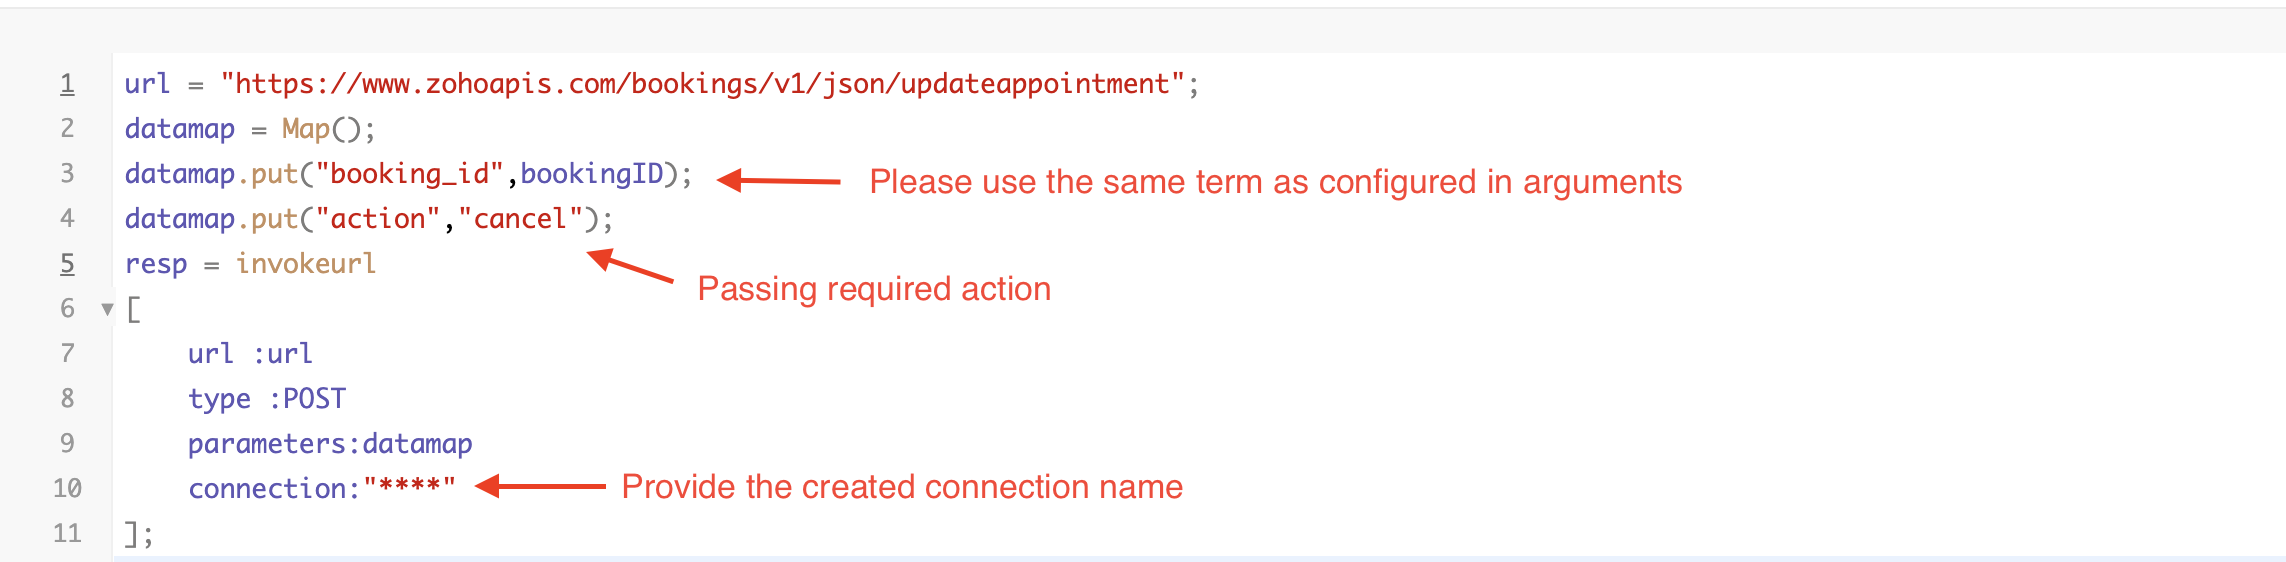
Line 1: Based on the Zoho Bookings account's data center, we're setting up the API endpoint URL configuration.
Lines 2 - 4: To update appointments, we utilize the Zoho Bookings API. Within the update appointment API, there are two mandatory fields that need to be included: BookingID and action (completed/cancel/noshow).
Lines 5 - 10: We use the invokeURL task for API calls. To learn more about the invokeURL task, please refer to the following document: InvokeURL task for API calls
Now, let's proceed and learn about the process of creating a workflow and linking the established functions to it. This will enable us to automate the entire appointment status updating process.
Step 3: Creating a workflow
Workflow rules are sets of actions (email notifications, tasks and field updates) that are executed when specified conditions are met. Here, we'll generate workflow rules for each action to activate the respective function, thereby automating the appointment status updating process.
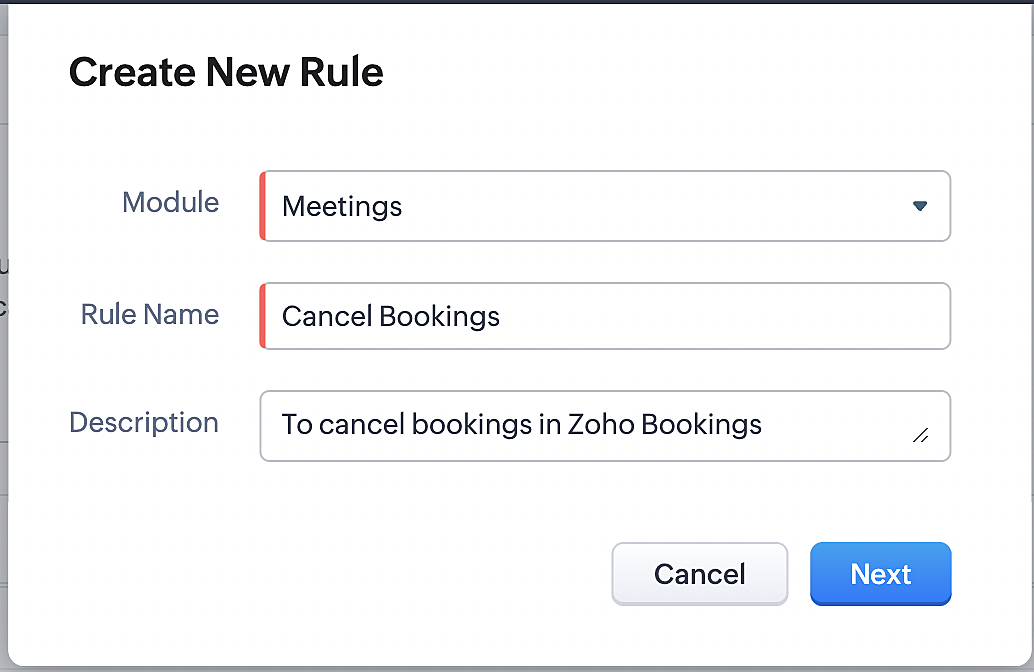
i. Creating a workflow for "canceling" appointments in Zoho Bookings when a meeting is deleted in Zoho CRM
Part 1: Creating the rule
1. Go to Setup > Automation > Workflow Rules.
2. In the Workflow Rules page, click Create Rule.

3. Select "Meetings" under Module and configure rule name and description as required.
More details: Create Rule
Reference:
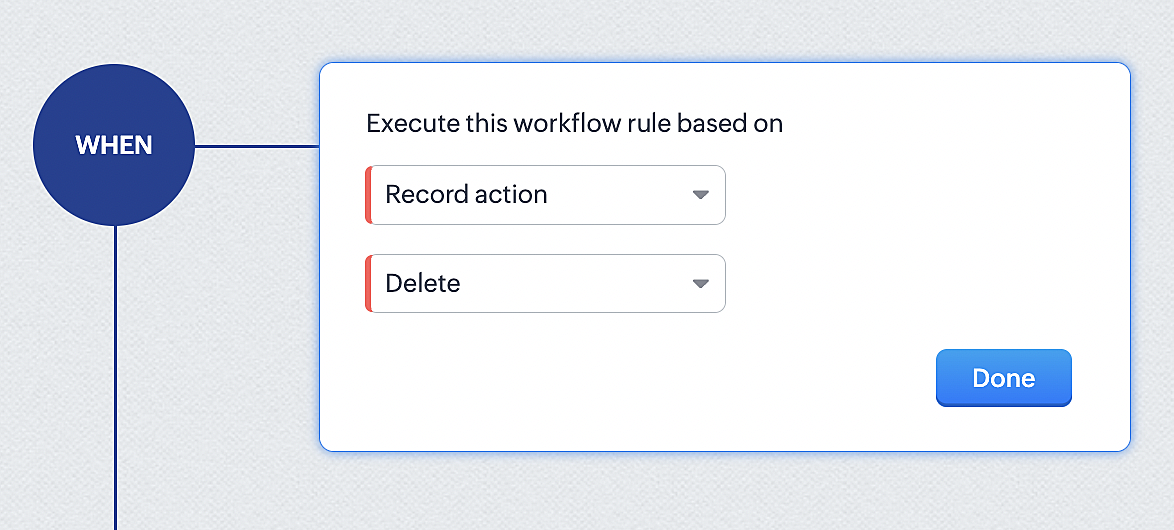
1. Select Record Action > Delete > Done to execute the rule when meetings are deleted.
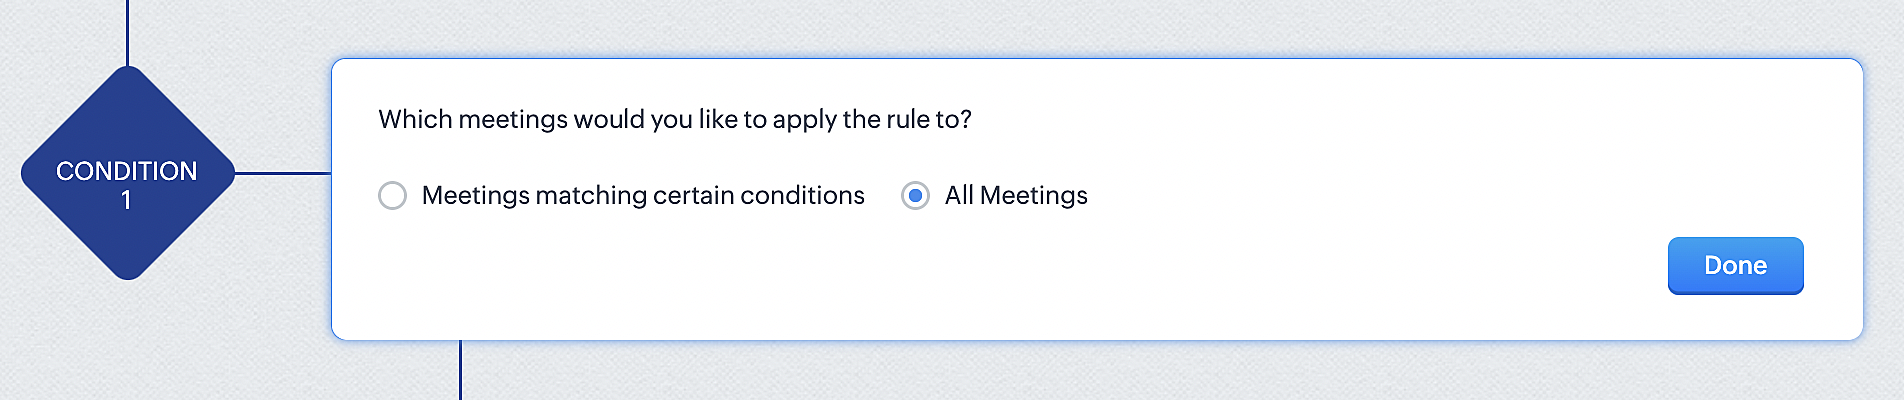
2. Configure condition > All Meetings.
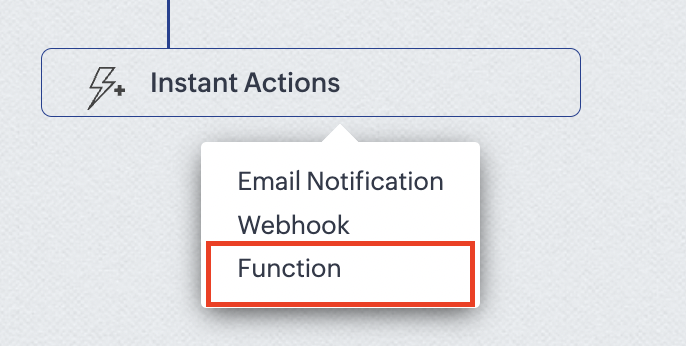
3. Instant Actions > Function.
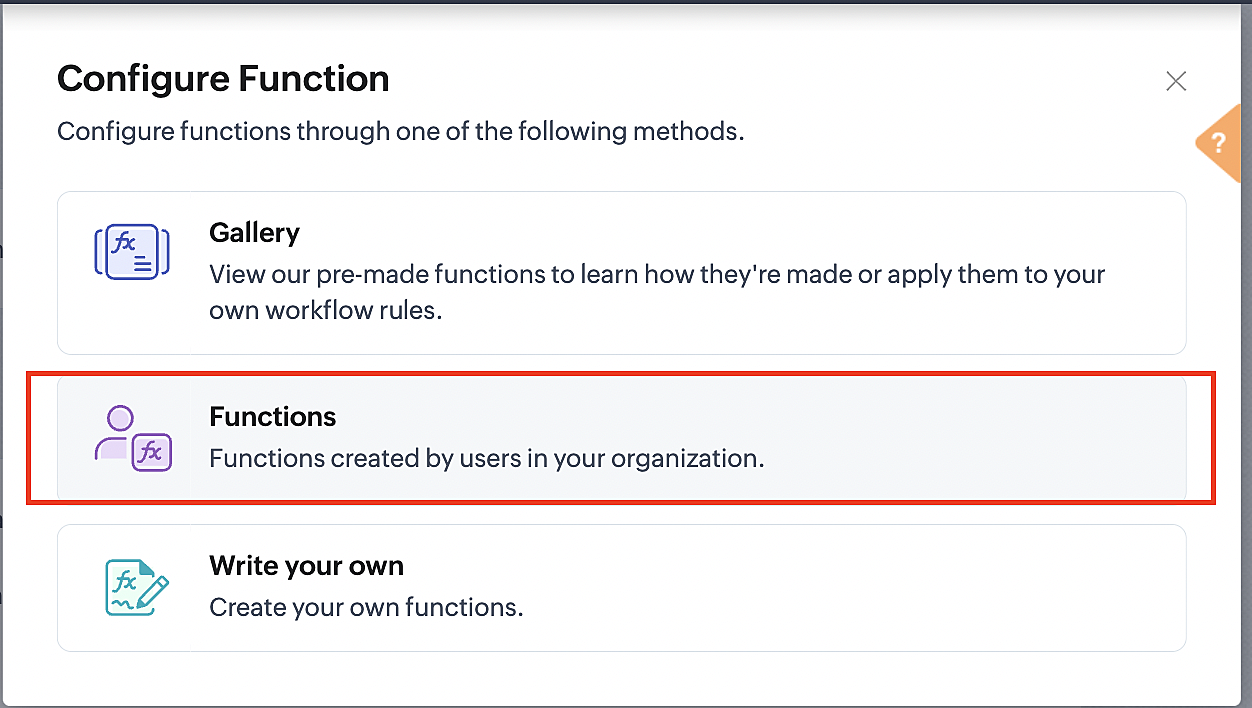
4. Click the New Function button.

5. In the Configure custom function page, select the "cancel" function you created from among the functions users in your organization have created.
Part 3: Argument mapping
1. Press # to choose an argument value.
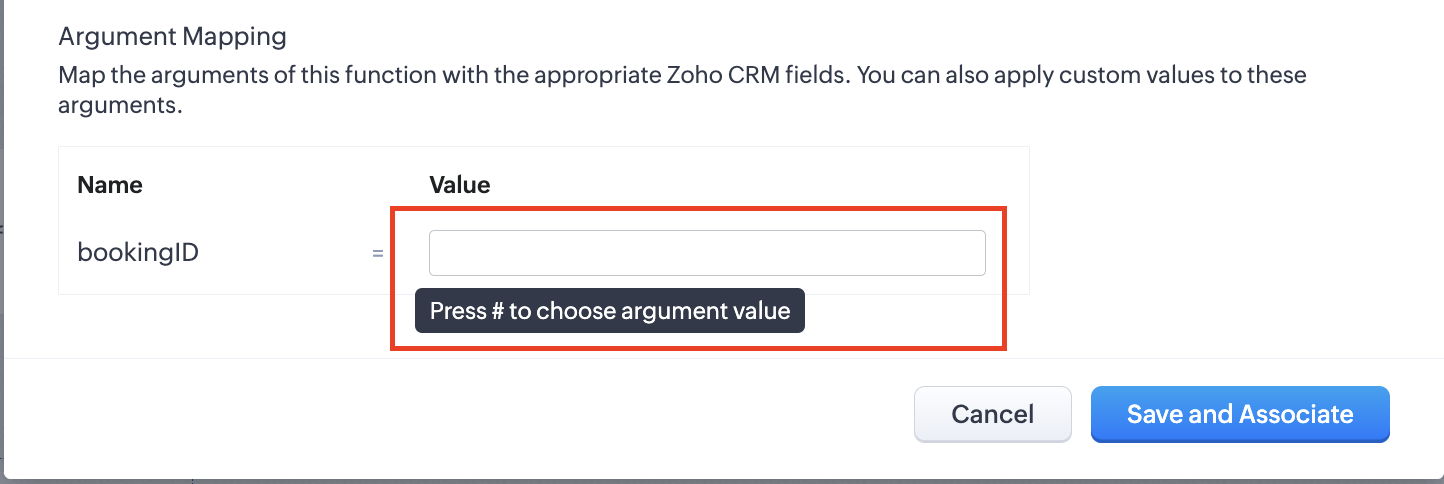
2. Select Meetings under Module and BookingId in the field.
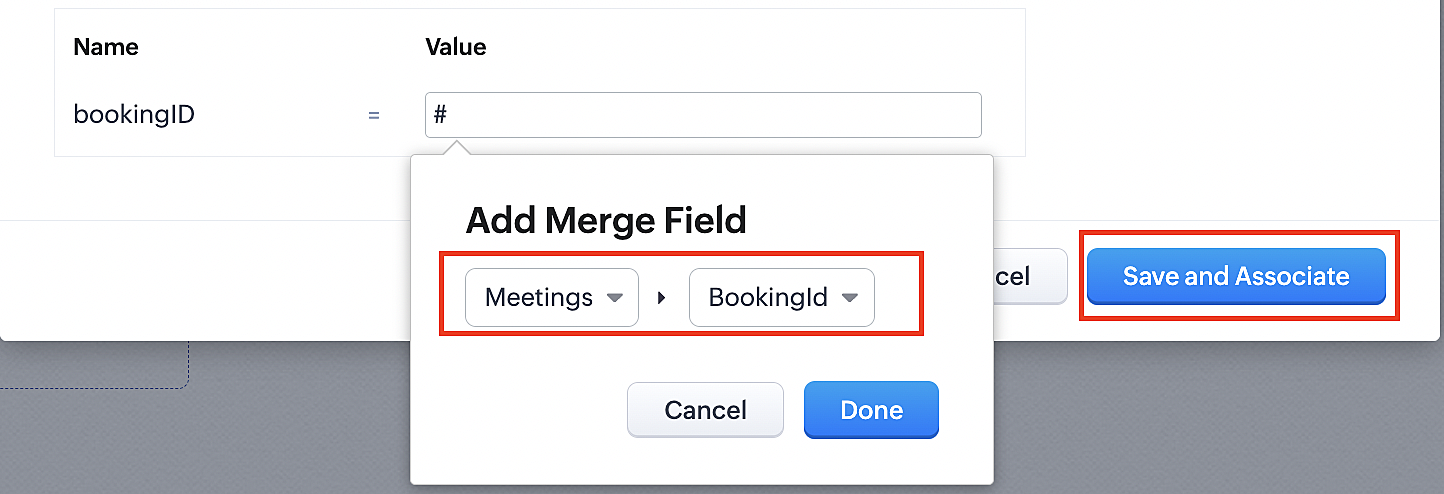
3. Click the Save and Associate button.
Reference:
Below is the final flow of the cancel booking workflow:

At the end of Part 3, we will have created a workflow that will be executed automatically when meetings are deleted in Zoho CRM. Simultaneously, the bookings associated with the meeting will also be canceled in Zoho Booking.
ii. Creating workflow for updating an appointment's status as "no show" in Zoho Bookings when the meeting's booking status is marked as no show in Zoho CRM
Part 4: Creating the rule
1. Go to Setup > Automation > Workflow Rules.
2. In the Workflow Rules page, click Create Rule.

3. Select Meetings under Module and configure the rule name and description as required.
Reference:

Part 5: Specifying the rule trigger
If you encounter difficulties while navigating through the steps mentioned below, please refer to Part 2 above, where we have provided step-by-step screenshots for clarification.
1. Record Action > Edit.

2. Enable the Specific field(s) gets modified and configure it per the screenshot below.
a. This is to ensure that the workflow is executed only when the booking status under the meeting module is
updated to "No Show".
updated to "No Show".
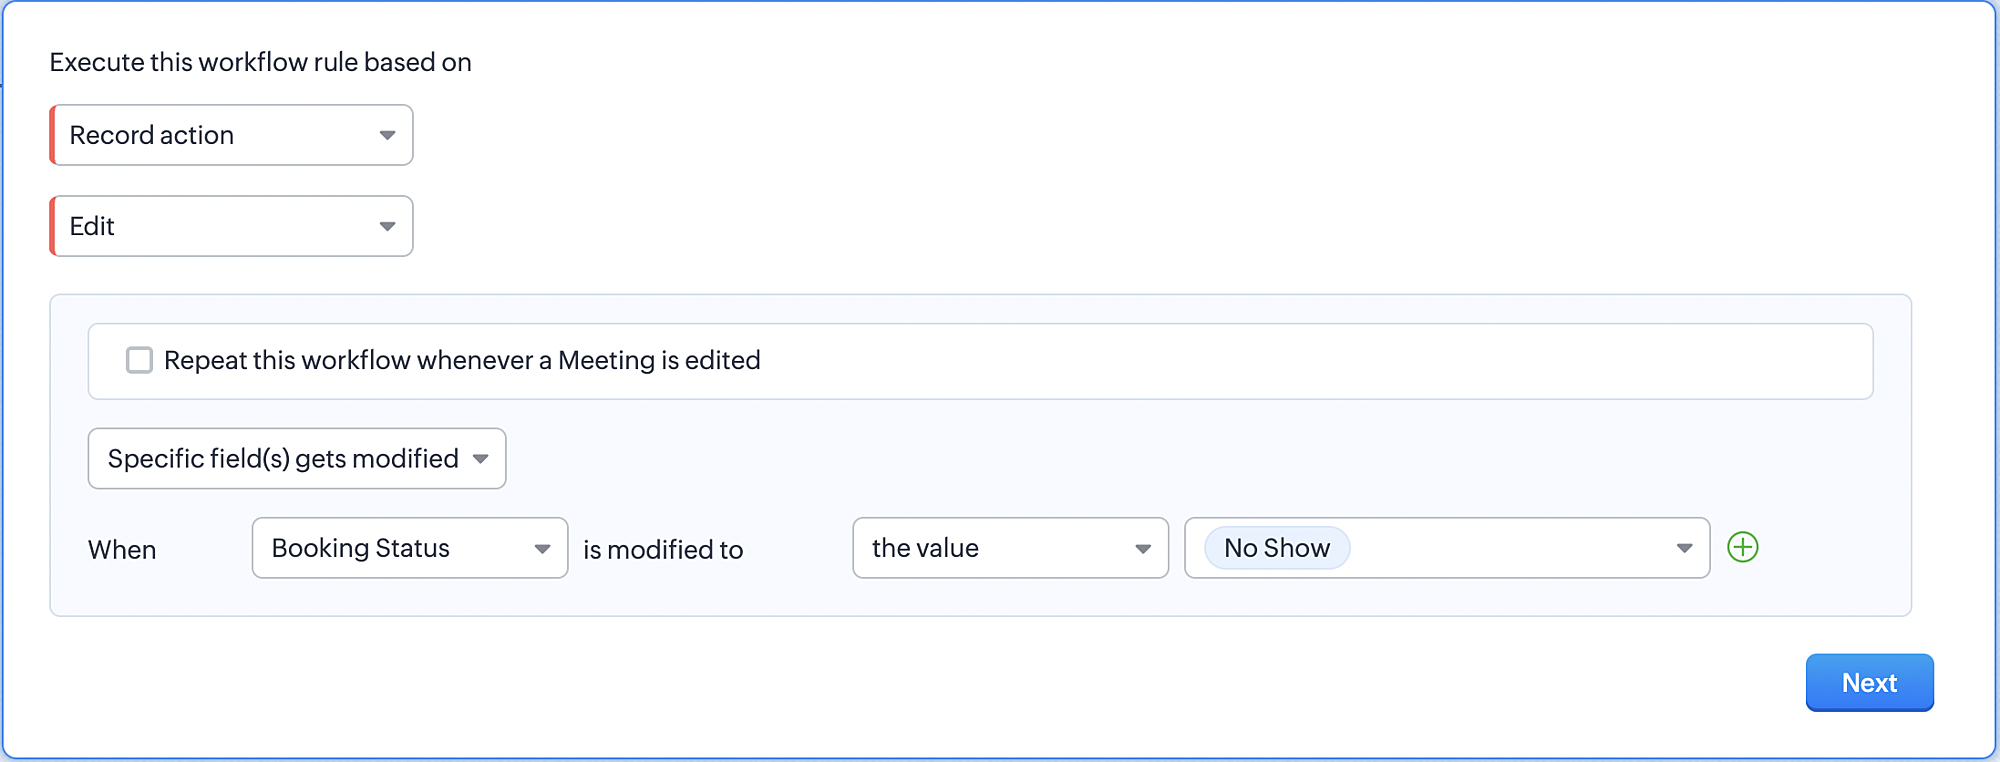
3. Configure condition > All Meetings.
4. Instant Actions > Function > New Function.
5. In the Configure custom function page, select the "no show" function you created from among the functions
users in your organization have created.
users in your organization have created.
Part 6: Argument mapping:
If you encounter difficulties while navigating through the steps mentioned below, please refer to Part 3 above, where we have provided step-by-step screenshots for clarification.
1. Press # to choose an argument value.
2. Select Meetings under Module and configure the field as "BookingId".
3. Click Save and Associate button.
Reference:
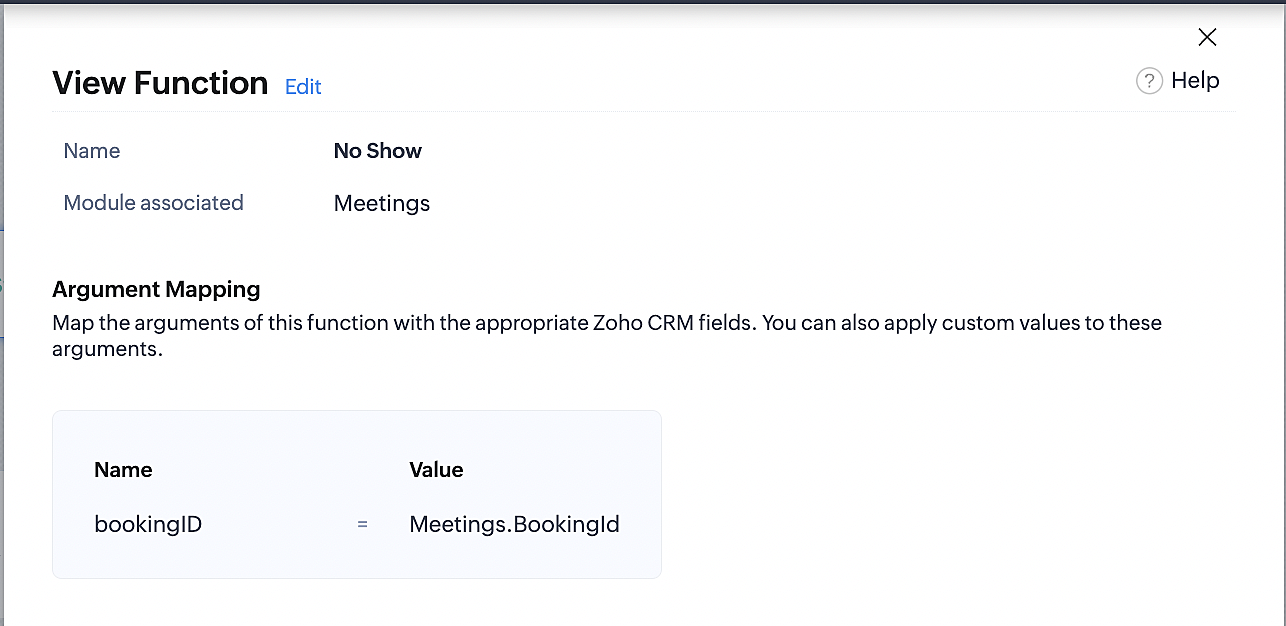
Below is the final flow of the "No Show" booking status workflow:
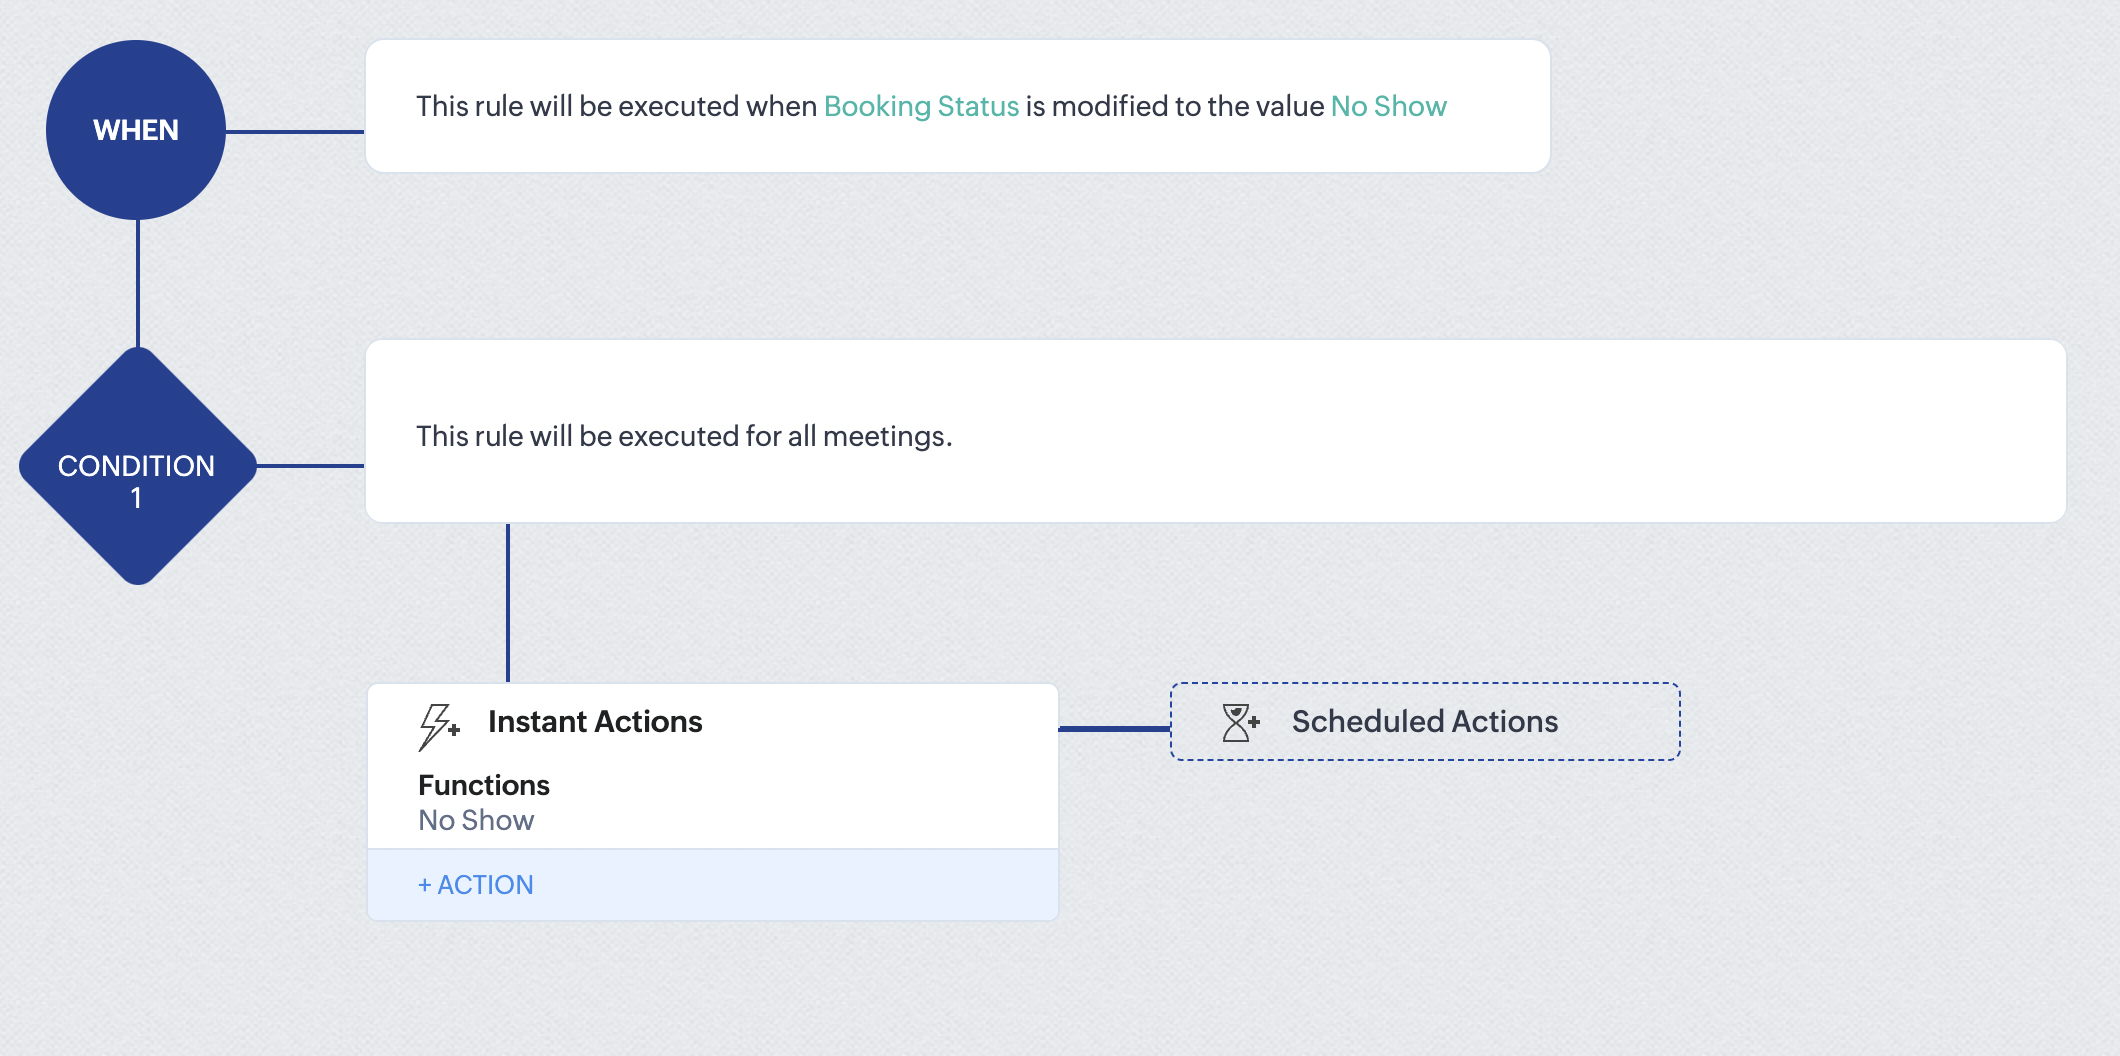
At the end of part 6, we will have created a workflow that automatically executes when the booking status field within the Zoho CRM Meetings module is updated to "No Show." This action will result in the associated bookings for that meeting also being marked as "No Show" in Zoho Bookings.
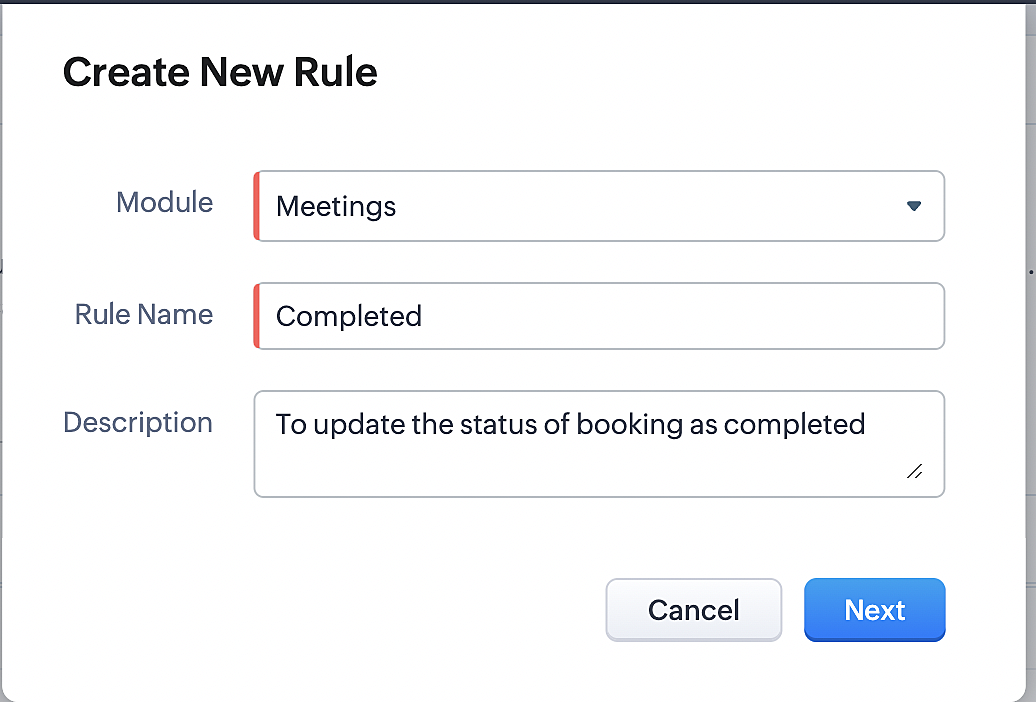
iii. Creating workflow for updating appointment status as "Completed" in Zoho Bookings when the booking status field of the meeting is marked as completed in Zoho CRM.
Part 7: Creating the rule
1. Go to Setup > Automation > Workflow Rules.
2. In the Workflow Rules page, click Create Rule.

3. Select Meetings under Module and configure rule name and description as required.
Reference:
Part 8: Specifying the rule trigger
If you encounter difficulties while navigating through the steps mentioned below, please refer to Part 2 above, where we have provided step-by-step screenshots for clarification.
1. Record Action > Edit.

2. Enable the Specific field(s) gets modified setting and configure it per the screenshot below.
a. This serves to ensure that the workflow is executed only when the booking status under the Meetings module is
updated to "Completed".
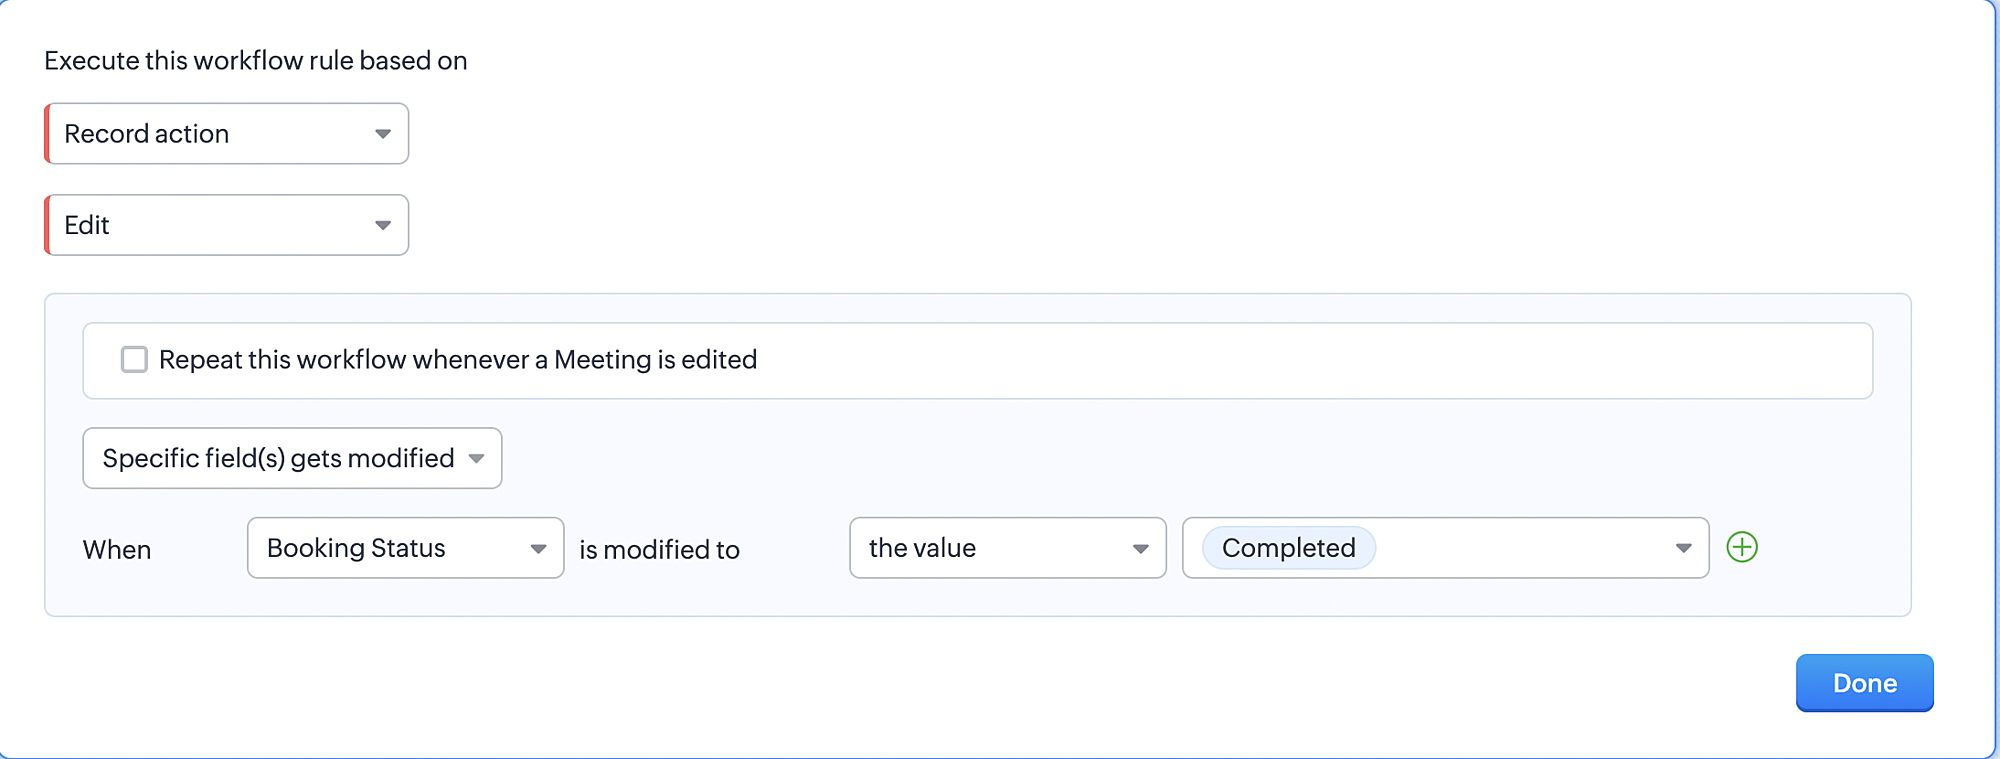
3. Configure condition > All Meetings.
4. Instant Actions > Function > New Function.
5. In the Configure custom function page, select the "completed" function you created from among the functions users
in your organization have created.
Part 9: Argument mapping:
If you encounter difficulties while navigating through the steps mentioned below, please refer to Part 3 above, where we have provided step-by-step screenshots for clarification.
1. Press # to choose an argument value.
2. Select Meetings under Module and configure the field as "BookingId".
3. Click Save and Associate button.
Reference:
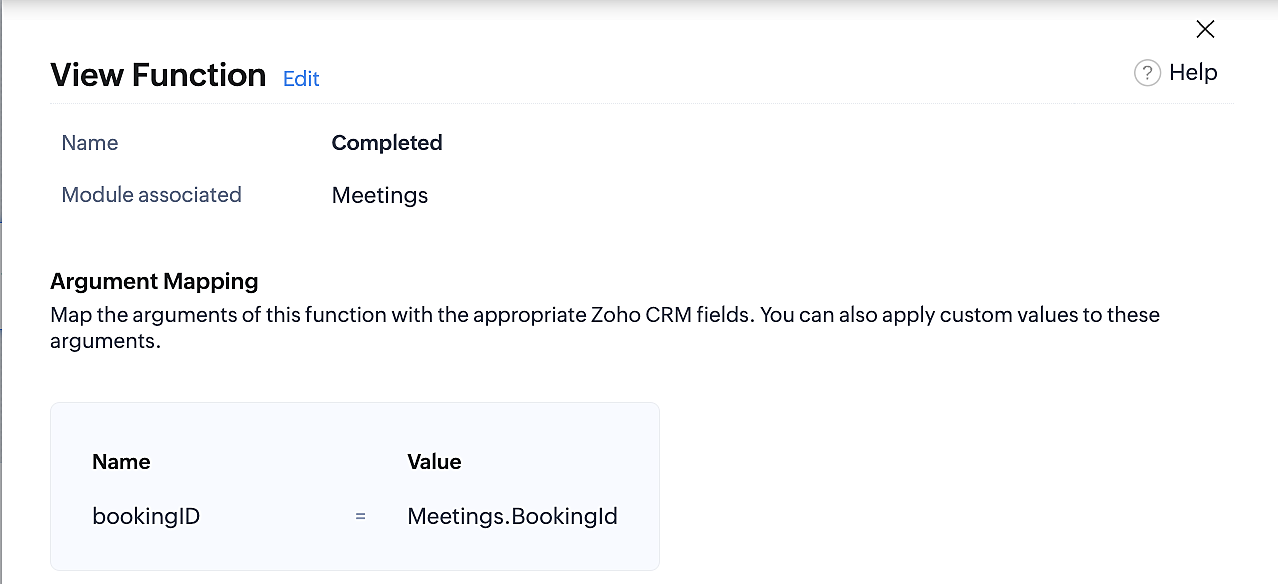
Below is the final flow of the "Completed" booking status workflow:
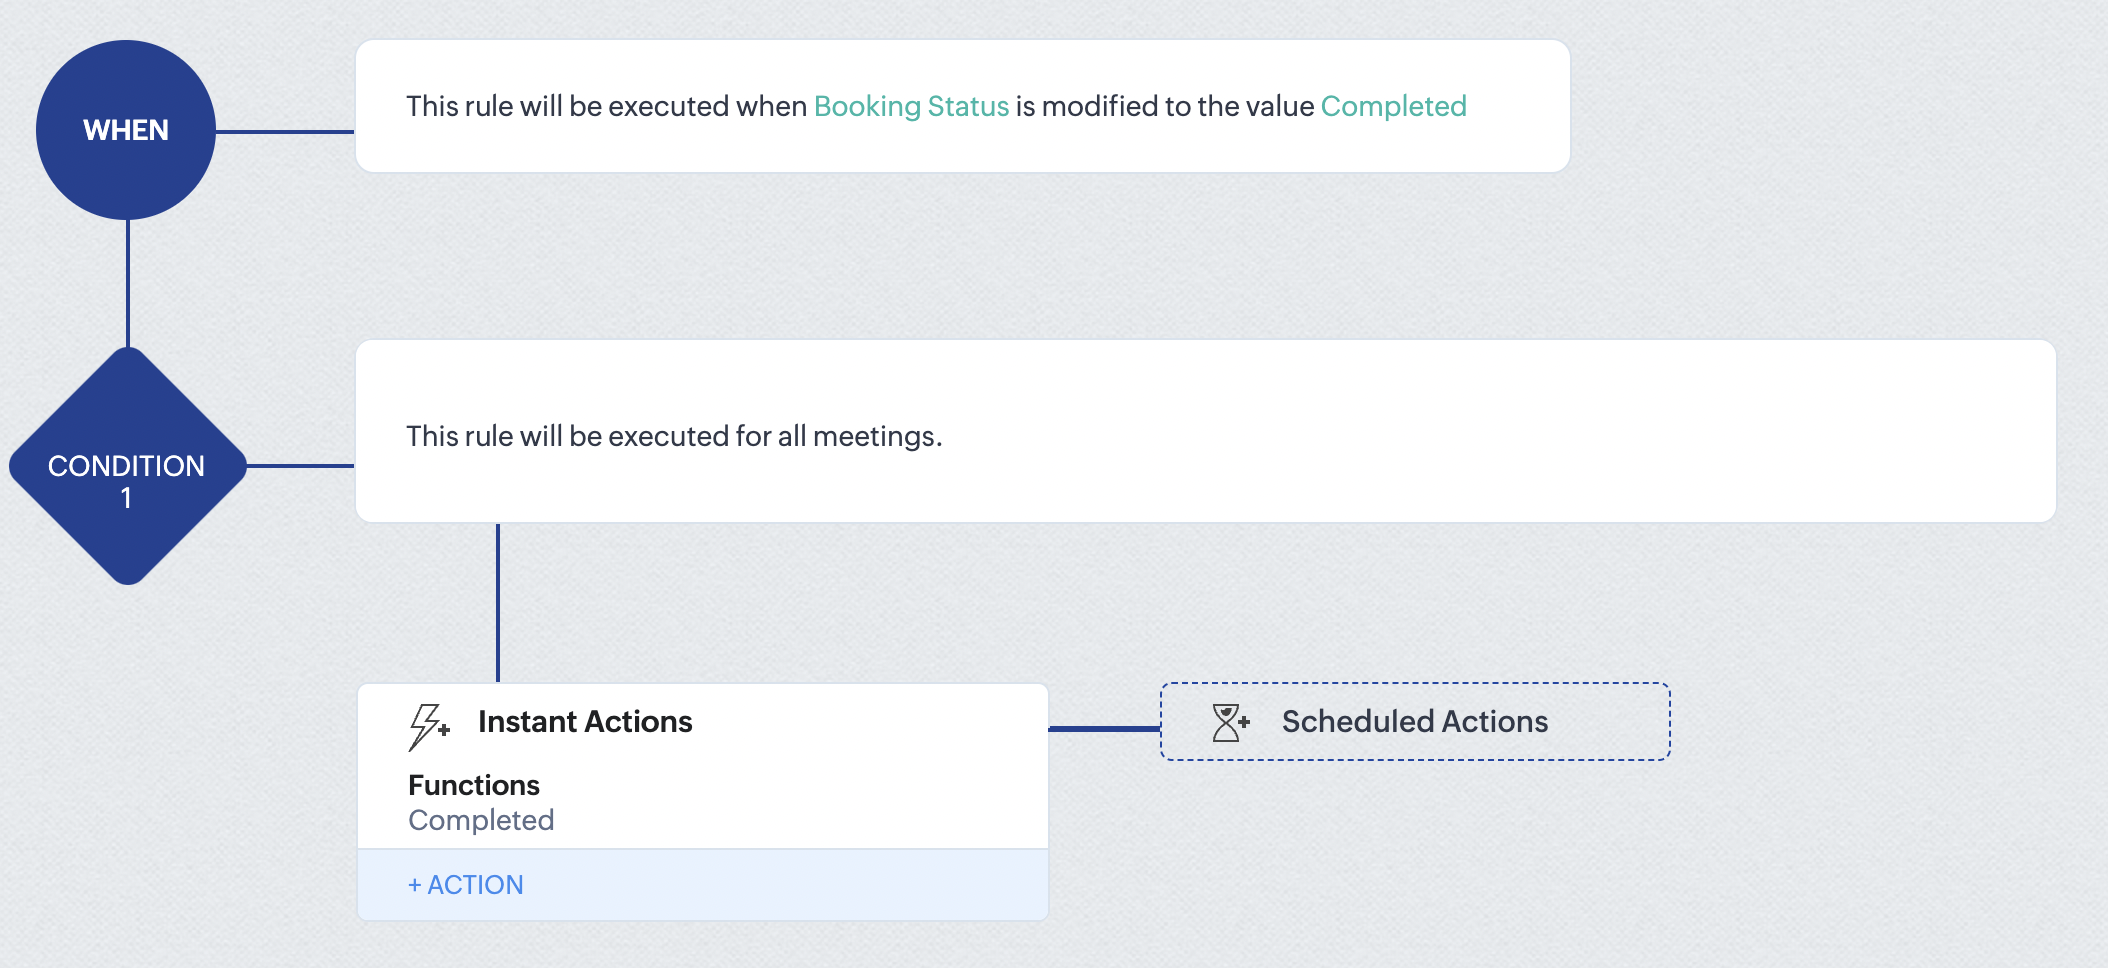
At the end of part 9, we will have created a workflow that is automatically executed when the booking status field within the Zoho CRM Meetings module is updated to "Completed." As a result, the associated bookings for that meeting will also be marked as "Completed" in Zoho Bookings.
Conclusion
We've reached the end of this community post. With the integration mentioned above in place, you'll be able to book, cancel, and update the status of appointments in Zoho Bookings directly from your Zoho CRM application. This will help you effectively manage your appointments in one place. As mentioned above, we've covered the rescheduling action in a separate post, which you can access by clicking on the following link: Reschedule Action
Furthermore, we've outlined a method for automating appointment statuses in detail. You can use this document as a reference to explore the various possibilities that suit your needs.
If you have any questions or need assistance with your configuration, please email us at hello@zohobookings.com or support@zohobookings.com.
Topic Participants
Kaushik S
bruce
Ishwarya SG
PrismaNote Support
Sticky Posts
Good news! Calendar in Zoho CRM gets a face lift
Dear Customers, We are delighted to unveil the revamped calendar UI in Zoho CRM. With a complete visual overhaul aligned with CRM for Everyone, the calendar now offers a more intuitive and flexible scheduling experience. What’s new? Distinguish activitiesNimble enhancements to WhatsApp for Business integration in Zoho CRM: Enjoy context and clarity in business messaging
Dear Customers, We hope you're well! WhatsApp for business is a renowned business messaging platform that takes your business closer to your customers; it gives your business the power of personalized outreach. Using the WhatsApp for Business integrationPresenting ABM for Zoho CRM: Expand and retain your customers with precision
Picture this scenario: You're a growing SaaS company ready to launch a powerful business suite, and are looking to gain traction and momentum. But as a business with a tight budget, you know acquiring new customers is slow, expensive, and often deliversConsumers are talking about your business. Are you listening?👂
A loyal customer might be praising your product in a forum. A frustrated user could be posting a harsh review on a public site. An excited partner may have left a comment on your campaign. A domain expert might be deconstructing your product. A prospectEnhancements to the formula field in Zoho CRM: Auto-refresh formulas with the "Now" function, stop formula executions based on criteria, and include formulas within formulas
Dear Customers, We hope you're well! By their nature, modern businesses rely every day on computations, whether it's to calculate the price of a product, assess ROI, evaluate the lifetime value of a customer, or even determine the age of a record. With
Recent Topics
Using IMAP configuration for shared email inboxes
Our customer service team utilizes shared email boxes to allow multiple people to view and handle incoming customer requests. For example, the customer sends an email to info@xxxx.com and multiple people can view it and handle the request. How can I configureThe sending IP (136.143.188.15) is listed on spamrl.com as a source of spam.
Hi, it just two day when i am using zoho mail for my business domain, today i was sending email and found that message "The sending IP (136.143.188.15) is listed on https://spamrl.com as a source of spam" I hope to know how this will affect the deliveryChanging a Single-Line Text field into a Multi-line Field without losing data
Is it possible to change a Single-Line Text field into a Multi-line Field without losing data. I have a module with data for which I would like to change a single-line field into a multi-line field but I'm worried it might delete the pre-existing daWebhook - Google Sheets
I have 2 forms that are both integrated with Google Sheets. I've set up a webhook to pull form 1 data from Google Sheets to prefill data in Form 2. The issue I have is that the forms name fields are First Name & Last Name but the Google sheets integrationVerified Mark Certificate
Hello Dears, Can anyone help and check my mail or direct me to the desired person who can add the verification tag to my mail https://www.zoho.com/blog/mail/email-authentication-with-bimi.htmlAppointment booking is temporarily unavailable
Embeded Zoho booking page in my WordPress website. When someone starts a booking, after choosing time and date, an error appears before payment - "Appointment booking is temporarily unavailable due to restricted settings." Used the embeded code givenCannot connect to 365 business calendar and Teams, says personal but it is not.
hi I have a number of users connected to their 365 business accounts. Adding a new user and it thinks hes got 365 personal edition. He does not.... Anyone know what's going on. Trying for days now. Bookings go into his MS calendar but as its thinks itsLimited review (/questions) for Bookings 2.0
Hi all, I'm writing this review of Bookings 2.0 for two reasons: 1) it may be of interest to others, and 2) I'd like to be corrected if I'm wrong on any points. It's a very limited review, i.e. the things that have stood out as relevant, and particularlyZoho Bookings - Reserve with Google
Does Zoho Bookings plan to to integrate with Reserve with Google?Tip #3: How to change your booking page language
Displaying your booking page in your target audience's language can greatly increase customer satisfaction. By speaking their language, you will help customers feel more comfortable scheduling with you and create a stronger connection with them. Let'sBigin Android app update: Alerts while creating tasks outside of working days, conflicting events and calls.
Hello everyone! In the most recent version of the Bigin Android app, we have brought in support to display an alert if task is being scheduled outside of the working days. Also, when scheduling an event or call in the Activities module, a conflict alertBigin update: Link email messages to pipeline records.
Hello everyone! In the latest version of the Bigin iOS(v1.11.9) and macOS(1.8.9) app, we have brought in support for an option to link email to pipeline records. This helps you to view emails specific to a deal, especially when a contact is associatedBigin Android app update: Custom buttons and widgets
Hello everyone! We are excited to introduce custom buttons and widgets on the Bigin Android app. Widgets: A widget is a customizable UI component in Bigin that improves efficiency and user experience. It lets businesses embed components, streamline interactions,Zoho Sheet for Desktop
Does Zoho plans to develop a Desktop version of Sheet that installs on the computer like was done with Writer?Zoho Sheet - Desktop App or Offline
Since Zoho Docs is now available as a desktop app and offline, when is a realistic ETA for Sheet to have the same functionality?I am surprised this was not laucned at the same time as Docs.Collective-booking event not added to all staff calendars
We assign two staff to certain events. When the client books this event, it adds it to one staff calendar (the 'organiser') but not the other. How can I ensure all staff assigned to a collective booking get the event in their calendar? (A side note: itProject Management Bulletin: October, 2025
Every need leads to innovation. Project Management tools were developed out of sheer necessity to drive large projects. With wide usage, the specifications grew precise, and so did the refinement. Over years we’ve crafted one of the best project managementZoho Sheets saying locked when not locked
Zoho Sheets won't let me add more rows to sheet because it's saying the sheet is locked, but the sheet is not locked. I tried using a different browser but I still have the same issue.Identifying and Merging Accounts with Similar (Non-Exact) Names
Hello everyone, I’m aware of the built-in deduplication feature in Zoho CRM that allows merging records with exactly matching values for selected fields. However, I’m running into a situation where our migrated data contains multiple variations of theOption for super admin to recover the deleted chats in Zoho Cliq
Currently, in Zoho Cliq, if a user accidentally deletes their chats, there is no option for the Super Admin to recover or view those deleted messages. I believe it would be helpful if Super Admins had a recovery option, perhaps within a certain time frame,Zoho CRM iOS app updates: the Homepage, Zoho Survey integration, and support for multiple file uploads in subform
Hello everyone! The Zoho CRM mobile app continues to evolve to bring you a smoother and more powerful CRM-on-the-go experience. We're excited to share some important updates now available in the iOS app. Here's what's new: Homepage support Zoho SurveyI am trying to integrate my module in sandbox environment to add data via API
I went through the documents and tried to setup the API for adding the module via the api but the problem is the token setup is done on "https://accounts.zoho.in/oauth/v2/token" domain and the bulk write is done on "https://content.zohoapis.com/crm/v8/upload"Setting up primary mobile number.
Hi Sir Earlier I joined IIFL team and got an organizational email of zoho services. Later i quit and now my account is deactivated with IIFL but i am unable to link my mobile number to my own email id with zoho.Tables for Europe Datacenter customers?
It's been over a year now for the launch of Zoho Tables - and still not available für EU DC customers. When will it be available?Guided Conversations - Ticket Creation
Hi there, Using Guided Conversations to Take Customer Data and apply it into a Support Ticket for internal use, Is there a way to take multiple Textual Variables Inputs (A series of questions), and have the answers all appear in the Description of theHow to send certain invoices for Approval based on condition?
To streamline operations, I need the invoices to go for approval when certain conditions are met. For example, if my staff gives a discount of x amount, it must go for approval. If there is no discount, then the invoice will be approved automatically.Unable to continue payment
Hi, I want to make a payment for my email subscription, but I cannot proceed with the payment because my NITKU is invalid. In Indonesia, the NITKU consists of 22 digits, but Zoho only provides 20 digits, causing my NITKU to be invalid. Please help meIs there a way to show contact emails in the Account?
I know I can see the emails I have sent and received on a Contact detail view, but I want to be able to see all the emails that have been sent and received between all an Accounts Contacts on the Account Detail view. That way when I see the Account detailMassive spam pretending to come from our address – is this a Zoho security issue?
Hi, We’ve been receiving more and more suspicious emails lately — many of them clearly look like scams. But yesterday, we got an email that appeared to be sent from our own address, which was very concerning. We're starting to wonder if this might beCant recieve mails
I’m having an issue with my external IMAP account not fetching any emails into Zoho Mail, even though the connection test says “Success”. I can send, if someone sends an email to me. my original directory (home.pl host) recieves it in their portal butZoho Sheet Autofit Data
While using Autofit Data function in Zoho Sheets with Devnagri Maratji or Hindi Fonts, a word or a number, it keeps couple of characters outside the right side border.Enhancements to finance suite integrations
Update on the migration (October 28, 2025): Starting this week (October 29 tentatively), we’ll begin migrating Zoho CRM users to Zoho Books as integration users. This means actions will now run under each user’s own Zoho Books access, instead of the admin’s.Edit 'my' Notes only
The permissions around Notes should be more granular, and allow to user to be able to edit the notes he created only. The edit Notes permission is useful as it allows the user to correct any mistakes or add information as needed. However, with this sameHow do I filter contacts by account parameters?
Need to filter a contact view according to account parameter, eg account type. Without this filter users are overwhelmed with irrelevant contacts. Workaround is to create a custom 'Contact Type' field but this unbearable duplicity as the information alreadyJob Alerts for Candidates
hi All, I have 2 questions relating to sharing job details with candidates. 1. is there a way to notify candidates that meet certain criteria of current jobs available? eg. I run a candidate search, and identify 50 candidates that might be suitable. CanAdd multiple users to a task
When I´m assigning a task it is almost always related to more than one person. Practical situation: When a client request some improvement the related department opens the task with the situation and people related to it as the client itself, the salesmanEnhancing Task Accuracy: Automatically notify the owners upon Task duplication.
Hello Everyone, A Custom function is a user-written set of code to achieve a specific requirement. Set the required conditions needed as when to trigger using the Workflow rules (be it Tasks / Project) and associate the custom function to it. The requirementShow/ hide specific field based on user
Can someone please help me with a client script to achieve the following? I've already tried a couple of different scripts I've found on here (updating to match my details etc...) but none of them seem to work. No errors flagged in the codes, it justWhere are Kanban swimlanes
So i've been playing with Zoho Projects Kanban view a bit more. It appears that task lists are being used as the Kanban columns, which makes sense from the implementation point of view but not the logical one. Kanban columns are statuses that a task can flow through, while a task list has been a logical way to organize related tasks and relate them to a mislestone. In other words a task in a particular task can go through several stages while remaining in the same task list. After doing some researchTip 19: How to display images in Pages using ZML snippets
Hi folks, We're back with another tip on how to use Zoho Markup Language (ZML) to create interactive pages in Zoho Creator. You can use ZML snippets to add various kinds of components to your pages and structure them in meaningful ways. That's not all, though—using ZML you can ensure your application is automatically compatible with all kinds of devices without any inconsistencies. We often get questions from users about how to invoke Deluge scripts within ZML code. Here's a simple use case for addingNext Page