Kaizen #188 - Building a Timer and Worklog Widget (Part 2)

Welcome back, Tech Wizards!
In Part 1, we developed a Timer Widget that logs active work sessions into the Timer Entries module.
Now, let's enhance this functionality by transferring these entries into the Work Log subform within the Cases module using a workflow with Deluge function and APIs. We will also explore how to generate insightful reports from the Timer Entries module data.
Here is a consolidated view of the outcomes we aim to achieve through these sequential posts.

The following data model illustrates the modules and subforms involved in this use case to help you understand the structure more clearly.

Learn more about the Data Model and how it helps to simplify the understanding of complex processes.
Auto-Syncing Timer Entries to Case Work Logs
For automating the data transfer from the Timer Entries module to the Work Log subforms within Cases module, we will create a workflow rule with an instant action defined in Deluge function.
Prerequisites
Create a subform named Work Log in the Cases module with the following fields.
Field Name | Data Type |
Actual Time Taken(in mins.) | Aggregate (sum of Total Duration (in mins.) field in related case ) |
End Time | DateTime |
Related to Case | Lookup to Cases |
Related to Current Case | Checkbox |
Start Time | DateTime |
Timer Entry | Lookup to Timer Entries |
Total Duration | Aggregate (sum of all the Total Duration (in mins.) field ) |
Total Duration (in mins.) | Number |
Work Description | Multi Line |
Follow the Building a Subform and Working with Custom Fields help pages for creating the subform and fields in Zoho CRM UI, or you can also make Post Custom Fields API calls to create the custom fields in the subform.
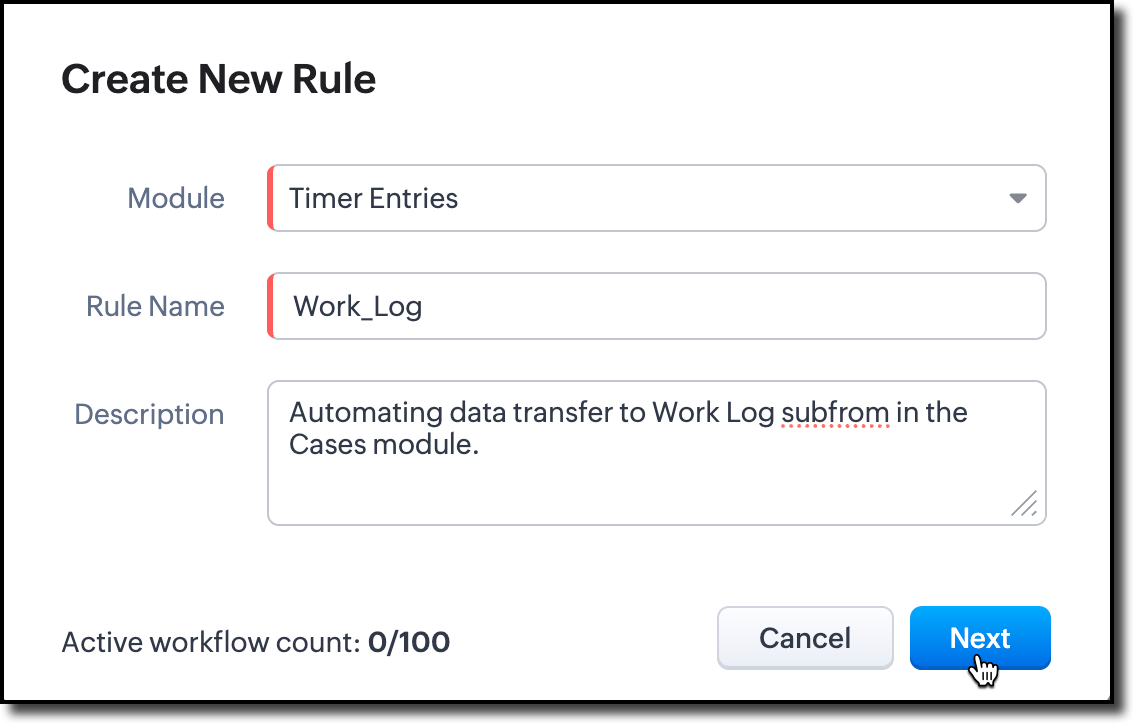
Step 1: Create a Workflow
- Login to your Zoho CRM and go to Setup > Automation > Workflow Rules and click Create Rule.
- Choose the Timer Entries module from the dropdown. Provide name and description for the workflow rule.
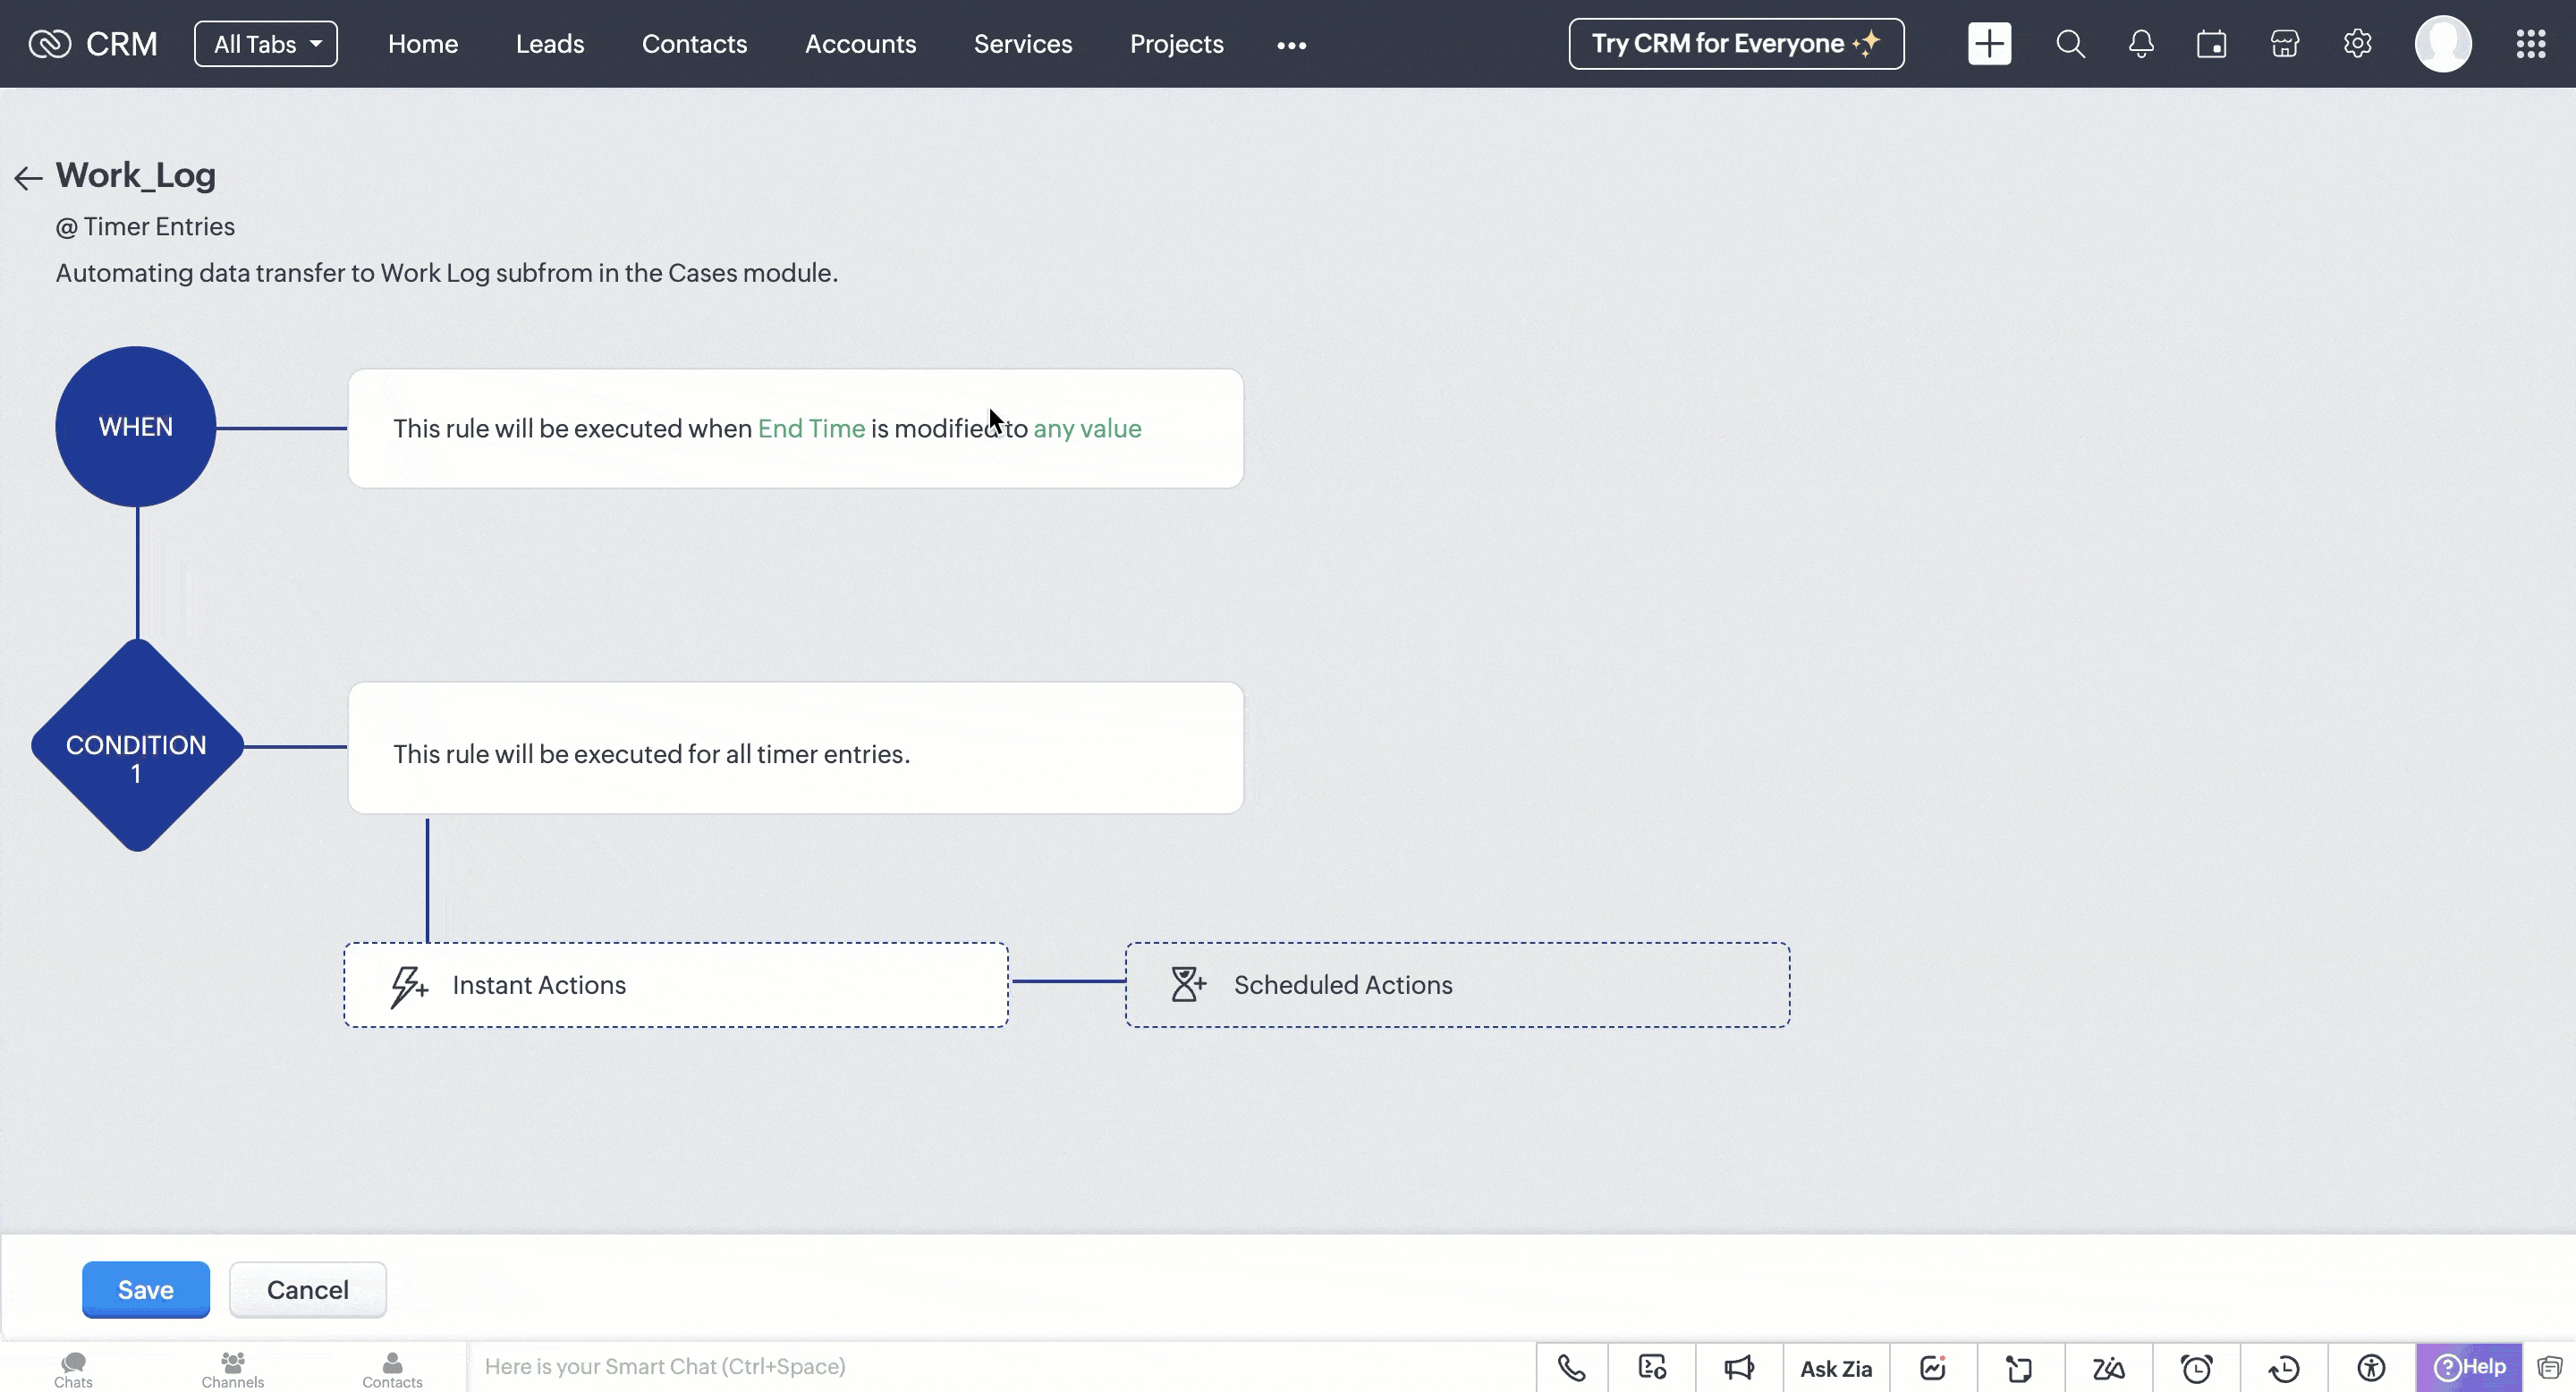
- In the 'When' section of the workflow, choose the trigger as Record Action. In record action, define the trigger as when the End Time field is modified to any value.
- In the 'Condition' section, choose all timer entries. In the 'Instant Actions' section, select Function and choose Write your own.
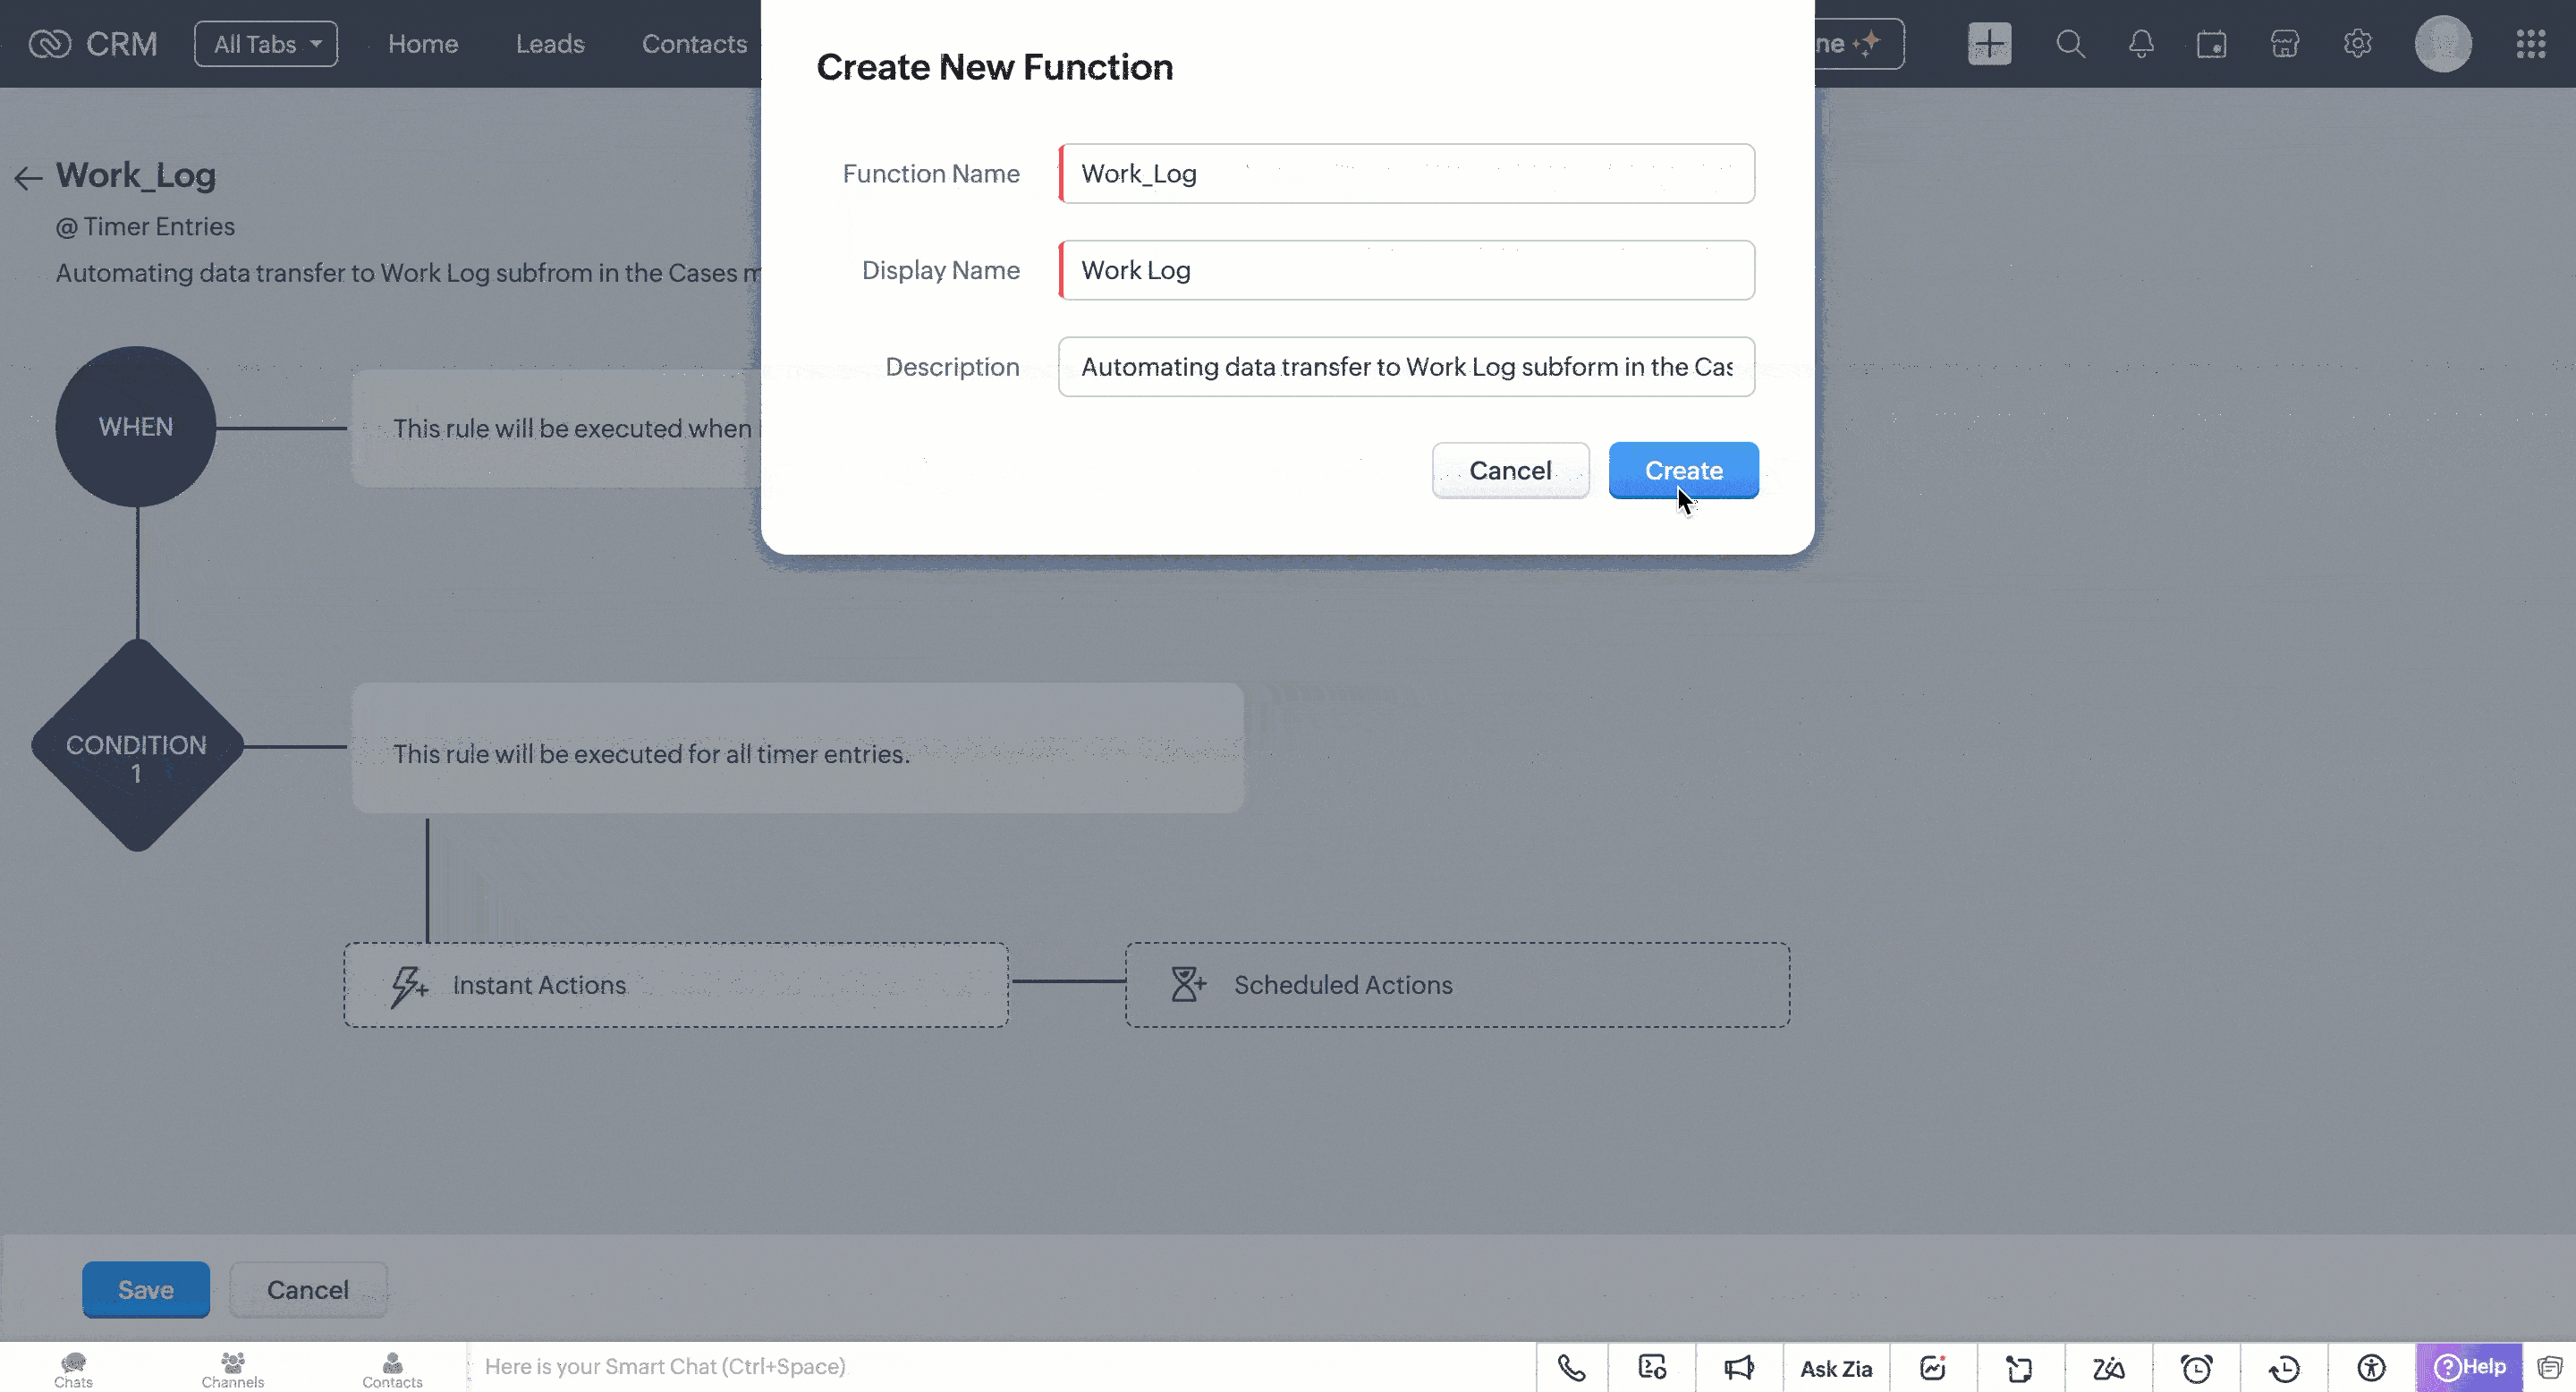
Step 2: Create a Deluge Function
- In the pop box that appeared after choosing to write your own function. Fill in the following details as shown in the image and click Create.
- A code editor will open, where you have to define the data transfer logic in Deluge.
Code logic
The UpdateDataInWorkLog function automates the process of syncing a completed Timer Entry with its associated Cases in Zoho CRM by populating the Work_Log subform for each case.
Fetches Target Case Records
The function uses a predefined custom view (cvid) that we created in Part I of this post to retrieve a list of Case records that are eligible for update. It extracts their record IDs and prepares them for bulk processing.
paramMap = Map(); paramMap.put("cvid","5545974000011183885"); getRecordsResponse = invokeurl [ type :GET parameters:paramMap connection:"crm_oauth_connection" ]; responseDataArray = getRecordsResponse.get("data"); idList = List(); for each item in responseDataArray { idList.add(item.get("id")); } caseRecordsToUpdate = idList; |
Retrieves Timer Entry Details
The selected Timer Entry (identified by recordId received through workflow trigger) is fetched to extract its key details like, Start and end times, Total time spent (duration), Work description, the Case it’s directly related to (if any).
record = zoho.crm.getRecordById("Timer_Entries",recordId,Map(),"crm_oauth_connection"); startTime = record.get("Start_Time"); endTime = record.get("End_Time"); totalTime = record.get("Total_Duration"); workDescription = record.get("Work_Description"); relatedToCaseId = ""; if(record.get("Related_to_Case") != null) { relatedToCaseId = record.get("Related_to_Case").get("id"); } |
Prepares Work_Log Subform Entries
For each retrieved Case, a new subform entry is created in the Work_Log subform. This entry contains the time details, work description, and a reference to the Timer Entry. A flag (Related_to_Current_Case) marks whether the Timer Entry is directly associated with the Case.
caseRecordIds = caseRecordsToUpdate; if(!caseRecordIds.isEmpty()) { recordUpdateArray = List(); for each caseRecordId in caseRecordIds { TimerArray = List(); TimerObj = Map(); TimerObj.put("Work_Description",workDescription); TimerObj.put("Timer_Entry",recordId); TimerObj.put("Related_to_Case",relatedToCaseId); TimerObj.put("Start_Time",startTime); TimerObj.put("End_Time",endTime); TimerObj.put("Actual_Duration_in_mins",totalTime.toNumber()); info totalTime; TimerObj.put("Related_to_Current_Case",caseRecordId == relatedToCaseId); TimerArray.add(TimerObj); recordUpdateObj = Map(); recordUpdateObj.put("id",caseRecordId); recordUpdateObj.put("Work_Log",TimerArray); recordUpdateArray.add(recordUpdateObj); } |
Bulk Updates Case Records
All Case records are updated in bulk via the Update Records API. Each gets its Work_Log subform updated or appended with the latest Timer Entry details.
updateRequestBody = {"data":recordUpdateArray}; updateResponse = invokeurl [ type :PUT parameters:updateRequestBody + "" connection:"crm_oauth_connection" ]; } |
Once done, click Save and associate the merge field (Timer Entry ID) with the function.

This workflow is triggered when the timer widget is stopped and the end time is updated in the corresponding timer entry record.
Following is a GIF that illustrates how the data sync reflects in the case records.
Generating Reports from Timer Entries
With the Timer Entries and Work Log data in place, you can create comprehensive reports to analyze work patterns, SLA adherence, and productivity trends.
- Navigate to the Reports module and click Create Report.
- Choose Cases as the primary module and include the Work Log subform.
- Select the desired fields like Case Subject, Start Time, End Time, Total Duration, and Work Description.
- Group data by fields like Case Owner or Status to gain insights into workload distribution and case progress.
- Apply filters as needed, such as date ranges or specific case statuses.

Refer to the Understanding and Building Report help page for more details.
With the Timer Widget, automated data transfer to Work Logs, and insightful reporting, we have established a robust system to track and analyze multiple active work times within Zoho CRM.
If you have specific scenarios or challenges you'd like us to address in future Kaizen posts, feel free to share them in the comments or reach out to us at support@zohocrm.com.
Cheers!
------------------------------------------------------------------------------------------------------------------
Additional Reading
- Subforms and Fields - Building Subforms and Working with Custom Fields
- Core APIs - POST Custom Fields, GET Records, POST Records and UPDATE Records
- Workflow - An Overview and Configuring Workflow Rules
- Functions - An Overview, Setting Up Functions, Functions IDE, FAQs
- Deluge - An Introduction
------------------------------------------------------------------------------------------------------------------

Previous Post: Kaizen #187 - Building a Timer and Worklog Widget (Part 1) | Kaizen Collection: Directory
Topic Participants
Kiruthiga G
Sticky Posts
Kaizen #198: Using Client Script for Custom Validation in Blueprint
Nearing 200th Kaizen Post – 1 More to the Big Two-Oh-Oh! Do you have any questions, suggestions, or topics you would like us to cover in future posts? Your insights and suggestions help us shape future content and make this series better for everyone.Kaizen #226: Using ZRC in Client Script
Hello everyone! Welcome to another week of Kaizen. In today's post, lets see what is ZRC (Zoho Request Client) and how we can use ZRC methods in Client Script to get inputs from a Salesperson and update the Lead status with a single button click. In thisKaizen #222 - Client Script Support for Notes Related List
Hello everyone! Welcome to another week of Kaizen. The final Kaizen post of the year 2025 is here! With the new Client Script support for the Notes Related List, you can validate, enrich, and manage notes across modules. In this post, we’ll explore howKaizen #217 - Actions APIs : Tasks
Welcome to another week of Kaizen! In last week's post we discussed Email Notifications APIs which act as the link between your Workflow automations and you. We have discussed how Zylker Cloud Services uses Email Notifications API in their custom dashboard.Kaizen #216 - Actions APIs : Email Notifications
Welcome to another week of Kaizen! For the last three weeks, we have been discussing Zylker's workflows. We successfully updated a dormant workflow, built a new one from the ground up and more. But our work is not finished—these automated processes are
Recent Topics
Dropshipping Address - Does Not Show on Invoice Correctly
When a dropshipping address is used for a customer, the correct ship-to address does not seem to show on the Invoice. It shows correctly on the Sales Order, Shipment Order, and Package, just not the Invoice. This is a problem, because the company beingPrepayment of a sales order
How does everyone handle this common (at least it is common for us!) situation? We require all our orders to be fully prepaid before shipment since we manufacture made to order, custom products. Since ZOHO does not allow a sales order to be prepaid, we are forced to create an invoice at the time an order is placed to allow the customer to pay it. Our sales category is therefore skewed, since the sale was actually booked at the time an order was placed, rather then at the time it is shipped, whichAccess to Specific Zoho Desk layout for external parties
Hi, We have a partner who handles for us sales requests from specific markets. He is not a Zoho Desk user. But we want him to b part of a specific Zoho Desk layout to handle inquiries. How to achieve it in the easiest way possible?Deposit on a Sales Order
Good day, 100% of my business is preorders, no inventory. I am trying to run away from QB for one of my businesses, but I require two options that I don't seem to find with Zoho Books. 1 - If there is a way to apply a deposit on a sales order, as withHow Does Knowledge Base Search and Article Recommendation Work?
Hello, I would like to understand how the Knowledge Base search engine works. Specifically, does it search based on: The article title only? The full article content? Both, the article and the content? Keywords? Tags? Also, how does the system determineBulk Delete Attachments
Is there a way to bulk delete attachments on the form entries? our storage is full and deleting files one by one is pain taking process.How do I sync multiple Google calendars?
I'm brand new to Zoho and I figured out how to sync my business Google calendar but I would also like to sync my personal Google calendar. How can I do this so that, at the very least, when I have personal engagements like doctor's appointments, I canAbility to Disable System Banner Messages in Chat Flow Control
Dear Zoho SalesIQ Team, Greetings, We would like to request an enhancement related to the system banner messages in Zoho SalesIQ chat flow control. Current Behavior: SalesIQ allows configuring various automatic banner/system messages such as: WaitingIdle Chat Reminders for Agent-Handled Conversations
Dear Zoho SalesIQ Team, Greetings, We would like to request an enhancement to the Idle Chat Handling functionality in Zoho SalesIQ—specifically for chats that are handled by human agents after a bot-to-agent transfer. Current Behavior: In Zobot settings,Snapchat
Are there any plans to add Snapchat to Zoho Social or is there any API that we can use to integrate into Zoho.Zoho Sign "An unexpected error occured" when clients trying to sign documents
We are unable to have clients sign our documents. When attempting to complete the process an error appears saying "an unexpected error occured" and in the document history just shows "signing failure." We are at a complete standstill with no response¡Vuelven los Workshops Certificados de Zoho a España!
¡Hola usuarios de Español Zoho Community! Hace ya unos días que hemos dado la bienvenida al 2026, y promete ser un año de lo más emocionante. Y es que nos gustaría haceros nuestro particular regalo de Reyes, aunque lleguemos un poco tarde. 🎁 ¡Nos gustaríaHow to list services on quote instead of products
I need to create a customer facing estimate that displays our services. The default quote layout only allows products to be listed. Is there a way to correct this?Syncing calendar with Google Calendar doesn't work when events are sent to auto repeat
Hi... The ZOHO CRM -- GOOGLE CALENDAR sync is broken. If I create a single event on either side, sync works, but if I create an event with auto repeat on either side it doesn't work. Furthermore, events created before the sync don't show up in the calendar.Invoice status on write-off is "Paid" - how do I change this to "Written off"
HI guys, I want to write off a couple of outstanding invoices, but when I do this, the status of the invoices shows as "Paid". Clearly this is not the case and I need to be able to see that they are written off in the customer's history. Is there a wayZoho Books - France
L’équipe de Zoho France reçoit régulièrement des questions sur la conformité de ses applications de finances (Zoho Books/ Zoho Invoice) pour le marché français. Voici quelques points pour clarifier la question : Zoho Books est un logiciel de comptabilitéCreating meetings from an email
Hi. Similar to Outlook, it would be helpful if a meeting can be scheduled from an email so that the attendees need not be manually entered every time it's created.Please, make writer into a content creation tool
I'm tired of relying on Google Docs. I'm actually considering moving to ClickUp, but if Writer were a good content creation tool instead of just a word processor, I would finally be able to move all my development within the Zoho ecosystem, rather thanZohoSalesIQ.Chat cannot send messages
Chat cannot send messages. Our app implements the customer service chat window functionality by integrating the Mobilisten SDK. Recently, we encountered an issue: after successful SDK initialization and visitor registration, when the `startWithQuestion`Missed chats on WhatsApp closing after one minute
Hi, we have added WhatsApp as a channel. However, if a chat is not picked up within 2mins, the chat is marked as missed and is closed within a minute. Why are they not staying in our "missed" queue for 24 hours as per our WhatsApp preference settings?Feature Request: Add Tax ID Display on Event Tickets
Hello Backstage Team, I’ve had several clients bring up an issue regarding tax compliance when creating events. For tax purposes, they are required to show their Tax ID on the event tickets. Currently, this isn’t an option, so they have to manually generateRelease Notes | January 2026
We have rolled out a set of powerful new enhancements across Zoho Vertical Studio that bring several long-awaited capabilities to your applications. These updates focus on deeper customization, smarter automation, better reporting, and improved usabilityEmail Alias: To keep emails flowing without disruption
Email Alias acts like a nickname for a user’s primary email address, allowing multiple email addresses to deliver messages into the same mailbox. Consider the scenario where an employee manages multiple responsibilities, such as responding to sales inquiries,Archive Option in Conversation View
Hello, I have a suggestion\request to add an "Archive Thread" button in conversation view of Zoho Mail. The best suggestion I have is to put an "Archive Thread" button next to the "Label Entire Thread" button in conversation view. Most users don't justInventory "Bulk Actions" button - add more fields to "Bulk Update > Select a field"
Can we not get a lot more actions that are commonly used by customers into the "More Actions" button on the Inventory list? More fields listed in the Bulk Update > Select A Field? Possible Bulk update Fields Preferred Supplier ( to quickly move itemsBulk upload image option in Zoho Commerce
I dont know if I am not looking into it properly but is there no option to bulk upload images along with the products? Like after you upload the products, I will have to upload images one by one again? Can someone help me out here? And what should I enterFunction #11: Apply unused credits automatically to invoices
Today, we bring you a custom function that automatically applies unused credits from excess payments, credit notes, and retainer payments to an invoice when it is created. Prerequisites: Create a Connection named "zbooks" to successfully execute the function.Tip #60- Exploring Technician Console: Screen Resolution- 'Insider Insights'
Hello Zoho Assist Community! Have you ever started a remote session and felt the screen quality wasn’t sharp enough for detailed work? A new user recently explored Zoho Assist after installing the trial version and running a few initial tests. While theRight Moment, Right Message, Right Operator: Never Miss a High-Intent Lead
Ever been on a website or app, thinking “Should I buy this or not?” and suddenly a friendly message “Hi! How can I help you?” pops up at the perfect moment? That’s not luck. That’s timing done right. Engaging right visitors at the right moment, with theCRM x WorkDrive: We're rolling out the WorkDrive-powered file storage experience for existing users
Release plan: Gradual rollout to customers without file storage add-ons, in this order: 1. Standalone CRM 2. CRM Plus and Zoho One DCs: All | Editions: All Available now for: - Standalone CRM accounts in Free and Standard editions without file storageZoho CRM Workflow Automation: Activate & Deactivate Workflows Using API
Zoho has now enabled: ✅ Activate / Deactivate workflows using API ✅ Schedule workflow activation & deactivation This is extremely useful for real-world automation use cases 💡 🧩 My Use Case I created a scheduled automation that: ☀️ Activates workflows{Action Required} Re-authenticate your Google Accounts to Continue Data Sync
Hello Users! To align with Google’s latest updates on how apps access files in Google Drive, we’ve enhanced our integration to comply with the updated security and privacy standards, ensuring safer and more reliable access to your data. With this update,Function #53: Transaction Level Profitability for Invoices
Hello everyone, and welcome back to our series! We have previously provided custom functions for calculating the profitability of a quote and a sales order. There may be instances where the invoice may differ from its corresponding quote or sales order.Project-Based Inventory Consumption and Proforma Invoice in Zoho ERP
While working with customers across different industries, we have identified a few functional questions and gaps that commonly arise—especially for project-based and service-oriented businesses. Many organizations, such as those in shipping, construction,[Free Webinar] Zoho RPA - OCR, PDF Automation, & More
Hello Everyone! Greetings from the Zoho RPA Training Team! We’re excited to invite you to our upcoming webinar on the latest release updates for Zoho RPA, where we’ll unveil powerful new capabilities designed to make your automation journey smarter, faster,Zobot Execution Logs & Run History (Similar to Zoho Flow)
Dear Zoho SalesIQ Team, We would like to request an enhancement for Zoho SalesIQ Zobot: adding an execution log / run history, similar to what already exists in Zoho Flow. Reference: Zoho Flow In Zoho Flow, every execution is recorded in the History tab,Global Search Settings
I'd love a way to remove some modules from being included in the global search. This would allow use to provide a better user experience, limiting the global search to only those modules that are regularly used removing any models used for backgroundCard Location in Zobot
Hello, when using the “Location” card in a codeless builder Zobot, the behavior in WhatsApp is inconsistent. When asking the user to share their location, they can type a message, which will return the message “Sorry, the entered location is invalid.Automation Series: Auto-create Dependent Task on Status Change
In Zoho Projects, you can automatically create and assign a dependent task when a task’s status is updated. This helps teams stay aligned, ensures reviews happen on time, and reduces manual effort. In this post, we’ll walk through an easy setup usingLanguages in Zobot
Hello, I have found a list of supported languages for the Zobot. The information specifies the languages are supported in the following 3 features: SalesIQ supports 34 different languages in the following features. Resources (Articles, FAQs, Small Talks)Next Page