Extension pointers #15: Create blueprints to carry out business processes smoothly
When the various stages of a business process are well-planned and executed efficiently, the entire process runs smoothly and the overall functionality is efficient.
Blueprint is a useful feature available in Zoho CRM that is currently supported in the Zoho Developer platform. It allows you to plan different stages of a business process and set up predefined transitions between the stages to achieve the desired results. Along with defining the stages for a blueprint, you can associate people to each stage, guide them through the process, mandate information, validate information, and automate routine processes if necessary.
Components of a blueprint
A blueprint is made up of two major components or blocks: states and transitions. We’ll discuss each below.
State
A business process might involve one or more stages that need to be crossed for its completion. A state is a stage that is involved in a business process. It’s a particular condition/stage that a process is in at a given point of time.
Transition
A transition acts as a connecting factor or link between stages. It consists of the conditions that must be met to move from one stage to another.
Let's consider an example that demonstrates how blueprints can be effectively implemented/incorporated through an extension to achieve desired business processes.
Assume you run a campaign management organization. Several companies hire (outsource) you as a vendor to work on campaigns to help their businesses grow. Depending on your clients’ business needs, you manage the processes involved in preparing these campaigns using the Campaigns module in Zoho CRM. Campaigns can be of different types, such as webinar, advertisements, emails, etc.
Each of these campaign types will require following a different flow in order to be organized and executed. For example, for a webinar, you’ll need to check on resource availability and target audience, whereas for advertisements, you must check on content and banner design. It would be difficult to manually ensure that all of your team members assigned to a client’s campaign follows the correct flow each time.
A blueprint would be useful in this situation because a fixed process can be designed for a specific campaign type. This way, whenever one of your team members is assigned to handle that campaign type, they follow the defined process flow to execute it.
Similarly, different blueprints can be designed for different campaign types and collectively rendered as an extension to help your campaign management process as a whole. In this post, we'll build the overall blueprint flow for a webinar-type campaign.
A company contacts your campaign management organization about organizing a webinar to promote their business. You plan a webinar idea based on the needs of the company, gather the requirements to organize the campaign, generate or execute your campaign plan and share it with the manager, decide whether the plan is active or inactive based on feedback and discussion, and, finally, complete the campaign by finalizing (active) or closing (inactive) based on discussion.
Creating a blueprint for the Campaigns module in Zoho developer console
Here are the process steps for creating a blueprint flow:
- Go to the Extension's detail page in the Zoho Developer console.
- Choose Workflow under Automate from the left panel of the Zoho CRM console under Build, and then click Blueprint.
- Click Create Blueprint.

- Enter the necessary details. You can refer to this link to get detailed information on creating a blueprint. In our example, the module is Campaign, the layout is Standard and the field is Status.
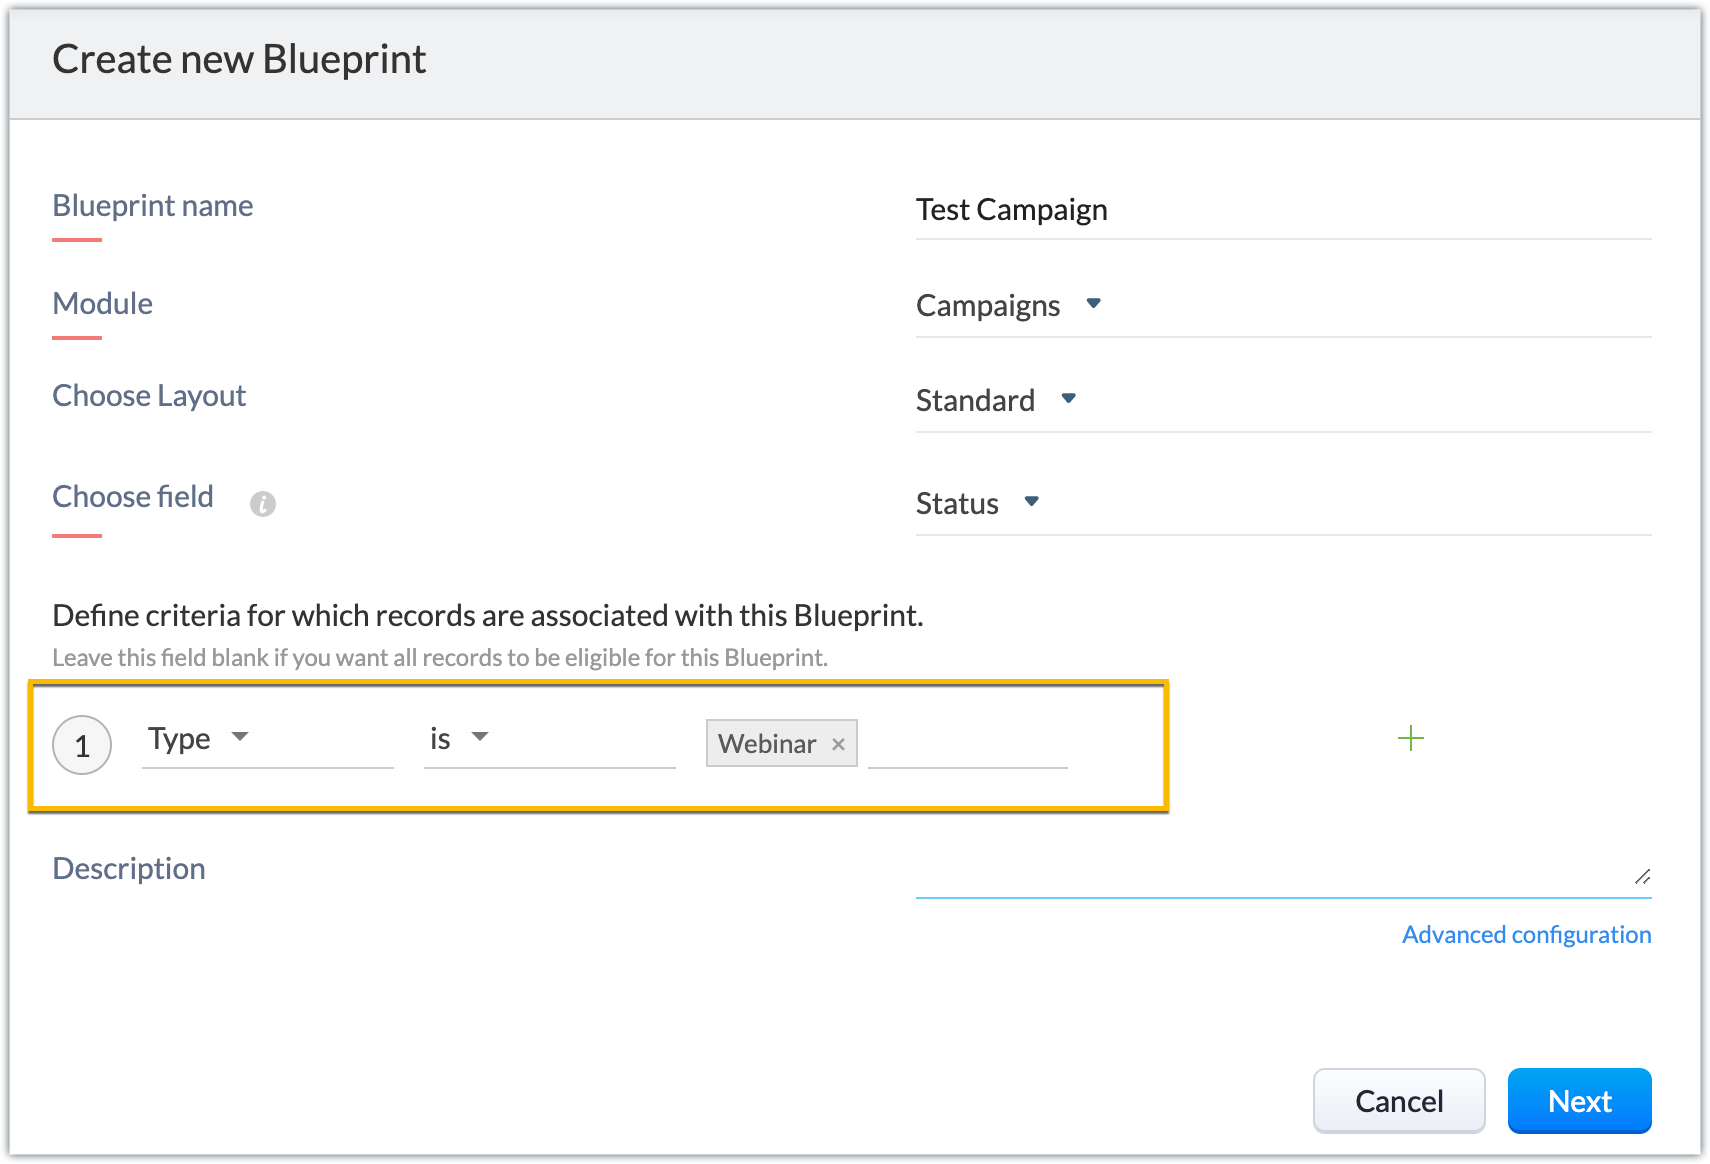
Note: You can create picklist fields through the extension and choose them as the field for the blueprint. This helps you run blueprints specific to your campaign’s organization-related Zoho CRM fields as well.
- When the basic details are filled in, next you’ll define the criteria based on which records will be associated with this blueprint. In our example, we choose the campaign records of the webinar type to be associated with this blueprint.
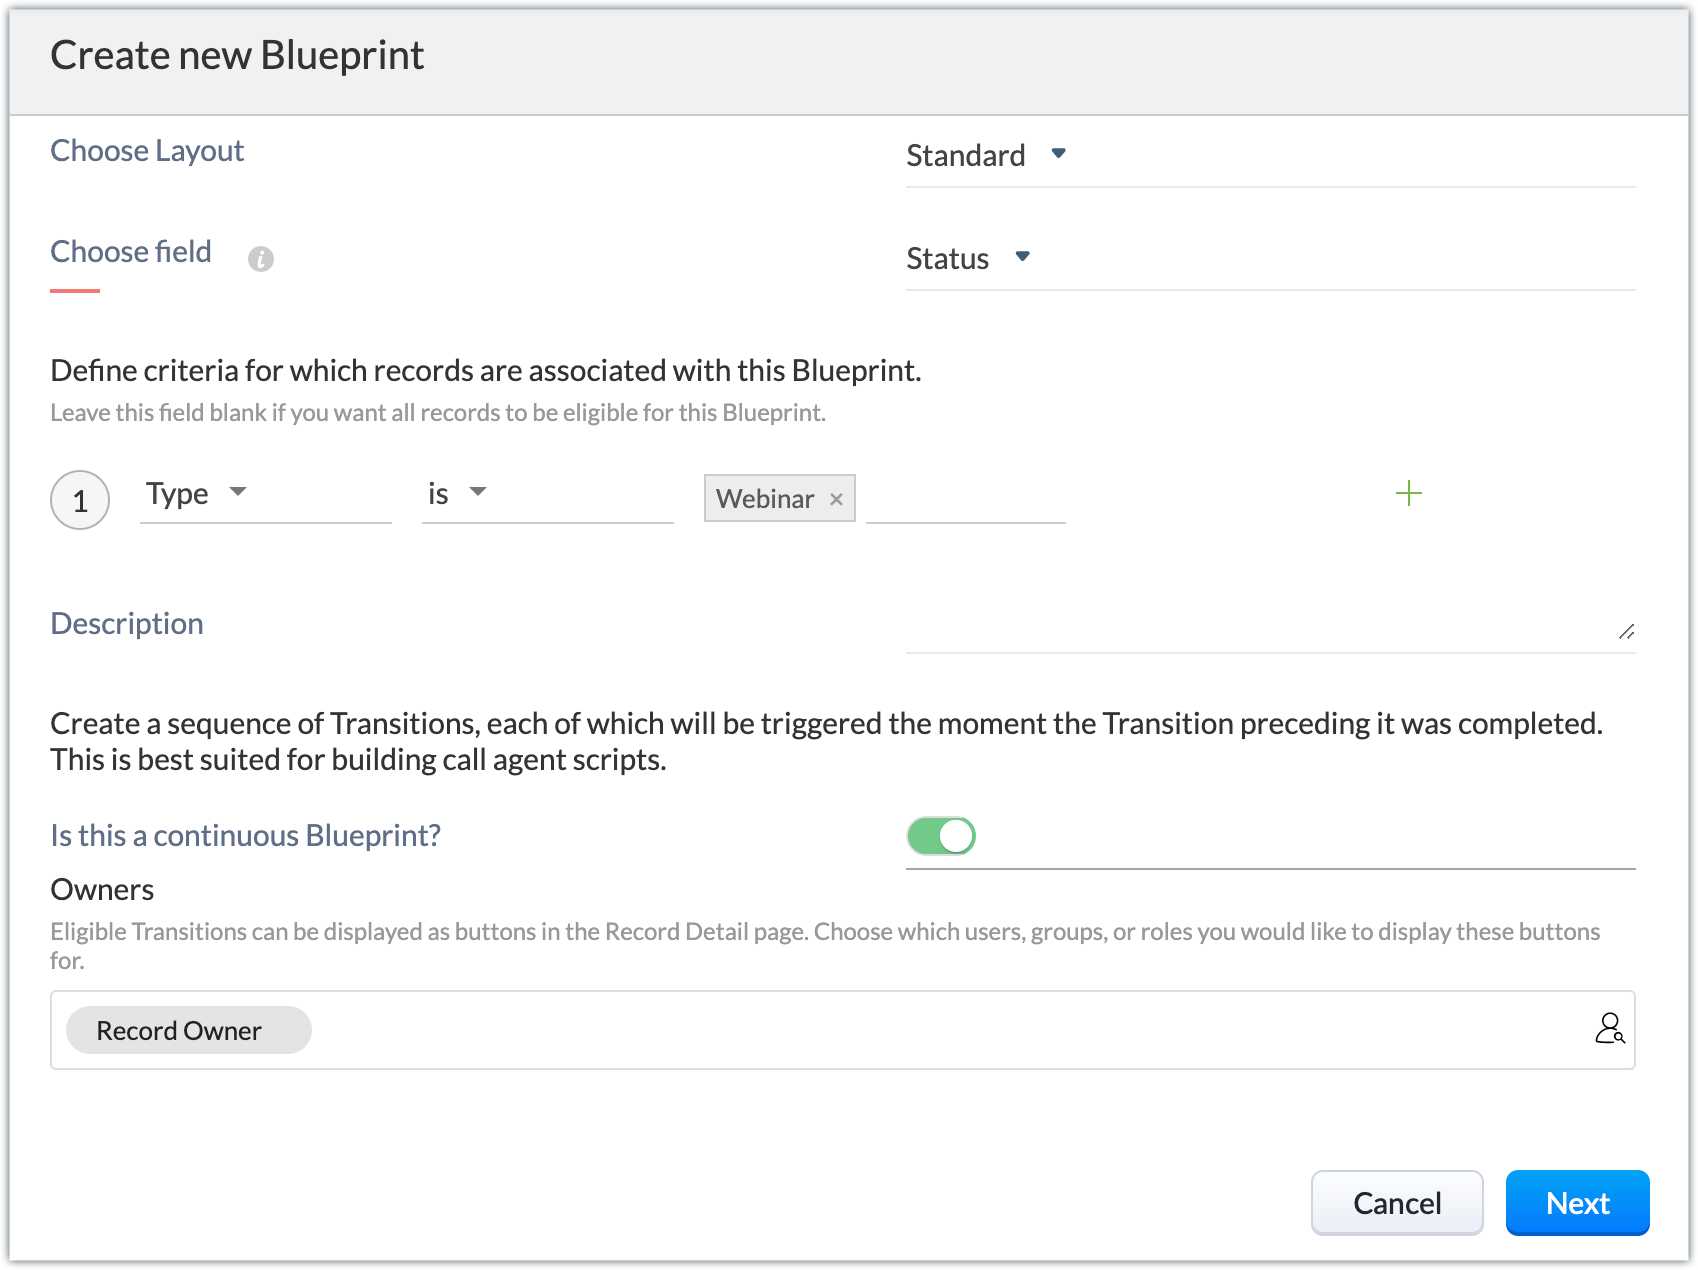
- There’s an option to create continuous blueprints, i.e., with the completion of a transition the next transition is automatically triggered, and so on. To achieve this, click Advanced configuration. Enable the Is this a continuous Blueprint? option. Choose the owners who will be eligible to view the transitions as buttons in the record's detail page.
Note: In our example, we don't enable this option; we manually execute transitions one after the other when the preceding transition's conditions are met and the next one is ready to be implemented. Click Next.
- Below is the blueprint created for our example.
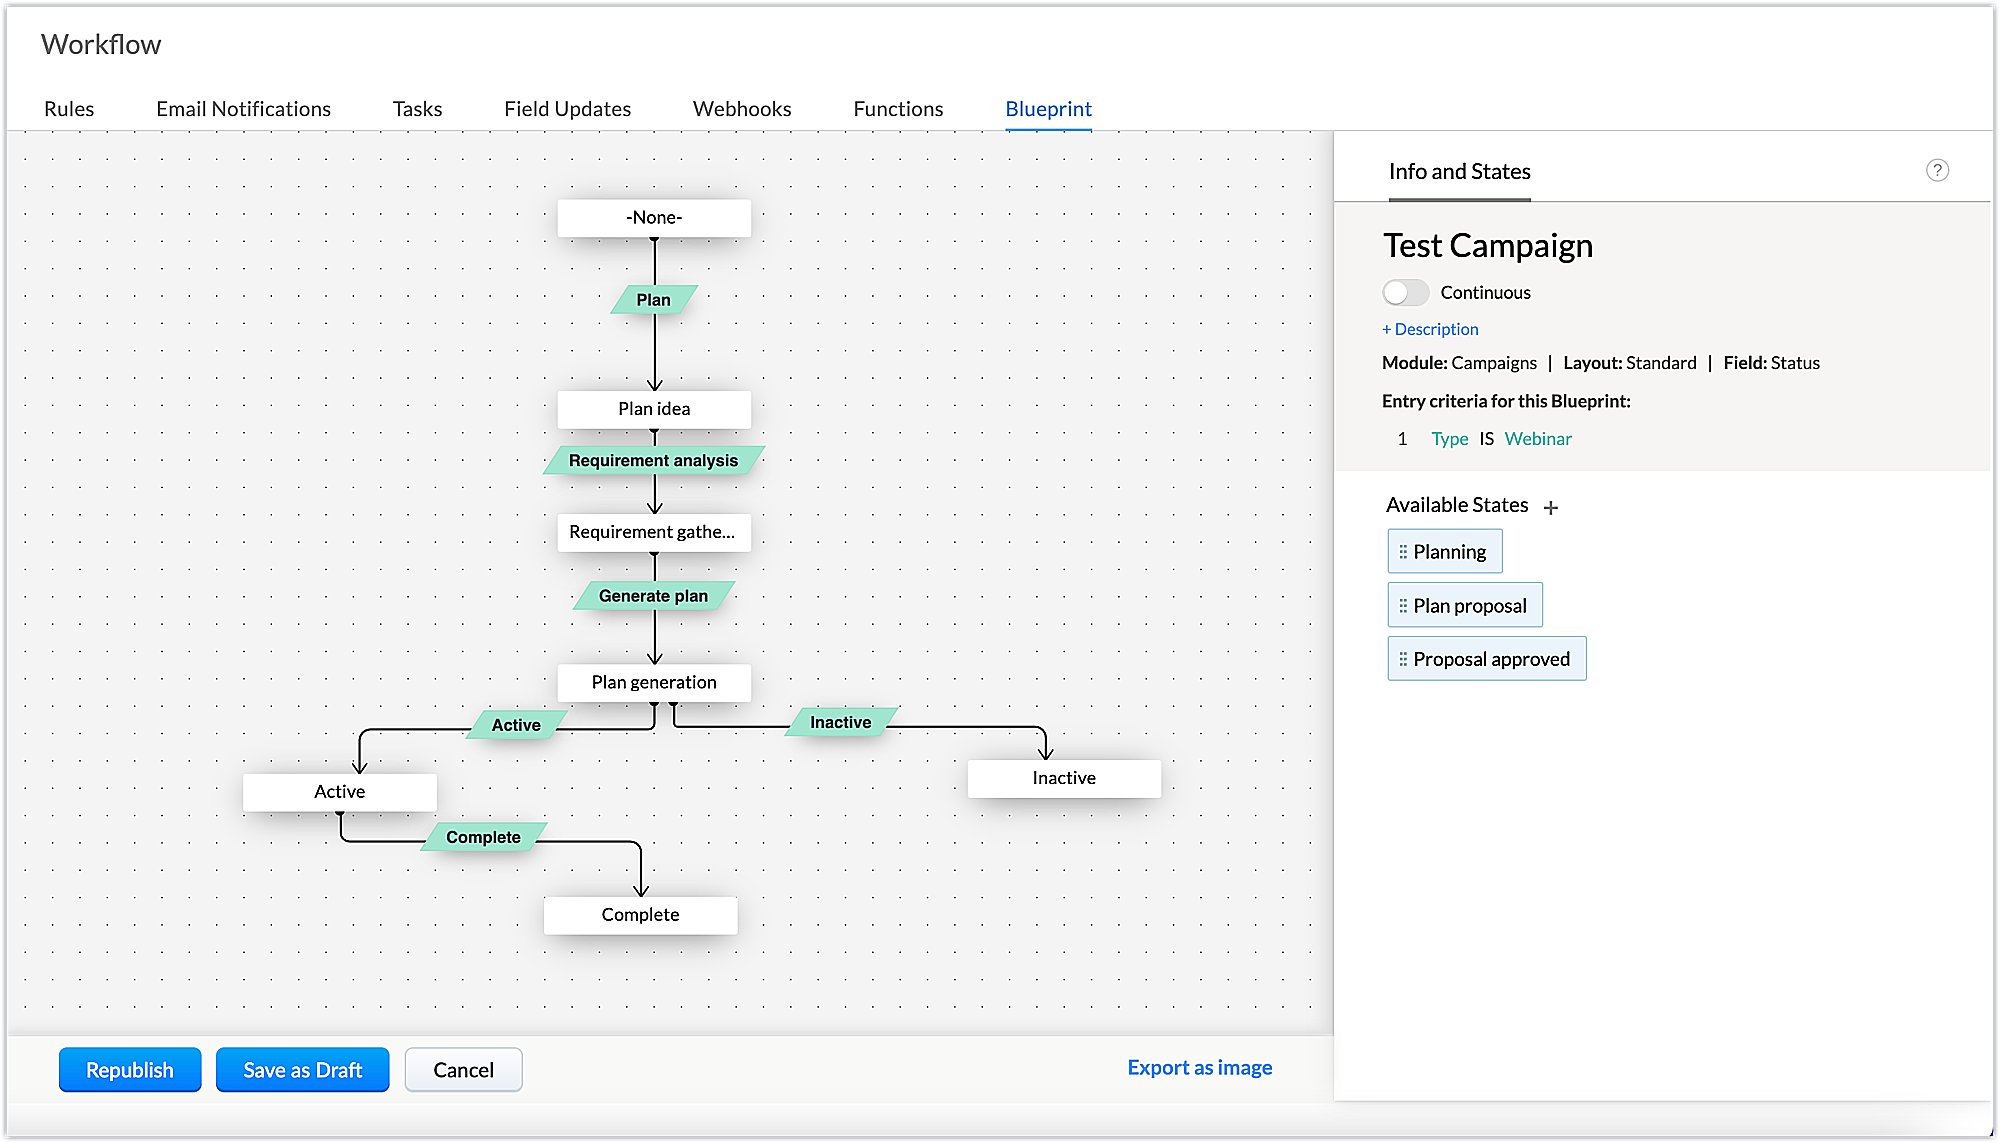
- The states and the transitions involved in our example are listed below.
States | Transitions |
Plan idea | Plan |
Requirement gathering | Requirement analysis |
Plan generation | Generate plan |
Active | Active |
Inactive | Inactive |
Complete | Complete |
- Next, add the criteria to be met at different stages of the transition (BEFORE, DURING, and AFTER). These transitions are conditions to be met to cross from one state to another, and will appear as buttons on the record details page.
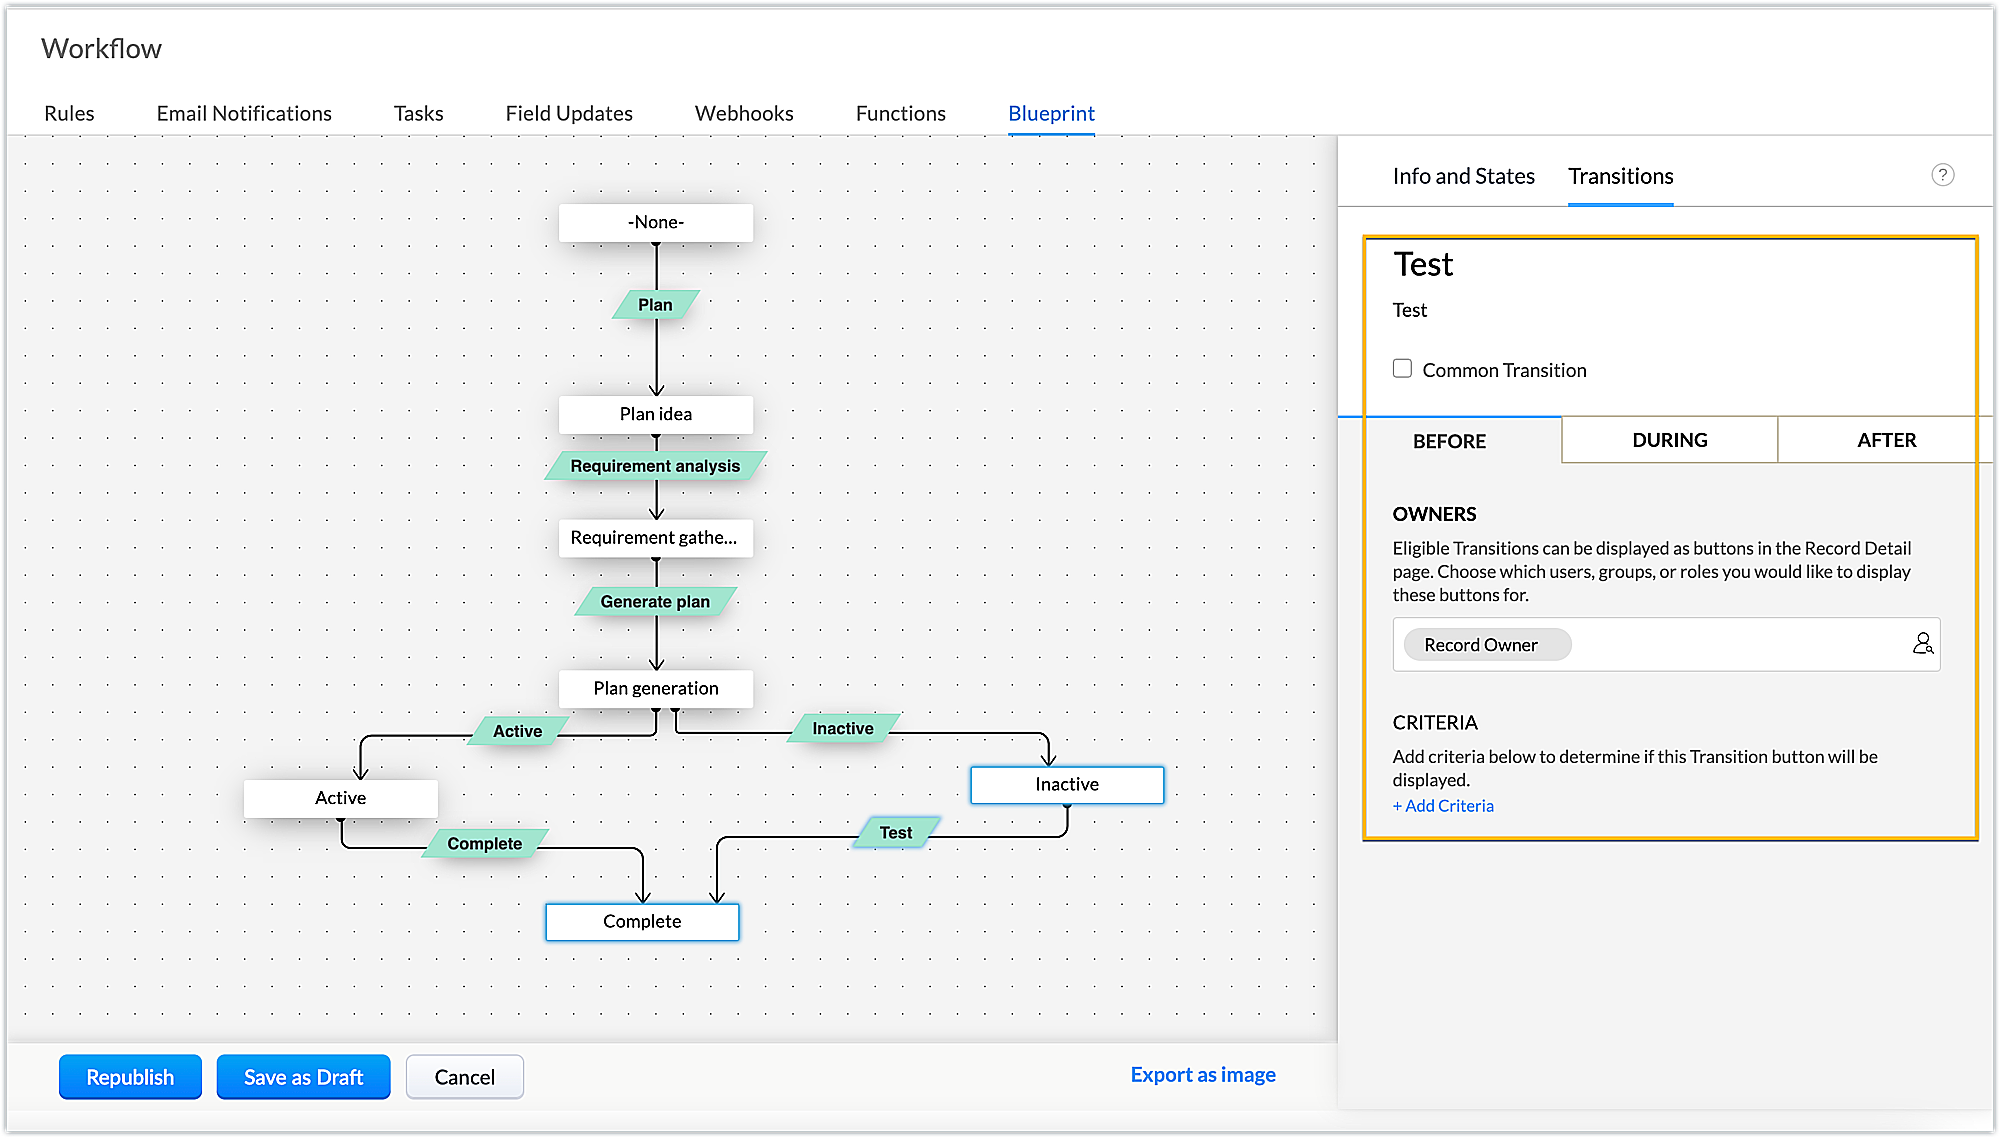
- Let's see the criteria involved in our example for each transition.
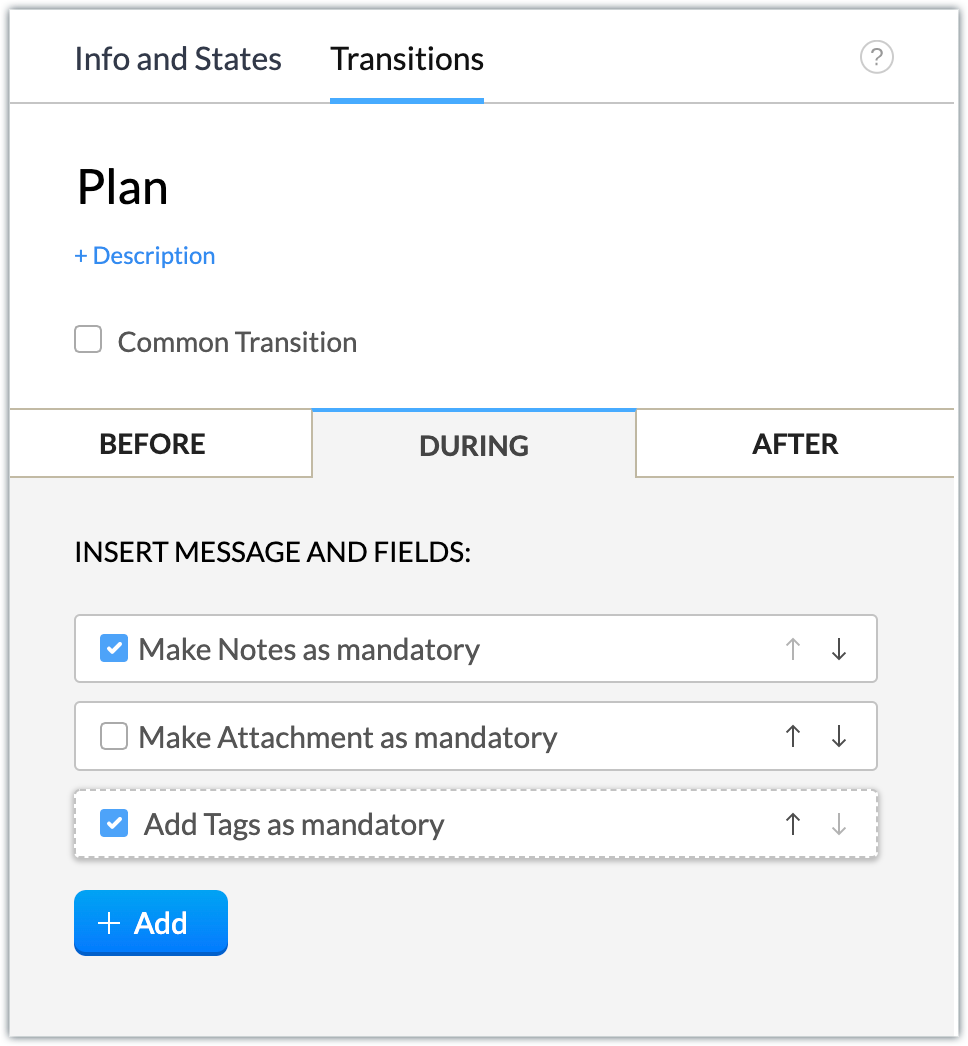
Plan: Notes on the webinar plan and tags are mandatory during this transition.
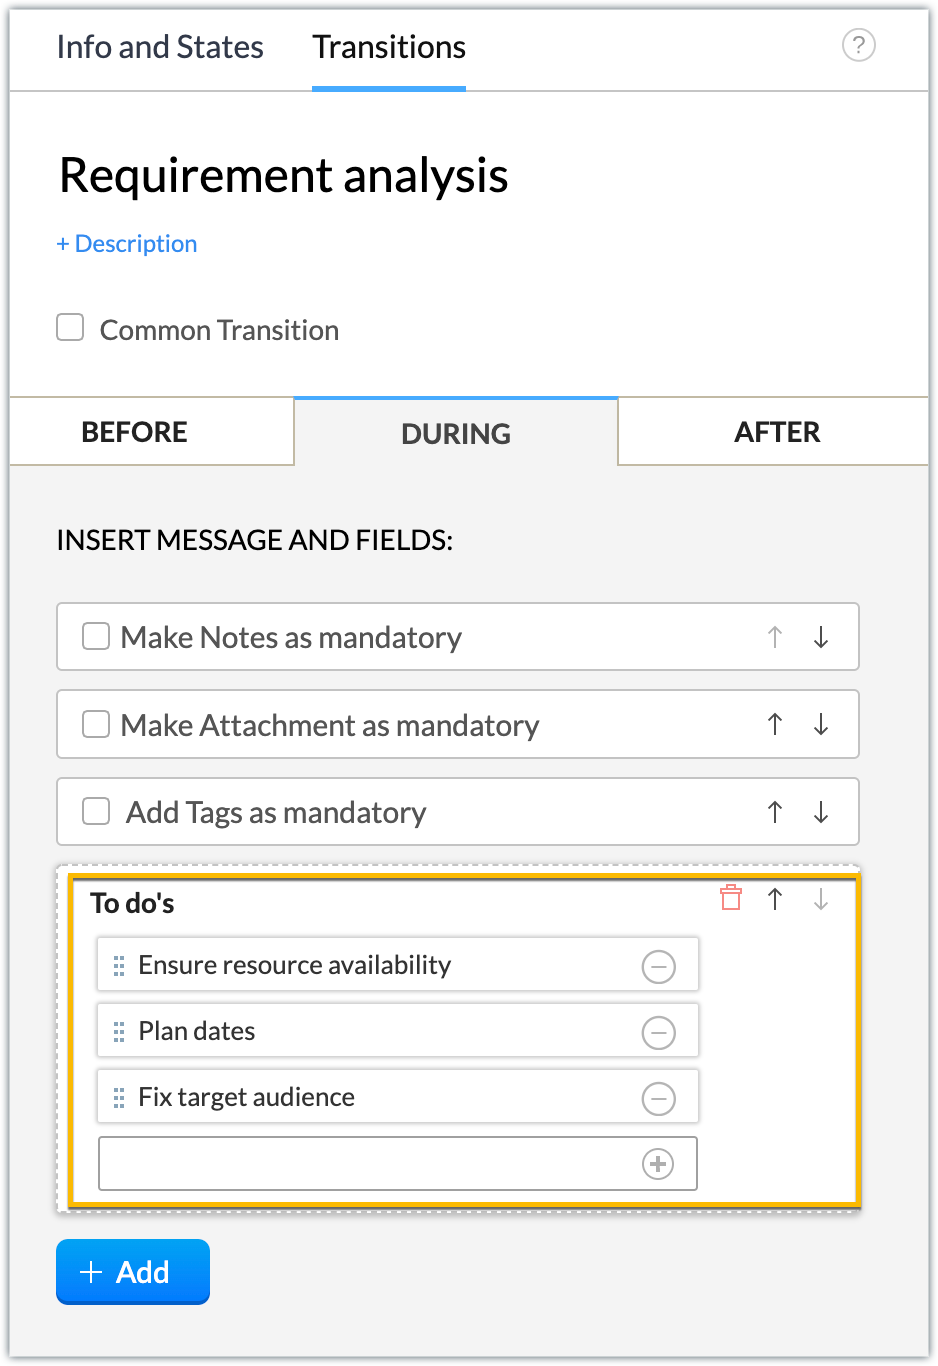
Requirement analysis: Create a checklist for analyzing the requirements by using the Add > Checklists during the transition.
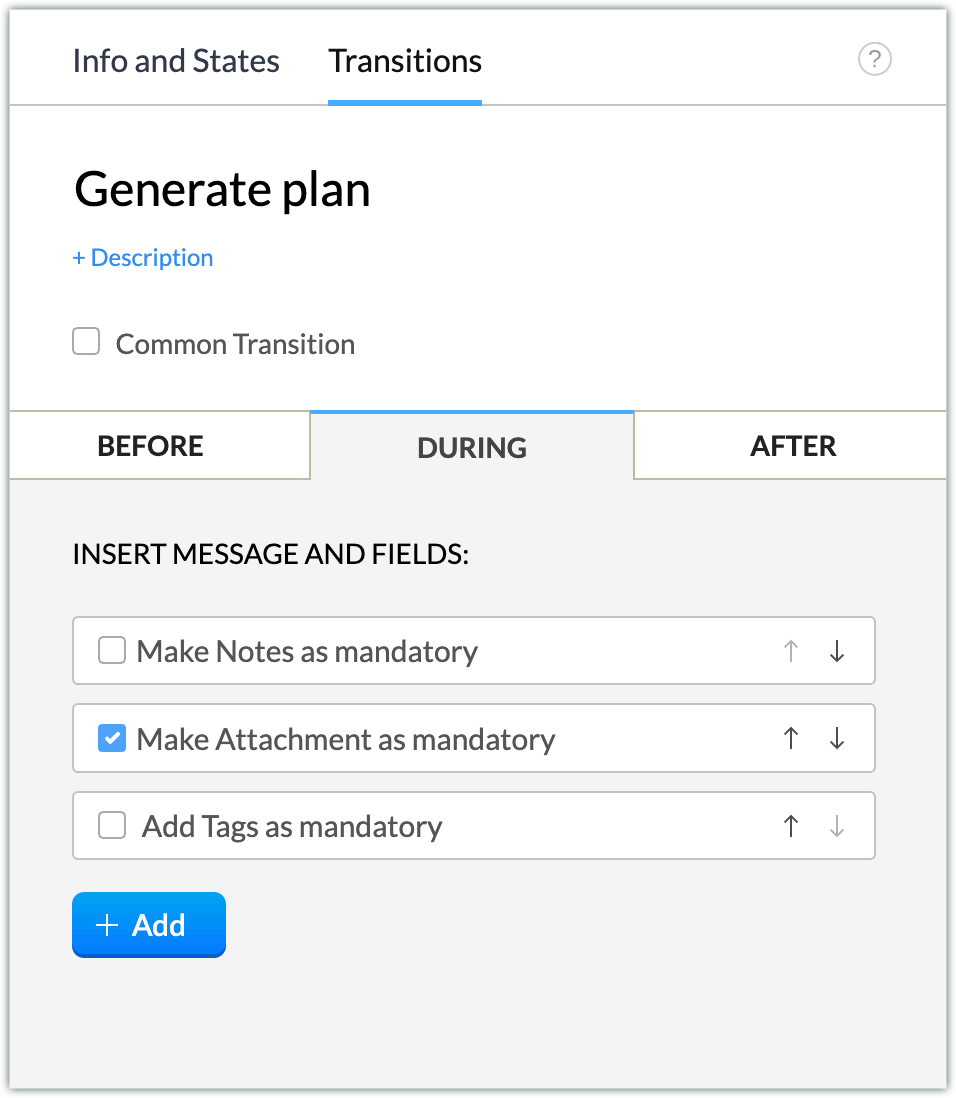
Generate plan: Make attachments of the contents or related documents required for the webinar mandatory during the transition.
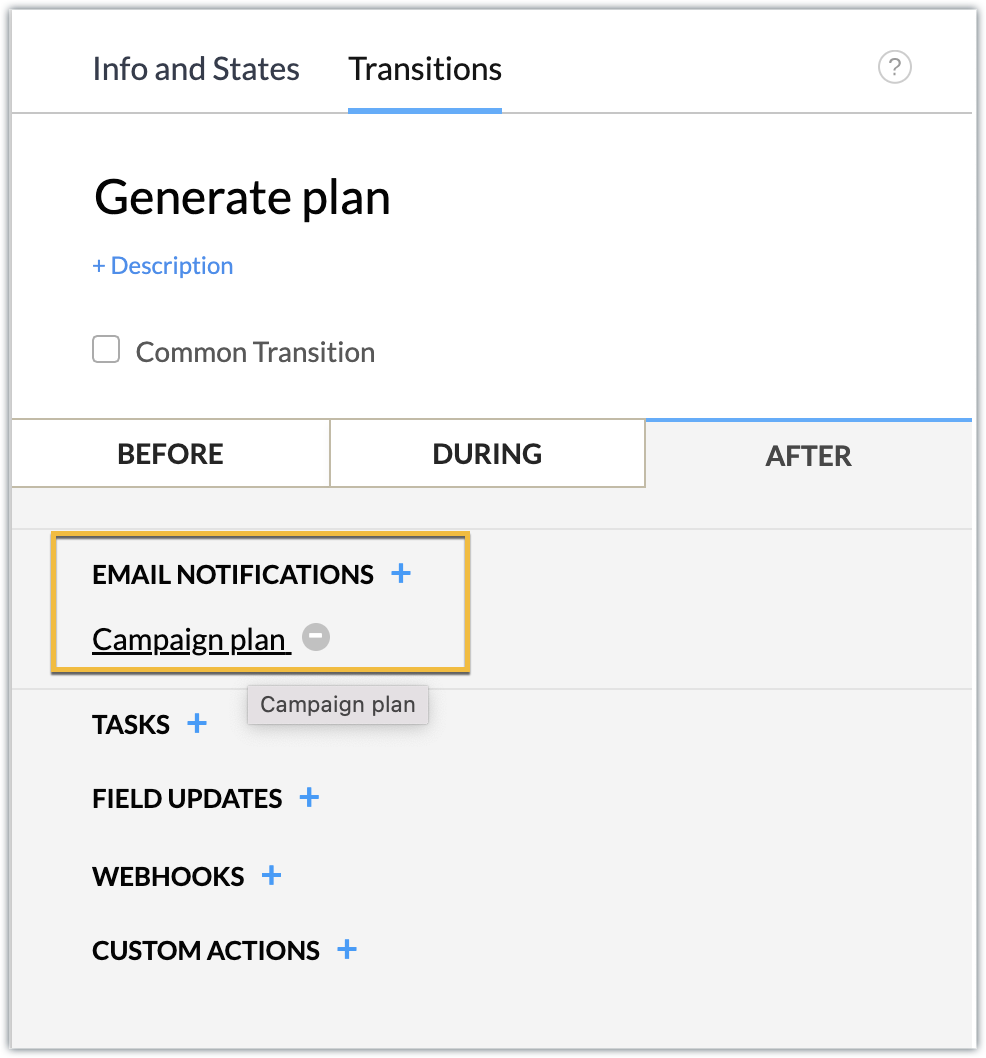
After the transition, generate an email notification to your manager with the campaign plan details. We’ve associated a campaign plan email template that includes the description of the campaign record as part of the email body.
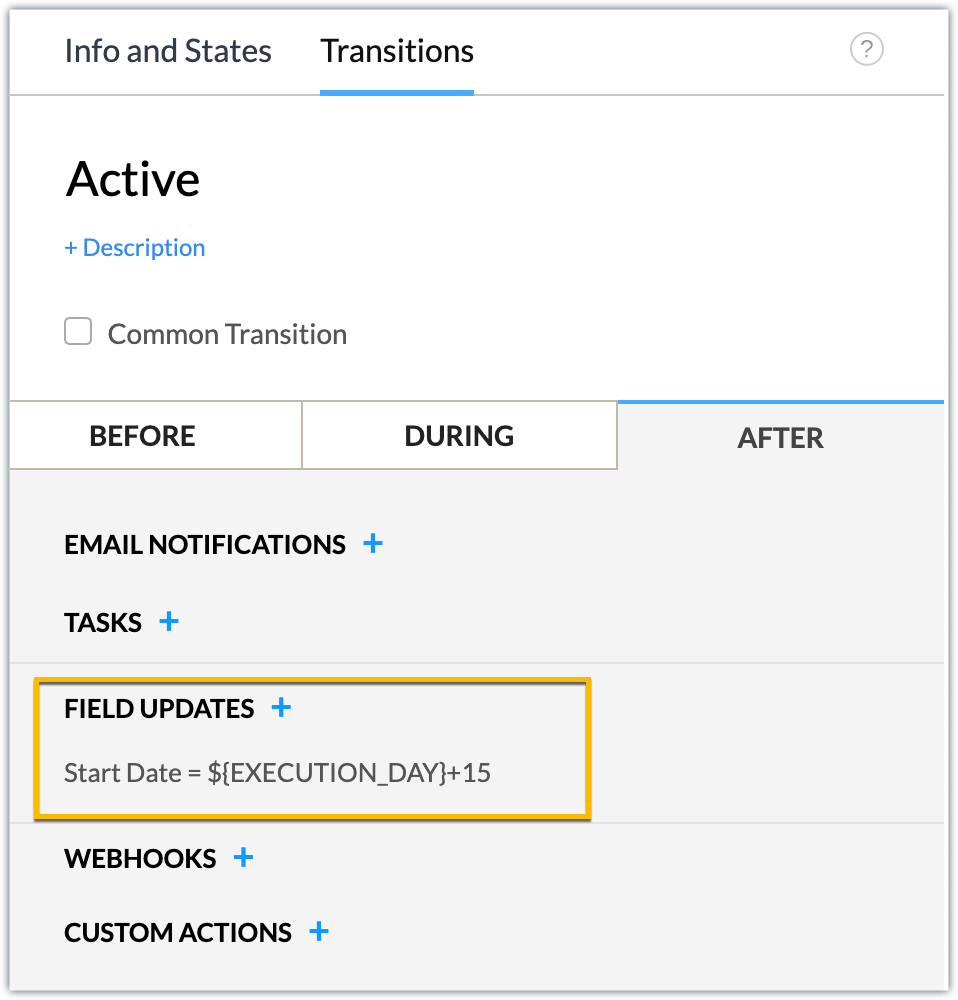
Active: Upon discussion with the manager, if the plan is approved, the campaign plan is active and is to be executed further. Make tags mandatory during the transition.
Schedule the campaign start date for 15 days from the current execution date (i.e., the date the plan changes to active status) after the transition is completed.
Inactive: After discussion with the manager, if the plan is not approved, the campaign plan is inactive and is then moved to an inactive state. When you click Inactive, the campaign is automatically moved to Complete status.
Complete: Finally, whether the plan is active and ready to be executed, we can move it to a closed state by making tags mandatory to establish that the record for creating the webinar campaign plan has been completed.
- Now that the blueprint is designed, click Publish.
- You can now publish the extension and install it in your Zoho CRM account.
Sample Output
You can view the sample output attached as a video.
In this manner, any webinar campaign will follow the blueprint process to completion. Similarly, you can create blueprints for each campaign and efficiently manage your campaign management process.
We hope you find this information useful. Keep following us for more inputs!!
Topic Participants
Nanditha Somasundaram Somasundaram
Sticky Posts
Kaizen #226: Using ZRC in Client Script
Hello everyone! Welcome to another week of Kaizen. In today's post, lets see what is ZRC (Zoho Request Client) and how we can use ZRC methods in Client Script to get inputs from a Salesperson and update the Lead status with a single button click. In thisKaizen #222 - Client Script Support for Notes Related List
Hello everyone! Welcome to another week of Kaizen. The final Kaizen post of the year 2025 is here! With the new Client Script support for the Notes Related List, you can validate, enrich, and manage notes across modules. In this post, we’ll explore howKaizen #217 - Actions APIs : Tasks
Welcome to another week of Kaizen! In last week's post we discussed Email Notifications APIs which act as the link between your Workflow automations and you. We have discussed how Zylker Cloud Services uses Email Notifications API in their custom dashboard.Kaizen #216 - Actions APIs : Email Notifications
Welcome to another week of Kaizen! For the last three weeks, we have been discussing Zylker's workflows. We successfully updated a dormant workflow, built a new one from the ground up and more. But our work is not finished—these automated processes areKaizen #152 - Client Script Support for the new Canvas Record Forms
Hello everyone! Have you ever wanted to trigger actions on click of a canvas button, icon, or text mandatory forms in Create/Edit and Clone Pages? Have you ever wanted to control how elements behave on the new Canvas Record Forms? This can be achieved
Recent Topics
Feature Request - Ability to Customise Contact Info Card on Ticket Details View
Hi Desk Team, I've added a "Contact Priority" and "Account Prioirty" field and it would be very useful to agents if they could see that information in the Contact Info card on the Ticket Details view. It would be great if we could choose some fields toTax in Quote
Each row item in a quote has a tax value. At the total numbers at the bottom, there is also a Tax entry. If you select tax in both of the (line item, and the total), the tax doubles. My assumption is that the Tax total should be totalling the tax fromZoho Flow integration with Facebook Messenger and Whatsapp
Hi there, any plans of adding integrations with Facebook Messenger and Whatsapp into Zoho Flow? Seems that more and more business are delivering automated updates such as "your order is received", "your order has been shipped" and so on via these two platforms. Not sure if Whatsapp has the API access needed i am pretty sure that Facebook Messenger has... Kind regards Bo ThygesenNotes badge as a quick action in the list view
Hello all, We are introducing the Notes badge in the list view of all modules as a quick action you can perform for each record, in addition to the existing Activity badge. With this enhancement, users will have quick visibility into the notes associatedReally want the field "Company" in the activities module!
Hi team! Something we are really missing is able to see the field Company when working in the activities module. We have a lot of tasks and need to see what company it's related to. It's really annoying to not be able to see it.🙈 Thx!Feature Requests - Contact Coloured Picklist Visibility & Field Visibility During Ticket Creation
Hi Desk Team, I have 2 feature requests for you. Since Coloured Picklists are now available in Desk, It would be great if the colours were visible on the Related Details (Contact Information) when creating a ticket. In the screenshot below, I have 2 fieldsMulti-currency and Products
One of the main reasons I have gone down the Zoho route is because I need multi-currency support. However, I find that products can only be priced in the home currency, We sell to the US and UK. However, we maintain different price lists for each.Campaigns unsubscribe/manage preferences links
Hi, Where can I edit the unscubscribe and manage preferences link in the footer of the email. I would like it so that when you click 'manage preferences' an form opens up that allows the person to choose what type of emails they do and don't wish toemail address somehow still not verified (?!)
L.S. After creating a new email template in CRM I was about to send a group email to my clients, then Zoho CRM announced that they would change the sender address to some kind of Zoho-e-ddress because my email address "has not been verified". Not onlyMarketing Tip #17: Add credibility to your online store with Review Widgets
One of the fastest ways to build trust in an online store is to show real customer feedback right where people are deciding to buy. Third-party widgets let you embed things like Google Reviews, Instagram feeds, or even a WhatsApp chat button. These addadding several team members to an Opportunity
How can we add several team members to one opportunity for collaboration? I have researched and only found something called Deal Team which I cannot find in my CRM to configure.CRM gets location smart with the all new Map View: visualize records, locate records within any radius, and more
Hello all, We've introduced a new way to work with location data in Zoho CRM: the Map View. Instead of scrolling through endless lists, your records now appear as pins on a map. Built on top of the all-new address field and powered by Mappls (MapMyIndia),PDF Annotation is here - Mark Up PDFs Your Way!
Reviewing PDFs just got a whole lot easier. You can now annotate PDFs directly in Zoho Notebook. Highlight important sections, add text, insert images, apply watermarks, and mark up documents in detail without leaving your notes. No app switching. NoBulk update Profile Permissions
Dears, What should we do if we add new forms or reports and need to update more than 20 permissions? Updating them one by one feels pretty harsh, doesn’t it?From Zoho CRM to Paper : Design & Print Data Directly using Canvas Print View
Hello Everyone, We are excited to announce a new addition to your Canvas in Zoho CRM - Print View. Canvas print view helps you transform your custom CRM layouts into print-ready documents, so you can bring your digital data to the physical world withCustomizable UI components in pages | Theme builder
Anyone know when these roadmap items are scheduled for release? They were originally scheduled for Q4 2025. https://www.zoho.com/creator/product-roadmap.htmlUnify Overlapping Functionalities Across Zoho Products
Hi Zoho One Team, We would like to raise a concern about the current overlap of core functionalities across various Zoho applications. While Zoho offers a rich suite of tools, many applications include similar or identical features—such as shift management,Filter in fields from Jira extension
We have installed the Jira extension so we can maken Jira issues from Zoho desk. In Zoho desk I can also see the Jira issue status for example but I can not filter on this field. I would like to setup an filter showing me the closed Jira issues. How cantext length in list report mobile/tablet
Is there a way to make the full text of a text field appear in the list report on mobile and tablet? With custom layouts, the text is always truncated after a certain number of characters.Zoho Creator customer portal limitation | Zoho One
I'm asking you all for any feedback as to the logic or reasoning behind drastically limiting portal users when Zoho already meters based on number of records. I'm a single-seat, Zoho One Enterprise license holder. If my portal users are going to add records, wouldn't that increase revenue for Zoho as that is how Creator is monetized? Why limit my customer portal to only THREE external users when more users would equate to more records being entered into the database?!? (See help ticket reply below.)Link Contacts to Billed Accounts
Hello, I want to do a survey on all my customers of 2025. For that I want to select all contacts linked to accounts who where billed in 2025. How to I create this link to I can then use Zoho Survey with this database of contacts?Export all of our manuals from Zoho Learn in one go
Hi, I know there's a way to export manuals in Zoho Learn, but I want to export everything in one go so it won't take so long. I can't see a way to do this, can I get some assistance or is this a feature in the pipeline? Thanks, HannahBring Zoho Shifts Capabilities into Zoho People Shift Module
Hello Zoho People Product Team, After a deep review of the Zoho People Shift module and a direct comparison with Zoho Shifts, we would like to raise a feature request and serious concern regarding the current state of shift management in Zoho People.Historical Sales Info - Blend with Finance Invoice Line Items, Access in CRM and Desk
My company has been using Zoho One since 2021, with sales data going back through 2020. However, we have been in business much longer, and we have historical sales information that we want to have at our fingertips when talking with customers (usuallyIs there API Doc for Zoho Survey?
Hi everyone, Is there API doc for Zoho Survey? Currently evaluating a solution - use case to automate survey administration especially for internal use. But after a brief search, I couldn't find API doc for this. So I thought I should ask here. ThanPre-Zoho Sales Info - Best Way to Add to Desk / CRM
My company has been using Zoho One since 2021, with sales data going back through 2020. However, we have been in business much longer, and we have historical sales information that we want to have at our fingertips when talking with customers (usuallyShift-Centric View for Assigning and Managing Shifts in Zoho People
Hello Zoho People Product Team, Greetings and hope you are doing well. This feature request is related to Zoho People - please don't move it to zoho one! We would like to submit a feature request regarding the shift assignment and management view in ZohoCRM function REST API response format
Is there a way to control the JSON response returned by the CRM function REST API? If I call a function using either OAuth or an API key it returns a 200 OK response with a string in the format shown below. I am using a particular feature of an externalAdd Employee Availability Functionality to Zoho People Shift Module
Hello Zoho People Product Team, Greetings and hope you are doing well. We would like to submit a feature request to enhance the Zoho People Shift module by adding employee availability management, similar to the functionality available in Zoho Shifts.Using MPN across multiple SKUs and inventory tracking
I have several different SKU's that share a common MPN and would like to track inventory by MPN. SKU1 has MPN1 assigned SKU2 has MPN1 assigned Here is an example If I start with 5 of MPN 1 in stock I want each SKU1 and SKU2 to show as 5 in stock, If IUnable to Access Application:
Whenever I try to access my application from the desktop, say I am editing it and want to test something in the desktop environment I get: An error has occurred. An internal error has occurred. Please check the URL , or try refreshing the page I can editAdding custom "lookup" fields in Zoho Customization
How can I add a second “lookup” field in Zoho? I’m trying to create another lookup that pulls from my Contacts, but the option doesn’t appear in the module customization sidebar. In many cases, a single work order involves multiple contacts. Ideally,Cannot see Application from Lookup field
Hi all, I am trying to access data for an application on our account via a lookup field; however, the application doesn't appear in the dropdown at all. Can anyone shed any light on this, please? I have asked Zoho support; however, they're just as confused,Cannot see correct DNS config for mail after moving domain to another provider
I have moved my domain from one provider to another and after that zoho mail stopped working (expected). Problem is, zoho mail admin panel still shows (10 hours after move) that all records are correct while I haven't changed anything in my domain DNSZoho CRM Meetings Module Issues
We have a use-case that is very common in today's world, but won't work in Zoho CRM. We have an SDR (Sales Development Rep) who makes many calls per day to Leads and Contacts, and schedules meetings for our primary Sales Reps. He does this by loggingZoho Books integration sync from Zoho CRM does not work
Hi Zoho Community & Zoho Support We just tried to get a sync some products into Zoho Books from CRM using the native sync and we're getting an error: "It looks like some mandatory fields you're trying to map are empty. Please provide valid field namesP & L Sub-categorized accounts
How can I show sub-categorized Income and Expense accounts on the P & L report?Report showing Bill Details with Project and Sales Invoice Number
Hi There, I am hoping that someone can help, I am looking for report that can show the bill and expense details along with project its as assigned to and the invoice number that the sales has been raised in. The goal is I can filter a customer/projectAdvanced Payment for Inventory Items with serial numbers
Hello, We sell equipment that we track the unique serial numbers on using Sales Orders. We can charge the customers an advanced payment, then the balance on delivery. We cannot figure out a way to do this in Books/Inventory: - Cannot part invoice a SOIs it possible to restrict ZCRM user to see only custom views created by administrator
I have segmented data in my CRM and I want to allow different users to be able to see only parts of it based on some criteria. I've tried to create and share a custom view, but then there is always an option for user to see all open lead for example.Next Page