Import data into a CRM module
This help document is for a new version of the import tool. The help document for the classic import tool is here.
The import tool helps you move data into a CRM module quickly. You can use this to add, update, or both (update + insert) multiple records in a CRM module. It is available in all editions of the CRM.
One common use case is importing data from various sources into the CRM.
For example, you'll have valuable contact information spread across tradeshow lists, purchased lists, or Excel files from sales reps. You can import each file into the Contacts module to have a single source of truth for your marketing and sales teams.Another use case is performing bulk updates. For example, your sales ops team can export, enrich, and re-import data. You may want to backfill data for a new field in all existing records. They can do this as needed to keep your data relevant.
You're looking to move your entire data from another CRM or system into multiple Zoho CRM modules.
You want to import attachments (files) or images into a module.
You want to import data into system fields like Created Time, Modified Time, etc.
The import tool, on the other hand, is designed to handle frequent data imports that are simple and module-specific.
How does the import process work?
The main steps of the import process are simple:
-
Prepare your files* and drop them in the import tool.
-
Map the files to the modules and the files' columns to the CRM fields.
-
Run the import and wait till it's completed.
-
If unsuccessful, fix the files and redo the import.
*For each import operation, you can add one file for the main module and one for each dependent module like subforms, multi-select lookup or multi-user associations.
Tip
-
First, copy your import file and make changes only to the copy. Then, import this copy into the CRM. This way, the original file stays untouched and available for other uses.
-
If you're looking to import a lot of records, it's better to import a small subset first. You can fix your file based on issues that come up before attempting the larger import.
Quick guide
Pre-requisites
-
Make sure the Import Records permission is enabled for your profile.
-
Prepare the import files (csv/ xls/xlsx/vcf formats are supported).
Sample import files
You can see two sample files embedded here (one for module data and another for a dependent module).
Hover over the column names to see the notes. Scroll as needed.
For testing, you can download a sample file from the Import page itself.
Module data import file
Dependent module import file
In each import, you can add one file for the module (mandatory) and one file for each dependent module (subforms / multi-select lookup field associations, multi-user associations).
If the dependent module is mandatory, you'll have to add an import file for it for Add (Insert) and Both(Upsert). For update, it is not necessary to add an import file for the mandatory dependent module.
Import data
-
Navigate to the module where you want to import the data. For example, this could be Leads, Contacts, Accounts, Deals, and so on.
-
Near the Create [Record] button, click the down arrow and select Import [Records].
-
Drag and drop the files containing the data, or click Browse and select the files.
-
Select the Charset to parse the files. This will appear only after you've uploaded the file. The default Auto-Detect option should work well in most cases. Click Next.
-
Select the layout and whether you want to add records, update them, or both. Click Next.
-
If you've added multiple files, drag and drop them from the left sidebar to the module on the right. Alternatively, you can click Map File for each module and select the file. Click Next.
-
Map the each files' columns to the CRM fields. Click Save and Next.
-
Choose the post-import actions and click Submit.
-
The import will commence. You'll see a popup once the import is complete. If successful, refresh the browser to see the newly imported data in the module.
-
You can check the details of the import by navigating to Setup > Data Administration > Import > Import History. Here, you can click on the import you've performed to see more details like which rows were added, updated, skipped, and so on.
Detailed guide
This guide contains the following sections:
-
Section 1: Things to know before using the import tool (permissions, file format and size requirements, supported modules and fields)
-
Section 2: Importing dependent module data along with main module data
-
Section 3: Detailed instructions for performing the import
-
Section 4: Find why the import failed for some rows
-
Section 5: Undo an import
-
Section 6: View history of imports
Things to know before using the import tool
Org modules: You'll need the Import Records profile permission to import in org modules. Ask your CRM admin to enable the permission for that module: Changing profile permissions.
Team modules: You'll need the Import Records permission enabled for your team module profile by the team module admin: Manage actions for team module profiles.
This tool imports data into most CRM modules and fields.
Standard org modules
Leads
Contacts
Accounts
Deals
Tasks
Meetings
Calls
Products
Quotes
Sales Orders
Purchase Orders
Invoices
Campaigns
Vendors
PriceBooks
Cases
Solutions
Custom modules
Custom org modules
Team modules
Dependent modules for the above modules
Subforms (both system-defined and custom subforms)
Linking modules(created via multi-user or multi-select lookup fields)
Price Book Record -> Price Book Product Relation (Related)
Campaign Record -> Leads/Contacts (Related)
Others
Notes for each module
Users
Unsupported fields
Auto Number
Formula
Aggregate Fields
Rollup Summary
Layout
Created Time
Modified Time
Created by
Modified by
File Upload
Image Upload
Record Image
Read Only Fields
Importing dependent module data along with main module data
When you import data into a module, you can simultaneously import dependent module data. The term 'dependent modules' refers to the following:
-
Subform records
-
Multi-select lookup associations
-
Multi-user associations
This means that you will drag and drop multiple files in the import tool and map them to the right dependent modules. Please note each module can have one file mapped to it.
Import data into a module
The import process involves a few steps. The first step involves preparing the import files. The import tool is designed to guide you through the subsequent steps smoothly.
Step 1: Prepare the import files
In each import, you can add one file for the module (mandatory) and one file for each dependent module (optional or mandatory based on configuration in layout).
The maximum size for each import file is 25 MB.
The following file formats are supported:
CSV
XLS
XLSX
VCF (for Leads, Contacts, and Users module only)
Maximum number of rows in a file that can be imported depends on edition:
Free - 1,000
Standard/ Zoho One Standard - 20,000
Professional - 50,000
Enterprise/ Zoho One Enterprise - 100,000
Ultimate/ CRM Plus - 200,000
For Users module - 1,000 across all editions
The maximum number of columns supported in a file is 500.
In case you're importing parent records along with dependent module records, each parent record can have up to 100 related records per dependent module in the mapped file (for example, in Multi-User or Multi-Select Lookup fields). For subforms, the limit depends on the configuration defined in that module.
Ensure that the file does not contain unsupported elements:
Special controls, such as combo filters or embedded images in XLS/XLSX files, can lead to unexpected errors.
File attachments should not be present in the import file.
Data enclosed in <script> </script> should not be present.
Ensure the first row in your import file has column names, not data values.
Add columns for mandatory fields and fill them for each row: Records with missing mandatory fields will not be imported.
How to find the mandatory fields
Navigate to the module and click the Create [Records] button.
Click Save.
You will see a warning for certain fields or subforms. Those are the mandatory ones.
Add columns for lookup fields: For lookup fields, you should add a column in the file to help identify the lookup record. This can be one of the following:
Record ID
Unique field
Record name fields (except when the lookup is Leads, Contacts, or Users)
Email (Only for Leads, Contacts, Users,Custom modules, and Linking modules).
External ID field
Remove unwanted columns: Deleting unused columns makes mapping easier.
Add a column from the main module's import file in dependent modules' import file: When importing data for a module along with its dependent modules, the dependent modules' import file needs a column showing which main module record it is related to. Use a column in the main module’s file that has unique values.
Add custom fields to the CRM module: If your file has important data in a column without a corresponding field in the CRM, you can't map that column and that data will not be imported. To import this data, add custom fields before importing or use the Create New Fields option during import.
Ensure lookup column entries have values of the same type: All rows in a single column must use the same type of lookup. If you choose "Email" to identify lookup records, then all rows in that column should use emails. You can’t mix emails with record IDs in the same column.
Format tag values: For tags, the data should be comma (,) separated if you have multiple tags for a single record in file. Eg: "Tag 1,Tag 2".
Format multi-select picklist values: For multi-select picklists, the data should be separated using a semi-colon (';') if you want to select multiple values. Eg: "Option 1;Option 2".
Remove empty rows: If more than 10 consecutive rows are empty, it will be considered the end of the import file. Rows after these consecutive empty rows will not be imported.
Download the sample file
In the import tool, you can download a sample file. It shows the correct format for that module’s import.
-
Navigate to the module where you want to import the data. For example, this could be Leads, Contacts, Accounts, Deals, and so on.
-
Near the Create [Record] button, click the down arrow, and select Import [Records].
-
Click the CSV or XLSX link to download the sample file in that format. The links will be present below the Browse Files button.
Step 2: Upload the files
-
Navigate to the module where you want to import the data. For example, this could be Leads, Contacts, Accounts, Deals, and so on.
-
Near the Create [Record] button, click the down arrow and select Import [Records].
Not able to see this option?
You don't have the Import Records permission enabled for your profile (org module) or your team module profile (team module). Please contact the respective admin and get this permission enabled for your profile. -
Drag and drop the files containing the data, or click Browse and select the files.
-
Select the Charset to parse the files. This will appear only after you've uploaded the file. The default Auto-Detect option should work well for most cases.
-
Check the Notify Email option if you want to receive an email on the completion of the import.
-
Click Next.
Step 3: Choose whether records need to be created, updated, or both
-
If the module has multiple layouts, select the one into which you want to import data.
- Select whether you want to add records, update them, or both. Added records can be undone, but updates to existing records cannot be reverted.Add as new [Records]This adds the entries from the import file as new records in the CRM. Prevent duplicates by selecting a unique CRM field. In a subsequent step, you'll have to map an import file column to that CRM field. Rows in the file with matching values already in the CRM will be skipped.Update existing [Records] onlyThis makes changes to existing records based on the entries in the import file. No new record is created.
To find existing records, you'll have to select a CRM field that is unique. You'll map this field to a corresponding column in the import file in a subsequent step.
You can skip updating empty values in the records.
For example, your CRM record has "Hospitality" as the Industry. The import file leaves the Industry field as blank for that record. Choosing this option will retain the existing "Hospitality" value in the CRM record. If you don't choose this option, the value will be overwritten and the Industry field will be empty.
Both
If the entries in the file are not present in the CRM, they are added as new records. If they are present in the CRM, they will be updated.To find existing records, you'll have to select a CRM field that is unique. You'll map the corresponding column in your import file in the next screen.
You can choose to skip updating empty values in the records.
Example: If your CRM record has "New York" as the Location, and the import file leaves that field blank, choosing this option will keep the existing "New York" value unchanged after the import.
-
Click Next.

Important note: You don't choose an import option for dependent modules separately. The option you chose for the main module controls how dependent module records are handled.
If you are importing dependent module data along with the main module data, the option chosen for the main module decides how dependent module records are imported:
-
Add as new for main module: Dependent module records will be added as new records.
-
Update existing record/ Both for the main module: Dependent module records will be up-serted i.e. updated if it already exists in the CRM and inserted if it doesn't.
Step 4: Mapping files and fields
-
Map the import files to the right modules. If you're importing one file, click Next. Otherwise, drag and drop the files from the Unmapped files section in the left to the module in the right.
Note: If a dependent module is mandatory, you will have to upload a file for it in the second step and map it here in order to proceed. -
Map the import file's columns to the CRM module's fields using the dropdown list.
-
On the left, you will see the import file's columns. On the far right, you can see a preview of values in those columns.
For each column that you need, you can:
-
Map the column to a CRM field: Click the dropdown next to them and select the field in Zoho CRM.
-
Map the column to multiple CRM fields: Hover over the selected field, click + and select an additional field. You can only map to fields of the same data type. So, a column containing date values can only be mapped to date type fields.
-
Replace empty values with a pre-defined value: If you hover to the right of the dropdown list, you will see an option to Replace Empty Values. Simple click here and set the value. For an empty value in the column, this value will be used to fill the CRM field. For example, you can set the field's value as "Not available" if the value in the import file is empty.
-
Select format for certain fields: If you've chosen a CRM field that is Date, Date Time, Currency, Double, Long Integer, Percent, or Integer, you will have to select the format for them. This picklist will appear when you hover over a row.
-
Replace or append tags and multi-select picklist options: When you map a field to the Tag field and a multi-select picklist, a popup appears that lets you choose whether to replace or append values. Click Done.
In addition, you can do the following on the field mapping page:
This will map the file's columns to CRM fields based on how their names match. Please check the mapping before you proceed to the next step.
Instructions
Click Auto Map.
In the popup, click Apply.
Use this option to set a single value for a selected CRM field. For example, you can set the Lead Status as 'New Lead' for all imported lead records.
Instructions
Click the Assign Default Value button.
Select a CRM field.
Set the default value.
Click + to add the default value for another field. Repeat as needed.
Click Save.
When you map a column to a lookup field*, you can associate it based on a unique value like record ID, a unique field's value, record display name, and so on. You'll have to choose one of these in order to link the imported record to the right lookup record.
For example, when importing accessories into the Accessories module, the file may contain a Product column that contains GTIN values. You must map the Product column to the Product lookup field and ensure the lookup matches on GTIN, not on the record ID or any other field.
*This includes the Related To field in Calls, Meetings, and Tasks, and the Connected To field in Team modules.
Instructions
When you map a column to a lookup field, you'll see a popup. Choose the field in the lookup module that'll be used to find the lookup record.
You can click the settings icon next to this field at any time to change the option.
This setting comes up when you import the dependent module data along with parent module data. In a dependent module import file, include a column with unique values to identify each parent record. While mapping fields, you must select the parent module import file's column that needs to be used to find those parent records.
For example, if a subform's import file has a column with email addresses to identify the parent record, you should choose the Email column in the parent module file to help match the records correctly.
Instructions
When you map fields for a dependent module import file, you'll see a popup when you map the Parent Id field. Choose the parent module file's column that will be used to find the parent record.
You can click the settings icon next to this field at any time to change the option.
Once you are done with mapping the necessary fields, click Save and Next.
Perform the mapping for other files. Click Save and Next once you've mapped fields for all files.
Sometimes, an import file column contains valuable data but you may have forgotten to create a CRM field to hold that value. In such cases, you can use this option.
Instructions
Click the Create New Fields button.
A list of unmapped columns in the import file will be displayed. Check the ones you need.
For each column, you can set the field name and field type.
Click Create.
Step 5: Decide what happens after the import
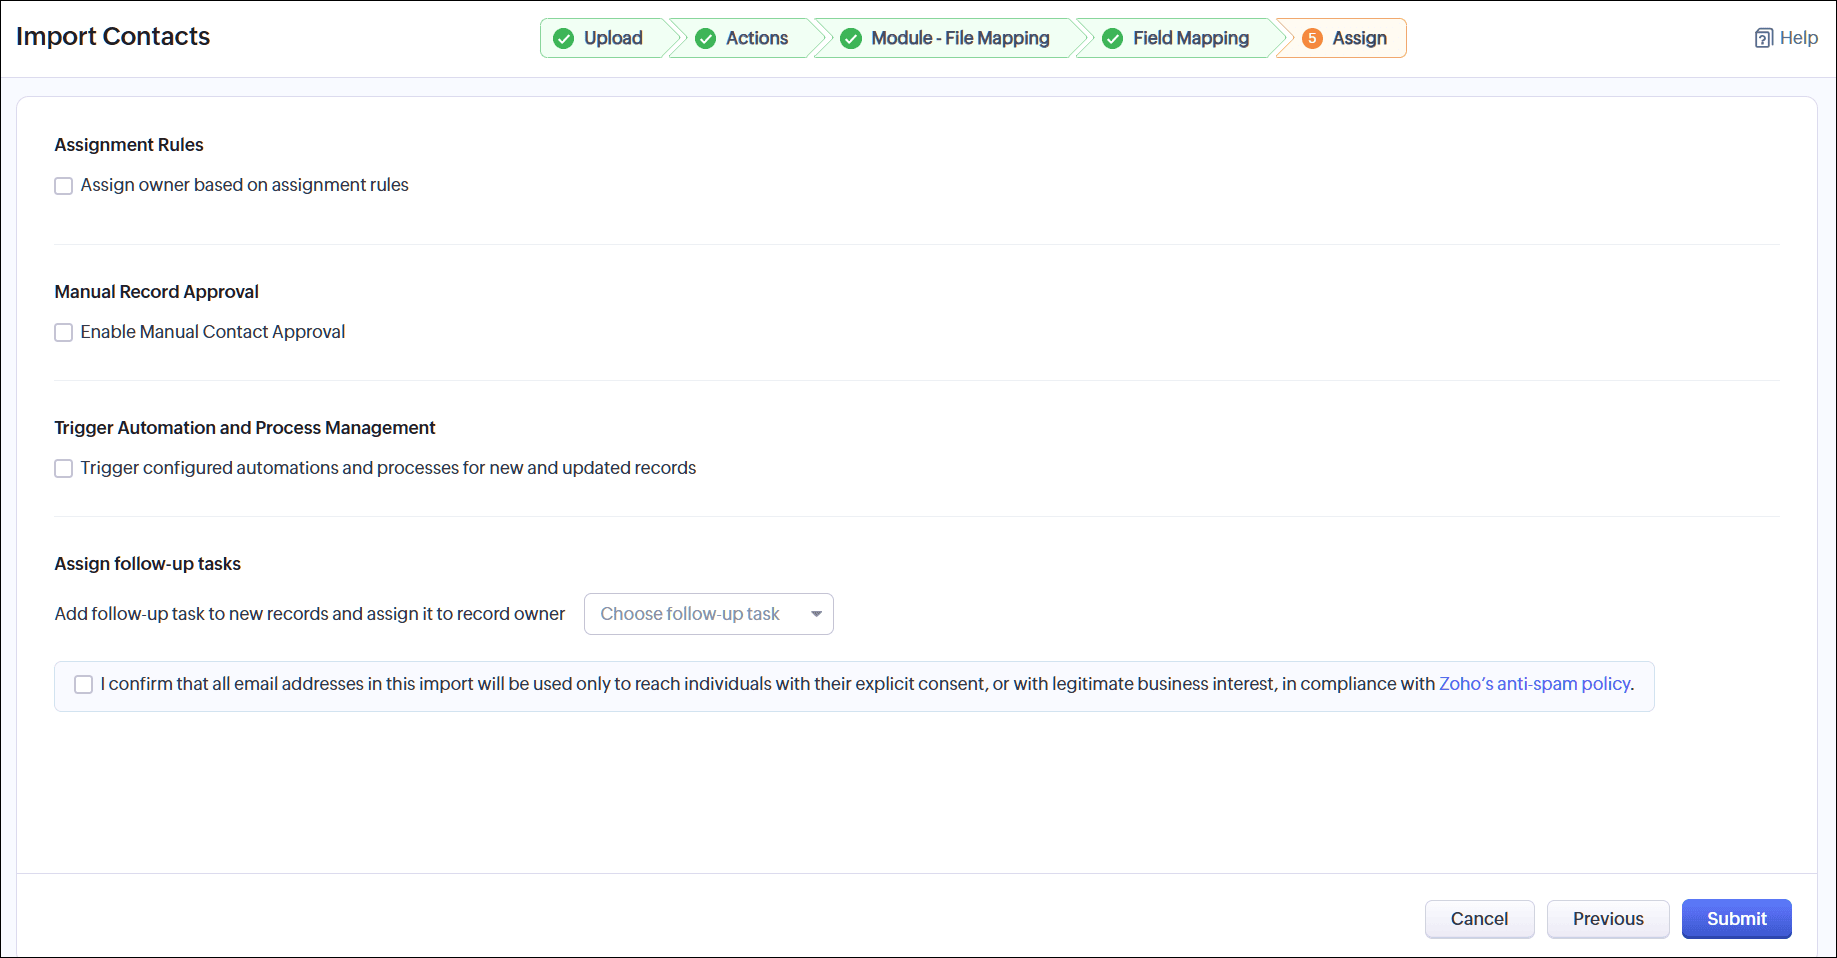
-
If you want to automatically assign owners for imported records, check Assign owner based on Assignment rules, then select an assignment rule.
- If you want the imported records to be manually approved before they are added to the CRM, check the Enable Manual [Record] Approval checkbox.How do I approve these records?1. Navigate to the module.
2. Click the Actions button (...) in the top-right corner.
3. Click Approve [Record Name] and approve the records. -
When you complete an import, new records will be created and/or records will be updated. If you want these events to trigger automations and processes, check Trigger automation and process management for imported records.
-
You can Assign followup tasks for each imported record. This option will be available only if the trigger automation checkbox is not selected.
-
Accept Zoho's anti-spam policy by selecting the checkbox.
-
Please note that updates to existing records cannot be reverted. Click Submit to initiate the import. You'll see a message saying "Import Scheduled".
-
Once the import is completed, you'll receive a notification in the CRM. If you've enabled the Notify via email option, you'll receive an email as well. Refresh the browser tab to see the imported data.
Find why import failed for some rows
This option will be available for imports performed within the last seven days.
Some records in the import file will be skipped due to errors. Here's how you can quickly identify what caused the error for each row:
-
Navigate to Setup > Data Administration > Import > Import History.
-
Under the import you've completed, click View Imported Modules.
-
Click the module and, under Skipped column, click the number.
-
You'll see the Import Summary with the list of skipped records along with the Errors.
-
You can even download the list of records with error.
Undo an import
This option will be available for imports performed within the last 30 days.
You can undo records that have been added via import. You will not be able to undo updates made to records via import.
To undo the import, do the following:
-
Navigate to Setup > Data Administration > Import > Import History.
-
Hover over the import you've completed.
-
Click Undo Import.
-
Read the warning and click Yes, Proceed.
You'll see a message near the import saying "Undo in progress".
You'll receive a popup notification in the CRM when the undo is complete.
View history of imports
The list of all the imports performed in your account will be tracked in the Import History page. To access it, do the following:
-
Navigate to Setup > Data Administration > Import > Import History.
-
You will see your list of imports. You can do the following:
-
For imports done within the last seven days, you can undo the import (for added records), view the import summary (number of records added, updated, skipped), detailed import summary (along with the number of records added, updated, skipped, and you can see field values (for added and updated records) and warnings and errors (for skipped records).
-
For imports done within the last 30 days, you can view the import summary.
Note: The import history tab will include entries for imports done via the data migration tool.
See also
If you'd like to import data into multiple CRM modules or you're migrating data from another CRM system, see Data migration.
If you'd like to export the records in a CRM module, see Data export.