Export data to Zoho WorkDrive
Zoho DataPrep supports exporting data to Zoho WorkDrive, a popular cloud storage service. Zoho WorkDrive allows you to store files and collaborate securely on the cloud.
To export data to Zoho WorkDrive
1. Open an existing pipeline or create a pipeline from the Home Page, Pipelines tab or Workspaces tab. You can bring your data from 50+sources.
2. On the Pipeline Builder page, once you have completed creating your data flow and applying the necessary transforms in your stages, you can right-click a stage and select the Add Destination option.
2. On the Pipeline Builder page, once you have completed creating your data flow and applying the necessary transforms in your stages, you can right-click a stage and select the Add Destination option.
3. Choose the Cloud storage category and Zoho WorkDrive option or you can type Zoho WorkDrive in the search box.
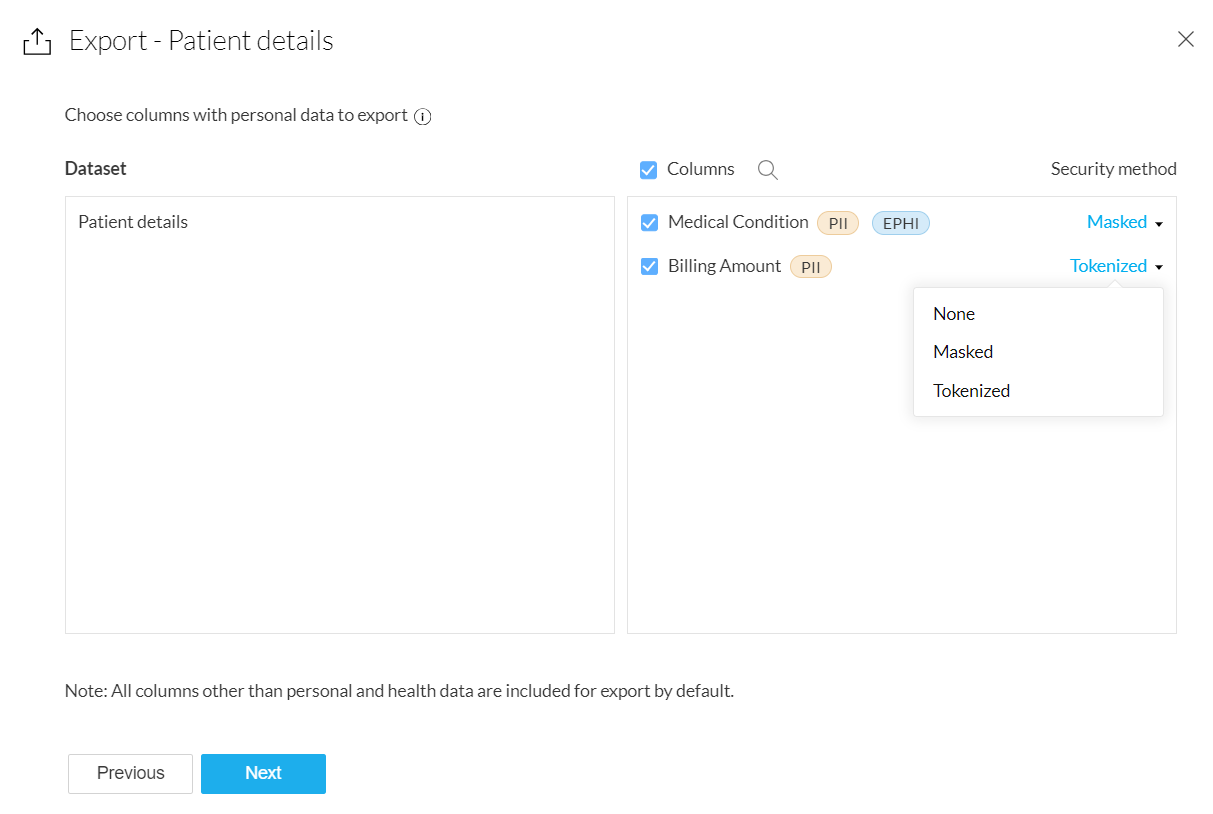
4. If your data has columns with personal data or ePHI data, you can choose to include or exclude some or all of them in the Columns section.
You can also apply the necessary security methods below to protect your personal data column:
You can also apply the necessary security methods below to protect your personal data column:
A. Data masking
Data masking hides original data with 'x' to protect personal information.
B. Data Tokenization
Data tokenization replaces each distinct value in your data with a random value. Hence the output is statistically identical to the original data.
C. None
You can select None if you do not want to use any security method.

Note:
- Exporting datasets without securing personal data will be restricted if Secure data exports option is enabled in your organization's privacy settings. Click here to know more.
- Based on the Compliance settings of your organization, exporting datasets with ePHI data may be restricted or restricted without securing ePHI data with security measures or password protection.
5. Click Next and You can choose to export your dataset in any of these supported file formats: CSV, TSV, JSON, XLS, XLSX, and XML formats.
6. Select the required option from the File export option. You can choose to Add as new version or Add as new file during export.
6. Select the required option from the File export option. You can choose to Add as new version or Add as new file during export.
7. The folders available to export will be directly fetched from your Zoho WorkDrive account using which you have logged into Zoho DataPrep. Select the folder you want to export your data. You can also create a New Folder.

Note: You can also export files to your shared folders in Zoho WorkDrive.
8. You can also click the Advanced options link for the following options.
- You can encode the file using character encoding methods like UTF-8 using the File encoding option.
- Use the Compress file option to save your export as a .zip file.
- You can use a Row Separator such as UNIX (Line Feed) or MAC (Carriage Return) to ensure the line endings are translated properly.
- You can distinguish the point at which the content of a text field begins and ends using Text qualifiers such as Single Quote(') or Double Quote(").
- You can separate out the data or split using a Delimiter such as a Comma(,) , Semicolon(;) , or a Space.
- You can also encrypt the file and protect it using a password before export.
9. Click Export.
10. Now that you have added a destination, you may want to try executing your pipeline using a manual run at first. Once you make sure manual run works, you can then set up schedule to automate the pipeline. Learn about the different types of runs here

Info: Each run is saved as a job. When a pipeline run is executed, the data fetched from your data sources will be prepared using the series of transforms you have applied in each of the stages, and then data will be exported to your destination. This complete process is captured in the Jobs page.
SEE ALSO