Multi-page Forms | Zoho Forms

Page Break

While you build a form with numerous questions, the form can look unorganized if you keep adding questions without breaking them up into pages and sections. This might result in a drop in the response rate as your respondents may find the form filling experience to be cumbersome. Organize and structure your form to contain relevant fields or questions on each page and ensure that respondents are directed to the pages with questions that pertain to them. To organize sections into separate pages and provide a clean form filling experience to your respondents, you can use the Page Break field in Zoho Forms.


Break your form into pages

Page Break

Page Break field example

The Page Break field enables the design of multi-page forms. This field introduces a break in the form, dividing it into distinct pages. Users navigate through the form by progressing from one page to the next. It is ideal for guiding users through a step-by-step process, where each page represents a distinct stage.
When adding a Page Break field, you can specify a title for the page which serves as a label for the content on that particular page, providing users with context.

What is the difference between Section field and Page Break Field?

Section Field: The Section field is used to divide the form into separate parts or sections within the same page. This can help organize related fields together under a heading (like "Personal Details" and "Travel Details") for better readability and structure.

Page Break Field
: The Page Break field separates parts of the form into different pages. When a user completes one page, they click "Next" to move to the next set of questions. This is useful for longer forms as it prevents the form from feeling overwhelming by presenting one page at a time.
In summary, Sections organize content within the same page, while Page Break splits the form into multiple pages for a step-by-step flow.
Section and page break

With multi-page forms, you can let your users navigate through the form with ease! You can customize the look and feel of the navigation to your liking. The Navigation Bar can be displayed horizontally at the top below the form title or vertically on the left side of the form.

multipage form

You can customize the navigation buttons’ labels, colors, and styles. You can also modify the appearance of visited and unvisited pages in the navigation bar to provide clear progress indicators. Learn More

Page Navigation Customization

Creating Multiple Pages

To split your form into multiple pages,
  1. Drag and drop a Page Break field from the form fields in the left pane after the last field of a page or in between two fields to create a new page.
    Alternatively, you can click the + icon between form pages or from the page navigation strip at the bottom of the builder to insert a new page.
    Adding Page Break field

    Note: The page navigation strip at the bottom of the builder shows all pages in your form. It also displays the total number of pages.
    Notes

  2. Under Page Properties, enter a suitable title for each page. To change the order in which the pages must appear in the form, click  Rearrange.
    Page Properties

  3. Under Navigation Bar, customize the appearance of the navigation bar.
    To hide the Navigation Bar, select None.
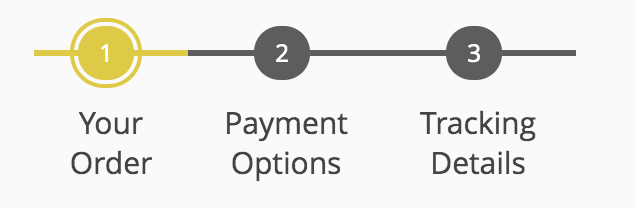
    To modify its layout & style, click the Change button under Layout & Style
  4. Choose a layout based on how you want the navigation bar to be displayed:
    1. Top: Displays page progress horizontally at the top of the form.
    2. Left: Displays page progress vertically on the left side of the form.
  5. Based on the selected layout (top or left) , the available styles may vary. Select the preferred style from the popup.
    Navigation Bar Styles

  6. To show or hide the page title from the Navigation bar or the page header, choose from the options under Show page title in.
  7. Choose whether to validate the form fields on each page before the respondent navigates to the next page or on final submission under Field Validation.
  8. To include the page number in the footer of each page, select Display Page Number under Other Options.
  9. If you have enabled the Save & Resume option to allow respondents to save their partially filled form, you can choose to Provide Save button in every page  under Other Options. With this option, respondents can save their progress after each page and avoid accidental data loss.
To navigate your respondents to specific pages based on their responses, configure the Page Rules.

Changing Navigation Button Labels

In a multi-page form, you will find Next and Back buttons in the footer of each page to navigate between pages. You can change the label of these buttons as per your preference.
To do this, click the button and change the label name under Properties.

Duplicating a Page

If you are looking to create a new page with the same set of fields in another page, you can save time by duplicating that entire page with all the fields.
To do this, 
  1. Click the page title of the page that you wish to duplicate.

  2. Click the Duplicate icon as shown.
    Duplicate a page


Notes
Note:
  • Unique ID, Subform, Zoho CRM, and Payment fields will not be duplicated when you duplicate a page.

  • Field encryptions should be configured again in the duplicate page. 

Check out Card forms to put up one question at a time!