API Testing
Overview
In API testing users send a request to a third-party application and receive a response. The request contains information about the action you are performing and a response is returned for the same. Different HTTP methods let you perform various actions. For example, a GET request can be sent to fetch data from another application, and the response would contain the data you are looking for. In this way, API tests check if the received response matches the expected response, and as a result also determines performance, functionality, and reliability of the integration.
An API response is nothing but the backend of what you see in your application UI during various operations. For instance, when a website loads, the front end or the data you see is fetched from some source. The source also sends a backend response, known as a message layer, which is responsible for what you see on the website. API testing is performed at the message layer.
With Zoho QEngine API testing you can:
- Automate a sequence of API tests together.
- Perform complicated tests with actions like point-and-click or drag-and-drop.
- Pause the next request for the required amount of time before it is triggered again.
Click + Add Request.
The first API test section is denoted by Request 1 by default. Subsequent requests created using the + Add Request button will be marked Request 2, Request 3, and so on.
API Test UI elements
Before we see examples for API testing, let's look at the UI elements.
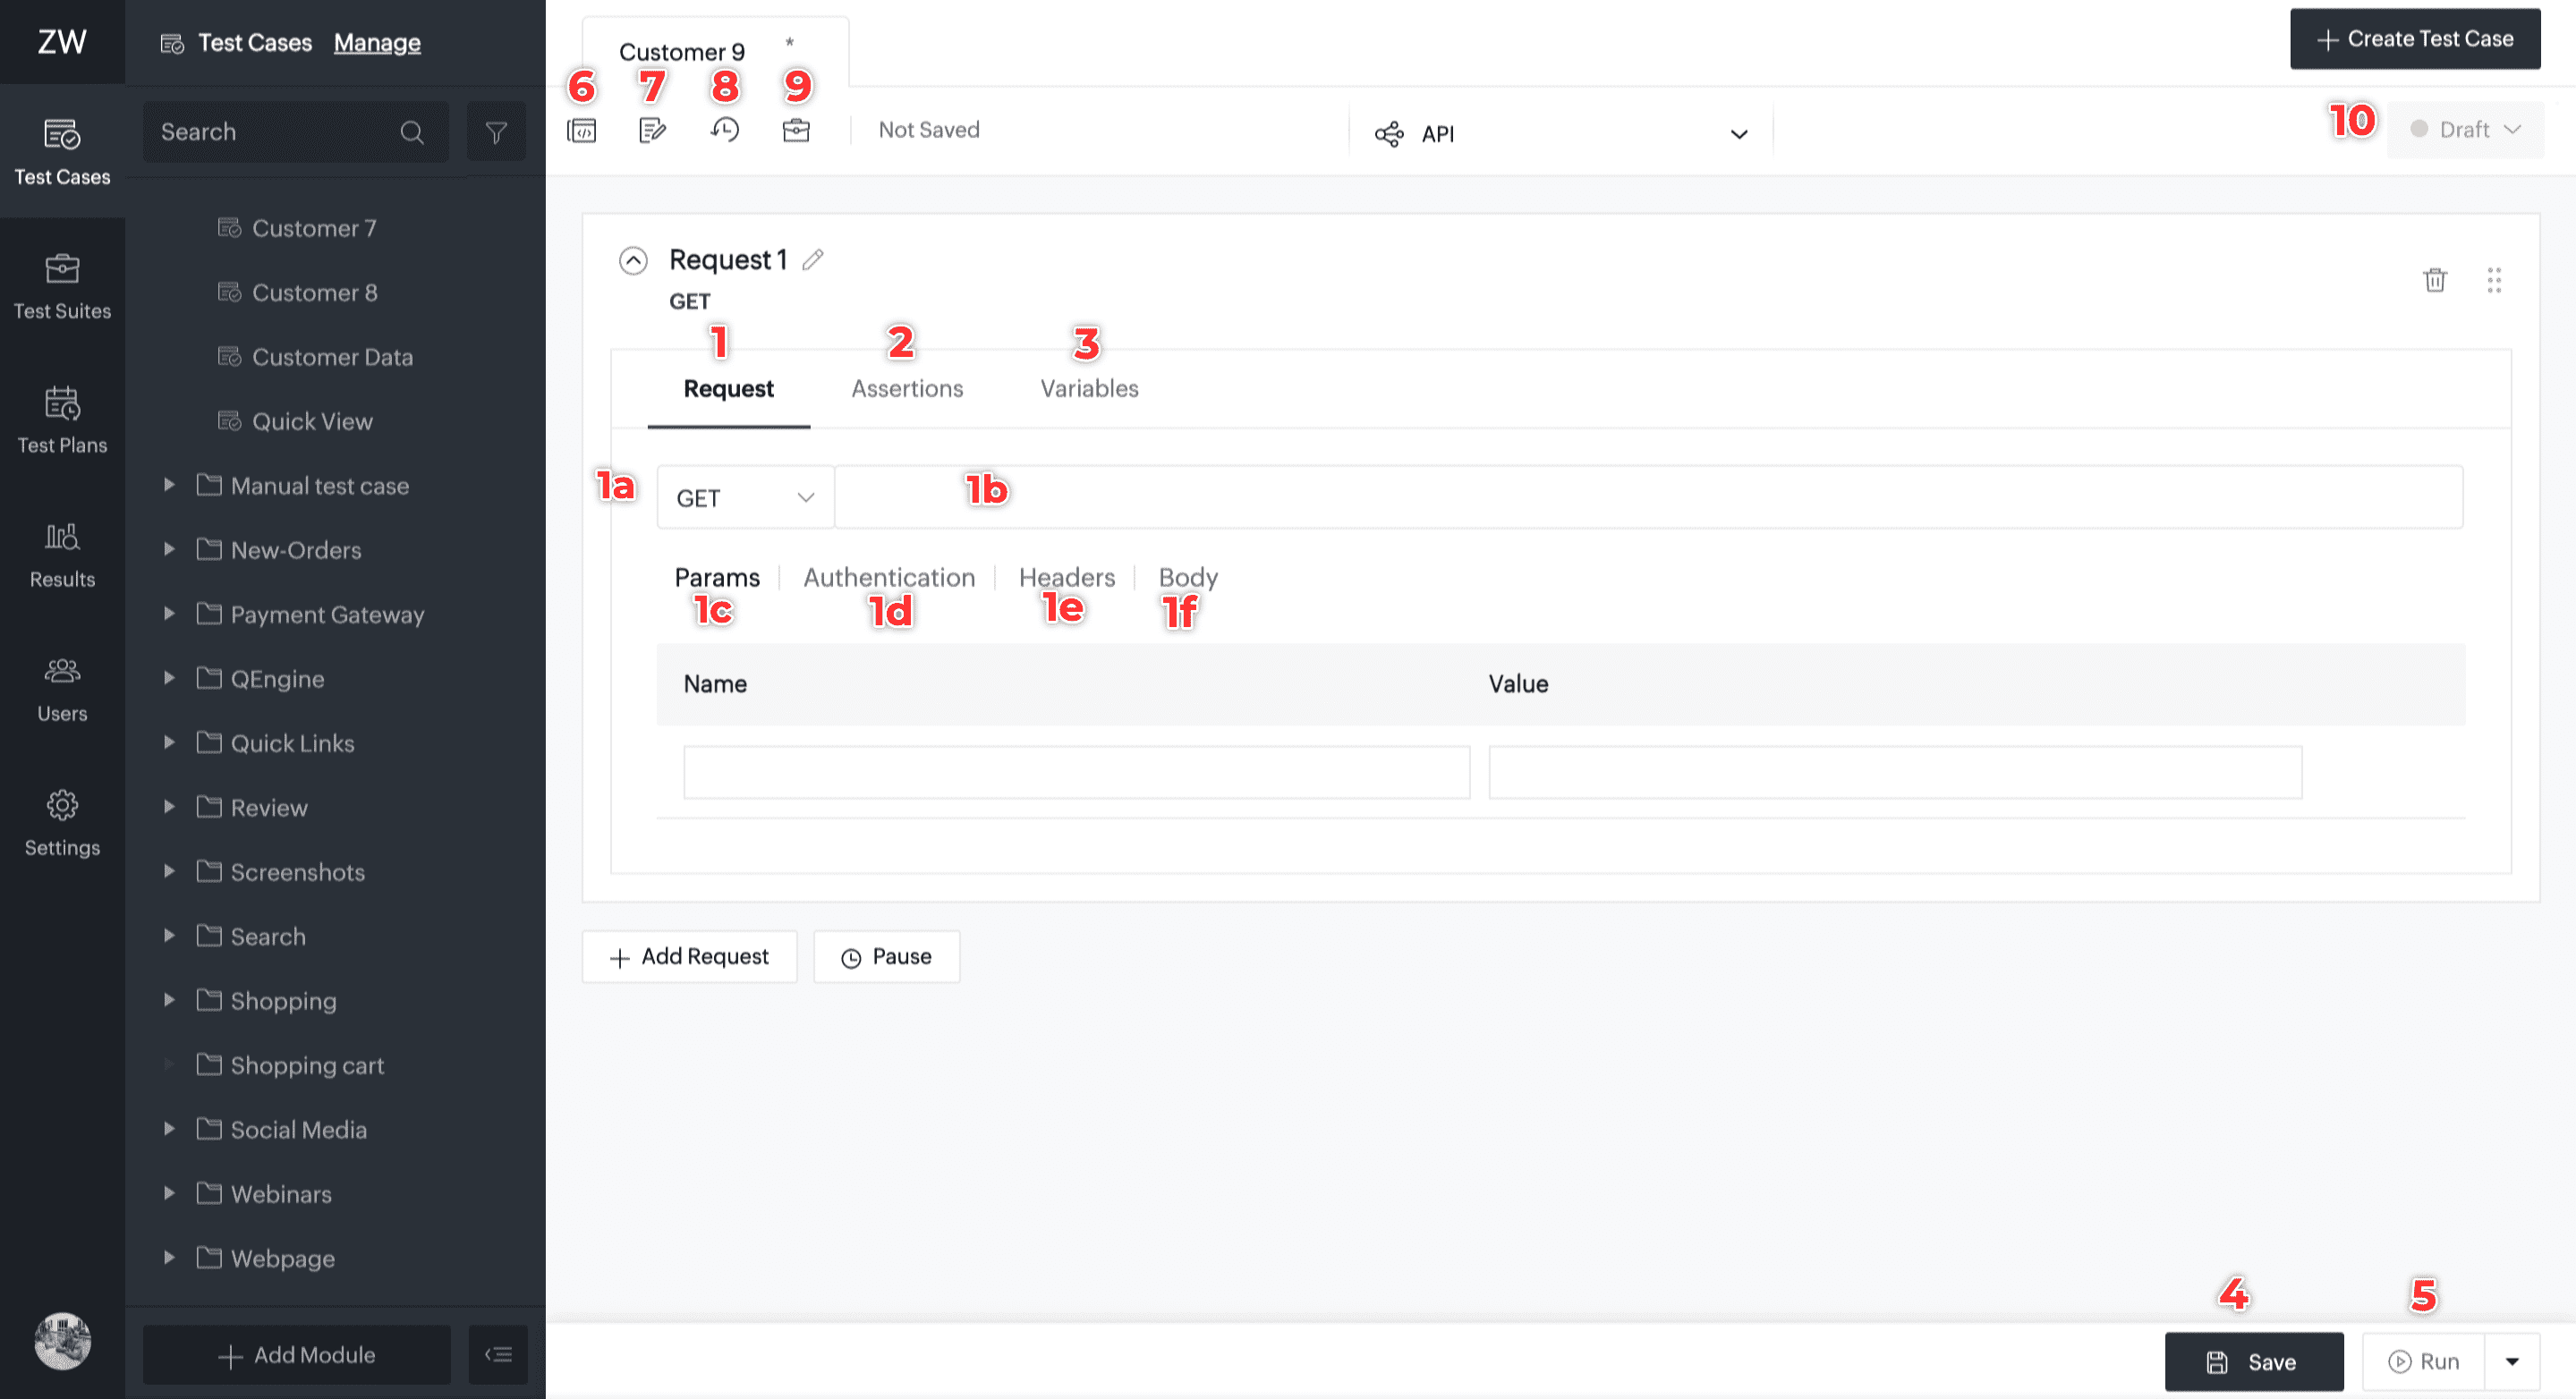
- Request: All the details required to make an API call, for example, the API method and the request URL, can be specified in this section.
- Select HTTP method:
- GET: To transfer data. Typically used to fetch data from other applications in the form of response containing response body and response headers.
- POST: To transfer data. Typically used to create a new record in the other application.
- PUT/PATCH: The PUT method is generally used to update the entire record. The PATCH method updates a portion of the record.
- DELETE: To delete a record.
- HEAD: Similar to GET, but it only returns the header values without any response body.
- OPTIONS: Returns the type of methods (along with other header values), which are applicable for the requested endpoint.
- Address bar: Enter the request URL here.
- Params: Add query strings in key-value format with the key as the parameter name, and its value. Query strings appended in the request URL are auto populated in this section, and vice versa. Params can be deleted by clicking the X mark which appears when hovering over the param record.
- Authentication: Use connection or connection as variable for authentication requirements. Alternatively, you can also supply authentication credentials in the request URL as params or in headers.
- Headers: Enter additional information about the request. Start typing to view autosuggestions for <Header> keys. The API provider specifies the required header values for the API calls.
- Body: When performing requests like POST or PUT where data is involved, you can specify the content here in the applicable formats: form-data, raw, or x-www-form-urlencoded.
- Assertions: Validate your response using the sources, Header, Status Code, XML Body, JSON Body. For example, set Status Code Equals 200, where the operator can be selected from a simple dropdown. The test will pass only when the returned status code is 200. Learn more.
- Variables: Use variables to extract values from the sources, Header, Status Code, XML Body, JSON Body, which can be reused in subsequent requests. Learn more.
- Save: You can run a test without having to save it. However, tests will be retained only when saved. Which means if you close the window or navigate to a different section without saving, you might lose your changes.
- Run: Click this icon to execute tests instantly. When tests are executed using this option, the response details are displayed in the Live Preview section which will be covered in the examples below.
- Edit: Perform actions like editing the test name or description, or moving the test to a different module.
- Run History: Provides a comprehensive overview of the test case's overall executions.
- Status: Add other useful information about the test which you want shared users to know.
Live Preview for API
To preview the real-time execution of API test cases, customize the run configuration using the steps below:
- Click Run to initiate a preview run.
- Select between Agent or Zoho Cloud to execute your test case.
- With the Zoho Cloud agent, you can execute your test cases in the cloud.
- To use the local agent, the agent extension should be installed on your machine. Learn more about Agent installation here. This allows you to run your test cases locally, providing a more private option.
- Select the desired environment variable from the dropdown, if you wish to test with them. If you don't have anything chosen, the global variable will be considered by default.
- Check Save as preferred configuration to avoid configuring the run each time. If you choose not do so, Zoho QEngine will ask for your choice every time you click Run.
 Note: To edit a saved preferred configuration, click the dropdown next to Run, then click Customize.
 - Click Run.
Note: If you want to execute test cases in your preferred private network, you can opt for tunnels. The tunnels dropdown lists all the configured networks for your project. Learn moreLive Preview Summary
When a test runs, the Live Preview window will display the progress and the test result.
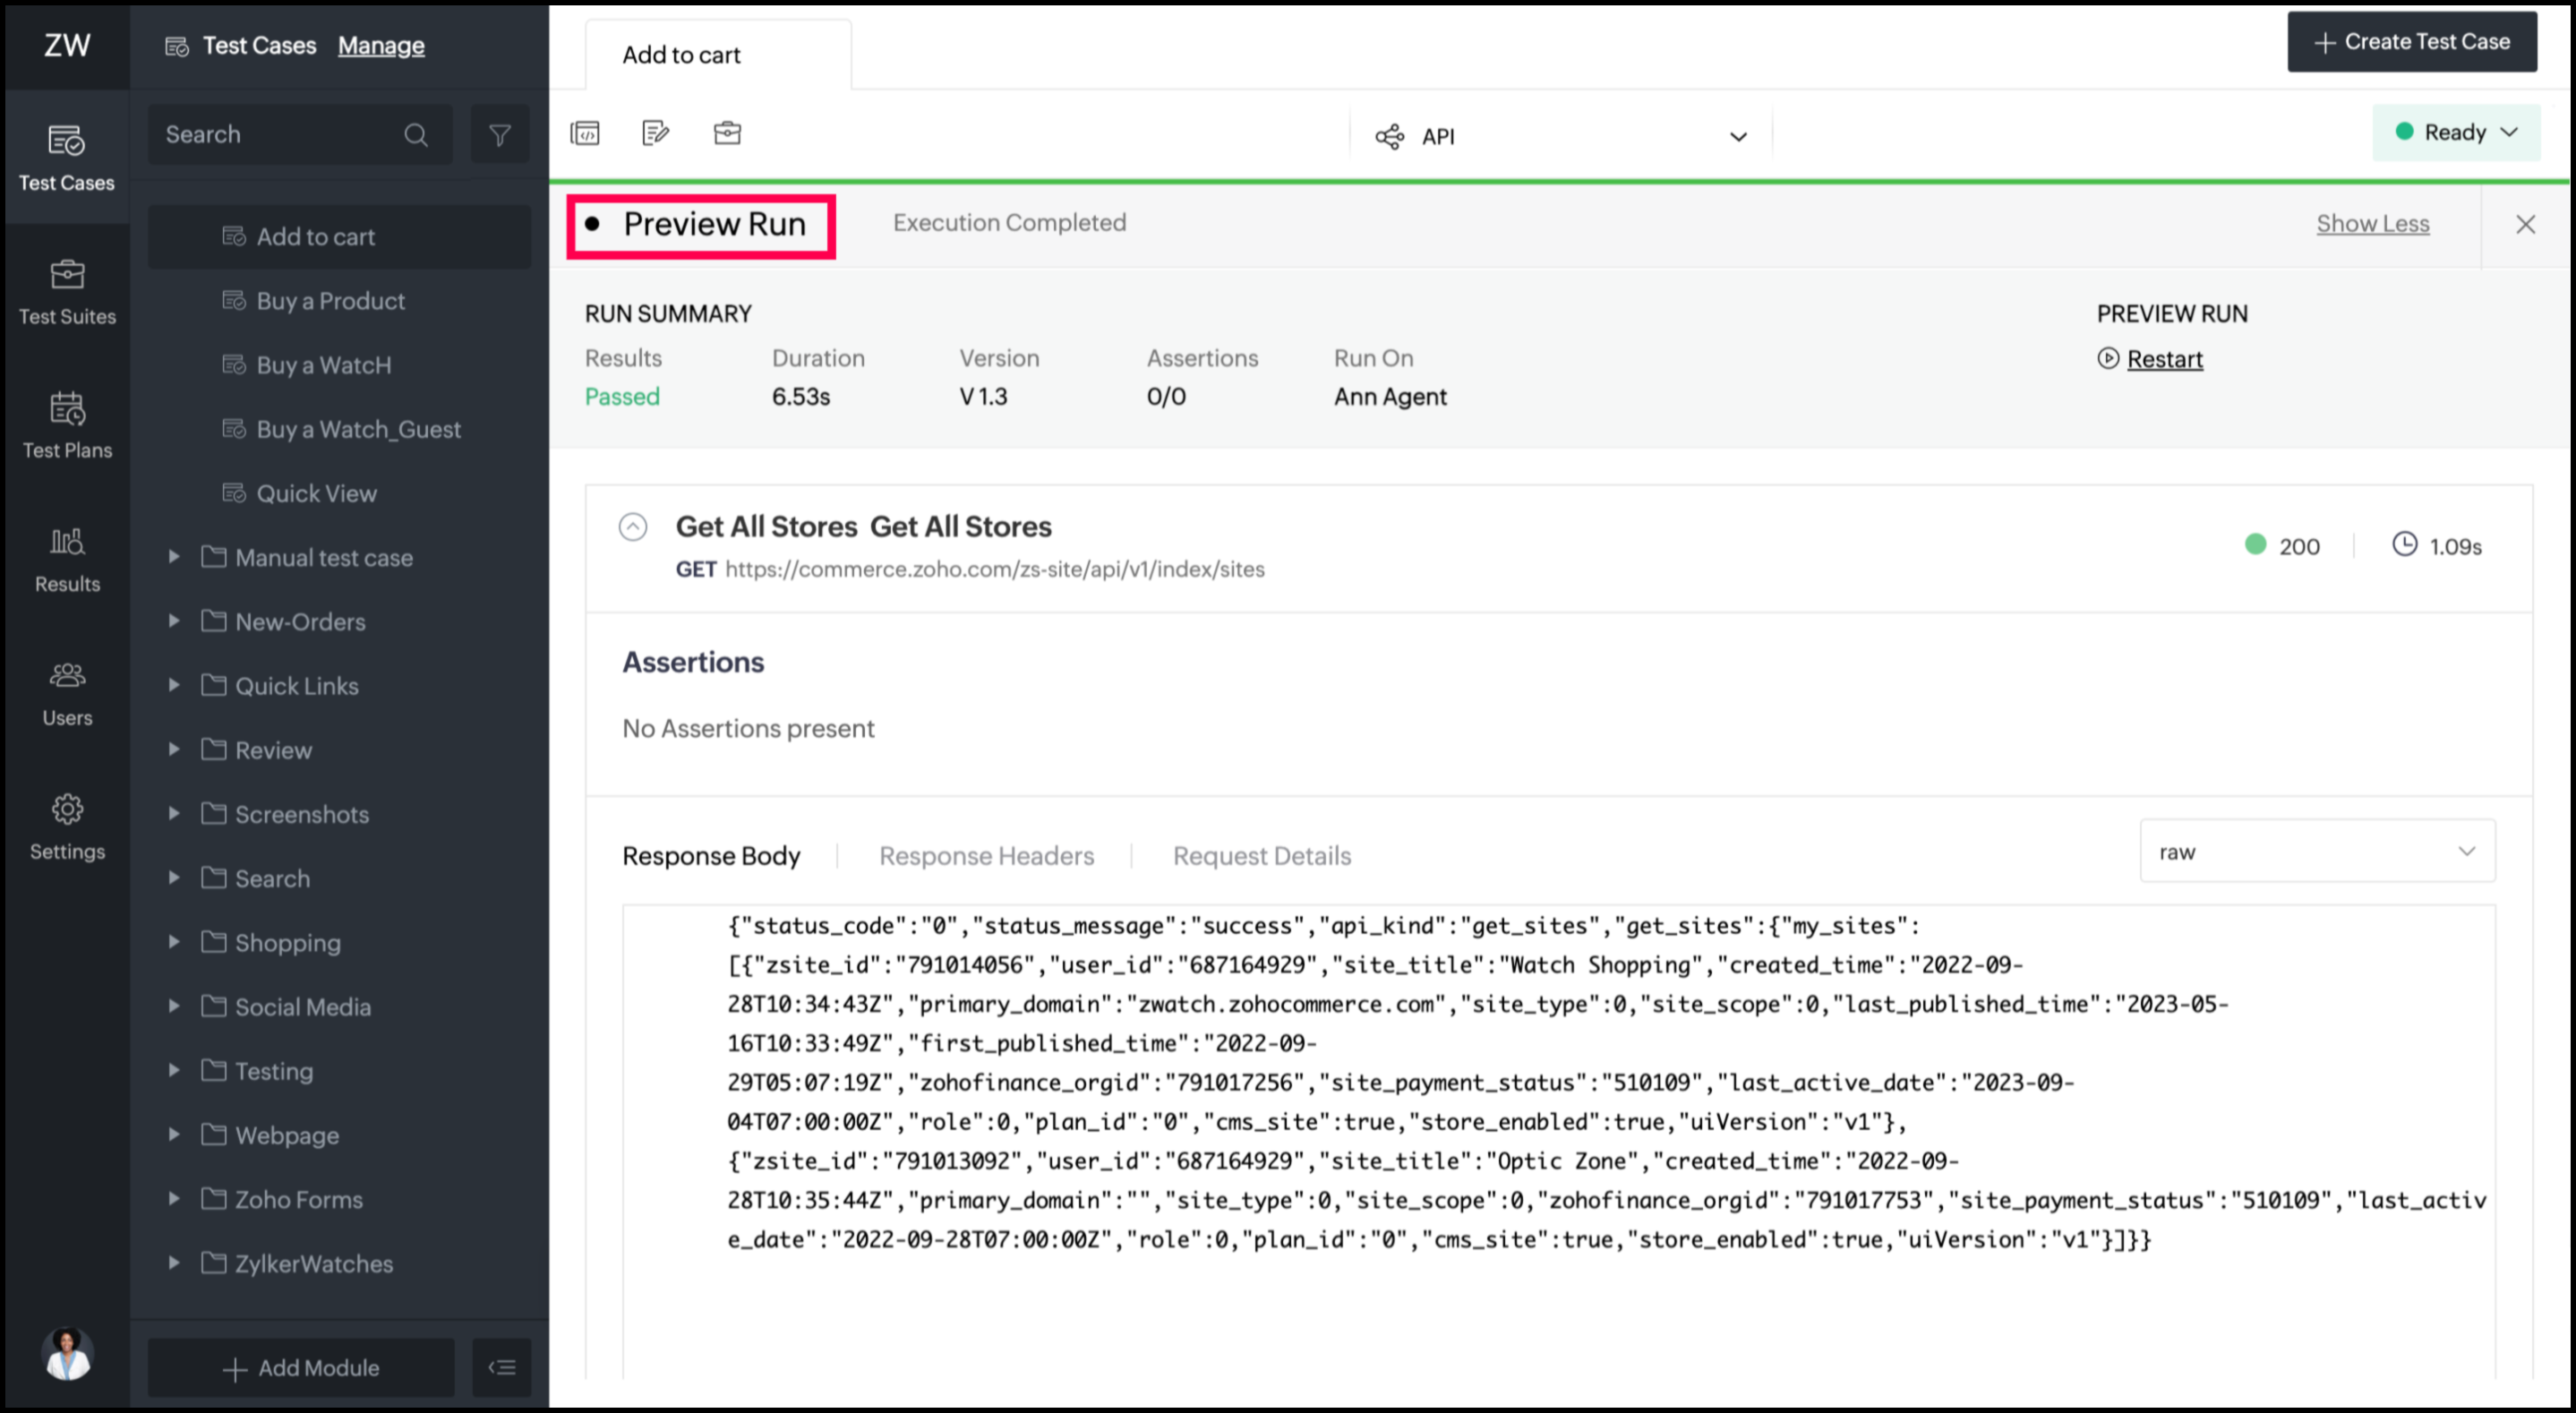
The results will be available to view once the test is complete. Response details can be expanded or collapsed by clicking on the corresponding request.
The response body can be viewed in raw or pretty format by clicking the dropdown towards the right. The arrow at the top-right corner will take you back to the test section.
Now, you can analyze the results to debug test cases for any issues or errors, or proceed to add it to a test suite and then, to a test plan.
API Testing examples
For demonstration, we will be using JSONPlacehoder which provides sample data for API Tests. The site lists the following URL paths:
/posts
/comments
/albums
/photos
/todos
/users
We will perform the API tests for the examples given on this page. For variety, we will use different URLs for different examples. You can also test with the other URL paths mentioned above.
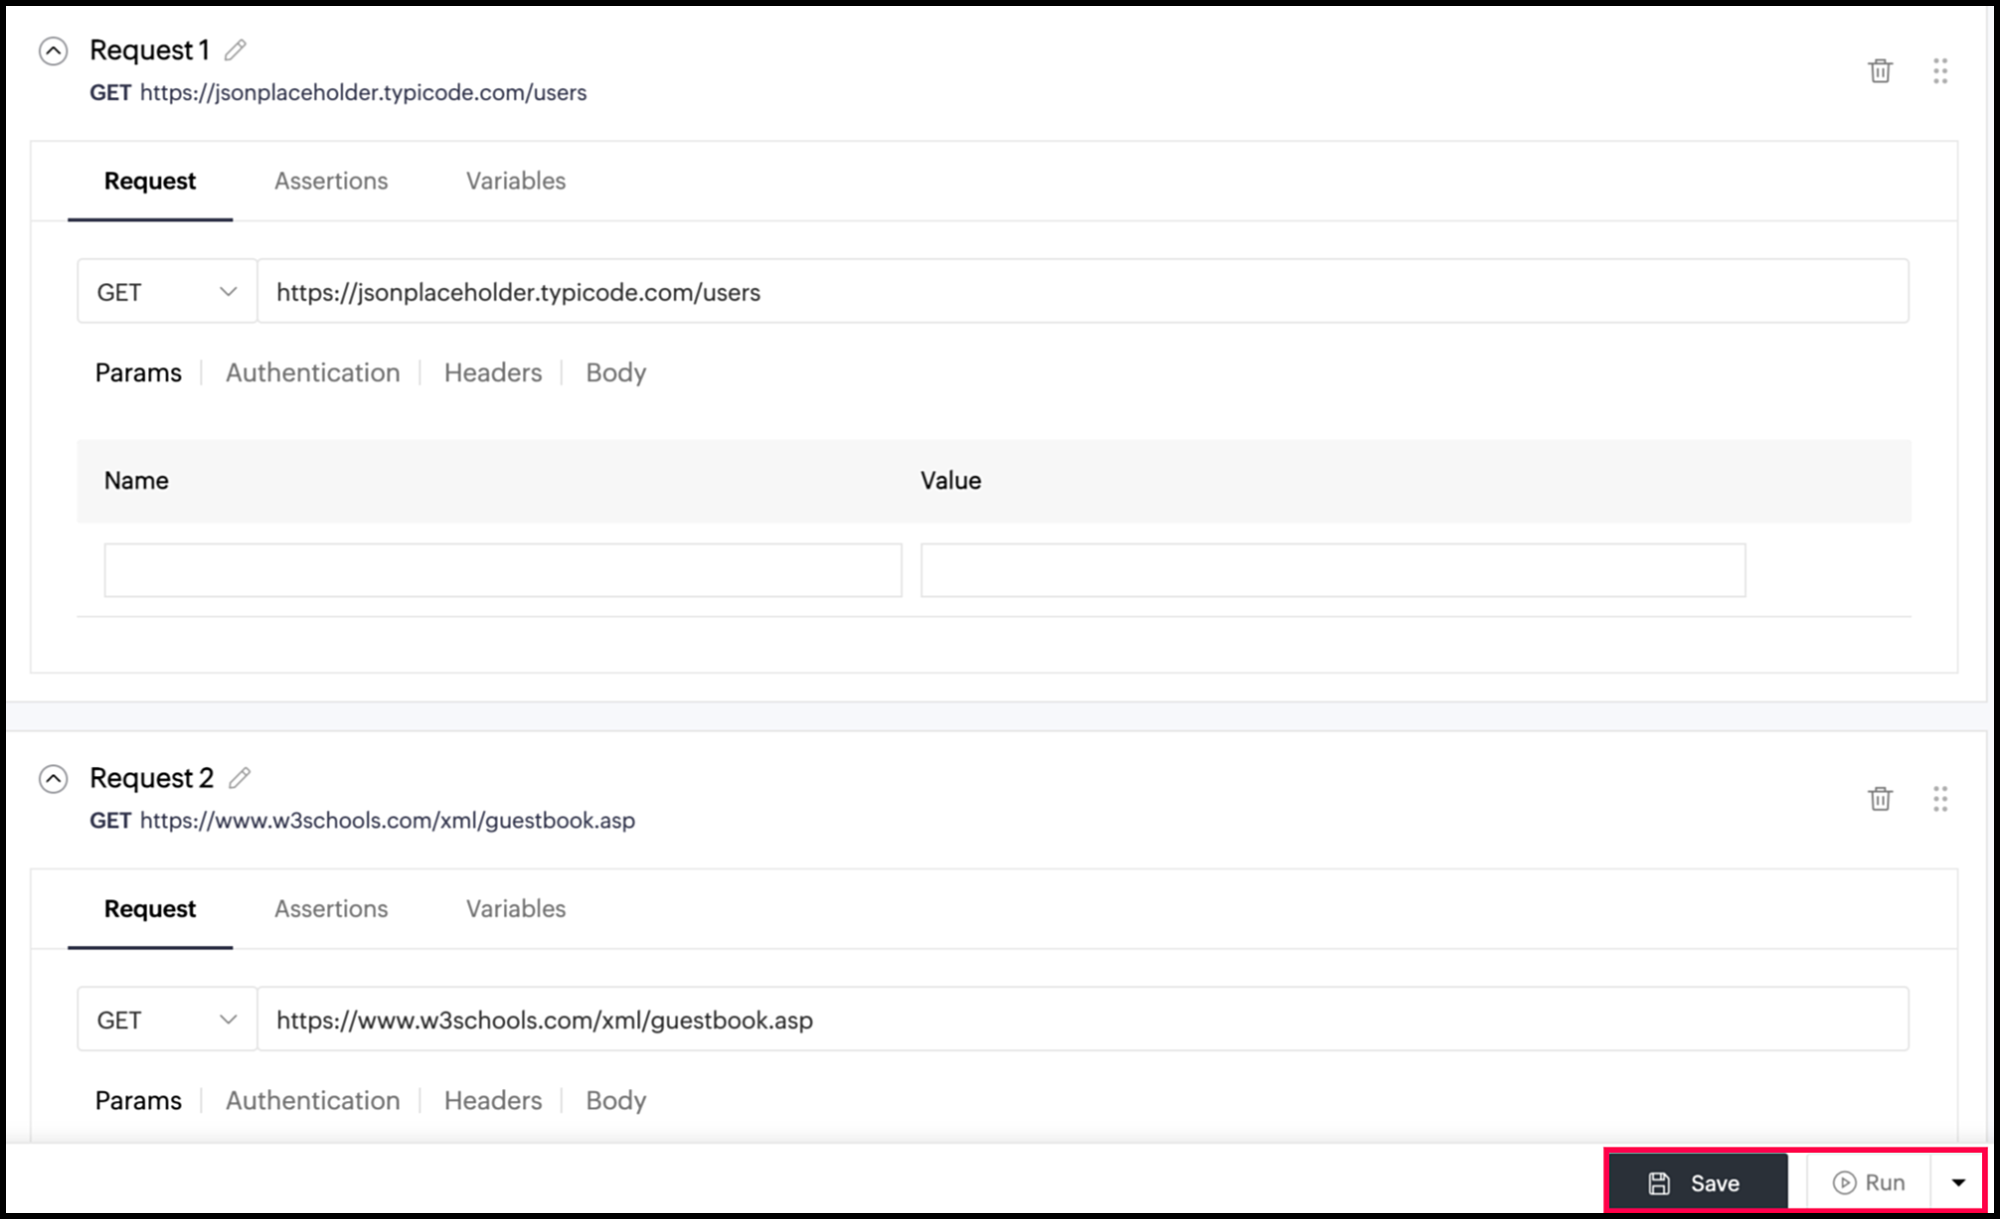
GET request example
We will make two GET requests in this example. The first request returns a JSON response, and the second request returns an XML response.
Run API calls with the following data:
Request 1:
HTTP method: GET
Click + Add Request below the first request (displayed in the above image).
Request 2:
HTTP method: GET
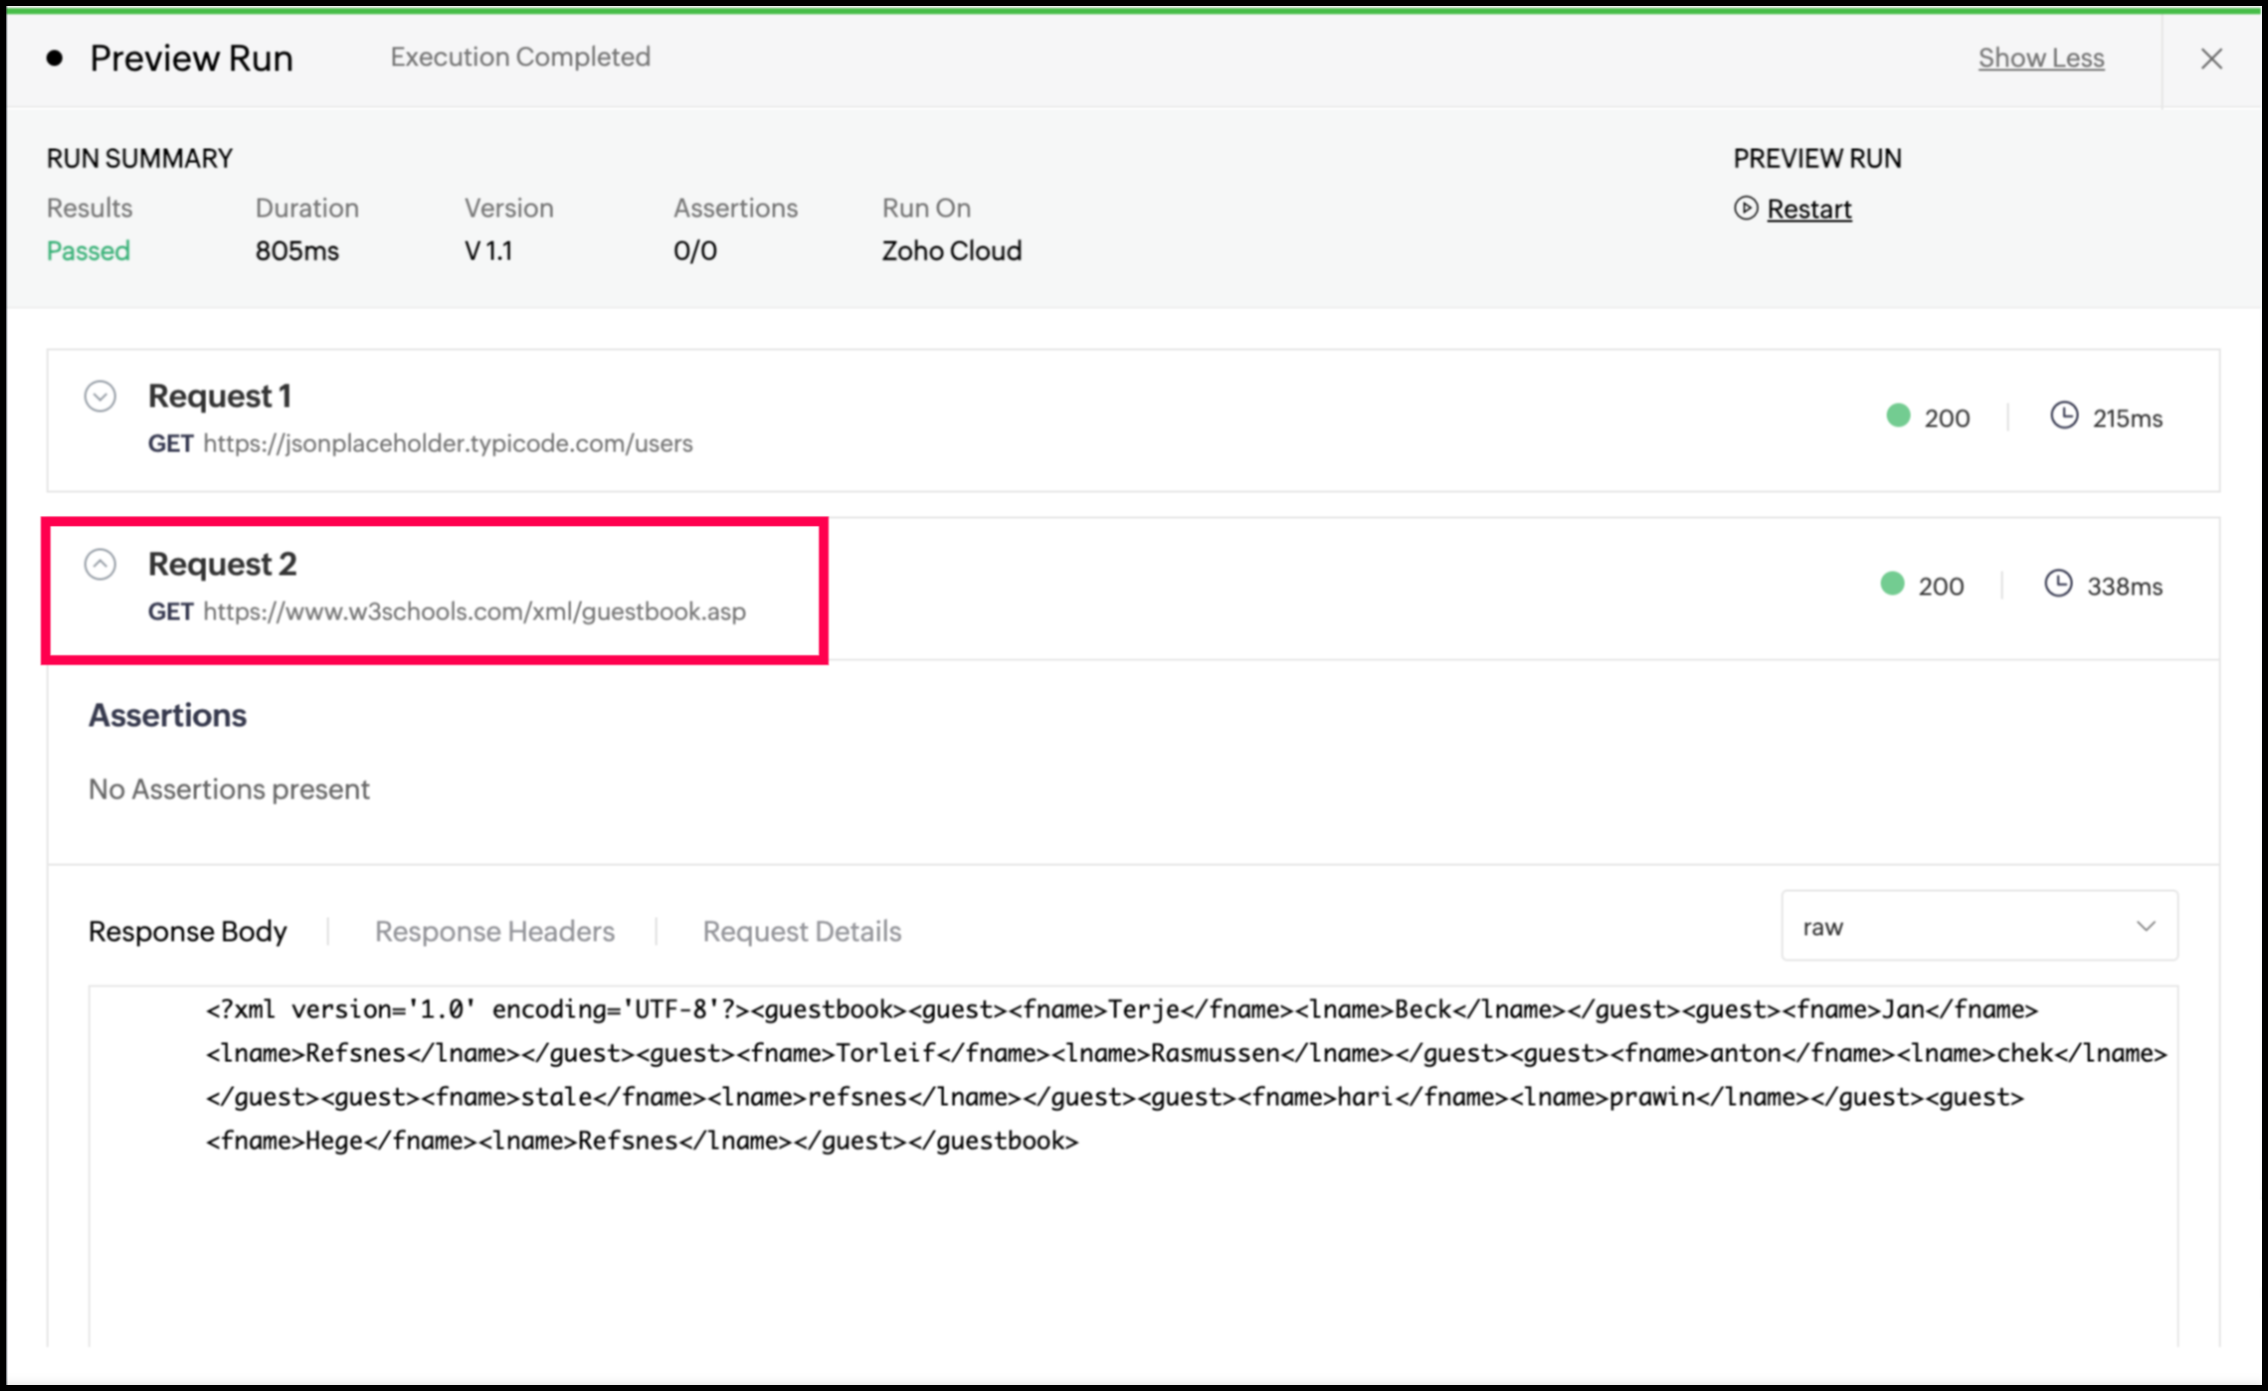
Save and run the test using the buttons on the top-left. The Live Preview window will display the progress and the test result.
The results will be available to view once the test is complete. Response details can be expanded or collapsed by clicking on the corresponding request. The following image displays the response for the first request.
The image below displays the response for the second request.
GET request example with assertions
Learn about Assertions to understand this example better. In this example, we will perform the same GET API calls mentioned above, but with assertions.
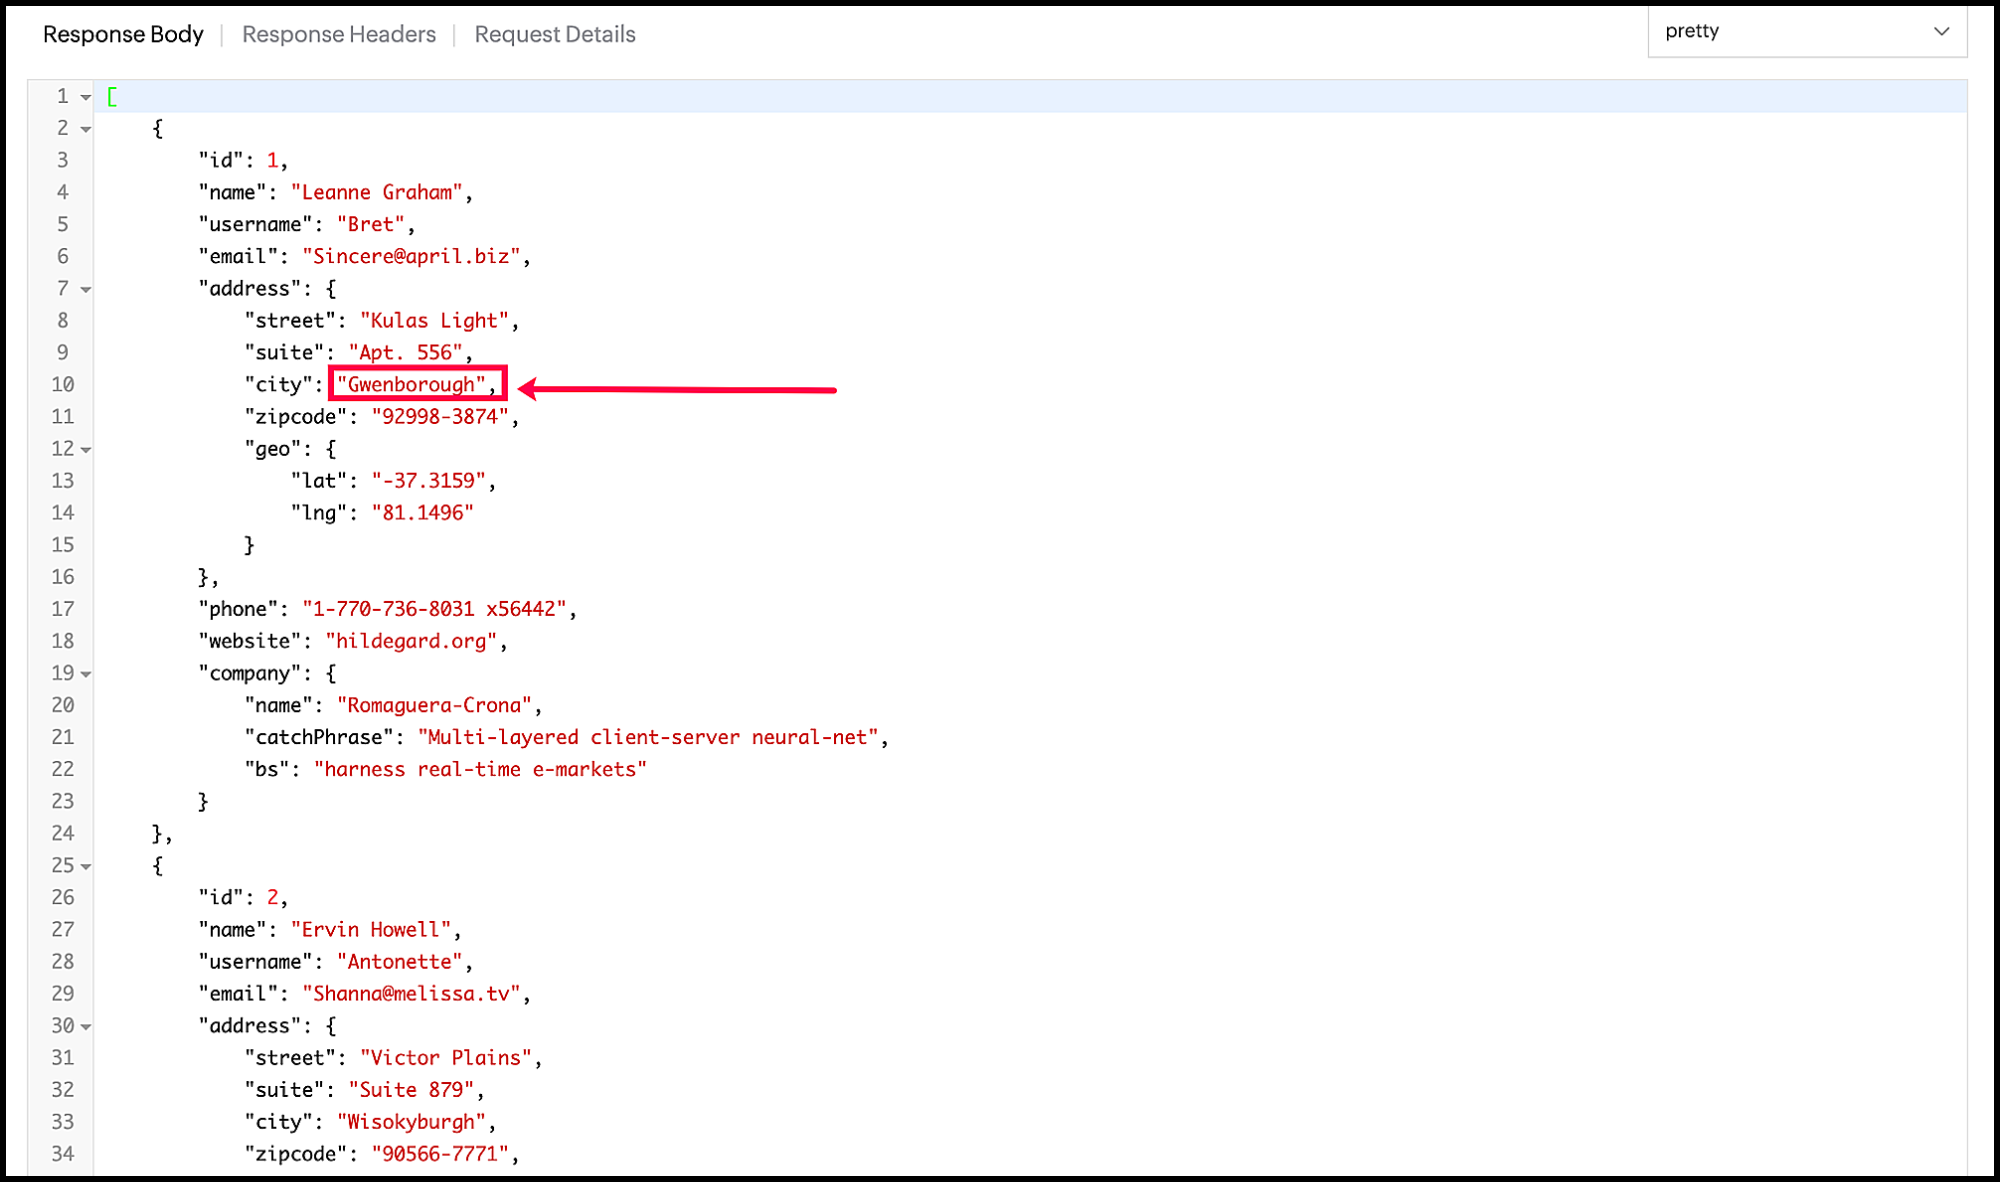
The following is a truncated view of the JSON response received in the previous example's first request. The highlighted value will be used in validating the first request.
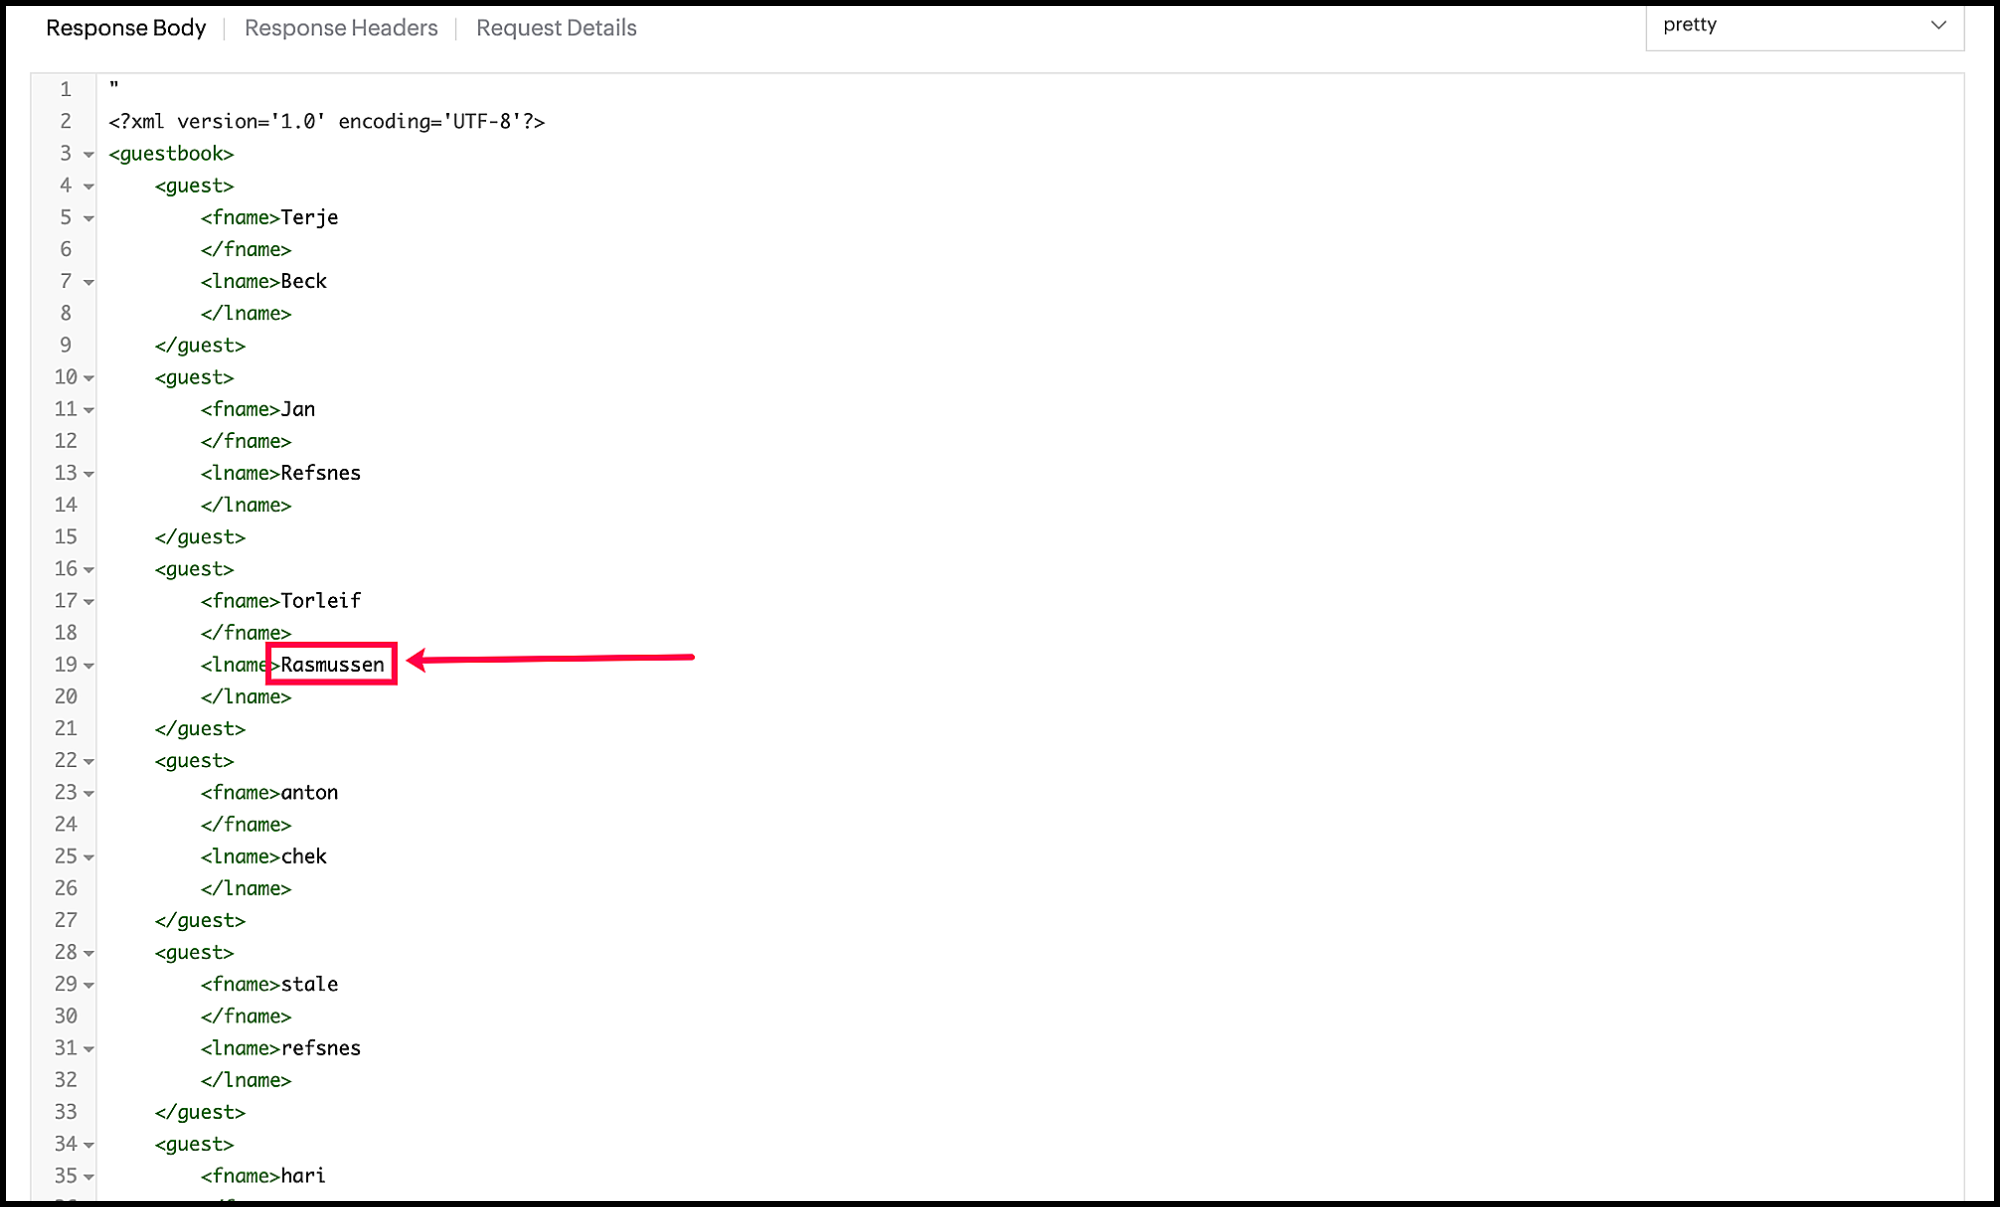
The following is a truncated view of the XML response received in the previous example's second request. The highlighted value will be used in validating the second request.
Run API calls with the same data used in the previous example:
Request 1:
HTTP method: GET
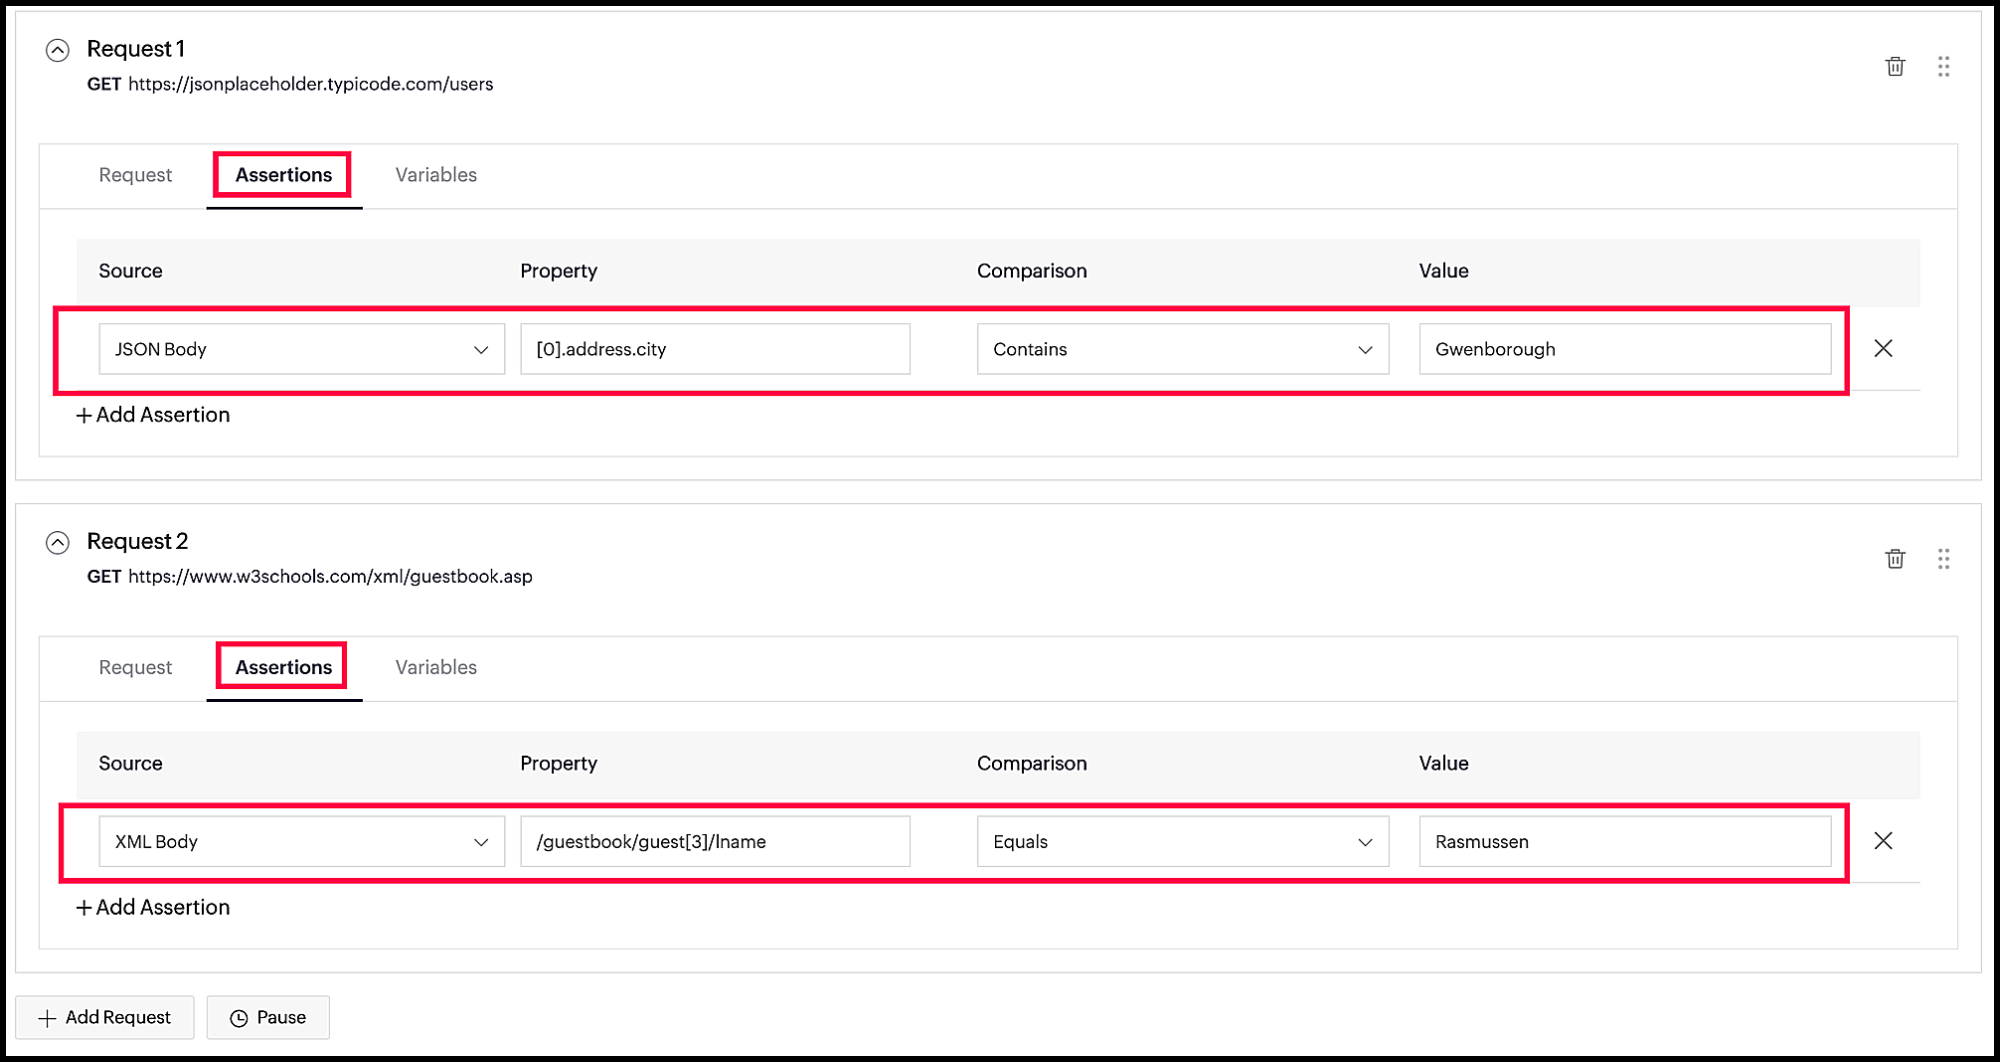
Assertions
Source: JSON Body
Property: [0].address.city
Comparison: Contains
Value: Gwenborough
Request 2:
HTTP method: GET
Assertions
Source: XML Body
Property: /guestbook/guest[3]/lname
Comparison: Equals
Value: Rasmussen

Save and run the test. The test is successful since all assertions are satisfied.
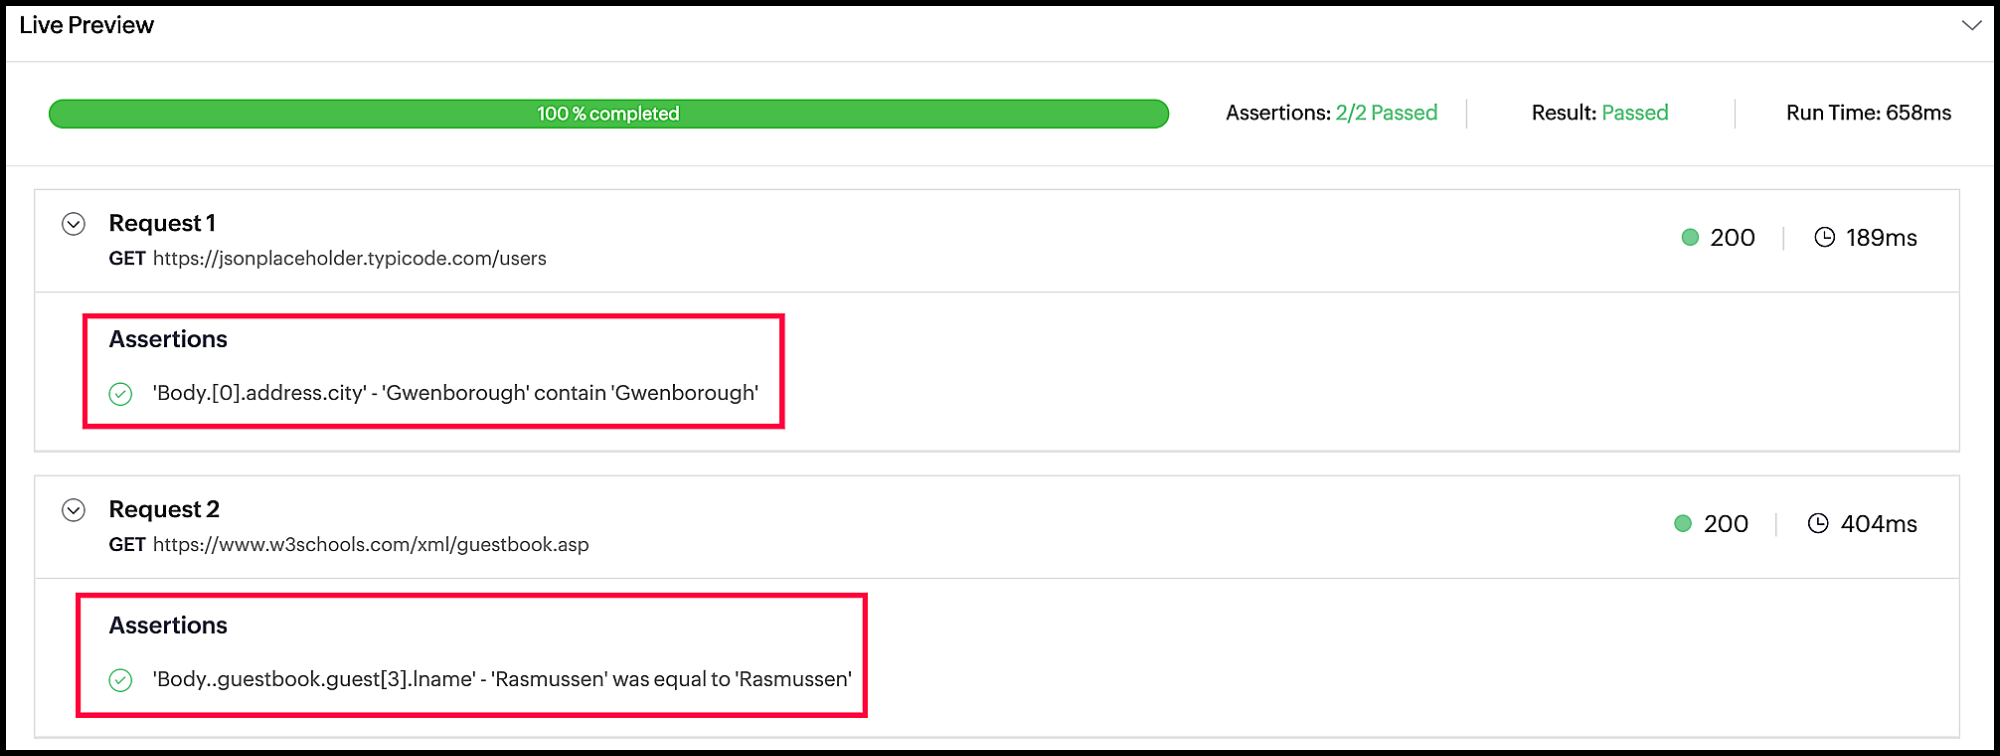
If you try changing the assertion values, you will see that the test fails. Note that the test will fail even if one of the assertions fails.
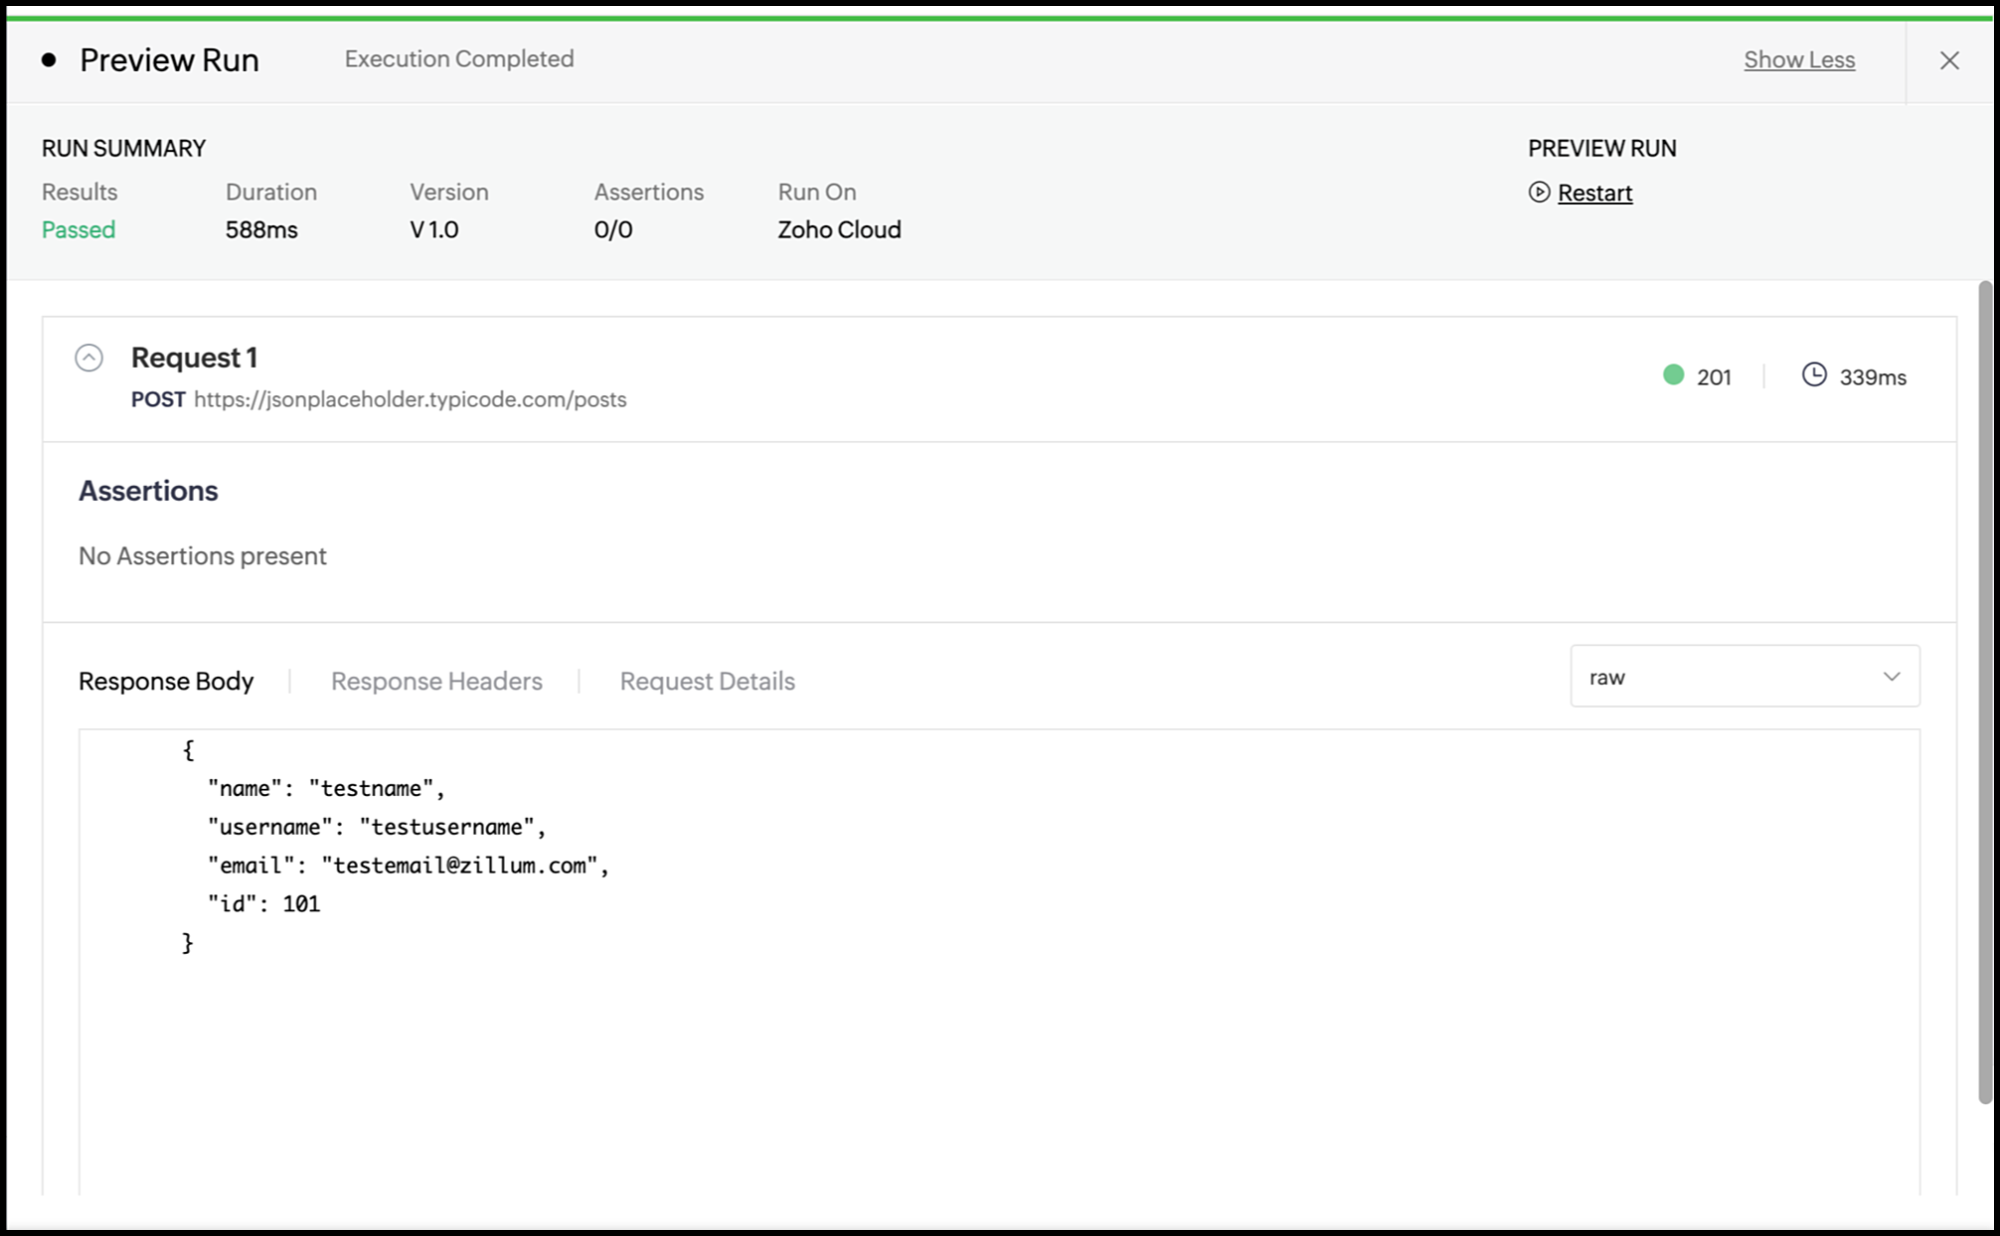
POST request example
In this example, we will create a new record using the POST method. Run the API call with the following data:
HTTP method: POST
Headers
Name: Content-Type
Value: application/json; charset=UTF-8
Body
body type: raw
Run the test and view the response containing new data. Note that this is just a demonstration and JSONPlaceholder does not really alter the data. If you perform a GET request, this record will not be available.
PUT and PATCH request examples
The major difference between the two is that while the PUT method updates an entire record, the PATCH method only updates the portions specified in the request. This will be demonstrated in this example.
The following is a truncated view of the JSON response received using the GET method example. In this example, we will update the first element (denoted by the appending 0 in the request URL) using PUT and PATCH, and then compare their responses.
Request 1 (PUT):
HTTP method: PUT
Headers
Name: Content-Type
Value: application/json; charset=UTF-8
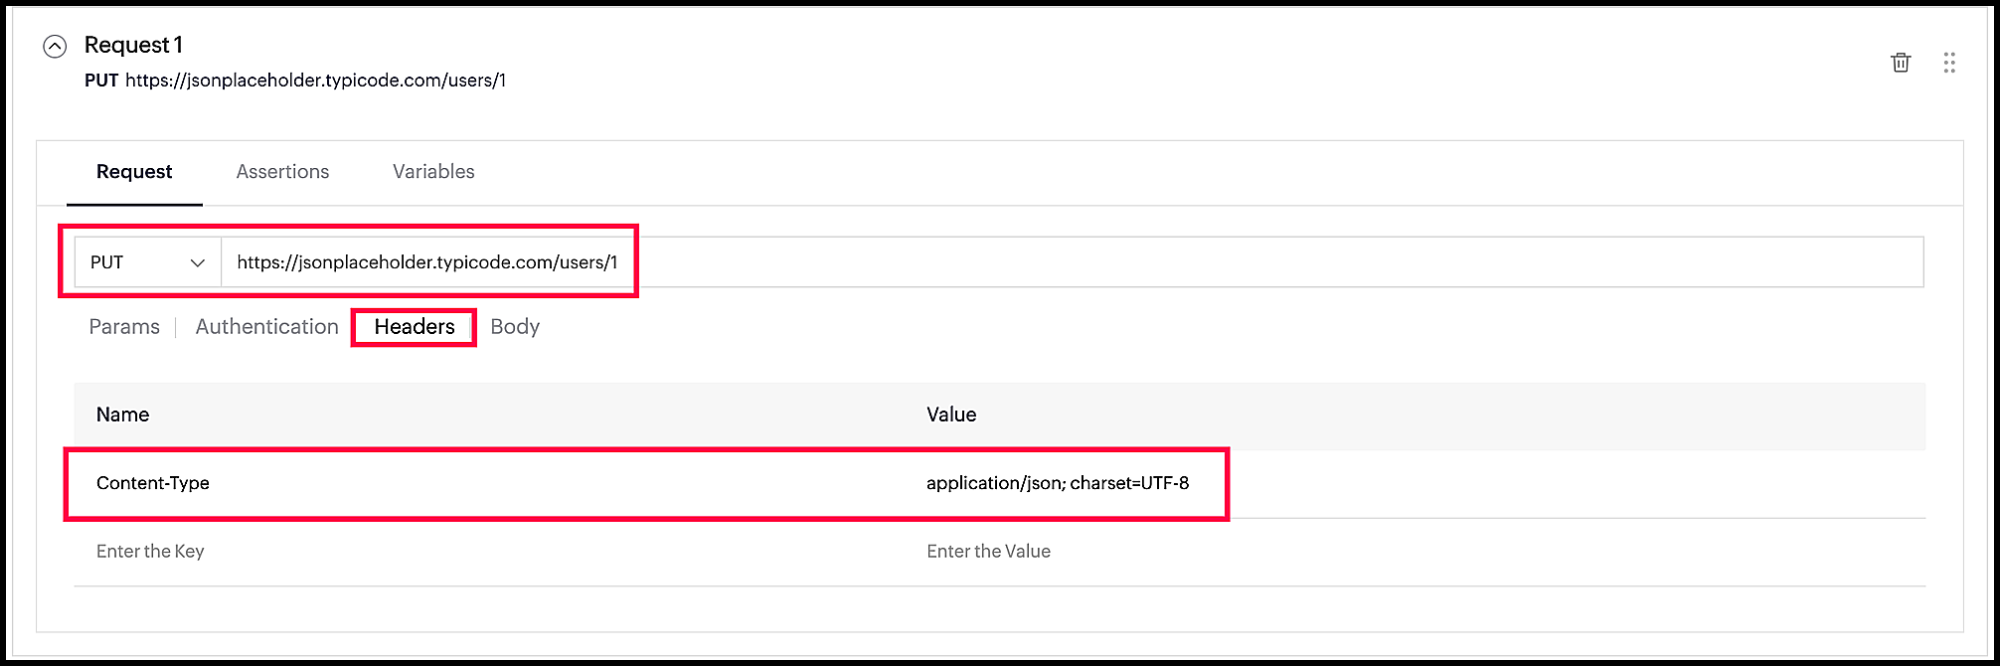
Body
body type: raw
Request 2 (PATCH):
HTTP method: PATCH
Headers
Name: Content-Type
Value: application/json; charset=UTF-8

Body
body type: raw
Run the test to view the difference in the response body for the requests. The response for the PUT method updates the specified values and removes all the other key values.
The response for the PATCH method updates the specified values while keeping the other values intact.
DELETE request example
In this example, we will remove a record using the DELETE method. Create an API request with the following data:
HTTP method: DELETE
Run the test to view the empty response, which denotes that the deletion was successful. Note that this is just a demonstration and JSONPlaceholder does not really alter the data.
HEAD request example
The following example with the HEAD method returns only the header values without any response body. Create an API request with the following data:
HTTP method: HEAD
Run the test to view the response containing only header values.
OPTIONS request example
The following OPTIONS method example returns the supported methods as one of the response header values without any response body. Create an API request with the following data:
HTTP method: OPTIONS
Run the test to view applicable HTTP methods for the specified endpoint as header values.