Kaizen #187 - Building a Timer and Worklog Widget (Part 1)

Howdy Tech Wizards!
Welcome back to a fresh week of Kaizen!
This time, we are diving into a two-part series where you will learn how to build a Timer and Worklog Widget for Zoho CRM. This widget helps track active work time and log multitasking sessions using Zoho CRM APIs, Client Script, Functions, and Workflows.
Why It Matters?
Zoho CRM effectively captures stage/status transitions, like tracking when a case moves from Open to In Progress or On Hold. However, in dynamic work environments, employees juggle multiple work items and engage in impromptu tasks or conversations.
Let’s take the On Hold status as an example.
While it can be used to indicate pauses in progress, it does not always align with real-world workflows. Consider these scenarios:
Not all interruptions justify a status change
Moving the case to On Hold for every minor detour (to clarify something with a colleague or respond to another emergency work item) would be impractical and could lead to under reporting actual work hours. Over time, this untracked effort adds up, creating a gap in visibility.
Frequent status changes may dilute their meaning
In many teams, On Hold signifies a legitimate blocker like waiting on customer input or an external dependency. Using it frequently to reflect quick shifts in attention could compromise that clarity.
A timer widget solves this by:
- Capturing hands-on work items.
- Logging context switches (unrelated tasks) with descriptive entries.
- Feeding structured entries into a custom module for reporting and subform sync.
Business Scenario: IT Service Desk & Ticket Resolution
A tech support team uses the Cases module to resolve customer issues. Some tickets are straightforward; others require follow-ups, escalations, or cross-team coordination. While CRM timestamps (like stage transitions or picklist tracking) track when changes happen, they do not reflect how long someone actively worked on a case.
This Timer Widget can be the ultimate solution to track down the active time spent on each case through out the day.
What are we Building?
By the end of this two-part guide, you will know how to:
- Build a timer widget to track time per task or any CRM record.
- Log work sessions into a custom module every time the timer is started/stopped.
- Automatically populate a subform in the corresponding record module using workflows and Deluge functions.
- Leverage the Reports module to analyze work patterns, SLA adherence, and productivity trends.
In Part I, we will focus on:
-> Building and configuring the Timer Widget.
-> Capturing each timed session as a record in a custom module.
Prerequisites
1. Create a Custom Module
Create a custom module named Timer Entries to log work details and generate reports from the Reports module. A new record will be added to this module each time a timer is started.
Set up the following custom fields in the Timer Entries module:
Custom Fields | Data Type |
Start Time | DateTime |
End Time | DateTime |
Total Duration (in mins.) | Formula DateBetween(${Timer Entries.Start Time},${Timer Entries.End Time},'Minutes') |
Related to Case | Lookup to Cases module |
Work Description | Multi Line |

2. Add a custom picklist option
Add a custom picklist option called In Progress to the Status picklist field in the Cases module for precisely identifying the status of the cases.
Follow this Add/Remove Picklist Values help section for more details.

3. Setup Custom Views for Contextual Filtering
To streamline the widget experience and ensure users only see relevant records to associate while tracking time, set up two smart custom views—one in the Cases module and another in the Timer Entries module.
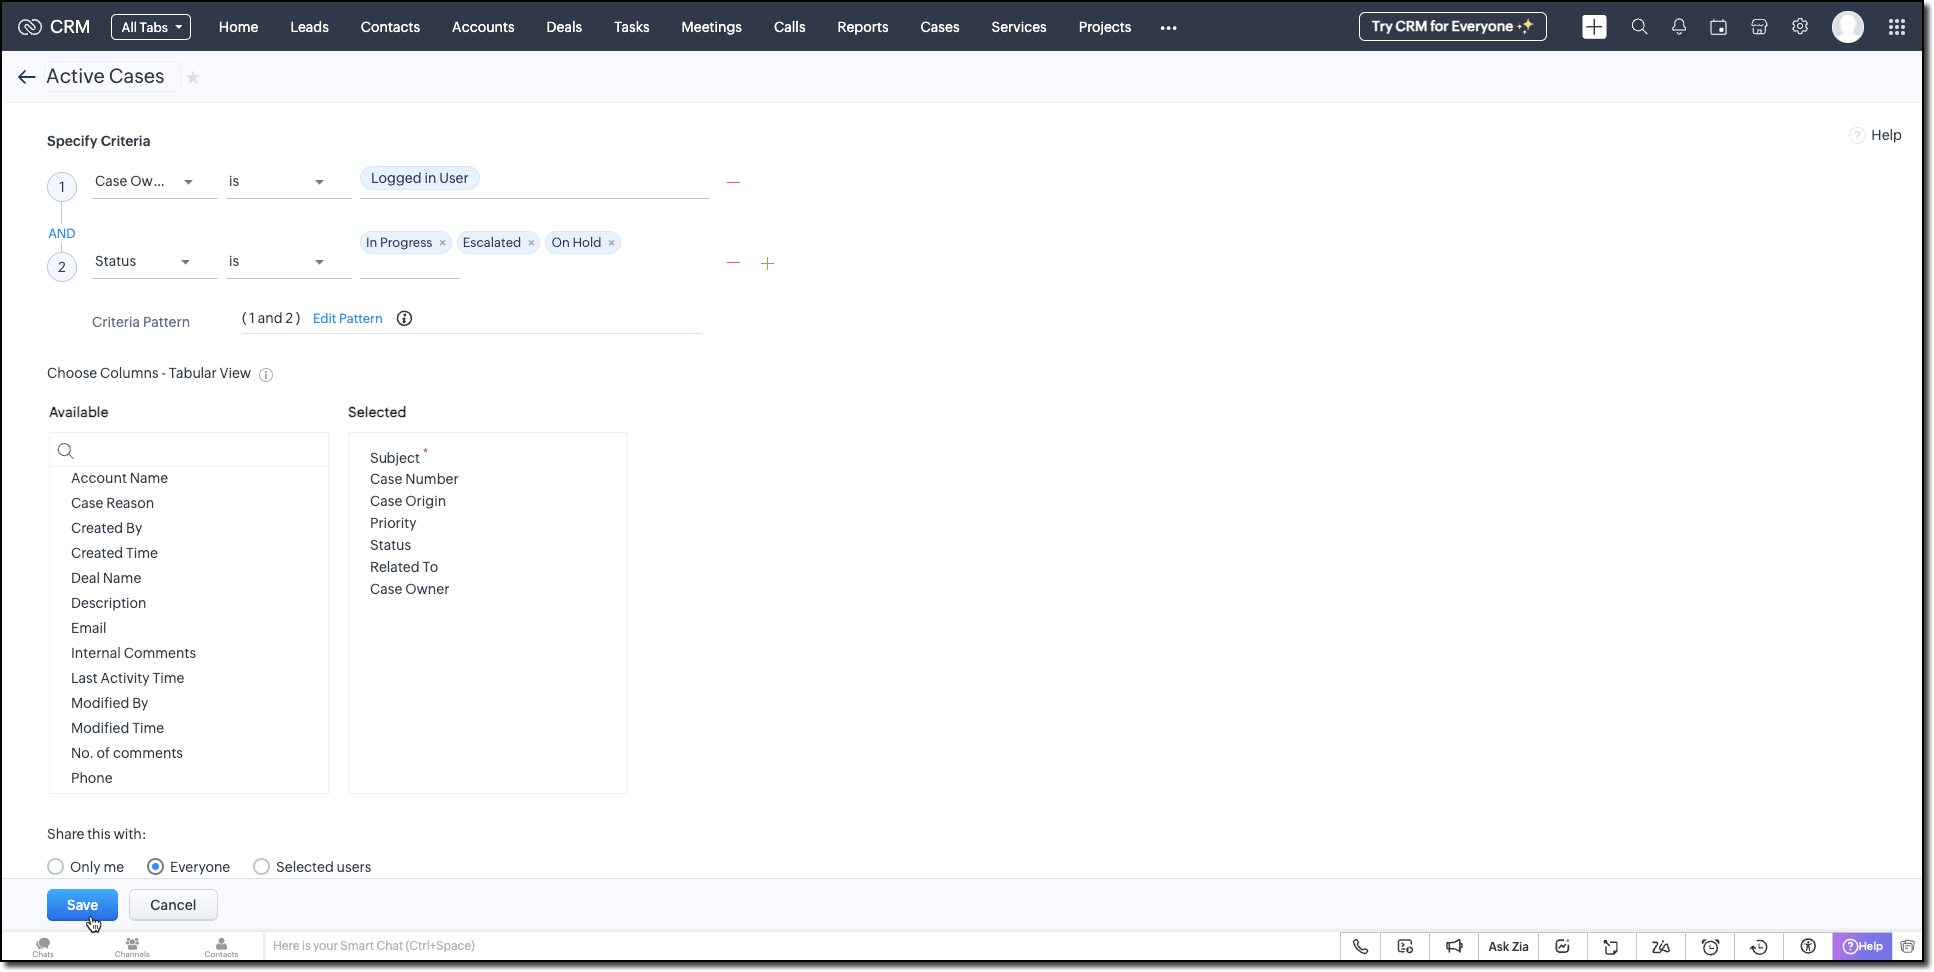
Active Cases View (Cases Module)
Create a custom view in the Cases module to list only the active tickets the logged-in user is working on. Use the following criteria tips:
- Use the Status field to filter records with values like In Progress, On Hold, or Escalated.
- Use the Case Owner field to show records that are assigned only to the currently logged-in user.
This view powers the drop-down inside the widget where users select the case they want to start the timer for.
Active Timers View (Timer Entries Module)
Set up a second custom view in the Timer Entries module to track entries where the timer has been started but not yet stopped. These represent active timers. Use the following logic for criteria:
- The End Time field is empty (i.e., timer still running).
- Timer Entry owner field matches the logged-in user.
This view is used internally by the widget to detect if a timer is already running and update the same entry once the timer is stopped.
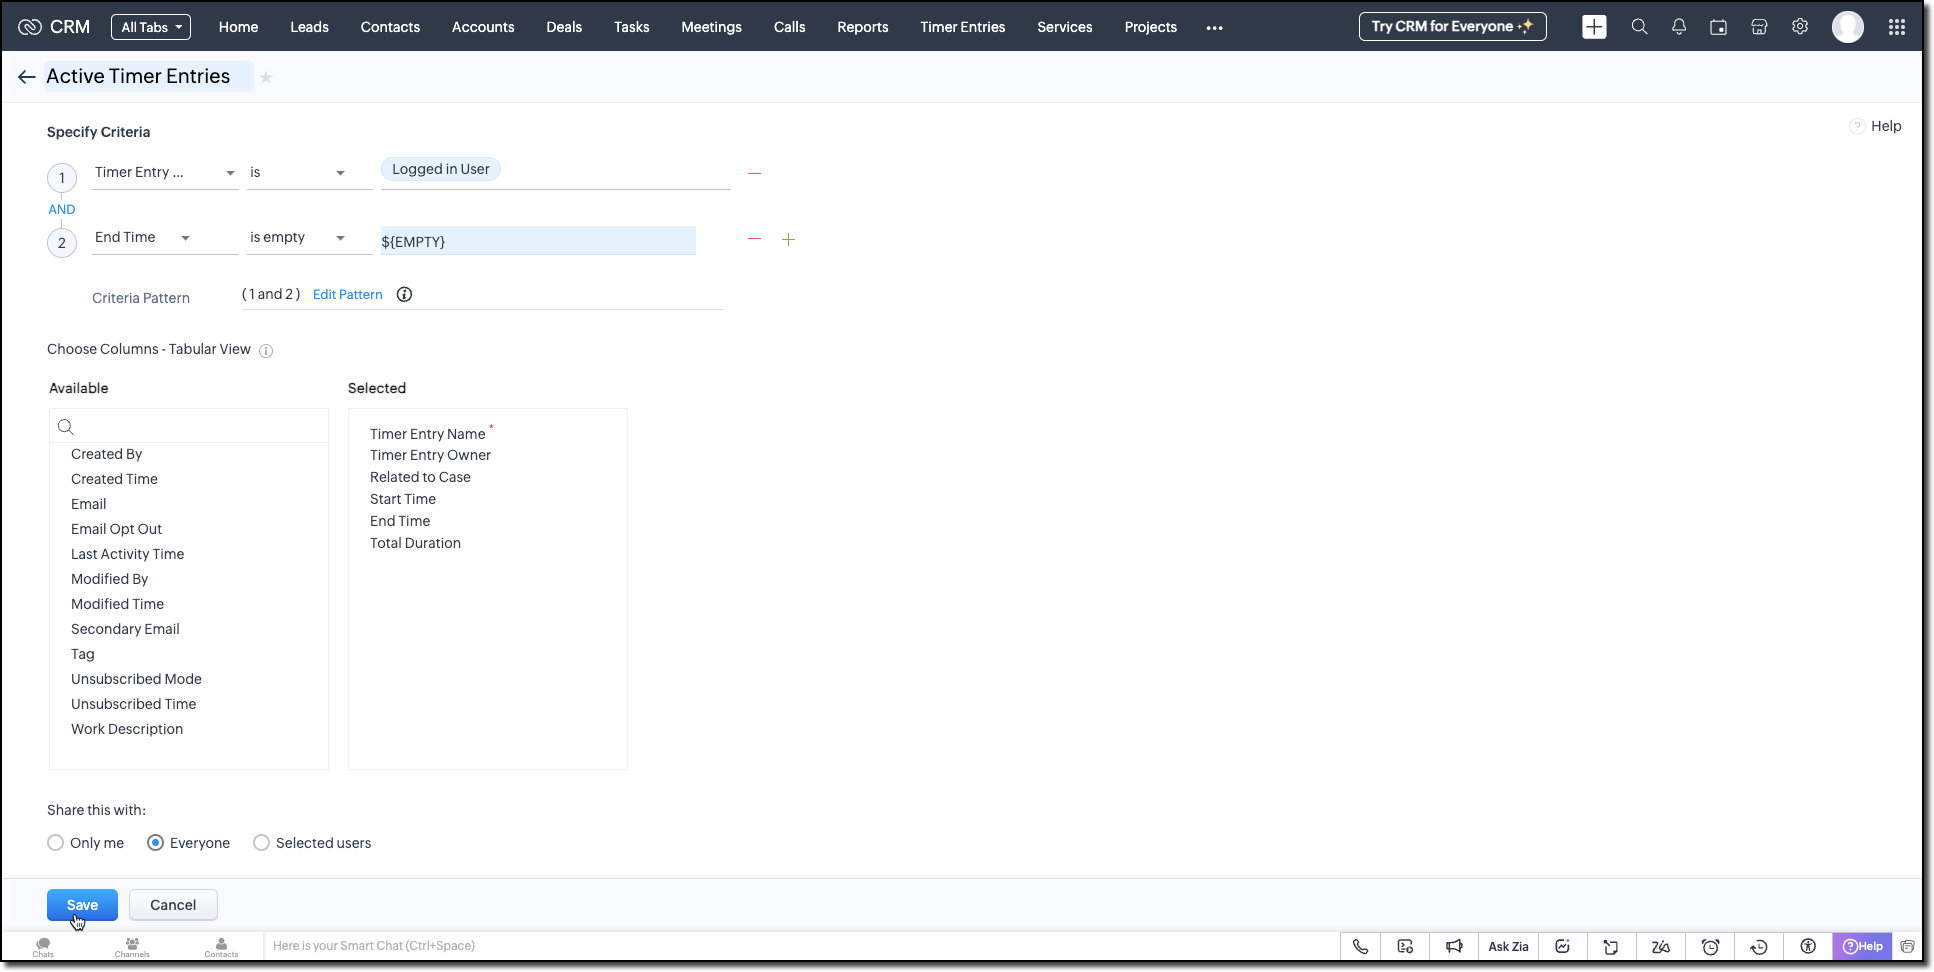
Follow the Managing List View help page and use the specifications shown in the following image.
Building the Timer Widget
Step -1: Review Basics
Refer to our earlier Kaizen on CLI Installation, Creating a Widget Project, and Internal hosting of the same.
Step 2 - Develop the Widget
After initializing your widget project using CLI, implement the timer logic:
Fetching Active Cases
On page load, the populateRecordsDropdown function initiates a Get Records API call to the Cases module, using the Active Cases custom view ID. This fetches all active case records assigned to the logged-in user.
These records are then listed in a dropdown, allowing users to quickly select the relevant case they are about to work on.
async function populateRecordsDropdown() { const recordsDropdown = document.getElementById("moduleRecords"); recordsDropdown.innerHTML = ""; try { const recordsResponse = await ZOHO.CRM.API.getAllRecords({ Entity: casesModule, cvid: casesCVID, per_page: 10 }); if (recordsResponse.data && recordsResponse.data.length > 0) { recordsResponse.data.forEach(record => { const option = document.createElement("option"); option.value = record.id; option.textContent = record.Subject || "Unnamed Record"; recordsDropdown.appendChild(option); }); } else { const placeholderOption = document.createElement("option"); placeholderOption.value = ""; placeholderOption.textContent = "No records found"; placeholderOption.disabled = true; placeholderOption.selected = true; recordsDropdown.appendChild(placeholderOption); } } catch (error) { console.error("Error fetching records:", error); } } |
Starting the Timer and Creating an Entry
Once the user starts the timer, The createRecord function triggers a Create Record API call to log the session in the Timer Entries custom module. The record captures the start time and the related case and description (if provided).
Even if no details are entered or case is selected, a timer entry is still created with the start time. This ensures that spontaneous work sessions are tracked and not lost.
async function createRecord(startTime) { try { const workDescription = document.getElementById("workDescription").value; const selectedRecordId = document.getElementById("moduleRecords").value; const selectedRecordText = document.getElementById("moduleRecords").options[ document.getElementById("moduleRecords").selectedIndex ].text; const data = { Start_Time: startTime, Owner: currentUserId, Work_Description: workDescription, Related_to_Case: selectedRecordId, Name: selectedRecordText }; const response = await ZOHO.CRM.API.insertRecord({ Entity: timerModule, APIData: data }); console.log("Start time recorded successfully"); } catch (error) { console.error("Error creating record:", error); } } |
Stopping the Timer and Updating the Entry
When the timer is stopped, the widget uses the Active Timer Entry custom view to locate the most recent Timer Entry record created by the logged-in user that does not have an end time.
The updateRecord is then triggered to update that active entry using the Update Record API call. It updates the End time of the session and the related case, descriptions, if it was not already provided when the timer was started.
async function updateRecord(endTime) { try { const workDescription = document.getElementById("workDescription").value; const selectedRecordId = document.getElementById("moduleRecords").value; const response = await ZOHO.CRM.API.getAllRecords({ Entity: timerModule, cvid: timerEntriesCVID, per_page: 1 }); const latestRecord = response.data[0]; if (latestRecord) { const recordId = latestRecord.id; const data = { id: recordId, End_Time: endTime, Work_Description: workDescription, Related_to_Case: selectedRecordId }; await ZOHO.CRM.API.updateRecord({ Entity: timerModule, APIData: data, RecordID: recordId }); console.log("End time updated successfully"); } } catch (error) { console.error("Error updating record:", error); } } |
Step 3 - Validate and Pack the Widget
- Follow the steps given in the Widget help page to validate and package the widget.
- Go to Zoho CRM > Setup > Developer Hub > Widgets and click Create New Widget.
- Fill in the required details as shown in this image and ensure to select Button as the widget type.

Step 4 - Associate it with Flyout
- Go to Setup > Developer Space > Client Script. Click New Script.
- Enter a name and description for the script. Choose Command type in Category.

- Create a Flyout and render a widget within it using its details like the API name of the widget, title, size, and animation type. You can get the Widget API name from the widget's detail page.
let allowedUserEmails = []; allowedUserEmails.push('user1_email_address'); allowedUserEmails.push('user2_email_address'); allowedUserEmails.push('user3_email_address'); let currentUserEmail = $Crm.user.email; if (allowedUserEmails.indexOf(currentUserEmail) == -1) { ZDK.Client.showMessage('Command access resticted', { type: 'error' }); return false; } ZDK.Client.createFlyout('myFlyout', {header: 'Timer', animation_type: 4, height: '600px', width: '500px', top: '10px', left: '10px', bottom: '10px', right: '10px' }); ZDK.Client.getFlyout('myFlyout').open({ api_name: 'Timer', type: 'widget' }); return true; |
Refer to Creating a Client Script help page for more details.
Try It Out!
A complete working code sample of this widget is attached to this post.
Now, let us see how this Timer widget works:
1. Start the Timer
Open the widget and select an active case from the dropdown. As soon as you start the timer, a new record will be automatically created in the Timer Entries module to capture the session.

2. Stop the Timer
When the task is complete, provide a description of the work you have done and stop the timer. The same Timer Entry record (created when the timer was started) will be updated automatically with the end time and your work description.
This forms the foundation for accurate time tracking at the record level.
In Part 2, we will show how to:
-> Use a workflow and Deluge function to transfer these entries into the Work Log subform inside the relevant Cases record.
-> Use CRM Reports to slice and dice work time for better SLA and productivity insights.
In the meantime, would you like us to address any of your pain-points or have a topic to discuss? Let us know in the comments or reach out to us via support@zohocrm.com.
Until next time, Happy Coding!
-----------------------------------------------------------------------------------------------------------------
Related Reading
- Custom Fields - Working with Custom Fields and Working with Picklist Field
- Widget - An Overview, CLI Installation, Working with Widgets, JS SDKs, Mobile Compatibility of Widgets and Kaizens
- Core APIs - GET Records, POST Records and UPDATE Records
- Client Script - An Overview, Creating a Client Script, Best Practices and Troubleshooting
-----------------------------------------------------------------------------------------------------------------

Previous Kaizen: Client Script Support for Subforms | Kaizen Collection: Directory
Topic Participants
Kiruthiga G
Sticky Posts
Kaizen #198: Using Client Script for Custom Validation in Blueprint
Nearing 200th Kaizen Post – 1 More to the Big Two-Oh-Oh! Do you have any questions, suggestions, or topics you would like us to cover in future posts? Your insights and suggestions help us shape future content and make this series better for everyone.Kaizen #226: Using ZRC in Client Script
Hello everyone! Welcome to another week of Kaizen. In today's post, lets see what is ZRC (Zoho Request Client) and how we can use ZRC methods in Client Script to get inputs from a Salesperson and update the Lead status with a single button click. In thisKaizen #222 - Client Script Support for Notes Related List
Hello everyone! Welcome to another week of Kaizen. The final Kaizen post of the year 2025 is here! With the new Client Script support for the Notes Related List, you can validate, enrich, and manage notes across modules. In this post, we’ll explore howKaizen #217 - Actions APIs : Tasks
Welcome to another week of Kaizen! In last week's post we discussed Email Notifications APIs which act as the link between your Workflow automations and you. We have discussed how Zylker Cloud Services uses Email Notifications API in their custom dashboard.Kaizen #216 - Actions APIs : Email Notifications
Welcome to another week of Kaizen! For the last three weeks, we have been discussing Zylker's workflows. We successfully updated a dormant workflow, built a new one from the ground up and more. But our work is not finished—these automated processes are
Recent Topics
Cliq iOS can't see shared screen
Hello, I had this morning a video call with a colleague. She is using Cliq Desktop MacOS and wanted to share her screen with me. I'm on iPad. I noticed, while she shared her screen, I could only see her video, but not the shared screen... Does Cliq iOS is able to display shared screen, or is it somewhere else to be found ? RegardsInserting images into Articles or Knowledgebase
Hi, Are there any plans in improving the Knowledgebase text editor so it would allow inserting images through Windows clipboard via copy-paste? Say for example I took a screenshot using the snipping tool in Windows and I'd like to insert that image toLinks not functioning in Zoho mail
Links that are included in emails I receive are not activating. Nothing at all happens when I click on them. I have researched FAQs and this forum to no avail. Any suggestions?Zoho Mail iOS app update: Manage folders and tags
Hello everyone! In the most recent version of the Zoho Mail iOS app, we have brought in support to manage(create, edit and delete) the folders and tags. Create folders Create Tags Edit/ Delete folder In addition to this, we have also brought in support[Important announcement] Zoho Writer will mandate DKIM configuration for automation users
Hi all, Effective Dec. 31, 2024, configuring DKIM for From addresses will be mandatory to send emails via Zoho Writer. DKIM configuration allows recipient email servers to identify your emails as valid and not spam. Emails sent from domains without DKIMZoho CRM Feature Requests - SMS and Emails to Custom Modules & Time Zone Form Field
TLDR: Add Date/Time/Timezone form field, and be able to turn off auto timezone feature. Allow for Zoho Voices CRM SMS Extension to be able to be added to custom modules, and cases. Create a feature that tracks emails by tracking the email chain, ratherOur Review Of Zoho CRM after 60 Days
The purpose of this is to just share with Zoho why I love their product, but ultimately why I could not choose Zoho CRM for our next CRM. About two months ago we begun a CRM exploration process for our financial planning firm, based in Texas. We alreadyLink Purchase Order to Deal
Zoho Books directly syncs with contacts, vendors and products in Zoho CRM including field mapping. Is there any way to associate vendor purchase orders with deals, so that we can calculate our profit margin for each deal with connected sales invoicesExtend the Image Choice Field
Hi, The New Yes/No field is great for what it does, and the Image Choice Field is good but could be better with some functions from the Yes/No field. Take an example, rather than just Yes/No you want Yes/No/Maybe (Or more than 3 choices), but unlike theCRM x WorkDrive: File storage for new CRM signups is now powered by WorkDrive
Availability Editions: All DCs: All Release plan: Released for new signups in all DCs. It will be enabled for existing users in a phased manner in the upcoming months. Help documentation: Documents in Zoho CRM Manage folders in Documents tab Manage filesZoho Desk: Macro to assign Ticket to self
Hello, We are using macros in Zoho Desk to set some fields and send a response. I would also like to assign the ticket to myself (or whoever applies the macro). I can only set a fixed agent in the macro, so I would have to create one for every agent.Turn off Knowlege Base Follow options and Follower lists
Is there a way to hide or turn off the option in the Knowledge Base for users to follow specific departments/categories/sections/articles? If not, is there a way to turn off the public list of followers for each of those things? Otherwise, customer namesEnterprise Data management solutions
I'm on the hunt for the perfect Data management solution for my organization. I've been doing a ton of research across different websites, but honestly, it's just left me more confused! A friend suggested I check here, so I'm hoping someone can pointNew Feature: Audit Log in Zoho Bookings
Greetings from the Zoho Bookings team! We’re excited to introduce Audit Log, a new feature designed to help you track all key actions related to your appointments. With Audit Log, you can maintain transparency, strengthen security, and ensure accountability.Automated Task reminder
First question: If a task does not have a reminder set, will it still send an email notification that the task is due today? If not, how can I set up an automated reminder to send the task owner an email that it is due on a certain date?Zoho Support - contract notifications
Hi, I have a few questions about using Zoho support. Is there a way to add custom contract notifications like (90 days before expiry send notification e-mail to agent and customer, then another 60 days before expiry and another 30 days.). And is it possibleKaizen #230 - Smart Discount-Based Quote Approvals Using CRM Functions and Approval Process
Hello everyone! Welcome back to the Kaizen series! Discount approvals are a standard part of sales governance. Most organizations need something like this: Discount % Required Action < 10% Auto-approve 10–19.99% Sales Manager approval ≥ 20% VP Sales approvalHow to create a new Batch and update Stock via Inventory?
Hi everyone, We are building an automation where a user enters batch details (Batch Number, Mfg Date, Expiry, and Quantity) into a Custom Module. I need this to trigger an API call to Zoho Inventory to: Create the new batch for the item. Increase theOAuth2 Scope Error - Incorrectly defaulting to CRM instead of Analytics.
Hello Zoho Team, I am trying to connect n8n to Zoho Analytics API V2 for a simple automation project. Despite using the correct Analytics-specific scopes, my OAuth handshake is failing with a CRM-related error. The Problem: The authorization screen shows:Archive Option in Conversation View
Hello, I have a suggestion\request to add an "Archive Thread" button in conversation view of Zoho Mail. The best suggestion I have is to put an "Archive Thread" button next to the "Label Entire Thread" button in conversation view. Most users don't justIs it possible to create a meeting in Zoho Crm which automatically creates a Google Meet link?
We are using Google's own "Zoho CRM for Google" integration and also Zoho's "Google Apps Sync" tools, but none of them provide us with the ability to create a meeting in Zoho CRM that then adds a Google Meet link into the meeting. Is this something thatTrigger a Workflow Function if an Attachment (Related List) has been added
Hello, I have a Case Module with a related list which is Attachment. I want to trigger a workflow if I added an attachment. I've seen some topics about this in zoho community that was posted few months ago and based on the answers, there is no triggerHow can I link Products in a Deal Subform to the Products Module
Hello, I have a pricing subform on our Deals page and use a lookup field to associate a product with each line. I want to be able to look at a product page within the Products module and see a list of the deals connected to that product. I have this workingEmail Field Validation Incorrectly Rejects RFC-Compliant Addresses (Forward Slashes)
I've encountered a validation issue with Zoho Creator's Email field that rejects RFC-compliant email addresses containing forward slashes, and I'm hoping the Zoho team can address this in a future update. The Issue When entering an email address containingCall result pop up on call when call ends
I’d like to be able to create a pop up that appears after a call has finished that allows me to select the Call Result. I'm using RingCentral. I have seen from a previous, now locked, thread on Zoho Cares that this capability has been implemented, butZOHO.CRM.UI.Record.open not working properly
I have a Zoho CRM Widget and in it I have a block where it will open the blocks Meeting like below block.addEventListener("click", () => { ZOHO.CRM.UI.Record.open({ Entity: "Events", RecordID: meeting.id }).catch(err => { console.error("Open record failed:",Payment system for donations management
I manage an organization where we receive donations from payers. Hence, there is no need to first create invoices and then create payments received against the invoices. What are the recommended best practices to do this in ZohoBooks?Recording the deducted TDS on advance received from Customer (Zoho Books India)
Hi, How can we record the tds that has been deducted by my customer for the advance that he has paid to me. 1) My customer has paid Rs 10000 to me as advance (Rs 9800 as cash and deducted Rs 200 as TDS). I am not able to record the tds that has been deductedChanging Account Type in Chart of Accounts
Does anyone know how to change/edit the account type for an Account name in Chart of Accounts. Zoho will not let me do this for some reasonBulk bank rule creatioin
Hi team, I am exploring Option to create a multiple bank rule. Could please suggest the option to implement this?Zoho books aide
Bonjour, je rencontre un problème avec Zoho Books. J’ai effectué une demande de support via l’interface prévue à cet effet, mais je n’ai jamais de retour. Je ne reçois ni email de confirmation, ni information concernant la prise en charge de ma demande,Smart Data, Smarter Contracts — Ensuring Consistency Between Metadata and Documents
In contract management, data accuracy is not just a nice-to-have—it is essential. A single mismatch between what your system shows and what is written in the contract can ripple into approval delays, compliance risks, and broken trust in your data. ImagineJoin Zoho Meeting only via Web browser and not with Zoho Meeting App
Dear Zoho team, according to the documentation [1], Zoho Meeting only offers web view for Chrome and Firefox on a desktop. For other browsers and devices, participants can only join a Zoho Meaning with the Zoho Meeting App installed. This is a big hurdleCRM gets location smart with the all new Map View: visualize records, locate records within any radius, and more
Hello all, We've introduced a new way to work with location data in Zoho CRM: the Map View. Instead of scrolling through endless lists, your records now appear as pins on a map. Built on top of the all-new address field and powered by Mappls (MapMyIndia),Manage control over Microsoft Office 365 integrations with profile-based sync permissions
Greetings all, Previously, all users in Zoho CRM had access to enable Microsoft integrations (Calendar, Contacts, and Tasks) in their accounts, regardless of their profile type. Users with administrator profiles can now manage profile-based permissionsinability to use different primary address on invoice per location
my company operates in two different locations with different email address. The problems then is the inability to edit the primary to suite the invoice for the second location.AI Search and Record Retrieval Inside Zoho Creator – Is This Possible?
Is it possible to integrate an AI assistant into Zoho Creator that can intelligently search, retrieve, and analyze records within the application’s forms and reports? Can AI access and query existing Creator data securely using Deluge or APIs to provideI have a requirement to integrate Zoho Books with Zoho Projects at both project and task levels.
Currently, when i create transactions in Zoho Books (Expenses, Invoices, Bills), we can only map them at the project level. However, our requirement is to: Map records at both project and task levels Sync these transactions back to Zoho Projects underScheduled AU Data Center Database Version Upgrade for Zoho Forms
Dear Zoho Forms' users, We would like to update you on a scheduled AU Data Center database version upgrade for Zoho Forms. Find the schedule below: Migration window: Sunday, 22nd February 2026 12.00 AM to 12.30 AM AEDT This migration is a part of ourCannot get code to work with v2.mergeAndStore!
Please can someone help me pass subform items into a repeating mail merge table row using v2.mergeAndStore? I have a mail merge template created in Writer and stored in Workdrive. This template is referenced by a custom CRM function which merges all ofNext Page