How to use Twilio to send appointment notification and reminder SMS in Zoho Bookings
Hit no-shows out of the ballpark by combining Zoho Bookings and SMS providers.
SMS notifications help you remind customers of their appointments and reduce no-shows by reaching out where they are.
In this guide, we'll configure an SMS provider called Twilio.
Prerequisites
- A Premium Plan of Zoho Bookings - Pricing Page.
- A Twilio Subscription
- You need at least one number to send messages from. It can be a short code, your personal number, a local number, or anything else. Twilio charges monthly for phone numbers. Check out Twilio's pricing page for more details.
- Since Twilio uses a pay-as-you-go model, there are no monthly commitments (except the sender number). The minimum recharge value is $20, and you can use it until the credits expire - Learn more about Twilio's pricing model here.
Things to Know Before Using Twilio
- You can share your Twilio subscription amongst multiple admins (if required).
- Twilio is responsible for everything except configuring SMS text (You can configure this inside Zoho Bookings).
- Both single and dual way communication is possible with Twilio
- Using Twilio, you can send messages across borders.
- Case 1: When you send messages from a US number to an Indian number, sender IDs might change. It ensures the deliverability of messages.
- However, reply messages from those recipients will not be routed back to your Twilio Number. You can read more about it here.
- Case 2: SenderIDs don't change when the sender and the recipient numbers belong to the same country.
- Twilio charges for text messages on a segment basis. (1 segment = 160 Characters). For instance, if you send an SMS with 200 characters, you'll be charged for two SMS credits - Learn more about it here.
- To find the number of SMS you'll be able to send with your top-up, use this formula:
- Number of SMS that can be sent = (Top Up Value - Phone Number Price)/ Message Per SMS
- Let's assume you belong to the US and recharge for $20. You've also opted for a long code that costs $1.16 (with carrier fees), the equation would look like
- Number of SMS that can be sent* = ($20 - $1.16)/ ($0.0079) = 2200.
- You'll be able to send approximately 2200+ SMS with this. (If you don't buy additional phone numbers in the US)
- Note - The calculation is only an approximate estimation of the number of messages that you can send. This is because factors like carrier fees, and per-message rate change often and vary widely across different service providers.
- Twilio credits are one-off amounts that don't expire until you use them.
- Your Twilio account will get suspended once your account balance reaches zero. To avoid this, Twilio sends a notification to your email requesting you to refill your funds when the balance hits $5.
- Another way to prevent your account from hitting zero you can set up an auto-recharge trigger for a minimum of $10. When your balance hits $10, you can automatically set it up to top up your account. Check out this page for setting up automatic payment triggers.
A2P 10 DLC Registration (only if you wish to send messages to the US)
Note - This is only necessary if you send messages to the United States. (Regardless of where you send your messages from - inside or outside the US)
- If you send messages to the US, you should register for A2P 10 DLC. (Application to Person 10 Digit Long Code messaging protocol)
- A2P 10DLC is a secure way to communicate with businesses and ensures that the messages are relevant to the recipients. We highly advise you to register for A2P 10 DLC Protocol as numbers without it will incur higher fees and even service disruptions from June 1, 2023. This is to comply with US messaging regulations. You can learn more about it here.
- This registration will cost a one-time fee - Read more about it here.
- A2P 10 DLC registration is only possible with a Twilio premium subscription and not for trial accounts.
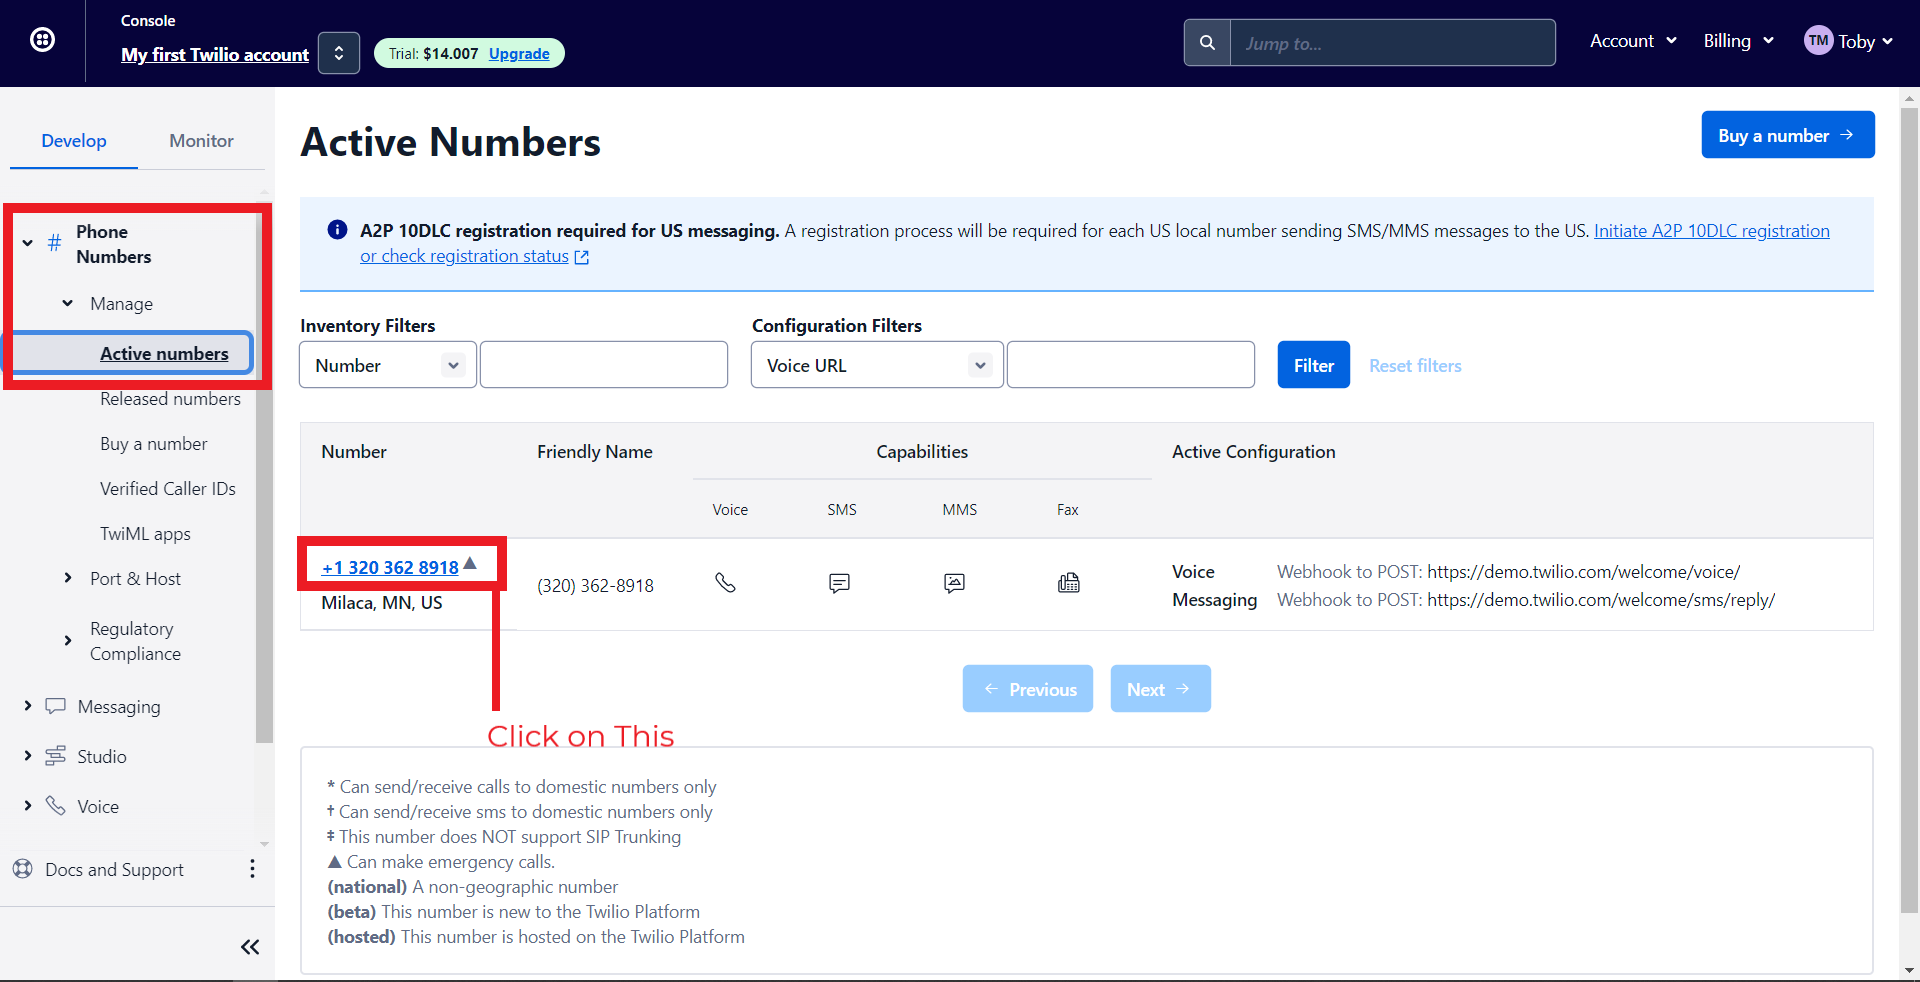
- To do this, navigate to Phone Numbers > Manage > Active Numbers > Click on a Number.
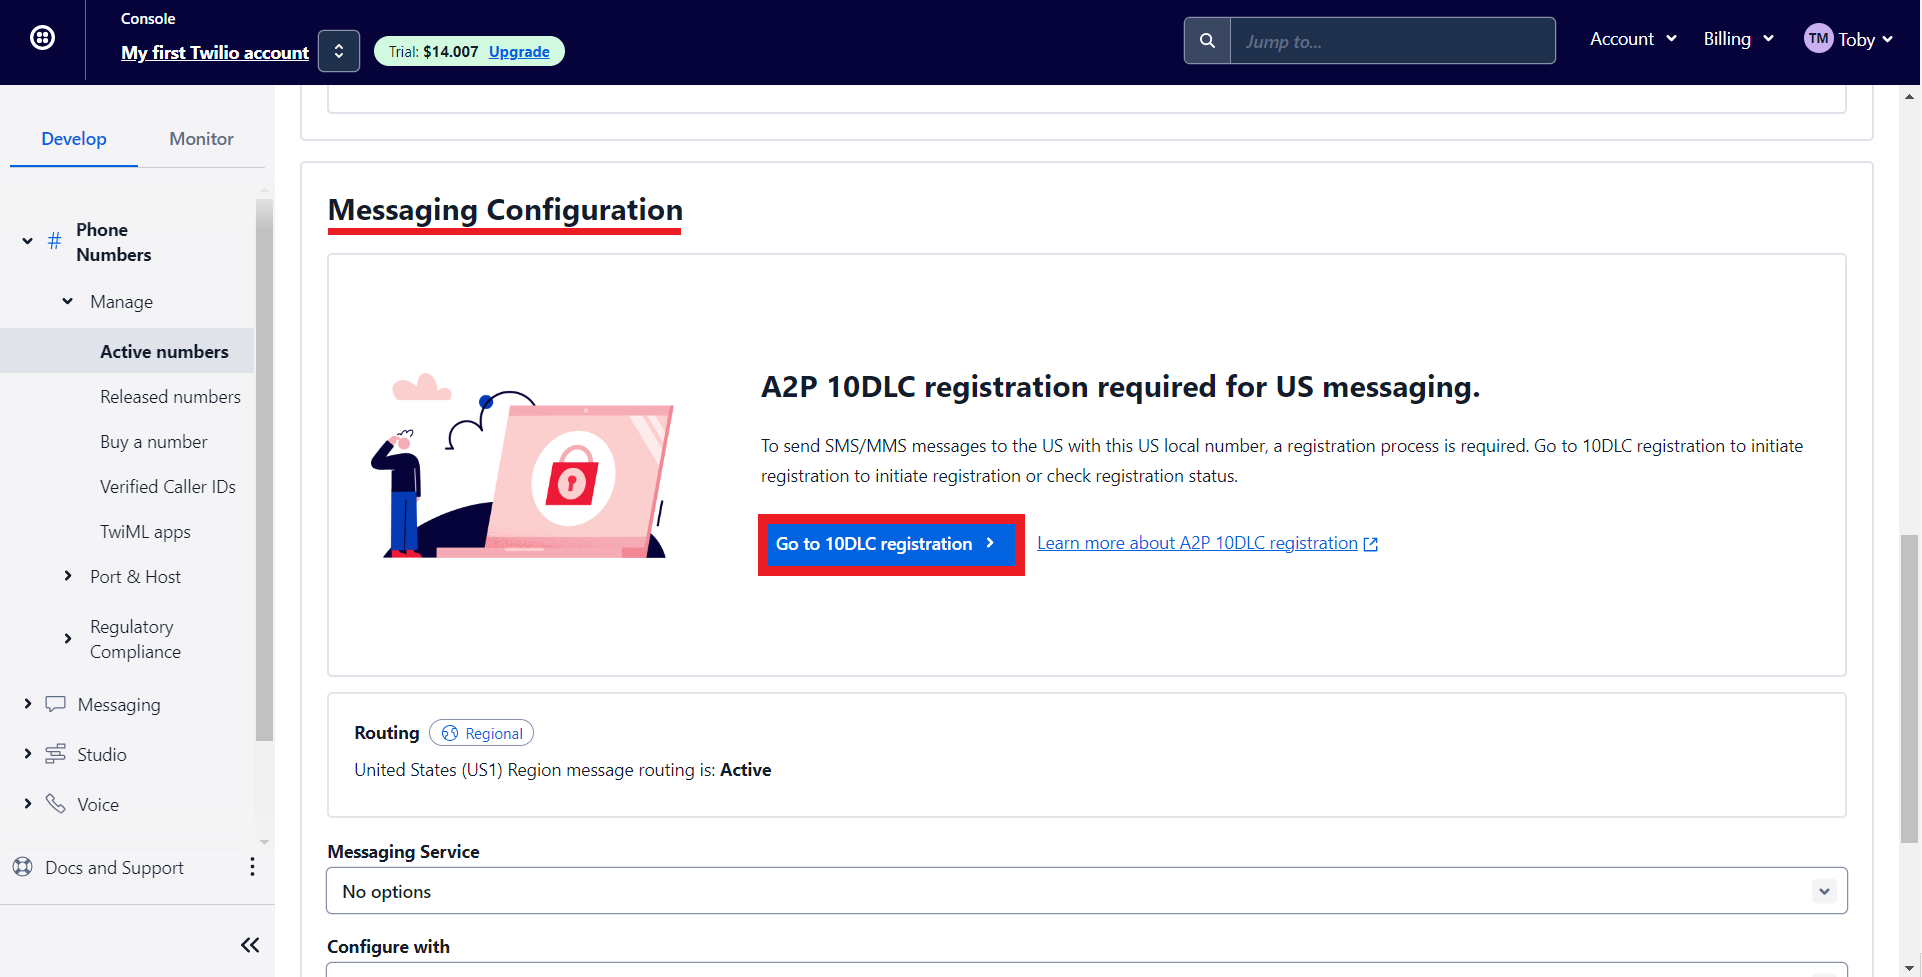
- Under Messaging Configuration, click on 'Go to 10DLC registration.'
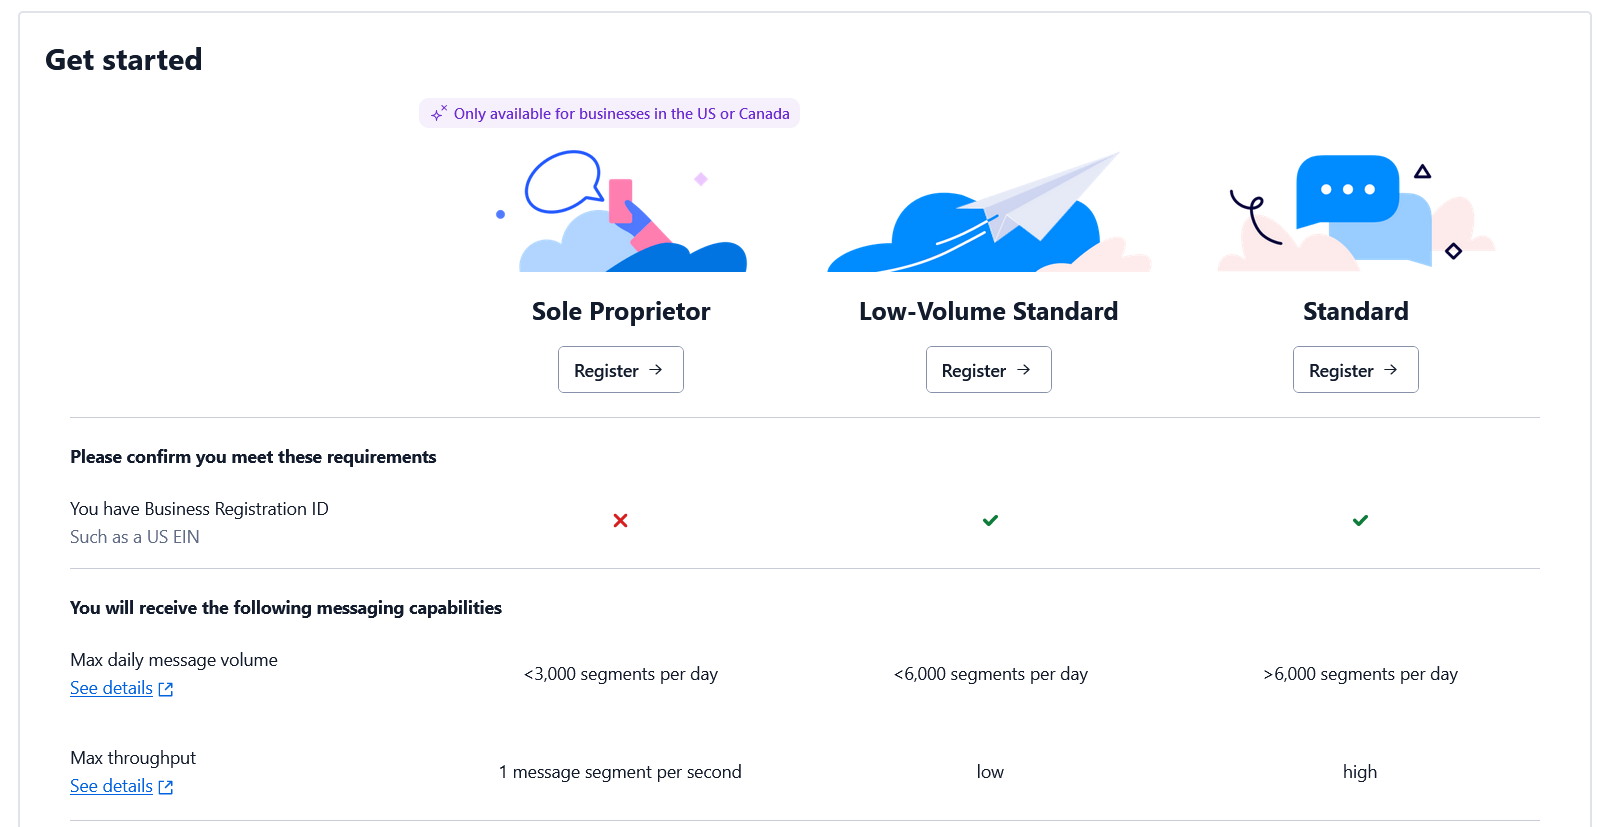
- Depending on whether you have an EIN (Tax ID) or not, you can register for the corresponding option. Check out this page for more details.
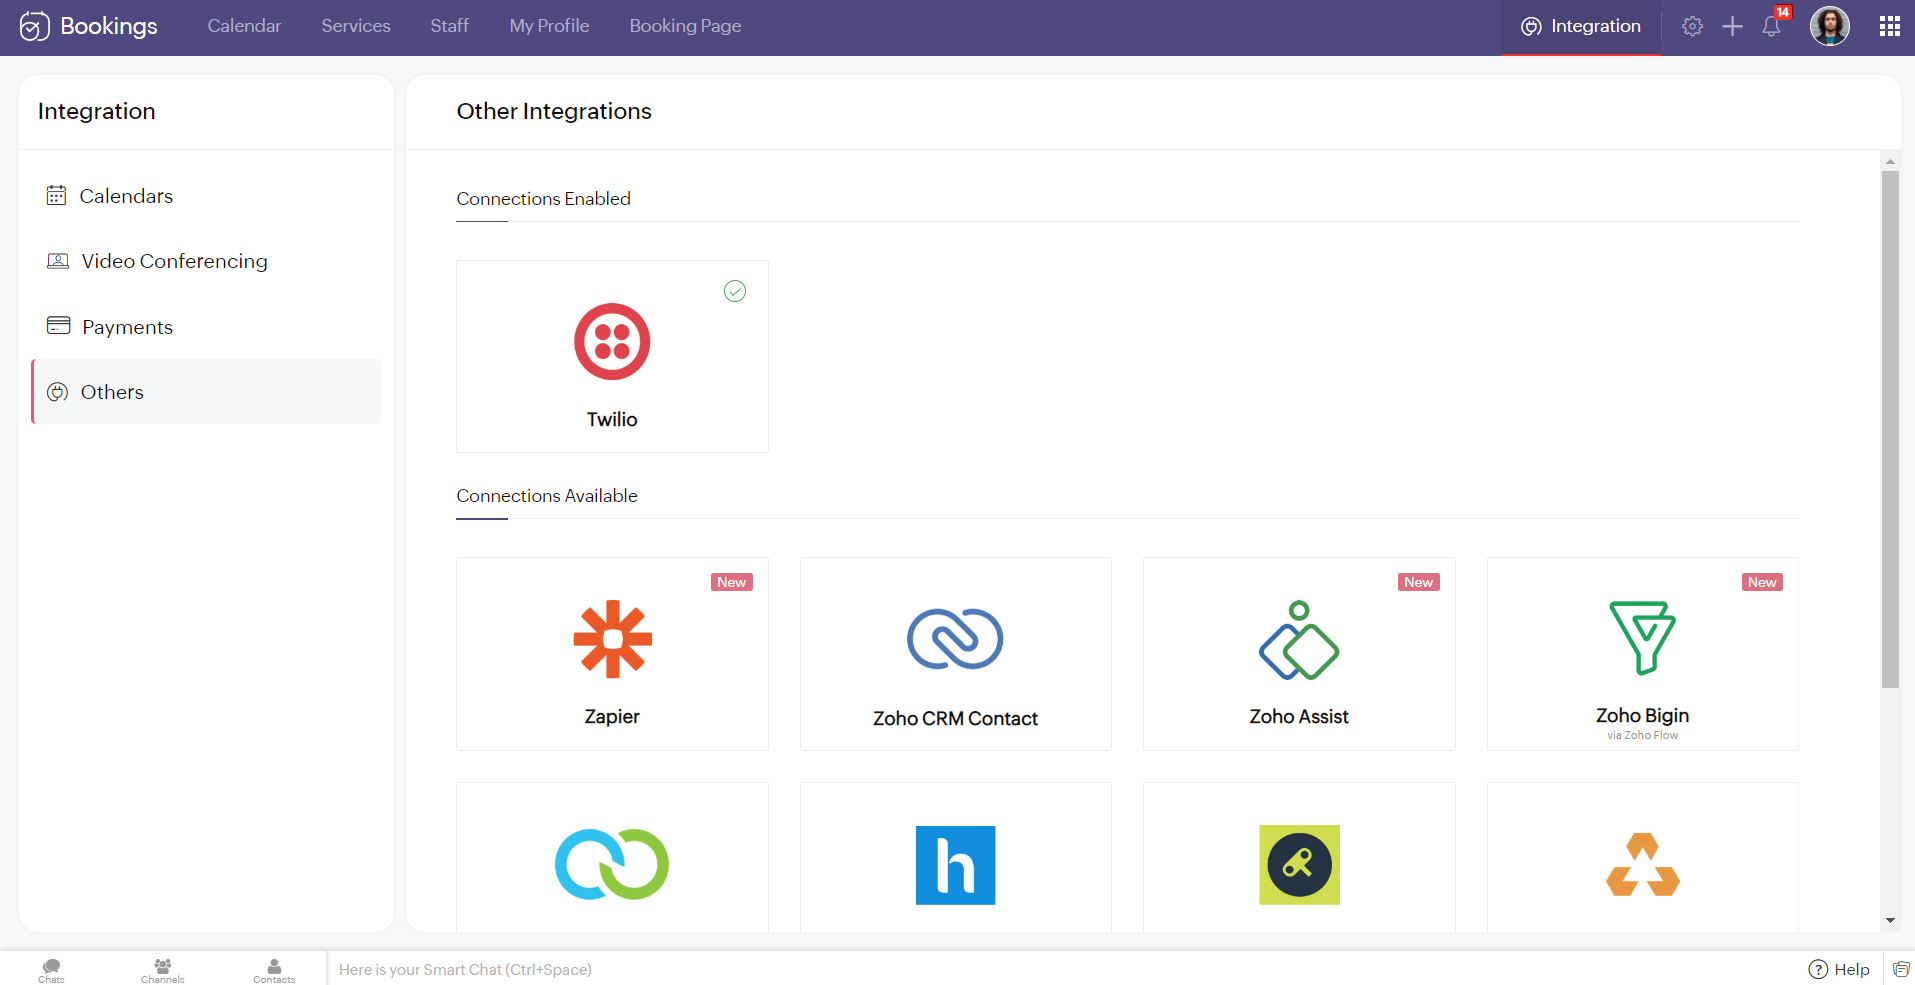
Note - You cannot integrate multiple SMS providers to Zoho Bookings simultaneously.
Configuring Twilio with Zoho Bookings
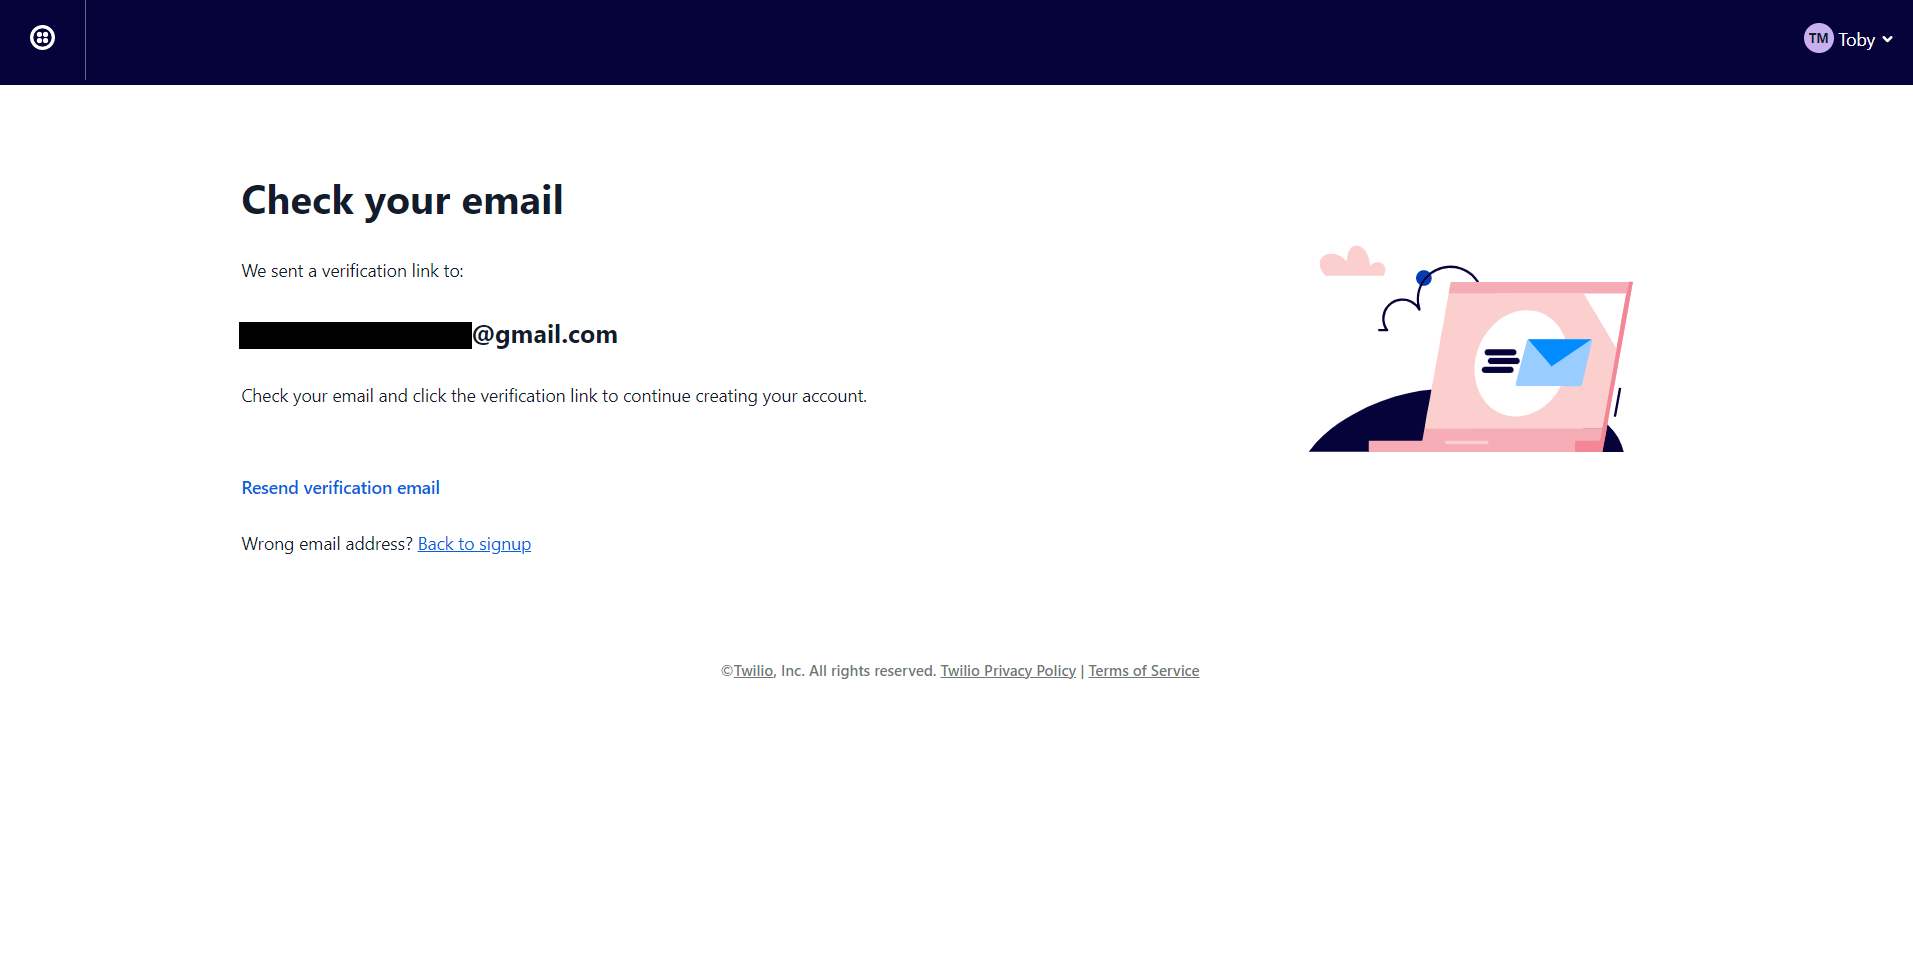
2. You'll be redirected to the following screen once you've signed up. Check your mail inbox.
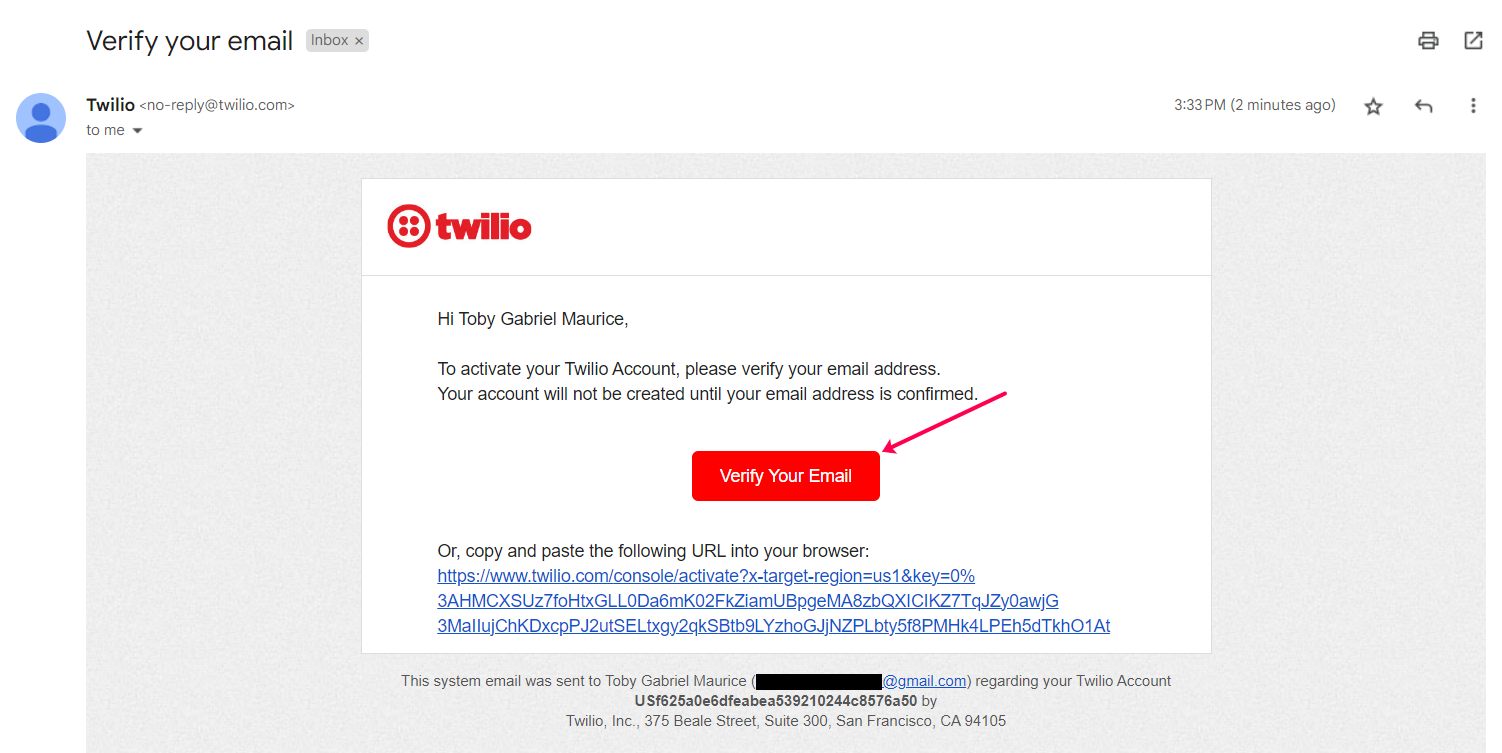
3. Your email would look like this. Confirm your account.
4. Twilio asks you to secure your account with a phone number. Enter your number and click on Send verification code/Get code via phone call depending on your choice.

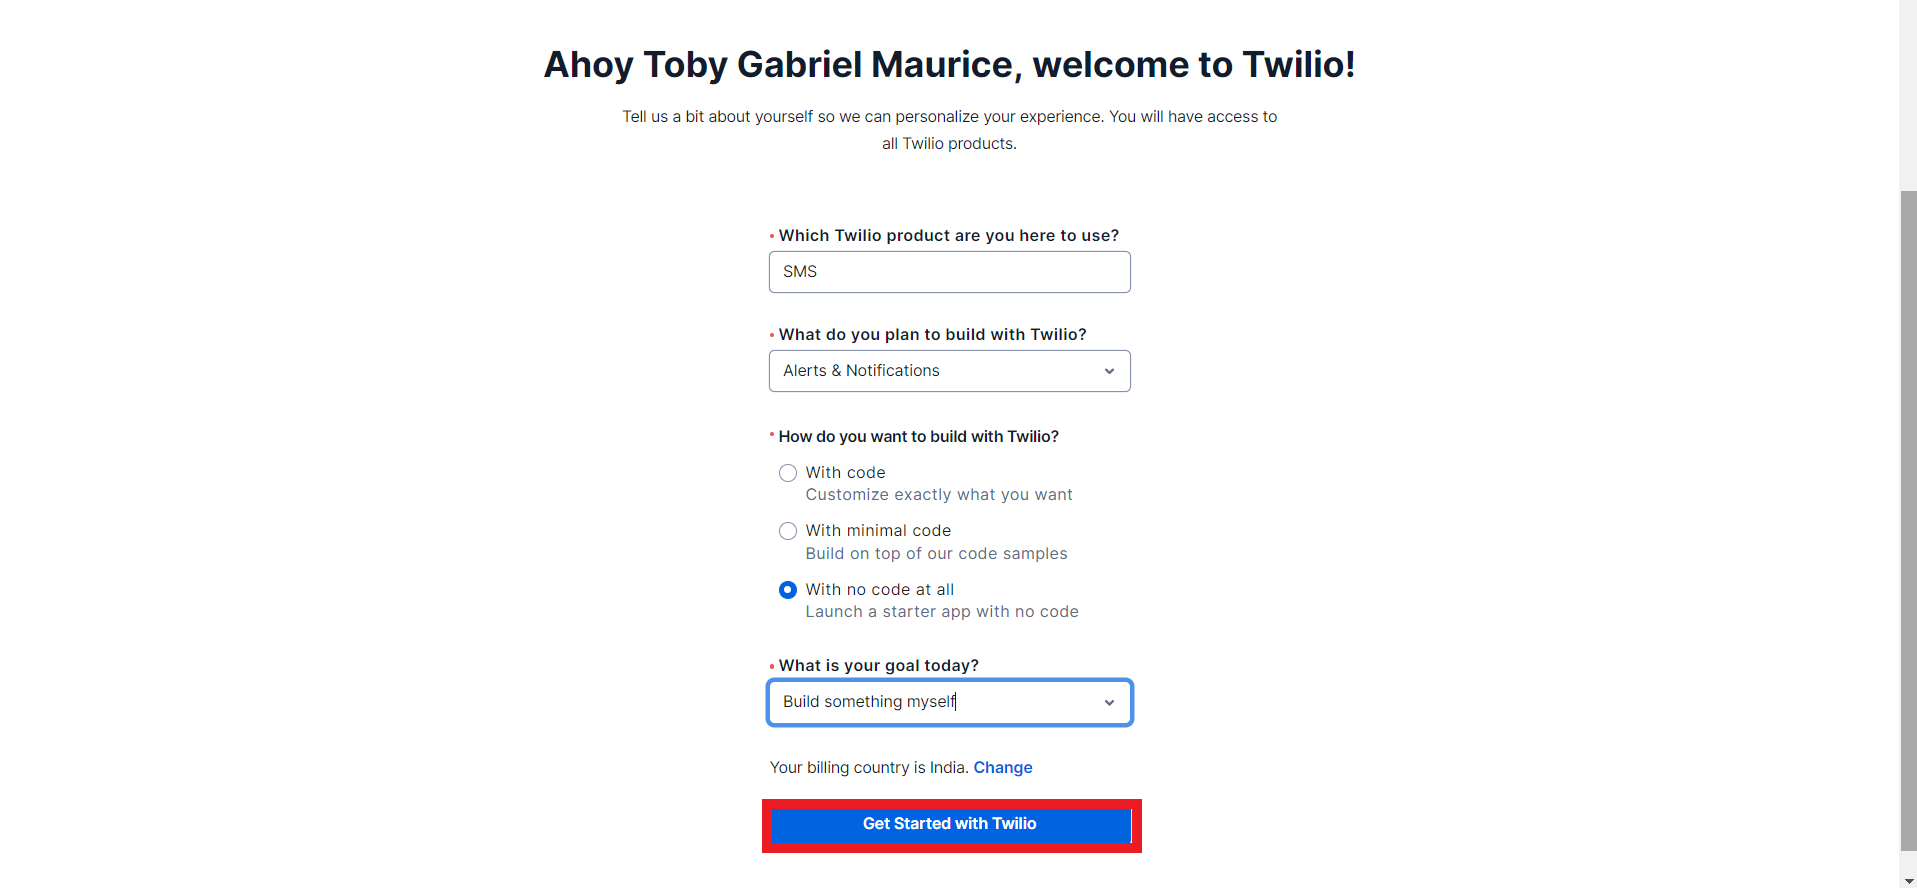
5. Once you've confirmed your phone number you can fill in the onboarding form and click on get started with Twilio.
6. You'll be redirected to the Twilio dashboard.
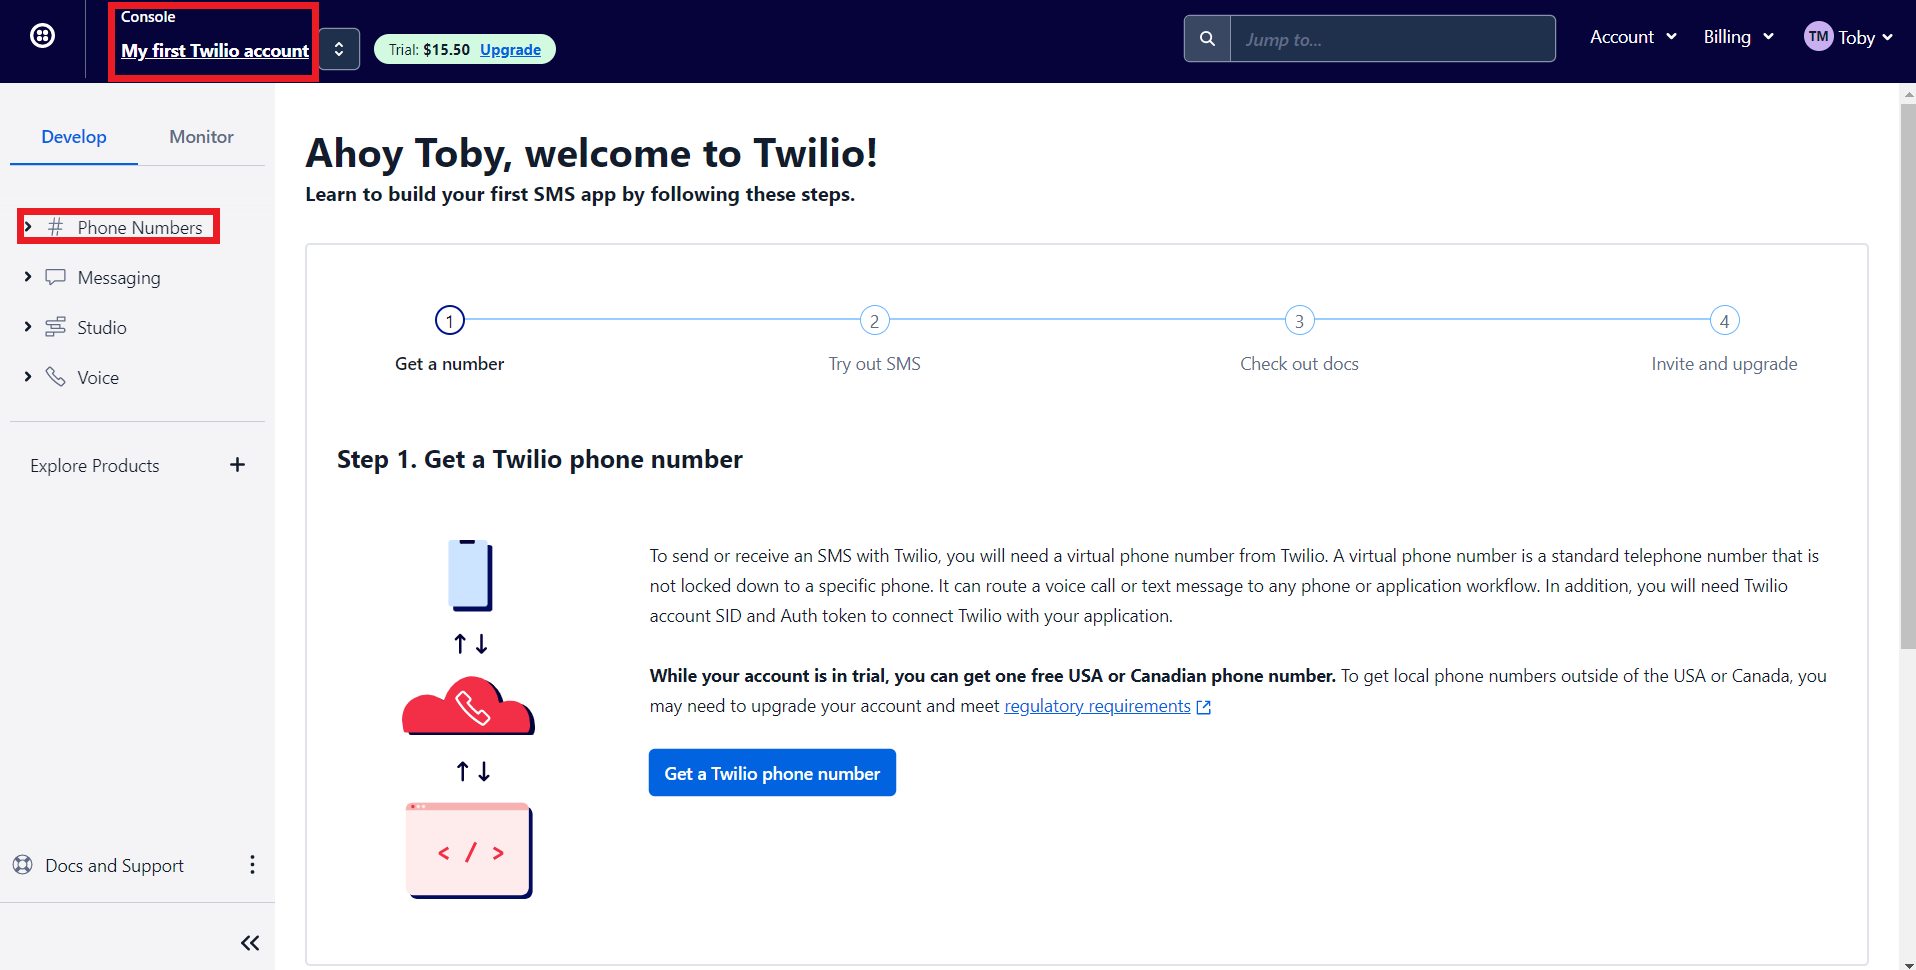
- 'My first Twilio account' is the account name of your Twilio SMS account. If you have multiple Twilio SMS accounts you can navigate it from here
- The Phone numbers tab helps you to
- Manage all your Phone numbers
- Buy new Numbers
- Release a Phone number
- When you sign up for a Twilio account, you'll get $15.50. You can get a trial number using this to test their configurations before opting for a premium plan.
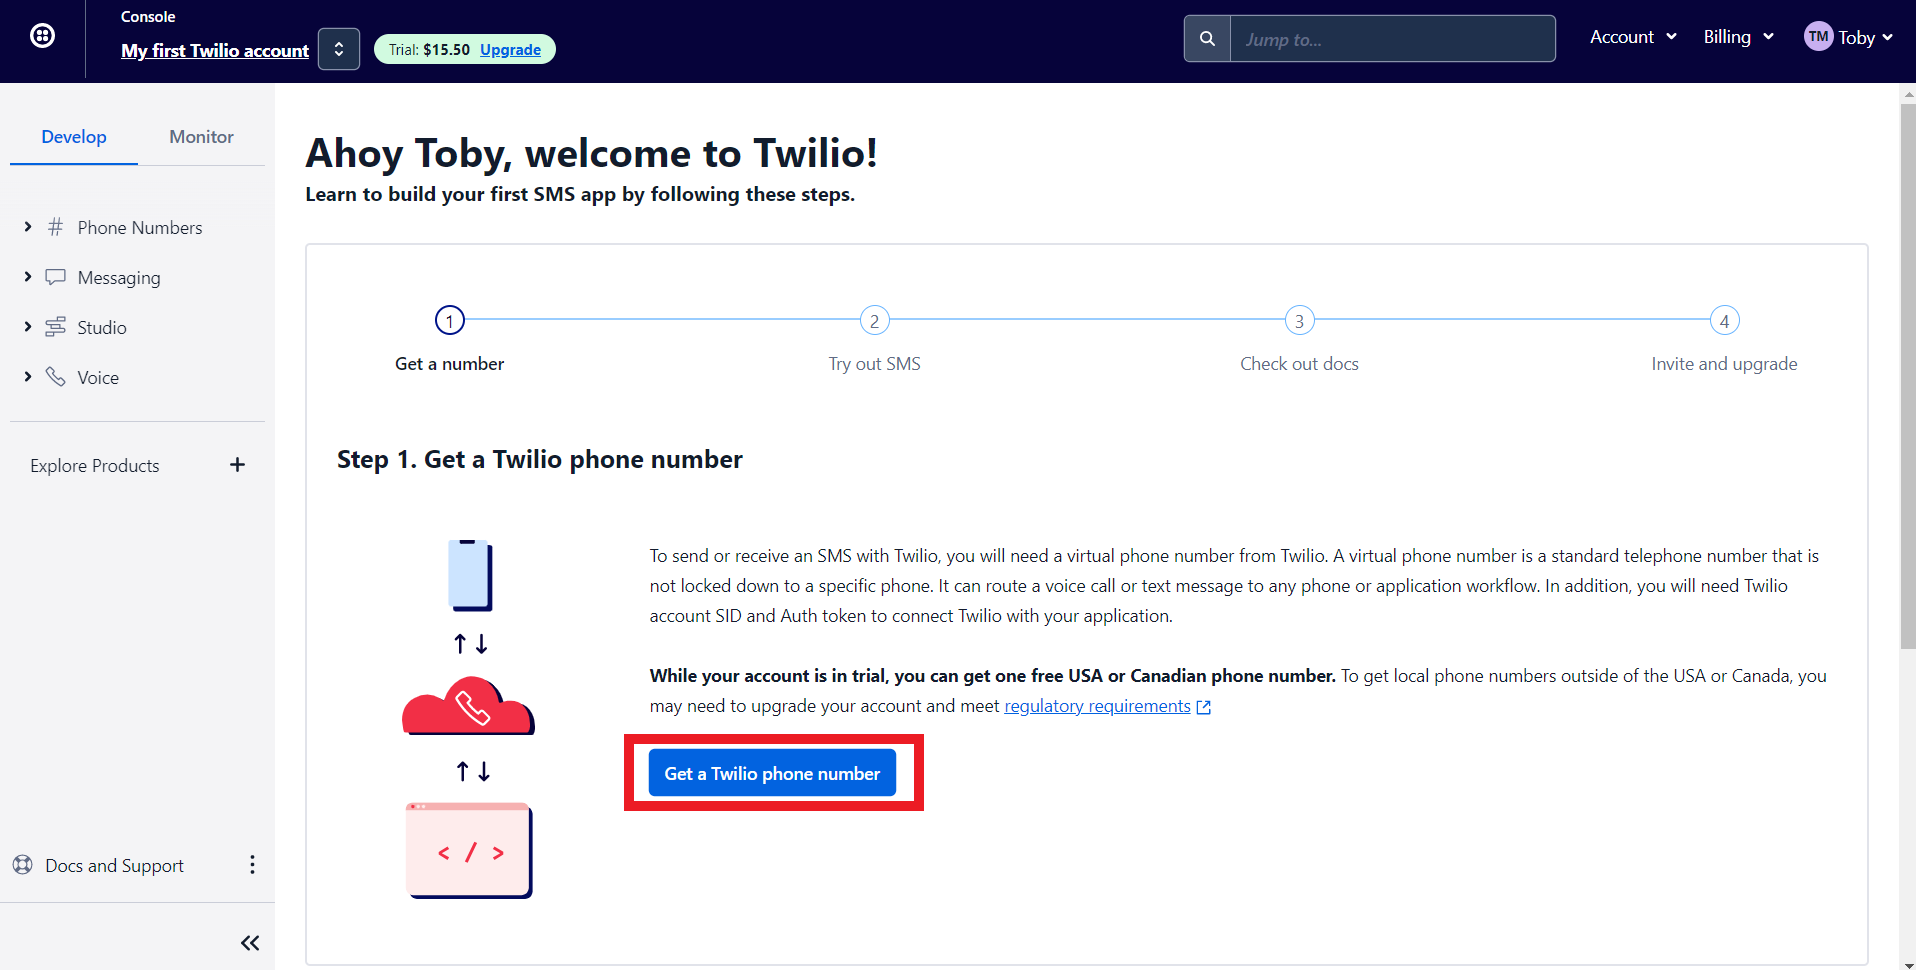
7. Let's get a phone number from Twilio. Click on 'Get a Twilio Phone Number.'
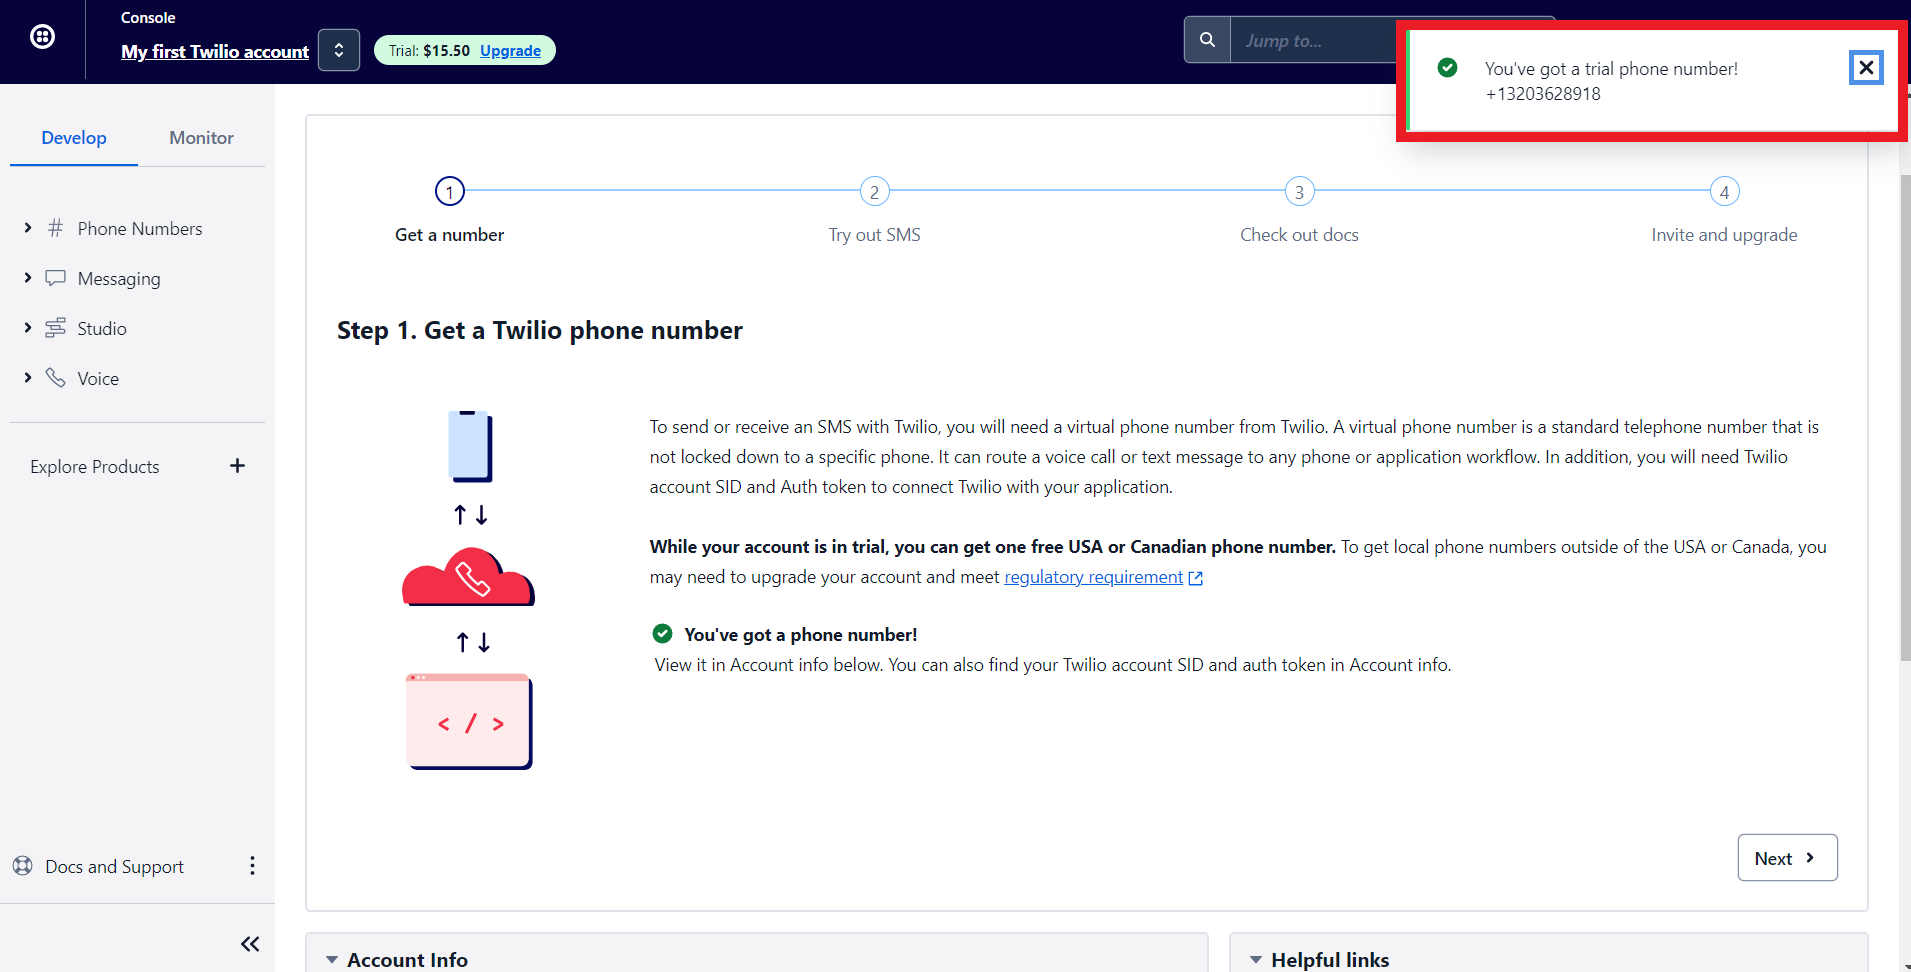
8. Twilio will assign you a phone number. Now let's configure Twilio with Zoho Bookings.
Note - To get a premium number, navigate to Phone numbers > Manage > Buy a Number
Choose which country's number you wish to get, SMS (as capability), and click search. You can click on buy to obtain the number.
Choose which country's number you wish to get, SMS (as capability), and click search. You can click on buy to obtain the number.

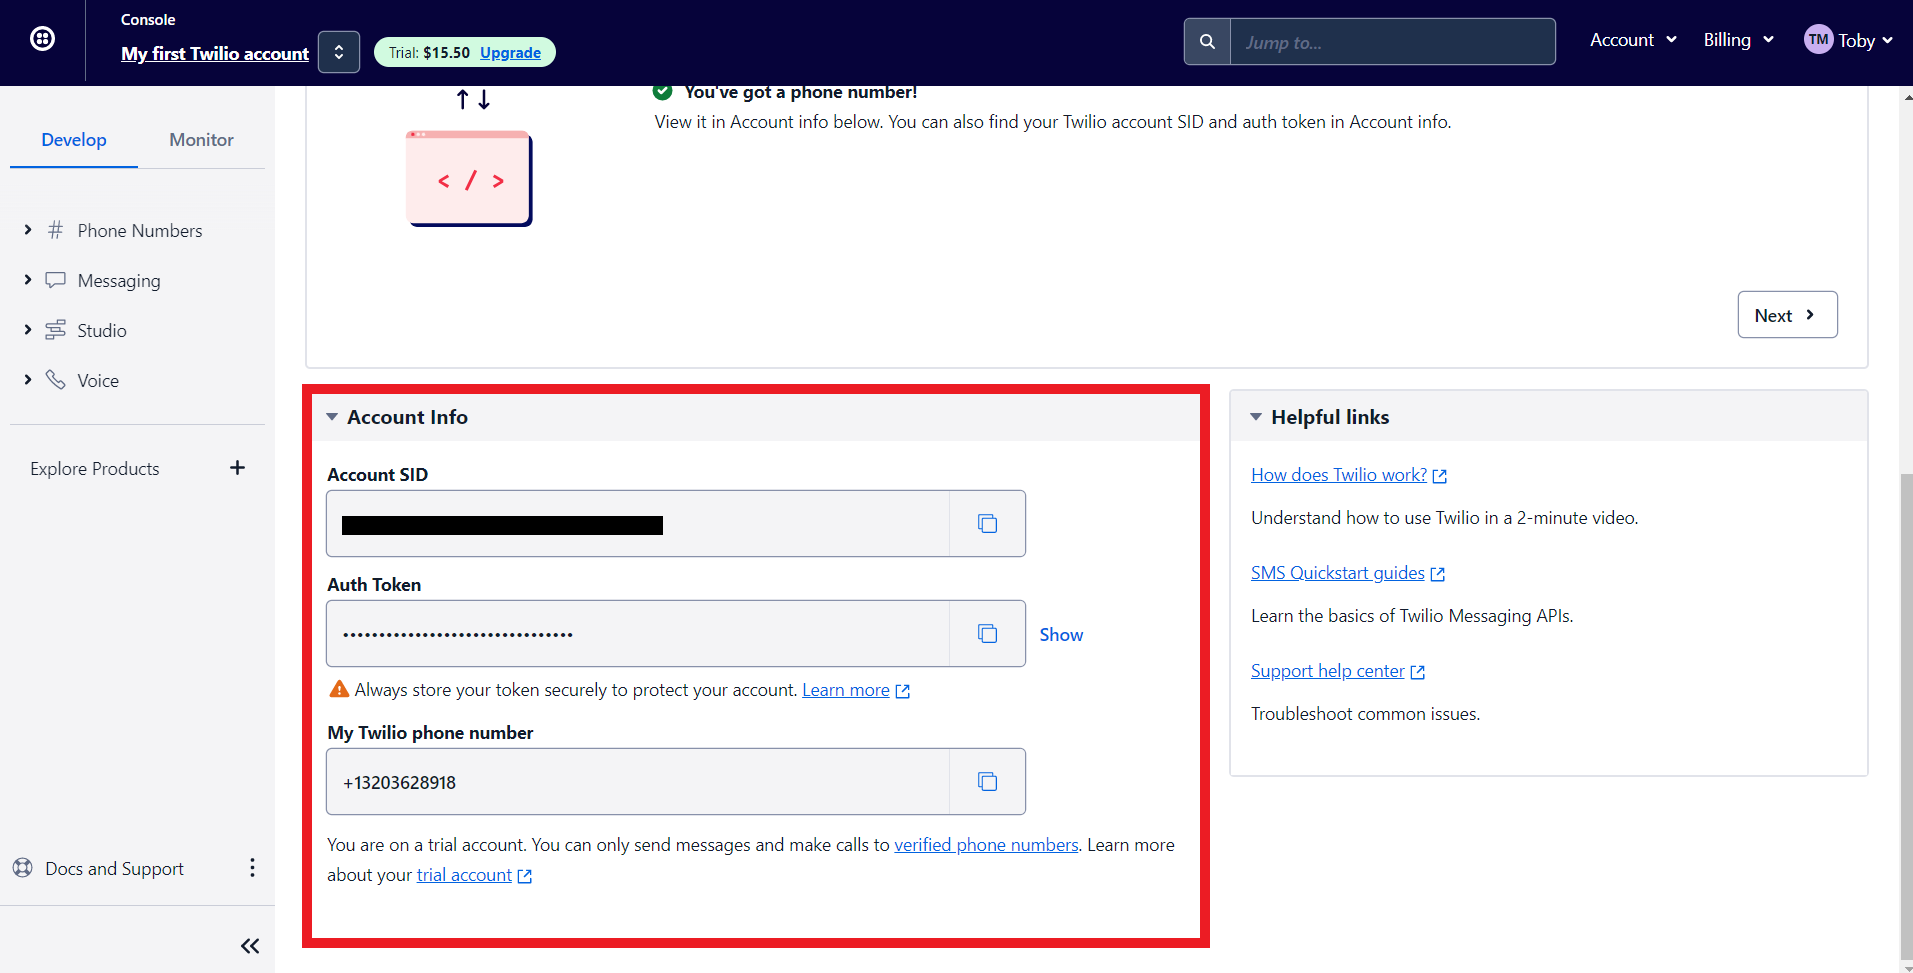
9. Scroll to the bottom of Twilio's main dashboard. You'll find three fields here, Auth Token, Account SID, and your Phone number. We'll paste all this data to integrate Zoho Bookings and Twilio.'
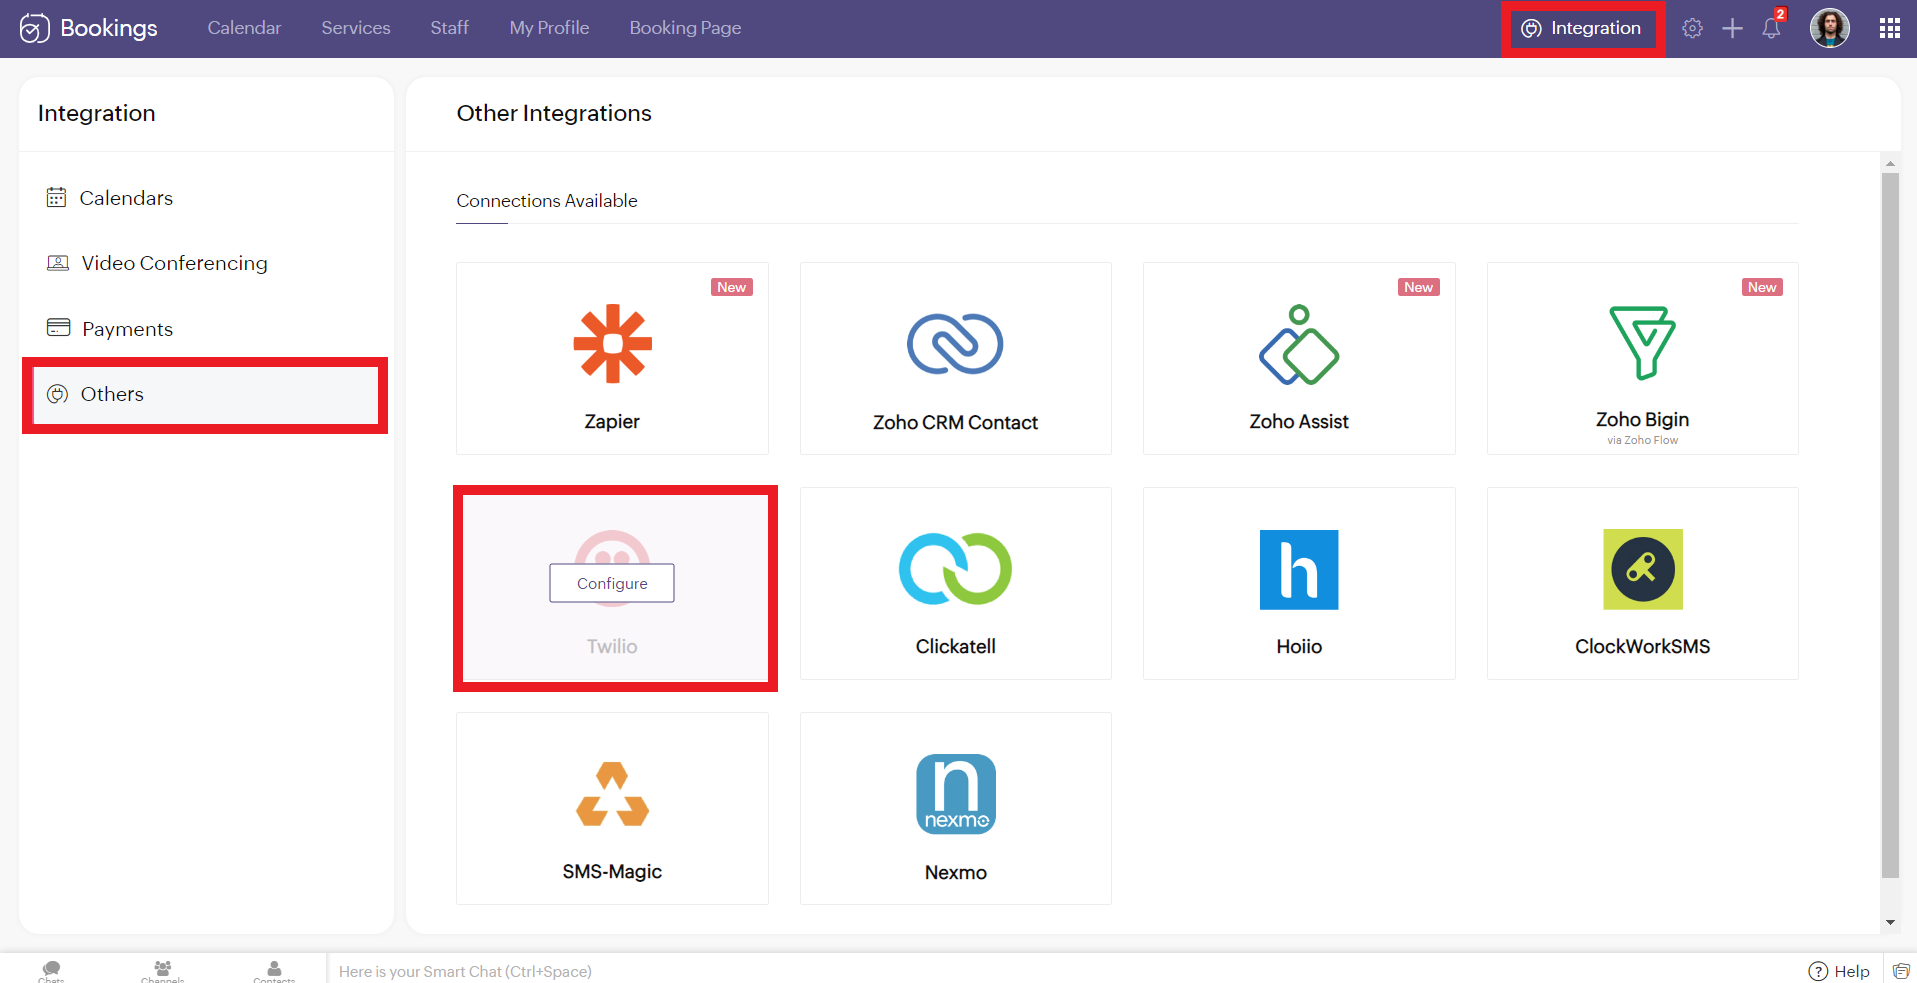
10. Now log in to your Zoho Bookings Dashboard. Navigate to Integrations > Others > Twilio. Hover over Twilio and click on Configure.
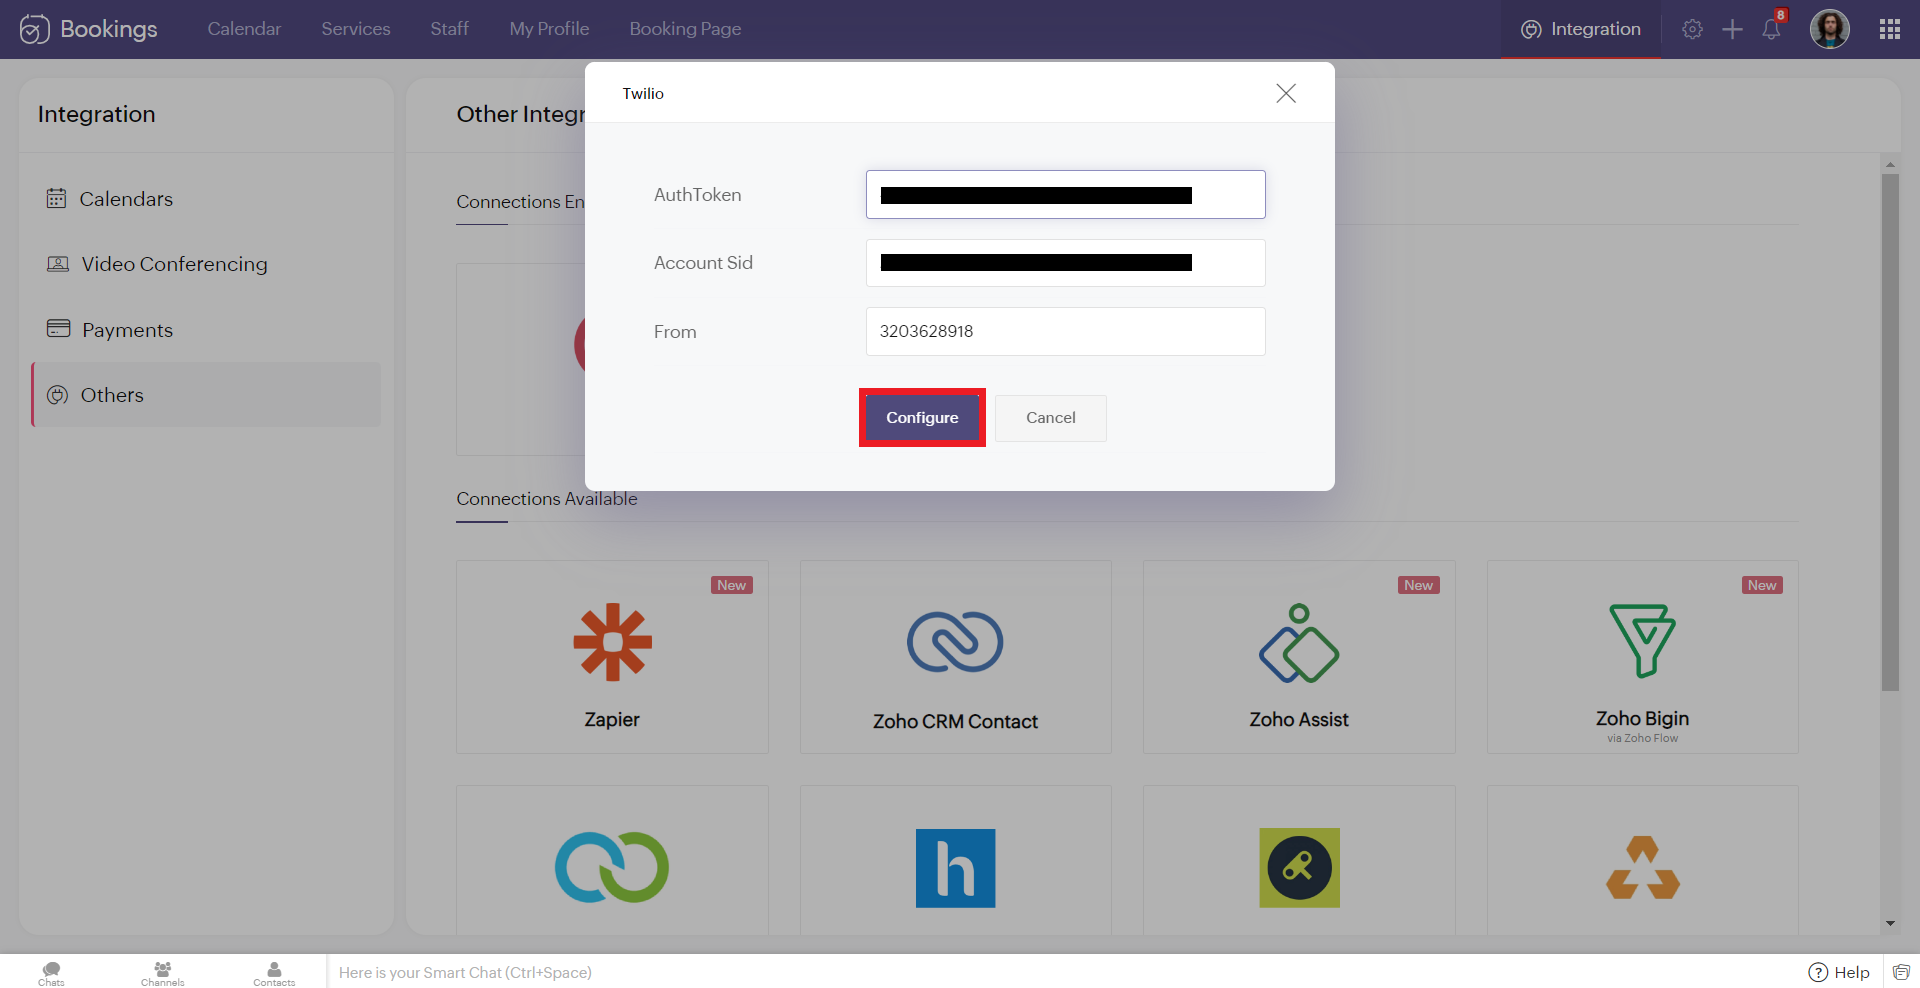
11. Copy and paste the details from Twilio to the corresponding fields in Zoho Bookings. Once you have pasted the details, click 'Configure.'
Note: While pasting the phone number, remove the country calling code. In this case, my phone number was +13203628918. '+1' is the country calling code. Remove it and paste the rest (i.e., 3203628918 without any spaces/symbols in between)
Note: While pasting the phone number, remove the country calling code. In this case, my phone number was +13203628918. '+1' is the country calling code. Remove it and paste the rest (i.e., 3203628918 without any spaces/symbols in between)
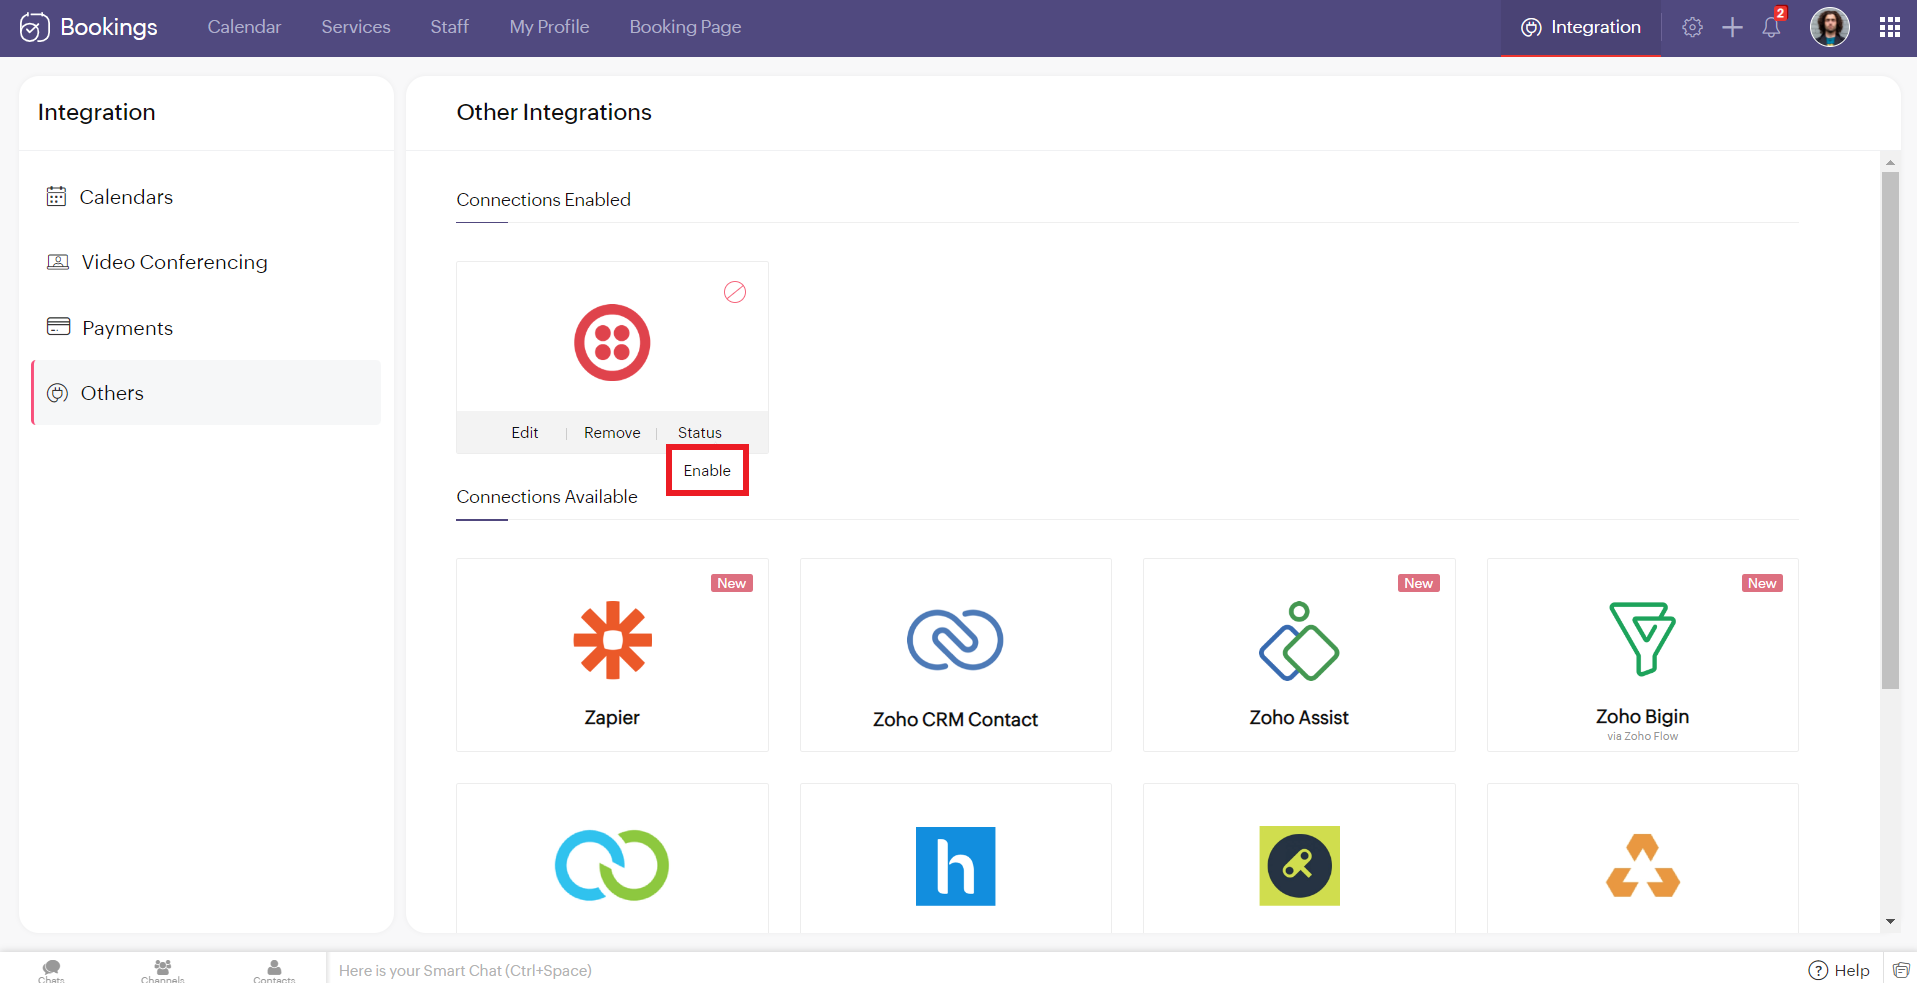
12. Hover over the created Twilio connection and click enable. Reload the page if the connection is still not active. You've successfully integrated Twilio with Zoho Bookings.
Editing Your Twilio Connection
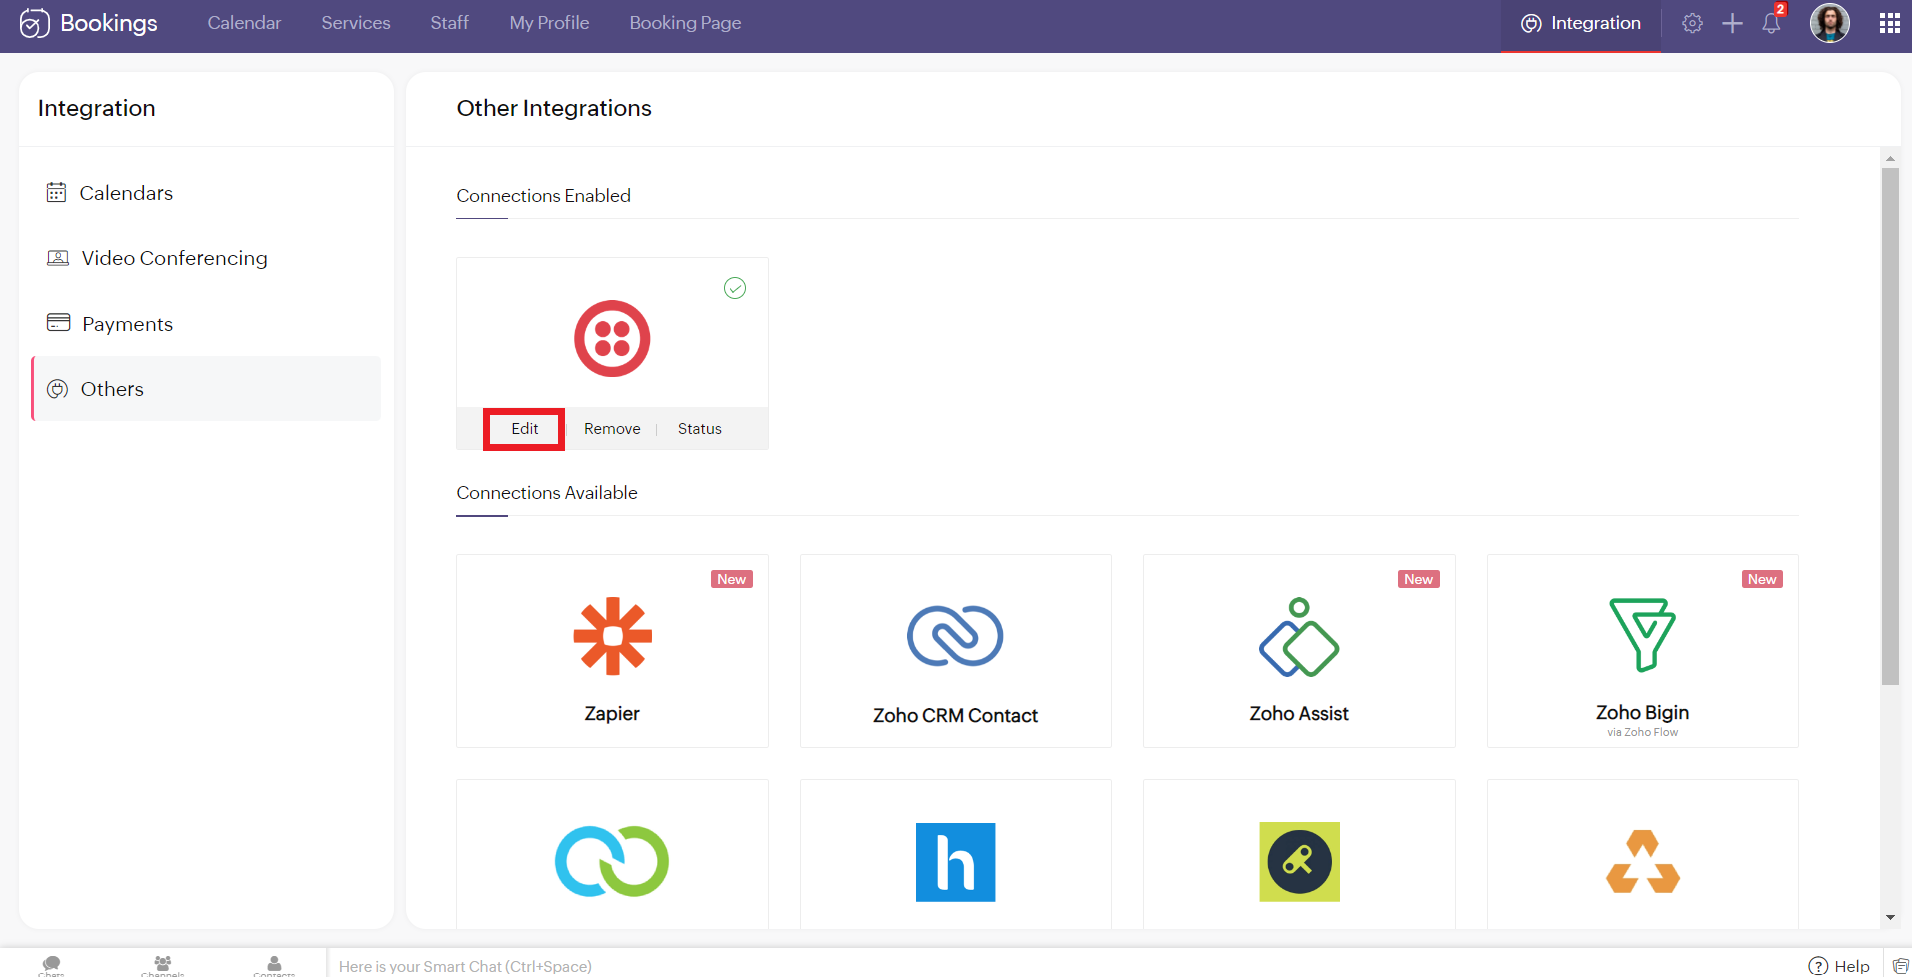
To edit your Twilio connection, hover over the Twilio integration and click on edit. Once you've made the changes, click Configure.
If you wish to remove your Twilio connection, hover over the Twilio integration and click remove.

A pop-up appears asking you to confirm. Click 'Proceed' to delete your Twilio connection.
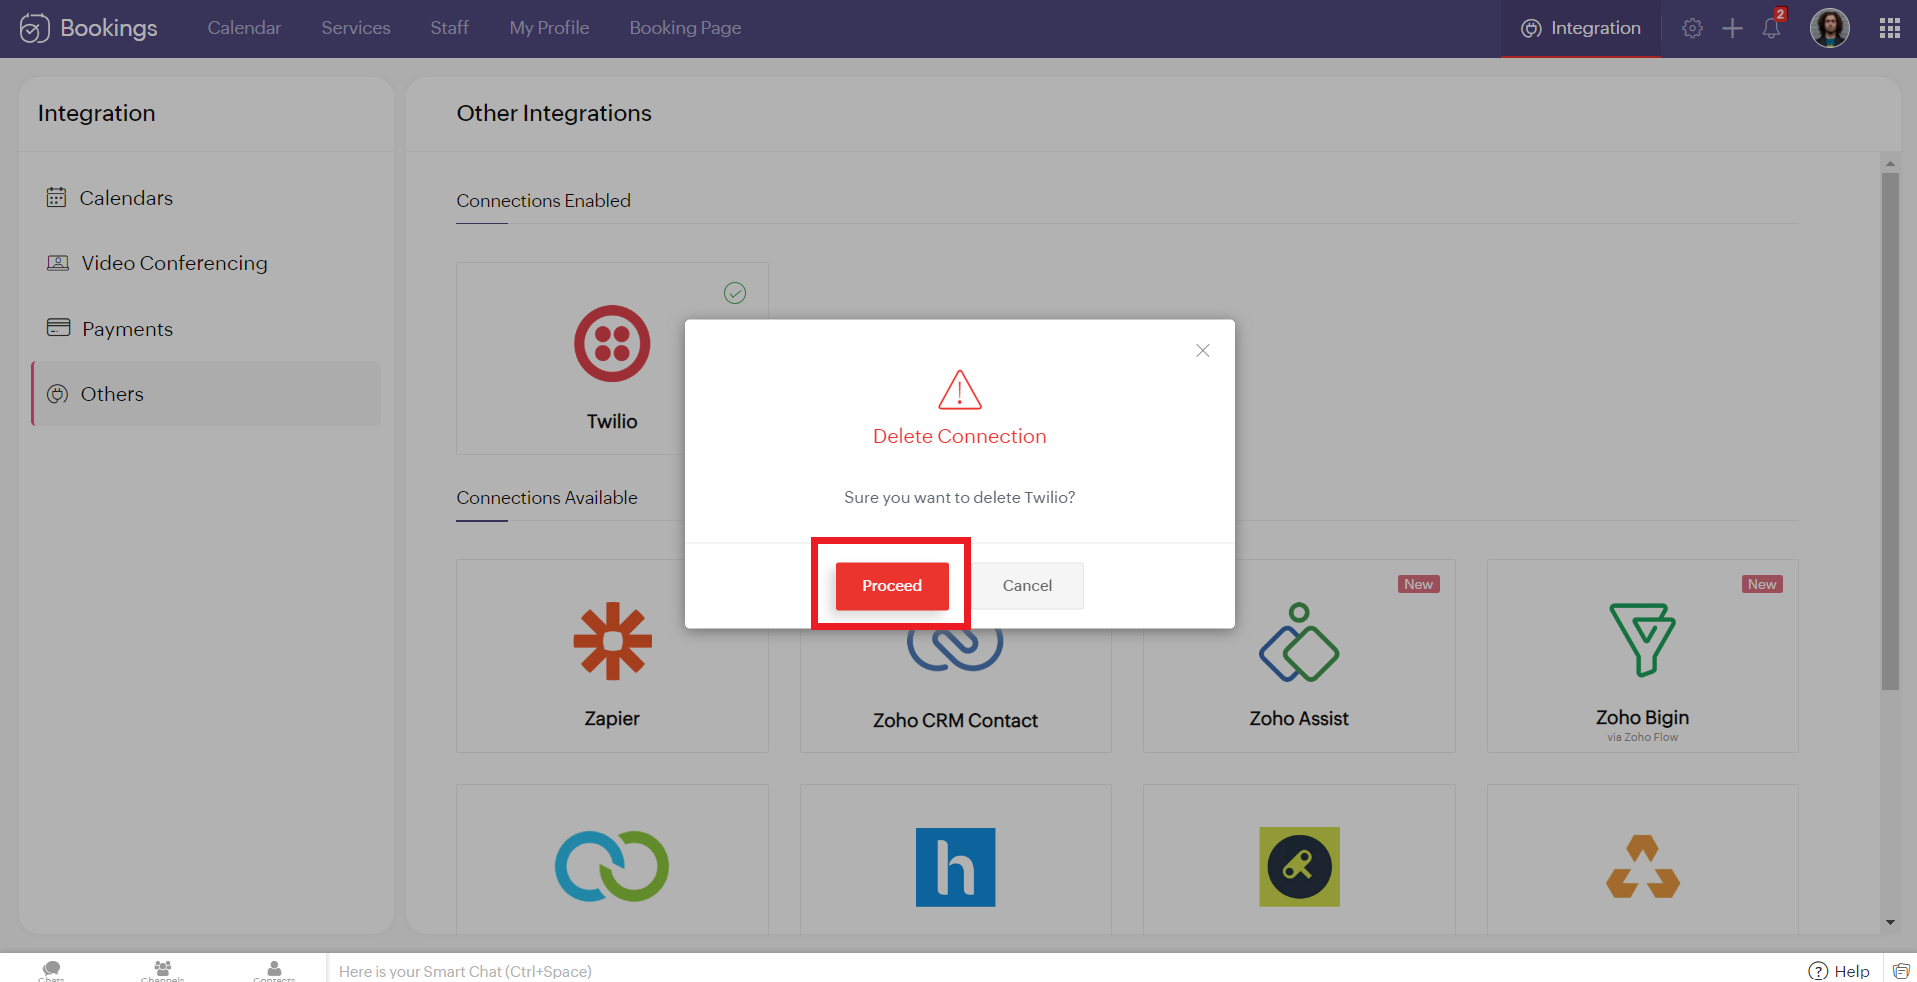
Note - While Editing or Removing your Twilio connections, if the changes don't reflect immediately, reload the page for the changes to reflect.
Configuring SMS Notifications
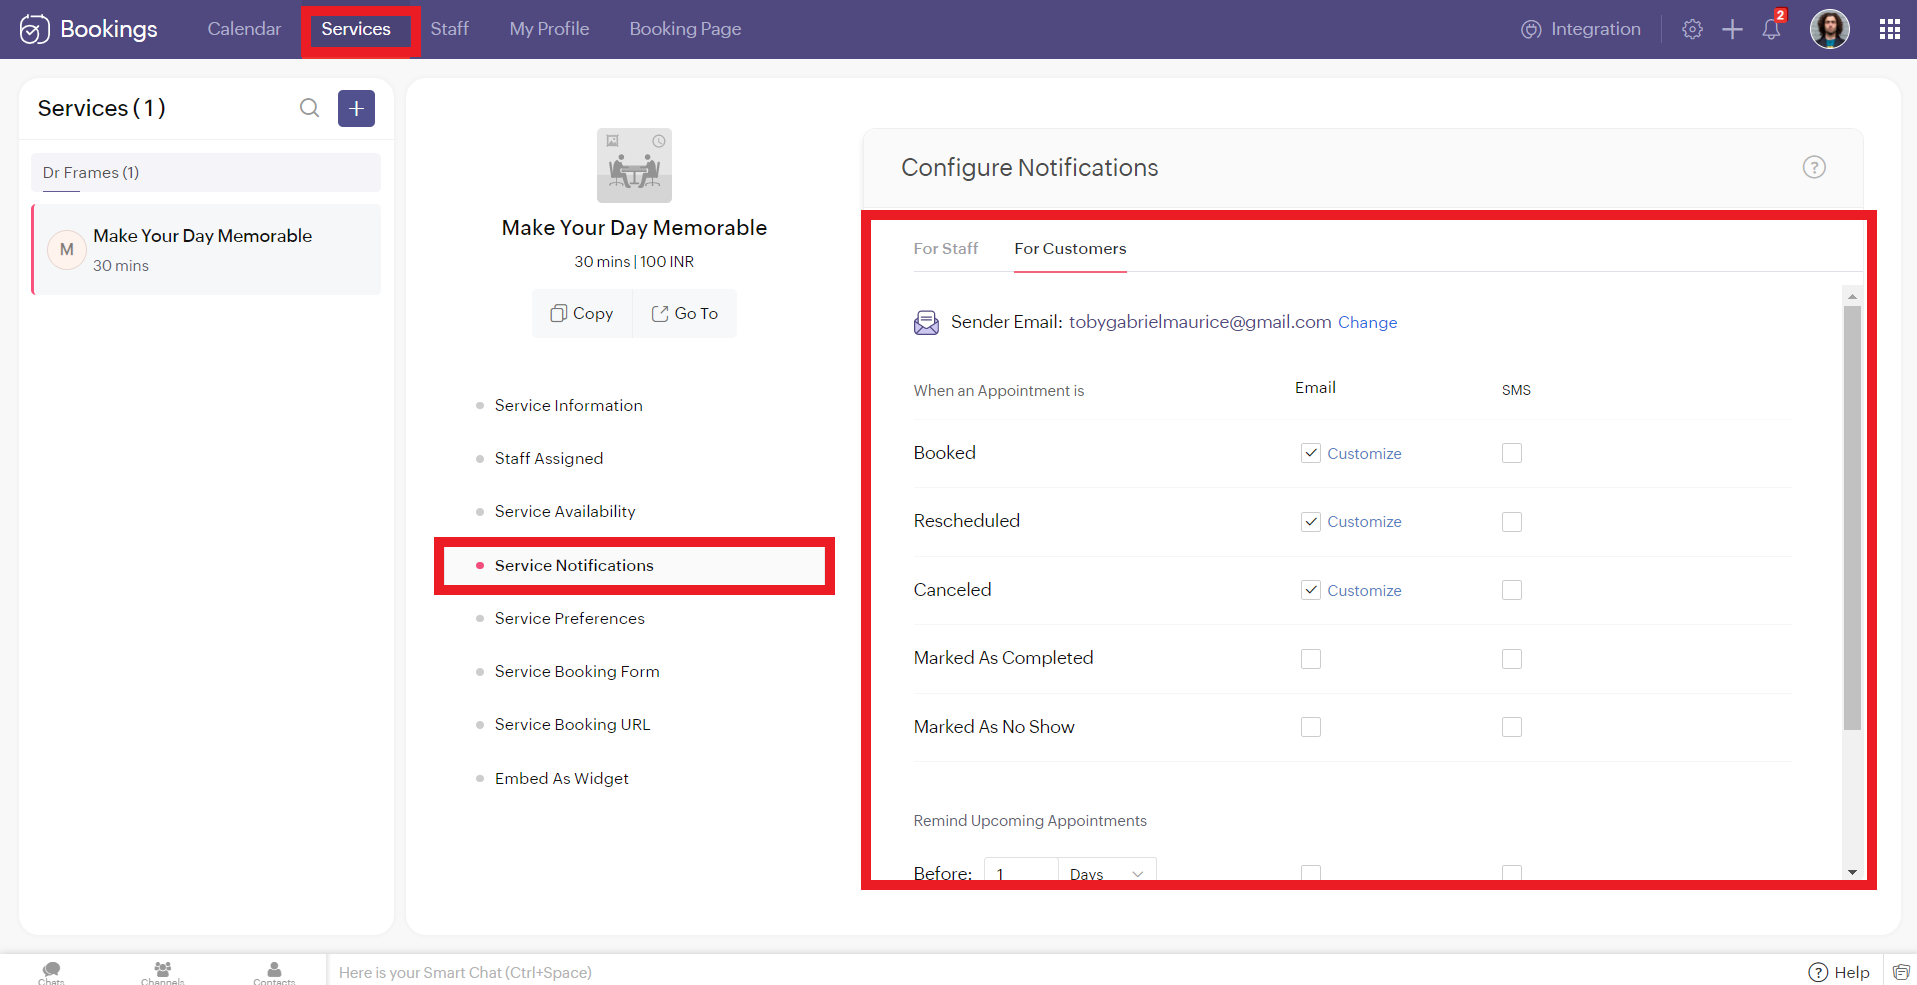
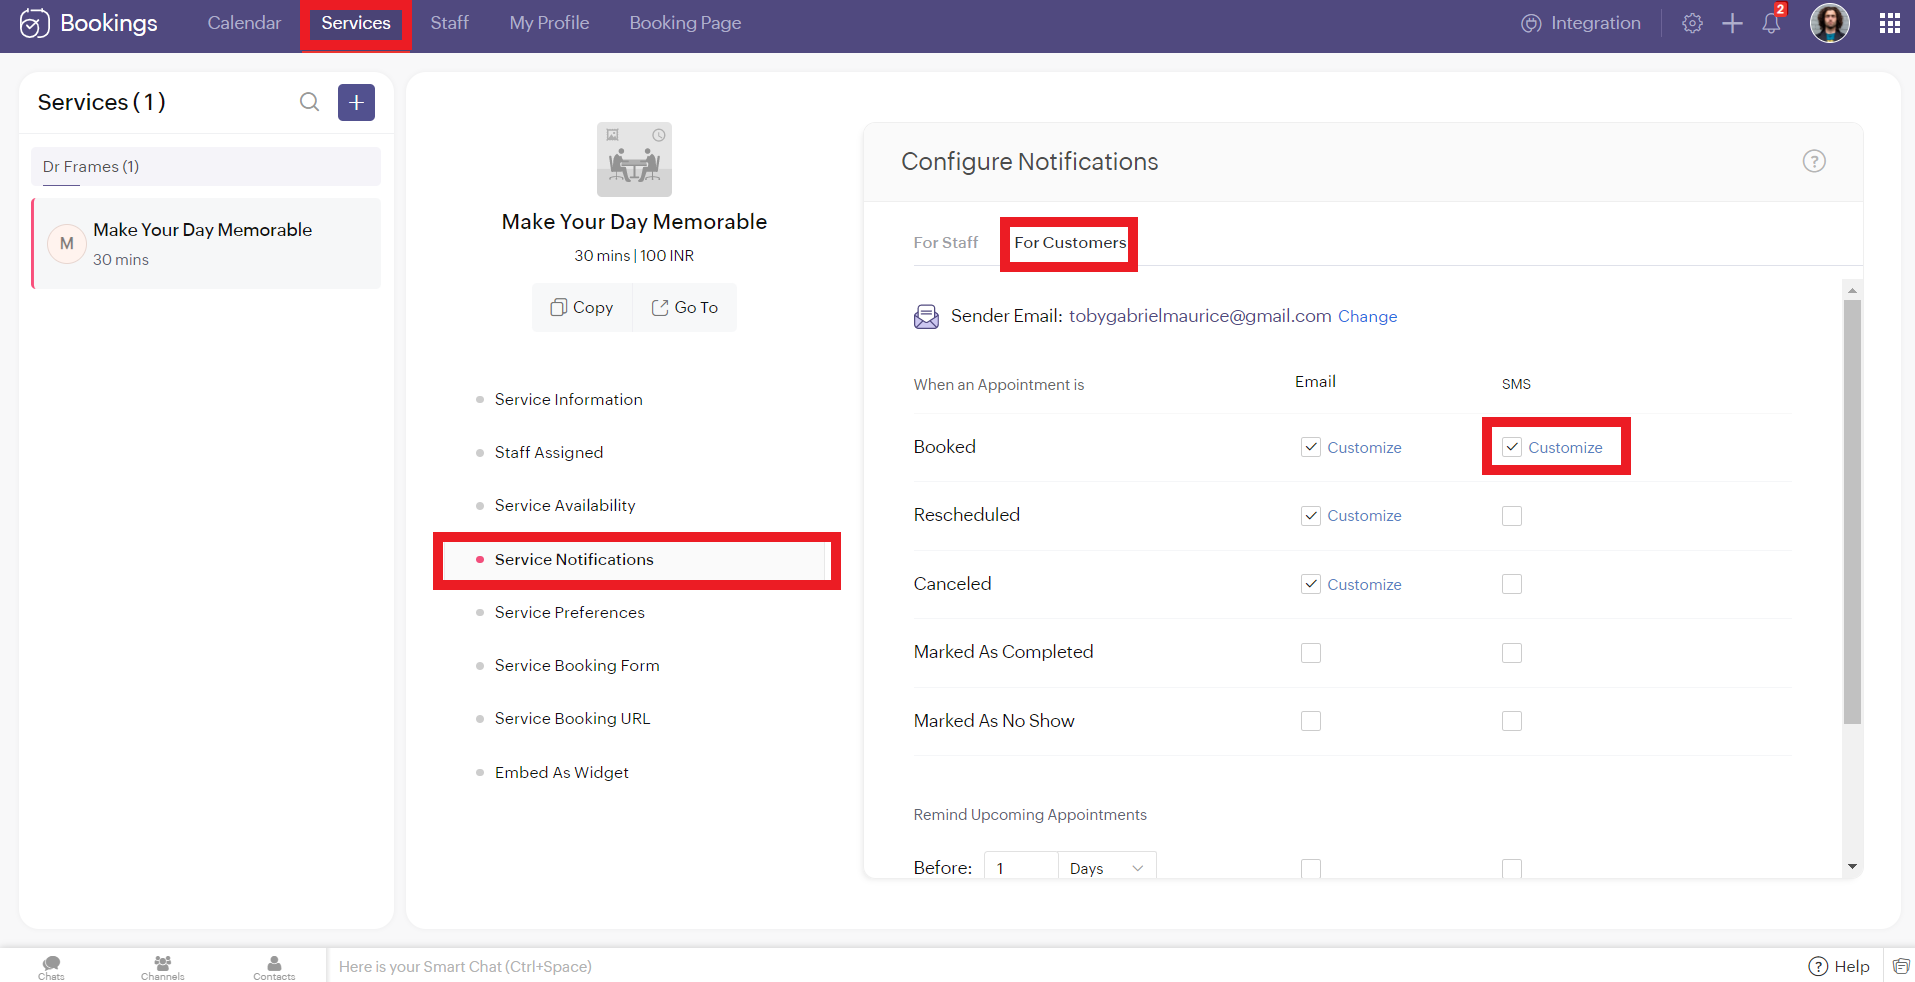
To configure SMS notifications for one on one bookings, navigate to services > service notification.
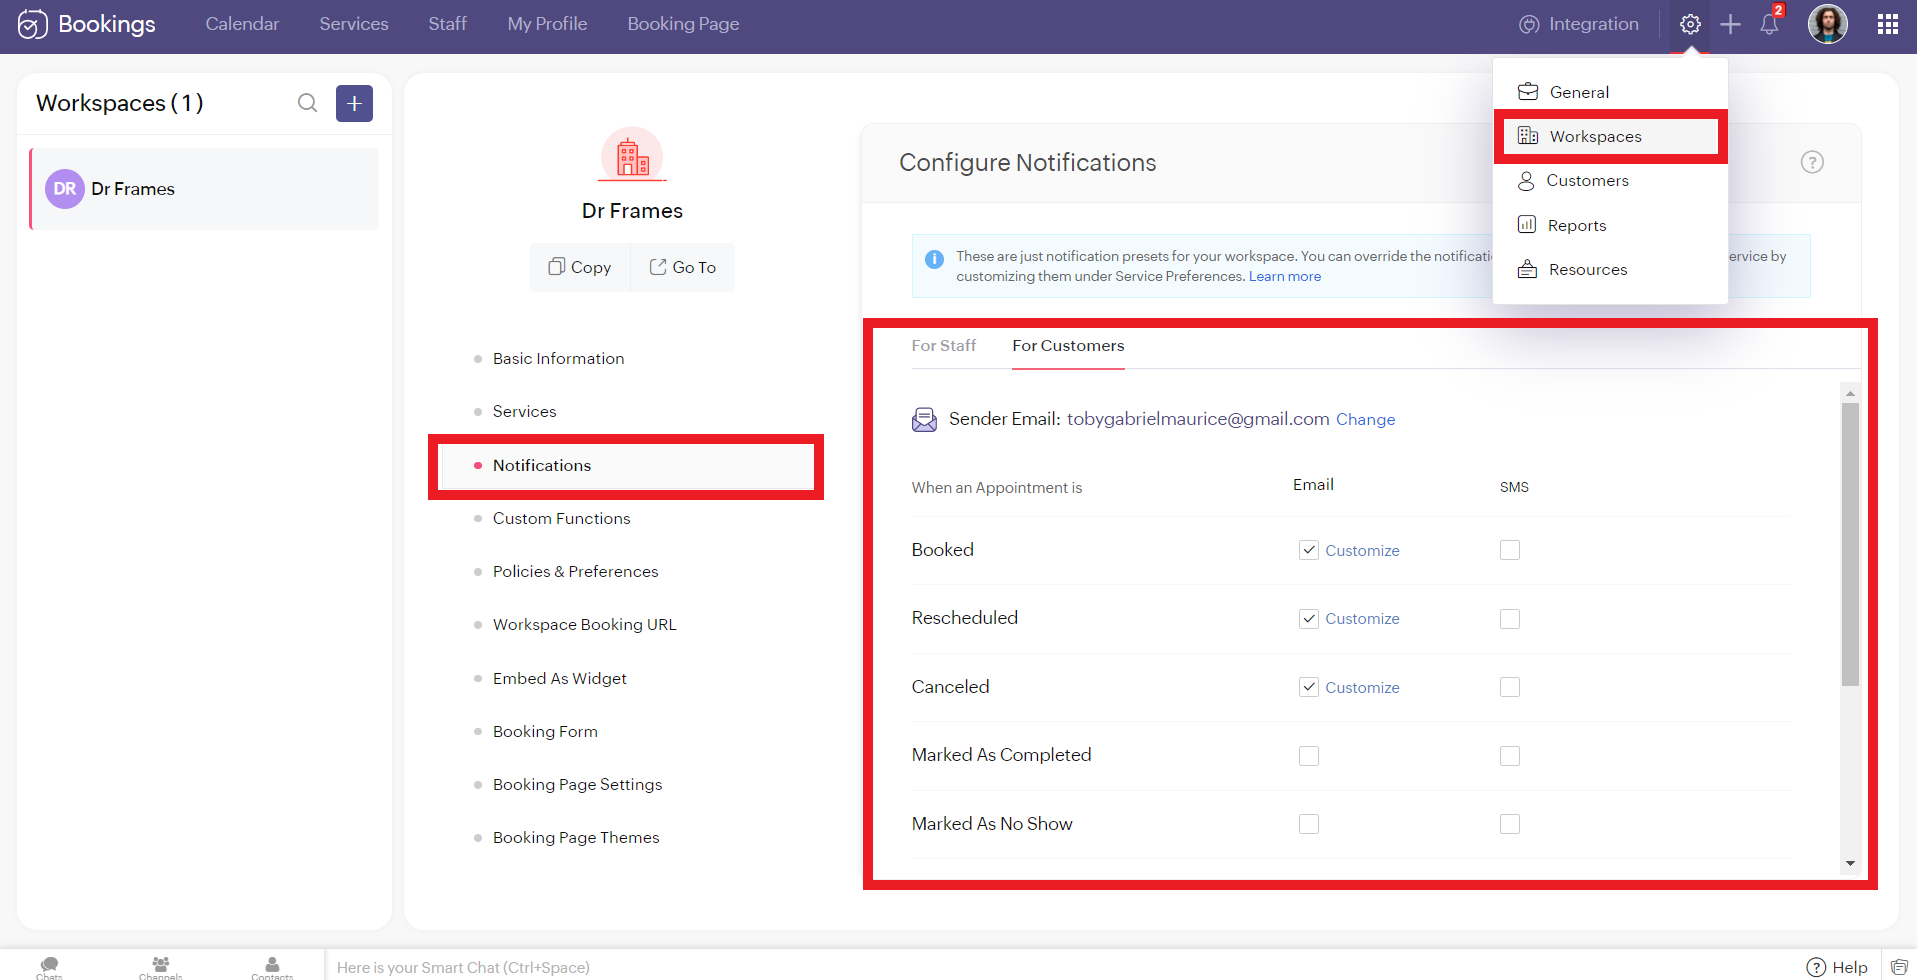
To configure SMS notifications for group/ resource bookings, navigate to settings > workspaces > notifications.
You'll see two tabs here. 'For Staff' and 'For Customers.' Zoho Bookings allows you to send eight different types of SMS under each tab.
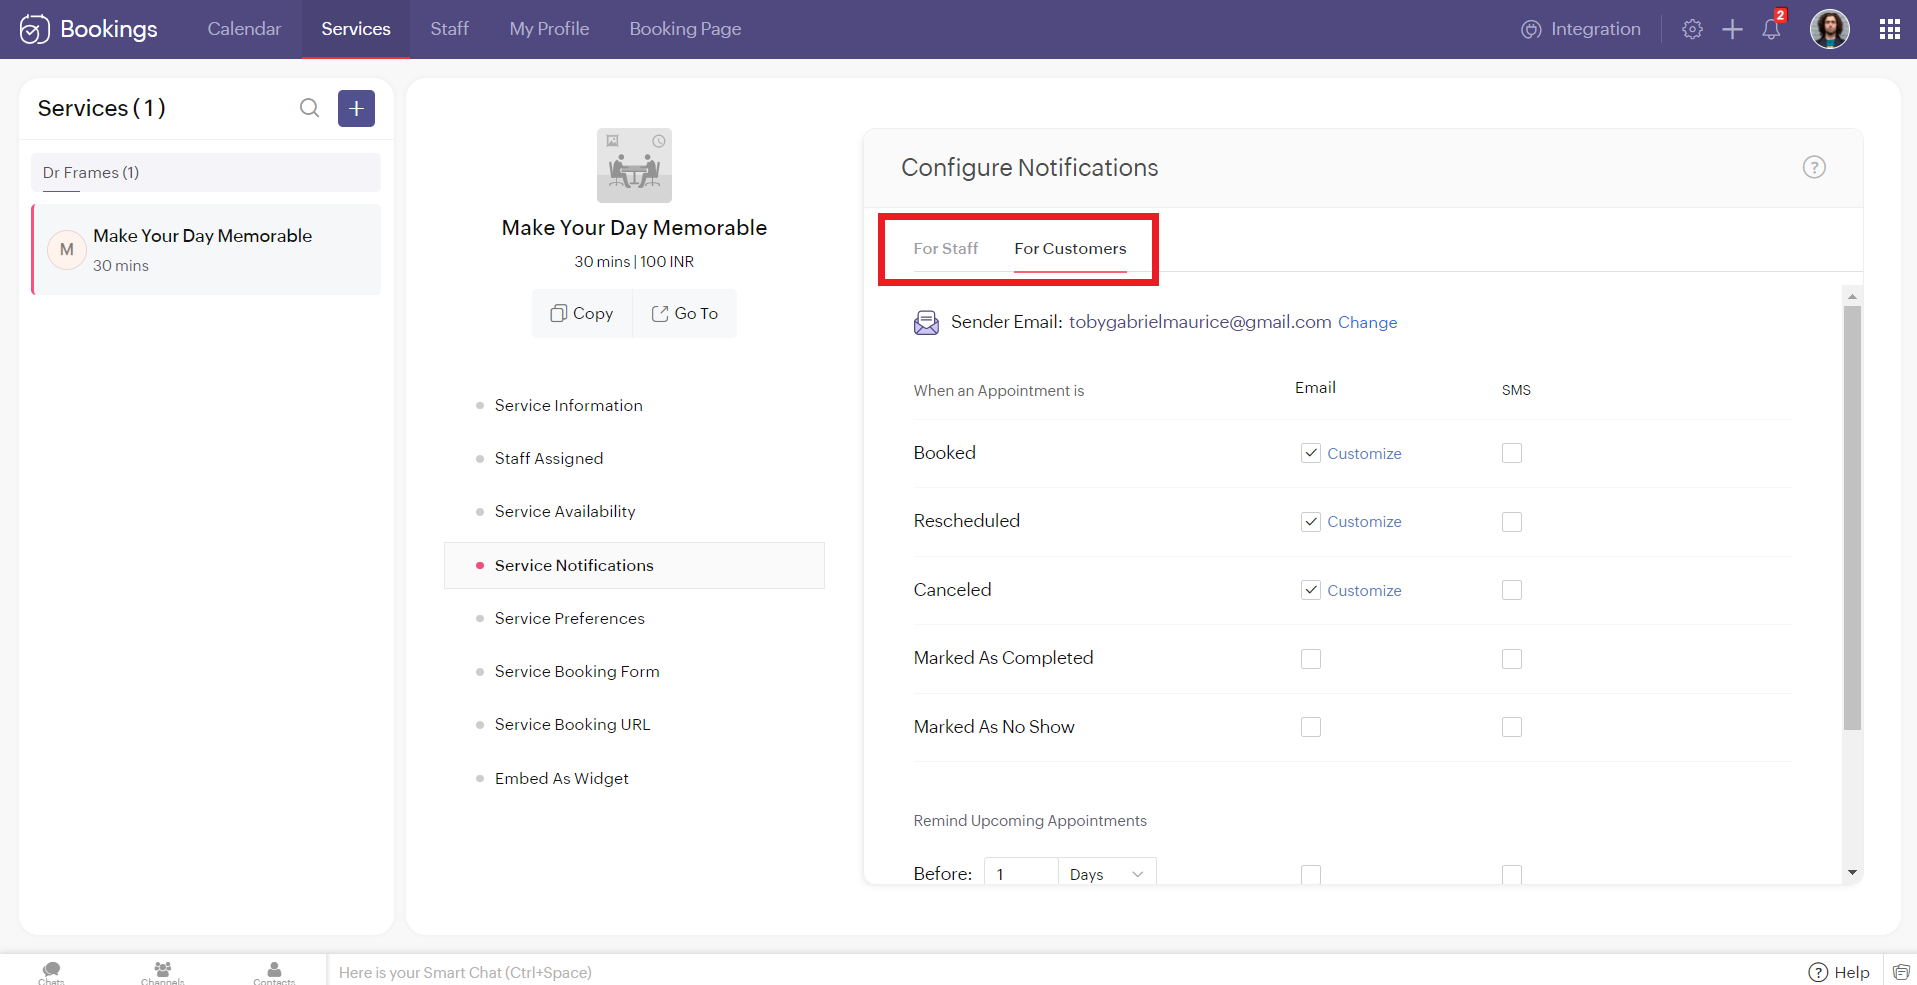
You can configure Zoho Bookings to send SMS using Twilio when you change the appointment status to
- Booked
- Rescheduled
- Canceled
- Marked As Completed
- Marked As No Show
Alternatively, you can set up to three reminders before your appointment time.

Illustration: Let's send SMS notifications to a customer when an appointment(one-on-one) is booked.
- Make sure that the checkbox is enabled corresponding to the booked notification in the customer tab. It ensures that the customer receives an SMS notification when an appointment is booked.
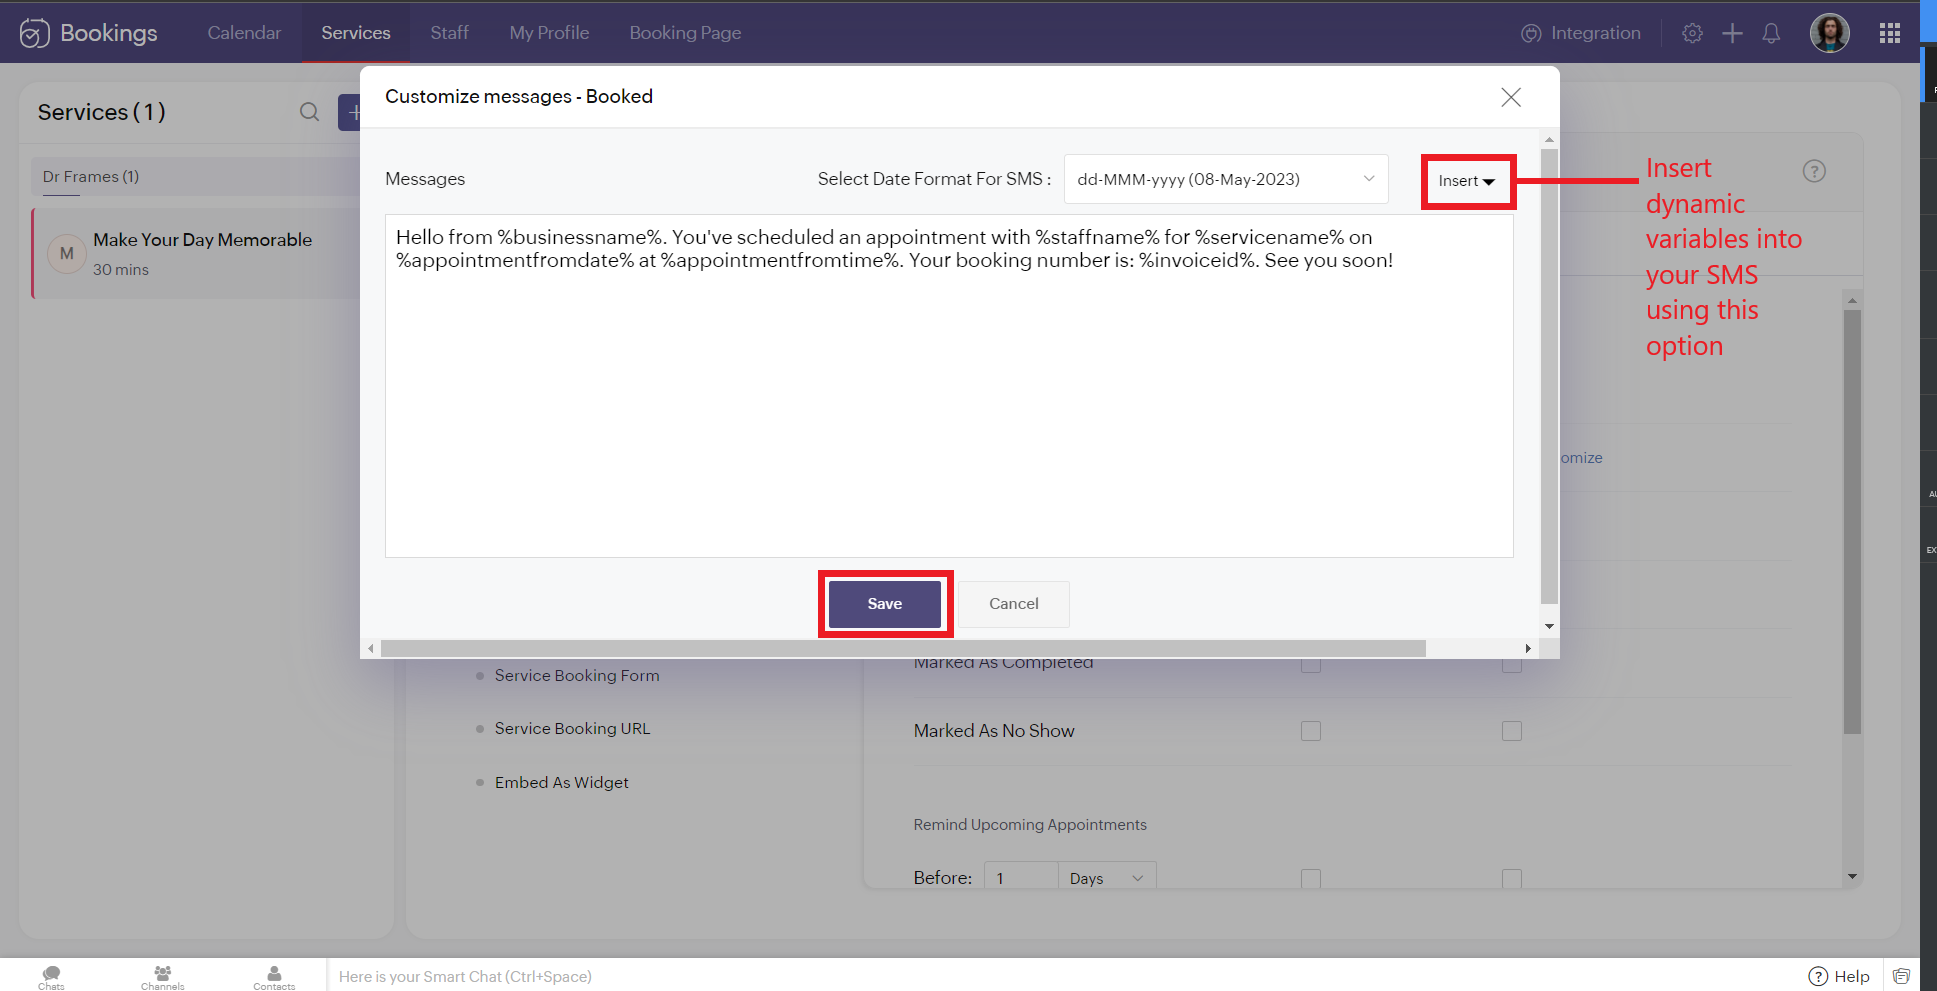
2. To customize the messages that will be sent, click on customize. You can change the message and insert dynamic variables like meeting info, customer name, meeting date, and more into your outgoing messages. Click 'Save' once you are done with the changes.
The customer receives the following message when an appointment is made.
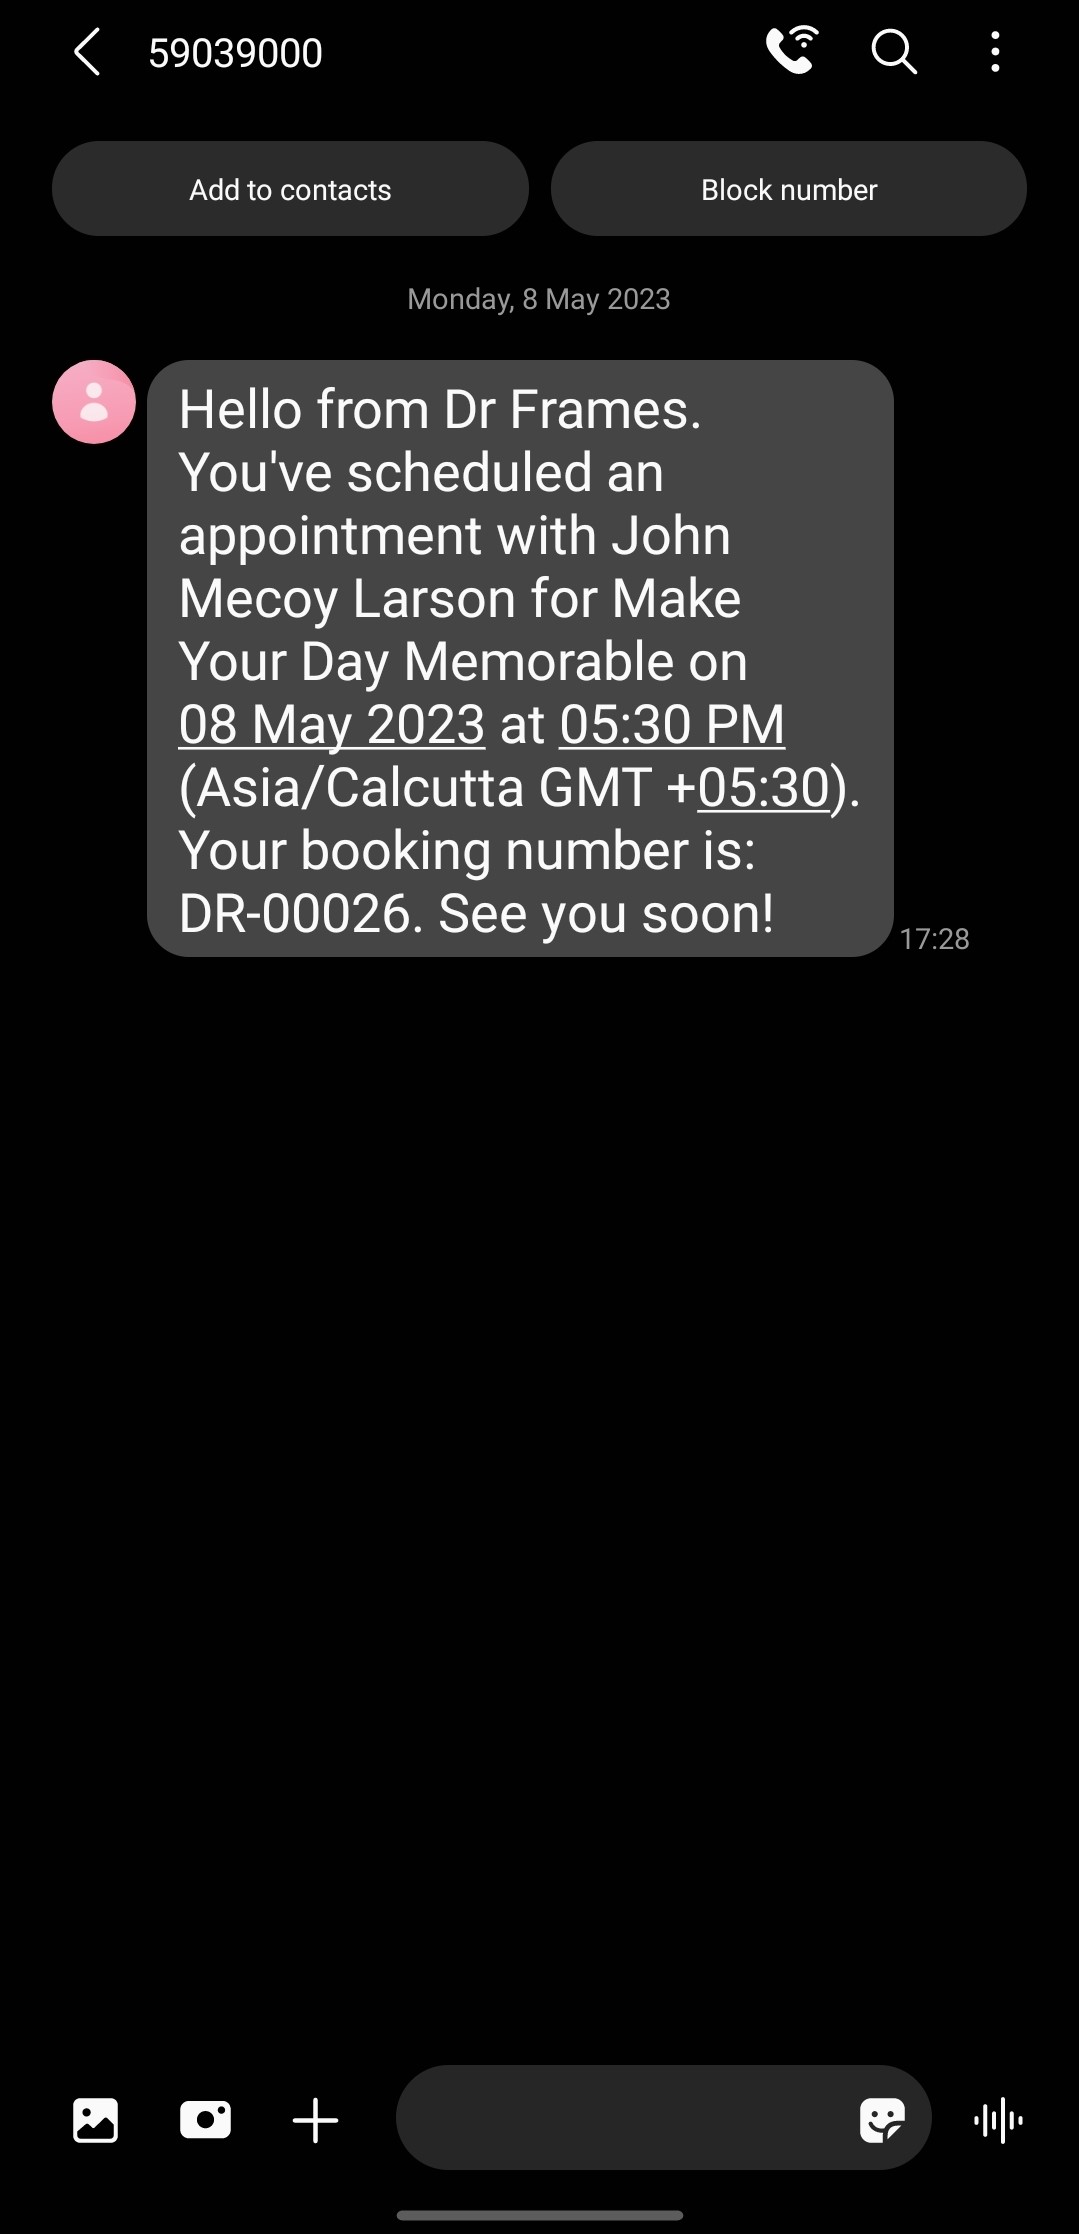
Note that the message is from the number '59039000' and not my original phone number. This is because the message is sent from a US number to an Indian Number. So the original long code is replaced with this number to ensure seamless deliverability.
If the sender and recipient belong to the same country, then the SenderID (i.e., your phone number) doesn't change.
There are cases where you might want to block incoming messages. For example, customers might reply to your SMS notifications requesting a reschedule or cancellation. This breaks the flow of Zoho Bookings and introduces unnecessary manual work. If that's the case, check out this document to block all incoming messaging.
SMS Customization Recommendations
- Since each message can accommodate only 160 characters, we recommend keeping your message crisp. Include vital info like appointment date, time, and business name.
- Avoid using emojis in your sms. As a single emoji consumes a lot of characters.
- We recommend you have your entire message length from 160 to 320 characters (i.e., 1 to 2 messages per message) to avoid consuming too many message credits for a single SMS.
Zoho Bookings Plans supporting this feature
Applicable in |
Premium |
If you want to start a trial of the Zoho Bookings Premium plan, please send an email to support@zohobookings.com including the word 'Twilio' in the subject line.
Topic Participants
Siva
Spencer Schmerling
Warren Krige
Recent Topics
Unlocking New Levels: Zoho Payroll's Journey in 2025
Every year brings its own set of challenges and opportunities to rethink how payroll works across regulations and teams. In 2025, Zoho Payroll continued to evolve with one clear focus: giving businesses more flexibility, clarity, and control as they grow.Introducing Connected Records to bring business context to every aspect of your work in Zoho CRM for Everyone
Hello Everyone, We are excited to unveil phase one of a powerful enhancement to CRM for Everyone - Connected Records, available only in CRM's Nextgen UI. With CRM for Everyone, businesses can onboard all customer-facing teams onto the CRM platform toSend Supervisor Rule Emails Within Ticket Context in Zoho Desk
Dear Zoho Desk Team, I hope this message finds you well. Currently, emails sent via Supervisor Rules in Zoho Desk are sent outside of the ticket context. As a result, if a client replies to such emails, their response creates a new ticket instead of appendingform data load issue when saving as duplicate record is made
Hello. I have a form with a lookup when a value is selected the data from the corresponding record is filled into all of the fields in the form. But the form is loaded in such a state that if any value is changed it will take all of the values pre loadedCRM project association via deluge
I have created a workflow in my Zoho CRM for closing a deal. Part of this workflow leverages a deluge script to create a project for our delivery team. Creating the project works great however, after or during the project creation, I would like to associateZoho Browser??
hai guys, this sounds awkward but can v get a ZOHO BROWSER same as zoho writer, etc. where i can browse websites @ home and continue browsing the same websites @ my office, as v have the option in Firefox, once i save and close the browser and again when i open it i will be getting the same sites. If u people r not clear with my explanation, plz let me know. Thanks, SandeepWhere can we specify custom CSS in Zoho Forms custom theme ?
I'm using a form with a dark theme. The OTP popup window is unreadable, because for some reason, the OTP popup background fixes color to white, but still takes the font color specified in the custom theme. This ends up as white on white for me, renderingMCP no longer works with Claude
Anyone else notice Zoho MCP no longer works with Claude? I'm unable to turn this on in the claude chat. When I try to toggle it on, it just does nothing at all. I've tried in incognito, new browsers, etc. - nothing seems to work.Enable History Tracking for Picklist Values Not Available
When I create a custom picklist field in Deals, the "Enable History Tracking for Picklist Values" option is not available in the Edit Properties area of the picklist. When I create a picklist in any other Module, that option is available. Is there a specific reason why this isn't available for fields in the Deals Module?The reason I switched away from Zoho Notebook
My main reason for switching to Zoho was driven by three core principles: moving away from US-based products, keeping my data within India as much as possible, and supporting Indian companies. With that intent, I’ve been actively de-Googling my digitalAdd RTL and Hebrew Support for Candidate Portal (and Other Zoho Recruit Portals)
Dear Zoho Recruit Team, I hope you're doing well. We would like to request the ability to set the Candidate Portal to be Right-to-Left (RTL) and in Hebrew, similar to the existing functionality for the Career Site. Currently, when we set the Career SiteAbility to Edit YouTube Video Title, Description & Thumbnail After Publishing
Hi Zoho Social Team, How are you? We would like to request an enhancement to Zoho Social that enables users to edit YouTube video details after the video has already been published. Your team confirmed that while Zoho Social currently allows editing theFree Webinar : Unlock AI driven business insights with Zoho Inventory + Zoho Analytics
Are you tired of switching between apps and exporting data to build customized reports? Say hello to smarter & streamlined insights! Join us for this exclusive webinar where we explore the power of the Zoho Inventory–Zoho Analytics integration. LearnCritical Issue: Tickets Opened for Zoho Support via the Zoho Help Portal Were Not Processed
Hi everyone, We want to bring to your attention a serious issue we’ve experienced with the Zoho support Help Portal. For more than a week, tickets submitted directly via the Help Portal were not being handled at all. At the same time no alert was postedHide/Show Subform Fields On User Input
Hello, Are there any future updates in Hide/Show Subform Fields "On User Input"?Cloning Item With Images Or The Option With Images
Hello, when I clone an item, I expect the images to carry over to the cloned item, however this is not the case in Inventory. Please make it possible for the images to get cloned or at least can we get a pop up asking if we want to clone the images asArchiving Contacts
How do I archive a list of contacts, or individual contacts?WorkDrive and CRM not in sync
1/ There is a CRM file upload field with WorkDrive file set as the source: 2/ Then the file is renamed in WorkDrive (outside CRM): 3/ The File in CRM is not synced after the change in WorkDrive; the file name (reference) in CRM record is not updated (hereCustom validation in CRM schema
Validation rules in CRM layouts work nicely, good docs by @Kiran Karthik P https://help.zoho.com/portal/en/kb/crm/customize-crm-account/validation-rules/articles/create-validation-rules I'd prefer validating data input 'closer to the schema'Adding Default Module Image into mail merge field
As with most people finding their way to these forums i have a specific requirement that doesn't seem to be supported by Zoho I have created 2 custom modules to suit my purpose 1 is an inventory type module that lists aluminium extrusions, and all relevantSync Data from MA to CRM
Currently, it's a one-way sync of data from the CRM to MA. I believe we should have the ability to select fields to sync from MA to the CRM. The lead score is a perfect example of this. In an ideal world we would be able to impact the lead score of aIs it possible to roll up all Contact emails to the Account view?
Is there a way to track all emails associated with an Account in one single view? Currently, email history is visible when opening an individual Contact record. However, since multiple Contacts are often associated with a single Account, it would be beneficialUpdate CRM record action
Currently, MA only offers a "Push Data" action to push data to a CRM module. This action is built to cover the need to both create a new record and update an existing record. Because it has been implemented this way all required fields on the CRM moduleNotes badge as a quick action in the list view
Hello all, We are introducing the Notes badge in the list view of all modules as a quick action you can perform for each record, in addition to the existing Activity badge. With this enhancement, users will have quick visibility into the notes associatedWhat's new in Zoho One 2025
Greetings! We hope you have all had a chance by now to get hands-on with the new features and updates released as part of ZO25. Yes, we understand that you may have questions and feedback. To ensure you gain a comprehensive understanding of these updates,Good news! Calendar in Zoho CRM gets a face lift
Dear Customers, We are delighted to unveil the revamped calendar UI in Zoho CRM. With a complete visual overhaul aligned with CRM for Everyone, the calendar now offers a more intuitive and flexible scheduling experience. What’s new? Distinguish activitiesAdd deluge function to shorten URLs
Zoho Social contains a nice feature to shorten URLs using zurl.co. It would be really helpful to have similar functionality in a Deluge call please, either as an inbuilt function or a standard integration. My Creator app sends an email with a personalisedEdit default "We are here to help you" text in chat SalesIQ widget
Does anyone know how this text can be edited? I can't find it anywhere in settings. Thanks!Quick way to add a field in Chat Window
I want to add Company Field in chat window to lessen the irrelevant users in sending chat and set them in mind that we are dealing with companies. I request that it will be as easy as possible like just ticking it then typing the label then connectingHow to create a two way Sync with CRM Contacts Module?
Newbie creator here (but not to Zoho CRM). I want to create an app that operates on a sub-set of CRM Contacts - only those with a specific tag. I want the app records to mirror the tagged contacts in CRM. I would like it to update when the Creator appZoho Sheet for Desktop
Does Zoho plans to develop a Desktop version of Sheet that installs on the computer like was done with Writer?Allow Manual Popup Canvas Size Control
Hello Zoho PageSense Team, We hope you're doing well. We would like to request an enhancement to the PageSense popup editor regarding popup sizing. Current Limitation: Currently, the size (width and height) of a popup is strictly controlled by the selectedWhere is the settings option in zoho writer?
hi, my zoho writer on windows has menu fonts too large. where do i find the settings to change this option? my screen resolution is correct and other apps/softwares in windows have no issues. regardsHow to set page defaults in zoho writer?
hi, everytime i open the zoho writer i have to change the default page settings to - A4 from letter, margins to narrow and header and footer to 0. I cannot set this as default as that option is grayed out! so I am unable to click it. I saved the documentDevelop and publish a Zoho Recruit extension on the marketplace
Hi, I'd like to develop a new extension for Zoho Recruit. I've started to use Zoho Developers creating a Zoho CRM extension. But when I try to create a new extension here https://sigma.zoho.com/workspace/testtesttestest/apps/new I d'ont see the option of Zoho Recruit (only CRM, Desk, Projects...). I do see extensions for Zoho Recruit in the marketplace. How would I go about to create one if the option is not available in sigma ? Cheers, Rémi.How to import data from PDF into Zoho Sheet
I am looking to import Consolidated Account Statement (https://www.camsonline.com/Investors/Statements/Consolidated-Account-Statement) into zoho sheet. Any help is appreciated. The pdf is received as attachment in the email, this document is passwordZoho Projects Android app: Integration with Microsoft Intune
Hello everyone! We’re excited to announce that Zoho Projects now integrates with Microsoft Intune, enabling enhanced security and enterprise app management. We have now added support for Microsoft Intune Mobile Application Management (MAM) policies throughCant't update custom field when custom field is external lookup in Zoho Books
Hello I use that : po = zoho.books.updateRecord("purchaseorders",XXXX,purchaseorder_id,updateCustomFieldseMap,"el_books_connection"); c_f_Map2 = Map(); c_f_Map2.put("label","EL ORDER ID"); c_f_Map2.put("value",el_order_id); c_f_List.add(c_f_Map2); updateCustomFieldseMapWrapping up 2025 on a high note: CRM Release Highlights of the year
Dear Customers, 2025 was an eventful year for us at Zoho CRM. We’ve had releases of all sizes and impact, and we are excited to look back, break it down, and rediscover them with you! Before we rewind—we’d like to take a minute and sincerely thank youAbout Zoneminder (CCTV) and Zoho People
Hi team I would like to implement a CCTV service for our branches, with the aim of passively detecting both the entry and exit of personnel enrolled in Zoho Peeple, but my question is: It is possible to integrate Zoho People with Zoneminder, I understandNext Page