Kaizen #175 - Leverage Settings Widget for Zoho CRM Extensions

Howdy, innovators!
Welcome back to a fresh week of Kaizen.
This week, we will delve into configuring a Settings widget in Zoho CRM for the effective functioning of extensions. It centralizes around key configurations that will be carried out to various integrations in an extension. A user-friendly settings widget enhances the usability and flexibility of your extensions.
Why use a Settings Widget?
A Settings Widget plays a crucial role in making extensions user-friendly and adaptable to specific business needs. Following are a few key advantages of using the settings widget:
- Seamless Setup Post-Installation: Users can configure critical parameters right after installing the extension.
- Dynamic Customization: Users can revisit and modify configurations at any time, ensuring that the extension adapts to changing needs without re-installation or development
- Improved User Experience: Allows the end-users to control how the extension interacts with their workflows and data.
- Enhanced Control: Provides an overview and centralized control, making maintenance, troubleshooting, and updates simpler and faster.
Business Scenario: Notification Settings for Lead Import Extension
Let’s take a real-world use case to understand the value of this settings widget.
Imagine an organization named Zylker, using Zoho CRM along with a lead import extension. This extension pulls in leads from multiple sources like web forms, social media, or third-party marketing tools.
Requirement
Whenever a new lead enters a Zoho CRM organization through this extension, the sales team wants to receive an instant notification on a specific Zoho Cliq channel for that organization. This ensures they never miss a lead.
Solution
By adding a Settings Widget to the extension, users can:
> Select a Preferred Zoho Cliq Channel: From the settings page, users can choose the channel where notifications should be sent.
> Modify the Channel Anytime: Based on team restructuring or communication preferences, users can revisit the settings and update the channel as needed.
With this setup, the settings widget becomes the control center, ensuring the efficient functioning of both the extension and the sales process.
Building a Settings Extension Widget
Let us create a sample settings widget for the above business scenario.
Create a Private Extension Widget
1. Log into Zoho CRM, navigate to Setup > Marketplace > Extension Builder, and create a new extension by selecting Zoho CRM as the service.
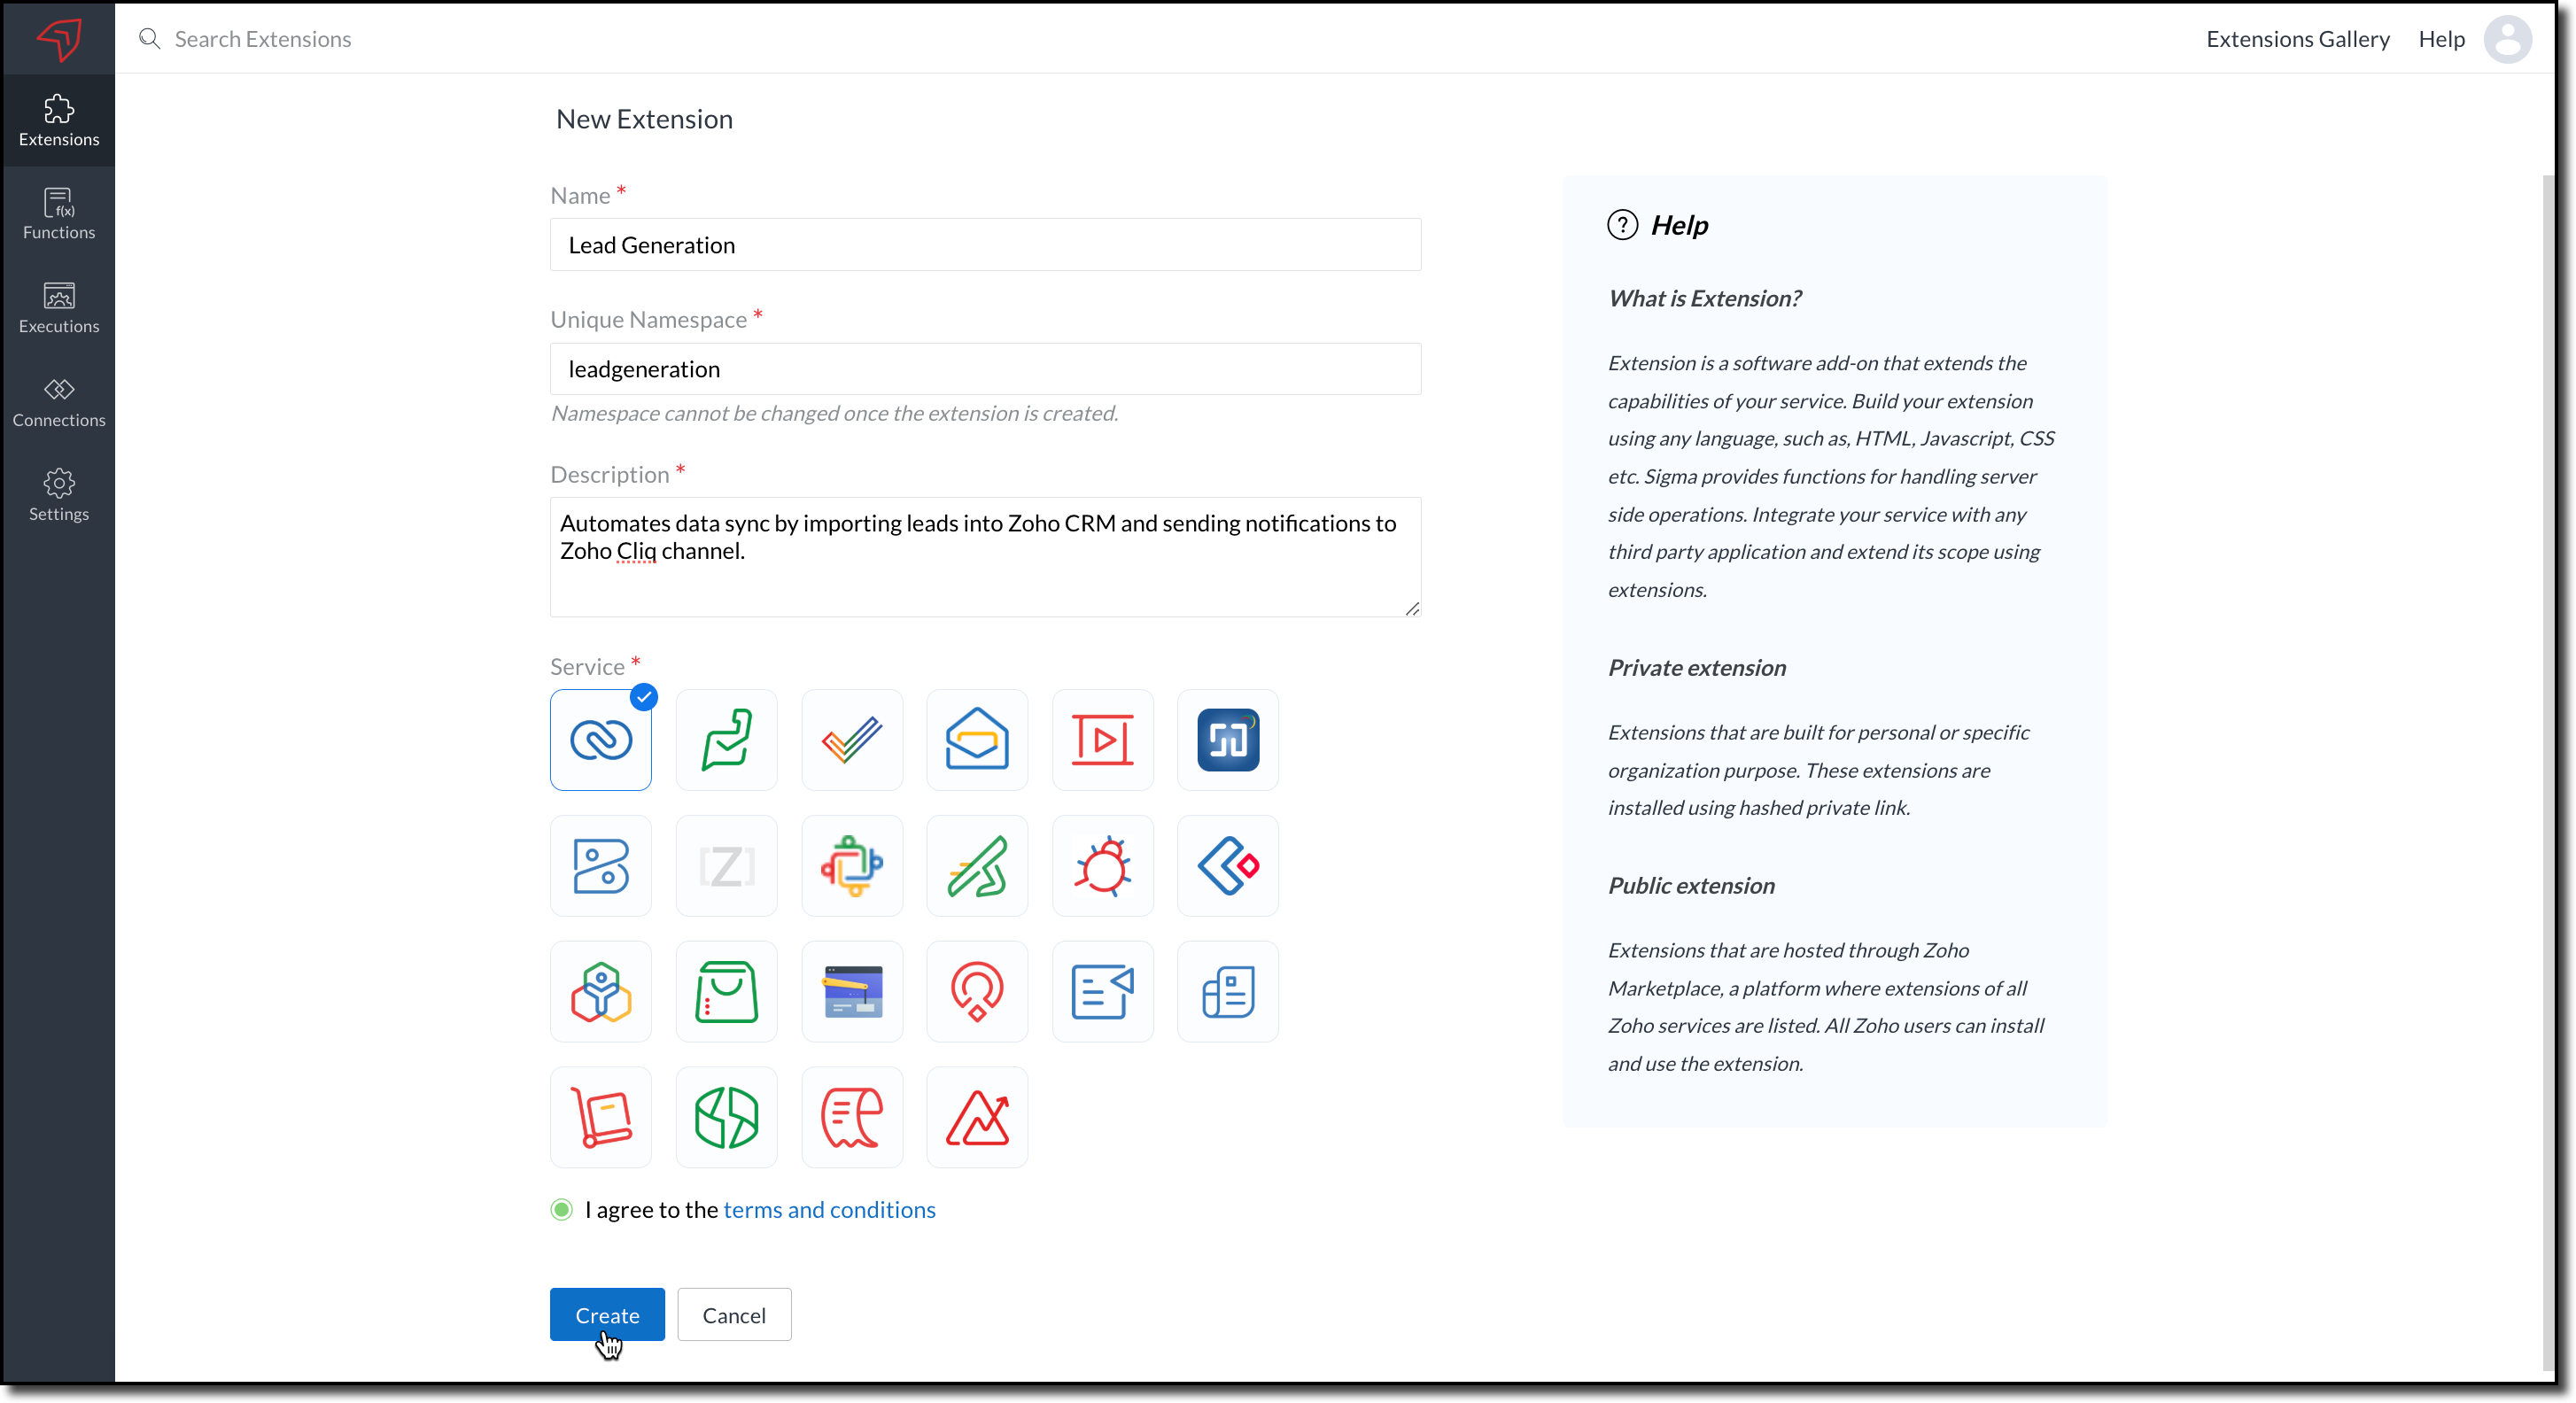
2. The private extension that you have created will be listed in the Extensions page. Choose your extension and click the edit icon.
You will then be redirected to the Zoho Developer Console.
Dependency Configuration
Now, let us configure a couple of dependencies required for this use case in the developer console.
Connectors
To notify a Zoho Cliq channel, Connectors authorize the end user's Zoho Cliq account with the extension and grant access to the necessary data. Follow these steps to create a connector with the required APIs for the widget.
3. In the console, navigate to Utilities > Connectors on the left-side menu.
4. Click Create Connector and provide the required details using the guidance available on the Server-based Application help page.
5. Use the generated Redirect URL to register your application in Zoho's API Console. After registration, enter the Client ID and Client Secret in the developer console.

6. Create Connector APIs for the following:
- GET List of all Channels to fetch all the available channels from your Zoho Cliq Account.

The Authorization header is automatically added to all the Connector APIs. - POST Message in Channel to notify the incoming leads in the channel.
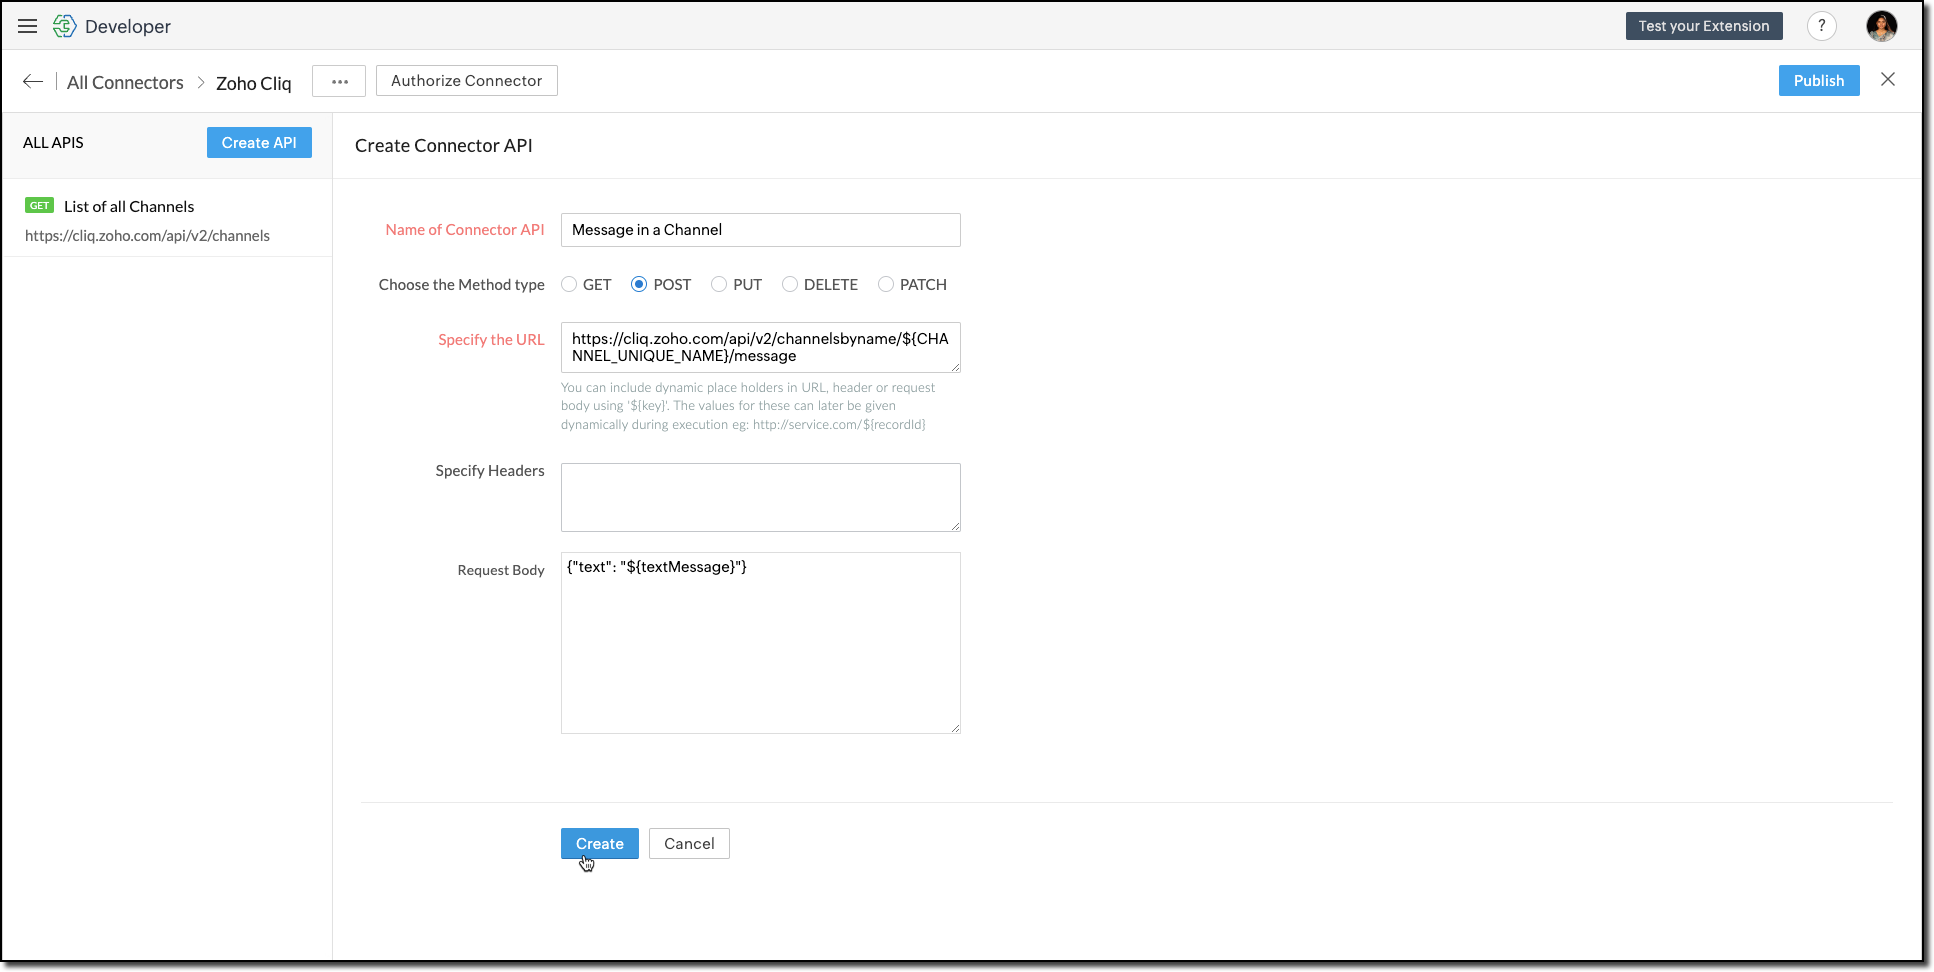
You can include dynamic place holders in the URL, header, or request body using this format ${place_holder}.
7. Once the APIs are configured, publish and associate the connector with the extension.

Refer to the Connectors help document to learn more.
Variable
Variables are required to store the admin's preferred channel details and retrieve them when a lead enters Zoho CRM through the extension. Upon installing the extension, this variable is automatically created in your Zoho CRM org.
8. Go to Build > Custom Properties and create a variable.

Set the variable's permission to Hidden to prevent the CRM users from accessing/modifying the variable data from the Zoho CRM Variables page. This ensures that variables can only be configured through the extension.
For more information, refer to the Custom Variables help document.

Tip
In your Zoho CRM, go to Setup > Security Control > Profiles and restrict permissions for your extension to prevent unauthorized access to the settings page.
In your Zoho CRM, go to Setup > Security Control > Profiles and restrict permissions for your extension to prevent unauthorized access to the settings page.
Building a Connected App
9. In the console, go to Utilities > Connected Apps on the left-side menu.
10. Follow the steps provided in this kaizen to create a new Zoho CRM widget for this use case.
Code Logic for the Settings Panel
- Create a drop-down field called Select Cliq Channel to the settings panel. This dropdown should dynamically list the channels from your Zoho Cliq account by invoking the GET Cliq Channels API. Follow the given Invoke Connector method to execute Connector APIs.
// Initialize Zoho Embed SDK ZOHO.embeddedApp.on("PageLoad", function () { fetchCliqChannels(); }); ZOHO.embeddedApp.init(); // Fetch Cliq channels async function fetchCliqChannels() { const channelDropdown = document.getElementById("cliqChannel"); try { console.log("Fetching channels from Zoho Cliq..."); const req_data = { "parameters": {} }; const response = await ZOHO.CRM.CONNECTOR.invokeAPI("leadgeneration.zohocliq.listofallchannels", req_data); console.log("Response from Zoho Cliq:", response); const parsedResponse = JSON.parse(response.response); const channels = parsedResponse.channels; if (channels && Array.isArray(channels)) { channelDropdown.innerHTML = channels.map(channel => `<option value="${channel.unique_name}">${channel.name}</option>`).join(''); } else { throw new Error("Invalid response structure"); } } catch (error) { console.error("Error fetching channels:", error); if (error.code === '403') { console.error("Authorization Exception: Please check your API permissions and authentication."); } channelDropdown.innerHTML = '<option value="">Failed to load channels</option>'; } } |
- Add a Save Configuration button that stores the selected channel name and channel ID in the variable created earlier. To save the selected data into the variable, use the invokeAPI() function, with the namespace as crm.set.
// Save configuration async function saveConfiguration(event) { event.preventDefault(); const channelDropdown = document.getElementById("cliqChannel"); const selectedChannelUniqueName = channelDropdown.value; const selectedChannelName = channelDropdown.options[channelDropdown.selectedIndex].text; if (!selectedChannelUniqueName) { alert("Please select a channel."); return; } const settings = { unique_name: selectedChannelUniqueName, name: selectedChannelName }; const data = { "apiname": "leadgeneration__Cliq_Channel", "value": JSON.stringify(settings) }; try { const response = await ZOHO.CRM.CONNECTOR.invokeAPI("crm.set", data); console.log("Updated settings:", response); document.getElementById("setupStatus").innerText = "Configuration saved successfully!"; } catch (error) { console.error("Error saving configuration:", error); document.getElementById("setupStatus").innerText = "Failed to save configuration."; } } |
- When a lead enters Zoho CRM through the extension, it should trigger a function that:Retrieves the saved channel details:
> Retrieves the saved channel details: Uses the Get Organization Variable JS SDK to call the Zoho CRM GET Variable API to fetch the saved channel details.
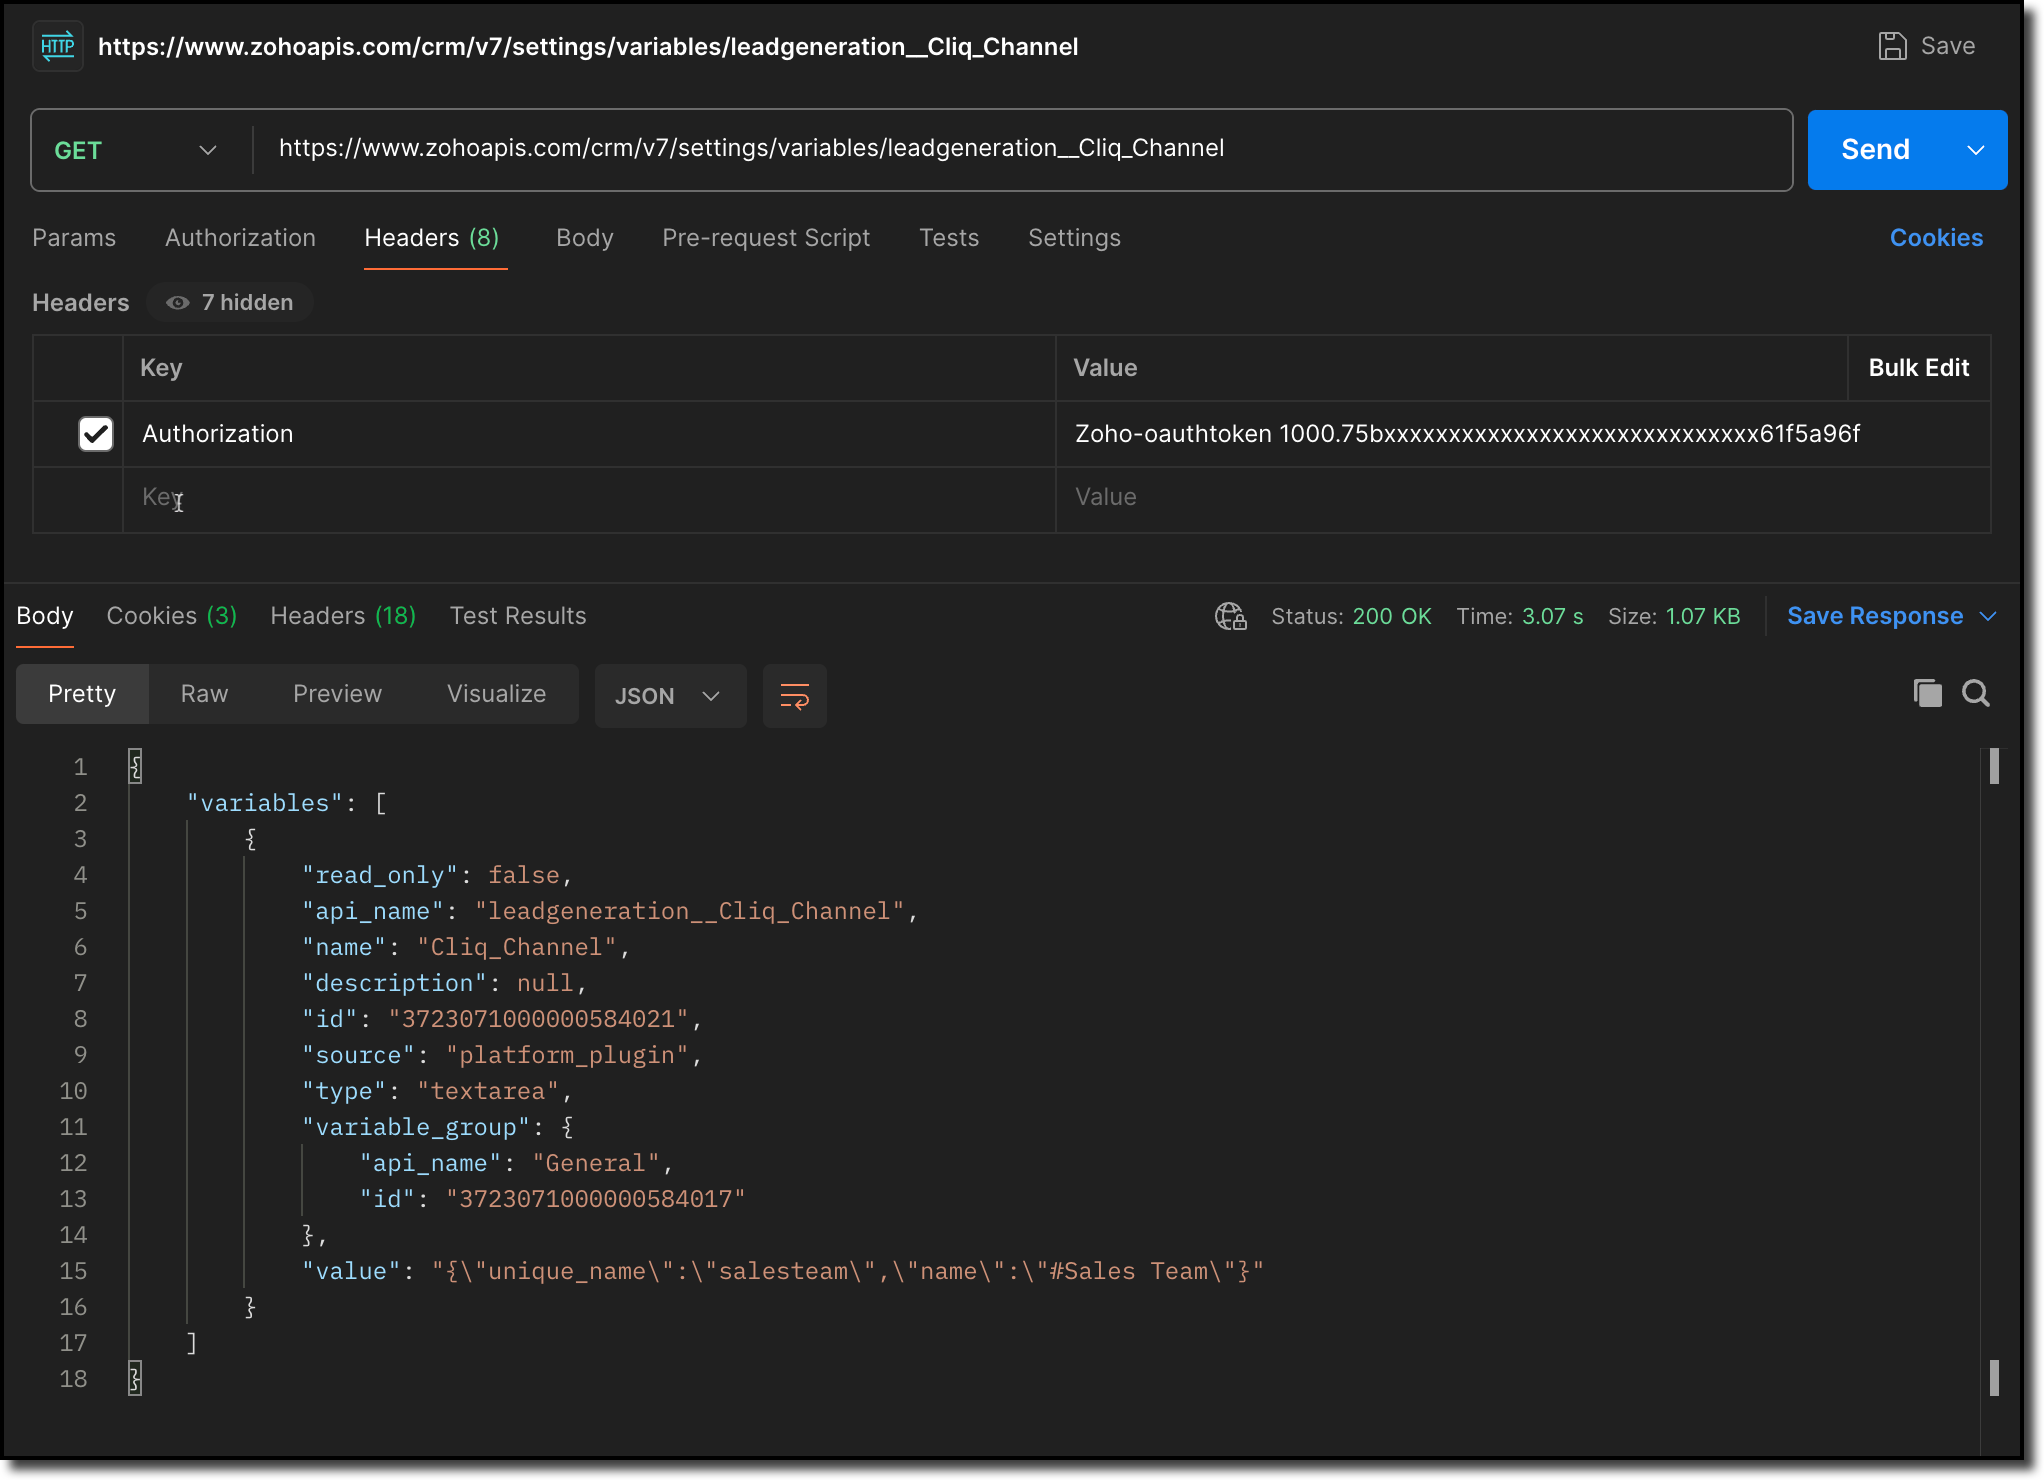
> Notifies the channel: Sends a message to the retrieved channel using the Post Message API.

Info
-> A complete working code sample for the use case is attached at the end of this post for your reference.
-> The test function for triggering notifications is also included in the attachment. You can use the same snippet in your extension to initiate the notification process.
-> Ensure to replace the unique names of your Connector APIs and Variable.
11. Fill in the details of the application as shown in this image and upload the widget ZIP file packed using the Zoho CLI command.
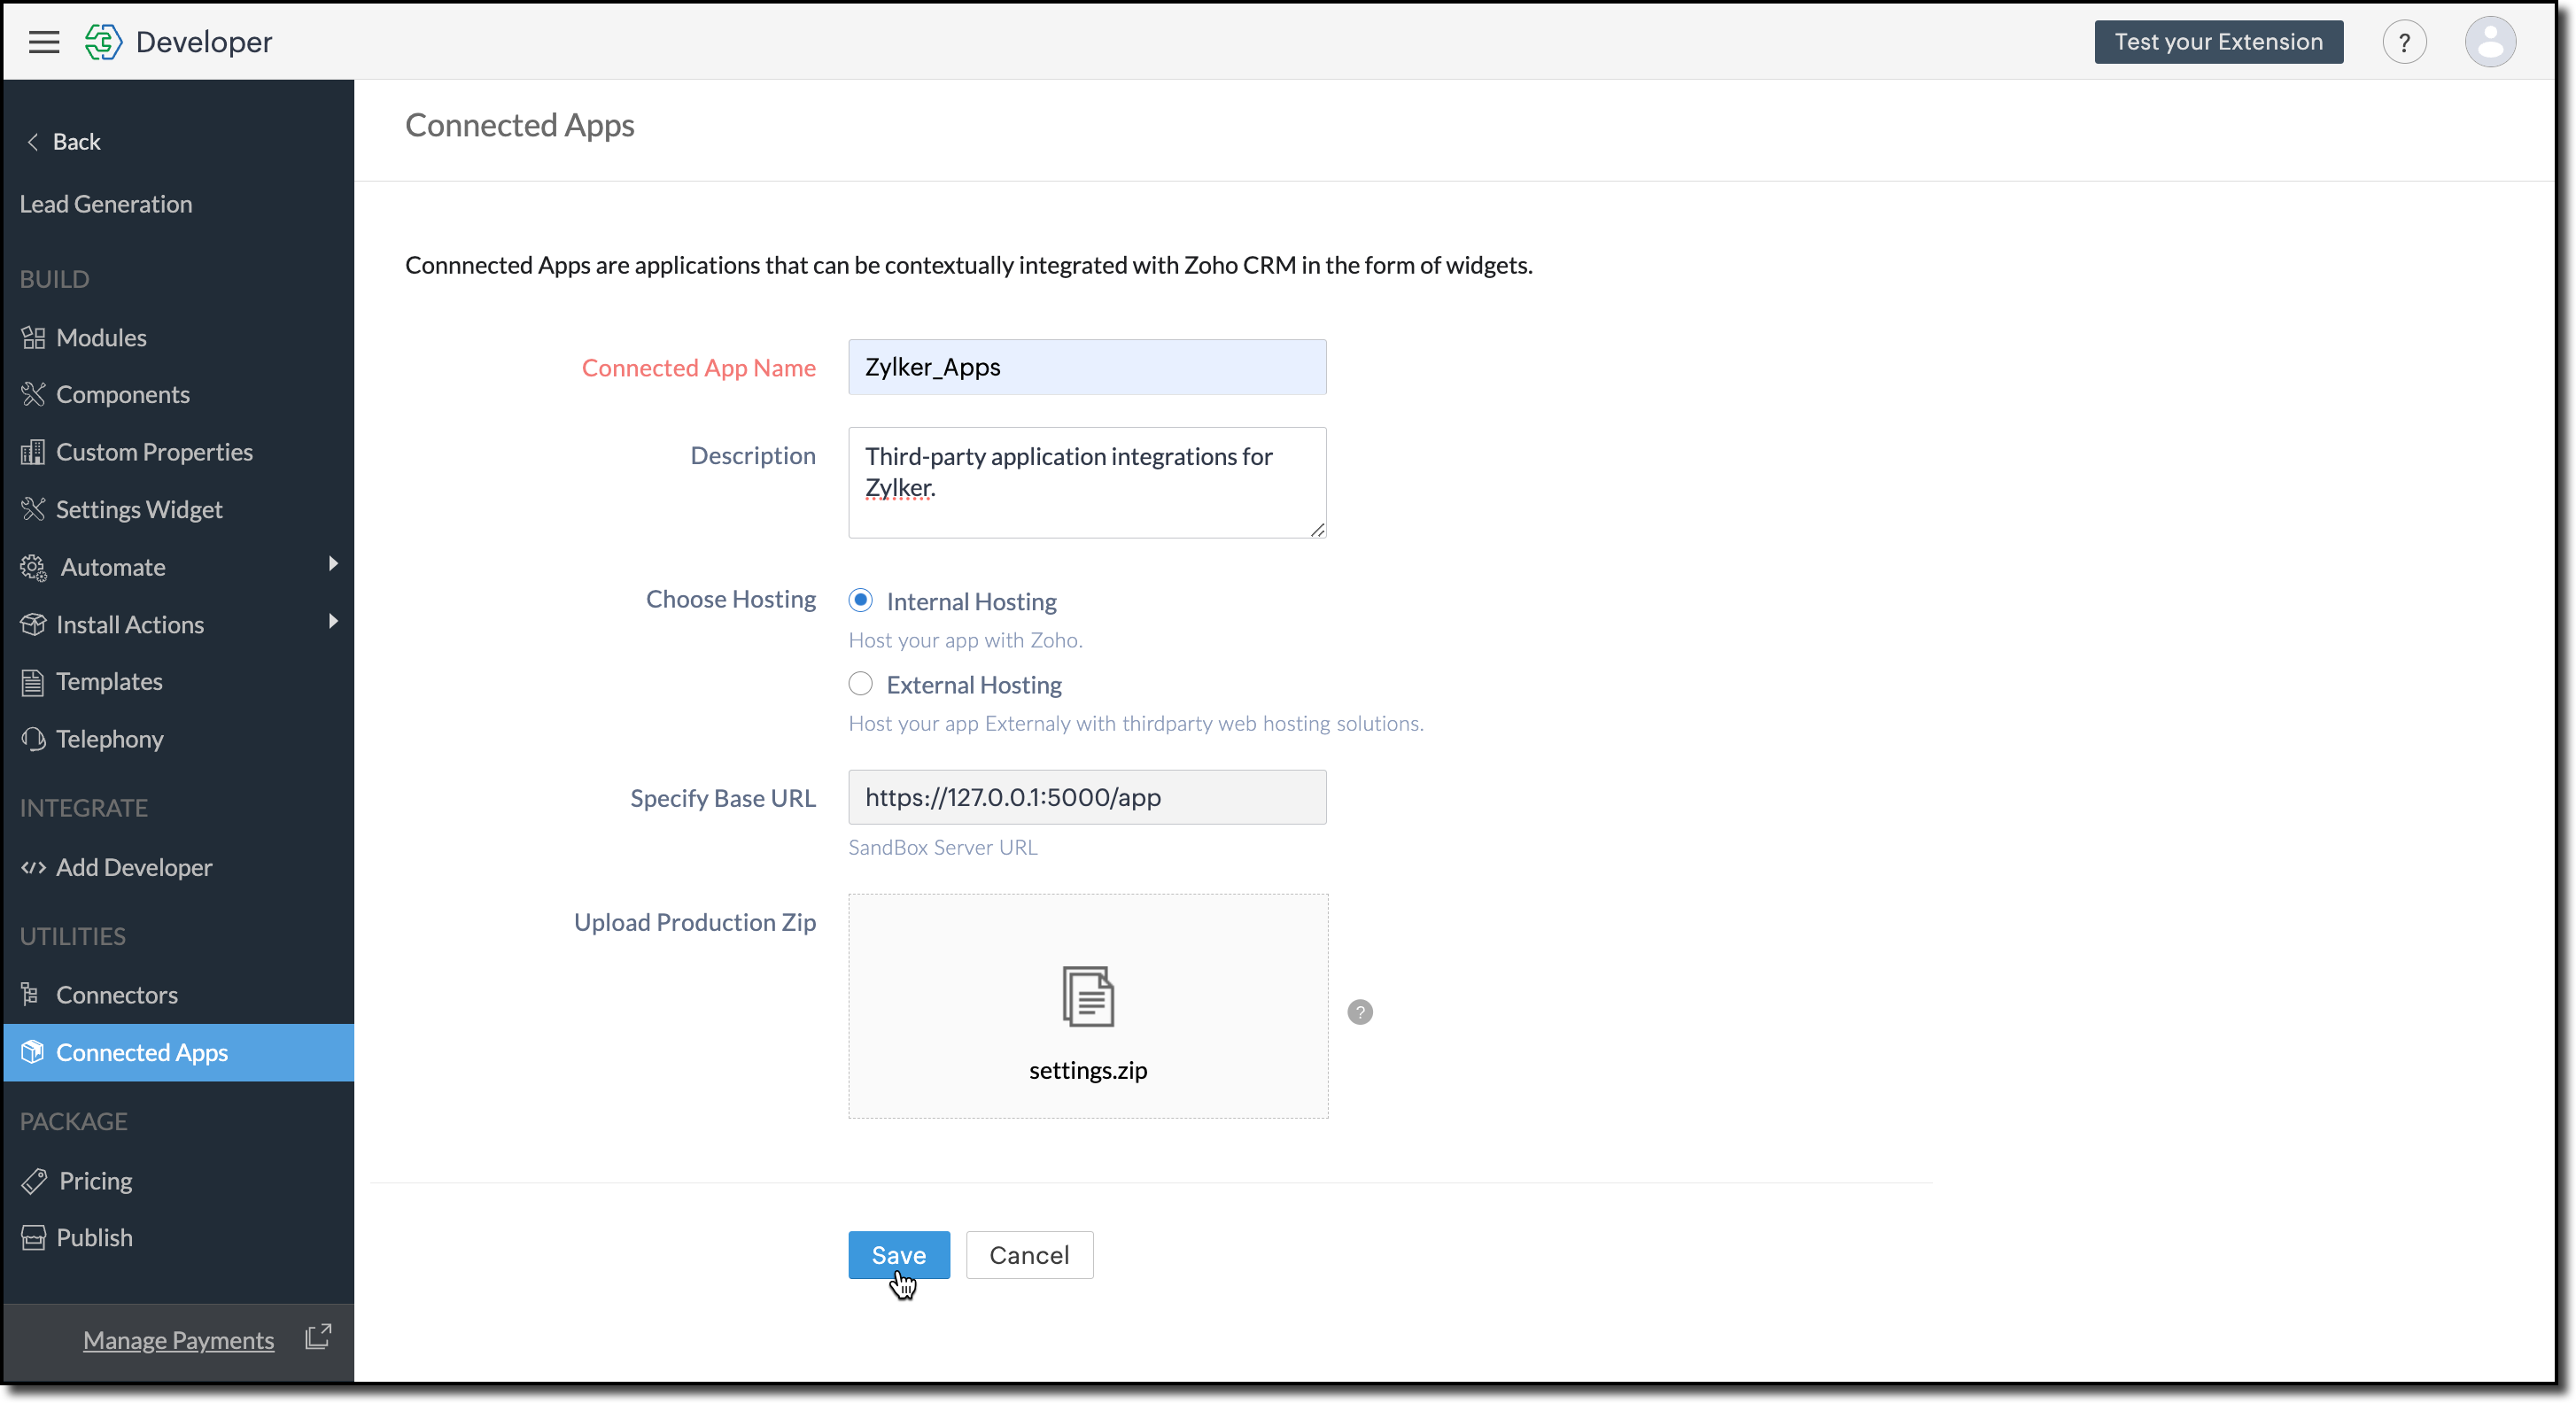
12. Click Save.
Configure the Settings Widget
13. Navigate to Build > Settings Widget in the left menu.
14. Provide a Name and the Resource Path of your widget.
15. Click Save.

The Settings Widget for Extension is available upon request. Contact support@zohocrmplatform.com to enable it for your account.
Packaging, Publishing and Deploying
16. Go to Package > Publish on the left-side menu and publish the extension.
17. The review process for listing an extension in the Marketplace will take from three weeks to one month.
For the demo, we will proceed with deploying the extension using the private plugin deployment link.

18. Now, replace the URL of your Zoho CRM page with the deployment link from the Developer Console and approve the extension installation.
Try it Out!
Once installed:
> A pop-up will appear, prompting you to authorize Zoho Cliq for the required configurations.
If you do not already have a Zoho Cliq account, you can sign up directly from the pop-up and proceed with the authorization.
> After authorization, you will be redirected to the Settings widget page, where you can select and save your preferred Cliq channel.
> If you need to update the settings later, you can find them on the Installed Extensions page under the respective extension.


Note
The demo videos above use a testing function to notify the channel. You can deploy it anywhere in your extension to trigger a notification whenever a lead enters a Zoho CRM organization through the extension.
Find the function in the attachments at the end of this post.
Similar Scenarios
- Sales Territory Management: An extension that auto-assigns incoming leads to sales reps can use a settings widget to allow managers to define territories and sales rep mappings dynamically.
- Custom Field Mapping: For extensions that sync data between Zoho CRM and external systems, a settings widget can let users map CRM fields to external system fields.
- Automated Email Preferences: In email automation extensions, the settings widget can allow users to specify email templates, recipients, or trigger conditions for follow-ups and campaigns.
Adding a Settings Widget to your Zoho CRM Extensions not only enhances user experience but also boosts the flexibility and efficiency of your extension. Whether it is notifying sales teams or customizing field mappings, a well-designed settings page is a game-changer for your extensions.
Explore the Widget section in our Kaizen collection to try out various widget types and discover their unique use cases.
If you have any queries or a topic to be discussed reach out to us at support@zohocrm.com or drop your comment below.
Until next time, keep innovating!
Cheers!
----------------------------------------------------------------------------------------------------------------------------------------
Related Reading
- Zoho CRM Widget - An Overview, Installation and Creation, Mobile Compatibility, Telephony Widget Extension, and other Kaizens.
- Widget SDKs - An Overview, Invoke Connector and Get Organization Variable.
- Zoho Developer Console - An Overview, Creating Extensions, Building Connected Apps, and A Quick Start Guide.
- Zoho Extensions - Custom Variables and Connectors
- Zoho Cliq - GET List of Channels and POST Message in Channel.
- Zoho Marketplace - An Overview
----------------------------------------------------------------------------------------------------------------------------------------
Previous Kaizen: Kaizen #174 - Client Script Commands | Kaizen Collection: Directory
More enhancements in the COQL API are now live in Zoho CRM API Version 7. Check out the V7 Changelog for detailed information on these updates.
Topic Participants
Kiruthiga G
Sticky Posts
Kaizen #217 - Actions APIs : Tasks
Welcome to another week of Kaizen! In last week's post we discussed Email Notifications APIs which act as the link between your Workflow automations and you. We have discussed how Zylker Cloud Services uses Email Notifications API in their custom dashboard.Kaizen #216 - Actions APIs : Email Notifications
Welcome to another week of Kaizen! For the last three weeks, we have been discussing Zylker's workflows. We successfully updated a dormant workflow, built a new one from the ground up and more. But our work is not finished—these automated processes areKaizen #152 - Client Script Support for the new Canvas Record Forms
Hello everyone! Have you ever wanted to trigger actions on click of a canvas button, icon, or text mandatory forms in Create/Edit and Clone Pages? Have you ever wanted to control how elements behave on the new Canvas Record Forms? This can be achievedKaizen #142: How to Navigate to Another Page in Zoho CRM using Client Script
Hello everyone! Welcome back to another exciting Kaizen post. In this post, let us see how you can you navigate to different Pages using Client Script. In this Kaizen post, Need to Navigate to different Pages Client Script ZDKs related to navigation A.Kaizen #210 - Answering your Questions | Event Management System using ZDK CLI
Hello Everyone, Welcome back to yet another post in the Kaizen Series! As you already may know, for the Kaizen #200 milestone, we asked for your feedback and many of you suggested topics for us to discuss. We have been writing on these topics over the
Recent Topics
Add "Fetch Composite Item" Action for Inventory
I want to make a Flow that uses information returned in the GET call for Composite Items, and it's not currently available in Zoho Flow. Please consider adding this functionality.Calling Function via REST API with API Key gives 401 using Zoho Developer
Hi, I created a couple of functions using the one month trial of Enterprise edition, which I was able to call using the API Key method from Postman and from an external site. Now that my trial has expired, I have created the same functions in the DeveloperError due to - 'Internal Exception' when uploading Sign-generated PDF file to workdrive via Deluge in Zoho CRM
Hi I wasnt getting this error a few days ago and my code had not changed, so I'm wondering if there's a Zoho bug somewhere? I am downloading a PDF file from a Zoho Sign url using invokeurl and then uploading it to a Workdrive folder using zoho.workdrive.uploadFile.Embed CRM record images in email templates
I have email templates that I want to embed dynamic images in their body - not as an attachment. For the context, the image is a QR code individual to each contact. So there are couple of challenges for which I think there is no solution in CRM: 1/ IAssign multiple departments to multiple helpcenters
Hi there! I have a reseller company for a software and I'm using Zoho Desk as my helpcenter and ticket management system. The software is great and I would like to make a suggestion! With multi-branding activated, your departments that visible in helpZoho Desk Training
Hello, We've had Zoho desk for a while now, but we run into issues occasionally, and I was wondering if there was a customer who currently uses it and really enjoys the functionality, that would be wiling to chat with us?Exciting Updates to the Kiosk Studio Feature in Zoho CRM!
Hello Everyone, We are here again with a series of new enhancements to Kiosk Studio, designed to elevate your experience and bring even greater efficiency to your business processes. These updates build upon our ongoing commitment to making Kiosk a powerfulEdit default "We are here to help you" text in chat SalesIQ widget
Does anyone know how this text can be edited? I can't find it anywhere in settings. Thanks!PO Based Advance payment to Vendor
We recommend to introduce a provision at PO to make advance payment to vendors and auto apply that advance paid later at the time of Vendor Bill submission for that PO. This will help us track PO-wise Total Payments.Converting Customer Invoice to Purchase Bill
Hi, In my service-based business, I sometimes create the customer invoice first, and later I receive the purchase bill from the vendor for the same job. Is there any option in Zoho Books to: Convert a customer invoice into a purchase bill, or Link/associateGetting Project Template List using the REST API
I am trying to confirm that I can use the REST API to create a project using a project template. The API documentation indicates this is possible by providing the Template ID, but it is not clear at all how to get a list of available Project TemplatesHow to get Quickbooks Desktop Info into Zoho?
Our team has used Quickbooks desktop for years and is looking at switching to Zoho books in 2026. I want to bring all old sales history over since we use Zoho CRM. I can export Item sales history and generic sales orders from Quickbooks desktop. How doZeptoMail API Request
We tried to send mail using ZeptoMail using Django. Following is my payload {'from': {'address': 'abc@abc.com'}, 'to': [{'email_address': {'address': 'xyz@xyz.in', 'name': 'Bhavik'}}], 'subject': 'Report Name', 'htmlbody': '<p>Test</p>'} Following isZoho Inventory - Allow Update of Marketplace Generated Sales Orders via API
Hi Inventory Team, I was recently asked by a client to create an automation which updated a Zoho Inventory Sales Order if a Shopify Order was updated. I have created the script but I found that the request is blocked as the Sales Order was generated byAdmin asked me for Backend Details when I wanted to verify my ZeptoMail Account
Please provide the backend details where you will be adding the SMTP/API information of ZeptoMail Who knows what this means?Mass import of documents into Zoho Writer
I'm using Google's word processor at the moment but feel that Zoho does a better job (on the online apps market). Iwant to move my documents (about 50-70) to Zoho but it seems to me that I have to import them seperately. Is it already possible to upload several documents at a time or is this a forthcoming feature? Cheers Rolli :?:Add home page or dashboard in CRM customer portal
is it possible to add home page or dashboard in CRM customer portal?User Tips: How to change the the label display name of a system defined field
Most users know how to change field label names via Settings > Modules & Fields but if you want to change the name of a system defined field you can’t as there is no “edit properties” option. However with a simple hack you can edit any system definedSearch not working!
I have items in my notebook tagged but when I search for a tag nothing comes up! Any fix for this?Zoho CRM Community Digest - October 2025 | Part 1
Hello Everyone! Here's a quick recap of first two weeks of October! Product Updates: Zoho CRM Android App Update: Surveys, Blueprints, and Smarter Mobile Features! Zoho CRM’s Android app just got a useful upgrade. You can now share records, upload yourAutomate onboarding emails with CRM Workflow and Accounts module
We’re a B2B SaaS company selling to public-sector organisations. Each organisation is stored as an Account in Zoho CRM, and each organisation typically has multiple associated Contacts. Our backend syncs product-usage data (setup status, user activity,Important update: Enhanced security measures for account operations in Zoho Cliq
Greetings from the Zoho Cliq team! We’d like to share an important security update that has an influence on some admin actions such as password reset, MFA reset, and MFA backup code generation. What’s changing? With our latest security enhancements, theseSales Receipts Duplicating when I run reports why and how do we rectify this and any other report if this happens
find attached extract of my reportNo Functional Autosave or Manual Save Button
Application : Zoho Notebook So I wanted to try Zoho Notebook(On Ubuntu) as an application, I installed the application and went solving my LeetCode problems visually(Drawing mode), at one point the app just stopped saving anything... Every time I triedEnterprise subscription support
My organization sells subscription services to enterprise customers, which is a different model from the consumer subscription model that Zoho Billing has been designed to support and I beleve this capability should be added. An enterprise subscriptionIssue with Creator's IF logic
Hi, I found the following code produces unexpected results: if(-1.0 < 0.0000000) { info "True"; } else { info "False"; } if(-1.0 < 0.000000) { info "True"; } else { info "False"; } The output returned is: False True However, theNeed option to send Package PDF in shipment email (Shipment PDF is missing Lot info)
Is there any way to automatically attach the Package PDF instead of (or alongside) the Shipment PDF in the notification emails? We really need this feature because the default Shipment PDF creates a blind spot for our customers. It does not display Batch/Lotzoho creator view is not present in the workspace and blank reports
Hi Support, Users who have "write" permissions keep getting this error for all of our embedded reports all of a sudden. See screen shot below: Meanwhile, my developer permissions account sees a blank screen in view and edit mode as shown in the screenshotsCustomize portal email template
Can i fetch only first name of the user in portal email template instead of the below code Hi ${User.FULL_NAME}Can't we let users decide which options they'd like to add at embed widget?
It seems embed widget DOES NOT offer a feature, where users can choose options upon subscribing plans. What Zoho has instead, is that admins have to manually create plan with options. How come no one in Zoho dev team never raised issue about usabilityReupload and rename from one field to another field (file upload)
Hi Everyone, Sorry, i have question to use invoke url for rename and reupload attachments file to another field. Tested on development mode. Zoho C6. Refer to https://www.zoho.com/creator/help/api/v2/upload-file.html look my error notification. Does anyonePrinting Multi-Page Reports (PDF Export)
Hi, I am moving a report from Google's Looker Studio to Zoho Analytics and trying to reproduce the Looker page by page dashboard editing experience. With Google, what you see is what you get when you print to PDF. But I can't seem to create the same experienceResume Harvester: New Enhancements for Faster Sourcing
We’re excited to share a set of enhancements to Resume Harvester that make sourcing faster and more flexible. These updates help you cut down on repetitive steps, manage auto searches more efficiently, and review candidate profiles with ease. Why we builtI NEED TO NUMBER TO TEXT NO HERE
=NUMBERTEXT NEEEDError: View is not present in the workspace
When saving a dashboard, user receives a popup with the following error. "View is not present in the workspace" What does this mean or refer to? There is no further insight given.Dear Zoho CEO: Business Growth is about how you prioritise!
All of us in business know that when you get your priorities right, your business grows. Zoho CRM and Zoho Books are excellent products, but sadly, Zoho Inventory continues to lag behind. Just this morning, I received yet another one-sided email aboutBin Locations
Dear all, I am wondering if someone has the ability to develop the bin locations option for zoho inventory (integrated with zoho books) Regards, RyanCreate and populate a record in an instant: Introducing zero-shot field prompting to Zia's ICR
A couple of months ago, we upgraded our in-house AI image detection and validation tool, Zia Vision, with intelligent character recognition (ICR). By training Zia with sample images, you could create and enrich CRM records with data extracted from standardHow to Prevent Users From Skipping LMS Videos in Zoho People
How to Prevent Users From Skipping LMS Videos in Zoho People Hello Zoho Developers, In this blog, we will quickly look at how you can stop users from skipping or fast-forwarding videos in Zoho People LMS. Zoho People provides a feature called Disable[Integration Edition] Deluge Learning Series – Custom API with Deluge | November 2025
We’re excited to conclude this four-month Integration Edition of the Deluge Learning Series: Session 1 – Integrating Zoho Apps with Deluge Using Built-In Integration Tasks Session 2 – Integrating Zoho Apps with Deluge Using invokeURL and invokeAPI SessionNext Page