View subform entries without viewing a record in Zoho CRM | Kiosk Studio Session #8
In a nutshell
Have you ever wanted to take a quick peek at a record's subform?
Examples might be invoiced items in an invoice, ordered items in a sales order, or purchased items in a purchase order.
Let's say you're viewing your list of invoices in Zoho CRM and there's a button next to an invoice. When you click it, you see the invoiced items (subform entries) for that invoice—and you can do the same for every invoice in the list. And imagine you can quickly add a subform entry or delete multiple entries—all without ever opening a record.
With Kiosk Studio, you can now quickly build this for your CRM users.
Want to replicate this option in multiple modules? Simply clone the kiosk and rework it to suit each module. Easy work with Kiosk Studio!
Hello everyone,
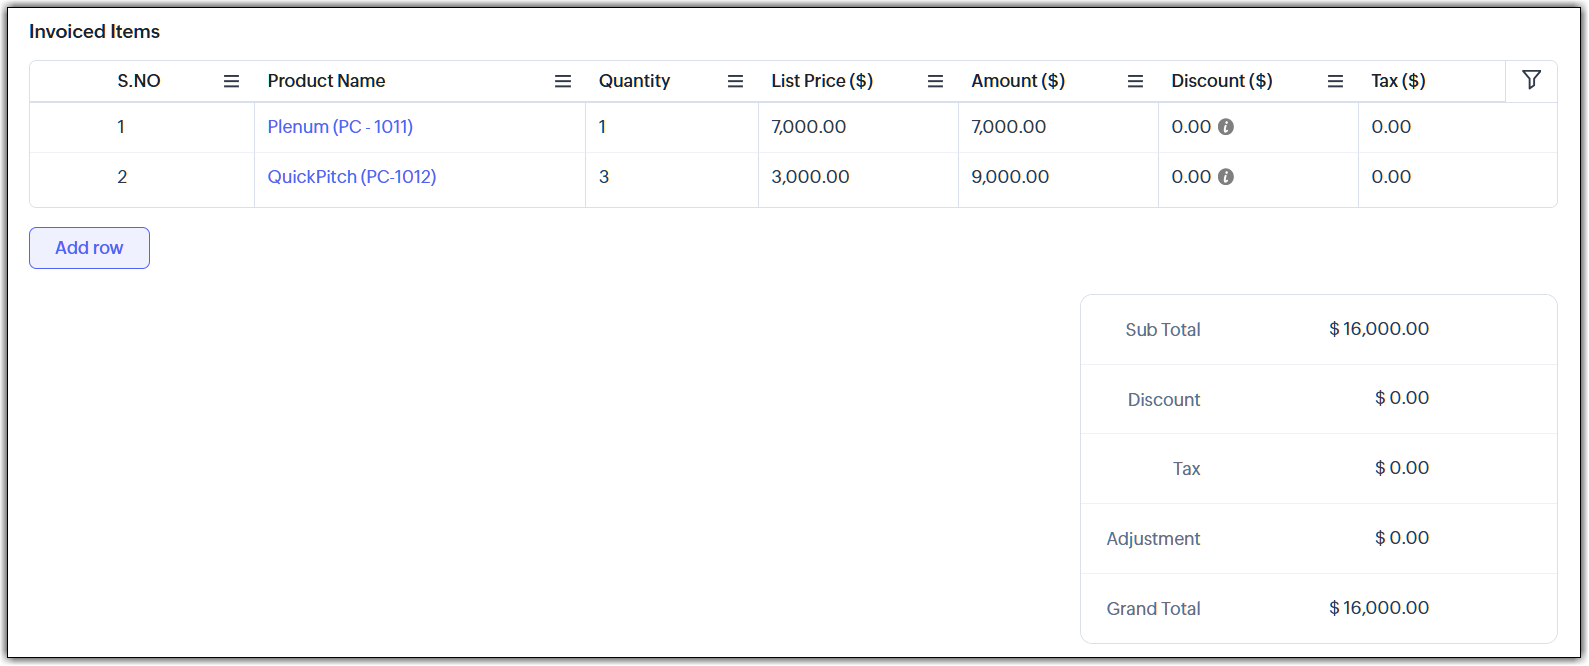
Modules in Zoho CRM often contain subforms, which are collections of individual entries related to the specific module you're looking at. For example, records in an invoice module might contain the products/services for which each customer has been billed, all added as entries in a subform, along with other details like quantity, list price, and so on.
In the past, working with a subform has usually involved opening a record, scrolling down, making changes, saving them, and then returning to the list view. Doing that for multiple records ends up in a slow workflow for your end users.
Speed it up with Kiosk Studio
What if you could add a button that made the following possible?
- Click the button and instantly see the invoiced items tied to that invoice.
- Need to add a new item? Do that right there.
- Want to remove one or more items? Select and delete—again, without opening that record.
You can make this happen with Kiosk Studio. Let's look at how.
Scenario
Members of your finance team open the Invoices module and are surprised to see a new addition. Next to each invoice is a button: “View Invoiced Items.”

They decide to try it out:
Your teams can zoom through their workflows and make small changes quickly—all thanks to this new button. You can even clone this kiosk for other modules, like Sales Orders, Quotes, and so on.
Behind the button
The button that you see in the UI is connected to a kiosk.

Let's see how this kiosk is configured:
As you can see, we can quickly configure the kiosk using elements like GetRecords, Screens, and others.
The code for the adding and removing subform entries is attached to this article. Please note that the code in these files will give you a rough idea of what to do, but you'll have to tweak it and make it better before you use it in your account.
The code for the adding and removing subform entries is attached to this article. Please note that the code in these files will give you a rough idea of what to do, but you'll have to tweak it and make it better before you use it in your account.
New to Kiosk Studio? Get up to speed quickly by checking out the following resources:
- For a basic overview, check out Kiosk Studio: An overview.
- If you'd like to learn more about the various elements found in kiosks, check out Elements of a kiosk.
- For instructions on how to create and embed kiosks, see Working with Kiosk Studio.
- If you run into difficulties, submit a ticket and get help from our support team.
Check out previous Kiosk Studio session posts here:
- Session #1 covers how to view customers from the same industry.
- Session #2 covers how to build a call script kiosk.
- Session #3 looks at streamlining appointments.
- Session #4 shows how kiosks can simplify sales for bank employees.
- Session #5 helps you review loan applications quickly.
- Session #6 packs an entire service request workflow into a single kiosk.
- Session #7 helps you create your own convert feature.
Got a Kiosk Studio success story or creative use case? Share it in the comments—we might feature yours in an upcoming post!
Topic Participants
Kiran Karthik P
Sticky Posts
Enhancement to ICR’s field prompting: Preferred data extraction using advanced field prompting
Dear Customers, We hope you’re well A quick background Intelligent Character Recognition (ICR) comes as part of Zia’s optical recognition capability called Zia Vision. When we introduced it last April, the data extraction was training-based and was applicableGood news! Calendar in Zoho CRM gets a face lift
Dear Customers, We are delighted to unveil the revamped calendar UI in Zoho CRM. With a complete visual overhaul aligned with CRM for Everyone, the calendar now offers a more intuitive and flexible scheduling experience. What’s new? Distinguish activitiesAccessibility in Zoho CRM: Not just a feature—a way to empower
For instructions on setting up these controls, please check this help document: Configuring accessibility controls. Hello everyone, Today (December 3, 2024), on the International Day of Persons with Disabilities, we begin our journey towards a CRM thatScaling the customer journey: What's new in CommandCenter
Dear Customers, The last time we connected about CommandCenter, it was about the tool's new controls and revamped UI. Personally, the overhaul of the UI from the last update, still excites me. Today, we're here with news about its scalability and addedZoho CRM's sales trend and sales follow-up trend dashboards are now customizable
Dear Customers, We're here with good news! Sales trend and sales follow-up trend are two system-defined dashboards that help you understand trends and anomalies in your sales outreach and conversion efforts. They use Zia's intelligence to identify patterns
Recent Topics
Can I export a TXF (TurboTax exchange format) file out of Zoho Books?
Hello, I'm trying to do my US Small Business Taxes using Intuit's Turbo Tax. Can I export my expenses from Zoho Books to a TXF format file, so that it can then be imported into Turbo Tax? Thanks, RajneshWhere is the settings option in zoho writer?
hi, my zoho writer on windows has menu fonts too large. where do i find the settings to change this option? my screen resolution is correct and other apps/softwares in windows have no issues. regardsUsing IMAP configuration for shared email inboxes
Our customer service team utilizes shared email boxes to allow multiple people to view and handle incoming customer requests. For example, the customer sends an email to info@xxxx.com and multiple people can view it and handle the request. How can I configureWhen Does WorkDrive integrate with Books?
When Does WorkDrive integrate with Books?POP mailbox limits
If I am accessing a remote POP mail server using Zoho Mail is there a mailbox quota for the account or is it all related to my mail account storage limits?Warranty Service and Repair in Zoho FSM
Hi There, We are a retail store that sells products and also performs installations and repairs. Our field technicians handle this work. Some repairs are covered by manufacturers, who reimburse us for both parts and labour. In these cases, we performZoho Sheet for Desktop
Does Zoho plans to develop a Desktop version of Sheet that installs on the computer like was done with Writer?WhatsApp phone number migration
Hi @Gowri V and @Pheranda Nongpiur, Thanks for implementing the promised enhancements to the integration between Zoho CRM and WhatsApp. The previous discussion has been locked, so I'm opening this new one. I am copying below a specificWebDAV support
I need WebDAV support so that I can upload/download (and modify) documents from my local file system. Is anything planned in his direction?SPF: HELO does not publish an SPF Record
I am using Zoho mail. Completed all of the required prerequisites from the dashboard to avoid any issues with mail delivery. But when checking on mail-tester.com getting the following error. Can anyone help me solve this?How do I create an update to the Cost Price from landed costs?
Hi fellow Zoho Inventory battlers, I am new to Zoho inventory and was completely baffled to find that the cost price of products does not update when a new purchase order is received. The cost price is just made up numbers I start with when the productPrice Managment
I have been in discussions with Zoho for some time and not getting what I need. Maybe someone can help explain the logic behind this for me as I fail to understand. When creating an item, you input a sales rate and purchase rate. These rates are justRegarding the integration of Apollo.io with Zoho crm.
I have been seeing for the last 3 months that your Apollo.io beta version is available in Zoho Flow, and this application has not gone live yet. We requested this 2 months ago, but you guys said that 'we are working on it,' and when we search on GoogleActual vs Minimum
Hi all, I am sure I am not the only one having this need. We are implementing billing on a 30-minute increment, with a minimum of 30 minutes per ticket. My question is, is there a way to create a formula or function to track both the minimum bill vs theGenerate leads from instagram
hello i have question. If connect instagram using zoho social, it is possible to get lead from instagram? example if someone send me direct message or comment on my post and then they generate to leadKaizen #234 - Automating Deal Handoff with Zia Assistant API, Workflow, Deluge, and Widget in Zoho CRM
Hello all! Welcome back to a fresh Kaizen week. In this post, we will explore how to automate the deal handoff process in Zoho CRM using Zia Assistant API + Workflow + Deluge + Widgets. Here’s how the final output looks when a deal is reassigned 1. DealHow do you print a refund check to customer?
Maybe this is a dumb question, but how does anyone print a refund check to a customer? We cant find anywhere to either just print a check and pick a customer, or where to do so from a credit note.Ability to assign Invoice Ownership through Deluge in FSM
Hi, As part of our process, when a service appointment is completed, we automated the creation of the invoice based on a specific business logic using Deluge. When we do that, the "Owner" of the invoice in Zoho FSM is defaulted to the SuperAdmin. ThisEnhancement to ICR’s field prompting: Preferred data extraction using advanced field prompting
Dear Customers, We hope you’re well A quick background Intelligent Character Recognition (ICR) comes as part of Zia’s optical recognition capability called Zia Vision. When we introduced it last April, the data extraction was training-based and was applicableSee a list of all records enrolled in a cadence?
I am looking for a way to see a list of all leads or contact currently enrolled in a cadence. I do not see any way to do this through the cadence UI.Limitation in chart of accounts
There is a limitation of 4000 accounts in chart of accounts Zoho needs to remove this limitHow do I change the account bank charges are charged to?
I want bank charges charged to my Credit Card Fees account. Is there a way to do this?Real signature in Zoho Expense PDF report ?
Hello ! Is there a way to put a real signature on the signature line when a PDF report is generated in Zoho Expense? Through Zoho Sign or another way? Can't seem to make it work.Copy paste settings
Hello all i have 2 organizations running in ZOHO books in one organization i have customised Tax rates, codes and customized templates instead of manually doing again in org 2 can i have some shortcut to copy paste or export and import??Custom TDS on Vendor Credits via API
Hi, We are using Zoho Books APIs for posting Bills and vendor credits. We are unable to post custom TDS amount posting vendor credits. Can you please share the API spec and Payload that need to be sent for Custom TDS for Vendor Credits."Unlink" Advance from Bill without Deleting the Payment Record
I am writing to highlight a significant workflow issue in Zoho Books (India Edition) regarding Vendor Advances and Bills. The Scenario: I recorded an Advance Payment to a vendor. I matched/reconciled this payment in the Banking module. I received a BillWhat is the best way to convert MSG file to Word format?
The best way to convert MSG files to Word format is by using a reliable and professional tool Aryson MSG file Converter. Manual methods are often time-consuming and may not preserve email formatting, attachments, or metadata accurately. In contrast, ArysonZoho Projects : Task should auto-update to 'In Progress' if timer started
Namaskaram. Right now, if a Task's timer is started, the Task stays in 'Not Started' status. One has to manually update it to 'In Progress'. From a #uxdesign standpoint, it is an unnecessarily two step process to start working on a task. It would be better that, if I start the timer on a task, it should automatically change to 'In Progress' status. Crafted with ❤️ Zoho Gurus | Zoho One Practice Team @ CubeYogi Zoho Authorised Partner | 7+ Yrs | 200+ Projects | 100+ CustomersInvoice template with sales tax totals
Hi everyone, I am trying to edit my invoice template so that only the total sales tax collected for my tax group shows up. Right now, under by sub total, each individual tax shows up and that takes up a lot of unnessary space, so I just want the oneZoho Delayed Posting & Loss of Article Thumbnails on BlueSky
Hello! I am wondering if anyone else has had the either of the following issues when posting to socials via Zoho and if there is a fix? 1. Post says it is scheduled or it is live when sent off via Zoho but it doesn't show up on socials till some timeConnection Not Secure (Certificate Mismatch) Error
Hi, Just a fyi, when you go to https://bigin.zohocloud.ca/bigin/Home you get a "Your Connection Is Not private" error. (Certificate mismatch to domain.) I get to that page after I have signed up and signed in as a customer and select the Access BiginUnable to create new finance account in Zoho Books Android app due to missing account number field.
Free plan I have enabled a setting via the website requiring unique account codes to be specified for all accounts. When using the android app, go to expenses, new expense, select account, new account. Promoted to enter the Account name and description.Recording the Investment
Hello, - One Investor Invested to our company, So how do we record investment which we received in our bank in the Zoho books ? - How do we record if we provide shares to the investor in the Zoho books? ThanksClient and Vendor portal at the same time
We have companies that serve both as clients and vendors and they are linked. However, we have a problem giving them access to the vendor/client portal. If they accept the invitation from the client portal, when we try to invite them to the vendor portalIntegrate Multiple ZohoBooks organization with zoho projects
We have successfully connected our Zoho Books with Zoho Projects for synronizing timesheet data. Our Business specialty is, that the staff of the Main company (A) is working on several projects, but the Clients are sometimes contracted and paying to aWays to calculate the difference form two years or months
Hi to everyone I have this request: I need to show the difference or variation from two periods (years or months) whether using a Pivot View or a graph, in this is case is better in a Pivot view. In the pivot view I will have the amount or results fromCareer site URL - Suggestion to modify URL of non-english job posting
Hi, I would like to suggest making a few modification to career sites that are not in english. Currently, the URL are a mix of different languages and are very long. It makes for very unprofessional looking URLs... Here is an example of one of our URLIntroducing Contract Settings & Backdated Contracts in Zoho Contracts
We are rolling out updates that give you more control over how contracts are created and managed in Zoho Contracts. From defining default workflows with Contract Settings to aligning agreements with real timelines using Backdated Contracts, these enhancementsCelebrating our customers on International Client's Day
Hi everyone, Every customer is part of our Zoho Desk family, and we wouldn’t want to miss celebrating you on this special day. This International Client's Day, we’d like to take a moment to appreciate every customer who has helped us grow and build meaningfulFaster Ticket Response with use of Snippets in comments
Hello everyone, Responding to tickets often involves repeating the same messages, whether it is sharing updates with customers or leaving notes for internal collaboration. To make this easier and more consistent, we are allowing agents to use snippetsNext Page