IMPORTANT: This is the help page of the latest version of Zoho Campaigns.
Click here to access the corresponding help page if you're still in the older version.
Segments let you group contacts based on specific criteria so you can send targeted campaigns to the right audience. In Zoho Campaigns, segments are available under the Audience module, and can be selected as recipients when creating campaigns.
Segmenting your contacts ensures that your campaigns reach only those who are likely to be interested in receiving them, which leads to better engagement and fewer unsubscribes.
Segments can be built on a wide range of criteria including geography (country, state, city), demographics (age, gender), behavior, buying patterns, and more. Zoho Campaigns offers an extensive set of conditions to help you create precise, targeted segments.
Segments are also dynamic. Any contact added to Zoho Campaigns after a segment is created will automatically be included in that segment if they meet its criteria.
Once a segment is created, you can perform several operations on it: send a campaign, assign topics, clone the segment, and export its contacts.
Availability
Depending on the criteria you choose, the segment can either be categorized as Basic segmentation (available in the Standard plan) or Advanced segmentation (available in the Professional plan).
Segments aren't available in the Forever Free plan.
Who can create segments?
Segments can be created by users having the below roles:
- Admin
- WorkSpace Admin
- Manager
- Any custom role having the Create permission for segments.
How do you create segments?
Creating your first segment
To create the first segment:
From the Navigation Toolbar to the left, click Audience and click Segments.
Provide a name for the segment.
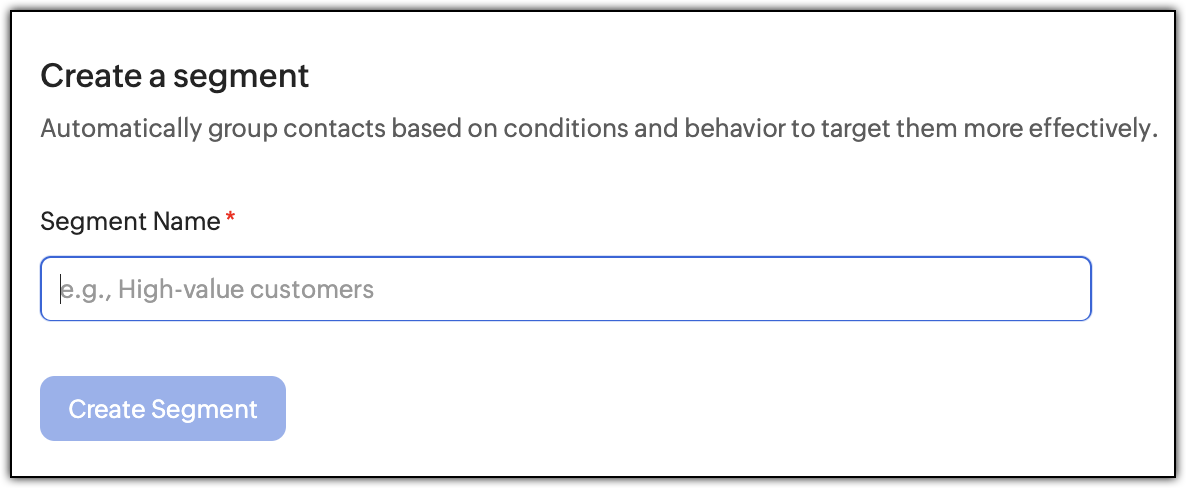 Creating your first segment.
Click the Create Segment button.
Choose a field, modifier, and the value for your segment. If needed, include another group by clicking the Add a Group button.
● When there are multiple groups, you'll see the Criteria Pattern box below the last group. Click Change Pattern to change the logic manually. Click Save once you're done.
Click the Preview button at the top-right corner. A slide-in window appears where the contacts satisfying the criteria you've set for the segment will be fetched. Search for the contacts here to see if every contact is fetched correctly.
Click Save Segment to create your first segment.
Creating segments
The steps are different only for creating the first segment. After that, the subsequent segments will follow the same navigation steps below:
From the Navigation Toolbar to the left, click Audience and click Segments.
Click the Create button at the top-right corner.
Provide a name for the segment and follow the same steps that you used for creating the first segment.
Notes:
● The segment name can have a maximum of 70 characters.
● There's no limit to the:
○ Number of segments you can create
○ Number of segments a contact can belong to
○ Number of contacts present under a segment
● You cannot associate segments to unsubscribed contacts.
Understanding segment creation
When you create a segment, you'll find terms like field, modifier, value, criteria, and group. It may be confusing, but once you understand their purpose, you can use segments efficiently. Let's look at a simple example below, and go over these terms in brief based on it.
Example segment
The general format to set a criteria for a segment is: Field > Modifier > Value. First, you'll choose the field, then the modifier, and finally the value. In some cases you can choose a value and in other cases you need to type the value. This depends on the field you're choosing.
The screenshot below shows a simple criteria you can set up for a segment.
As shown above, Contact Email is the Field, 'contains' is the Modifier, and '@gmail.com' is the Value. This segment will have contacts whose Contact Email contains the value @gmail.com.
What is a field in a segment?
A field signifies a contact's field based on which you will create the segment. In the above example, 'Contact Email' is the field chosen.
For example, Contact Email, Mobile, First Name, Last Name, Country, and many more are fields you can see when creating contacts.
When you click the field drop-down in the segment creation screen, you'll see various sections such as Contact Attributes, Account Attributes, and so on. Each section will have fields related to it.
The custom fields you create for contacts will also be available for segmentation purpose. What is a modifier in a segment?
A modifier accompanies a field. You choose a modifier to filter contacts accurately. In the above example, 'contains' is the modifier.
There are various modifiers you can use. Only one modifier can be chosen per criteria. Some modifiers you'll frequently use include contains any of, starts with any of, is empty, equal, greater than, lesser than, and many more.
What is a value in a segment?
A value tells the segment to check if the contacts have or don't have the specified value. In the above example, '@gmail.com' is the value.
You can either type a value or select depending on the field you choose. For a date-based field, the modifier and value will differ compared to a text-based field. To type multiple values, press Enter after typing each value.
What are criteria in a segment?
The entire line of field -> modifier -> value makes up a single criteria. You can have multiple criteria under a group; it need not be strictly a single criteria for each segment.
AND logic is applied between two or more criteria.
What is a group in a segment?
A group comprises the field, modifier, value, and criteria in a segment. Groups are used to expand the range of filtering so you can get more in a single segment. Groups are highly useful to ensure you don't end up creating multiple segments for similar logic.
Multiple groups can be present in a segment. You can even have multiple groups with each containing only one criteria. You can switch between AND/OR logic between groups.
Notes:
● A maximum of 50 criteria can be used in the entire segment.
● A maximum of 10 groups can be used in a segment.
Example segment with multiple groups
With the help of criteria and groups, you can efficiently set up and narrow down the Contacts in order to segment them. Below is an image showing how to use multiple criteria within a group and having more than one group when creating a segment.
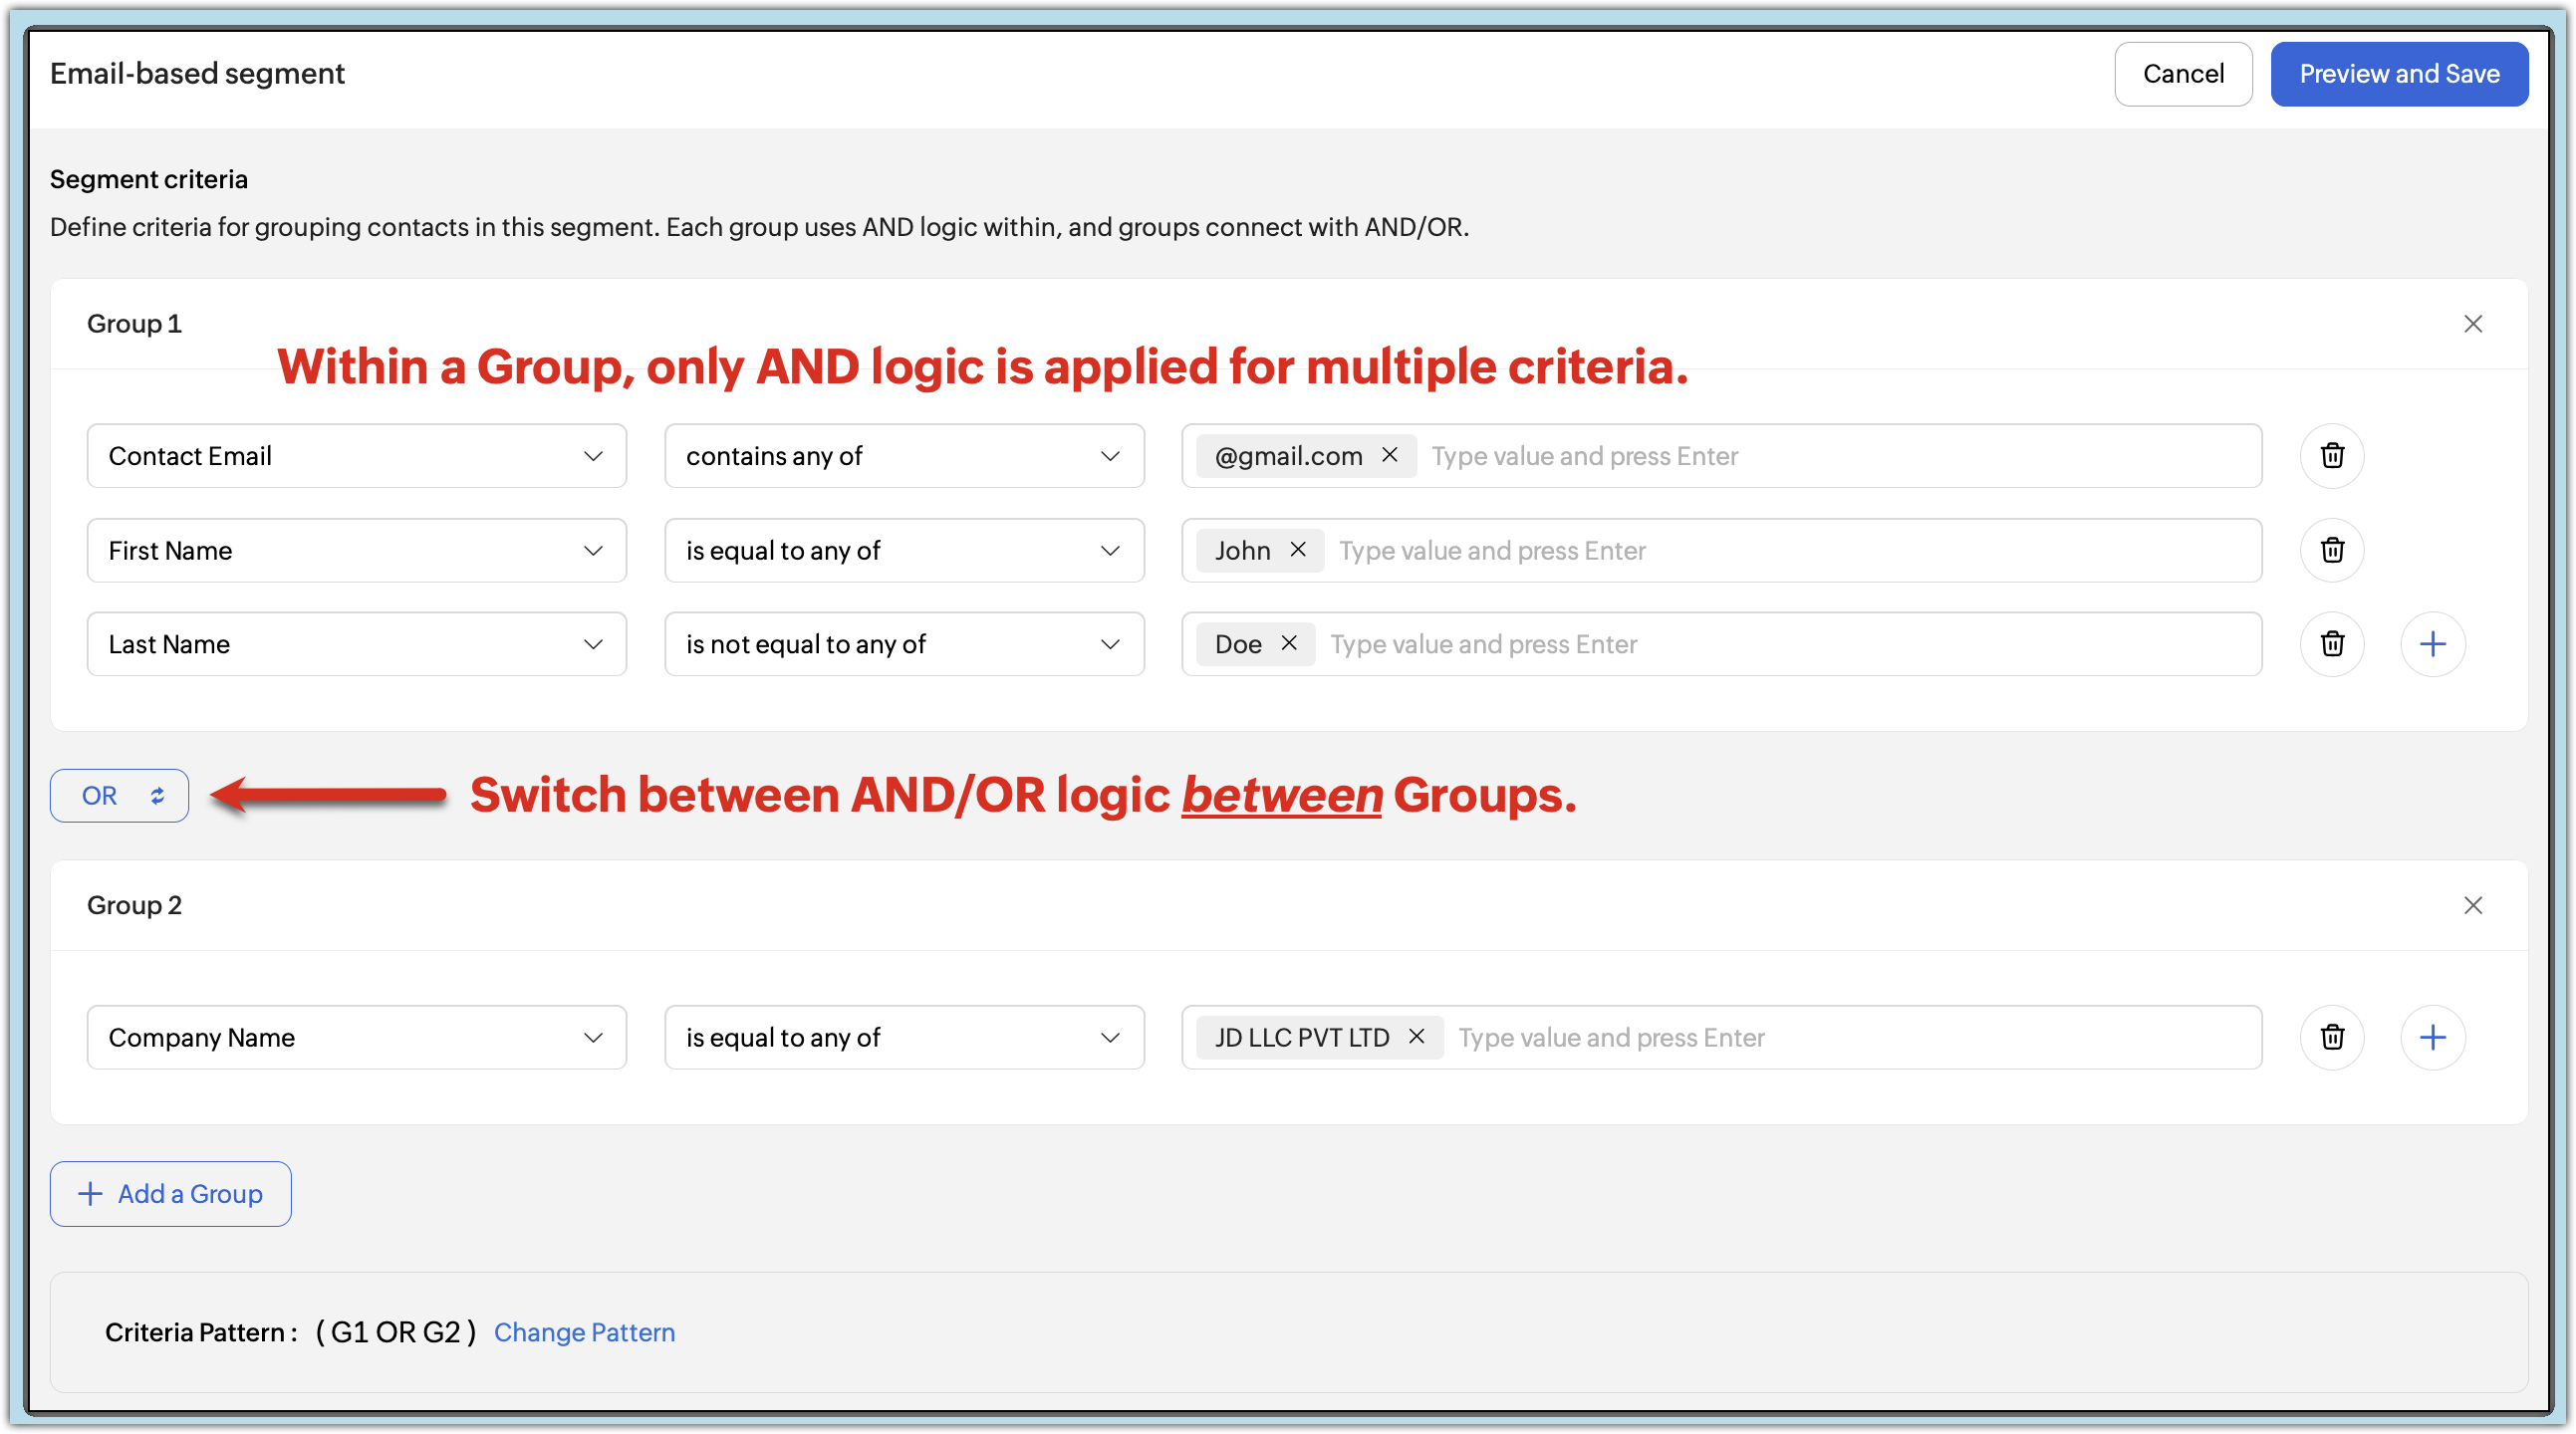 A segment example with multiple groups.
As you can see, there are two groups, labeled Group 1 and Group 2.
There are four criteria in total. In the first group, there are three and in the second group, one. With the help of the Add a Group option you can add multiple groups.
Within a group, logic will always use AND. That is why having multiple groups will be handy in case you want to segment contacts on an either/or basis.
The above configuration will work as follows:
If a contact's [ (email contains "@gmail.com" And the first name is "John" And the last name isn't "Doe") Or (if the company name is "JD LLC PVT LTD") ], then those contacts that satisfy this criteria will be segmented.
To explain further, you can split this configuration into two groups.
If the first group's condition is satisfied in its entirety, the contacts will be segmented accordingly. If the first group's condition is not satisfied, the system will then look for the condition of the second group since an Or operator is used between the two groups. If the second group's condition is satisfied, the system will then segment the contacts as per this group's condition. In this way you can use multiple groups within a single configuration to satisfy either/or scenarios.
Detailed view page of a segment
After contacts get captured in the segment, you'll be present in the detailed view page of the segment. On this page, you can view various details of a segment, perform actions on it and its contacts, and many more. We'll look at each functionality in detail.
How to access
Open the detailed view page of a segment by going to Audience -> Segments, then clicking a segment.
What does the detailed view page contain
The detailed view can be unofficially split into three sections for a better understanding:
1. Segment Details
As the name suggests, this section, present at the top-left, displays basic details of a segment including:
● Segment name, which you can edit by clicking inside it.
● Segment creation date and time.
● Segment status. Two status are there:
○ Active - Segment is in use and active
○ In-Progress - Contacts are being captured in this segment. Once it is done, status will change to Active.
● User who created the segment.
2. Edit Criteria & More Actions
Edit Criteria, as the name indicates, is for editing the criteria or group of a segment. If you want to revisit the criteria set for the segment or include more criteria/groups, you can use this option.
How to access: Navigate to Audience -> Segments, click a segment, then click Edit Criteria at the top-right corner.
More Actions is the 3-dotted button at the top-right of a segment, beside the Edit Criteria button. It comprises options that are useful for performing various operations on your segment.
How to access: Navigate to Audience -> Segments, click a segment, then click the More Actions (3-dotted) button at the top-right corner.
Options Present
Here are the options available under the More Actions button:
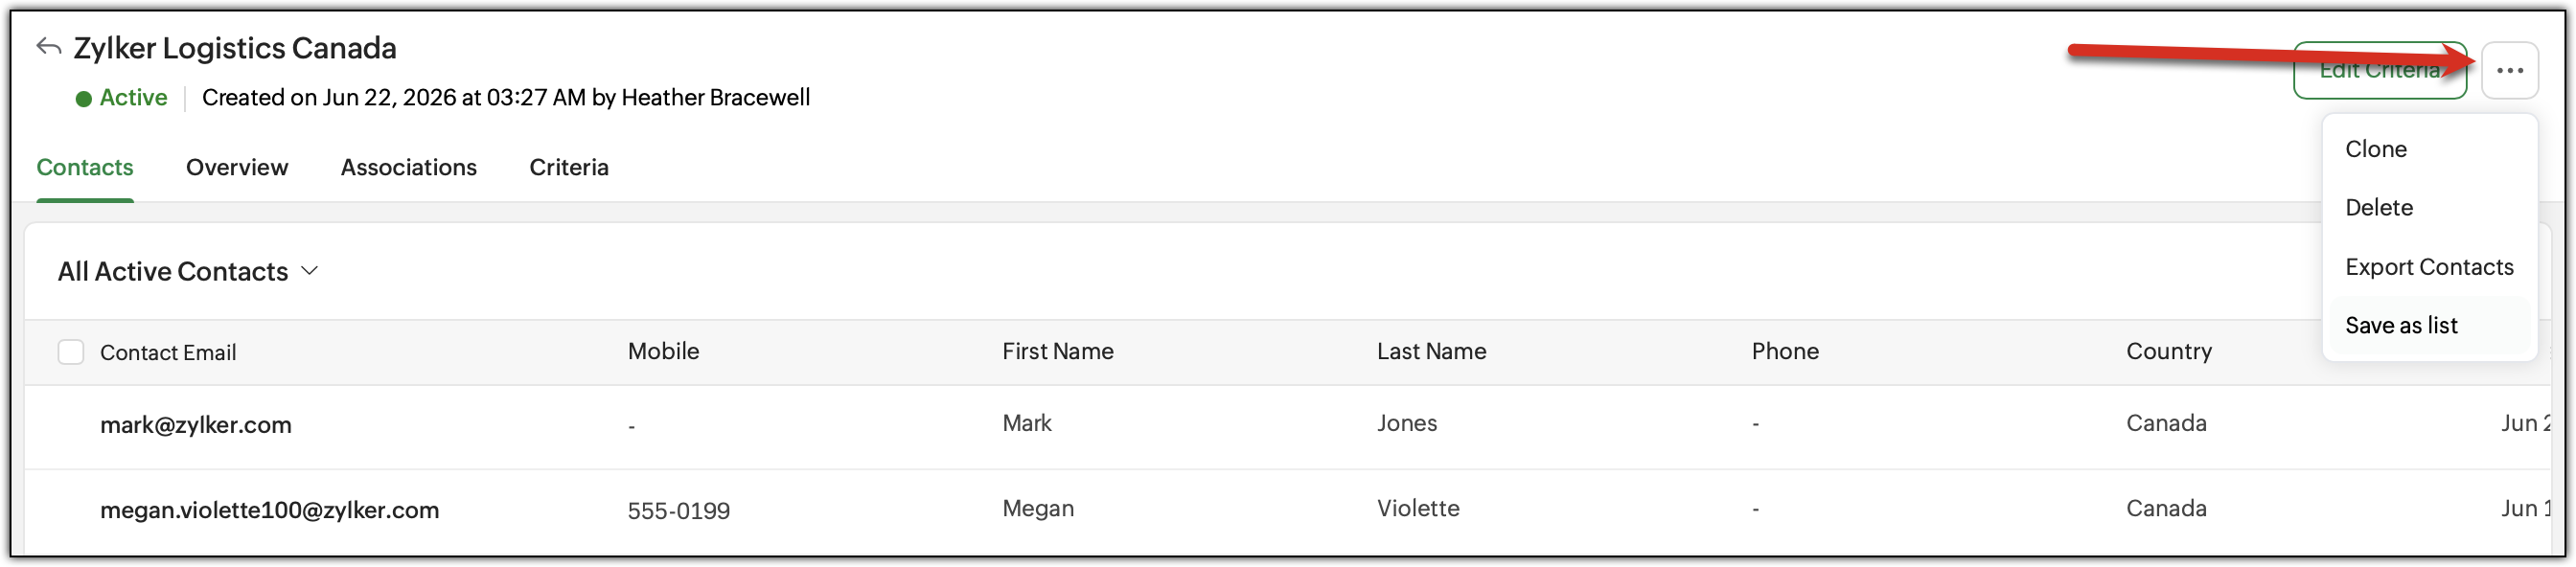 Segment's more actions
● Clone. To create a copy of this segment. Useful for when you want to have a similar segment but only do minor modifications to it.
● Delete. To delete a segment. Once it is deleted, you cannot retrieve it. The contacts will not be deleted.
● Export Contacts. To export the contacts of this segment.
● Save as List. To create a list from a segment's criteria. This is another way of using the Add using Filter option for adding contacts to a list.
 Note: A segment cannot be deleted if it is associated to campaigns that are yet to be sent and workflows.
3. The four tabs
● Overview
● Contacts
● Associations
● Criteria
Let's look at each tab in detail.
The Overview tab
The Overview tab displays essential statistics of a segment in multiple cards. You can get a quick summary of the segment by going through this tab. You can filter the stats using date-based filters and types of campaigns.
The follow cards are available:
● Contacts Distribution. Shows how contacts are distributed in the segment. You can view a percentage increase or decrease in the number of contacts beside each metric. It includes metrics:
○ Total Contacts - Number of contacts in a segment
○ Marketing - Number and percentage of marketing contacts
○ Non-Marketing - Number and percentage of non-marketing contacts
● Contacts Engagement Stats. Displays the percentage and number of contacts engaged with campaigns for the last 30 days only (date filter isn't applicable). It includes:
○ Active Contacts - Contacts that have interacted with a campaign in the last 30 days.
○ New Contacts - New contacts created in your Zoho Campaigns organization in the last 30 days that got added to the segment.
● Engagement Summary. Displays various email metrics with respect to a segment. You can filter to view similar metrics for SMS and WhatsApp Campaigns. Metrics shown include:
○ Sent - Number of campaigns sent for number of contacts
○ Delivery Rate - Number and percentage of contacts to which campaigns got delivered
○ Open Rate - Number and percentage of contacts who opened delivered campaigns
○ Click Rate - Number and percentage of contacts who clicked at least one link in the opened campaigns
○ CTOR - Stands for Click-to-Open-Ratio. This is a percentage indicating the ratio between the total clicks made compared to the total opened campaigns
○ Unsubscribes - Number and percentage of contacts unsubscribed from the campaigns sent with this segment
○ Hard Bounces - Number and percentage of contacts that suffered a hard bounce leading to a permanent failure in delivery
○ Soft Bounces - Number and percentage of contacts for whom soft bounces occurred. Retries will happen
○ Spam - Number and percentage of contacts who marked your campaigns as spam
○ Engagement Rate - Percentage of contacts actively engaging with your campaigns sent with this segment
● Segment Growth by Time. Displays a graph on how your segment has grown over a period of time. Plotted between Date-Time (X) and Contacts (Y) for total, marketing, and non-marketing contacts.
● Contacts by Source. Pie chart of percentages of top five sources from which contacts were captured into this segment such as Import, Manual, X, Wistia, and many more.
● Contacts by Email Client. Pie chart of percentages of top five email clients used by your contacts to open campaigns. Example: Zoho Mail, Gmail, Yahoo, and Outlook.
● Usage Stats. Shows a pie chart of percentages of where the segment is used in your Zoho Campaigns organization such as Email, SMS, WhatsApp, and Workflow.
● Top Five Campaigns. Displays data of the top five performing email campaigns, SMS campaigns, or WhatsApp campaigns based on their engagement rate. Use the filter at the far-right of this card to switch between the three types of campaigns.
● Location Breakdown. A world map showing from which countries your contacts are from for this segment. This data is derived based on the Country and City data provided for your contacts. You can filter this map to specific country or state.
○ Country Performance: Opens & Clicks - Displays the top five performing countries of contacts based on opens and clicks tracked in your campaigns.
The Contacts tab shows the contacts present in your segment. This tab will look exactly like the contacts list view page. Not only that, almost all the functionalities and bulk actions you can perform in the contacts list view page can be done in this tab, too.
This is the tab you'll visit by default whenever you click a segment to view its details.
By default, you'll see the All Active Contacts view. Click this view at the top-left to change to view only the Marketing or Non-Marketing contacts of this segment.
Bulk actions can be performed on the contacts in this segment by:
Navigate to Audience -> Segments.
Click a segment to access its detailed view. Click the Contacts tab.
To do bulk actions, you need to select the contacts and it can be done in three ways depending on what you want:
Select specific contacts - Click the checkbox to the left of their email address to select those contacts only.
Select all contacts in a page - Click the checkbox next to the Contact Email column to select all the contacts in a page. Maximum 200 contacts can be selected.
Select all contacts in the segment - Click the checkbox next to the Contact Email column, then click the Select All option to select more than 200 contacts in the segment.
Once you've selected the contacts, click the Actions drop-down option to view all the bulk actions on contacts you can perform. Choose the desired one and proceed updating the contacts. The actions include: ● Change Subscription Type - Change the subscription type of the selected contacts in this segment.
● Assign Tags - Atssign tags to the contacts
● Remove Tags - Rmove the assigned tags from the contacts
● Add to Lists - Add the contacts to lists
● Remove from Lists - Rtemove contacts from lists
● Assign Topics - Assign topics to the contacts
● Remove Topics - Remove the assigned topics
● Export Contacts - Export the selected contacts of this segment
● Mass Update - Bulk or mass update a particular field of the selected contacts
The Associations tab
The Associations tab displays various modules as sub-tabs to which the segment is associated. The sub-tabs include:
● Email
● SMS
● WhatsApp
● Workflow
● Signup Form
Under these sub-tabs, you can find the list of campaigns, workflows, and signup forms along with their details.
You can filter the date-range at the far-right. By default the last 90 days data will be displayed. If needed, you can choose a custom range or the entire duration. Entire duration will display all the data right from when you created your Zoho Campaigns organization till the present date.
How to access: Go to Audience -> Segments, click a segment, then click the Associations tab. Click through the sub-tabs to view the details of each module.
Clicking a campaign, workflow, or a signup form from these sub-tabs will display their details in a slide-in window and you can go to that particular record where you can do further operations on it.
Info displayed by each sub-tab:
Each sub-tab displays details and metrics related to their module.
● The Email sub-tab displays metrics such as Sent, Delivered, Opened, Clicked, and CTOR.
● The SMS sub-tab displays data such as Sent, Delivered, and Clicked.
● The WhatsApp sub-tab shows metrics including Sent, Delivered, Read, Clicked, Replied, and Unsubscribed.
● The Workflow sub-tab displays a list of workflows with the workflow name and its creation date for this particular segment.
The Criteria tab
The Criteria tab displays the current criteria specified for the segment so you can have a glance.
How to access: Go to Audience -> Segments -> click a segment -> click the Criteria tab.
List view page for segments
The list view page for the Segments module can be accessed simply by going to Audience -> Segments.
Similar to the list view page of contcts, this page displays the basic details of every segment you've created in your Zoho Campaigns organization.
Let's explore what you can find and do on this page.
What you can find in the list view page
You can find:
● Segments along with their details such as:
○ Segment Name - Name of the segment
○ Status - Status of a segment (Active or In-Progress)
○ Contacts - Number of contacts in the segment
○ Last Updated On - Date and time at which the segment was last updated
○ Updated By - The user of your Zoho Campaigns organization who did the last update.
Except for the Segment Name and Status columns, other columns can be sorted in ascending or descending order when you click their names.
● The folder option at the top-right corner.
● Filter icon beside the folder option.
● And the Create button to create new segments (after the first segment is created).
● The More Actions (3-dotted) button at the top-left corner just next to the All Segments view.
● The More Actions (3-dotted) button at the right of each segment.
Now, let's look at the operations you can perform in the list view page.
How do you create a new segment from the list view page?
Navigate to Audience -> Segments.
Click the Create button at the top-right corner.
Choose a pre-defined segment or use the Start from Scratch button at the top-right corner.
Specify the field, modifier, value, and group for the segment and click Preview at the top-right corner.
Click Save Segment in the slide-in window that appears.
What is the use of folders and how can you create one?
When you access the list view page, you can view the folder option at the top-right corner. By default, you'll see All Folders and Unclassified.
If you have similar type of segments, you can have them in a single folder and access them without interruptions from other segments. Let's say you have separate segments for Gmail contacts, Yahoomail contacts, Outlook contacts, and Zoho Mail contacts. You can create a folder called 'Email Client Segments' and move these four segments here for ease of access.
How to create a folder and move segments?
To create a new folder:
Go to Audience -> Segments.
Select the segments using checkbox present to the left of each segment.
Click the Move to Folder option at the top.
Type the folder name and click the Create button that appears. The folder will be created and the segments will be moved into it.
Notes:
● The folder name can be a maximum of 70 characters.
● You can create any number of folders.
● You can move any number of segments to a folder.
How do you navigate between folders?
If you want to move from one folder to another, simply click the All Folders or the folder name at the top-right in the list view page, and click the folder name to move to.
How do you edit or delete a folder?
To edit or delete a folder:
Go to Audience -> Segments.
Select the segments using checkbox present to the left of each segment.
Click the Move to Folder option at the top.
Hover over a folder, click the More Actions (3-dotted) button. If you click:
Edit - Edit the folder name and click Save.
Delete - Delete the folder. Click Delete in the pop-up that appears. Only the folder will be deleted, segments will remain intact and be moved to the Unclassified folder.
What is the difference between All Folders and Unclassified folder?
Both All Folders and Unclassified are default folders. They cannot be edited or deleted.
The All Folders folder displays segments present in all the folders including the Unclassified folder whereas the Unclassified folder displays only the segments that aren't present in any folder. If a segment is present in a particular folder, it'll show up in the All Folders but not in Unclassified. Similarly, if a segment is not present in any folder, it will be displayed in All Folders as well as the Unclassified folder.
| All Folders | Unclassified |
Type | Default folder | Default folder |
Can be edited or deleted | No | No |
What it shows | Segments from all folders, including Unclassified | Only Segments not assigned to any folder |
Segment assigned to a folder | Visible | Not visible |
Segment not assigned to any folder | Visible | Visible |
How can you filter segments?
If you want to narrow down a particular segment or similar segments, you can use the filter option. To do so:
Navigate to Audience -> Segments.
Click the Filter icon at the top-right corner.
Select a criteria from the available ones such as Name, Contact Size, Created By, and many more.
Specify the value or condition based on the criteria you choose and click Apply.
To go back to the list view page, click the 'x' button beside the filter at top-right corner.
What is a custom view and how do you create it?
Custom views can be used to have particular segments in a separate view so you can access them easily. Unlike folders, where you just move segments to specific folders, you can provide specific criteria while creating a custom view to make it more granular and customized.
How do you create a custom view?
You can create a custom view by:
Navigate to Audience -> Segments.
Click the More Actions (3-dotted) button at the top left, next to the All Segments view.
Click the Create Custom View option.
Specify the View Name.
Select a criteria from the available ones such as Name, Contact Size, Created By, and many more.
Specify the value or condition based on the criteria you choose and click Create View.
The segments will be populated into this view based on your criteria and the custom view should also appear at the top next to the All Lists view.
Notes:
● The custom view name can be a maximum of 70 characters.
● You can create any number of custom views.
To perform actions in a custom view:
Navigate to Audience -> Segments.
Click the More Actions button beside All Segments or the custom view.
You'll see the custom views you've created here. Hover over a custom view and click the More Actions button.
The actions you can perform include:
Pin View - Pin a view at the top so you can access it easily.
Edit - Modify the view name and criteria. Once changes are made, click the Update View button.
Clone - Clone an existing view.
Example: If you have a view with a complex criteria and want to create a similar view but change only a single criteria, you can simply clone the existing view, edit the cloned view, and change the criteria. Ensure to change the cloned view's name.
Delete - Delete a custom view. Click the Delete button in the pop-up that appears. Once deleted, the view cannot be retrieved.
Unpin View - Appears only for a pinned view. To unpin a view from the top bar.
What actions can be performed on a segment on the list view page?
You can perform various actions on a segment on the list view page such as:
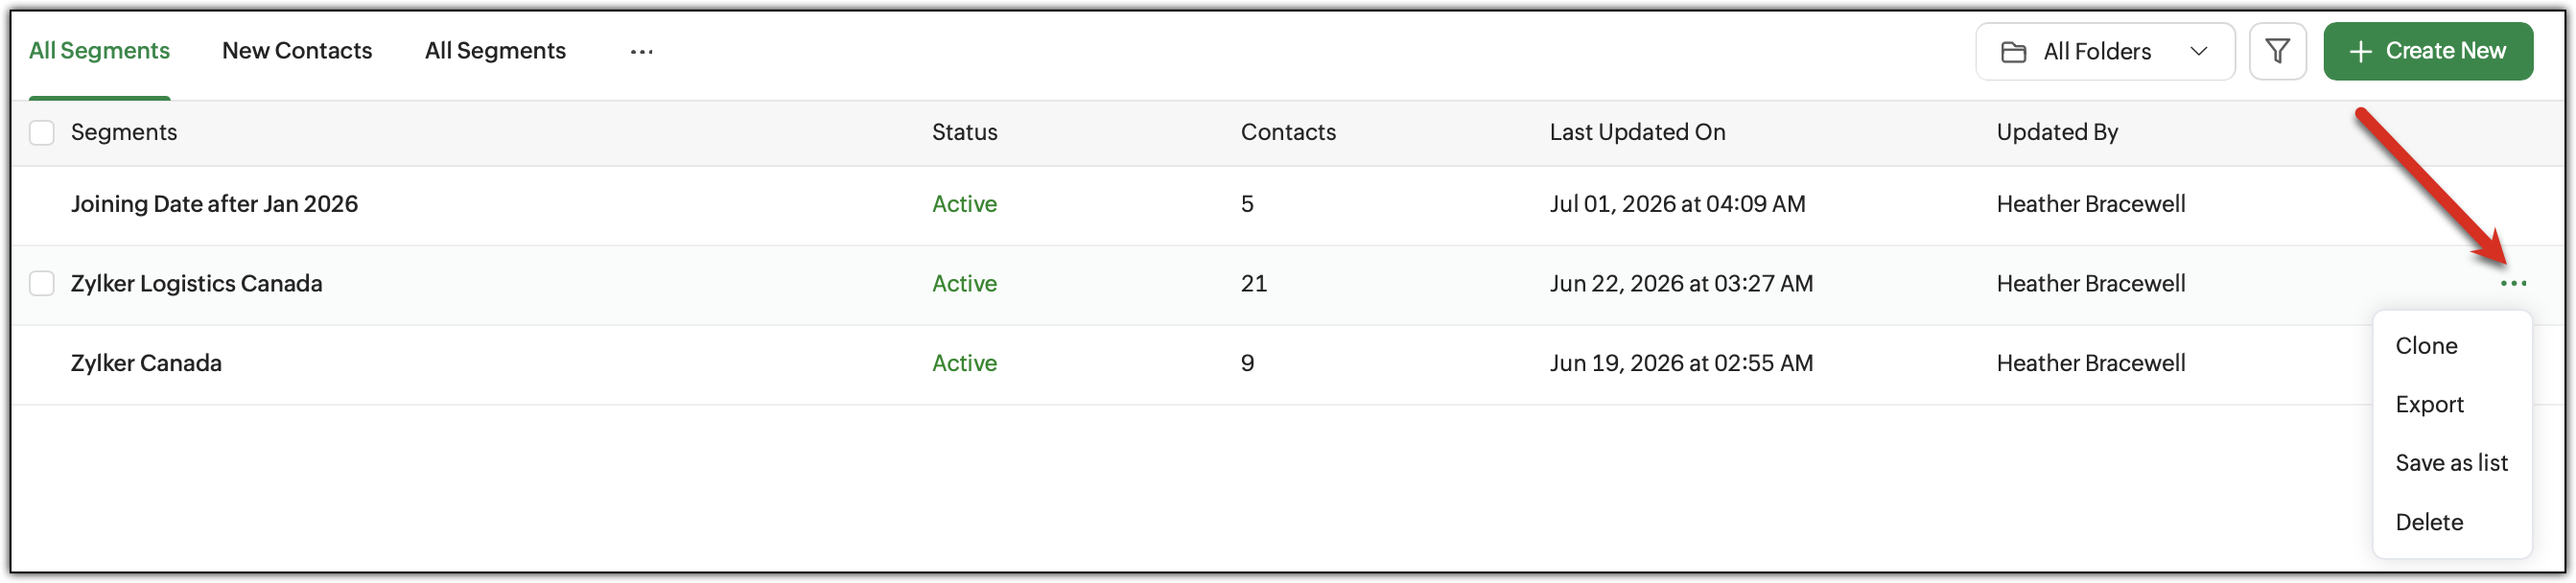 More Actions' options in the list view page of a segment
● Clone - Clone an existing segment.
● Export - Export the contacts of a segment. In the slide-in window that appears, specify the file name, extension, choose the fields to be exported, and click Export.
● Delete - Delete a segment.
● Save as List - Save the segment as a list.

