Contact Management FAQ - Online Help | Zoho Campaigns

Contact Management FAQ

Introduction to contact management

1. How many contacts can you add at one time using the Add Multiple Contacts option? 

You can add 20 contacts at a time. If you want to add more than 20 contacts at a time, we suggest importing them. You can do this by uploading a .csv or .xls file containing the contacts data into your Zoho Campaigns organization.

2. Why can’t you view contacts added by other users? 

You may not have the permission to view contacts added by other users of your Zoho Campaigns organization. Reach out to your super admin to review the permissions assigned to your role because they have the access to modify the permissions.

3. How do you display a field in the All Contacts view? 

To list a particular field in the All Contacts view, follow these steps:

1. Go to Audience → Contacts.
2. Click the Customize Columns icon at the far right.

Customize Columns option to show or hide the desired contact field.


3. Select the checkbox for the desired field to make it visible.
4. If needed, you can re-position the field by dragging it using the six dots located to the left of its name.
5. Click Save.

4. How do you filter contacts based on a particular field in the All Contacts view?

1. Go to the Audience module.
2. Click Contacts.
3. Click the filter icon at the top-right before the Import Contacts button.

Click the Filter icon -> select a field -> specify a value -> Apply.

4. Select the field you want, select the modifier and value, and click Apply.

This filters contacts based on a specific field.

5. How do you add a new email address to the unsubscribed contacts list? 

You can add a new contact directly to the unsubscribed contacts only via an import. When you do the import, you need to choose the Subscription Type as Unsubscribed and that should do it.

1. Navigate to the Audience module.
2. Click Contacts.
3. Click the Import Contacts button at the top-right.
4. Choose the file to upload.
5. Select the Subscription Type as Unsubscribed and proceed with the import.

This adds a new email address to the unsubscribed contacts list

6. How do you export contacts added by other users? 

1. Navigate to the Audience module.
2. Click Contacts.
3. Click the More Actions (3-dotted button) at the top-right in any contact view.
4. Select Export Contacts.
5. In the slide-in window that appears, you can specify the file name.
6. You can also further filter the contacts based on the users who added them.
7. Click the Export.

This exports contacts added by other users.

7. What are re-added contacts? 

Re-added contacts in Zoho Campaigns are email addresses that were previously removed or deleted but have been added back into the system. They retain their original status and subscription preferences. You'll come across re-added contacts in the Import Overview section where you can check the details of an import.

8. How do you re-add unsubscribed contacts into Zoho Campaigns? 

There are two scenarios when it comes to re-adding unsubscribed contacts:

1. If these contacts have unsubscribed themselves from your campaigns or newsletters using the Unsubscribe button, you'll need to use Zoho Campaigns' signup forms to have them resubscribe.

2. If these contacts were moved to the unsubscribed list by you or other users of Zoho Campaigns, you can follow these steps:

1. Navigate to the Audience module.
2. Select Contacts.
3. Click More Actions (3-dotted button) on the top bar.
4. Choose the Manually Suppressed view.
5. Select contacts using the checkbox to the left of the Contact Email column.
6. Click the Actions button at the top.
7. Click Change Subscription Type.
8. Select the Marketing subscription type.
9. Click Proceed in the pop-up window.

This re-adds unsubscribed contacts into Zoho Campaigns.

9. What is Zoho Campaigns' default password for export files? 

Zoho Campaigns’ default password is a combination of the first four characters of the registered email address and the last four digits of your Zoho account user ID. When you sign up for Zoho Campaigns, an account will be created in Zoho Accounts, and this account will have a unique user ID. This password will be used for every file you export. To see your user ID, click the profile icon at the top right of your Zoho Campaigns organization. There, you'll see the User ID.

10. How do you delete non-marketing contacts? 

To delete the non-marketing contacts:
  1. Go to Audience -> Contacts.
  2. Click the More Actions (3-dotted) button in the top bar.
  3. Select the Non-Marketing view.
  4. Select the contacts using checkbox present to the left of their email column,
  5. Click the Delete button that appears at the top.
  6. Click the Delete Contacts button in the pop-up that appears.
This deletes non-marketing contacts. Once these contacts are deleted, you'll have to re-add them.

11. Where can you view and delete bounced contacts? 

To view bounced contacts, follow these steps:

1. Go to the Audience module.
2. Click Contacts.
3. Click the More Actions (3-dotted) button in the top bar.
4. Choose the Bounced view.

You cannot delete bounced contacts in Zoho Campaigns. You won’t be able to send campaigns to them, and they won’t count toward the contacts count of your subscription plan.

Similarly, you can view invalid contacts using the below steps:

1. Go to the Audience module.
2. Click Contacts.
3. Click the More Actions (3-dotted) button in the top bar.
4. Choose the Invalid Contacts view.

12. How can you view the campaign activities of a single contact? 

1. Navigate to the Audience module.
2. Click Contacts.
3. Search for the contact using the Search button.
4. When the contact appears, click their email address to open its detail view.
5. Click the Timeline tab.
6. At the far right, click the Filter icon.
7. In the drop-down, select Email Campaigns. If needed, use the date filter beside the filter icon to expand or narrow down your search.

This allows you to view the campaign activities of a single contact.

13. How can you check if a contact is synced from Zoho CRM? 

1. Navigate to the Audience module.
2. Click Contacts.
3: Search for the contact using the Search button.
4. When the contact appears, click their email address to open its detail view.

You should see the Source at the top below the contact name. There, you'll see the text  "Zoho CRM."
This label confirms that the contact synced from Zoho CRM.

14. How can you move contacts who haven’t opened any campaigns to the Unsubscribed list? 

1. Navigate to the Audience module.
2. Click Contacts.
3. Click the More Actions button at the top.
4. Choose any of No emails opened in the last month/3 months/6 months views.
5. Click the checkbox next to the Contact Email column to select all of the contacts.
6. Click the Actions button at the top.
7. Choose Change Subscription Type and click Unsubscribed. Click Proceed in the pop-up that appears.

This moves contacts who haven’t opened any campaigns to the Unsubscribed list.

15. Is there a limit to the number of marketing contacts that can be deleted? 

Yes, there is a limit to the number of marketing contacts you can delete per organization in Zoho Campaigns. The limit is set at 100%, but it will reset every month. The reset date depends on when you've subscribed to the paid plan of Zoho Campaigns. If you subscribed to the paid plan on January 2, the reset will happen on February 2 irrespective of whether you're in the monthly or yearly subscription.

This ensures that users don't needlessly delete and re-add their marketing contacts repeatedly.

The limit is set at 100% for each organization based on the license purchased. If you have 1,000 marketing contacts, you can delete a maximum of 1,000 marketing contacts only. You can't delete marketing contacts for whom you've created campaigns; you have to delete the campaigns first before deleting the contacts.

In exceptional cases where you need to delete marketing contacts that exceed the limit, contact support (support@zohocampaigns.com) for further help.

16. Can you display more than 50 contacts on a single page? 

Yes. By default, 50 contacts are displayed on a single page, but you can choose to display 100, 150, or even 200 contacts. To do that:

1. Go to Audience → Contacts.
2. At the bottom of the page, click the arrow next to 50.
3. Choose the number of contacts you want to display.

This displays more than 50 contacts on a single page.

17. How do you delete a contact permanently? 

Imagine you have a contact to whom you sent email campaigns in the past, but they decided they no longer want to receive campaigns and unsubscribed. But, they also request you not store their data in your Zoho Campaigns organization and ask you to remove their data permanently.

In this scenario, you may think that deleting this contact using the Delete option would be the best course of action. But, if you're deleting this contact, they’ll be deleted from your Zoho Campaigns organization, but not permanently. Data related to this deleted contact will still be available on our end. If you manually re-add this contact individually or via import, their data and activities will be populated automatically as soon as they’re added to Zoho Campaigns.

For example, say you've deleted a contact for whom the First Name and Job Title were filled. If you manually re-add this contact without filling data in these two fields, those fields will be auto-populated with data that was present at the time of deletion.

Instead, when you're deleting the contact, ensure you enable the Permanently delete this contact checkbox. if you use the Right to be forgotten option, this contact along with its data will be permanently deleted in 15 days. 

Audience -> Contacts -> click a contact -> More Actions -> Delete -> tick checkbox -> Delete Permanently

If you still want to re-add that particular contact, they have to add their details via a signup form, email campaign, or other means.

18. What is the Right of Access option, and what does it do?

The Right of Access option is present in the detail view of a contact. After entering the detailed view, click the More Actions button at the top right to access this option.


The Right to Access option will send an email to the contact asking them to update their information. A pop-up will appear once you click this option. You can click the Proceed button to send the email.

Imagine you have a contact to whom you’ve sent email campaigns in the past, but they decided they no longer want to receive campaigns and unsubscribed from your campaigns. Then you learn that they want to resume receiving campaigns. In these cases, you can use this option to request information regarding topics and preferences.

The email the contact receives can vary from user to user because you can customize the email content and include relevant information for your contact to fill. Under Settings → Contacts and Customization  Signup Pages and Emails, you'll see the Update Profile section. Here, you can edit the sender details and the email content of the Email section. You can also edit the Form section to include necessary details that you want your contacts to fill in.

19. How can you easily view the campaigns associated to a particular contact?

To view the email, SMS, and WhatsApp campaigns associated to a particular contact:
  1. Navigate to Audience -> Contacts.
  2. Click a contact for whom you want to view the associated campaigns.
  3. Click the Engagement tab at the top.
  4. Here, you can switch between the three marketing channels.

20. How to view campaigns created for a contact for a particular date range?

To view the email, SMS, and WhatsApp campaigns associated to a particular contact:
  1. Navigate to Audience -> Contacts.
  2. Click a contact for whom you want to view the associated campaigns.
  3. Click the Engagement tab at the top.
  4. Here, you can switch between the three marketing channels.
  5. At the far-right, click the date range filter to display the campaigns for a particular date range.

21. How can you export a particular contact from Zoho Campaigns? 

You can export a single contact in two ways: from the Contacts page, and the Detail View.

For Contacts, follow these steps:
1. From the Navigation Toolbar, click Audience.
2. Select Contacts.
3. On the All Contacts page, select the contact by ticking the checkbox on the left of the Contact Email column.
4. Click More Actions. 
5. Choose Export Contacts.

Exporting single contact from list view page.Exporting single contact from list view page.

For
Detail View, follow these steps: 
1. Click the contact's email to open the Detail View.
2. Click the More Actions button at the top-right and choose the Export option.

After clicking the Export option in the two ways, a window appears. Select either all of the fields or just the fields you want to export. Name the file, choose the format, and decide if you want to password protect it. Click Export when you’re done, and the file will be downloaded to your computer. You can access the downloaded file from the
Downloads section of your browser.

22. Can you create a custom view instead of using default views in the Contacts page? 

Zoho Campaigns has default views that you can use to filter your contacts. For example, you can filter contacts based on their subscription type, or if there have been no opens for the past few months. If you're looking to create your own custom view for a list of contacts that can't be captured by the default views, you can do that as well.
  1. Navigate to Audience -> Contacts.
  2. In the list view page of the contacts, click the More Actions (3-dotted) button at the top.
  3. Click the Create Custom View button.

    Creating a custom view for contacts.

  4. Provide a view name.
  5. Specify the criteria by selecting various attributes, and choosing values and modifiers.
  6. Click Create View

23. How do you update the subscriber preference for your existing contact list? 

Imagine you have 200 contacts (mailing list) in your Zoho Campaigns organization. You want to update their subscriber preferences based on the campaigns they want to receive from you. You have preferences like Monthly Newsletter, Latest Offers, Coupons, Product Releases, and Freebies.

In Zoho Campaigns, you can use Topics for this purpose.

You can create topics for the list of preferences you have and send emails to your contacts based on these preferences. Once you've collected their preferences, you can create segments to segregate these contacts based on the topics they've chosen.

Creating segments will allow you to send targeted campaigns to a group of customers showing similar interests or preferences. When sending an email campaign, you can choose a segment. The campaign will be sent to the contacts in this segment.

In this manner, you can use topics to understand your contacts' interests and improve your campaign sending strategy.

24. How do you display the Account Name from Zoho CRM in the All Contacts view?

If you're using Zoho CRM and have integrated it with Zoho Campaigns, you may need to view the Account information, such as Account Name, for your contacts in Zoho Campaigns. While this information can be viewed by accessing each contact, it’s time consuming to go into each contact and check. There's a way to display the Account Name field as a column in the All Contacts view.

To do this:
1. From the Navigation Toolbar, click Audience and select Contacts.
2. Click the Customize Columns icon at the far right.

Audience -> Contacts -> Customize Columns

3. Scroll through the drop-down and tick the Account Name field, or search for 'account name' using the search icon and tick this field.
4. If needed, change its position to the top by dragging it using the small dotted icon next to it so you can view this field instantly instead of scrolling horizontally in the All Contacts view page
5. Click Save once you're done.

This displays the Account Name from Zoho CRM in the All Contacts view.

25. How do you add an internal note to some contacts for your reference?

You can add internal notes to your contacts in Zoho Campaigns. You can do this in two ways:
  • In the Detail View.
  • While creating contacts.

A. In the Detailed View   

You can also add a note in the detailed view of an already created contact by following these steps:

1. From the Navigation Toolbar, click Audience.
2. Select Contacts.
3. Click the email address of a contact to open its detail view.
4. Scroll to the Notes section at the bottom, click Add Note.
5. Type the note and click Add Note
6. Alternatively, You can also click the More Actions (3-dotted) button at the top right inside the contact's detail view, select Notes, type a note and click Add Note.

B. When creating contacts   

If you want to add a note when manually creating contacts, follow these steps:

1. From the Navigation Toolbar, click Audience.
2. Select Contacts.
3. Click the drop down next to Import Contacts button at the top right and select Add New Contacts.
4. On the screen that appears, click the Customize Columns icon at the far right.
5. Scroll through the drop-down that appears and tick the Note field, or search for Note
using the search icon and tick this field.

When adding contacts manually, use Customize Columns -> include Note field and add your notes.

6. If needed, change its position to the top by dragging it using the small dotted icon next to it.
7. Click Save. If you use this field frequently, this method is useful if you don't have to scroll horizontally to include this information for your contacts.
8. Type the data in the Note field.
9. Click Save after ensuring all of the necessary information has been filled in.

These processes add an internal note to select contacts.

26. How do you have the City field to be a part of the first five columns of the All Contacts view?

If you want to see the city your contacts are from at a glance when you are in the contacts list view, follow the steps below.

1. From the Navigation Toolbar, click Audience. 
2. Select Contacts.
3. Click the Customize Columns icon at the far right.
4. Scroll down the drop-down and tick the City
field (if it hasn't already been ticked).

Select the City column and re-arrange by dragging it.

5. Change its position to the top by dragging it using the small dotted icon next to it.
6. Click Save

This arranges the different fields according to your needs.

27. How can you edit a particular contact's fields?

To edit the field data of a particular contact:
  1. Navigate to Audience -> Contacts.
  2. Click a contact to open its detail view.
  3. You can edit in one of the two ways:
    1. Click the More Actions button -> choose Edit.
    2. Hover over the Personal Info section in the left side and click the Edit icon.

      Edit option under More Actions or Edit icon in Personal Info section.

  4. A slide-in window will appear, you can make the edits and Save the changes.

28. Can you search contacts having similar email addresses?

Yes, you can. Say you're sending email campaigns to the employees (contacts) of Zylker Corporation. You want to know via a simple search how many contacts are present in your Zoho Campaigns organization from this company. The company doesn't follow a uniform email address pattern; instead it uses a mixture of @zylker.com and @zylker.org. You can perform the search by:
  1. Navigate to Audience -> Contacts.
  2. Click the filter icon (present before the Import Contacts button) at the top right in the contacts list view page.
  3. Tick the Contact Email checkbox and choose "contains any of" as the modifier.
  4. Enter the value you want and press the Enter key. Then, enter another value and press Enter to have multiple values.

    Filter option useful for doing a quick search. Creating a Segment is another option.

  5. Click Apply.
The advanced way of searching would be to create a segment with the same criteria so that contacts that you add even after creating the segment get dynamically added to this segment. You also have a readily available way to access these contacts exclusively instead of doing the search again and again.

29. When adding multiple contacts, how can you include the data for the Country field?

When you're manually adding multiple contacts in Zoho Campaigns, you may not be able to include data for certain basic fields. You’ll just need to include them in the creation form.

For instance, if you need to specify the country of the contacts, you can do that by:

1. From the Navigation Toolbar, click Audience.
2. Select Contacts.
3. Click the drop-down next to Import Contacts button at the top right and choose Add New Contacts.
4. On the screen that appears, click the Customize Columns icon at the far right.
5. Scroll through the drop-down and tick the Country
field. Click Save.

Selecting the Country field to be displayed when creating contacts.

6. If needed, change its position to the top by dragging it using the small dotted icon next to it.

This includes data for the Country field when you’re adding multiple contacts. This is useful if you don't have to scroll horizontally to include this information for your contacts, provided you use this field frequently.

You can include the Country field and other fields you need to enter data in during contact creation.

NotesNote: Once you've set this column sorting, it will remain until you modify it again; if you rearrange the Country field to be displayed as the third field, it will remain there until you rearrange it again.

30. Why can't I find the Delete option under the Actions button when deleting contacts?

In Zoho Campaigns, you can delete a single contact and also mass delete contacts. But there can be cases where you won't be able to find the Delete option under the More Actions button.
NotesNote: Once contacts are deleted, they can't be retrieved because deletion is an irreversible process.
Currently, you can delete contacts from certain views inside the Contacts module. For instance, you cannot delete Bounced, Invalid, Unsubscribed contacts. That could be one reason why you cannot find the Delete option. This is also applicable for deleting a single contact. 

There can be a scenario where you can't find the Delete option even if you're in the correct contact view. It can be because of the role you're assigned. If you're assigned the Editor or the Viewer role, you can't delete data from your Zoho Campaigns organization. These roles, being system default roles, can't be modified. If you want permission to delete, you need to ask your admin to either provide you with the Manager role or create a custom role and provide the Delete permission for that role.

A custom role with Delete permission for Contacts module.

Once you're assigned the necessary default role or a custom role, you should be able to delete the contacts from the views in which deletion is possible.

31. Is there a limit for the number of non-marketing contacts that can be added? 

Yes, in Zoho Campaigns, you can have up to 1 million non-marketing contacts in all paid plans. In the Forever Free plan, you can't create non-marketing contacts.

32. How can you quickly view the topics associated to a particular contact? 

To check the topics associated to a particular contact:
  1. Navigate to Audience -> Contacts.
  2. Click a contact to open its detail view.
  3. Click the Associations tab at the top.
  4. Under the Topics sub-tab you should now be able to view the topics.

33. How do you change contacts’ subscription type from non-marketing to marketing? 

You can bulk update the subscription type of non-marketing contacts to marketing in Zoho Campaigns by following these steps:
  1. Navigate to Audience -> Contacts.
  2. Go to the Non-Marketing view by clicking it in the top bar. If it's not present there, click the More Actions (3-dotted) button and select it.
  3. Select the desired contacts using the checkbox present to the left of their email address.
  4. Click the Actions button at the top. 
  5. Select Change Subscription Type and choose Marketing.
  6. In the pop-up that appears click Proceed.
This changes contacts’ subscription type from non-marketing to marketing.

34. How do you search for a contact? 

To search for a particular contact, provided you know their name or email address, or any other detail:
  1. Navigate to Audience -> Contacts.
  2. At the top of your Zoho Campaigns organization, you can find the search bar. Place your cursor inside it or use the keyboard shortcut / (forward slash).
  3. Type the name or email address of the contact. Search results will appear instantly.
  4. Click Search in Contacts option to get more results. 

35. How do you mass delete contacts? 

Currently, it’s possible to mass delete contacts only from certain contact views such as Reachable Contacts, Non-Marketing, etc views. It’s not possible to mass delete contacts from All Contacts or Unsubscribed filters. Once contacts are deleted from your Zoho Campaigns account, they cannot be retrieved.

To mass delete contacts:

1. From the Navigation Toolbar, click Audience.
2. Choose Contacts.
3. Choose the desired view from the top bar.
4. At the bottom of the page, click on the drop-down and select 200 to show the maximum number of contacts in a single page.
5. Select the contacts using the checkbox next to them. If you want to select all of the contacts in one click, click the checkbox next to the Contact Email column.
7. Click the Delete button.
8. In the pop-up that appears, click Delete Contacts.

You can delete up to 200 contacts at a time. That’s the maximum number of contacts that can be displayed on a single page. But what if you want to delete more than 200 contacts at a time?

36. How do you delete more than 200 contacts at a time?

To delete more than 200 contacts:
1. After selecting all of the contacts, click Select All button that appears at the topThis will select all of the contacts that match the criteria of the current view. In this instance, all marketing contacts will be selected
2. Click the Delete button.
3. In the pop-up that appears, click Delete Contacts.

This deletes more than 200 contacts at a time.

37. How do you delete a contact? 

Currently, it’s possible to mass delete contacts only from certain contact views such as Reachable Contacts, Non-Marketing, etc views. It’s not possible to mass delete contacts from All Contacts or Unsubscribed filters. Once contacts are deleted from your Zoho Campaigns account, they cannot be retrieved.

1. Navigate to Audience -> Contacts.
2. Choose the desired view from the top bar (Marketing, Non-Marketing).
3. Click the contact you want to delete.
4. In the contact's detail page, click the More Actions (3-dotted) button at the top right.
5. Choose Delete.
5. In the pop-up that appears, click Delete Contact.

This deletes a contact. If you want to delete multiple contacts at one time or delete more than 200 contacts, refer to this help document.
NotesNote: You can delete other users' contacts only if you have sufficient privileges on those contacts.

38. How do you move Unsubscribed contacts to Marketing contacts?

NotesNote: You cannot use this option if the contacts have unsubscribed from their end. In that case, ask them to resubscribe or sign up again using the relevant signup form to reactivate them.
To reactivate unsubscribed contacts:

1. Navigate to Audience -> Contacts.
2. Go to the Manually Suppressed view by clicking it in the top bar. If it's not present there, click the More Actions (3-dotted) button and select it.
3. Select the contacts you want to move back to your mailing lists using the checkboxes next to each email address.
4. Click the Actions button at the top.
5. Click Change Subscription Type
6. Select Marketing in the Subscription type drop-down.
7. In the pop-up that appears, click Proceed.

This moves Unsubscribed contacts to Marketing contacts.

39. How do you export contacts from Zoho Campaigns? 

You can export your contacts from Zoho Campaigns to your desktop in different formats such as .csv, .xls, .json, etc. You need to have export privileges in the Contacts module to perform this action.

1. Navigate to Audience -> Contacts.
3. Click the Actions button at the top.
4. Click the Export Contacts option.
5. In the slide-in window that appears, specify a name for your file, choose the file format, select the fields that you want to export, and click the Export button.

The file will be downloaded to your system. Enter the password if you’ve chosen to use Zoho Campaigns' default password to open the downloaded file. Zoho Campaigns' default password is the combination of the first four characters of the users’ email address and the last four digits of the users’ Zoho user ID. 

Notes
Note: The file will be downloaded to the location where all of the files you download from a browser are located. To access the file in your system, open the Downloads page from your browser. After accessing this page, you can find the exported file. Click to access it.

For example, if you're using Google Chrome, access the Downloads page by typing chrome://downloads in a new tab and load this page. Use Ctrl + J (for Windows) or Command + Shift + J (for Mac) to access this page. If you use Mozilla Firefox, use Ctrl + J (for Windows) or Command + J (for Mac) to access this page.

40. What type of filters are available for filtering contacts based on WhatsApp marketing? 

You can filter your contacts in Zoho Campaigns based on WhatsApp campaign-related activities. To do so:
  1. Navigate to Audience -> Contacts.
  2. Click the filter button present the at top-right, before the Import Contacts button.
  3. In the search field, type 'whatsapp' to list all the filters you can use related to WhatsApp marketing.
Below are the filters available:

  • Whatsapp Campaign Received
  • WhatsApp Activity
  • Total Number of Whatsapp Campaigns Delivered
  • Total Number of Whatsapp Campaigns Clicked
  • First Whatsapp Campaign Delivered date
  • First Whatsapp Campaign Clicked date
  • Latest Whatsapp Campaign Delivered date
  • Latest Whatsapp Campaign Clicked date
  • First Whatsapp Campaign Delivered
  • First Whatsapp Campaign Clicked
  • Latest Whatsapp Campaign Delivered
  • Latest Whatsapp Campaign Clicked

  • 41. Where can you find a list of non-marketing contacts? 

    To find a list of non-marketing contacts:

    1. Navigate to Audience -> Contacts.
    2. Go to the Non-Marketing view by clicking it in the top bar. If it's not present there, click the More Actions (3-dotted) button and select it.

    You should now be able to find a list of non-marketing contacts.

    42. Why are you unable to convert some of the non-marketing contacts into marketing contacts? 

    The limit to change the subscription type of your contact is three times the number of contacts allocated to your plan for each month.  

    Use case: Paul has subscribed to the Standard plan (10,000 contacts limit) for his organization. He can update the subscription type of contacts in his organization 30,000 (3*10,000) times in a month.

    You can change the subscription type of any single contact, a set of contacts, or all of the contacts in your organization multiple times given that it comes within your monthly allotted limit.

    43. Why would you upload a list of contacts as Unsubscribed? 

    There are a few scenarios where uploading a list of unsubscribed contacts can be useful:
    • If a user is maintaining Unsubscribed contacts in a different service.
    • If the user is migrating from a different service.
    • If the user receives a direct request from their end recipient to unsubscribe them.
    We recommend that you upload contacts as Unsubscribed when they fall under one of these scenarios.

    44. What is E.164 format?

    E.164 is a numbering plan followed internationally to ensure each device on the Publicly Switched Telephone Network (PSTN) has a globally unique number. Its important to follow the E.164 format when importing contacts to your Zoho Campaigns organization. Rules you need to follow for a phone number to be E.164 qualified include:
    1. The maximum length of phone numbers is 15 digits.
    2. The format of the phone number should comprise a country code (1 to 3 digits) and subscriber number including area code (up to 12 digits).
    A sample phone number adhering to the E.164 plan would be similar to +12345678901, where [+1] is the country code, [234] is the area code, and [5678901] is the subscriber's phone number. Ensure that all your contacts are saved in the format as shown in the image below.
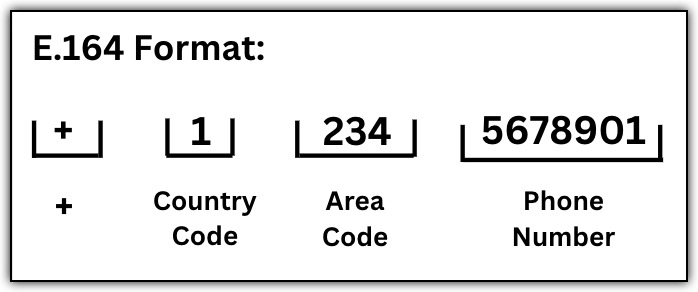
    E.164 format

    Given below are some of the examples of E.164 numbers:

    E.164 format
    Country code
    Country
    Subscriber Number
    +12468097531
    1
    US
    2468097531
    +16789012345
    1
    Canada
    6789012345
    +919876543210
    91
    India
    9876543210

    While creating or importing contacts into Zoho Campaigns organization, contacts that are not saved according to the E.164 format will either be ignored or considered invalid. You will not be able to send campaigns to such contacts, hindering your business communications with them.

    List Management

    1. Can you import contacts into a mailing list from an Excel file? 

    Yes. You can import an Excel file containing your contacts directly to the mailing list by following these steps:

    1. Navigate to the Contacts module.
    2. Select Manage Lists.
    3. Click Create List. 
    4. Enter the mailing list name for internal reference and click Save.
    5 Click Import inside the Import Contacts card and choose the file to import.

    This imports contacts into a mailing list from an Excel file.

    2. How do you add a contact to the mailing list? 

    1. Navigate to the Contacts module.
    2. Click Manage Lists. 
    3. Click the desired mailing list to open it.
    4. Click Add.
    5. Choose the Add Contacts option.
    6. Here, you can add multiple contacts manually, import the contacts, or create a signup form to let your contacts join via a web form.

    [OR]

    For associating lists to a contact, the steps are below:
    1. Navigate to the Contacts module.
    2. Click All Contacts.
    3. Search for the contact using the Search button.
    4. When the contact appears, click their email address to open the Smart view.
    5. Click View All Details to open the Detailed view.
    6. Scroll down to the Associated Lists section.
    7. Click the Edit icon at the far right.
    8. Choose the mailing lists in the pop-up.
    9. Click Save.

    This adds a contact to the mailing list.

    3. Can you automate adding contacts to a mailing list? 

    Yes. You can automate the addition of subscribers to a mailing list in Zoho Campaigns. This can be achieved through sign up forms, integrations with third-party applications, or by syncing contacts from Zoho CRM and other supported platforms.

    4. Can you remove the contacts from a list but not delete the list? 

    Yes, you can use the Clear List option to clear the contacts from a list.

    Follow these steps for clearing contacts from a list:

    1. Navigate to the Contacts module.
    2. Click Manage Lists and hover over the desired list.
    3. Click More (the three-dotted icon) at the far right of the list.
    4. Choose Clear List.
    5. In the checkbox, tick to remove contacts from the selected list only or to delete them permanently from your entire Zoho Campaigns organization.

    When using the Clear List option, contacts won’t be deleted from your Zoho Campaigns organization unless you intentionally choose to remove them during the deletion process. The contacts will remain in All Contacts and can still be part of other mailing lists or segments.

    However, if you select the checkbox Clear contacts associated to this list while clearing the list, the contacts will be permanently deleted from your organization. To read more about the Clear List option and how it differs from the Delete List option, refer to this help document.

    NotesNote: Contacts cannot unsubscribe from a mailing list. Every campaign you send from Zoho Campaigns includes an unsubscribe link that allows them to opt out of specific topics but not from the entire mailing list.

    5. How many contacts can you have per mailing list in the free edition? 

    You can manage up to 2,000 contacts in your organization or mailing lists in the Forever Free edition of Zoho Campaigns. Contact management is not on a per list basis, but on an overall basis for your organization.

    6. How do you export contacts that aren’t associated to any list? 

    1. Go to the Contacts module.
    2. Click All Contacts.
    3. Click the More button at the top right.
    4. Choose Export Contacts.
    5. Choose Contacts not yet associated to any list from the Export field drop-down.
    6. Apply filters based on users.


    7. Enter the file name for your reference.
    8. Click Export as CSV.

    This exports contacts that aren’t associated to any list.

    7. How do you identify bounced contacts in a list? 

    To identify the bounced contacts in a mailing list, follow the below steps:

    1. Navigate to the Contacts module.
    2. Click Manage Lists and open the desired list by clicking it.
    3. In the List Summary tab, click the number displayed under the Bounces section.

    You’ll see contacts categorized under:
    • Hard Bounce: Permanent delivery failure.
    • Soft Bounce: Temporary delivery failure.

    8. Can you set up email triggers based on list activity? 

    Yes. You can use the Workflow feature to set up email triggers based on list activity in Zoho Campaigns.

    For example, if you want to send emails to your contacts after they're added to a list, you can do that by creating a workflow. You need to use the List Entry component under the Trigger section and Send Email component under the Actions section. Refer to our documentation on workflows here.

    9. How do you tag contacts in a mailing list? 

    To assign tags to existing contacts in a mailing list, follow these steps:

    1. Navigate to the Contacts module.
    2. Click Manage Lists and open the desired list by clicking it.
    3. Click the Contacts tab at the top of this list.
    4. Click the checkbox next to the contacts' email address to select them.
    5. Click the Tags icon, then either assign an existing tag or create a new one and assign the tag.
    6. Click Save.

    This tags contacts in a mailing list.

    10. Can Zoho CRM contacts be synced into a mailing list in Zoho Campaigns? 

    Yes. Zoho CRM contacts can be synced directly into a mailing list in Zoho Campaigns. When you're setting up a sync in Zoho Campaigns, you'll see the Sync to Lists option. You can associate a list so that the contacts synced from Zoho CRM to Zoho Campaigns have this list associated automatically to them.

    11. Can lists be made private or restricted? 

    In Zoho Campaigns, mailing lists cannot be marked as private. However, you can restrict access and control user permissions for lists through the Roles and Privileges option in the settings ranging from completely restricting access for the Lists module to providing view-only access to the lists.

    12. How do you export a mailing list? 

    To export the contacts from a particular mailing list, these steps:

    1. Navigate to the Contacts module.
    2. Click Manage Lists and hover the mouse on the desired list.
    3. Click More (the three-dotted icon).
    4. Choose Export Contacts.
    5. Fill in the necessary information and proceed with the export.

    This exports a mailing list.

    13. Is there an API to manage mailing lists? 

    Yes. Zoho Campaigns provides an API to manage mailing lists programmatically. You can use the List Management APIs to create, update, delete, and retrieve mailing lists as well as manage a list's contacts. You can access the APIs for lists by clicking this link.

    You can also access the APIs related to segments in the List Management API document.

    14. Can you schedule list-based reports? 

    List-based reports under the Reports section in Zoho Campaigns cannot be scheduled. But, under Settings → General → Notifications → Mailing Lists, you can schedule reports for list opt-in and list deletion scenarios to be sent to your email or to team members automatically.

    15. Can you track open rates by mailing list? 

    Zoho Campaigns allows you to track open rates by mailing list, but this is done indirectly through viewing the reports of the campaigns in which a list is associated.

    Go to a particular list and at the top-right click the Response View button. In the screen that appears, under the List Summary tab, you can find the Recent Campaigns card. Click View Reports inside it to view various stats and metrics.

    16. What is the opt-in method used in mailing lists? 

    Zoho Campaigns supports both single and double opt-in methods. Using the single opt-in method, subscribers are added to your mailing list immediately upon submitting their email address. When using the double opt-in method, subscribers must submit their email via a signup form and click a confirmation link sent in a verification email to verify. Once verified, they’re added to the mailing list.

    17. How do you delete a single contact from a list? 

    1. Navigate to the Contacts module.
    2. Click Manage Lists. 
    3. Open the desired list by clicking it.
    4. Click the Contacts tab in the list to access the list of contacts.
    5. Search for the contact you want to delete using the Search icon.
    6. Select this contact by clicking the checkbox next to their email address.
    7. Click More Actions and choose Delete.
    8. Click Go Ahead in the pop-up that appears.

    If you follow these steps, the contact will not only be deleted from this list but also from your Zoho Campaigns organization and cannot be retrieved. In this case, you have to add this contact again.

    18. Can you see how many contacts are in a list? 

    Yes. List statistics display the total contacts, active contacts, unsubscribed contacts, bounced contacts, and non-marketing contacts. List statistics are displayed in the List Summary tab (the first tab at the top) and will appear when you click a list.

    19. How do you determine which list a contact belongs to? 

    You can find which list a contact belongs to on a contact's profile page. The steps are:

    1. Navigate to Contacts and select All Contacts.
    2. Click the contact’s email address or search for the contact using the Search icon.
    3. Click the contact's email address to access the Smart view.
    4. You should see the Associated Lists tab in this view. If not, click the View All Details button to open the detailed view.
    5: You should find the Associated Lists section where the lists associated to this contact will be displayed.

    This determines which list a contact belongs to.

    20. How often should you clean your mailing lists? 

    Cleaning a mailing list involves removing (deleting) inactive, bounced, or the least interactive contacts to ensure that your campaigns reach only those who want to receive them. You should clean your mailing lists at least once every 3 to 6 months to maintain a good sender reputation.

    Creating separate lists is also recommended to make it easier to target the right audience and deliver more personalized communication.

    21. Can you send a campaign to multiple mailing lists at once? 

    Yes, you can send a campaign to multiple mailing lists at once. When you're creating an email campaign, you can select more than one list during the recipient selection step of campaign creation process.

    22. Can you segment inactive contacts from a list? 

    Yes, you can create a segment with the list as one of the criteria. But, kindly note that this is applicable only for the users in Professional plan. Follow the steps below:

    1. Navigate to Contacts and click Segments.
    2. Click Create and choose Segment.
    3. Provide a name for the segment.
    4. Choose the criteria as ListInChoose the list name.
    5. Click the + button to add another criteria.
    6. Choose the criteria as Any campaign  Not Opened. 
    7. Choose any one of the options, such as Last 60 Days, Last 90 Days, Last 180 Days.
    8. Click Save to complete creating the segment.

    This segments inactive contacts from a list. If you're not in the Professional plan of Zoho Campaigns, you can use the available default filters instead. To access these filters, follow these steps:

    1. Navigate to Contacts  All Contacts. 
    2. Click the Marketing Contacts filter.
    3. Choose any of the filters available under the Inactive Contacts section. This will only display the list of overall inactive contacts but not for a particular list.

    23. How do you find the campaigns sent to a specific mailing list? 

    1. Navigate to the Contacts module.
    2. Click Manage Lists. 
    3. Click the desired list to open it.
    4. You'll see the List Summary tab. Click the number displayed below the Sent Campaigns section to view the campaigns that were sent to that list.

    This locates the campaigns sent to a specific mailing list.

    24. What is a List key? 

    A List key is used to add contacts to a mailing list via API method. It’s used as an authentication parameter and represents the mailing list you're trying to access.
    To view a List key:

    1. From the Navigation toolbar, choose Contacts. 
    2. Select Manage Lists.
    3. Click on the required list.
    4. Select Setup to view the list detai

    list key

    You’ll find the list key in this tab.

    25. Where can you view the contacts from your city, region, and country?

    You can view the local contacts by checking the list detail view.
    1. Open the Contacts tab from the navigation bar and select Manage Lists.
    2. You’ll get the List view of all your lists. Click any mailing list.
    3. In List Summary tab, click Response view.

    Response view

    You can find the contact details from your city, region, and country under Contacts Location.

    Contacts Location

    26. Can you receive a daily report on new contacts added to a list? 

    Definitely. You can receive notification emails for daily reports on the new contacts joining the selected list. The report will be sent on a daily basis and will provide detailed information about the new contacts joining via Signup form or through APIs.

    1. Open the Contacts tab from the Navigation toolbar.
    2. Select Manage Lists.
    3. Select the mailing list you want to receive notifications for.
    4. Click the Setup tab at the top of the list. You’ll see the List Notification section.
    5. Click Edit to configure the Send Interval and Time.
    6. Select the mailing lists you want to receive the emails for.
    7. Click Save Preferences.

    This generates a daily report on any new contacts that have been added to a list.

    27. How can I remove a particular contact from a list?

    If you're looking to remove only a single contact or a group of contacts from a list, then the Clear List option wouldn't be suitable as it'll remove all the contacts from the list. Instead, you can simply go to the list, click the Contacts tab at the top, select the contacts, and use the Remove from List option under the More Actions drop-down. Please refer to the below GIF for the steps.

    28. How can you view all the marketing contacts in a list?

    To view all the marketing contacts in a list, you can access that list, click the Contacts tab, and filter to the Marketing Contacts view.

    1. From the Navigation Toolbar click Contacts.
    2. Select Manage Lists.
    3. Click the list for which you want to view the marketing contacts.
    4. Click the Contacts tab at the top.
    5. Click the All Contacts view and change to Marketing Contacts.

    Please check the video below for a visual guide.

    29. Can I group similar lists in a single place?

    Imagine you have a steady set of contacts to whom you send email campaigns every Thanksgiving. And, every year, the contacts are new contacts, so you don't send campaigns to the existing contacts alone.

    Assuming you create a list for each Thanksgiving, such as "Thanksgiving 2022", "Thanksgiving 2023", etc., you would feel that it is better to access all the lists related to Thanksgiving in a single place as you feel it to be a cumbersome process to search for these lists. In such scenarios, you can create Folders. You can create a folder, add these Thanksgiving lists to the folder, and access them in a single place.


    To create a folder inside lists:
    1. From the Navigation Toolbar click Contacts.
    2. Select Manage Lists.
    3. Click the folder icon at the top-left.
    4. Click the + icon in the pop-up that appears.
    5. Provide a name for the folder and click the tick button.

    The folder is created.

    To move the lists to this folder:
    1. Select the lists using the checkbox present to the left of each list.
    2. Click the Move to Folder button that appears at the top.
    3. Click the name of the folder that you just created to move these lists.

    Below video shows how you can create a folder inside the Manage Lists module and add the lists to that folder.


    Notes
    Notes:
    • If you delete a folder, the lists inside it will not be deleted; only the folder will be deleted.
    • When creating email campaigns, you cannot choose the folder itself during recipient selection process. You can only choose individual lists.

    Segmentation

    1. Can you apply multiple criteria (AND/OR) in one segment? 

    Yes. In Zoho Campaigns, you can apply multiple criteria within a single segment using AND/OR conditions. This allows you to filter contacts more precisely by combining different rules. When creating a segment, after choosing the first criteria, click the + button at the far right to add additional criteria.

    2. Can you use behaviors (opens/clicks) to build segments? 

    Yes. You can use behaviors such as opens and clicks to create segments in Zoho Campaigns. When creating a segment, choose an option under the Campaign activity fields criteria, choose the campaign, and finally, choose the desired activity.

    3. Can you create a segment using tag-based criteria? 

    Yes. You can create a segment in Zoho Campaigns using tag-based criteria, allowing you to filter contacts based on one or more tags assigned to them. While setting up a segment, you can specify conditions such as Tag is or Tag contains to include only contacts with specific tags. This allows for precise targeting in campaigns.

    One advantage of creating tag-based segments is in A/B testing campaigns. You can use tags in A/B testing by first creating segments based on tags, then selecting those segments as your audience for each test version. This ensures that your A/B test targets a specific group defined by tags (e.g., "Frequent Buyers").

    4. What's the difference between Basic and Advanced Segmentation in Zoho Campaigns? 

    In the pricing page of Zoho Campaigns, you may have come across the terms “Basic segmentation” under the Standard plan and “Advanced segmentation” under the Professional plan and wondered what the difference between the two is. This article will help you understand that difference.

    Segmentation refers to the process of creating Segments under the Contacts section in Zoho Campaigns. From the Navigation Toolbar on the left, you can click Contacts and select Segments. You'll create segments on this page.

    When creating a segment, you can view the Criteria section. The first field under this section contains different fields so you can choose which segment should be focused on to filter your contacts. Based on the fields you choose, the system will decide if you're creating a basic or an advanced segment.

    Notes
    Notes:
    • In the trial version of Zoho Campaigns, you can create both basic and advanced segmentation.
    • If you created an advanced segmentation during the trial and purchased the Standard plan upon trial expiry, you won't be able to use that segment unless you upgrade to the Professional plan.

    Basic segmentation
    As the name suggests, basic segmentation includes all of the standard fields available in the Contacts module along with any custom fields you've created. When creating a segment, the fields under the sections below come under basic segmentation:
    • Predefined fields.
    • Contact Social fields.
    • Contacts Custom fields.
    Advanced segmentation
    To make use of the advanced segmentation process for segregating your contacts, you can create segments using advanced fields. If you integrate Zoho Campaigns with other Zoho apps like Zoho CRM or third-party apps like GoToWebinar, you can make use of fields related to that app.
    When creating a segment, the fields under the sections below come under advanced segmentation:
    • Consent
    • List Based
    • Contact Activity
    • Webinar
    • Topic Based
    • Campaign Activity
    • E-Commerce
    • CRM Deals
    • CRM Accounts
    You can find the full list of segment criteria here.

    5. How do you send an email campaign to a segment? 

    1. Open the Contacts tab and select Segments.
    2. Click the Create Campaign icon present on the right of the segment name.


    create campaign icon - segment

    Alternatively:
    1. Open the Contacts tab and select Segments.
    2. Open segments and click More.
    3. Click Create Campaign.


    create campaign

    This sends your email campaign to your selected segment.

    6. Can you send an autoresponder to multiple segments of a mailing list? 

    No, you cannot send an autoresponder to different email list segments. However, you can implement the Zoho Campaigns workflow feature. The Enter a Segment trigger can be used repeatedly to select the segments needed for this activity.

    To create a series of emails to be sent to multiple segments of a mailing list:

    1. From the Navigation toolbar, select Automation. 
    2. Click Workflows.
    3. Click Create Workflow.
    4. Select the workflow template or click Custom Workflow.
    5. Drag and drop the Enter a Segment trigger onto the canvas and select the segment.
    6. Perform the above steps for all segments that are required.
    7. Drag and drop the Send Email action onto the canvas.
    8. Connect it with all of the triggers and configure them.
    9. Add a delay component and configure it.
    10. Perform step 6 to configure all of the emails that need to be sent to the multiple segments.

    This creates an email series that you can send to multiple segments of your mailing list.

    7. If you have the same contact in two different lists or segments, will they receive the campaigns twice if you send them to both segments or lists? 

    When you're selecting multiple lists or segments as recipients in a particular email campaign and the same contact exists in multiple lists or segments, we'll consider only unique contact entries and send the email campaign to one contact entry only. Other duplicate contact entries will be ignored automatically to avoid this same contact receiving multiple emails.

    For example, you have a contact named Patricia. This contact is part of multiple lists named List A, List B, and List C and is also a part of multiple segments named Segment A, Segment B, and Segment C. If you select all of these lists and segments as recipients when creating an email campaign, the email will be sent to Patricia only once and not six times.

    This is a default process that will happen in all campaigns automatically, so no manual intervention is needed from your end.

    Topic Management

    1. What is a topic in Zoho Campaigns? 

    Topics are used to categorize your contacts based on their preferences, enabling you to send the right emails to the right recipients.
    In the new topic version of Zoho Campaigns, a default topic called Marketing is provided for all users.

    To create a topic, follow the below steps:

    1. Navigate to the Contacts module.
    2. Click Manage Topics.
    3. Click Add Topic.
    4. Give the topic a name and description.
    5. Click Save.

    You can configure multiple topics according to your requirements using the Topics feature in Zoho Campaigns. Currently, there’s no limit to the number of topics you can create.

    2. How do topics work with mailing lists? 

    In Zoho Campaigns, topics help organize and categorize your email content. They work alongside mailing lists to enhance contact management and ensure compliance. When creating contacts, you must assign it to a topic, which defines the purpose of communication for that list.

    3. How do you assign a topic to the existing contacts in Zoho Campaigns? 

    1. Navigate to the Contacts module.
    2. Click All Contacts.
    3. Click the checkbox next to the email address of the contacts to select them.
    4. Click More Actions.
    5. Click Assign Topics.
    6. In the pop-up that appears, choose the topic(s) and select a value in the Lawful basis for communication field.
    7. Click Save.

    To assign topics to a list:

    1. Navigate to the Contacts module.
    2. Click Manage Lists and hover the mouse on the desired list.
    3. Click the More option (the three-dotted icon).
    4. Choose Assign Topics.
    5. In the pop-up that appears, choose the topic(s) and select a value in the Lawful basis for communication field.
    6. Click Save.

    Now the topic(s) will be associated to the contacts present in the list.

    To assign topics to a segment:

    1. Navigate to the Contacts module.
    2. Select Segments.
    3. Open the desired segment by clicking it.
    4. Click More at the top-right and choose Assign Topics.
    5. In the pop-up that appears, choose the topic(s) and select a value in the Lawful basis for communication field.
    6. Click Save.

    This assigns topics to a segment.

    4. Can topics be assigned to contacts during manual import? 

    Yes. You can manually assign topics to contacts during the import process. Follow the steps below:

    1. Navigate to Contacts and select All Contacts.
    2. Click Add New.
    3. Select Import Contacts.
    4. Choose the file to import.
    5. Select the Subscription Type as Marketing; only then you can associate topics to the contacts you're importing.
    6. Choose the topic(s) and select a value in the Lawful basis for communication field.
    7.Click Save.

    Now the topic(s) will be associated to the contacts in the import file once the import process is completed.

    5. How do you export contacts that aren’t associated with any topics? 

    1. Go to the Contacts module.
    2. Click All Contacts.
    3. Under the Filter By section, select the checkbox next to the Associated Topics option.
    4. Select None from the drop-down menu.
    5. Click the Apply button at the bottom.


    6. Select the contacts in the checkbox to the left of the Contact Email column.
    6. Click the More Actions drop-down that appears at the top.
    7. Choose Export.

    This exports contacts that aren’t associated with any topics.

    6. How do you associate topics with contacts through signup forms? 

    You can associate topics to signup forms either when you're creating them or by editing them. The steps to associate topics to signup form are:

    1. Navigate to the Contacts module.
    2. Click Signup Forms.
    3. Open the desired form.
    4. Click the Edit icon beside the Associated topic option.
    5. In the pop-up that appears, select a topic and click Associate.

    You can assign multiple topics to a signup form only if it's a Long Form template.

    1. Navigate to the Contacts module.
    2. Select Signup Forms.
    3. Open the desired form or create a new long-form signup form.
    4. In the designing phase of the form, click the Topics section on the left side.
    5. If a pop-up appears asking to enable multiple topic association, click Go Ahead.
    6. Drag the desired topics from the left side onto the form template and save your changes.

    You can also assign topics to contacts through a signup form using workflow automation. You can do this in the Automation section by creating a Workflow.
    When you're creating a workflow, you need to ensure that you're:
    • Selecting the Form Submission component from the Trigger section. Configure this component by selecting the desired signup forms.
    • Selecting the Subscription Management component from the Actions section. Configure this component by selecting the desired topics.

    7. How do you check what topic is assigned to a contact? 

    1. Navigate to the Contacts module.
    2. Click All Contacts.
    3. Search for the contact through the Search icon.
    4. Once the contact appears, click on the contact email address to open the Smart view.
    5. Click View All Details to open the detailed view.
    6. Scroll down until you see the Topic Association History section. Here, you can view the topics associated to this contact.

    This shows you what topic(s) are assigned to a contact.

    8. How can a recipient select the topics they want to receive campaigns from? 

    After receiving email campaigns, recipients can click the Manage Preferences option to update their preferences. From there, they can view and choose from all of the topics and products you offer.

    1. Navigate to SettingsCustomization  Signup Pages and Emails. 
    2. Under the Topics section, click the Topics Landing Page to customize it per your needs before you send the email campaigns.

    Ensure you've included the Contact Preference Merge Tag in your email campaigns (if it isn’t already available) so your contacts can subscribe to the desired topics by clicking the merge tag.

    9. If a contact unsubscribes from a topic, will they be unsubscribed from the entire organization? 

    No. When a contact unsubscribes from a topic, they’re only removed from that specific topic, not from the entire organization.

    10. How do you remove a topic from a contact? 

    1. Navigate to the Contacts module.
    2. Click All Contacts.
    3. Search for the contact using the Search button.
    4. When the contact appears, click their email address to open the Smart view.
    5. In the Smart view, click View All Details to open the Detailed view.
    6. Scroll down until you see the Topic Association History section.
    7. Click the Delete icon at the far right of the topic you want to remove for this contact.
    8. In the pop-up that appears, click the Dissociate button.

    The topic should now be removed from a contact.

    11. Why do you see contacts associated with the Marketing topic in the workflow component when you’ve associated them with a different topic? 

    By default, all of the contacts will be associated with the default topic, Marketing, in the new flow. It will be listed at the top in the Subscription Management action component followed by the other topic that you've configured and selected.

    12. Why can't you see the Topic selection option after migrating to the new topic management model? 

    If you’re using the default topic, Marketing, and haven't configured any other topic for your organization, then all contacts will be associated with that topic by default. This will not be reflected explicitly while adding contacts or creating campaign or workflows.

    13. What will happen when a user deletes all topics except for the default topic? 

    Users who have already migrated earlier will have the older flow. None of the changes in the current update will be reflected for them. We don't associate topics by default. We show selected topics and you have to associate them manually with the default topic to send any emails through our service. You can select the topic iwhen creating a contact in the All Contacts view.

    14. What will happen when the user adds additional topics after the implementation of the default topic? 

    The additional topics will be added along with the default topic. Other changes include:
    • If the contacts choose to receive certain email campaigns on certain topics, they can do so under Manage Preferences.  
    • A mailing list can contain contacts mapped to different topics.

    15. How will Manage Preferences be handled when the default topic is enabled? 

    We will show the default topic, Marketing, as an option for the contacts under Manage Preferences. If they uncheck that option, they'll be unsubscribed from the organization and moved to the Unsubscribed registry. When contacts choose to unsubscribe from the default, they’ll be unsubscribed from the organization.

    If you want to give your contacts more choices and reduce unsubscribes, you can configure different topics relevant to your organization. If your contacts choose to receive certain email campaigns on certain topics, they can do so under Manage Preferences and uncheck the topics they’re not interested in instead of unsubscribing from all emails from your organization.

    16. Why are topics associated with contacts instead of mailing lists? 

    Each contact may have multiple preferences. This means that associating a contact with relevant topics is an easier and more efficient way of organizing and storing the contact preferences.

    If your organization doesn’t require multiple topics as you focus solely on sending generic email marketing campaigns or for any other reason, you can simply use the default topic. This will be configured in your account if you've created a Zoho Campaigns account recently or if you've migrated to the new Topics flow.

    17. Can you use an API to associate topics with a contact? 

    Yes, you can associate topics with contacts using API. With the help of the Contact Subscribe API, you’ll be able to associate a topic to a contact. For associating multiple topics to a particular contact, the topic_id parameter will accept multiple topic IDs separated by a comma.

    18. Can I rename a topic after it has been created?

    Yes, you can rename a topic even after it has been created. To do that, you can go to Contacts -> Manage Topics -> hover over the topic and click the pencil icon -> change the name of the topic -> click the Save Changes button.

    How to rename a topic in Zoho Campaigns

    Tags

    1. What is a contact tag in Zoho Campaigns? 

    A contact tag in Zoho Campaigns is a label or keyword assigned to one or more contacts to categorize, group, or identify them based on attributes, behavior, or custom criteria. Tags help organize contacts and enable more targeted email campaigns.

    Tags aren’t case-sensitive. For example, "VIP" and "vip" will be treated as the same tag so you can't create multiple tags having the same name.

    To create a new tag, follow the below steps:

    1. Navigate to Contacts.
    2. Go to Contact Tags.
    3. Click Create.
    4. Enter a tag name, description, and color.
    5. Click Create to save the tag.

    You can also create a tag while importing contacts or when manually editing a contact.

    Tags are global. They’re unique and shared across all mailing lists. A tag created once can be applied to any contact, regardless of which list they belong to.
    Zoho Campaigns doesn’t create or provide default tags. All tags must be manually created by users or added through automation, imports, or integrations based on your requirements.

    A contact can have multiple tags assigned, allowing for more flexible categorization and targeted segmentation across different campaigns.

    There’s no limit to the number of tags you can assign to a single contact in Zoho Campaigns. Contacts can have as many tags as needed for categorization, segmentation, and automation.

    Zoho Campaigns allows you to add tags to contacts during the import process. While importing a file, you can specify one or more tags to all contacts in that import. Click Show advanced options and click Select Tags.


    To bulk associate tags to multiple contacts, follow these steps:

    1. Navigate to Contacts.
    2. Go to All Contacts.
    3. Select multiple contacts by clicking the checkbox next to their email address.
    4. Click Assign Tags.
    5. Choose an existing tag or create a new tag.
    6. Click Save.

    This associates tags to multiple contacts.

    2. How do you add tags to a contact? 

    Single Contact
    To add tags to a single contact, follow these steps:

    1. Navigate to the Contacts module.
    2. Click All Contacts.
    3. Use the Search icon to find the contact.
    4. Select the contact by clicking the checkbox next to their email address.
    5. Click Assign Tags.
    6. Select the tag(s).
    7. Click Save.

    [OR]

    1. Click the contact email address to open the Smart view.
    2. Select View All Details.
    3. Scroll down to the Contact Tags section.
    4. Choose the appropriate tags to assign.

    Multiple Contacts
    1. Navigate to the Contacts module.
    2. Select All Contacts.
    3. Click the checkbox next to the contacts’ email addresses to select them.
    4. Click Assign Tags.
    5. Select the tag(s).
    6. Click Save.

    This adds tags to contact(s).

    3. How do you add a tag to specific contacts based on a particular field value? 

    1. Go to the Contacts module.
    2. Select All Contacts.
    3. Find the field using the column names at the top.
    4. Click the drop-down icon next to its name to access the filter option.
    5. Filter or segment the contacts as needed.
    6. Click Apply.
    7. Select the filtered contacts using the checkbox next to Contact Email column.
    8. Click the Assign Tags button at the top.
    9. Choose the tags and click Save.

    This adds a tag to specific contacts based on a particular field value.

    4. How do you remove a tag from a particular contact? 

    1. Navigate to Contacts.
    2. Go to All Contacts.
    3. Use the Search icon to search for the particular contact.
    4. Click the contact's email address to open the Smart view.
    5. Click View All Details to open the Detailed view.
    6. Navigate to the Contact Tags section.
    7. Remove the tag by clicking the X button on the tag name.

    This removes a tag from a contact.

    5. How do you delete a tag in Zoho Campaigns? 

    1. Navigate to Contacts.
    2. Go to Contact Tags.
    3. Find the tag you want to delete.
    4. Hover your cursor to the right of the tag.
    5. Click the Delete icon next to the tag.
    6. Confirm the deletion when prompted.

    Once deleted, the tag is permanently removed and cannot be recovered. It will also be automatically unassigned from all contacts.

    When a tag is deleted in Zoho Campaigns, it’s removed from all associated contacts. While the contacts remain in the system, the deleted tag will no longer be linked to them or available for use in filters, segments, or automation.

    6. How do you filter contacts by tag? 

    To filter contacts by a tag or tags, follow these steps:

    1. Navigate to Contacts.
    2. Go to All Contacts.
    3. On the left side of your screen, you’ll see the Filter By section.
    4. Select Tags under this section.
    5. Choose the desired tags.
    6. Click Apply at the bottom of the screen to view only contacts with those tags.

    If you want to view all of the contacts associated to a specific tag, follow these steps:

    1. Navigate to Contacts.
    2. Go to Contact Tags.
    3. Click the desired tag, and it will display the list of all contacts linked to that tag.

    Tags are visible on the Contact Details page in Zoho Campaigns. When you view a contact’s profile, all associated tags are displayed clearly, typically under the Contact Tags section for easy reference and management.

    7. Can you trigger workflows based on tags? 

    Yes. In Zoho Campaigns, you can trigger workflows based on tags. When creating a workflow, you can set the entry condition as "Tag Assigned" to start the automation whenever a contact is assigned a specific tag.

    8. Can tags be used in dynamic content or personalization? 

    No. Contact tags in Zoho Campaigns cannot be directly used for dynamic content or personalization within email templates. Instead, personalization relies on merge tags (like first name, email, etc.), and dynamic content is typically controlled through segments or custom fields.

    9. What’s the difference between tags and custom fields? 

    Tags in Zoho Campaigns are labels used to categorize or group contacts flexibly, while custom fields store specific data (like age, city, or interests) tied to each contact as a defined field. Tags are free-form, can be multiple per contact, and can be used for segmentation and automation. Custom fields are structured data fields (e.g., dropdowns, dates) used for personalization, filtering, and segmentation.

    10. How do you rename an existing tag? 

    To rename tags, follow these steps:

    1. Navigate to Contacts.
    2. Go to Contact Tags.
    3. Locate the tag you want to edit/rename and hover the cursor across the tag.
    4. Click on the Edit icon at the far-right of that tag.
    5. Make your changes and click Save.

    The tag will be renamed.

    11. How do you export contacts based on tags? 

    To export the contacts of a tag, follow these steps:

    1. Navigate to Contacts.
    2. Go to Contact Tags.
    3. Click the desired tag. It will display the list of all contacts linked to that tag.
    4. Select all of the contacts by clicking the checkbox next to the Contact Email column, or select only the necessary contacts by clicking the checkbox next to the email address of each contact.
    5. Click the Download icon at the top to export all of the selected contacts.

    This exports contacts based on their tags.

    12. Can you assign tags using signup forms? 

    Zoho Campaigns lets you assign tags to contacts automatically using signup forms with the help of workflow.

    When creating or editing a signup form, you can use the advanced option to associate a workflow to the signup form so that the tags are automatically assigned to every contact who signs up through that form. This is useful to track source-specific contacts (e.g., “Webinar Signup” tag), or to segment and trigger workflows based on where the contact added.

    When creating the workflow, choose Trigger as the Form Submission component and configure the desired signup form. Choose Actions as the Assign Tag component and configure it by selecting the tags that need to be associated to the contacts once they submit the signup form. You'll drag these components onto the workflow canvas to create a workflow.

    13. Can Zoho CRM tags sync with Zoho Campaigns? 

    No. Zoho CRM tags don’t automatically sync with Zoho Campaigns. While contacts can be synced between the two apps, tags in Zoho CRM aren’t transferred to Zoho Campaigns during sync.

    To use Zoho CRM tags, you can use custom fields or create segments in campaigns based on synced data.

    14. How do you view the total number of contacts under a specific tag? 

    1. Navigate to Contacts.
    2. Go to Contact Tags.
    3. Click the desired tag to open it.
    4. You'll see the list of contacts. Click Show text at the center of the tag screen.

    This will open a drop-down screen where the total number of contacts will be displayed. You can also scroll down the list of contacts and click the Total Count text to view the number of contacts in this tag.

    15. Can you use tags to exclude contacts from a campaign? 

    Yes. You can use tags to exclude contacts from a campaign in Zoho Campaigns. By creating segments, you can apply a criteria where the condition is “Tag is” or "Tag is not" with the desired tag and save it. Now, you can either use the segment (if the criteria is Tag = is not) or prevent using it (if the criteria is Tag = is) in the recipient option to prevent sending emails to those contacts.

    16. Do tags remain if a contact is removed from a list? 

    Yes. In Zoho Campaigns, tags remain associated with a contact even if that contact is removed from a mailing list. Tags are independent of lists and stay with the contact as long as the contact exists in your account.

    17. Can you assign a tag using API calls? 

    Yes. You can assign a tag to a contact using Zoho Campaigns’ API. The API provides endpoints that let you add tags to existing contacts by specifying the contact's email address and the tag name in the request. Tag Management APIs can be used for tag-related functions.

    18. What’s the impact of tags on unsubscribed contacts? 

    Tags are still associated to unsubscribed contacts in Zoho Campaigns when they unsubscribe. Even if a contact unsubscribes, their tags remain in the system and can be used for organizing, filtering, or reporting, but you can’t send campaigns to them. You can't associate a tag when you're manually adding an unsubscribed contact.

    19. Can you tag contacts based on campaign activity? 

    Yes. You can tag contacts based on their campaign activity in Zoho Campaigns. This can be done manually by filtering contacts (e.g., those who opened or clicked an email) or automatically through workflows.

    To do it manually:

    1. Navigate to Contacts and select All Contacts.
    2. On the left side of the screen you’ll see the Filter By section. Click the Activity checkbox and select the desired activity, such as Clicked, Opened, etc.
    3. Click Apply at the bottom of the screen.
    4. Select the list of contacts by clicking the checkbox next to the Contact Email column.
    5. Click Assign Tags.
    6. Select the desired tags and click Save.

    To do it automatically:

    When you're creating a workflow, choose the Trigger as an Email Action component. Click Select Email in the component and choose between a specific campaign or any campaign options and select the desired campaign activity. Choose Actions as an Assign Tag component. Configure it by selecting the tags that need to be associated to the contacts once they perform the activities you configured in the Email Action component. You'll drag these components on to the workflow canvas to create a workflow.

    20. Can you assign tags via third-party integrations? 

    Yes. You can assign tags via third-party integrations in Zoho Campaigns. Many integrations—especially through Zoho Flow, Zapier, or the Zoho Campaigns API—allow you to automatically assign tags to contacts based on external triggers, such as form submissions, CRM updates, or eCommerce activity.

    21. How do you manage tags across different user roles? 

    To manage tags across different user roles in Zoho Campaigns, set role-based permissions by going to Settings Roles & Privileges to control who can create, edit, or delete tags. Assign roles like Admin, Manager, or Viewer based on their need to manage contacts and tags. Use a clear tag to ensure consistency across users. Regularly audit tags to identify and clean duplicates or misuse.

    Contact Scoring

    1. How does contact scoring work in Zoho Campaigns? 

    Contact scoring in Zoho Campaigns assigns scores or points to contacts based on their actions, like opening emails or clicking links. You define the scoring rules, and the system automatically updates scores as contacts engage with your campaigns. This helps you identify and focus on highly engaged contacts.

    Contact scoring is automatic. You can assign different scores for various actions such as opens, clicks, bounces, and unsubscribes. You must set the score for various activities but the scoring process on the contacts is automatic.

    You can assign different scores for campaign activities like opens and clicks. The scores you assign to various activities don’t need to be the same score. For example, you can assign a score of 10 for opens and 20 for clicks. Scores are updated automatically in real time according to the contact’s most recent activities.

    You can also assign different scores for the same activity across different campaigns or mailing lists but you’ll need to set it up manually.

    2. What are the different types of contact scoring options available in email campaigns? 

    You can enable or disable the contact score for individual email campaigns in Zoho Campaigns. There are three different contact scoring options in email campaigns:
    • Default Scoring
    • Campaign Specific Scoring
    • Custom Rules
    Default Scoring: This is the default contact scoring located under Contacts Contact Scoring Campaign Activities. If this scoring is enabled in the Contact Scoring module, you can use it for an email campaign. Default Scoring will show as Enabled by default during campaign creation if it’s enabled in the Contact Scoring module.

    Campaign Specific Scoring: As the name suggests, this type of scoring can be set up only when you're creating an email campaign and will be applicable to the particular campaign you're creating.

    Custom Rules: Custom rules can be created in the Contact Scoring module. If it’s enabled, it'll be enabled by default when creating an email campaign as well.
    To read more about contact scoring in email campaigns, refer to this help document.

    3. How do you make the contact score negative for a contact? 

    The overall contact score can be negative for a contact depending on the actions they perform. A negative score is usually associated with negative actions. By default, the Unsubscribe and Negative Reply actions in a campaign are scored negatively.

    For example, if you're sending a campaign for a contact and they provide only negative replies, then the score can go below zero. You must enable an option for the overall score of a contact to be negative.

    1. From the Navigation Toolbar, click Contacts and select Contact Scoring.
    2. Enable the Allow contact score to go below zero toggle at the top-right to enable negative scoring for your contacts.


    3. Click Edit Score at the top of the score sheet under Campaign Activities. If this section needs to be enabled, enable it using the toggle next to the Edit button first and then edit it.


    4. Use the left arrows on the score sheet to assign negative scores to a particular activity or place the cursor inside the score and type a negative score directly.


    The least value that you can assign is -50.
    Below, you can see a contact with an overall negative score.

    4. Is contact scoring available for all plans? What else do you need to know about contact scoring? 

    Contact scoring is available for all users under the Professional plan. If you’re currently in another subscription plan, you need to change to a Professional plan to access this feature.

    In the new roles and privileges setup, both organization and workspace admins have access to edit, reset, and enable/disable contact scoring. Other users are only allowed to view scores.

    In the old setup, organization administrators had the privilege to assign, edit, and enable/disable scoring. Users are only allowed to view scores.

    Any user can create a contact score view, but only the owner and the admin can edit/delete it. You can set up to a maximum of two criteria per contact score view.

    You can't view the score details under the Contact Score module once the subscription is expired or canceled. However, on your subscription renewal, you can view and access contact scoring.

    5. Because your business uses Contact Score extensively, can you display the Contact Score in the All Contacts view?  

    Yes, it’s possible to display the contact score of your contacts in the view or page that appears as soon as you click All Contacts from the Contacts module.
    To do this:

    1. From the Navigation Toolbar, click Contacts. 
    2. Select All Contacts.
    3. Click Organize Columns.


    4. Scroll through the drop-down and tick the Contact Score field, or search for Score using the search icon and tick this field.
    5. Change its position to the top by dragging it using the small dotted icon next to it.


    6. Click Save once you've re-arranged the Contact Score field to the desired position.

    This displays the Contact Score in the All Contacts view.

    6. Is there a limit on the number of resets you can do for contact scoring? Can you edit or reset when contact scoring is disabled? 

    No. You can run as many resets as you like, but once you reset, you won't be able to see past scores. Make sure every reset is necessary.

    You can edit contact scores even when it’s disabled. Resetting contact scoring is possible when it’s disabled.

    Disabling/enabling contact scoring in the main feature doesn’t affect custom scoring. Custom scoring for campaigns, contact information, and website activities continue to happen until they’re disabled in their respective fields.

    7. Is it possible to have only the custom (Campaign-Specific) scoring active for your campaign? 

    Yes, you can have only the custom scoring active by disabling the default scoring for the campaign.

    1. In the campaign creation process, proceed to the review step.
    2. Navigate to the Contact Scoring section.
    3. Turn off the toggle switch under Default Scoring to disable it for this campaign.

    You can provide criteria for a custom score when you create it. You can give a maximum of three criteria in custom scoring (campaign-specific scoring). Each criteria can have a maximum of three conditions.

    If you don't want a criteria in the custom scoring, you can disable it following these steps:

    1. In the campaign creation process, proceed to the review step.
    2. Navigate to the Contact Scoring section.
    3. Under Campaign-Specific scoring, turn off the toggle switch next to the desired criteria.

    NotesNote: Only the owner of the campaign and the users who have privileges to access other users' campaigns can set campaign-specific scoring. Users who don’t have privileges can only view the scoring.

    8. You get an error when trying to filter contacts with a negative contact score. What are you doing wrong?

    If you're using either the Filter By option or the Advanced Search button to filter contacts with a negative contact score, you need to filter a bit differently.

    Let’s assume that you have contacts with scores are between -40 and -45 and you want to filter them. When you use the Filter By option in the All Contacts view, you probably filter as shown in the image below.


    If so, you'll face an error "Enter a lower From and a higher To score." as shown in the below image.


    Because the From score and To score are both negative, you should enter the lowest score first and the highest score next. In this scenario, -45 is the lowest score and -40 is the highest score.

    The same is applicable even if you want to find contacts whose scores are between 1 and -10. -10 should be entered first, and 1 should be entered next. If you're searching for contacts whose scores are between 8 and 10, you need to enter 8 first and 10 next.

    Refer to this video showcasing all three scenarios where this error occurs.


    The Contact Timeline provides valuable history about the contact and its activities, right from when it was added until the present. But if you want to view the full history of a particular activity, that is possible.

    Say you want to view the activities related to a contact’s contact score to understand the entire history of the score assigned to it. To do this, follow these steps:

    1. From the Navigation Toolbar, click Contacts.
    2. Select All Contacts.
    3. Click on a contact's email address.
    4. You'll see the Smart view of the contact information. Click the View All Details button.


    5. Scroll down until you see the Contact Timeline section. Here, you can find activities of this contact, including the contact score and the time the scoring took place.
    6. Click the Category drop-down and choose Contact Score, as shown in the GIF below.


    GIF of filtering contact timeline based on contact score


    This filters the contact timeline based on a particular category.

    Signup Forms

    1. What is a default signup form? 

    A default signup form lets recipients join a mailing list via the Subscribe link in the email footer link. You can make any signup form associated to a mailing list the default.

    1. Open the Contacts tab.
    2. Click Manage Lists. Click the list you want a default signup form for.
    3. Click the Forms tab at the top of the list.
    4. Hover over any signup form you see there.
    5. Click the More icon (three-dotted button).
    6. Choose the Make as Default option. From there, this signup form acts as the list's default signup form.

    This associates a signup form to a signup form and makes it the default.

    2. A mailing list already has a default signup form. Can you make another signup form associated to it as default? 

    Yes, you can. Follow these steps:

    1. Open the Contacts tab.
    2. Click Manage Lists.
    3. Click the list you want to have a default signup form for.
    4. Click the Forms tab at the top of the list.
    5. Hover over any sign up form other than the default sign up form.
    5. Click the More icon (three-dotted button) and choose the Make as Default option.

    From there, this signup form acts as the list's default signup form.

    3. How do you make a copy of a signup form? 

    You can create a replica of your signup form using the clone option.

    1. Open the Contacts tab and click Forms. You will get the signup form list view.
    2. Hover over any form and click the Clone icon to complete the action.

    4. What is a thank-you page? 

    A thank-you page is a webpage that a contact is redirected to after filling in a signup form. Zoho Campaigns provides a signup thank you page and confirmation thank you page. This page helps reassure users that their submission was successful and can be used to set expectations about what happens next. It can also be customized to share additional information, links, or next steps to keep the contact engaged.

    5. What is beacon tracking? 

    You can add unique custom tracking text in the pages where you've published your signup form. Using the text, you can gain insights on the performance of the form in each of your pages. This is Beacon Tracking under Signup forms. You can find this option under Show Advanced options once you've created a signup form.


    For example, if you add the text “Home” in the code that you'll embed in the homepage of your website, you'll get a tracking script exclusively for your homepage. You can track the conversions from your homepage using the report.


    You can also use the
    Map tracking text to field option to map the tracking text to a field and use it for segmenting contacts. This will help you generate reports based on the tracking text.

    6. Can you use third-party signup forms to resubscribe contacts? 

    No, to resubscribe unsubscribed contacts, you have to use the signup forms in Zoho Campaigns. You can't use third-party signup forms for this purpose.

    7. How do you create a signup form for a mailing list? 

    1. Navigate to the Contacts module.
    2. Click Signup Forms.
    3. Click Create Form and choose the form type (Pop-up, Long form, Compact form).
    4. Customize the form and click Launch.
    5. Click Edit next to the Associated mailing list option.
    6. Select the mailing list you want to associate with the signup form in the pop-up that appears and click Associate.

    [OR]

    1. Navigate to the Contacts module.
    2. Click Manage Lists.
    3. Click the list you want to create a form for.
    4. Click Add at the top-right of the list.
    5. Click Signup Form.

    The list will be associated to the form; you can then proceed to creating and launching the form.

    8. How do you save the signup form template to the library? 

    1. Navigate to the Contacts module.
    2. Go to Signup Forms.
    3. Open the particular signup form.
    4. Click More Actions.
    5. Select Save template.
    6. Name the template.
    7. Click Save.

    This saves the signup form template to the library.

    9. How do you get the code for the sign up form? 

    This is a conventional way to add signup forms to your website. Just copy the generated code and paste it wherever you want the signup form displayed on your website.

    1. From the Navigation toolbar, choose Contacts. 
    2. Click Signup Forms.
    3. Click on a form.
    4. Click Get Code.

    From here, you can copy the different types of code available on the left side of your screen.

    10. What's the purpose of having a default signup form in a list?

    You might've noticed there's an option to make a signup form as default in a list. But you also would've thought why there's such an option in the first place

    How to make a signup form as default?
     
    If you're not aware of this option, you can find it by:
    • From the Navigation Toolbar to the left, click Contacts and select Manage Lists.
    • Click the list for which you've created signup forms.
    • Click the Forms tab.
    • Hover over a signup form; click the More Actions (3-dot) button at the far right.
    • Click the Make as Default option.

    Now you've learned where this option is, let's understand why this option is even present.

    What's the purpose? 
    Imagine you're sending newsletters (email campaigns) to the contacts of a list, and you want them to subscribe. In such a case, you can set a signup form as default. You can have a creative design for the signup form to increase the chances of the contacts to subscribe.

    How it works?
     
    But setting the signup form alone as default isn't enough. You have to ensure you're selecting the list as a recipient when creating the email campaign. Not only that, but more importantly, you must include the 'Subscribe link' merge tag at the desired place in the email campaign you're sending. Only when the contacts click this merge tag will the signup form load.


    The best part is, you can set up different default signup forms for different lists. If you're selecting more than one list in the email campaign, and if you want to display different signup forms for different sets of contacts of these lists, this will come handy.

    If you're not setting up a default signup form but you include the Subscribe link merge tag in your email campaign, then the default signup form of Zoho Campaigns will be displayed for your contacts when they click this merge tag.

    11. Inside a list you can see the 'Forms' tab, but it doesn't appear in another list. What can be the reason?

    This can be because the signup form option could've been disabled for that particular list. You can check the Setup tab in the list to enable or disable the signup form option.

    1. From the Navigation Toolbar click Contacts.
    2. Click Manage Lists.
    3. Click the list in which the Forms tab doesn't appear.
    4. Click the Setup tab at the top of the list.
    5. You can see the toggle to enable or disable signup forms for this list here.

    Please check the below video to know how to enable or disable this option.


    Import Contacts

    1. How can you import a list of contacts to the Unsubscribed list? 

    1. Navigate to the Contacts module.
    2. Click All Contacts.
    3. Click More.
    4. Select Import to Unsubscribed Contacts. 
    5. Click Go Ahead.


    6: Choose the file to import.

    This imports a list of contacts to the Unsubscribed list.

    2. Why are valid contacts ignored as invalid, bounced, or unsubscribed when importing? 

    We use an internal validation system to verify all contacts. If a contact is identified as having an invalid email address due to an incorrect format, or if the contact has previously bounced or unsubscribed, it will be excluded. Ensure that the contacts you're importing have valid email addresses to avoid such issues.

    This is the reason there will be a discrepancy in the contact count during the import process. If you have 10,000 contacts to import, but only 9,000 can be imported. The remaining 1,000 contacts would be skipped due for the reasons mentioned above.

    If you see an error message, such as “invalid pattern in ignored contacts”, it signifies email addresses with incorrect formats, such as missing @ or domain parts, making them undeliverable and unusable. For example, "johngmail.com", "jane@aol", or "ted@abccom". Always verify the email address of your contacts.

    3. How can you view ignored contacts when a file is imported? 

    1. Navigate to the Contacts module.
    2. Click All Contacts.
    3. Click More.
    4. Choose Import Overview.


    The list of imports is available under Import overview. Click the relevant import, then click the number of ignored contacts. You can export them using the Download icon.

    4. How do you view all of the imports in Zoho Campaigns? 

    1. Navigate to the Contacts module.
    2. Click All Contacts.
    3. Click More.


    4. Choose Import Overview.

    Here, all of the imports you've done will be listed. You can click a particular import to view details about it, including the list of contacts imported or ignored.

    5. What are “Duplicate Contacts" in import overview after a file has been imported? 

    Duplicate contacts refer to the contacts that are already in your account. However, if you've imported the contacts into a new mailing list, the contacts will still be imported into the new mailing list you’ve chosen.

    When you import contacts into Zoho Campaigns, the system automatically performs duplication checks. For example, if the same email address appears multiple times in the file, duplicates are detected and ignored during the import process.

    6. What is the maximum file size when importing the contacts? 

    The maximum allowed file size is 25 MB. If you have a file that exceeds 25 MB, it’s better to split the file into smaller files—say, five files of 5 MB each—and proceed with the import.

    7. Can you select multiple mailing lists when adding or importing contacts? 

    Yes. When importing or adding contacts, you can select multiple mailing lists simultaneously. After selecting one list, click another list to select it as well.

    8. Does Zoho Campaigns allow you to re-import unsubscribed contacts? 

    You can’t change a contact’s status from Unsubscribed to Active manually. You can re-import unsubscribed contacts into Zoho Campaigns, but they’ll remain unsubscribed by default.

    If a previously unsubscribed contact is imported, Zoho Campaigns will recognize their unsubscribed status. The contact will be added to your account (if it’s not already), but it will stay on the Do Not Mail list. The contact won’t receive any emails unless they intentionally resubscribe through a double opt-in signup form.

    9. How can you import contacts whose email address has + symbol? 

    If you have contacts with email address such as john+t@abc.com or jamie+k@abc.com, you can’t import them in Zoho Campaigns. You can manually add them. If you still want to import these contacts, contact our support team at support@zohocampaigns.com and they will assist you.

    10. What does marketing and non-marketing subscription types mean? 

    Subscription Type can be used to identify the status of contacts to decide if it’s the right time to send them email campaigns and if they want to receive email campaigns.

    Marketing: For contacts who have agreed to receive promotional or marketing content from you, such as newsletters, product updates, offers, or event invites, messages sent under this subscription are typically commercial in nature and require explicit consent (opt-in) from the contact.

    Non-marketing: For contacts who haven't provided consent to receive marketing emails from you. You may reach out to them again personally if you want their consent for sending marketing emails.

    11. How do you map Zoho Creator fields with Zoho Campaigns fields? 

    To map Zoho Creator fields with Zoho Campaigns fields, follow these steps:

    1. Navigate to Contacts → Sync Services.
    2. Click the number above active syncs in Zoho Creator.
    3. Click the active sync to open the sync's Details.
    4. Click Edit at the top-right and click Next at the bottom-right.
    5. Click Map more fields to map the fields.
    6. Click Add once you've mapped them.
    7. Click Initiate at the bottom-right of the screen once you're done.

    This maps Zoho Creator fields with Zoho Campaigns fields. Periodic and two-way sync aren’t possible with this integration. Sync is one-time and permanent.

    To initiate a new sync between Zoho Creator and Zoho Campaigns, follow these steps:

    1. From the Navigation bar, select Contacts  Sync Services.
    2. Go to Zoho Creator.
    3. Click Add New Sync.
    4. Enter the Sync Name, Application, View and mailing list.  
    5. Click Next.
    6. Map the required fields by clicking Map more fields.
    7. Click Initiate.

    This initiates a new sync between Zoho Creator and Zoho Campaigns.

    12. How do you create a new sync for the Zoho Contacts integration with Zoho Campaigns? 

    With the Zoho Contacts integration, you can only add one sync. Multiple new syncs aren't possible. Once you've integrated the two apps you can:

    1. Navigate to Contacts  Sync Services.
    2. Click on Active Syncs to view the page where your active syncs are listed.
    3. On this page you can either click Add New Sync to add a new sync or Setup to enable or disable additional settings.
    4. Once you click Add New Sync you’ll see a page where you can set up a new sync.
    5. Select the module to be synced. You can only choose the Contacts module.
    6. Select other necessary options like list and topics.
    7. Click Initiate.

    Once the sync is completed, you’ll see the Configuration screen of the sync where you can find essential information about the sync. Note that periodic sync isn’t possible. Sync between Zoho Contacts and Zoho Campaigns is non-recurring.

    13. How do you import contacts from Zoho WorkDrive? 

    To import contacts from Zoho WorkDrive, follow these steps:

    1. From the Navigation toolbar, choose Contacts  All Contacts.
    2. Click Import under the Add New button.
    3. Click Select File.
    4. Click the Zoho WorkDrive card.
    5. On the next screen, select the file by clicking it.
    6. Click Attach.
    7. Choose a mailing list and the file from which you need to import.
    8. Map the fields. Assign tags if necessary.
    9. Click Import.

    This imports contacts from Zoho WorkDrive.

    14. How can you map additional fields in a Shopify sync? 

    To map additional fields:

    1. Navigate to the Ecommerce module.
    2. Click the Shopify sync you've set up.
    3. Click the Setup tab to open the field mapping section.
    4. Click Edit at the far right of this tab.
    5. Scroll down and click Map more to map additional fields.
    6. When you’re done, click Save.

    This maps additional fields in a Shopify sync.

    15. Your periodic sync of Zoho Creator has become inactive before the configured time period. Why did this happen? 

    If you change the application link name or the view link name in your Zoho Creator account, all syncs associated with the older link names will become inactive and can’t be reactivated. Create new syncs whenever you change either of these links.
    NotesNote: This is not applicable in the revamped sync setup.

    16. You want to map the Shipping Code field from a table in Zoho Books, but you can’t find it under the pre-mapped fields. How do you map it? 

    You can use the Map more link in the Mapping fields step of your sync. Shipping Code isn’t a default field in Zoho Campaigns, so you need to add a custom field for it.

    You can do this from the Mapping fields page during Zoho Books sync.

    1. From the Navigation toolbar, click Contacts  Sync Services.
    2. Click Zoho Books and open an existing sync.
    3. Click Edit Syn.
    4. Click Next to go to the field mapping section.
    5. On this page, click Map more fields


    6. Choose the
    Shipping Code field from Zoho Books.
    7. Ensure you tick the New Field checkbox, as this isn't a default field in Zoho Campaigns.


    8. Click
    Add. This field will be created as a custom field in the background in Zoho Campaigns and will be mapped to the corresponding Zoho Books field.
    9. Click Initiate to complete the process.

    This maps the Shipping Code field from a table in Zoho Books.

    17. You’ve synced contacts from Zoho Books. Out of 100 contacts, only 75 of them were synced. Why did this happen? 

    This may happen if those contacts have already been added to Zoho Campaigns as subscribers, so you’ll need to check if those contacts. There can be other reasons why some of the contacts were ignored. You can view the sync history in the Detailed view of the sync.

    To view the details of the sync:

    1. Navigate to Contacts.
    2. Click Sync Services. 
    3. Under Zoho Books, click the sync you want to view the details for.
    4. Click Sync History to view a report of the syncs that happened.


    5. Hover over the Skipped contacts and you'll be able to download a list of them.

    This will allow you to view the sync details.

    18. Can you edit the details of an inactive Zoho Analytics sync? 

    You cannot edit sync details after saving it. Instead, create another sync implementing the changes you need to make on the Sync Details page. You can have a maximum of 144 active Zoho Analytics syncs at once.
    NotesNote: You can select only one database and one table combination at a time to create a sync.

    19. You want to map the Product Category field from a table in Zoho Analytics, but you can’t find it under the pre-mapped fields. How do you map it? 

    You can use the Map more option in the Mapping fields step during sync. The product category isn’t a default field in Campaigns, so you’ll need to add a custom field for it.

    You can do this from the Mapping fields page during Zoho Analytics sync.

    1. From the Navigation toolbar, click Contacts  Sync Services.
    2. Click Zoho Analytics and open an existing sync.
    3. Click Edit Sync.
    4. Click Next at the bottom-right of the screen to go to the Field mapping section.
    5. On this page, click Map more fields.
    6. Choose the Product Code field from Zoho Analytics.
    7. Adjacently, ensure you tick the New Field checkbox because this isn't a default field in Zoho Campaigns.
    8. Click Add. This field will be created as a custom field in the background in Zoho Campaigns and will be mapped to the corresponding Zoho Analytics field.
    9. Click Initiate to complete the process.

    This maps the Product Category field from a table in Zoho Analytics.

    20. Can you sync a Zoho Analytics query table with a Zoho Campaigns mailing list? 

    Yes, you can sync a Zoho Analytics query table with your Zoho Campaigns list. Query tables contain data filtered from multiple Zoho Analytics tables based on a Select query. You can import query tables data as contacts into a mailing list.

    For example, you have a query table containing details of customers who have purchased your products stored in the tables Sales-2017 and Sales-2018. You can import these customers into a list called "Purchased" in your Campaigns account and use this list to send them newsletters related to product updates.

    21. Are there any limits to the number of segments, lists, or topics I can create in Zoho Campaigns? 

    You can create any number of segments in Zoho Campaigns to categorize your contacts because currently there’s no limit. While there's no limit to the number of contacts you can add to a list, it’s usually dependent on the number of contacts you've purchased if you're in the paid plan of Zoho Campaigns.

    In the Free plan, you can have 2,000 contacts. You can add all 2,000 contacts to a single list. Similarly, if you're in the Standard or Professional plan but have purchased 5,000 contacts, you can add all of them to a single list depending on your preference. If you want to manage all of your contacts in a single list, you can do that. If you want to spread your contacts across multiple lists, you can do that, too.

    As of now, there isn't a limit to the number of lists you can create in Zoho Campaigns.

    22. How do you map the Product Category field from a table in Zoho Analytics? 

    When importing contacts, you may have a field in your import file containing data you want to bring into Zoho Campaigns for your contacts. But you won’t find a suitable field from Zoho Campaigns to map it against.

    In such cases, Zoho Campaigns allows you to create a custom field in the field mapping section of the import screen itself. In the field mapping section, the left column displays the fields from your import file. The right column comprises the Zoho Campaigns fields, which you need to map or select against the corresponding fields from your file.

    Say that you have a Date of Birth field in your file, and you want to have this information in Zoho Campaigns as well. This field will be a date field. In this case, you can create a custom field during the field mapping process itself.

    Here are the steps:

    1. After uploading the import file, you'll set the subscription type and select lists.
    2. Next is the field mapping section. Assume that you have a Date of Birth field in your file. This will be displayed on the left column under Fields from file.
    3. Click the field against it under the Campaigns Fields column.
    4. Click Add New Field in the drop-down that appears.


    5. In the window that appears, you must select the field type. In this case, it should be Date. Select it and provide a name for the field in Display Label.
    6. Click Add.


    7. You'll see that the Date of Birth field you created is mapped against the Date of Birth field from your file.
    8. Choose the date format as MM/DD/YYYY.


    9. Once you've confirmed that every field has been mapped correctly, you can proceed further.

    This maps the Product Category field from a table in Zoho Analytics.

    23. Why are some of my contacts ignored?

    The table below lists each reason a contact may be ignored, what causes it, and the steps you can take. Where no fix is available, the status is noted accordingly.

    Reason
    Why it happens
    How to fix it
    Empty Email Address
    The email field is empty for this contact in the import file.
    Add a valid email address for the contact in your import file.
    Empty Contact Details
    Both the email and mobile fields are empty for this contact in the import file.
    Provide data for at least one field, either email or mobile, in your import file.
    Invalid Format
    Both the email and mobile fields have data, but one or both are in an invalid format.
    Make sure the email address is in a valid format and the mobile number follows the E.164 format.
    Invalid Format Email Address
    Only the email field is mapped, but the email address is in an invalid format.
    Correct the email address in your import file to match the standard email format (for example, name@domain.com).
    Invalid Format Mobile Number
    Only the mobile field is mapped, but the mobile number is in an invalid format.
    Correct the mobile number in your import file to follow the E.164 format.
    Group Email Address Not Allowed
    The contact's email is a role-based or generic address, such as info@, administrator@, careers@, service@, or support@. Zoho Campaigns does not permit these addresses to protect your sender reputation.
    Remove role-based email addresses from your import file and use individual contact addresses instead. Learn more about role/group addresses
    Duplicate Entry In File
    The same email address appears more than once in the import file.
    Remove duplicate entries from your file and keep only one occurrence of each email address.
    Duplicate Contact
    You selected the Overwrite Contacts option in the duplicate preference handling, but all field values for this contact in the import file are identical to what already exists in your organization.
    If you don't want to modify this contact, remove the contact from your import file. If you want to modify a field data for this contact, update at least one field value before importing again.
    Non-marketing Contact Limit Exceeded
    Your organization has reached the limit of 1,000,000 non-marketing contacts. No additional non-marketing contacts can be imported.
    This is a system limit. These contacts cannot be imported.
    Marketing Contact Limit Exceeded
    Your organization has reached the marketing contact limit for your current plan.
    Upgrade your plan to increase your marketing contact limit.
    Unsubscribed Contact Limit Exceeded
    Zoho Campaigns allows a contact's subscription type to be changed up to three times per month. Your organization has reached its monthly limit, which is three times your plan's contact limit. For example, on a 10,000-contact plan, up to 30,000 subscription type changes are permitted per month.
    Contact the support team at support@zohocampaigns.com for assistance.
    Hard Bounce
    The contact's email address has previously hard bounced. Importing hard-bounced contacts can negatively affect your domain reputation.
    Remove hard-bounced contacts from your import file. These contacts should not be re-imported.
    Do Not Mail
    The contact is on the Do Not Mail list in your organization, typically because they have unsubscribed. Contacts in this list cannot be re-imported.
    No action can be taken. Contacts on the Do Not Mail list cannot be imported.
    Awaiting Confirmation
    The contact signed up through a form but has not yet confirmed their subscription via the double opt-in email.
    Ask the contact to complete the double opt-in confirmation, or resend the confirmation email from your organization settings. Once confirmed, the contact will be added. Learn more about managing double opt-in.
    Invalid Contact
    The contact was processed during import, but the email address failed backend validation. The contact is moved to the Invalid Contacts view, and the import summary is updated to reflect them as ignored.
    Contact the support team at support@zohocampaigns.com if you believe these contacts are valid and want them added to your organization.
    Invalid Line
    A row in your CSV file could not be read due to a formatting issue. This only occurs with CSV files.
    Review the affected row in your CSV file for formatting issues, such as missing commas or line breaks. If the issue persists, contact the support team at support@zohocampaigns.com.
     
    To reduce ignored contacts in future imports, check your contact list for data quality before uploading. Make sure email addresses are valid, mobile numbers follow the E.164 format, and role-based or generic email addresses are removed. For guidance on preparing your file, see Best practices for importing contacts. For any issues that need hands-on help, reach the support team at support@zohocampaigns.com.