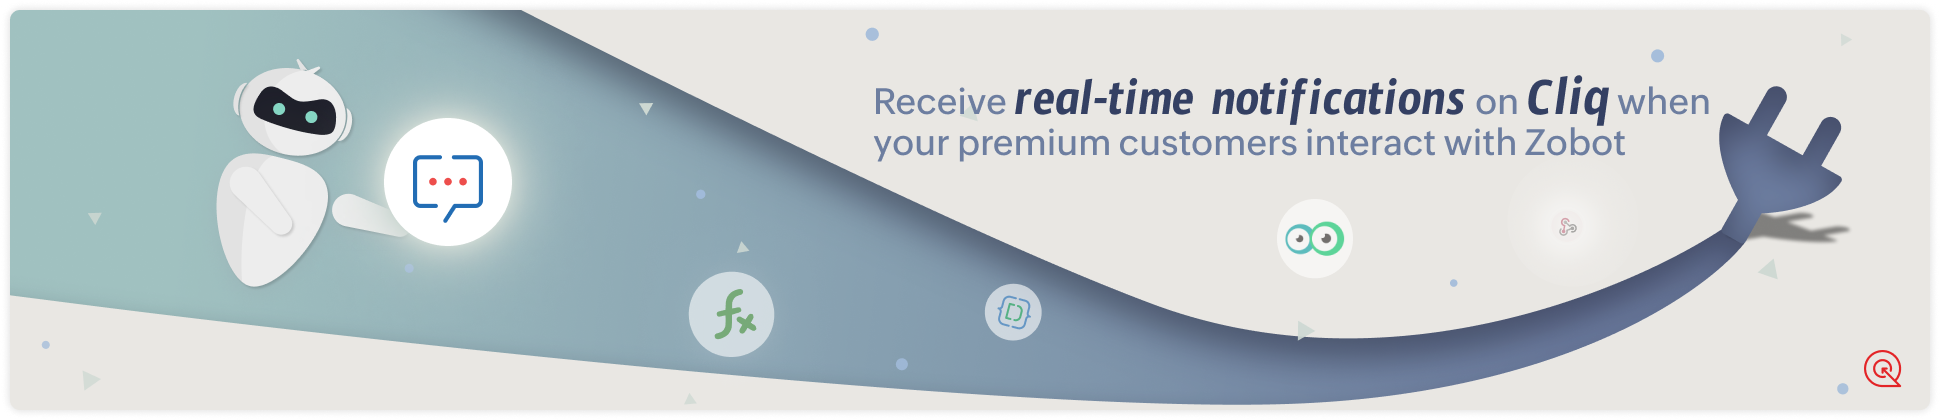
Plug Sample #9 - Get Notified on Cliq When Your Premium Customers Interact with SalesIQ's Zobot
Hi everyone!
We're here with another simple yet effective plug for your chatbot to integrate with Zoho Cliq to make your job easier. Just imagine whenever a potential lead or your premium customers are on your website, and they engage with your chatbot, you'll receive instant notifications on Cliq, complete with their details and a chat URL.
Sounds helpful, right?
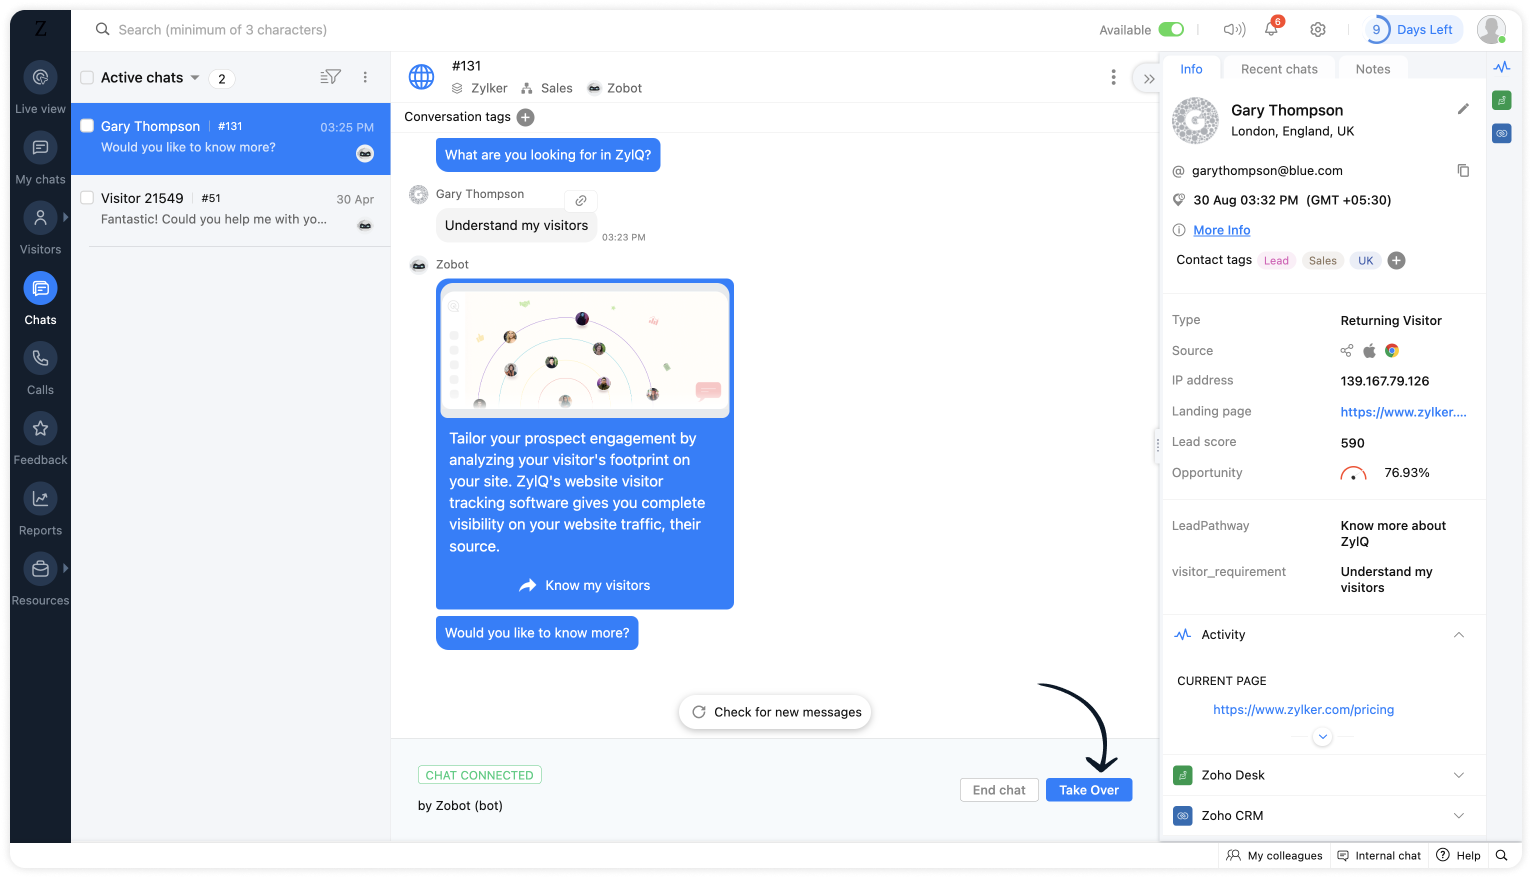
Now get all this information on your cliq as a message. If a prospect or a premium customer is conversing with the bot, then on a click you will be redirected to SalesIQ. You will get the complete information of the chat and can also take over the chat from the bot, thus providing your best assistance.
Are you new to SalesIQ? Wondering what these plugs and bots are?
Zoho SalesIQ is a customer engagement and live chat platform for your website. To automate customer engagement, SalesIQ offers chatbots. With the Codeless bot builder, you can build chatbots by dragging and dropping cards. This bot builder has almost all essential cards needed to build your bot. However, at times, businesses would require unique actions from the bot and for those instances, we have Plugs. With plugs, you can create a unique action and bring it as a card inside the codeless bot builder like the rest of the cards. In this post, we will take a look at how to create a plug integrating your bot with Zoho Cliq and the possible benefits.
How can this Plug help your business?
- Get notified in Cliq when a specific type of visitor engages with chatbot. These visitors can be who you think are important for your business like premium customers, potential leads, visitor with a good lead score, visitors from a specific URL or source, visitor with CRM deal closing date period, etc. as per your requirement.
- Cliq bot will notify on the personal chat (subscribers of the bot) or on a group channel based on the preference.
- Get your visitor details like name, chat URL, and other information, in the message notification.
- Clicking on the chat URL, you will get redirected to the SalesIQ's bot conversation, where you can look at the bot chat. If required, you can take over the chat.
Plug overview
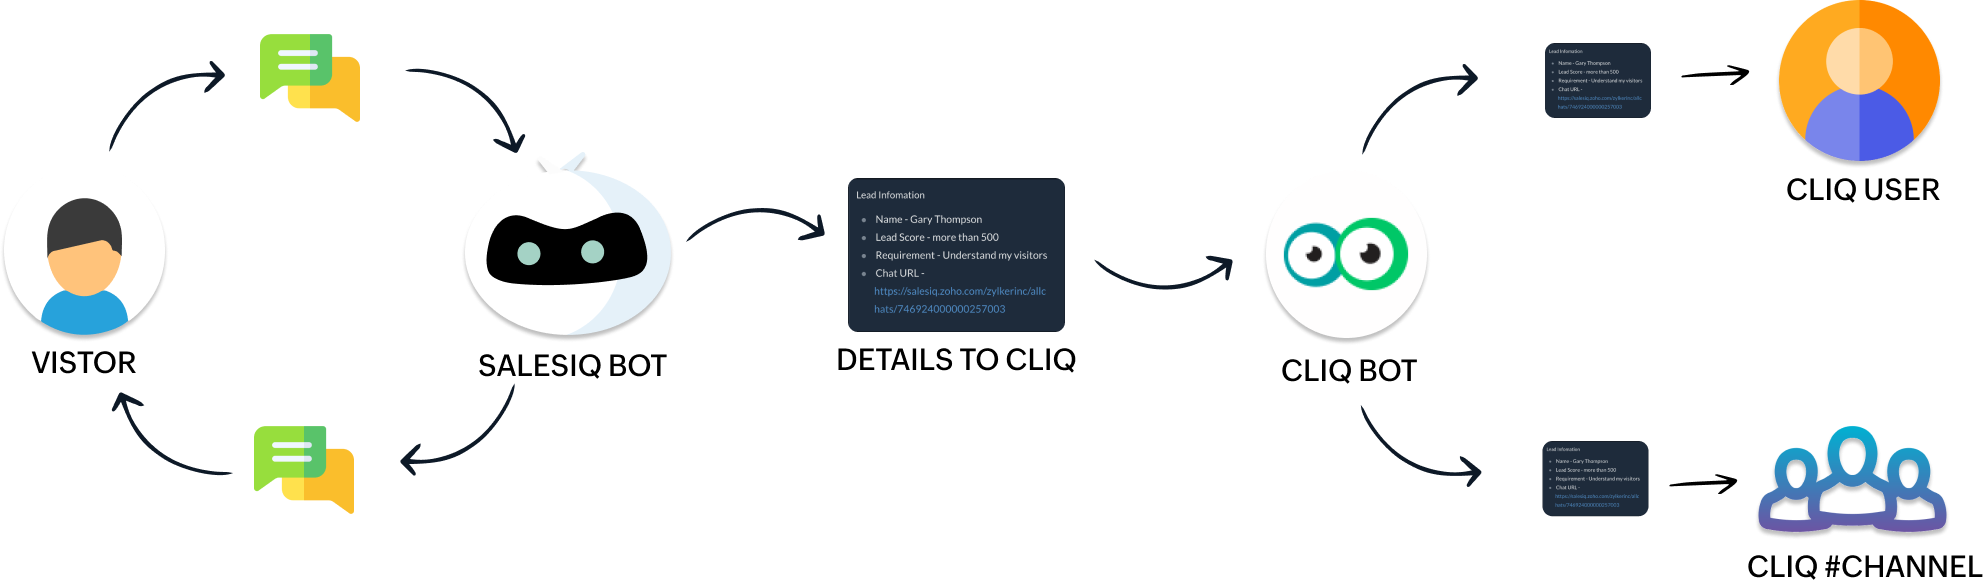
- The SalesIQ bot will collect the required information and send it to the Cliq bot while the conversation is ongoing.
- Next, the Cliq bot will send this information to personal chat or a group channel in Cliq as per your business needs.
How to build this Plug (promising lead engages with your bot) ?
Step 1 - Create a connection between SalesIQ and Zoho Cliq
- In your SalesIQ Dashboard, navigate to Settings > Developers > Plugs > Click on Add .
- Provide your plug a name, and description, select the Platform as SalesIQ Scripts , and finally, click on Connection to your left bottom. You will be redirected to the connection interface.
- Click on Create connection at the top right corner.
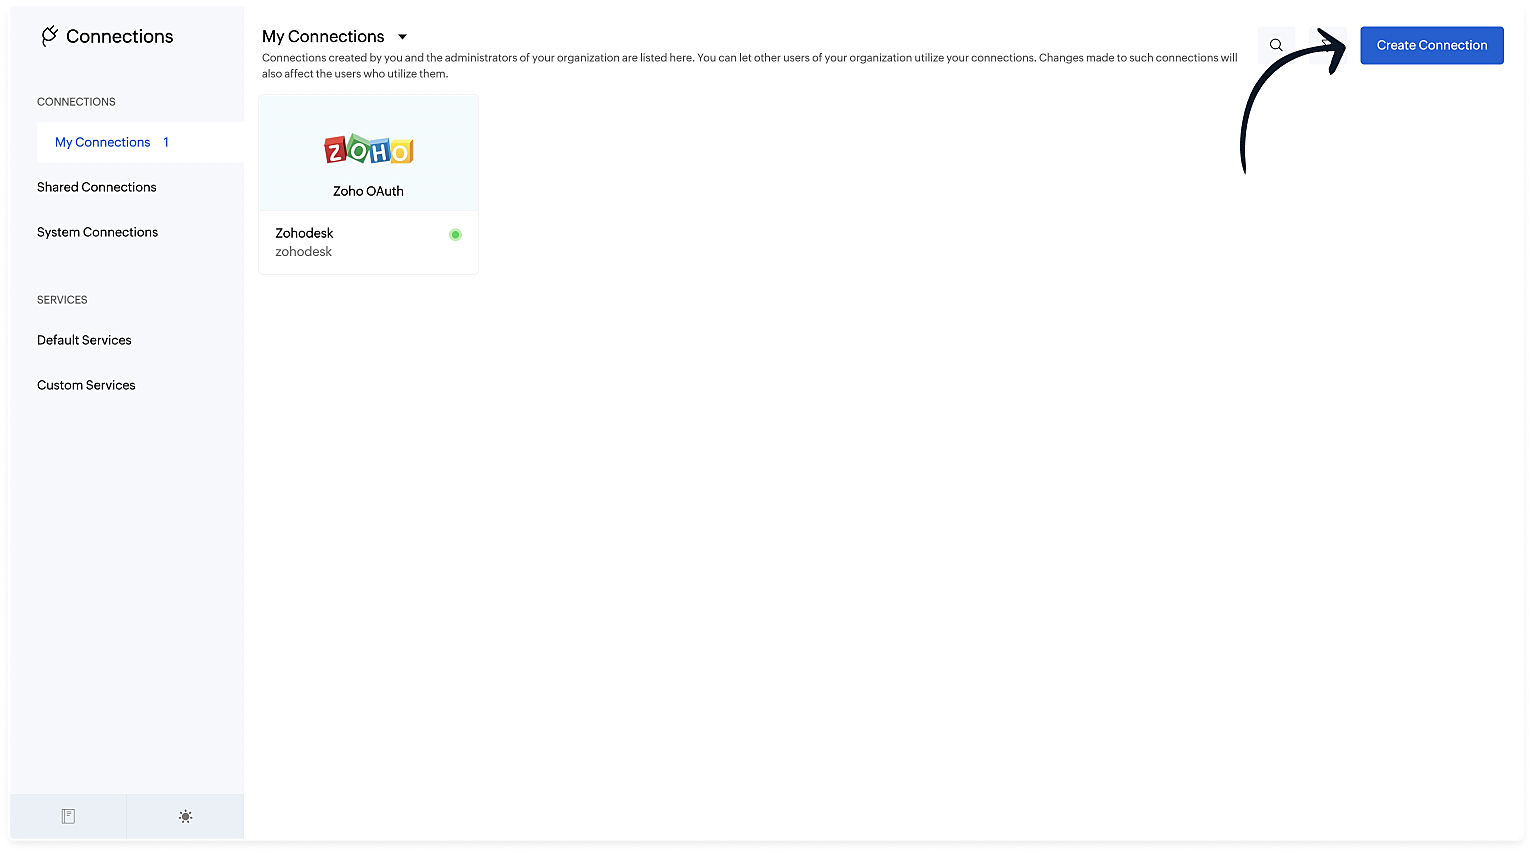
- Under Default connection, select Zoho OAuth service.
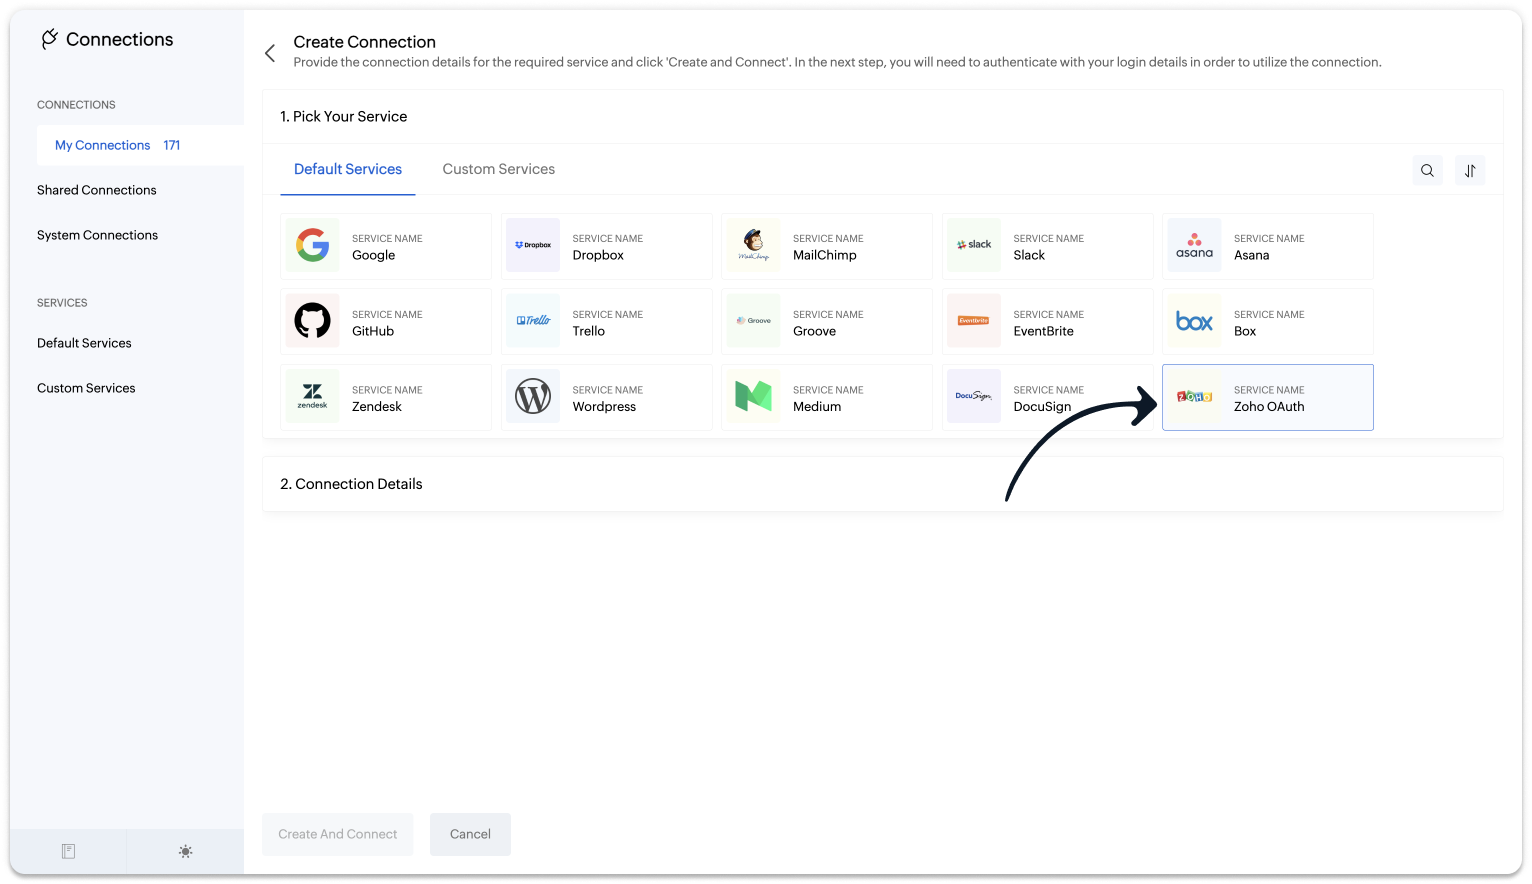
- Provide your connection name, connection link name, and choose the scopes below.
- ZohoCliq.Webhooks.CREATE
- ZohoCliq.Messages.ALL
- Click on Create And Connect to connect Zoho SalesIQ and Zoho Cliq.
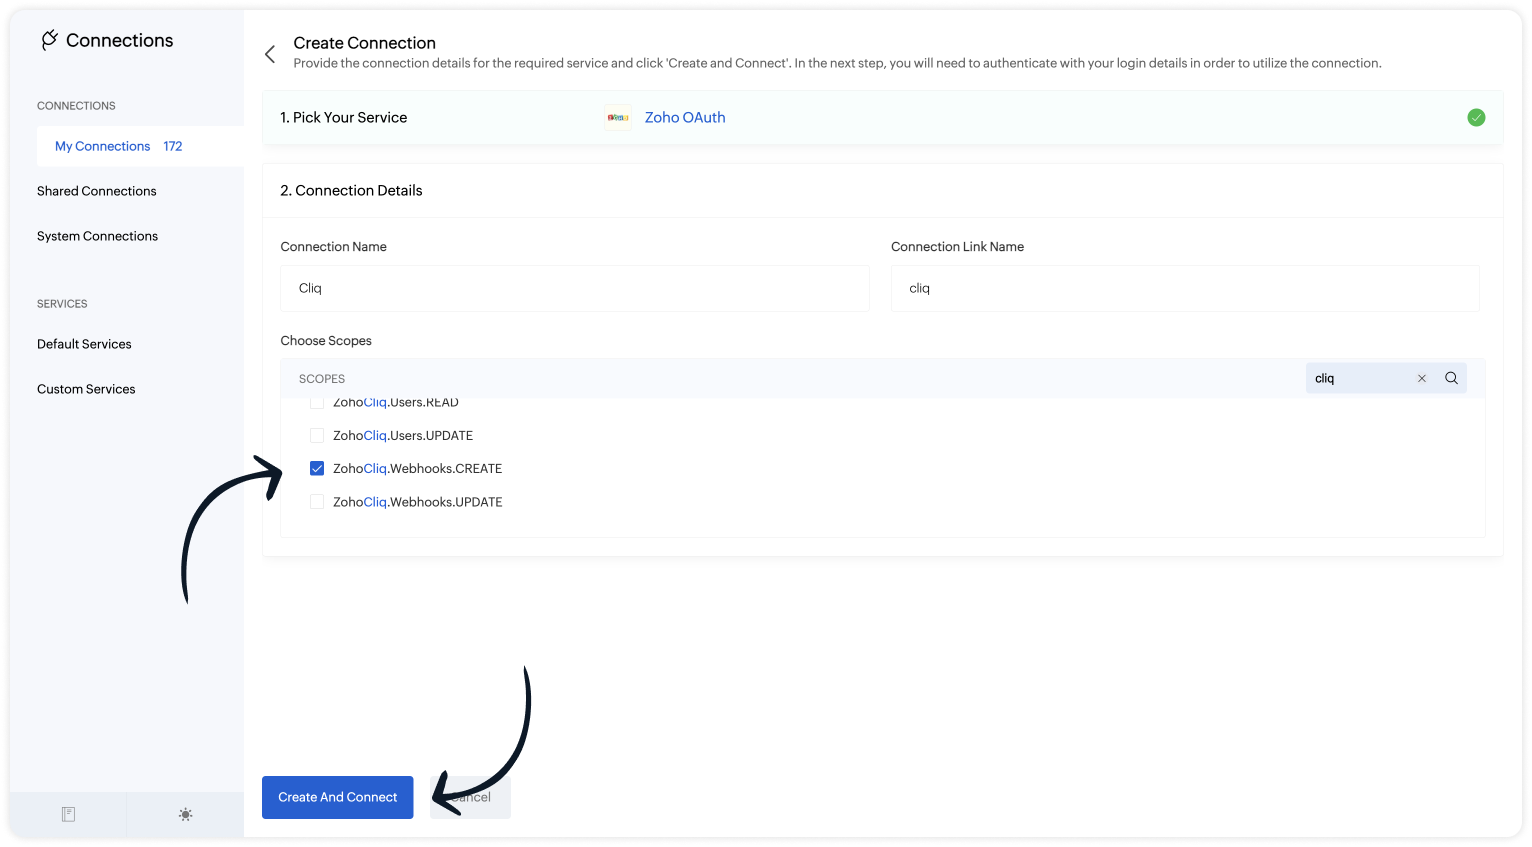

Note: The Connection Link Name will be used in the scripts to invoke URL tasks.
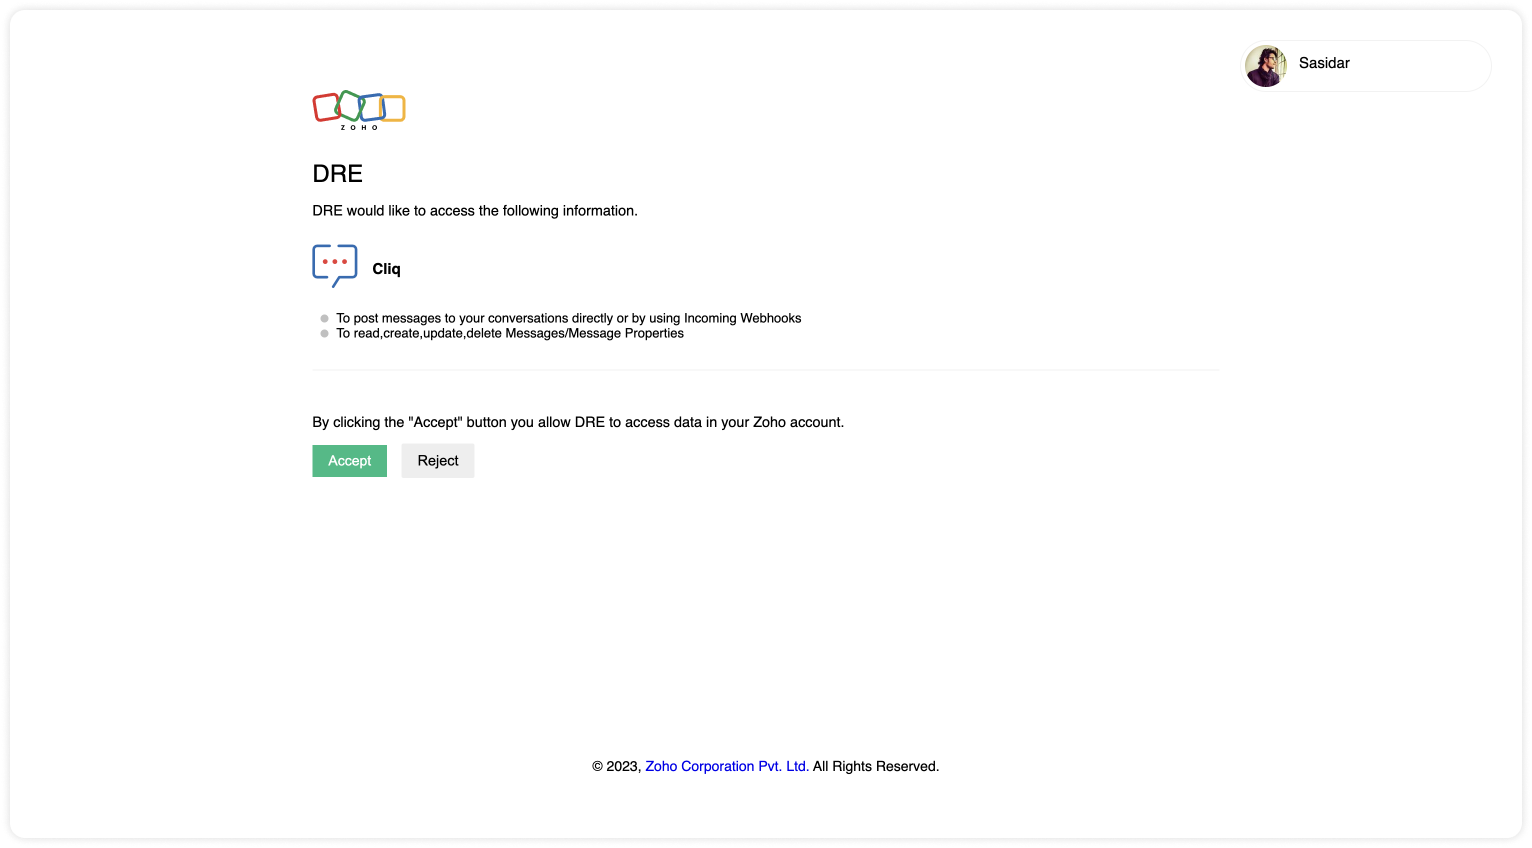
Upon successful authentication, Zoho SalesIQ will be connected with Zoho Cliq.
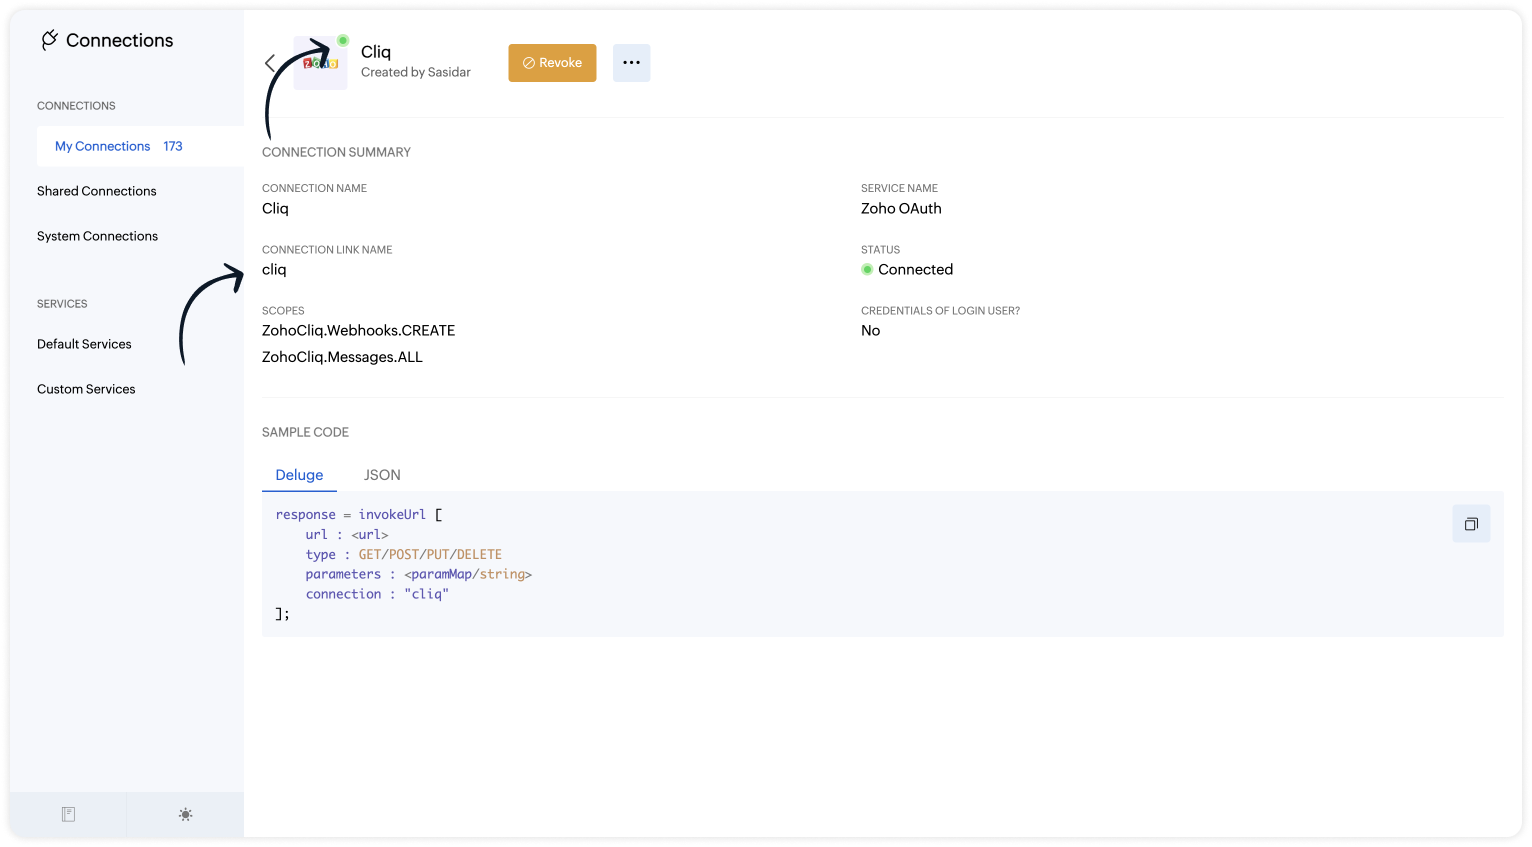
- The connection is successfully established.
Step 2 - Build the Plug
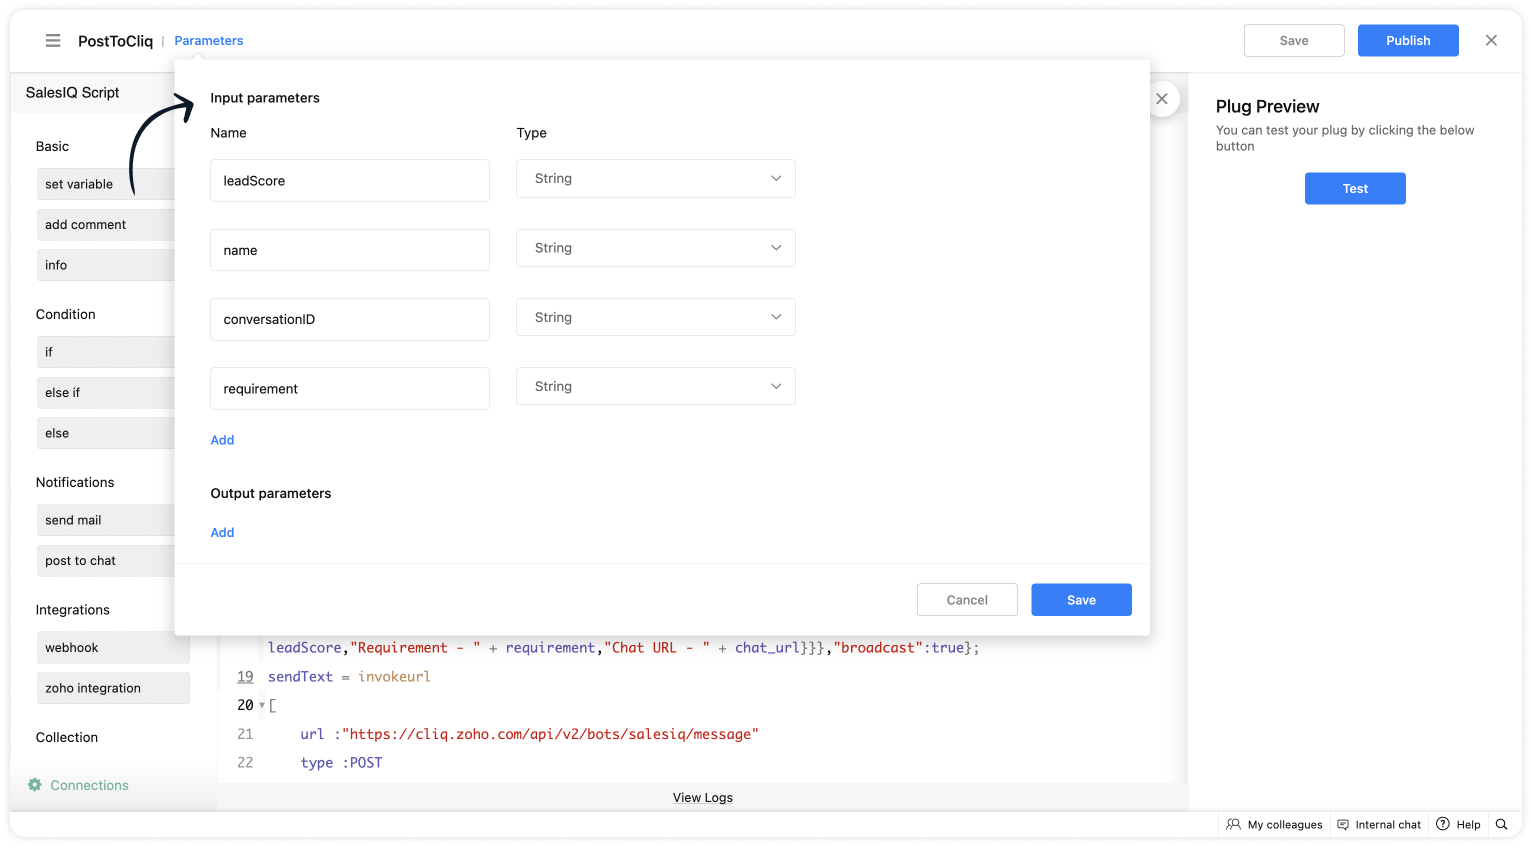
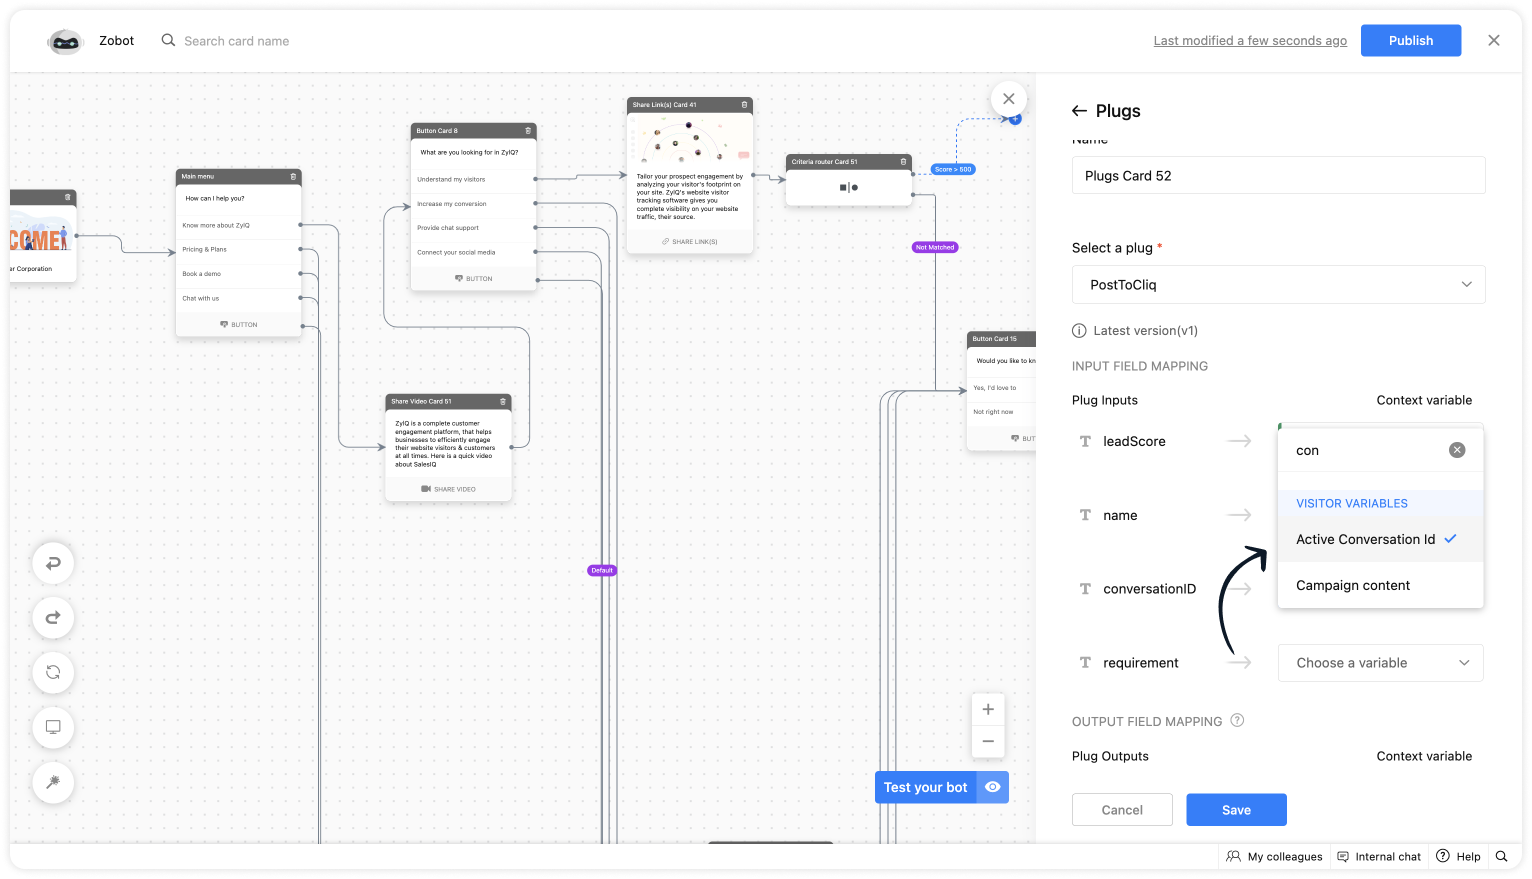
As we have created a connection between SalesIQ and Cliq successfully. It's time to build the plug. The first step in building the plug is defining the parameters. You can enter the metrics (information) which you want the SalesIQ bot to send to Cliq bot. I've taken the name, lead score, requirement (lead's interest) and conversation ID to create the chat URL.
Input Parameters
- Name : name | Type : String
- Name : leadScore | Type : String
- Name : requirement | Type : String
- Name : conversationID | Type : String
Script to notify a specific user via Cliq bot
If you want to notify (post information) to specific users in Cliq, copy the code below and paste it into your plug builder. Then, make the following changes.
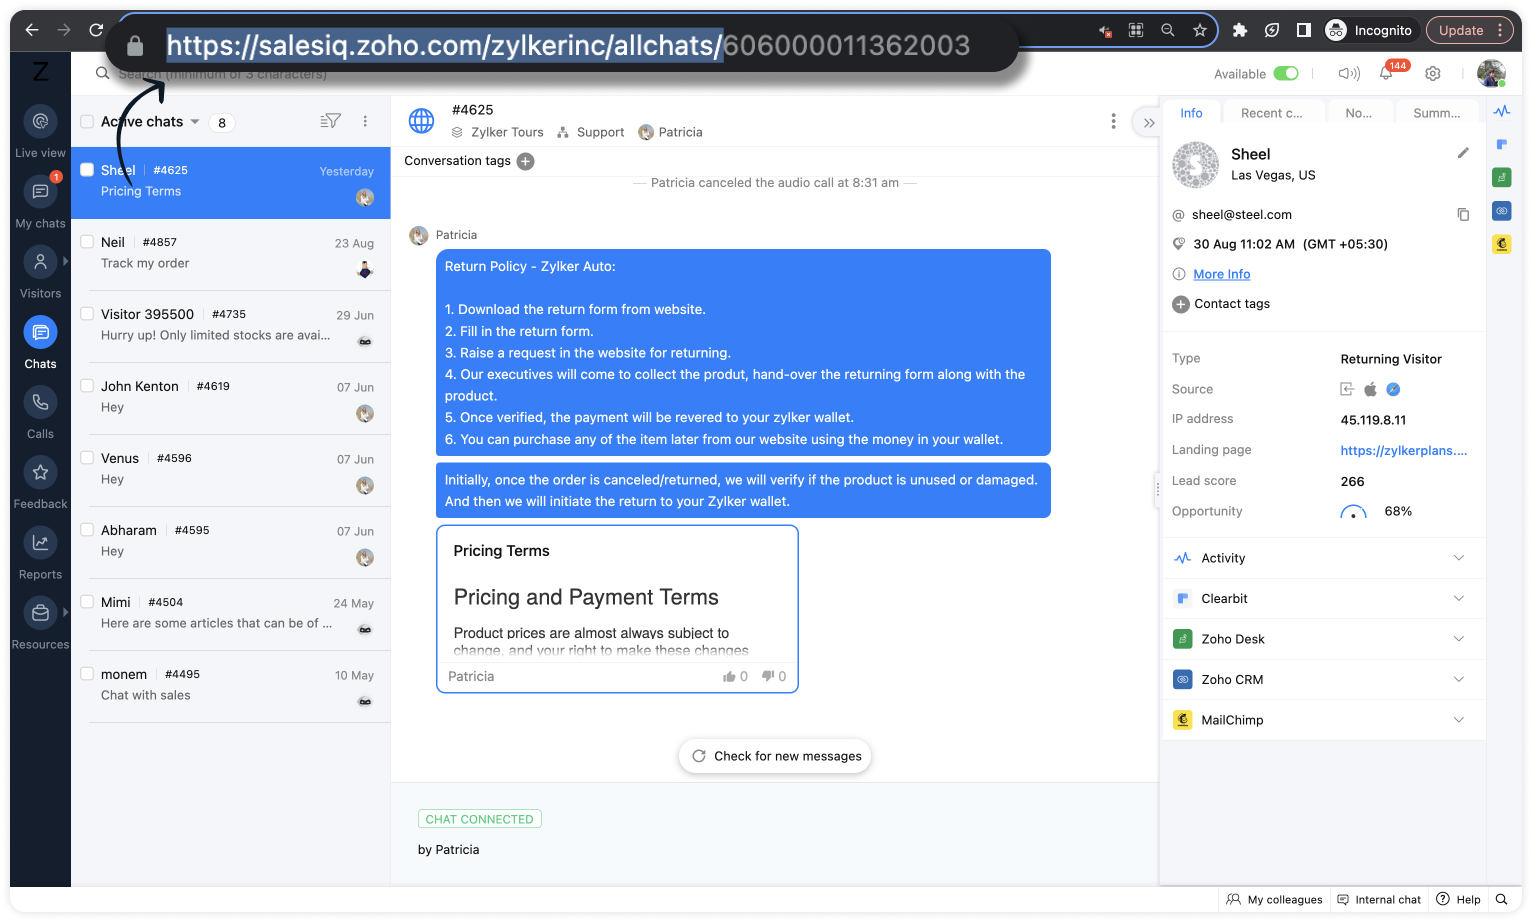
- In line #16, get your portal's chat URL. For that, navigate to SalesIQ > Chats > Copy the URL except the conversation ID.
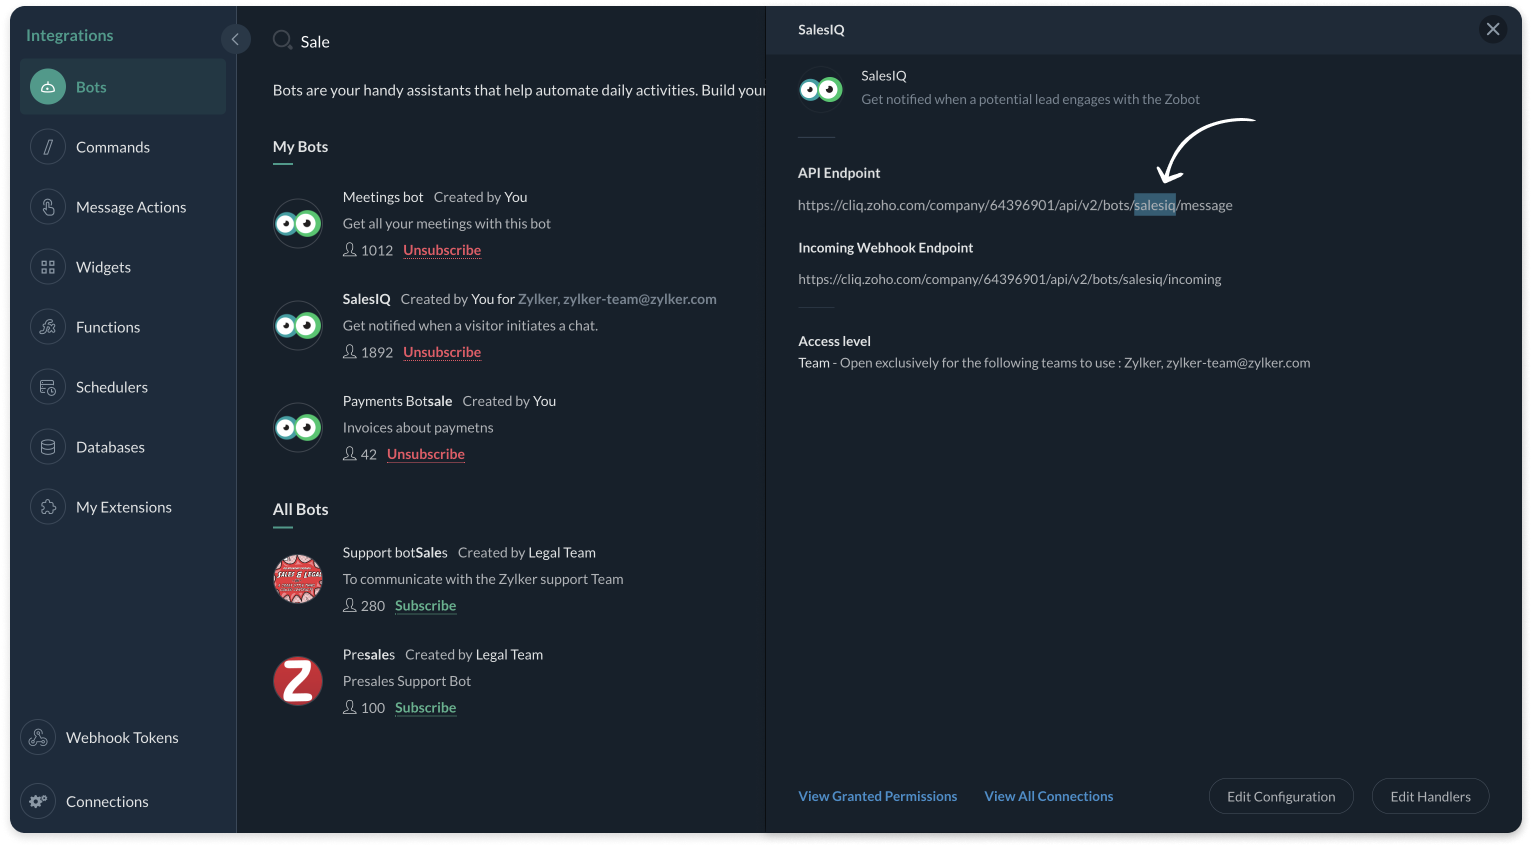
- In line #22, replace the cliq bot name in the URL. To get the bot name from your Cliq dashboard, click on your profile in the top right corner > Bots & Tools. Then, create a new bot or click on any existing bot. (All subscribers of this bot will get notified.)
- And, make sure, the connnection line name in line #25 is same as created during creating the connection between SalesIQ and Cliq (Step 1).
Plug Script/Code
- if(session.containsKey("name"))
- {
- name = session.get("name").get("value");
- }
- if(session.containsKey("leadScore"))
- {
- leadScore = session.get("leadScore").get("value");
- }
- if(session.containsKey("requirement"))
- {
- requirement = session.get("requirement").get("value");
- }
- if(session.containsKey("conversationID"))
- {
- id = session.get("conversationID").get("value");
- chat_url = "https://salesiq.zoho.com/zylkerinc/allchats/" + id;
- }
- list_data = {"text":"Lead Infomation","slides":{{"type":"list","data":{"Name - " + name,"Lead Score - " + leadScore,"Requirement - " + requirement,"Chat URL - " + chat_url}}},"broadcast":true};
- //replace your cliq bot name (salesiq) in line #22
- sendText = invokeurl
- [
- url :"https://cliq.zoho.com/api/v2/bots/salesiq/message"
- type :POST
- parameters:list_data + ""
- connection:"cliq"
- ];
- response = Map();
- return response;
- Then, click Save, preview the plug and Publish it.

Note: API invoked in the plug is Post message to a bot
Script to notify a specific channel via Cliq bot
If you want to notify (post information) to a specific channel in Cliq, copy the code below and paste it in your plug builder. Then, make the following changes.
- In line #16, get your portal's chat URL. For that, navigate to SalesIQ > Chats > Copy the URL except the conversation ID.
- In line #22, replace the Cliq bot and channel name in the URL. To get the bot name, click on your profile in the top right corner > Bots & Tools. Then, create a new bot or click on any existing bot. To get the channel name, click on the channel properties and get the channel's Unique Name.
- And, make sure, the connnection line name in line #25 is same as created during creating the connection between SalesIQ and Cliq (Step 1).
Plug Script/Code
- if(session.containsKey("name"))
- {
- name = session.get("name").get("value");
- }
- if(session.containsKey("leadScore"))
- {
- leadScore = session.get("leadScore").get("value");
- }
- if(session.containsKey("requirement"))
- {
- requirement = session.get("requirement").get("value");
- }
- if(session.containsKey("conversationID"))
- {
- id = session.get("conversationID").get("value");
- chat_url = "https://salesiq.zoho.com/zylkerinc/allchats/" + id;
- }
- list_data = {"text":"Lead Infomation","slides":{{"type":"list","data":{"Name - " + name,"Lead Score - " + leadScore,"Requirement - " + requirement,"Chat URL - " + chat_url}}}};
- //replace your cliq channel (leadsfromzobot) and bot name (salesiq) in line #22
- sendText = invokeurl
- [
- url :"https://cliq.zoho.com/api/v2/channelsbyname/leadsfromzobot/message?bot_unique_name=salesiq"
- type :POST
- parameters:list_data + ""
- connection:"cliq"
- ];
- response = Map();
- return response;
- Then, click Save, preview the plug and Publish it.
Note: API invoked in the plug is Post message in a channel
Step 3 - Adding the plug to the Codeless bot builder
- Navigate to Settings > Bot > Add, provide the necessary information, and select Codeless Bot Builder as a bot platform or open an existing bot.
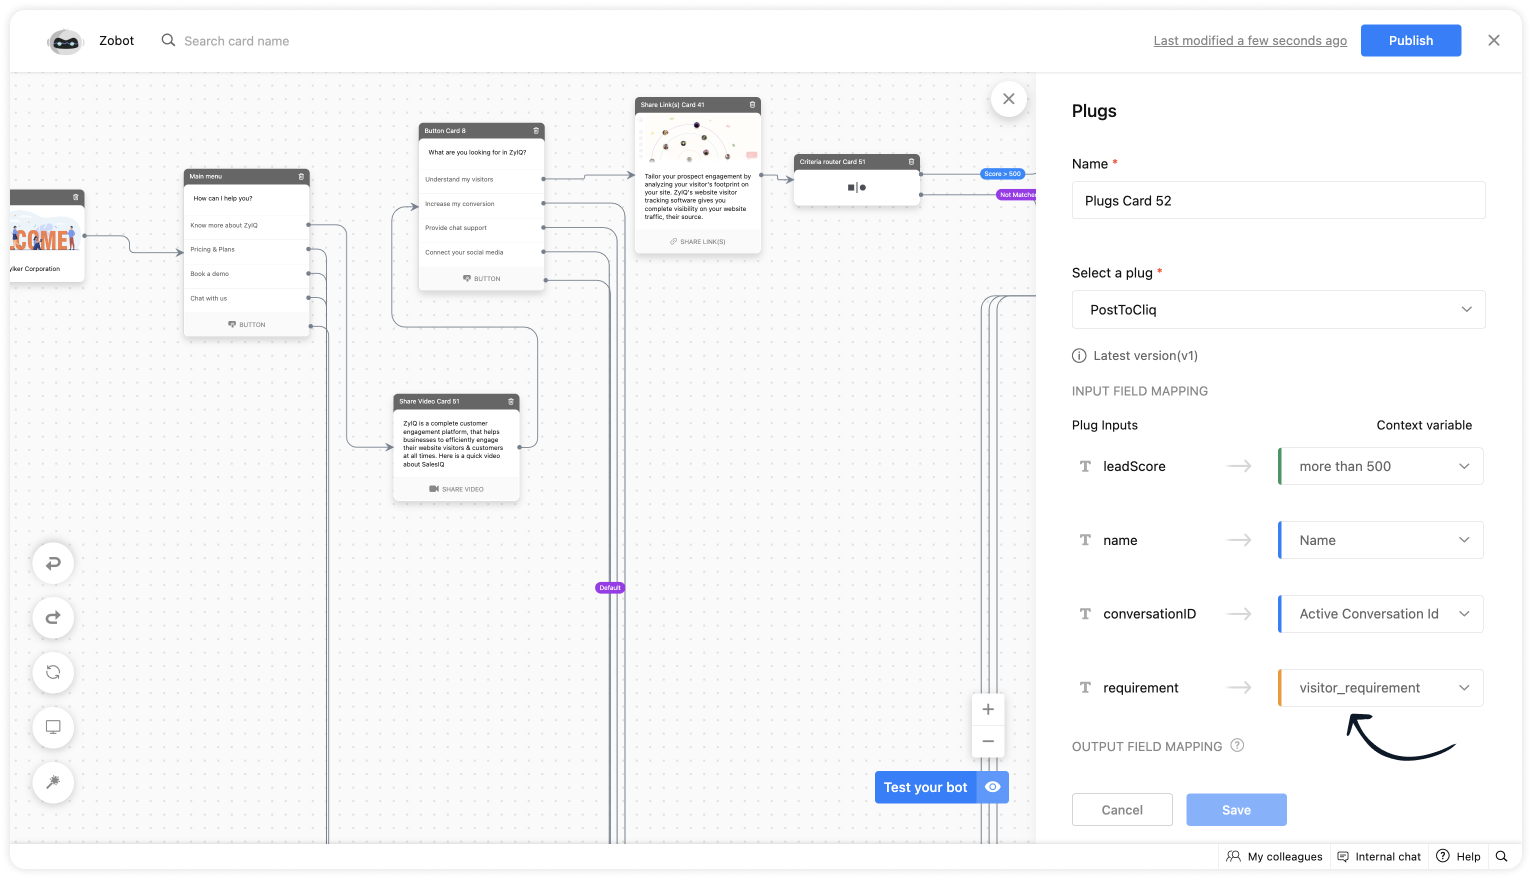
- To notify in Cliq, click on Plugs under Action cards, select the plug you have created and provide the input values for the parameters defined in the plug builder.

- As we want to notify only the visitors whose lead score is more than 500. Use the Criteria router card and set up a rule.
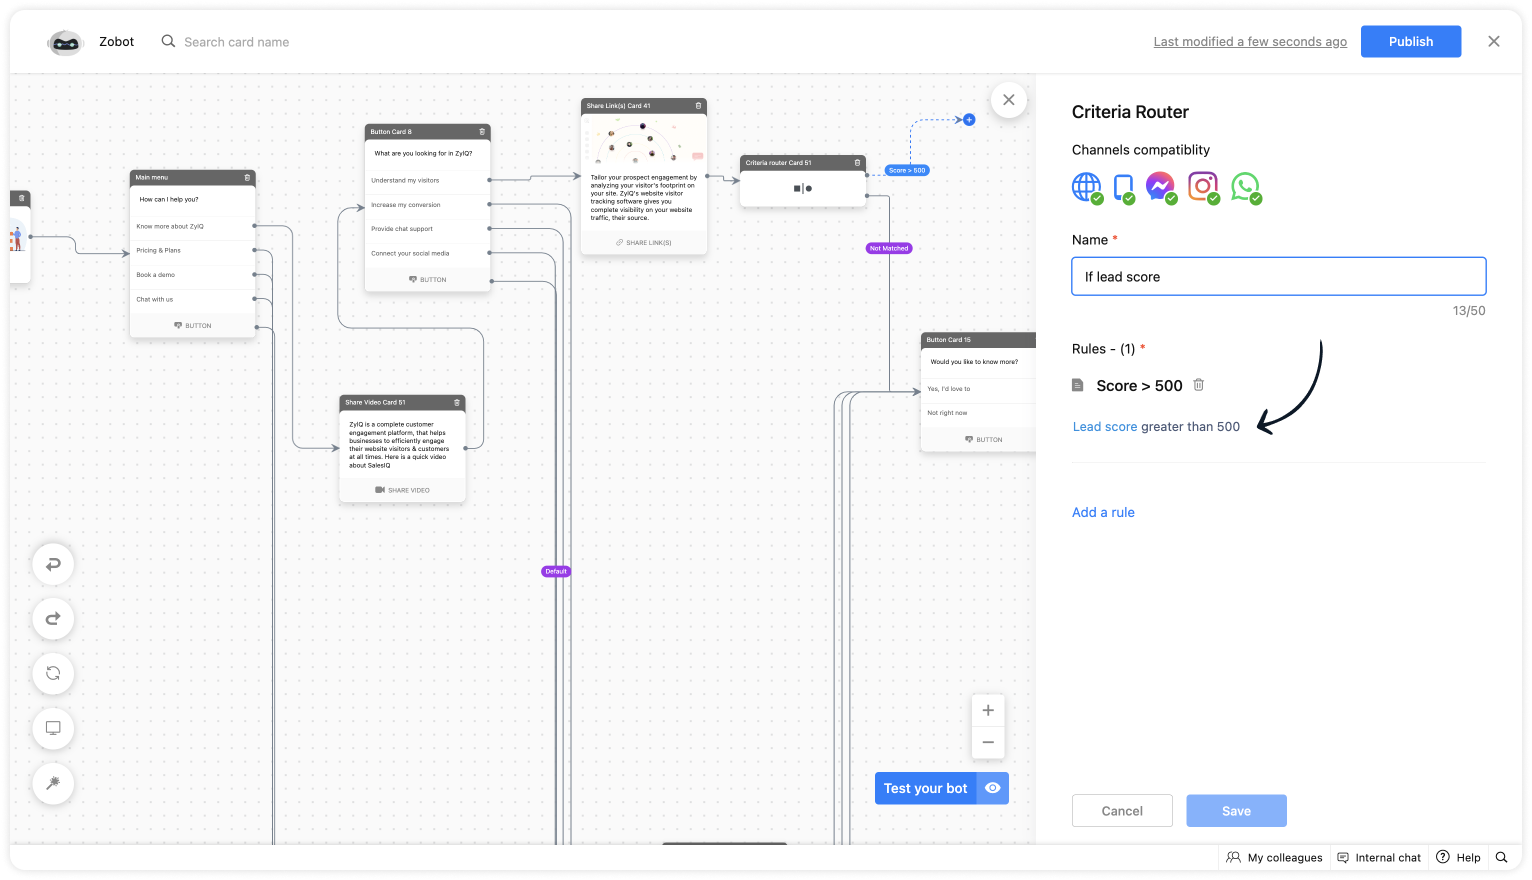
- For lead score, provide the value "more than 500".
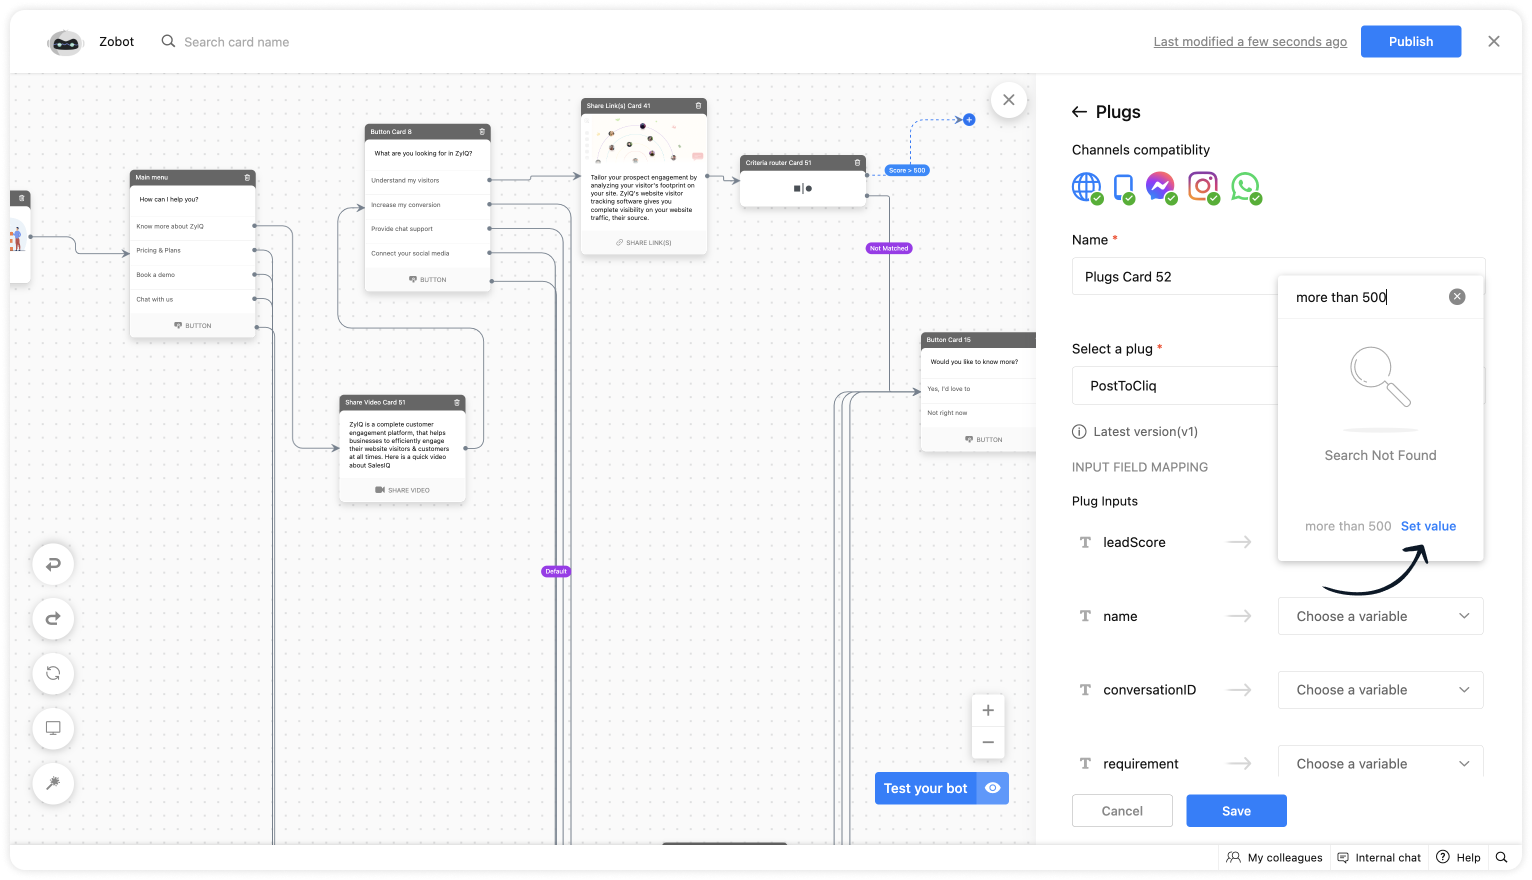
- Choose the %visitor.name% variable for the name.
- Select the %Active conversation id% to get the conversation ID for the chat URL.
- Get the requirement before using any input card, save it in the context variable and select the variable here.
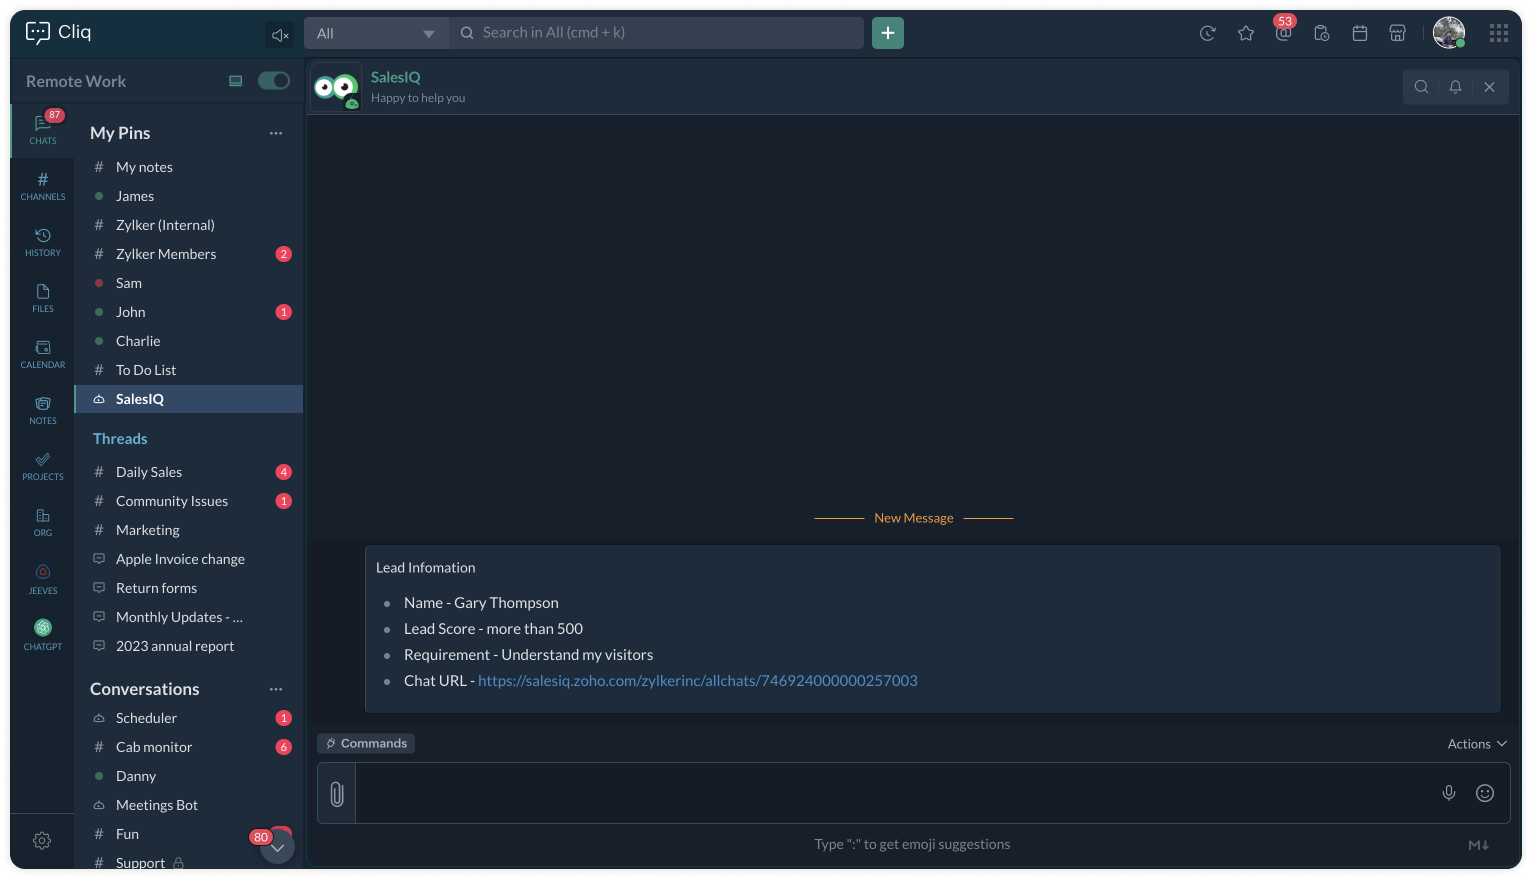
Plug Output
This is how the Cliq users will be notified.
To a specific user
To a specific channel
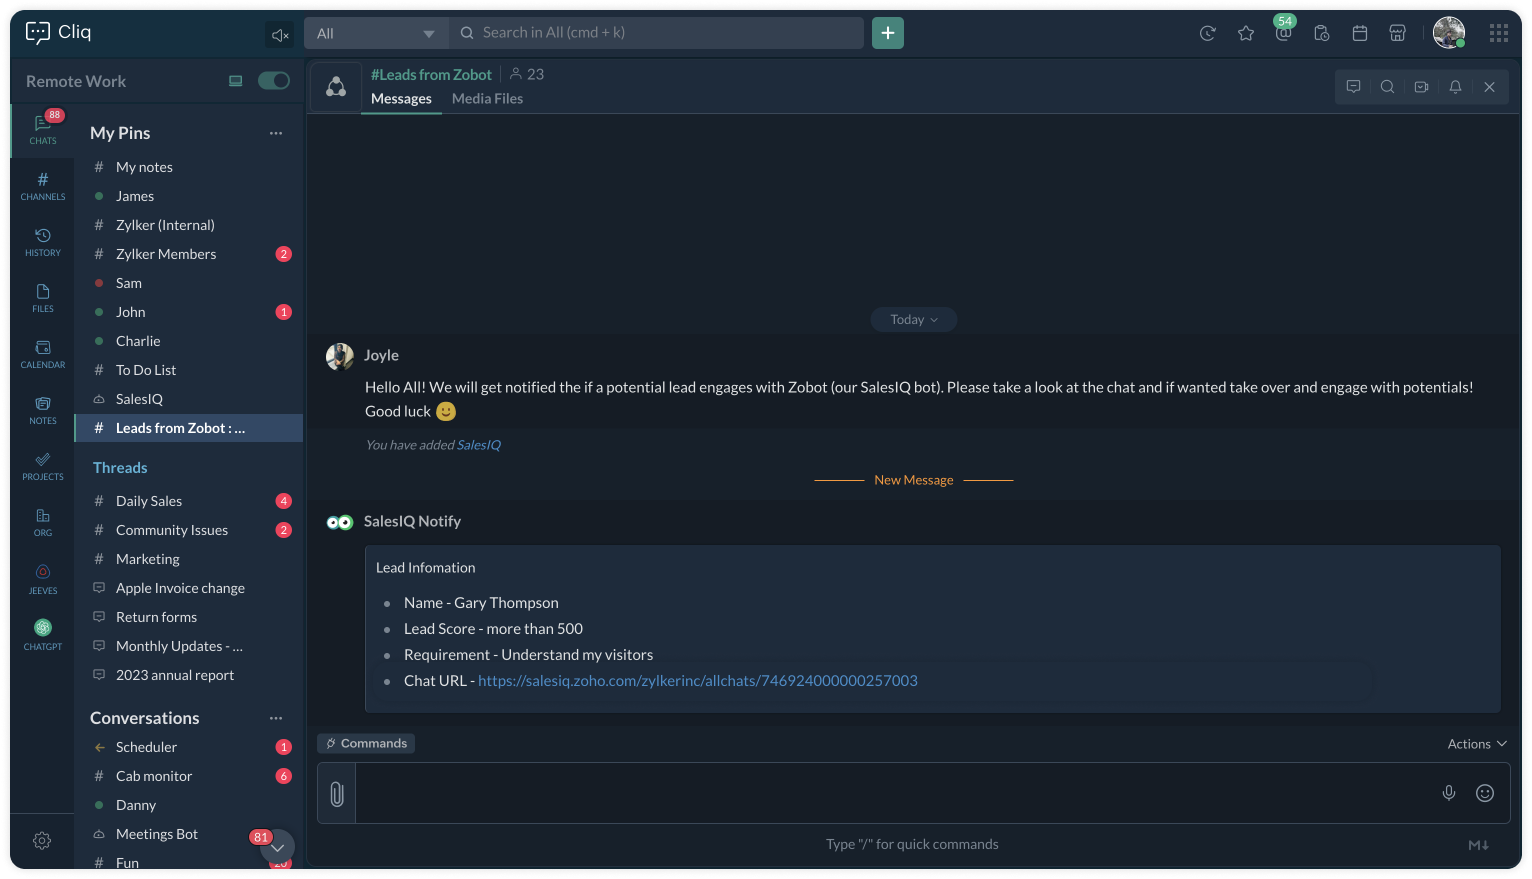
Upon clicking the chat URL, you will be redirected to the ongoing bot chat, where you can monitor and take the chat if required.
Related links:
- Plug guides
- Codeless bot guide
- Plugs for OTP verification.
- Plug to create a lead in Zoho CRM.
- Plug for getting the status of the ticket in Zoho Desk
- Plug to schedule appointments in Zoho Bookings
- Plug to read and write data in Google Sheet
- Plug to integrate bot with OpenAI
- Plug to track ecommerce orders from Zoho Commerce
- Zobot troubleshooting page
To know more about the features of Zobot, kindly visit our Resources Section. I hope this was helpful. Please feel free to comment if you have any questions. I'll be happy to help you.
See you again with another efficient plug sample :)
Best regards
Sasidar Thandapani