Building extensions #2: Creating extensions for Zoho Projects using a CLI
In our previous post, we noted the two ways to create extensions for Zoho Projects— using the cloud editor and using the command line interface (CLI). We also shared how to create an extension using the Sigma cloud editor. In this post, we'll take a closer look at creating an extension using the CLI.
You'll learn how to create an extension project template with the CLI, test it, upload the zipped project while creating an extension, and then edit or change it. Let's go over each of these steps in detail.
Building an extension project using the CLI
- To create an extension project, we must first set up the development environment, which involves:
➤ Downloading Node.js: Node.js acts as the base platform as well as the JavaScript environment in which the JavaScript code is executed.➤ Installing ZET CLI: Zoho offers a command line interface called Zoho Extension Toolkit (ZET) which enables you to build, test, and pack your extension project.Please follow the steps in this link to download Node.js and install ZET CLI.
- Once the development environment is ready, use the basic ZET commands to create, validate, pack, and test your extension project.
➤ zet init: Create a new project and add the necessary folder structure and resources➤ zet validate: Validate the entire project➤ zet pack: Pack the project to get a zipped file that will later be associated as the connected app➤ zet run: Run the internal Zoho server to test the project locally
Now, let's use these commands to create and manage an extension project.
- First, use the zet init command. Select Zoho Projects as the Zoho service from the dropdown list.
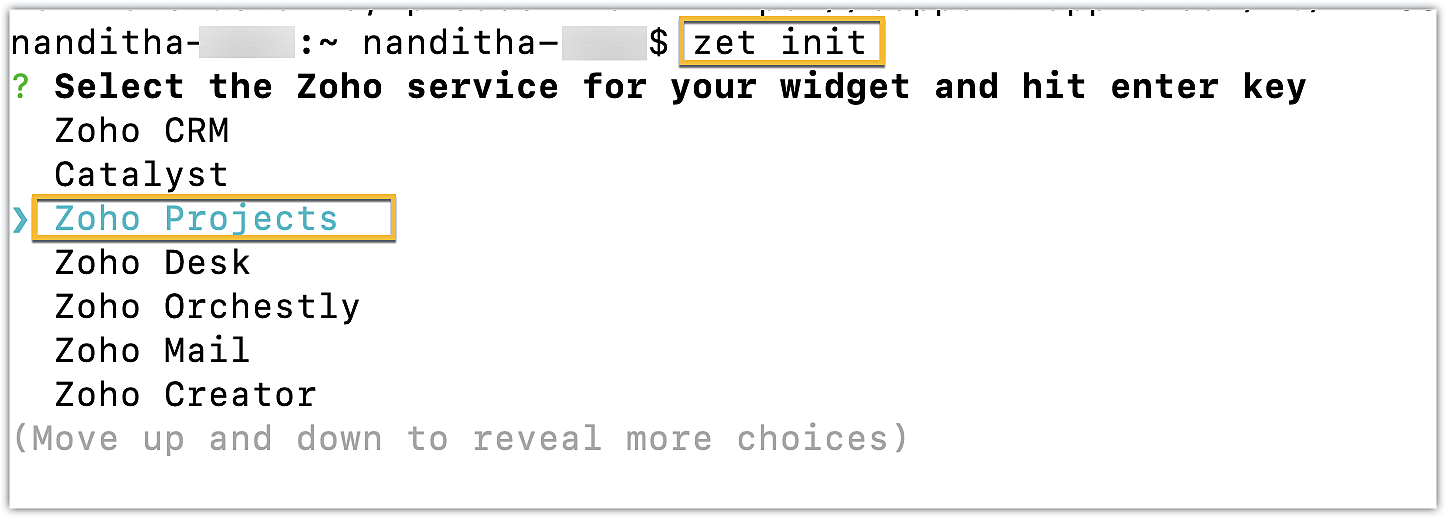
- Enter a name for the extension. An extension with the directory structure required for a sample Zoho Projects extension is created automatically.

- This directory structure contains an app folder and a plugin-manifest.json file, both of which are similar to those created by the Sigma cloud editor detailed in the last post.
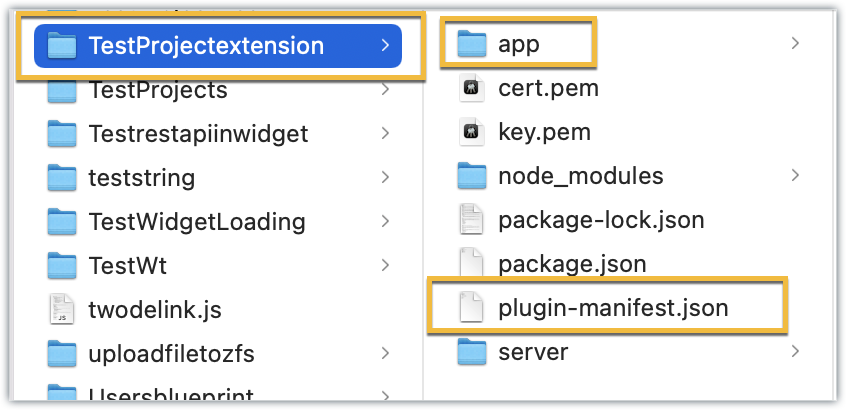
- The app folder can be used to manage all the important resources required for your extension. By default, itincludes an index.html file, which serves as the UI for a sample widget.
- The plugin-manifest.json file helps with extension configuration. It includes a widgets key configured with a default sample widget named, "Projects Extension" in the default location as the task details tab, along with the URL as the location of the index.html file.
Now that the extension project has been created, lets go ahead and test it in the Zoho Projects portal.
Testing an extension project using the CLI
- To test a sample Zoho Projects extension created with the ZET CLI, use the Change Directory command to navigate to the project folder. Then, run the zet run command.
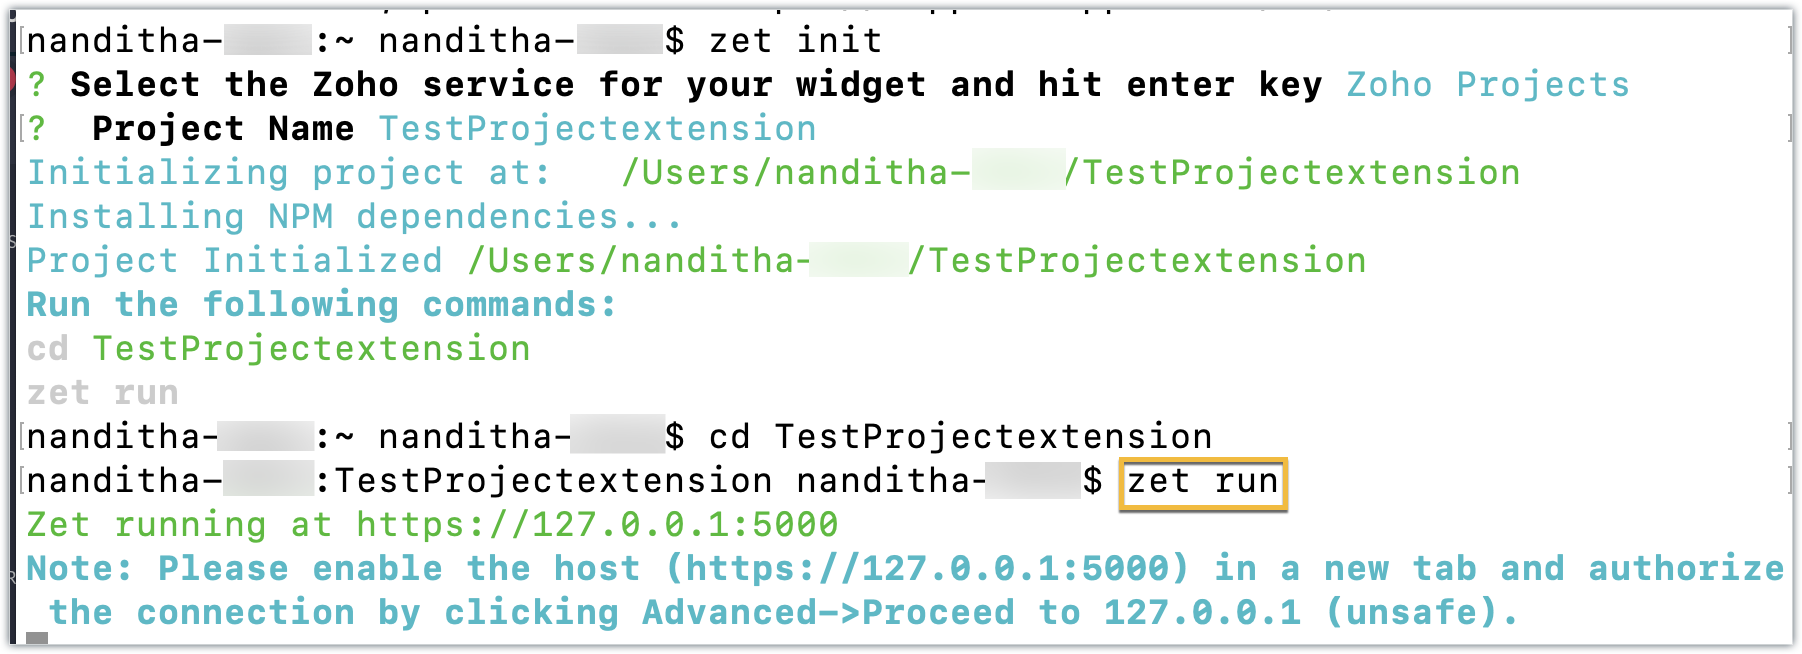
- This command starts a local server and enables you to test your extension locally.
- Now, navigate to your Zoho Projects portal. Click the Setup icon.
- Select Developer Space from the left panel. Click Enable Developer Mode.
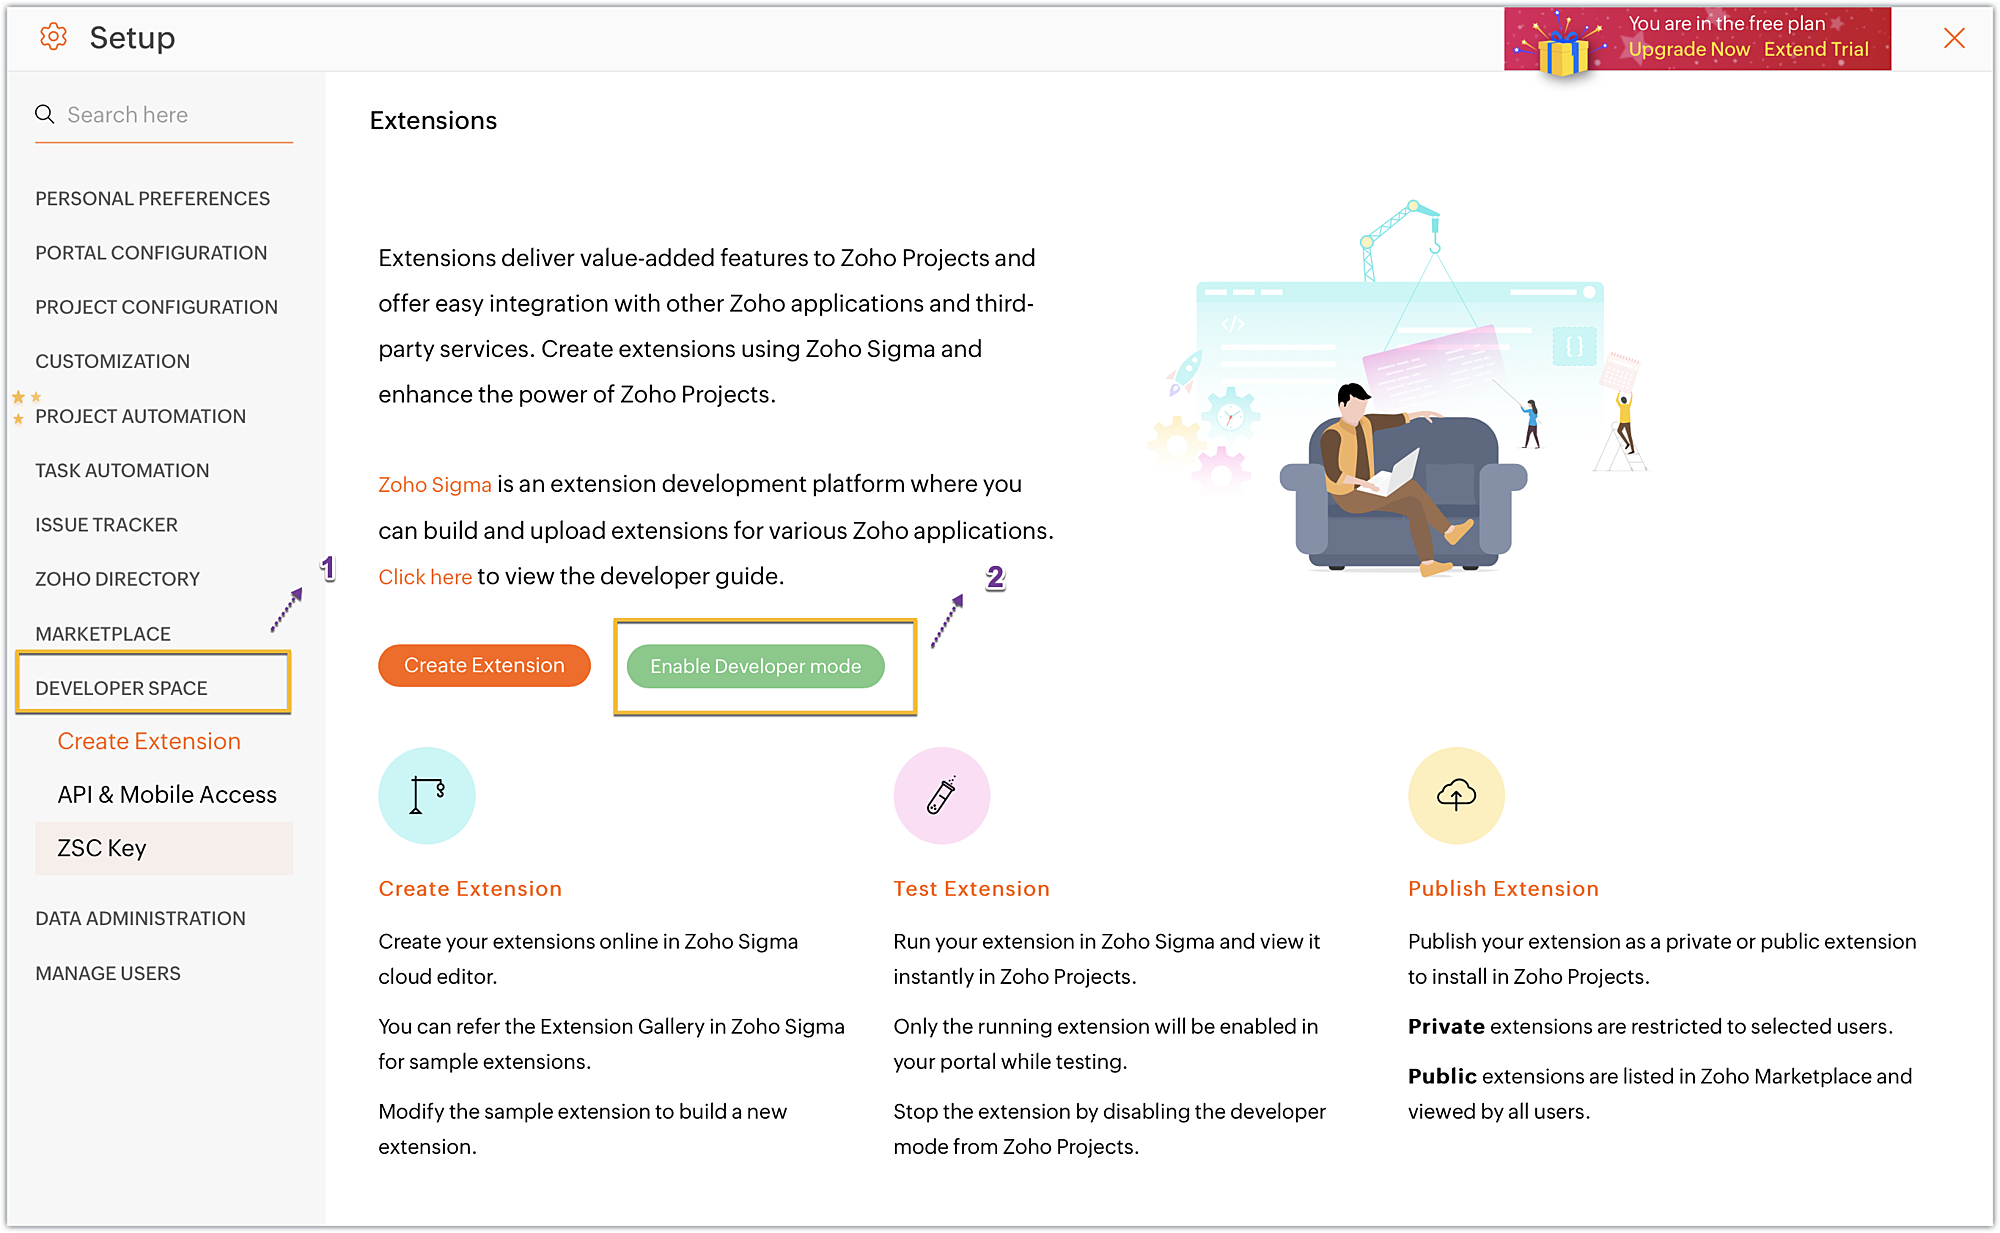
- Developer Mode will be enabled and the page will automatically refresh.
- You may now test your extension functionalities in the Zoho Projects portal.
- Since the sample extension had a default widget called, "Projects Extension" configured on the Task Details page, choose and enter a project task in your portal.
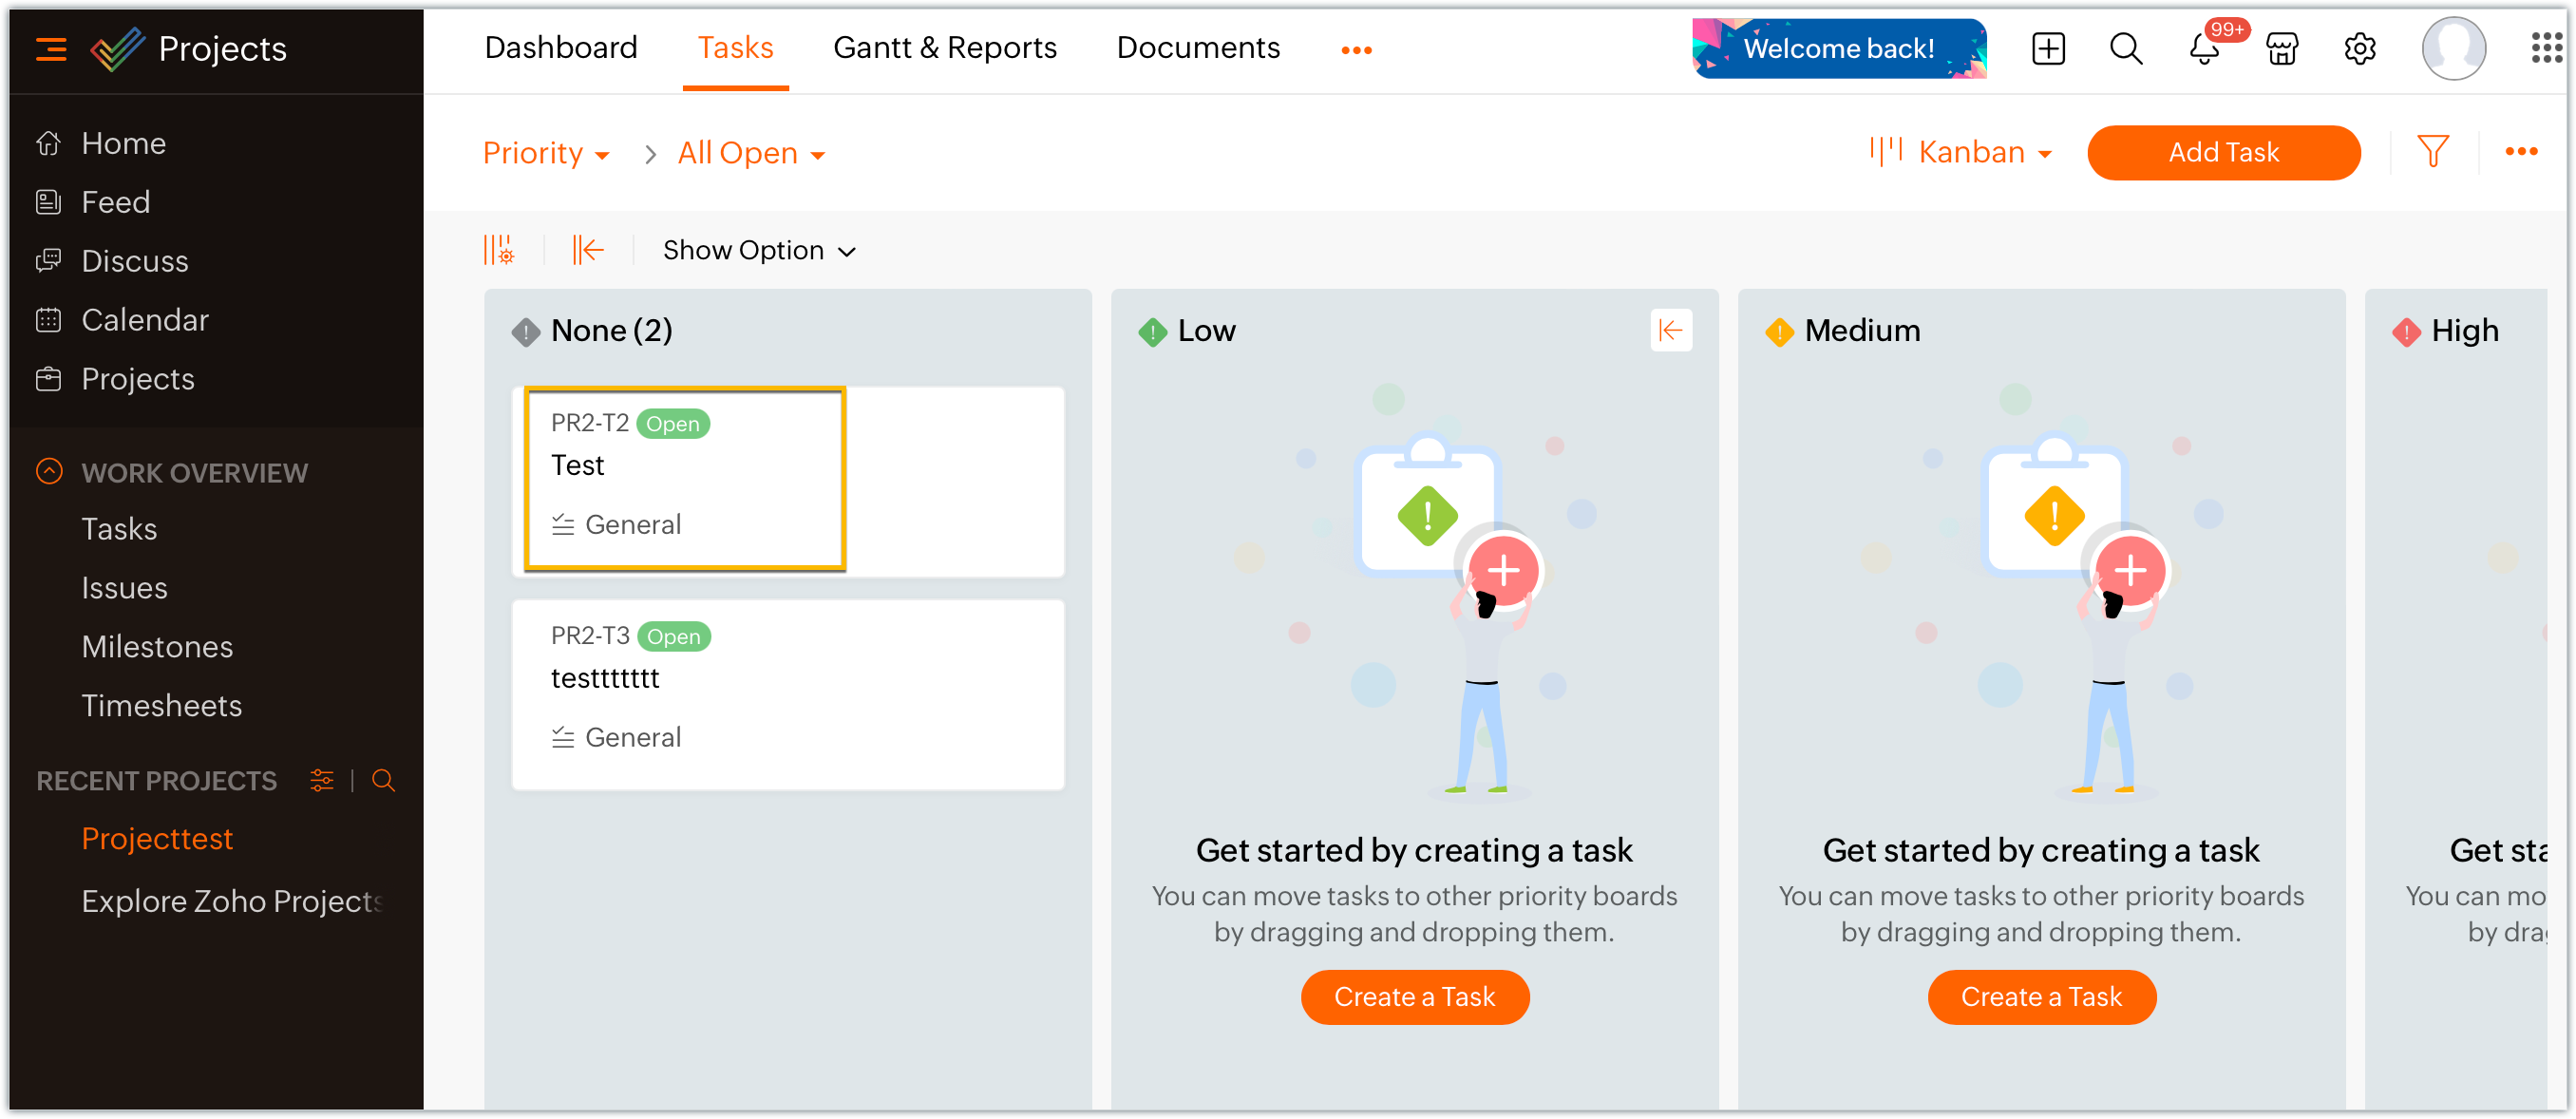
- Click on the Projects Extension tab on the Task Details page, and you will see that the widget has loaded.
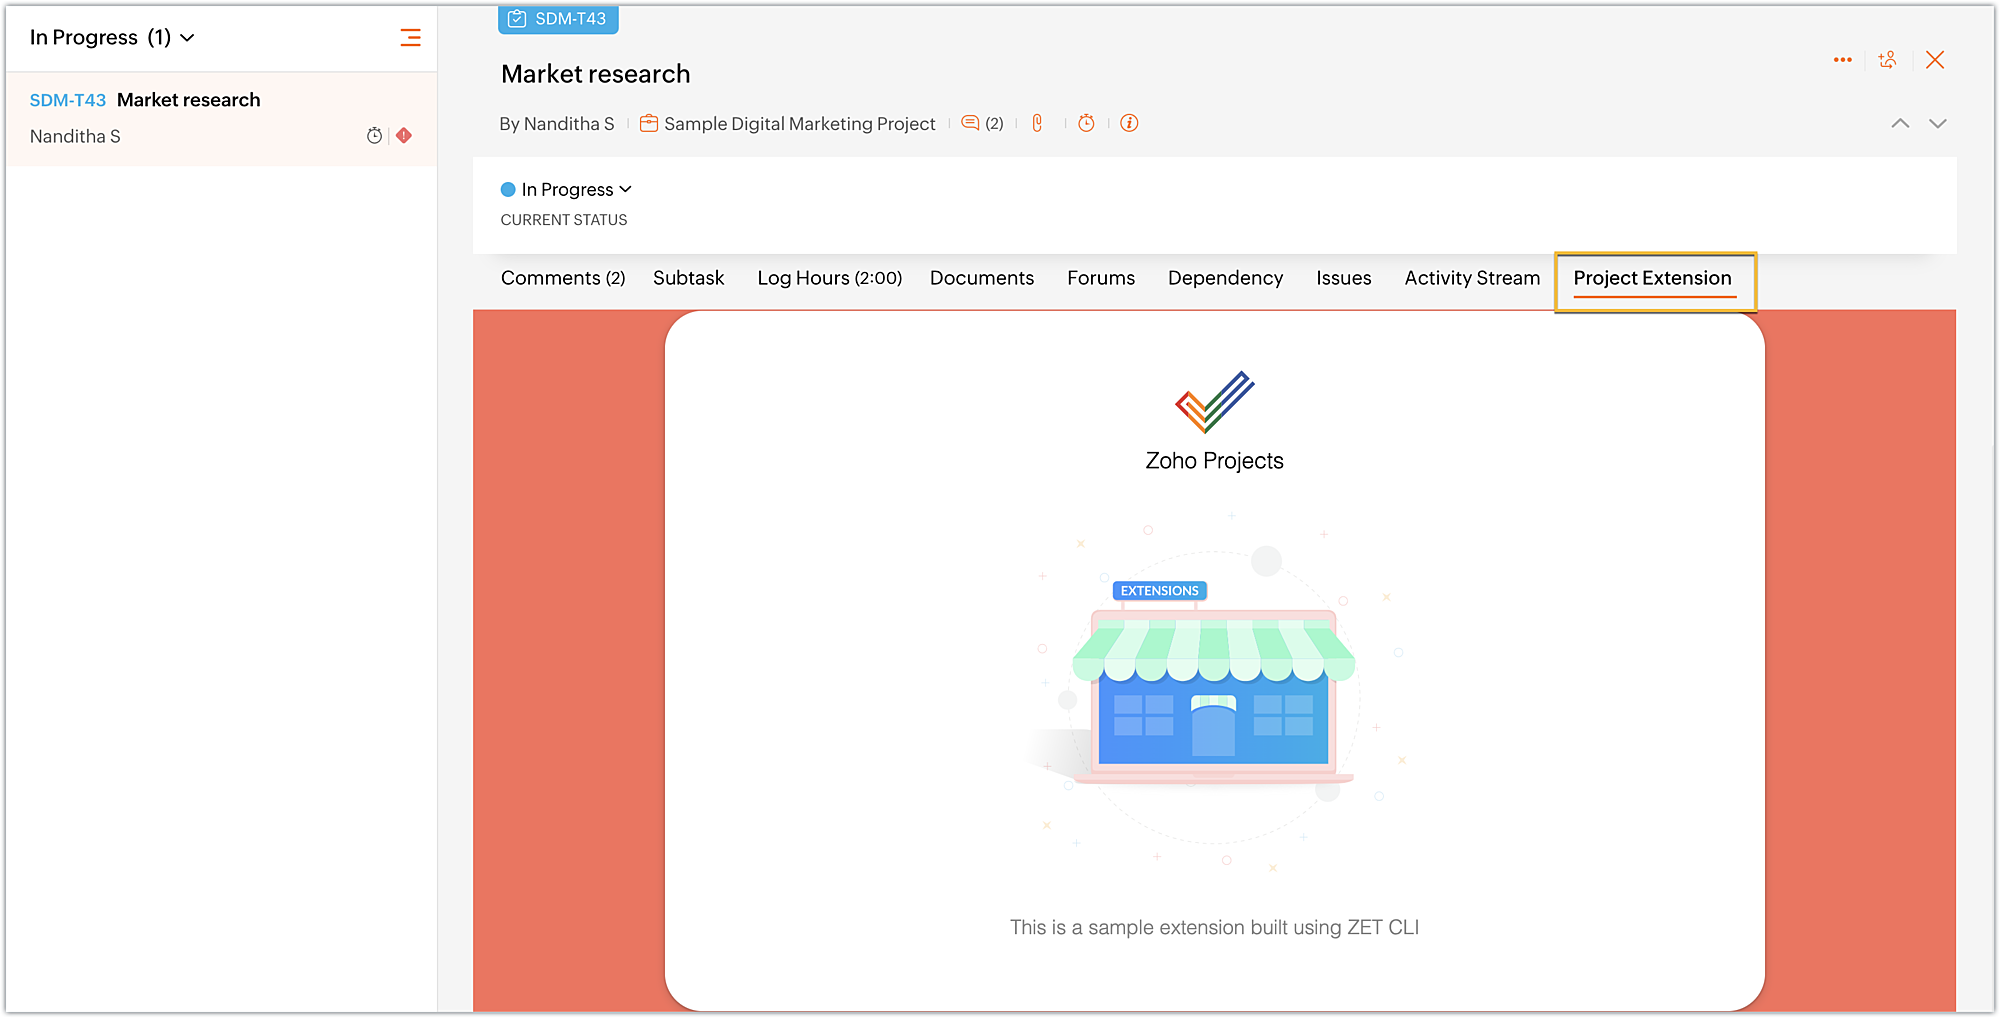
- Once you have finished testing your extension's functionality, use the zet pack command. This command adds a dist folder to the directory structure, zips the extension project, and places the zipped file inside the newly created dist folder.
Uploading the zipped file to your Sigma extension
Now that we have created the extension project and tested its functionalities locally, lets go ahead and create an extension in Sigma.
- Log into or sign up for developer.zoho.com. Go to Sigma and access your workspace.
- Once you enter your Sigma workspace, click the New Extension button to build a new extension.
- Enter a name and description for the extension. Choose Zoho Projects for the service.
- Toggle Upload Existing File to Yes.
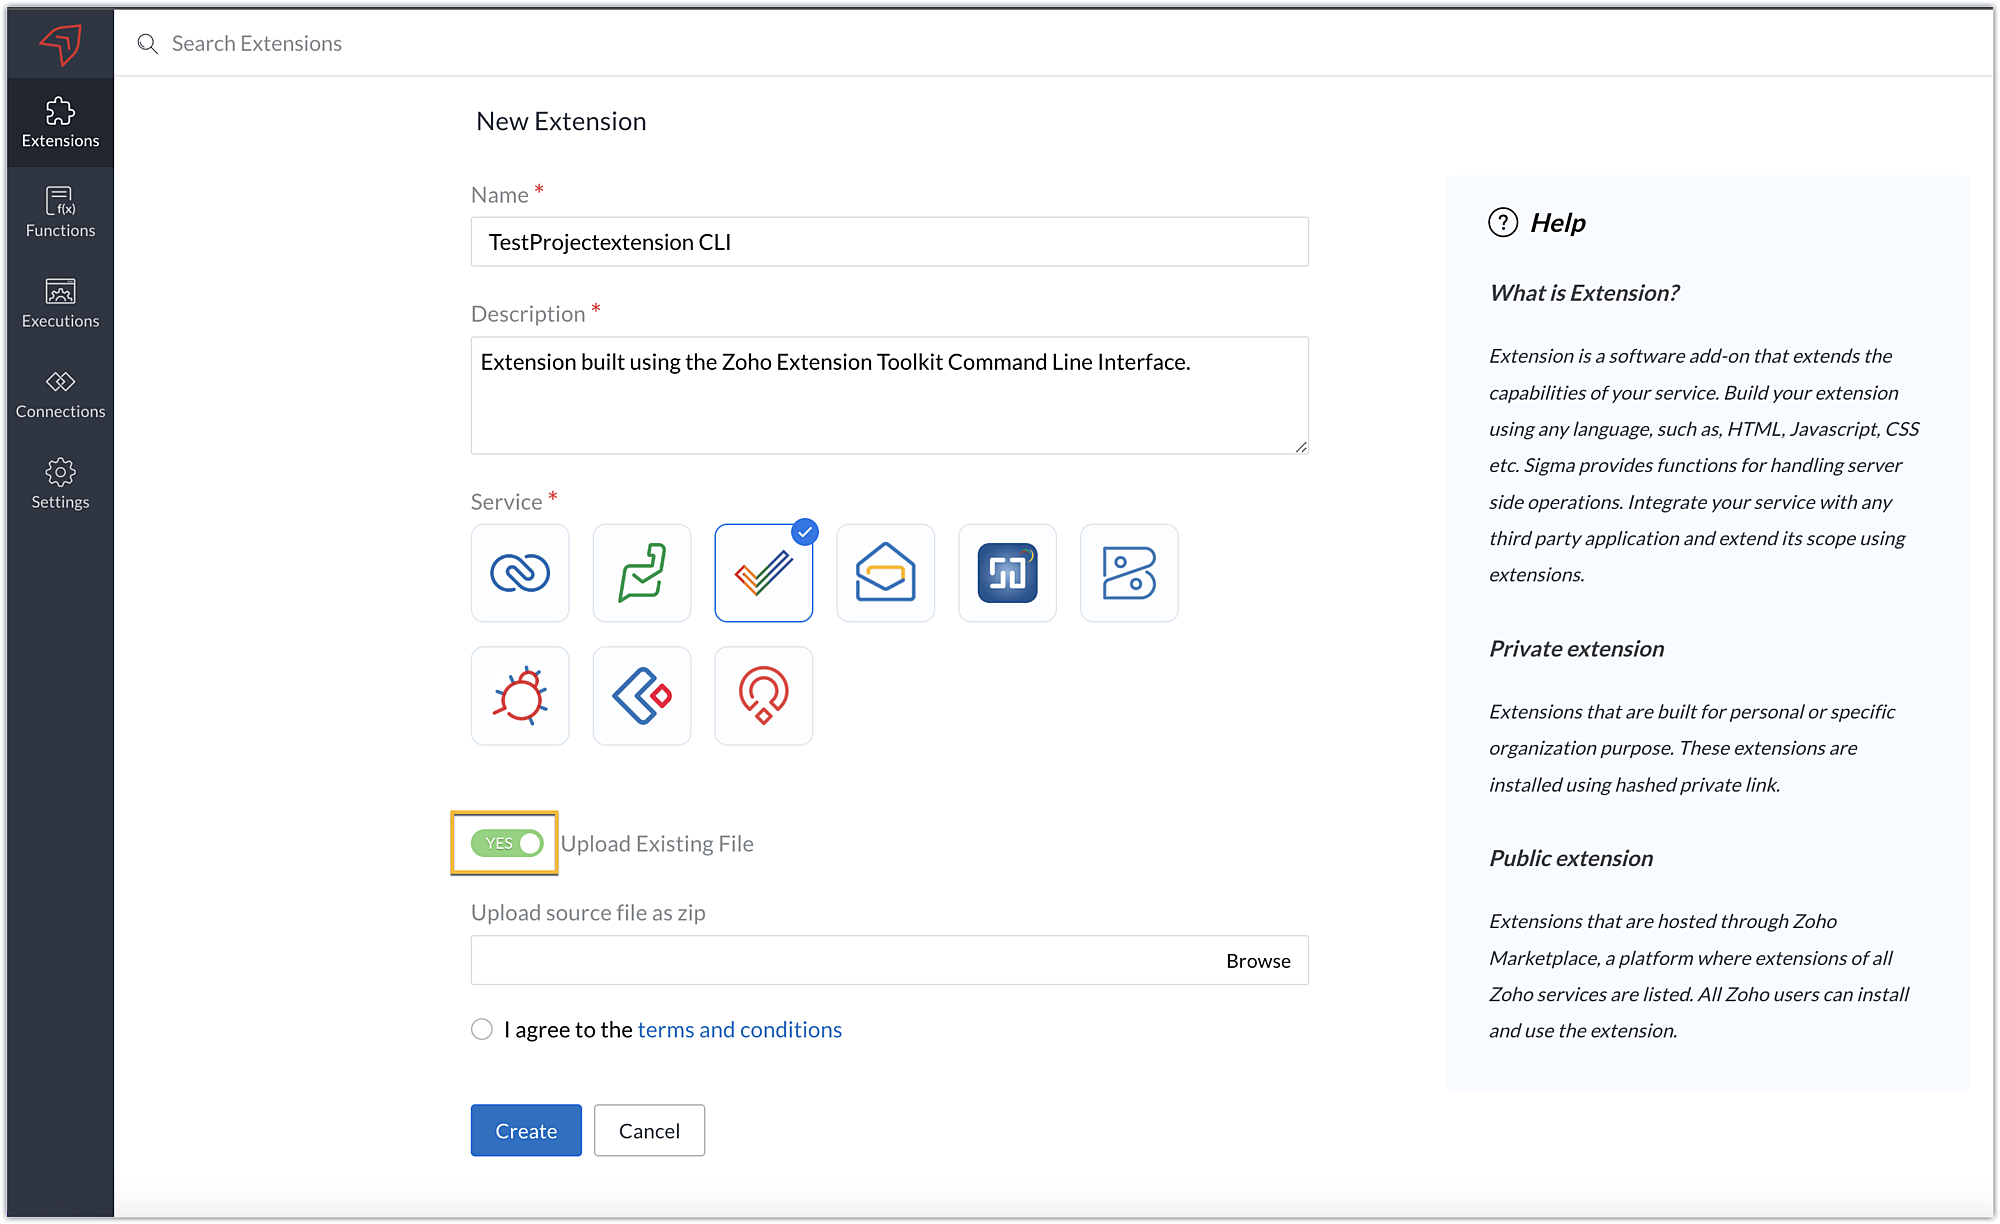
- Click Browse to locate and upload the extension project's zipped file, accept the terms and conditions, and click Create.
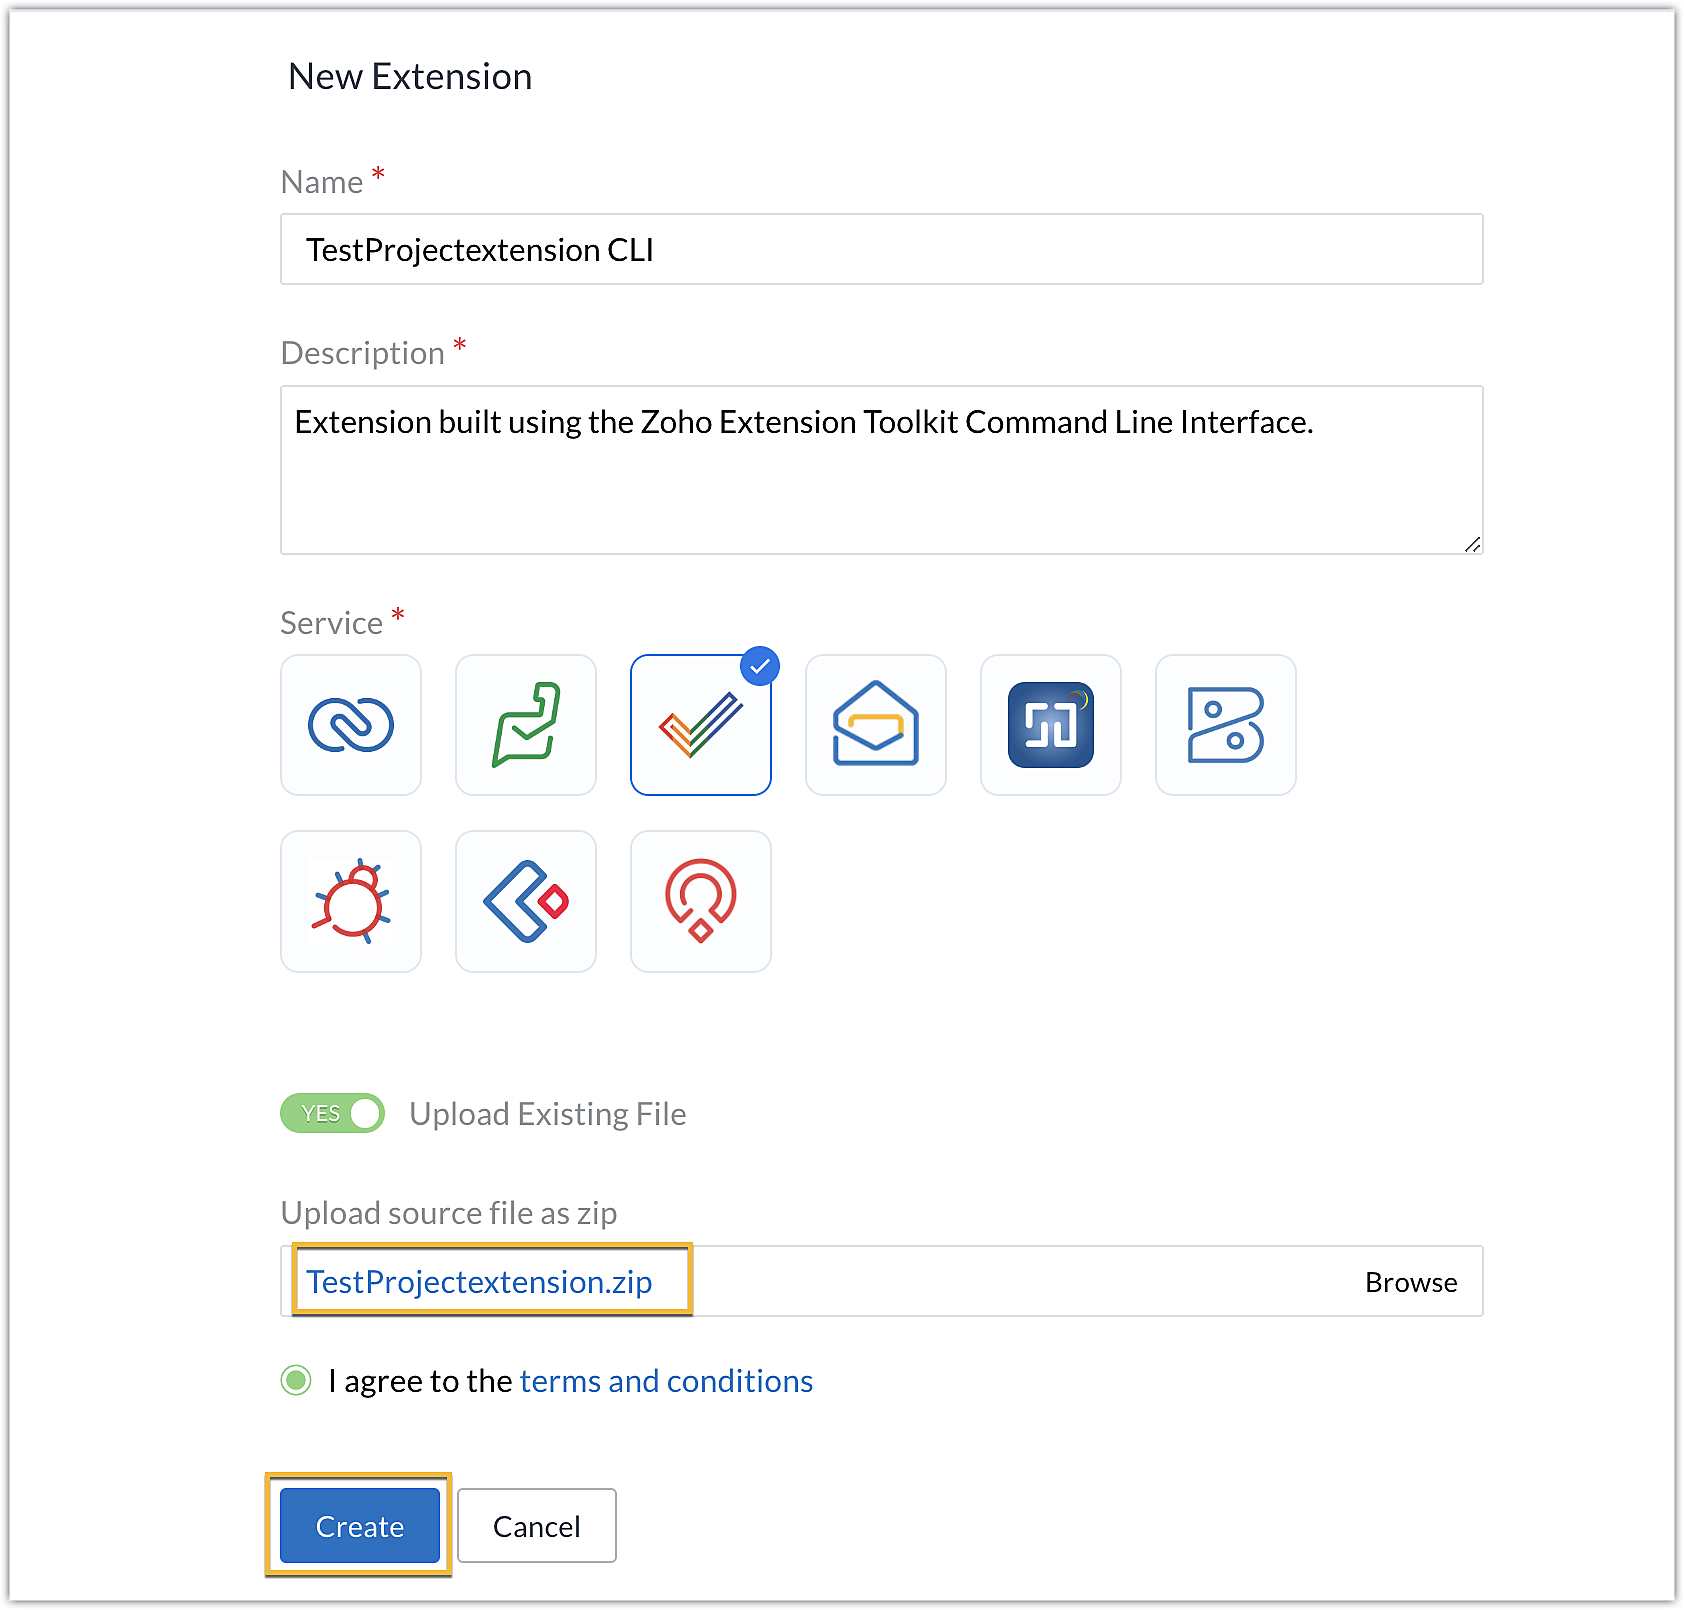
- You will be redirected to the cloud editor. The directory structure of your CLI extension project will be automatically populated with the project's contents.
Editing an extension created with the CLI
- You can make edits or changes to your extension code directly from the cloud editor.
- If you wish to make changes to a file or its contents in the directory structure of your CLI extension project, please be sure to pack the extension project again using the zet pack CLI command.
- Go to Sigma. Click the Extension Details icon of the extension you wish to edit.

- Click the Edit icon under the extension name.
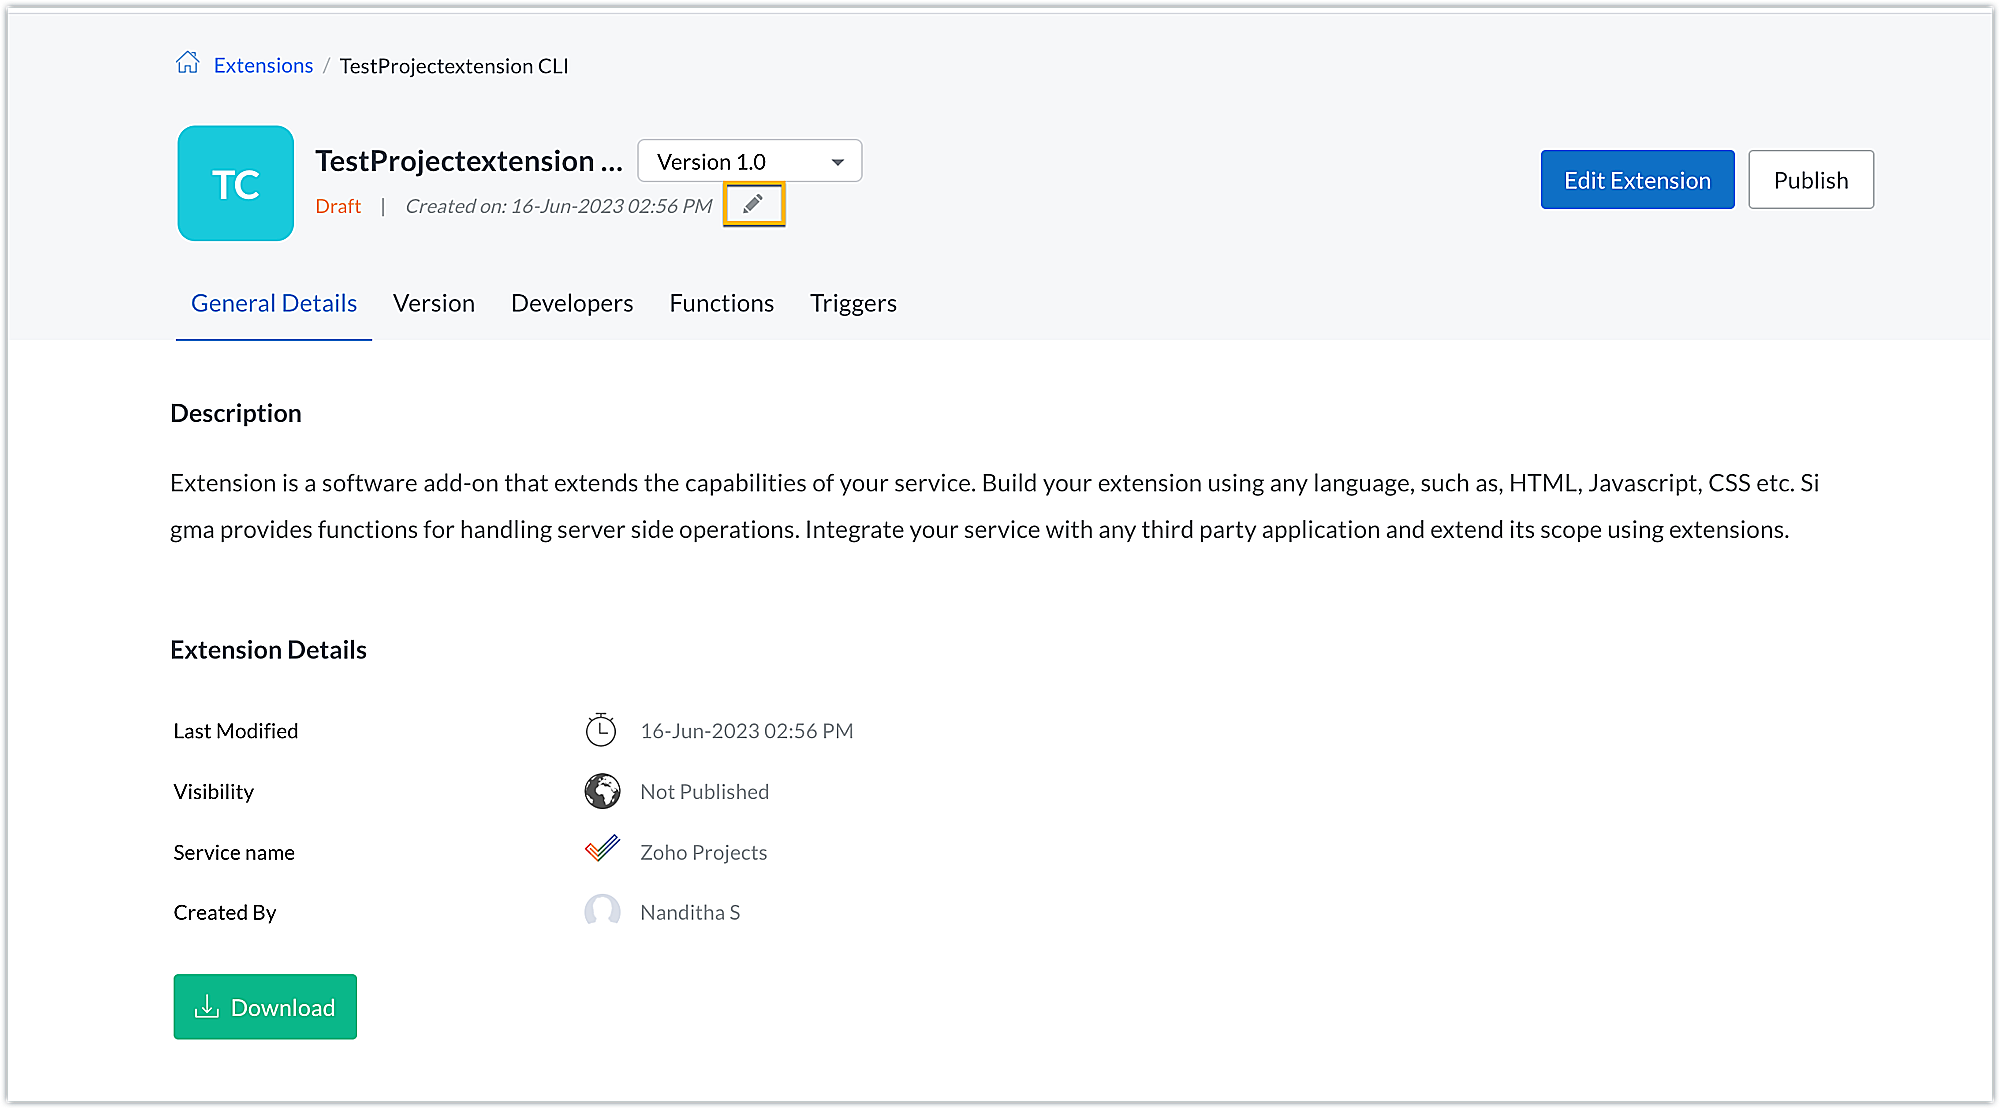
- Browse for and upload the new zipped file, accept the terms and conditions, and click Update.
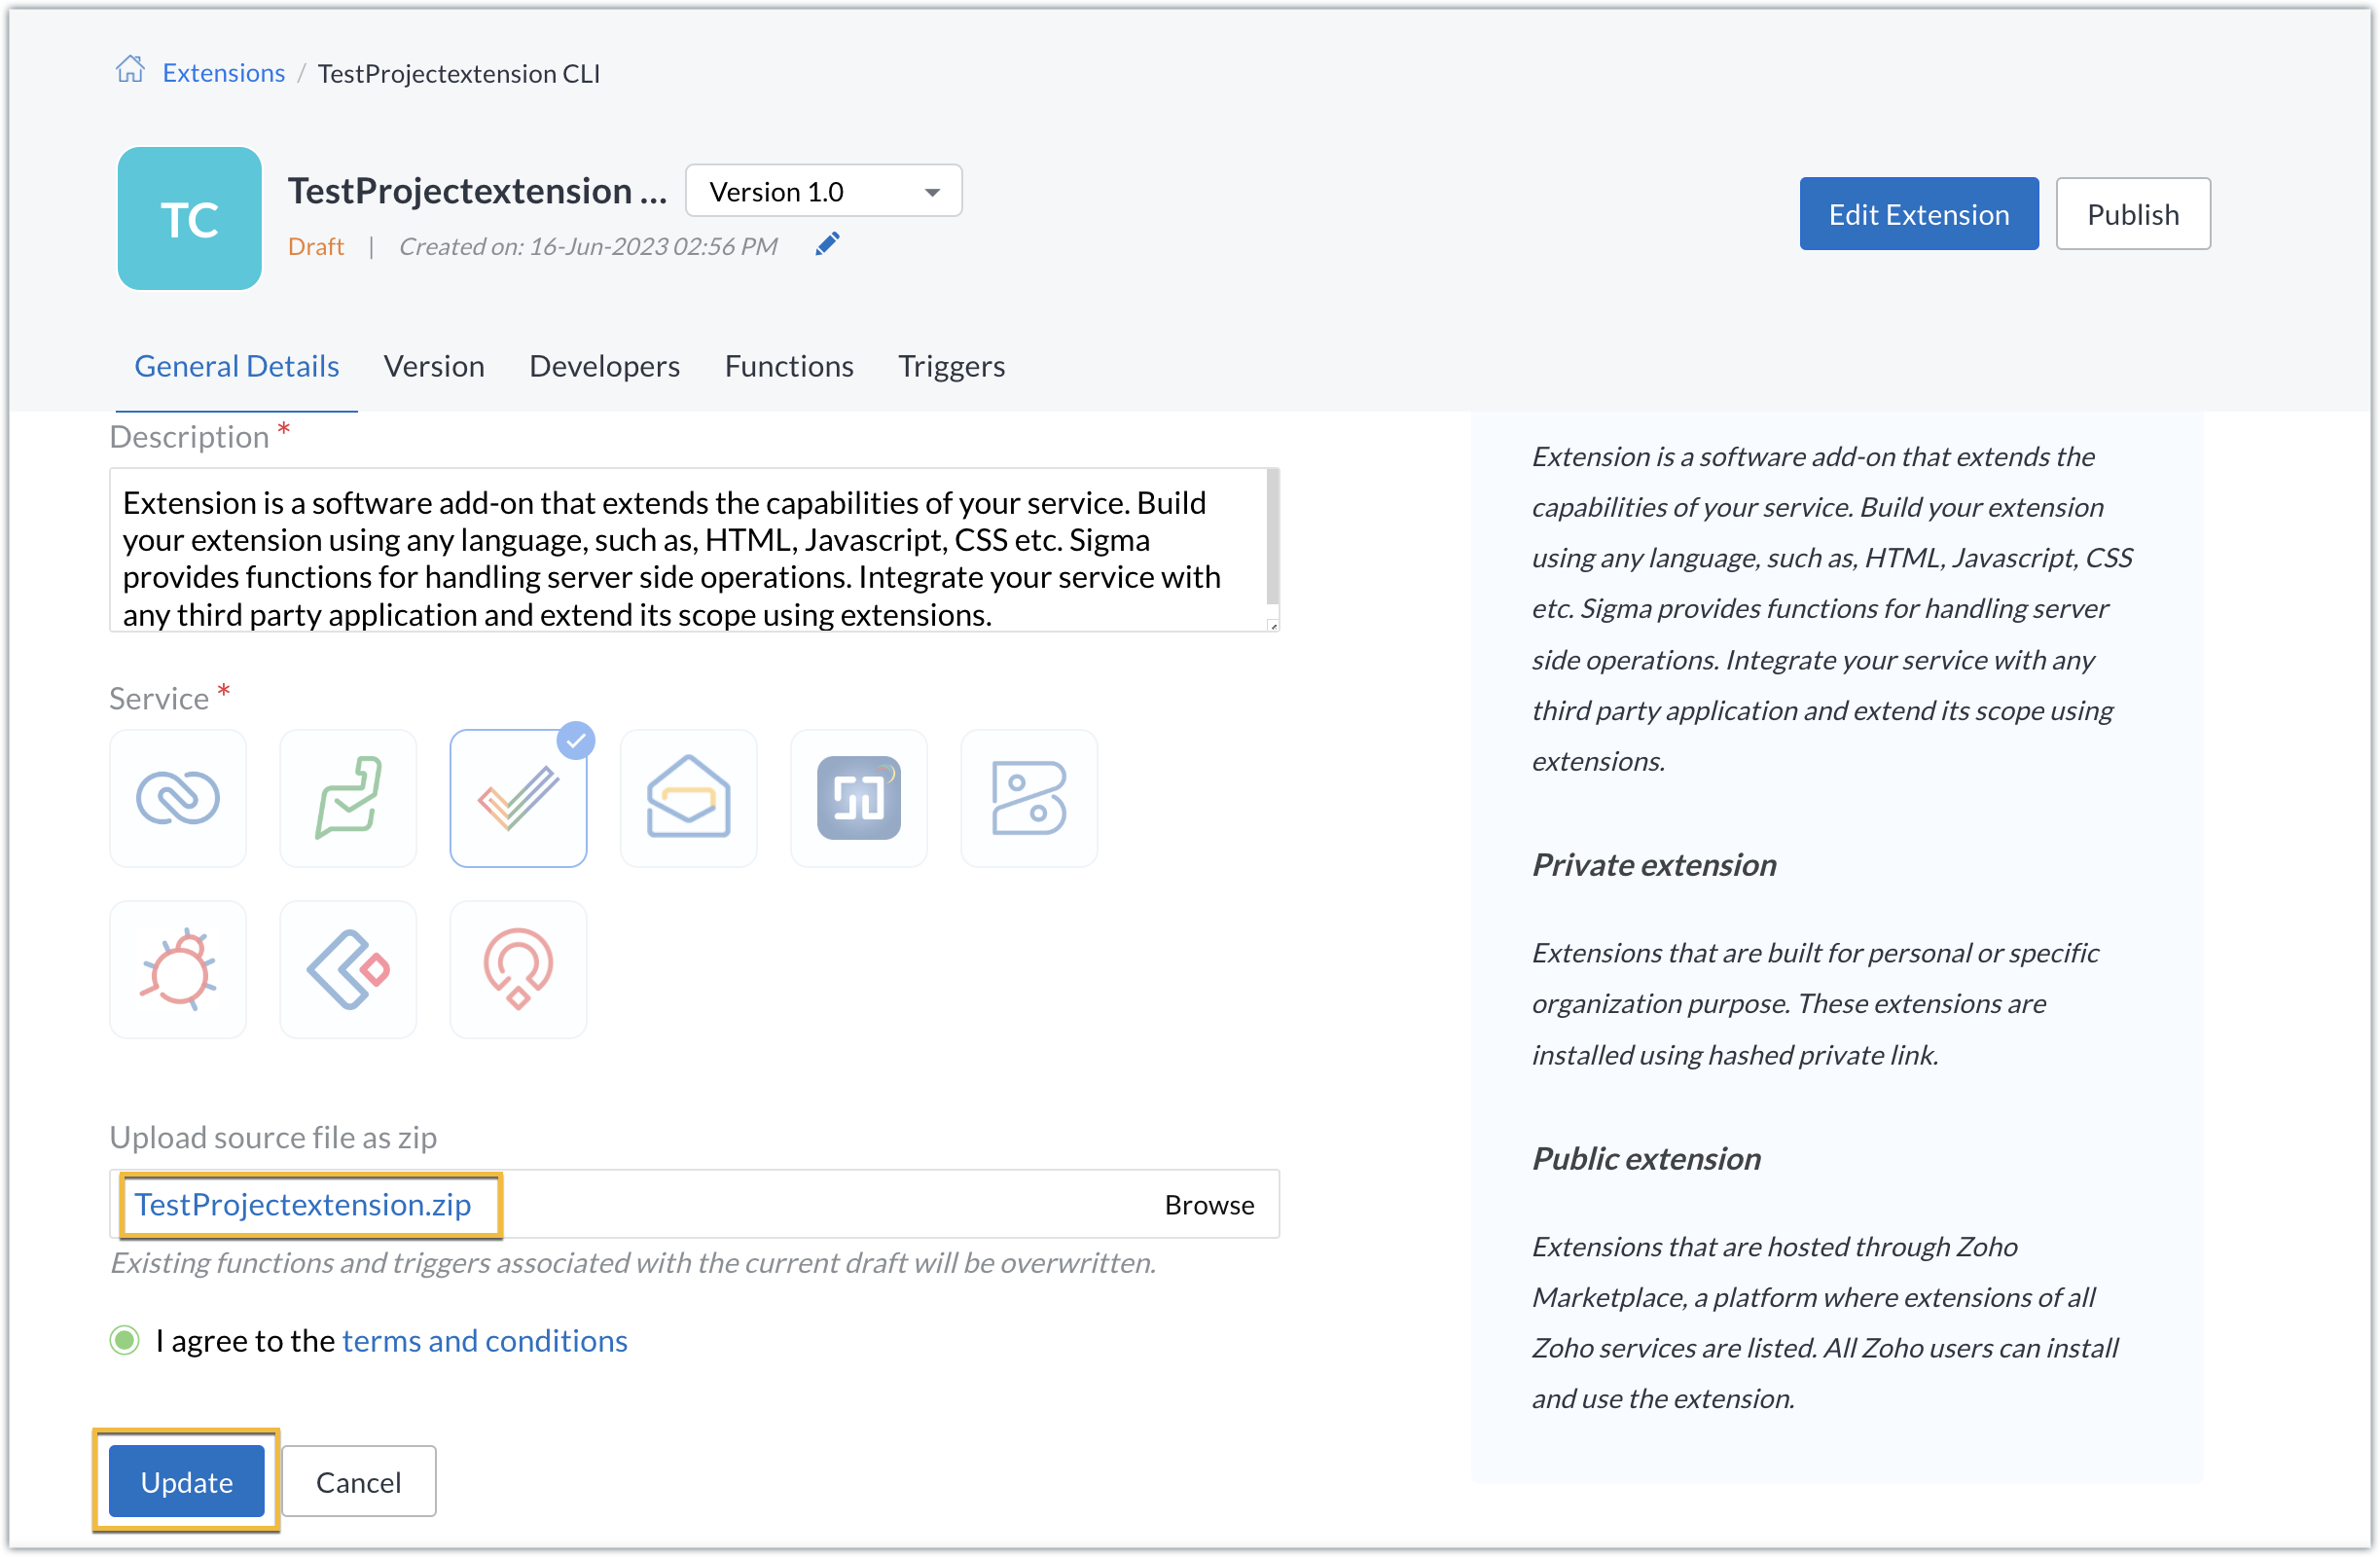
- The extension will be updated to reflect the changes you have made.
In this post, we have covered the process of creating an extension for Zoho Projects through ZET CLI. We hope you found this information useful. Keep following this space for more information!

Sign up for a Zoho Developer account and start developing extensions for Zoho products using Sigma.
SEE ALSO
Topic Participants
Nanditha Somasundaram Somasundaram
Sticky Posts
Building extensions #10: Fetch customized user inputs, store them globally at the app level, and access them across entities
This data storage concept enables you to store data related to your extension for both entity properties and extension properties. In our previous piece, we looked at how to store data for entities using entity properties. In this post, we'll look atBuilding extensions #9: Store, retrieve, and access entity-specific data in widgets using data storage
Data storage - Overview Storing data related to the extension you are working on is essential. It can be saved as key-value pairs for an entity or extension, known as entity and extension properties, respectively. Data can be saved for the following entitiesBuilding extensions #7: Create custom widgets for a simplified end-user experience
Discover the benefits of using widgets! We explored the significance of widgets, prerequisites, and the availability of JS SDK methods as part of our previous post. In this post, let's go over a detailed example of using widgets along with certain ZohoBuilding extensions #6: Custom user interfaces with Widgets
Welcome to our post on Widgets for Zoho Projects! In our last post, we explored the significance of the connections feature, showed how to use it, and provided an example use case. In this article, we'll look at the importance of widgets, another featureBuilding extensions #5: Integrating applications with Zoho Projects through Connections
In our last post, we discussed the essential features that a Zoho Projects extension can provide. Starting with this post andin every subsequent post going forward, we'll go through each of those features in depth, one by one, with an example use case.
Recent Topics
Please can the open tasks be shown in each customer account at the top.
Hi there This has happened before, where the open tasks are no longer visible at the top of the page for each customer in the CRM. They have gone missing previously and were reinstated when I asked so I think it's just after an update that this feature[Product Update] Locations module migration in Zoho Books integration with Zoho Analytics
Dear Customers, As Zoho Books are starting to support an advance version of the Branches/Warehouses module called the Locations module, users who choose to migrate to the Locations module in Zoho Books will also be migrated in Zoho Analytics-Zoho BooksIntroducing Schedules for smarter availability management
Greetings from the Zoho Bookings team! We’re excited to introduce Schedules, a powerful enhancement to manage availability across your workspace. Schedules are reusable working-hour templates that help you define and maintain consistent availability acrossWhy Zoho Contracts Prefers Structured Approvals Over Ad-hoc Approvals
Approvals are one of the most important stages in a contract’s lifecycle. They determine whether a contract moves forward, gets revised, or needs further discussion. The approval process also defines accountability within the organization. Zoho ContractsWhatsapp Connection Status still "Pending" after migration
Hello, I migrated my WhatsApp API to Zoho from another provider a day ago. So far the connection status is still “Pending”. There is a problem? How long does it usually take?Kaizen #226: Using ZRC in Client Script
Hello everyone! Welcome to another week of Kaizen. In today's post, lets see what is ZRC (Zoho Request Client) and how we can use ZRC methods in Client Script to get inputs from a Salesperson and update the Lead status with a single button click. In thisSearch Bar positioning
Why is the Search bar on the far right when everything is oriented towards the left?How to use Rollup Summary in a Formula Field?
I created a Rollup Summary (Decimal) field in my module, and it shows values correctly. When I try to reference it in a Formula Field (e.g. ${Deals.Partners_Requested} - ${Deals.Partners_Paid}), I get the error that the field can’t be found. Is it possibleHow to Filter timewise question to check uploaded one month or two months before in these community question ?
i want to find the question that is asked some month or before any particular year, so how can i filter it ?Send Whatsapp with API including custom placeholders
Is is possible to initiate a session on whatsapp IM channel with a template that includes params (placeholders) that are passed on the API call? This is very usefull to send a Utility message for a transactional notification including an order numberWelcome to the Zoho ERP Community Forum
Hello everyone, We are thrilled to launch Zoho ERP (India edition), a software to manage your business operations from end to end. We’ve created this community forum as a space for you to ask questions, comment answers, provide feedback, and share yourProposal for Creating a Unique "Address" Entity in Zoho FSM
The "Address" entity is one of the most critical components for a service-oriented company. While homeowners may change and servicing companies may vary, the address itself remains constant. This constancy is essential for subsequent services, as it providesHow to apply customized Zoho Crm Home Page to all users?
I have tried to study manuals and play with Zoho CRM but haven't found a way how to apply customized Zoho CRM Home Page as a (default) home page for other CRM users.. How that can be done, if possible? - kipi Moderation Update: Currently, each user hasWorkflow Down/Bug
We have a workflow that sends an email to one of our internal departments 10 minutes after a record is created in a custom module. The workflow actually works correctly. However, we have now noticed that on January 8, between 3:55 p.m. and 4:33 p.m.,Service Locations: Designed for Shared Sites and Changing Customers
Managing service addresses sounds simple—until it isn’t. Large facilities, shared sites, and frequently changing customers can quickly turn address management into an operational bottleneck. This is where Service Locations deliver clarity and control.Can I re-send the Customer Satisfaction Survey after a ticket closure?
Hello, Some customers does not answer the survey right after closure, is it possible to re-send after a few days or weeks? Best Regards!Filter contacts based on selected category in Zoho Desk ticket
Hello community, I’m setting up the Tickets module in Zoho Desk and I need help implementing the following: When a category is selected in a ticket, I want the Contact field to be filtered so that it only displays contacts that are related to that category.Mapping a new Ticket in Zoho Desk to an Account or Deal in Zoho CRM manually
Is there any way for me to map an existing ticket in Zoho desk to an account or Deal within Zoho CRM? Sometimes people use different email to put in a ticket than the one that we have in the CRM, but it's still the same person. We would like to be ableIntroducing Multi-Asset Support in Work Orders, Estimates, and Service Appointments
We’re excited to announce a highly requested enhancement in Zoho FSM — you can now associate multiple assets with Work Orders, Estimates, and Service Appointments. This update brings more clarity, flexibility, and control to your field service operations,Assign Income to Project Without Invoice
Hello, Fairly new user here so apologies if there is a really obvious solution here that I am just missing... I have hundreds of small deposits into a bank account that I want to assign to a project but do not want to have to create an invoice every timeTracking Non-Inventory Items
We have several business locations and currently use zoho inventory to track retail items (sales and purchase orders). We were hoping to use zoho inventory to track our non-inventory items as well (toilet paper, paper towels, etc). I understand that weProfile Page View Customization
I need to change the fields, sections from the profile view of an emplyoyee.Zoho Desk Android app update: Filter, Sort and Saved filters Enhancements
Hello everyone! We are excited to introduce the below features on the Android version Zoho Desk mobile app: 1. Filter & Sort support has been introduced for the Contacts and Accounts modules. 2. Sort options is now available in Custom Modules as well.Zoho CRM Meetings Module Issues
We have a use-case that is very common in today's world, but won't work in Zoho CRM. We have an SDR (Sales Development Rep) who makes many calls per day to Leads and Contacts, and schedules meetings for our primary Sales Reps. He does this by loggingHow to filter Packages in zoho inventory api
Hi Team, I want to perform some tasks in a schedular on the packages which are in "Shipped" state. I tried to use filter_by in my api call but in return I get response as {"code":-1,"message":"Given filter is not configured"} My Api request is as followsAccessing shared mailboxes through Trident (Windows)
Hi, I have a created a couple of shared mailboxes. The mailboxes are showing up on the browser based Zoho workplace, but I cannot seem to figure out how to access my shared inboxes through Trident (Windows). Am I missing something or is this feature notIssues Logging into ZOHO
Hello, one of my coworkers is having issues logging into ZOHO, she has requested a code when entering and the email is correct but she has not received the code. can you help us with this?Feature Request: Ability to set Default Custom Filters and apply them via URL/Deluge
I've discovered a significant gap in how Zoho Creator handles Custom Filters for reports, and I'm hoping the Zoho team can address this in a future update. This limitation has been raised before and continues to be requested, but remains unresolved. TheClosing the Loop: Why Lookup Asymmetry is Harming Data Integrity in Creator
TL;DR: Lookup fields allow users to add new related records inline via the "+" icon, but there's no equivalent ability to edit an existing related record without navigating away and losing form context. Adding a native "Edit" icon—with automatic UserSyncing with Google calendar, Tasks and Events
Is it possible to sync Zoho CRM calendar, task and events with Google Calendar's tasks and events. With the increasing adoption by many major tool suppliers to sync seamlessly with Google's offerings (for instance I use the excellent Any.do task planningfiltering lookup field options based on information in another module.
In our CRM system. We have the standard Accounts and Deals modules. We would like to introduce the ability to classify Accounts by Sector. Our desired functionality is to have a global list of all sectors that an Account can select, with the ability toReally want the field "Company" in the activities module!
Hi team! Something we are really missing is able to see the field Company when working in the activities module. We have a lot of tasks and need to see what company it's related to. It's really annoying to not be able to see it.🙈 Thx!Cliq iOS can't see shared screen
Hello, I had this morning a video call with a colleague. She is using Cliq Desktop MacOS and wanted to share her screen with me. I'm on iPad. I noticed, while she shared her screen, I could only see her video, but not the shared screen... Does Cliq iOS is able to display shared screen, or is it somewhere else to be found ? RegardsService op locatie organiseren met Zoho FSM: waar lopen organisaties tegenaan?
Bij organisaties met service teams op locatie merken we vaak dat de complexiteit niet zozeer in de planning zelf zit, maar in wat er rond die planning gebeurt. Denk aan opvolging na interventies, consistente servicerapporten, en het bijhouden van installatiesIntroducing Assemblies and Kits in Zoho Inventory
Hello customers, We’re excited to share a major revamp to Zoho Inventory that brings both clarity and flexibility to your inventory management experience! Presenting Assemblies and Kits We’re thrilled to introduce Assemblies and Kits, which replaces theAutomate pushing Zoho CRM backups into Zoho WorkDrive
Through our Zoho One subscription we have both Zoho CRM and Zoho WorkDrive. We have regular backups setup in Zoho CRM. Once the backup is created, we are notified. Since we want to keep these backups for more than 7 days, we manually download them. TheyDoes the ability exist to make tax on the customer profile mandatory?
I am reaching out to inquire about the possibility of making the "Customer Tax" field mandatory when creating a new customer in Zoho. We want to ensure that all customers have their tax information recorded to maintain compliance with our internal processes.CRM gets location smart with the all new Map View: visualize records, locate records within any radius, and more
Hello all, We've introduced a new way to work with location data in Zoho CRM: the Map View. Instead of scrolling through endless lists, your records now appear as pins on a map. Built on top of the all-new address field and powered by Mappls (MapMyIndia),IMAP mail after specify date
Hi My customer's mail server is on premise and mail storage is very huge. So It never finish sync. and finally stop sync. Cloud CRM have a option like zoho mail sync mail after some date.How to integrate XML with Zoho CRM
Hi, I have an eCom service provider that gives me a dynamic XML that contains order information, clients, shipments... The XML link is the only thing I have. No Oath or key, No API get... I want to integrate it into Zoho CRM. I am not a developer norNext Page