Creating a Gmail integration using custom connectors
Hello everyone!
Greetings from Deluge. Following up on our series aimed at exploring the capabilities of Deluge, today we'll take an in-depth look into the Deluge custom connections that can be created across Zoho services.
Deluge boasts an extensive range of over 260 built-in integrations spanning more than 35 Zoho services. These integrations streamline data access and modification with these services, from a single point in Zoho, without having to toggle between services. However, we understand that the needs of our users vary widely, and sometimes existing integrations may not cover every scenario.
That's where custom connections come in. Think of them as the Swiss Army Knife of integrations, enabling connections with hundreds of services—such as Gmail and Outlook—and seamlessly integrating them with your favorite Zoho services. With custom connections, you have the power to build your own integrations with virtually any third-party service and tailor them to meet your requirements. Moreover, since the custom connections use the OAuth 2.0 authentication mechanism, you're getting best-in-class security while integrating with third-party services.
What are connections?
Before we dive into the details of custom connectors, let's take a glimpse at what connections are in Deluge. Connections are a means to connect your Zoho account and any third-party accounts you wish to integrate with. Once a connection is created and connected, you can use it in Deluge integration tasks or invokeURL scripts to perform REST operations on the target service from the required Zoho service. For more information, visit our Connections help doc.
Use case
Assume the sales team of an organization uses Zoho CRM for managing leads, customer retention, and customer acquisition, and uses Gmail for communication purposes, like following up with potential clients via email. While the system works as is, it's time-consuming and prone to error, so an integration between Gmail and Zoho CRM is necessary to improve efficiency.
A custom connection to your Google account will enable you to sync your Zoho CRM and Google accounts, allowing you to perform actions related to your Google account from Zoho CRM. For example, you can invoke the connection using the invokeURL task in Zoho CRM and send an email to your leads from your Gmail address.
Steps to configure the Google custom connection
Configuration video
Configuration steps
Creating Google OAuth credentials
- Visit https://console.cloud.google.com/.
- Click the dropdown and choose the required project.

- Navigate to the hamburger menu on the left and click APIs and services -> Library.
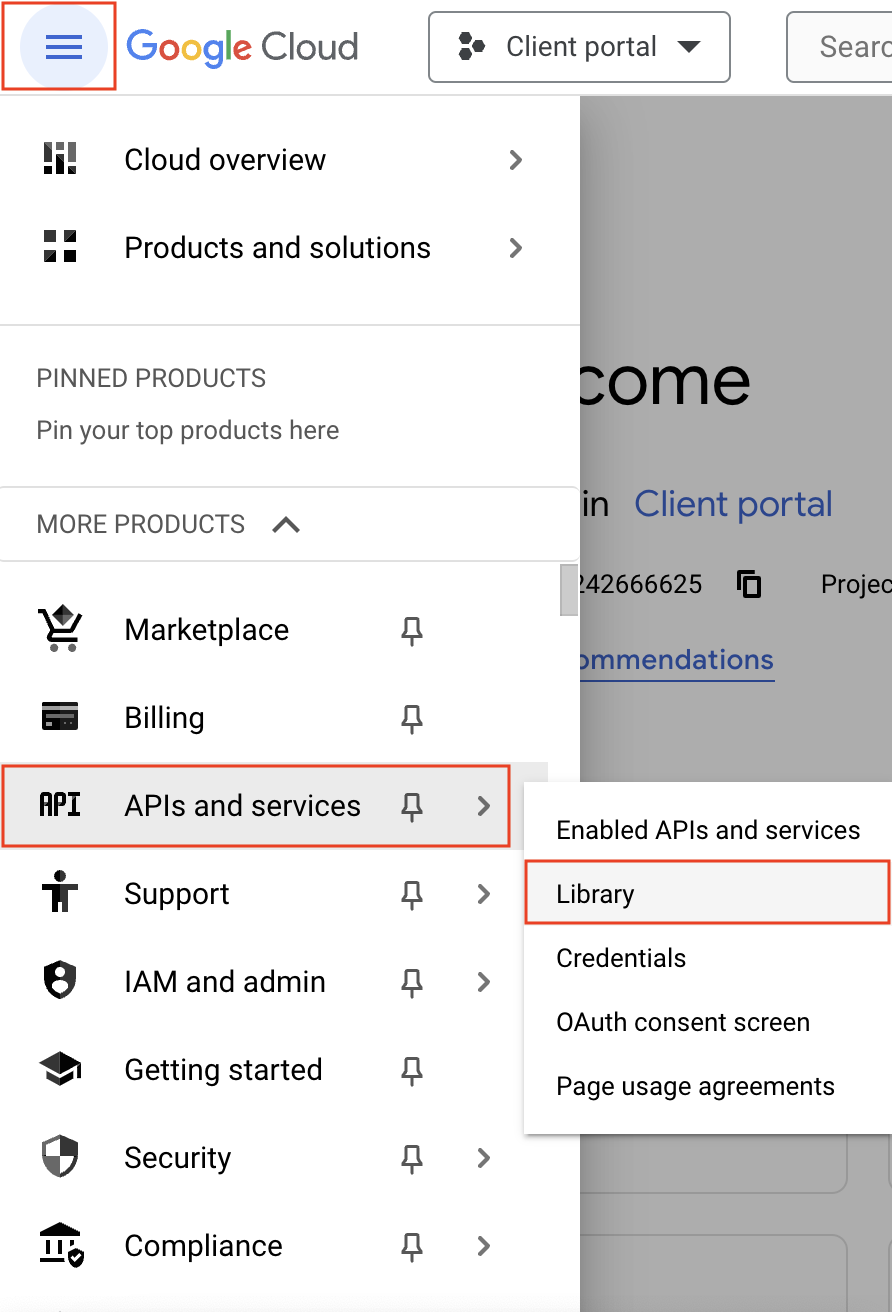
- You'll be taken to the API library page. Navigate to the Google Workspace section and click Gmail API.

- Next, click Enable on the Gmail API product details page.
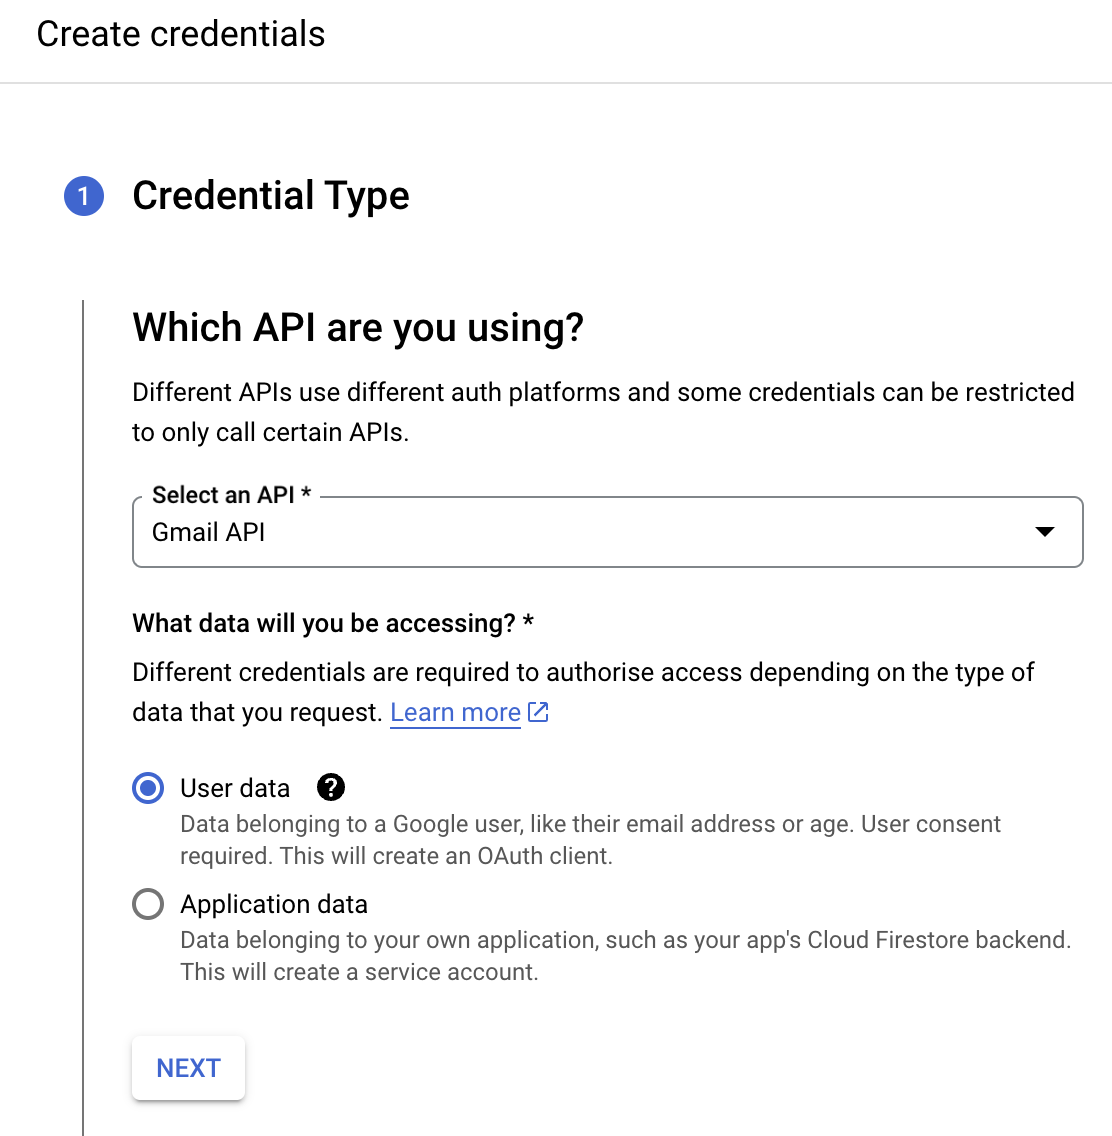
- In order to use this API, you'll need to create credentials. Click CREATE CREDENTIALS.

- On the Create credentials page, choose Gmail API in the Select an API dropdown and User Data under the What data will you be accessing? section. Click Next.
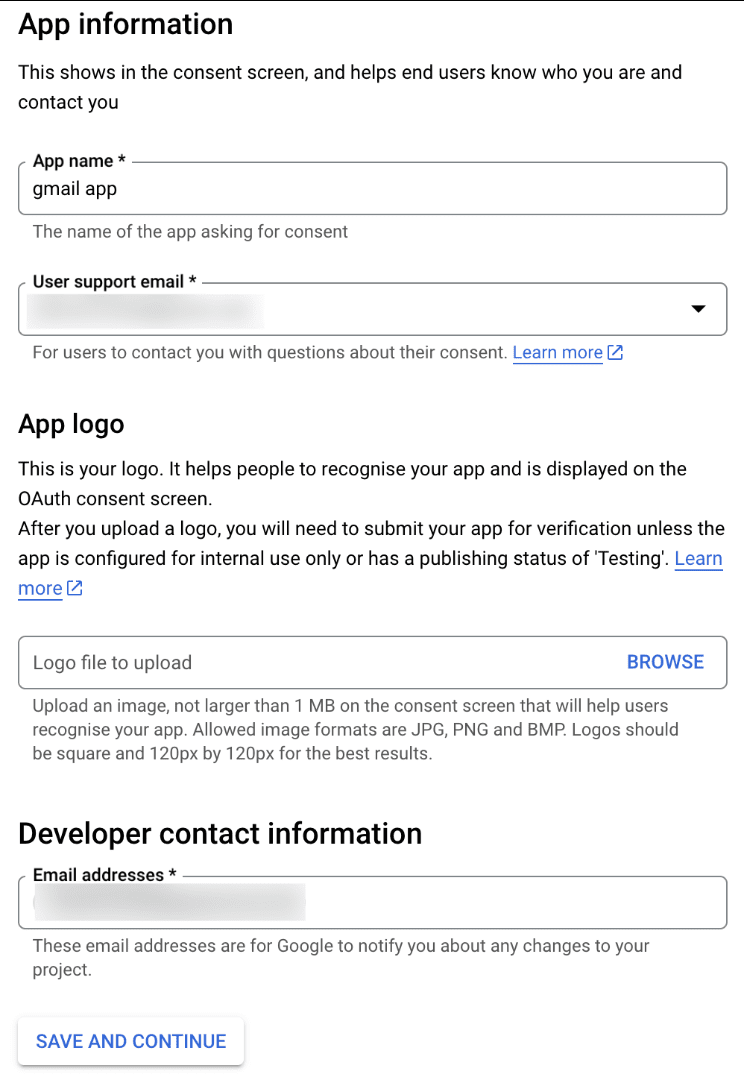
- Next, on the OAuth consent screen, enter the App name, User support email, and Developer contact email address. Then click Save and Continue.
- Next, under the Scopes section, click the ADD OR REMOVE SCOPES button.
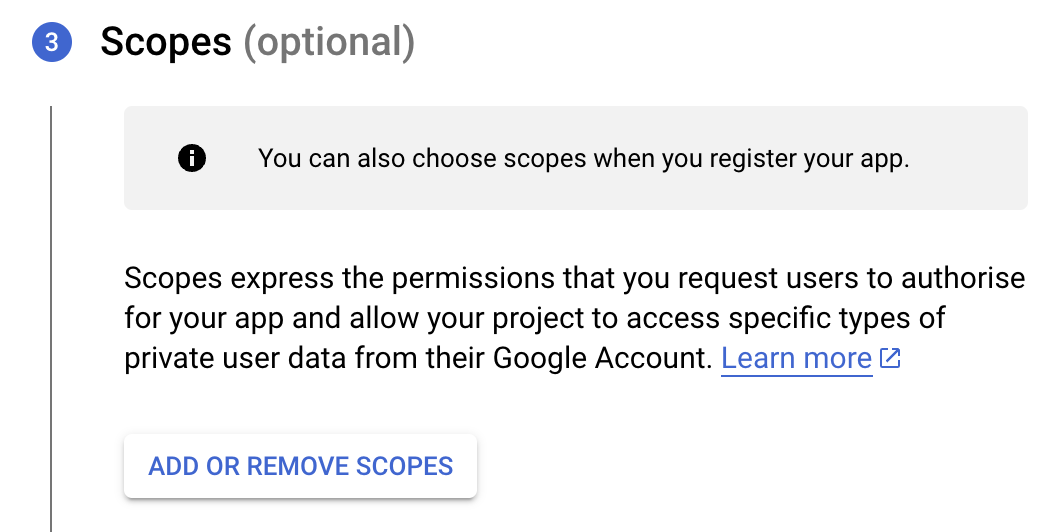
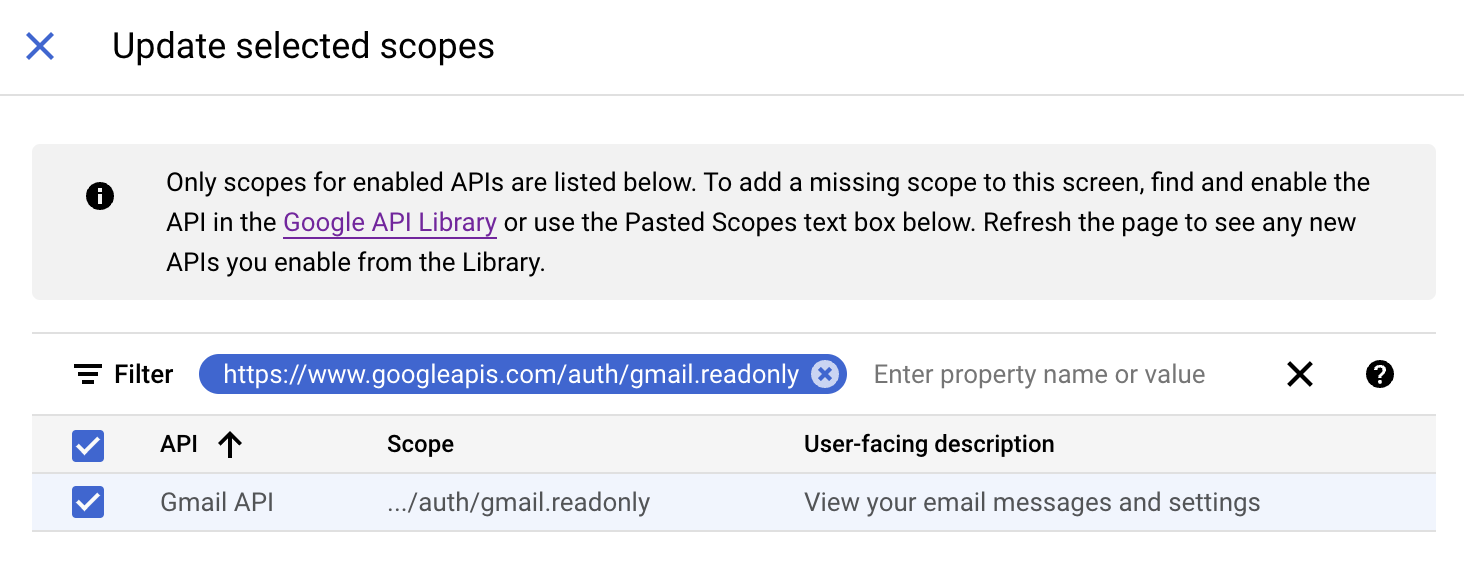
- In the Update selected scopes pane, search and select the gmail.readonly scope. Click Update, and then click Save and continue.
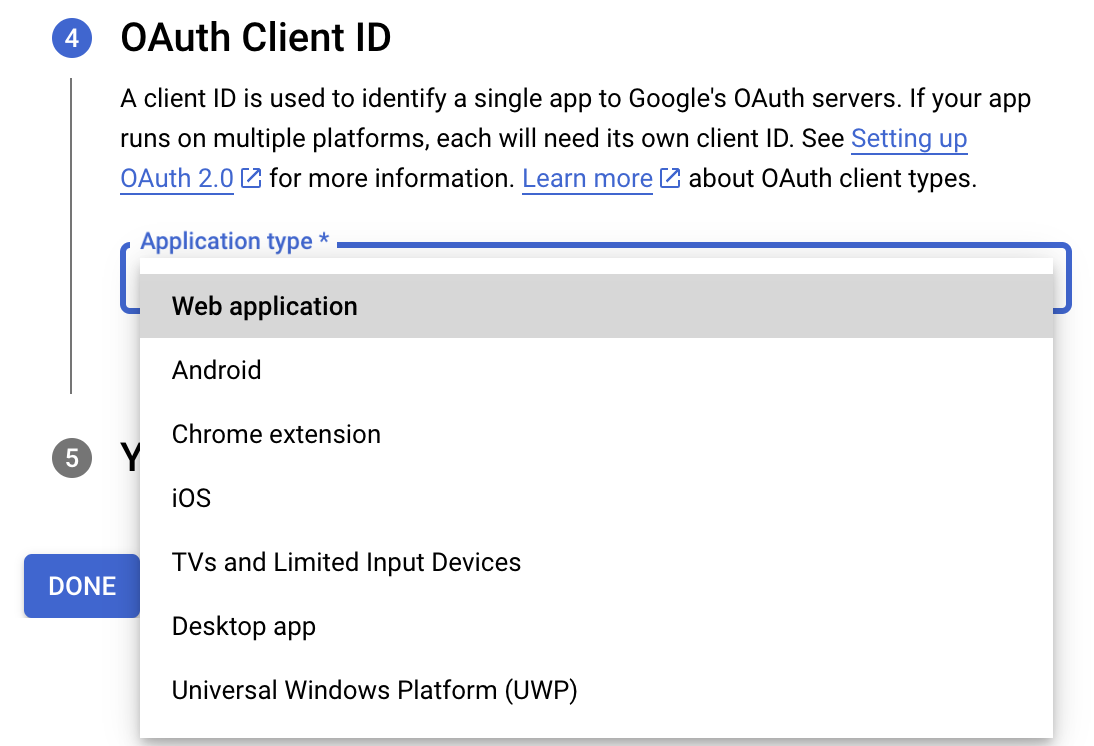
- Now, under the OAuth Client ID section, choose Web application in the Application type dropdown. Then name your app.
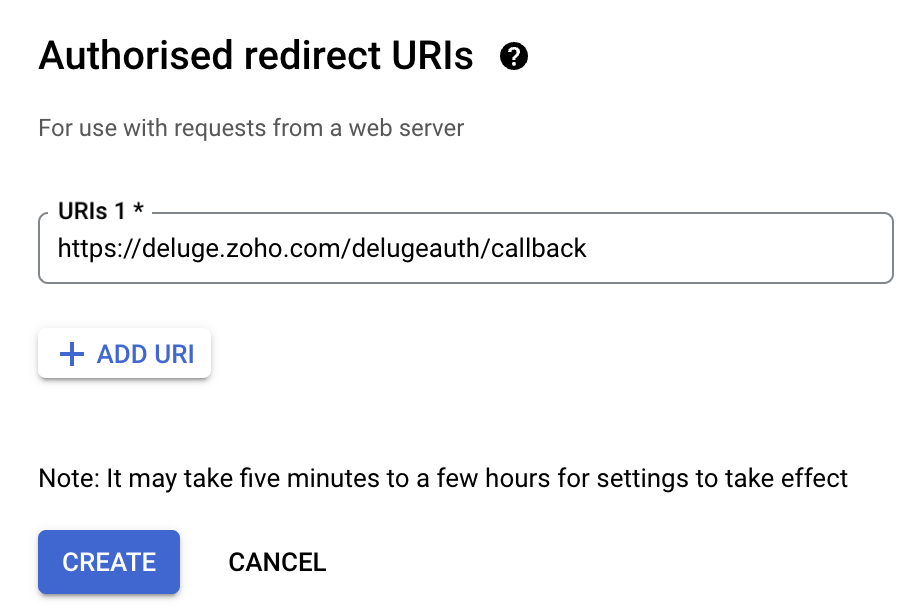
- Enter https://deluge.zoho.com/delugeauth/callback as the Authorized redirect URI.
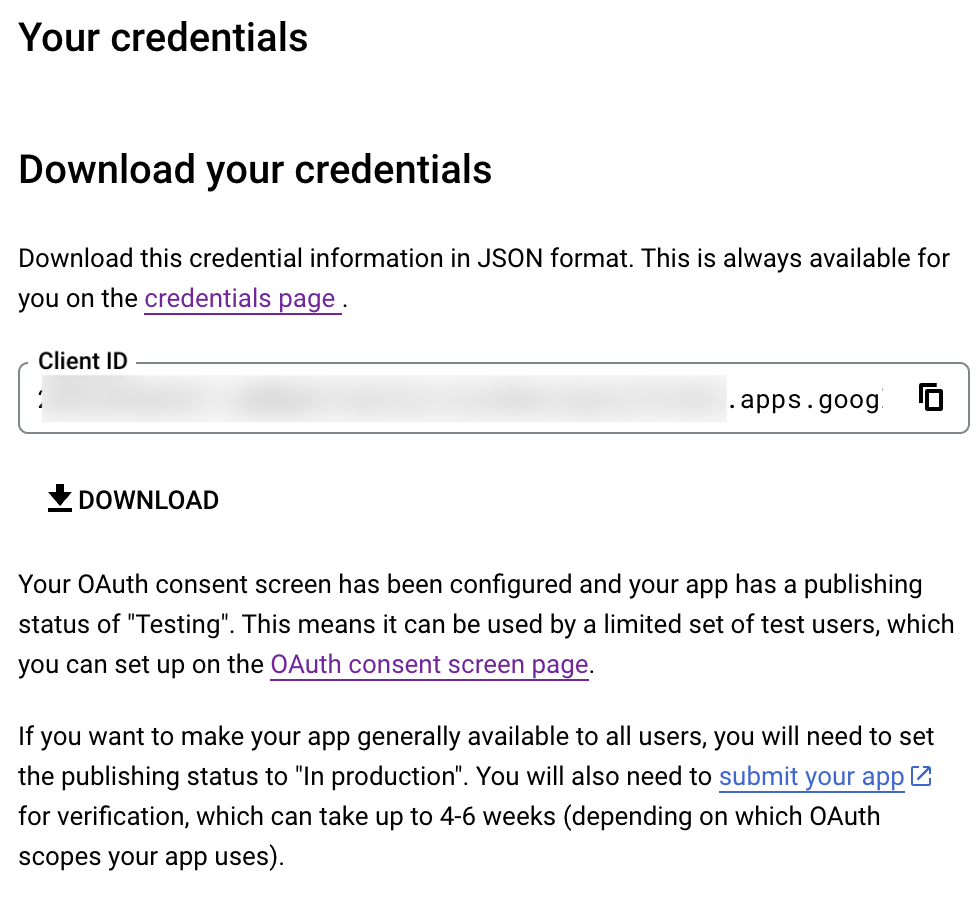
- Click Create and download your credentials. This Client ID and others will be required later, while creating a connection in Zoho CRM.
- Navigate to the OAuth consent screen and click Add users under Test users. Enter the user's email address and click Save.
Creating a custom connector for Gmail
- Now the action shifts to Zoho CRM. Navigate to crm.zoho.com -> Settings -> Connections.
- Choose Custom Services and click Create Service.
- On the Create Service screen, choose OAuth 2.0 as the Authentication type and Header as the Parameter.
- Enter the Client ID, Client Secret, and Authorize URL generated from Google as shown in step 12 above.
Tip: Having the Offline access type will allow your application to refresh tokens even when the user is not actively using the application. - Then enter https://oauth2.googleapis.com/token as the Access token URL and Refresh token URL.
- Specify the necessary scopes like read and create, etc. and then click Create Service.
- On the next page, click Create Connection. Give the connection name and choose the scopes. Then click Create and Connect.
- Finally, authenticate the connection on the Google accounts page. Your custom connection will be created, and the two services can be integrated!
Now that the connection between Zoho CRM and Gmail has been established, you can use the invokeURL task to access and modify data in Gmail using the different APIs.
Sample
You can use the below code in invokeURL task to get the latest emails from Gmail.

userId = "emailaddress@gmail.com";
get_gmail = invokeurl
[
url: "https://gmail.googleapis.com/gmail/v1/users/"+userId+"/messages"
type: GET
connection : "connectionname"
];
messageID = get_gmail.get("messages").get(0).get("id");
get_gmail_withID = invokeurl
[
url: "https://gmail.googleapis.com/gmail/v1/users/"+userId+"/messages/"+messageID
type: GET
connection : "connectionname"
];
Content_of_the_mail = get_gmail_withID.get("snippet");
info "Mail Content : " + Content_of_the_mail;
gmail_values = get_gmail_withID.get("payload").get("headers");
for each headers in gmail_values
{
if ( headers.get("name") == "Subject" )
{
info "Subject of the Mail : " + headers.get("value");
}
if ( headers.get("name") == "From" )
{
info "From Address : " + headers.get("value");
}
}
References
----
And that's a wrap for today! We hope you found this post informative and start using custom connections to experience the full capabilities of Deluge and Zoho.
Kindly let us know if you have any questions, feedback, or suggestions in the comments, or write to us at support@zohodeluge.com!
Regards,
The Deluge Team
New to Zoho Recruit?
Zoho Campaigns Resources
Topic Participants
Ashwin Vishal R
Kaushal
Anand M B
Zoho CRM Plus Resources
Zoho Books Resources
Zoho Subscriptions Resources
Zoho Projects Resources
Zoho Sprints Resources
Zoho Orchestly Resources
Zoho Creator Resources
Zoho WorkDrive Resources
Zoho CRM Resources
Get Started. Write Away!
Writer is a powerful online word processor, designed for collaborative work.
Zoho CRM コンテンツ
-
オンラインヘルプ
-
Webセミナー
-
機能活用動画
-
よくある質問
-
Ebook
-
-
Zoho Campaigns
- Zoho サービスのWebセミナー
その他のサービス コンテンツ
ご検討中の方
Recent Topics
Really want the field "Company" in the activities module!
Hi team! Something we are really missing is able to see the field Company when working in the activities module. We have a lot of tasks and need to see what company it's related to. It's really annoying to not be able to see it.🙈 Thx!Delay in rendering Zoho Recruit - Careers in the ZappyWorks
I click on the Careers link (https://zappyworks.zohorecruit.com/jobs/Careers) on the ZappyWorks website expecting to see the job openings. The site redirects me to Zoho Recruit, but after the redirect, the page just stays blank for several seconds. I'mIs Desk Down?
Across department - always an error. [Status Mode] - error [Table View and the rest] - workingWe Asked, Zoho Delivered: The New Early Access Program is Here
For years, the Zoho Creator community has requested a more transparent and participatory approach to beta testing and feature previews. Today, I'm thrilled to highlight that Zoho has delivered exactly what we asked for with the launch of the Early AccessCan the Product Image on the Quote Template be enlarged
Hello, I am editing the Quote Template and added ${Products.Product Image} to the line item and the image comes up but it is very tiny. Is there anyway that you can resize this to be larger? Any help would be great! ThanksHow do I change the wording of the tile of SignForm?
When my user opens a SignForm url, the title that is presented is always "SignForm signer Information" and a form is displayed asking for the username and email address. This can be confusing to the end user. How can I change the title at least (Or atHow to link tickets to a Vendor/Vendor Contact (not Customer) for Accounting Department?
Hi all, We’re configuring our Accounting department to handle tickets from both customers and vendors (our independent contractors). Right now, ticket association seems to be built around linking a ticket to a Customer / Customer Contact, but for vendor-originatedProblem with CRM Connection not Refreshing Token
I've setup a connection with Zoom in the CRM. I'm using this connection to automate some registrations, so my team doesn't have to manually create them in both the CRM and Zoom. Connection works great in my function until the token expires. It does not refresh and I have to manually revoke the connection and connect it again. I've chatted with Zoho about this and after emailing me that it couldn't be done I asked for specifics on why and they responded. "The connection is CRM is not a feature toAutomatic Matching from Bank Statements / Feeds
Is it possible to have transactions from a feed or bank statement automatically match when certain criteria are met? My use case, which is pretty broadly applicable, is e-commerce transactions for merchant services accounts (clearing accounts). In theseClone Recurring Expenses
Our bookkeeping practices make extensive use of the "clone" feature for bills, expenses, invoices, etc. This cuts down significantly on both the amount of typing that needs to be done manually and, more importantly, the mental overhead of choosing theUnify Overlapping Functionalities Across Zoho Products
Hi Zoho One Team, We would like to raise a concern about the current overlap of core functionalities across various Zoho applications. While Zoho offers a rich suite of tools, many applications include similar or identical features—such as shift management,Automation #7 - Auto-update Email Content to a Ticket
This is a monthly series where we pick some common use cases that have been either discussed or most asked about in our community and explain how they can be achieved using one of the automation capabilities in Zoho Desk. Email is one of the most commonlyTicket to article and Ticket to template
Hello! I would like to know if it is possible (and how) to do the following actions: 1. To generate an article from a ticket (reply + original message) 2. Easy convert an answer to an email templateIs there API Doc for Zoho Survey?
Hi everyone, Is there API doc for Zoho Survey? Currently evaluating a solution - use case to automate survey administration especially for internal use. But after a brief search, I couldn't find API doc for this. So I thought I should ask here. ThanWindows Desktop App - request to add minimization/startup options
Support Team, Can you submit the following request to your development team? Here is what would be optimal in my opinion from UX perspective: 1) In the "Application Menu", add a menu item to Exit the app, as well as an alt-key shortcut for these menusCreating Parent Child relationship in Accounts
We have customers with multiple locations, I setup the HQ as an account, then I setup the different sites marking the HQ as the parent to that location. If I then do a Deal for one of the locations, is there a way to show by looking at the parent accountKaizen #225 - Making Query-based Custom Related Lists Actionable with Lookups and Links
Hello everyone! Welcome back to another post in the Kaizen series! This week, we will discuss an exciting enhancement in Queries in Zoho CRM. In Kaizen #190, we discussed how Queries bridge gaps where native related lists fall short and power custom relatedWebDAV / FTP / SFTP protocols for syncing
I believe the Zoho for Desktop app is built using a proprietary protocol. For the growing number of people using services such as odrive to sync multiple accounts from various providers (Google, Dropbox, Box, OneDrive, etc.) it would be really helpfulCRM x WorkDrive: We're rolling out the WorkDrive-powered file storage experience for existing users
Release plan: Gradual rollout to customers without file storage add-ons, in this order: 1. Standalone CRM 2. CRM Plus and Zoho One DCs: All | Editions: All Available now for: - Standalone CRM accounts in Free and Standard editions without file storageNon-responsive views in Mobile Browser (iPad)
Has anyone noticed that the creator applications when viewed in a mobile browser (iPad) lost its responsiveness? It now appears very small font size and need to zoom into to read contents. Obviously this make use by field staff quite difficult. This is not at all a good move, as lots of my users are depending on accessing the app in mobile devices (iPads), and very challenging and frustrating.[Free Webinar] Learning Table Series - AI-Enhanced Logistics Management in Zoho Creator
Hello Everyone! We’re excited to invite you to another edition of Learning Table Series, where we showcase how Zoho Creator empowers industries with innovative and automated solutions. About Learning Table Series Learning Table Series is a free, 45-60Learner transcript Challenges.
Currently i am working on a Learner Transcript app for my employer using Zoho Creator. The app is expected to accept assessment inputs from tutors, go through an approval process and upon call up, displays all assessments associated with a learner inCustomizable UI components in pages | Theme builder
Anyone know when these roadmap items are scheduled for release? They were originally scheduled for Q4 2025. https://www.zoho.com/creator/product-roadmap.htmlFeature Request - Set Default Values for Meetings
Hi Zoho CRM Team, I would be very useful if we could set default values for meeting parameters. For example, if you always wanted Reminder 1 Day before. Currently you need to remember to choose it for every meeting. Also being able to use merge tags toAnalytics <-> Invoice Connection DELETED by Zoho
Hi All, I am reaching out today because of a big issue we have at the moment with Zoho Analytics and Zoho Invoice. Our organization relies on Zoho Analytics for most of our reporting (operationnal teams). A few days ago we observed a sync issue with theHow to use Rollup Summary in a Formula Field?
I created a Rollup Summary (Decimal) field in my module, and it shows values correctly. When I try to reference it in a Formula Field (e.g. ${Deals.Partners_Requested} - ${Deals.Partners_Paid}), I get the error that the field can’t be found. Is it possibleZoho Creator to Zoho CRM Images
Right now, I am trying to setup a Notes form within Zoho Creator. This Notes will note the Note section under Accounts > Selected Account. Right now, I use Zoho Flow to push the notes and it works just fine, with text only. Images do not get sent (thereCRM gets location smart with the all new Map View: visualize records, locate records within any radius, and more
Hello all, We've introduced a new way to work with location data in Zoho CRM: the Map View. Instead of scrolling through endless lists, your records now appear as pins on a map. Built on top of the all-new address field and powered by Mappls (MapMyIndia),Error Logs / Failure logs for Client Scripts Functions
Hi Team, While we are implementing client scripts for the automation, it is working fine in few accounts but not working for others. So, it would be great if we can have error Logs for client scripts also just like custom functions. Is there any way thatAutomate pushing Zoho CRM backups into Zoho WorkDrive
Through our Zoho One subscription we have both Zoho CRM and Zoho WorkDrive. We have regular backups setup in Zoho CRM. Once the backup is created, we are notified. Since we want to keep these backups for more than 7 days, we manually download them. TheyZoho Books blocks invoicing without VeriFactu even though it is not mandatory until 2027
I would like to highlight a very serious issue in Zoho Books for Spain. 1. The Spanish government has postponed the mandatory start of VeriFactu to January 1st, 2027. This means that during all of 2026 businesses are NOT required to transmit invoicesProblem : Auto redirect from zoho flow to zoho creator
Hi there, I've been waiting for zoho team to get back on this for last couple of days. Anyone else have the problem to access zoho flow? everytime I click on zoho flow it redirects me to zoho creator. I tried incognito mode but it still direct me to zohoClient and Vendor Portal
Some clients like keeping tabs on the developments and hence would like to be notified of the progress. Continuous updates can be tedious and time-consuming. Zoho Sprints has now introduced a Client and Vendor Portal where you can add client users and#7 Tip of the week: Delegating approvals in Zoho People
With Zoho People, absences need not keep employees waiting with their approval requests. When you are not available at work, you can delegate approvals that come your way to your fellow workmate and let them take care of your approvals temporarily. Learn more!Trouble with using Apostrophe in Name of Customers and Vendors
We have had an ongoing issue with how the system recognizes an apostrophe in the name of customers and vendors. The search will not return any results for a name that includes the mark; ie one of our vendors names is "L'Heritage" and when entering theWhy am I seeing deleted records in Zoho Analytics syncing with Zoho CRM?
I have done a data sync between Zoho CRM and Zoho Analytics, and the recycle bin is empty. Why do I see deleted leads/deals/contacts in Zoho Analytics if it doesn't exist in Zoho CRM? How can I solve this problem? ThanksNueva edición de "Ask The Expert" en Español Zoho Community
¡Hola Comunidad! ¿Te gustaría obtener respuestas en directo sobre Zoho CRM, Zoho Desk u otra solución dentro de nuestro paquete de CX (Experiencia del Cliente? Uno de nuestros expertos estará disponible para responder a todas tus preguntas durante nuestraHow to use MAIL without Dashboard?
Whenever I open Mail, it opens Dashboard. This makes Mail area very small and also I cannot manage Folders (like delete/rename) etc. I want to know if there is any way to open only Mail apps and not the Dashboard.Peppol: Accept Bill (Belgium)
Hi, This topic might help you if you're facing the same in Belgium. We are facing an issue while accepting a supplier bill received by Peppol in Zoho Books. There is a popup with an error message: This bill acceptance could not be completed, so it wasclick to call feature
I've Zoho CRM and in that i want click to call feature.Next Page


