Kaizen #194 : Trigger Client Script via Custom buttons

Hello everyone!
Welcome back to another interesting and useful Kaizen post.
We know that Client Scripts can be triggered with Canvas buttons and we discussed this with a use case in Kaizen#180. Today, let us discuss how to trigger Client Script when a Custom Button is clicked. Using this, you can execute Client Script when a custom button is clicked.
In this post,
1. Event Details2. Supported Pages3. Use Case - Export Subform Rows to Zoho Sheet in a Single Click!4. Solution5. Summary6. Related Links
Client Script support for Custom Buttons opens up possibilities for automation, personalization, and enhanced user interactions in Zoho CRM when a custom button is clicked.
Here is a detailed walkthrough to help you understand it better.
1. Event Details
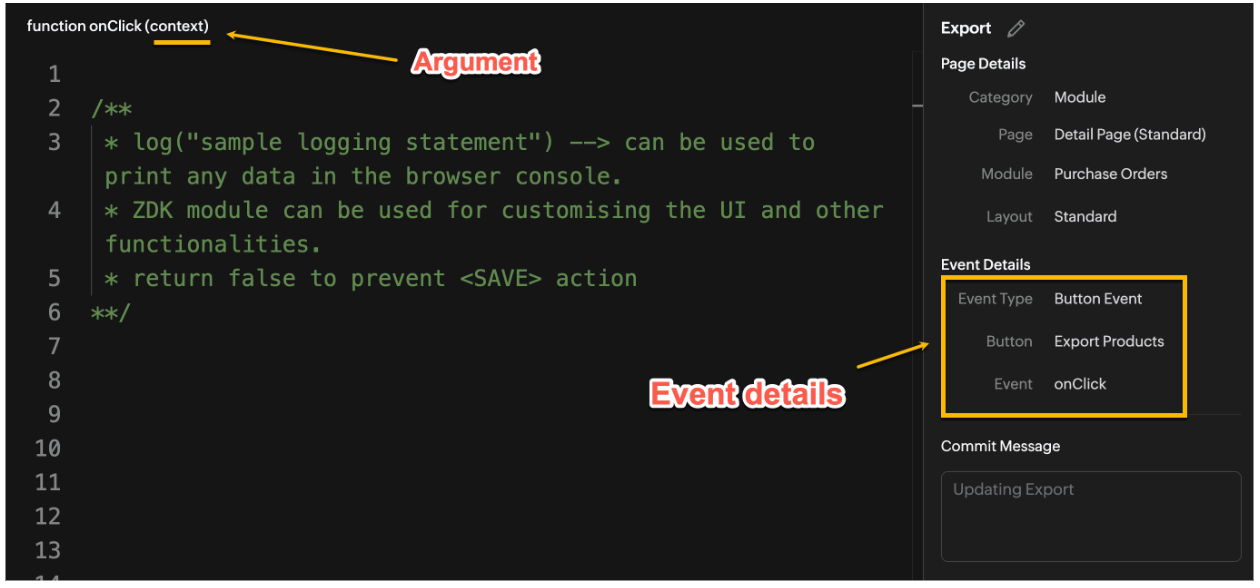
The Button event triggers the Client Script when a custom button is clicked. Each time this event is invoked, the context argument is passed to the Client Script. The context contains information about the page from which the button was clicked.
Click here to know more about Client Script Events.
2. Supported Pages
A Custom Button can be placed in different positions based on the Page.
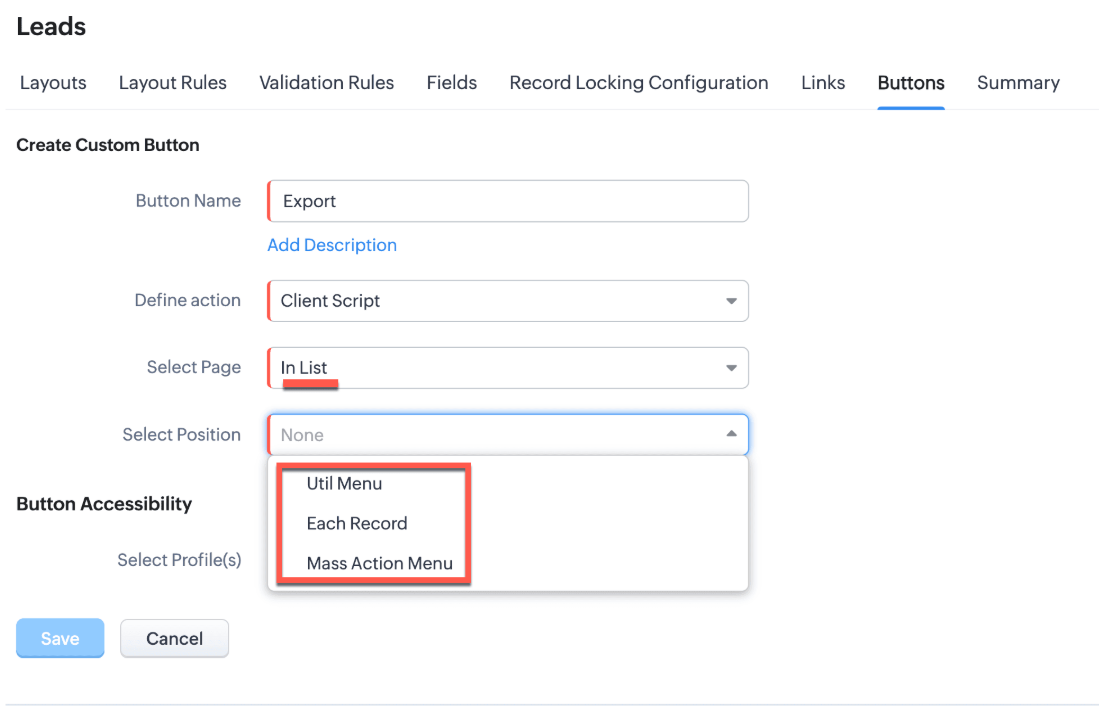
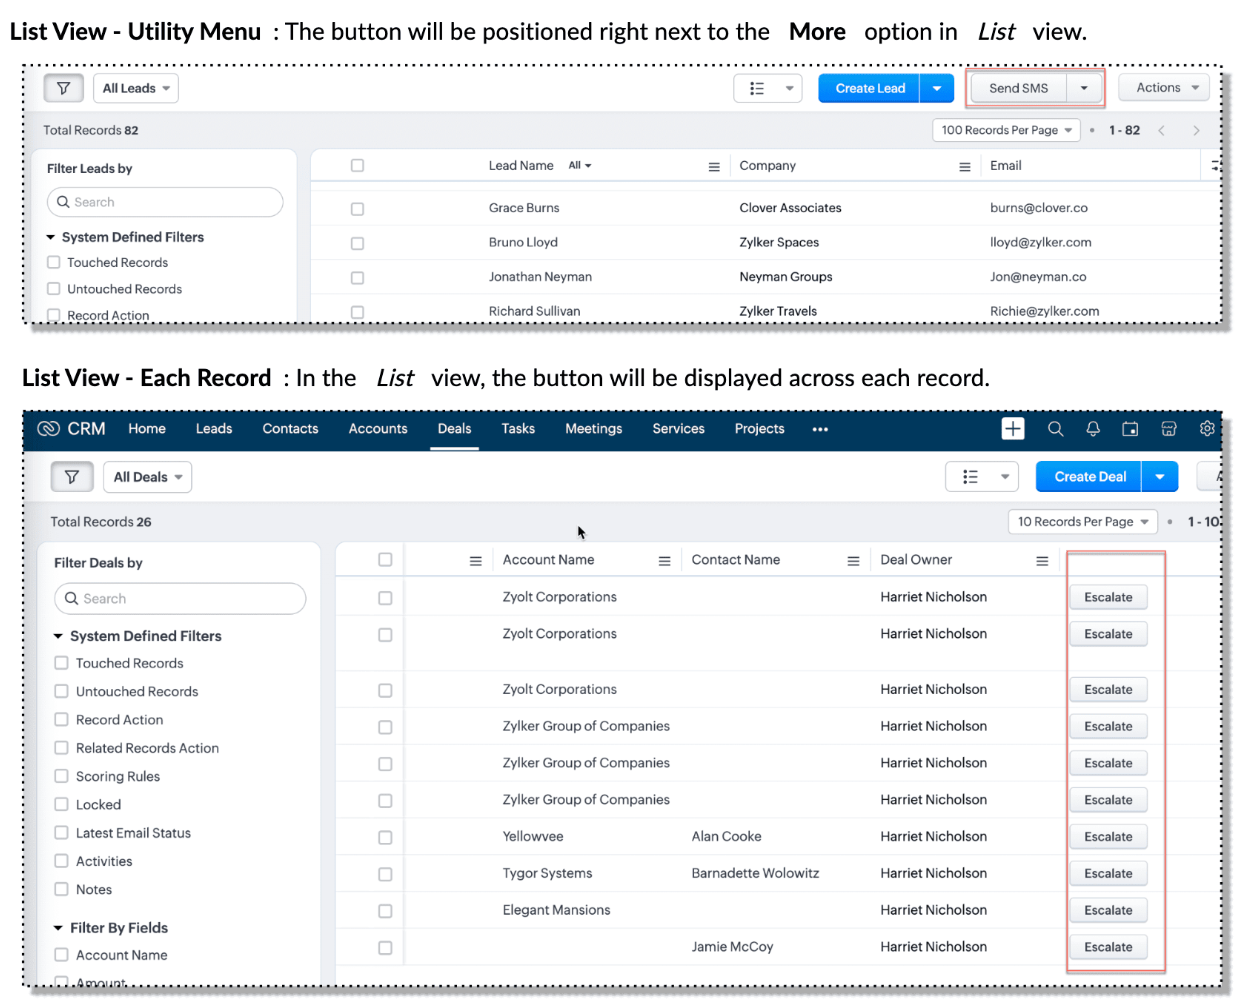
You can add a custom button in the Util Menu, in Each Record or in the Mass Action Menu of the List Page.

Also, a Detail Page can have a custom button either In Record or in the Related List. Click here for more details about the different possible positions of a custom button.
The following table lists the supported pages and the corresponding context argument, which provides different details based on the page type.

To create a Client Script and make it trigger when a custom button is clicked, first create a Custom button and associate it with a Client Script as shown in the following image.

Click here to view the steps to create a custom button and configure a Client Script.
Note:
You can configure the Client Script only from the Buttons page to trigger it when a user clicks a custom button, and not the usual way of Creating Client Script via setup page. Once a script is created, it can be edited and updated from the Client Script setup page
3. Use Case - Export Subform Rows to Zoho Sheet in a Single Click!
Zylker manufactures medical instruments, and its sales representatives frequently need to share bulk order details with distributors and hospital partners using Zoho Sheets. These details such as product names, quantities, and prices are captured in a Subform on the Purchase Order Detail(Standard) Page.
To simplify this, the admin wants to add a custom button called "Export Products" on the Purchase Order Detail Page. When clicked, it should export the Purchase Items from the Subform and move the content to the specified sheet.
4. Solution
To export subform rows to Zoho Sheet with a single click, you can add a custom button to the Detail Page of the record. When clicked, a Client Script will be triggered to fetch the subform data from the Detail Page and pass it to a Function that uses zoho.sheet.createRecords() to insert data into Zoho Sheet.
Here’s how to implement this:
- Add “Export Products” custom button on the Detail Page.
- Add the script to collect subform rows which invokes the Function.
- Write a Function to create entry in Zoho Sheets
A. Add “Export Products” custom button on the Detail Page.
- Go to Setup → Modules and Fields under Customization.
- Select a Module as Purchase Order.
- Click on Buttons → Then click + New Button.
- Enter Button Name and select Action Type as "Client Script"
- Choose Button Position and Layout details as shown in the following image.
- Click Create in Configured Client Script, enter the script, and click Add.
- Select the profiles for which these buttons should be visible.
- Click Save.

B. Add the Script to collect subform rows and invoke the Function
Use the following Client Script when you configure the custom button.
- var casesheetid = ZDK.Client.getInput([{ type: 'text', label: 'Enter the Sheet ID' }], 'Sheet details', 'OK', 'Cancel');
- if (casesheetid == null) {
- ZDK.Client.showAlert("Enter the *Case Sheet ID - Import* to import data");
- }
- var purchase_items = ZDK.Page.getField('Purchase_items).getValue();
- ZDK.Client.showLoader({type: 'page', template:'spinner', message: 'Export in progress, please wait'});
- var c=1;
- if (sheetid == null) {
- ZDK.Client.hideLoader();
- ZDK.Client.showAlert("Enter the *Case Sheet - Export* ID to export data");
- }
- purchase_items.forEach((r,i) => {
- try {
- resp = ZDK.Apps.CRM.Functions.execute("csvWrite", { "Product_Name": r.Product_Name.name, "List_Price": r.List_Price, "Discount": r.Discount, "Total": r.Total,"Sheetid":casesheetid }); }
- catch (error) {
- c = 0;
- ZDK.Client.hideLoader();
- ZDK.Client.showAlert("Unexpected issue occured while adding data in row number "); }
- });
- ZDK.Client.hideLoader();
- if (c) {
- ZDK.Client.showMessage("Export completed. Please check the Sheet");
- }
- else
- {
- ZDK.Client.showMessage("Unexpected error "); }}
In this code, several ZDKs are used for various purposes. Click on the ZDK hyperlinks to learn more.
- User Input: The code uses ZDK.Client.getInput() to fetch a "Sheet ID" from the user. This input is crucial for further operations.
- Input Validation: If the user cancels or doesn't enter a sheet ID, the code checks for null and prompts the user to enter the ID using ZDK.Client.showAlert().
- Function Invocation: The entries of Purchase Order subform are fetched using ZDK.Page.getField('Purchase_items).getValue() and written to Zoho Sheet using the Function csvWrite(), which internally calls zoho.sheet.createRecords().
- Loader Display: To indicate that a process is running, a loader is displayed using ZDK.Client.showLoader().
- Show Message: ZDK.Client.showMessage() displays that the Export is completed.
Note
The Client Script you intend to link with the button will be saved only after the custom button is saved.
C. Write a Function to create entry in Zoho Sheets
- Go to Setup > Developer Hub > Functions.
- In the Functions page, click + Create New Function.
- Choose the category as Button.
- Click Create.
- In the Create Function page, enter a name as csvWrite and description for your function.
- Enter the following function code and click Save.
- string standalone.csvWrite(String product,String qty,String up,String amt, String Sheetid){
- queryData = Map();
- writeData = Map();
- header = Map();
- writeData.put("Product",product);
- writeData.put("Quantity",qty);
- writeData.put("Unit_Price",up);
- writeData.put("Amount",amt);
- SheetData = zoho.sheet.createRecords("Sheetid","Sheet1",writeData,queryData,"sheetconnection");
- return SheetData;
- }
In the code above:
- sheetconnection refers to the name of the Zoho Sheet connection, which must have the scopes: ZohoSheet.dataAPI.UPDATE and ZohoSheet.dataAPI.READ.
- Click here to know how to create a Connection with the required scopes.
- sheetid is the unique identifier of the Zoho Sheet, available in the sheet’s URL.
- Sheet1 represents the name of the worksheet (i.e., the tab name shown at the bottom of the Zoho Sheet).
- Now, when the custom button is clicked, the Client Script is triggered. It prompts for the Sheet ID, fetches the contents of the Purchase Order subform, and invokes a function that writes the content to the Sheet.
Here's how the Client Script works.
5. Summary
In this post we have seen,
- What is a Button event?
- How to configure Client Script for a custom button
- How to write data into Zoho Sheets from Client Script
- How to create a Function and call it from Client Script
6. Related Links
- Customize Buttons using Client Script
- Automating Data Transfer from Zoho Sheets to Zoho CRM Subforms
- Update - Client Script Support For Custom Buttons
We are thrilled to be nearing the 200th post in our Kaizen series. As we approach this exciting milestone, we would love to hear from you. Do you have any questions, suggestions, or topics you would like us to cover in future posts? Your input helps us improve and shape the series to serve you better.
Previous Kaizen Post : Kaizen #193: Creating different fields in Zoho CRM through API | Kaizen Directory
We hope you found this post useful!
Happy Client Scripting! 😊