Plug Sample #9 - Get Notified on Cliq When Your Premium Customers Interact with SalesIQ's Zobot
Hi everyone!
We're here with another simple yet effective plug for your chatbot to integrate with Zoho Cliq to make your job easier. Just imagine whenever a potential lead or your premium customers are on your website, and they engage with your chatbot, you'll receive instant notifications on Cliq, complete with their details and a chat URL.
Sounds helpful, right?
Now get all this information on your cliq as a message. If a prospect or a premium customer is conversing with the bot, then on a click you will be redirected to SalesIQ. You will get the complete information of the chat and can also take over the chat from the bot, thus providing your best assistance.

Are you new to SalesIQ? Wondering what these plugs and bots are?
Zoho SalesIQ is a customer engagement and live chat platform for your website. To automate customer engagement, SalesIQ offers chatbots. With the Codeless bot builder, you can build chatbots by dragging and dropping cards. This bot builder has almost all essential cards needed to build your bot. However, at times, businesses would require unique actions from the bot and for those instances, we have Plugs. With plugs, you can create a unique action and bring it as a card inside the codeless bot builder like the rest of the cards. In this post, we will take a look at how to create a plug integrating your bot with Zoho Cliq and the possible benefits.
How can this Plug help your business?
- Get notified in Cliq when a specific type of visitor engages with chatbot. These visitors can be who you think are important for your business like premium customers, potential leads, visitor with a good lead score, visitors from a specific URL or source, visitor with CRM deal closing date period, etc. as per your requirement.
- Cliq bot will notify on the personal chat (subscribers of the bot) or on a group channel based on the preference.
- Get your visitor details like name, chat URL, and other information, in the message notification.
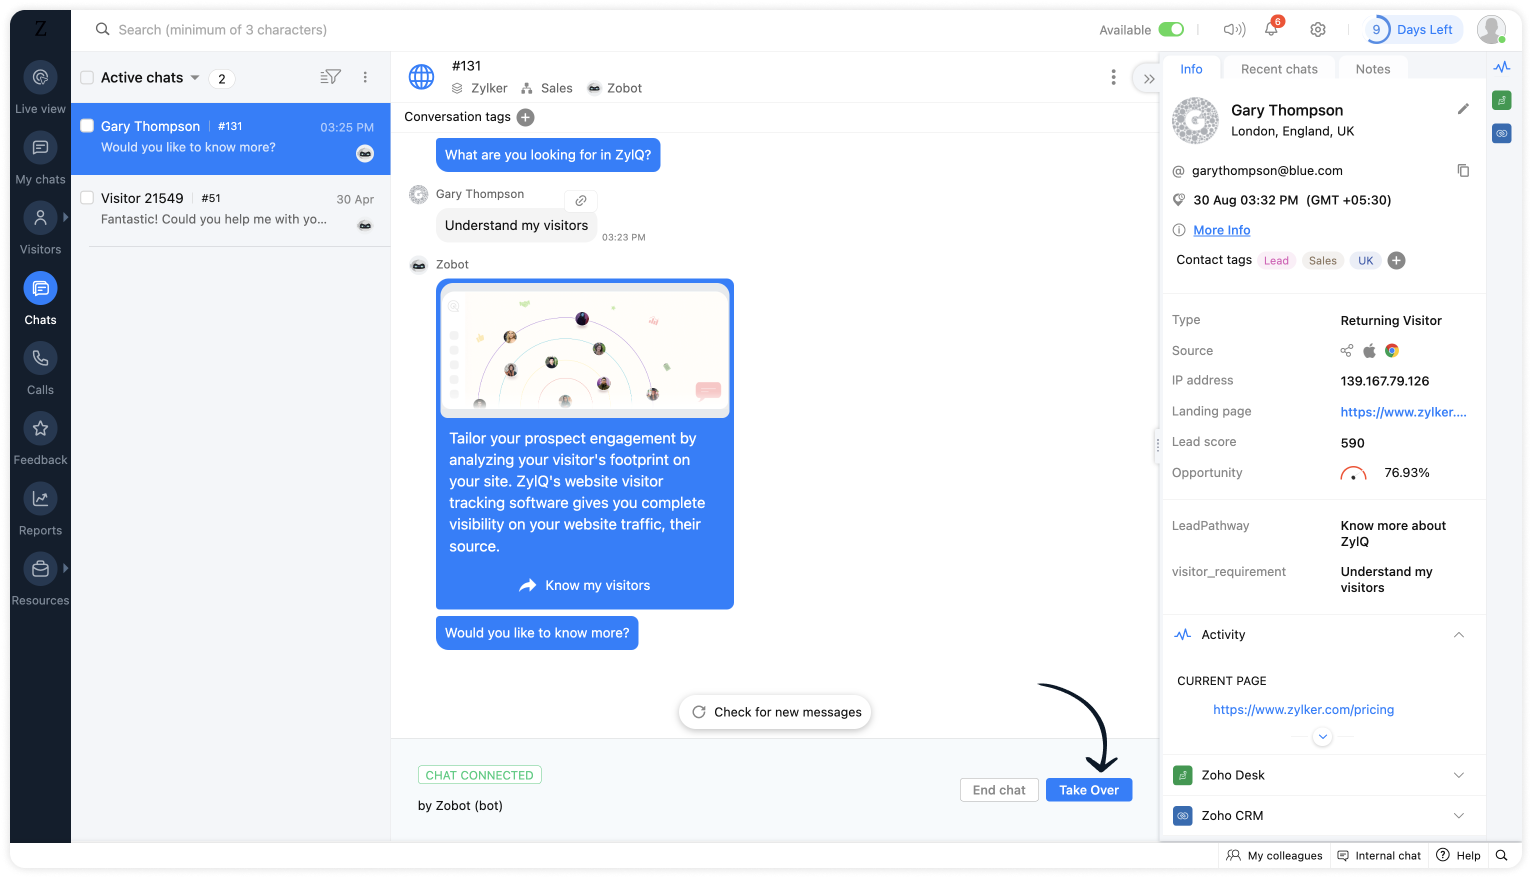
- Clicking on the chat URL, you will get redirected to the SalesIQ's bot conversation, where you can look at the bot chat. If required, you can take over the chat.
Plug overview

- The SalesIQ bot will collect the required information and send it to the Cliq bot while the conversation is ongoing.
- Next, the Cliq bot will send this information to personal chat or a group channel in Cliq as per your business needs.
How to build this Plug (promising lead engages with your bot) ?
Step 1 - Create a connection between SalesIQ and Zoho Cliq
- In your SalesIQ Dashboard, navigate to Settings > Developers > Plugs > Click on Add .
- Provide your plug a name, and description, select the Platform as SalesIQ Scripts , and finally, click on Connection to your left bottom. You will be redirected to the connection interface.
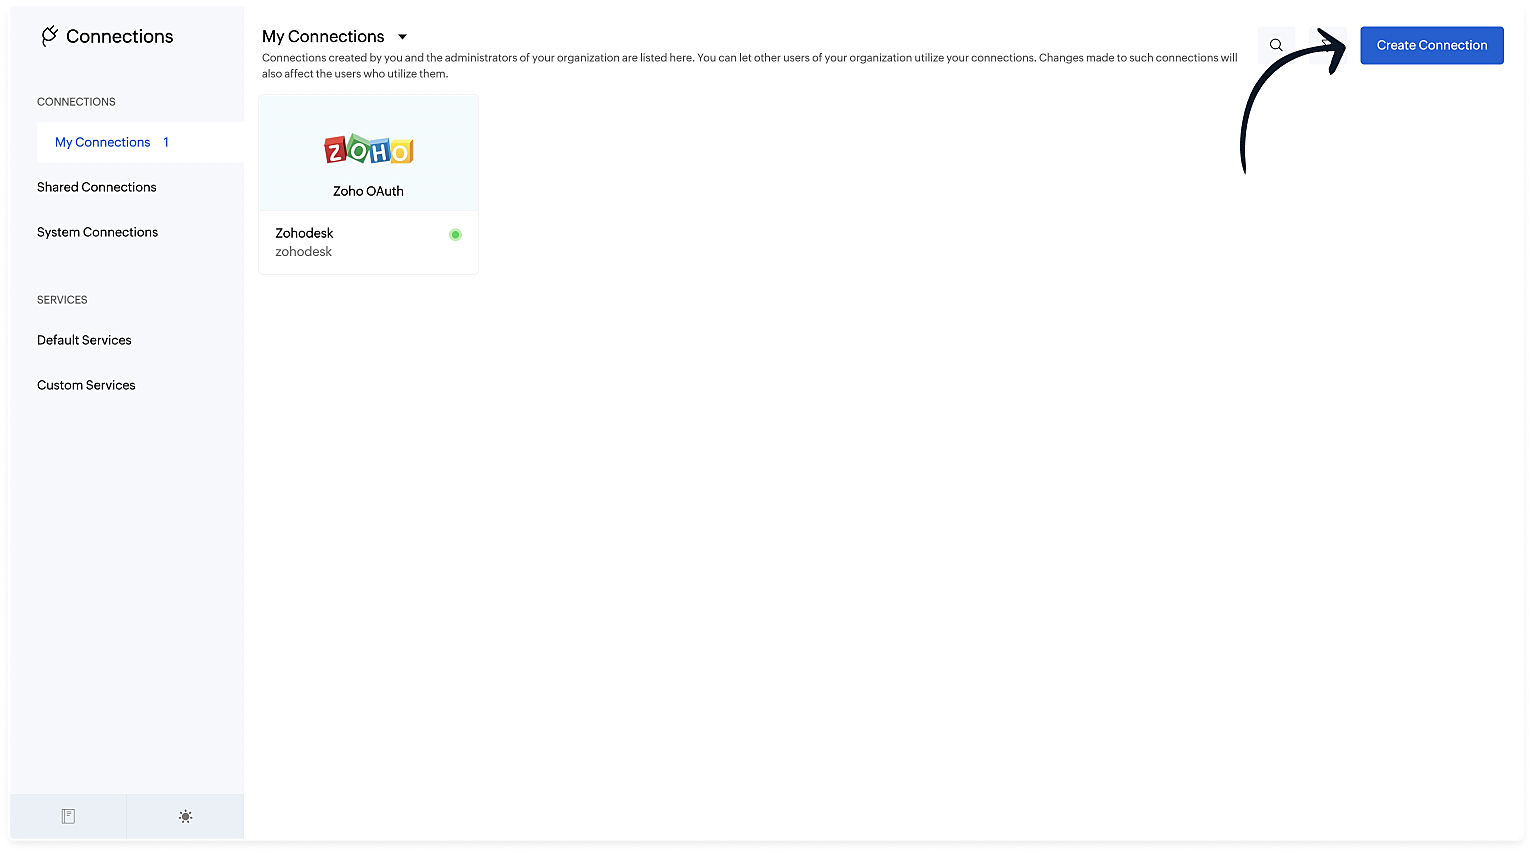
- Click on Create connection at the top right corner.
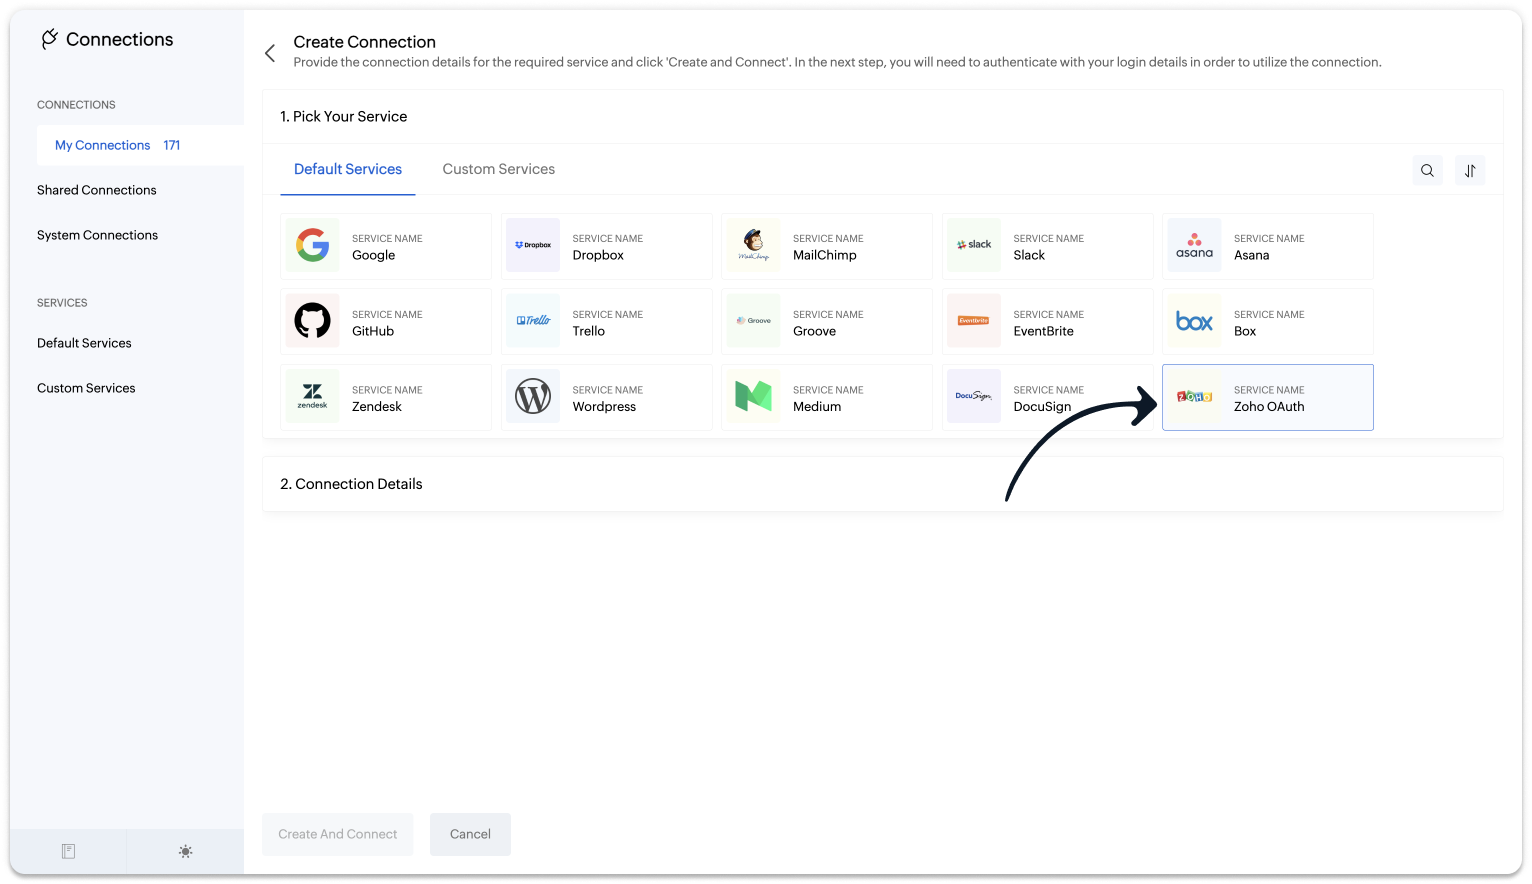
- Under Default connection, select Zoho OAuth service.
- Provide your connection name, connection link name, and choose the scopes below.
- ZohoCliq.Webhooks.CREATE
- ZohoCliq.Messages.ALL
- Click on Create And Connect to connect Zoho SalesIQ and Zoho Cliq.
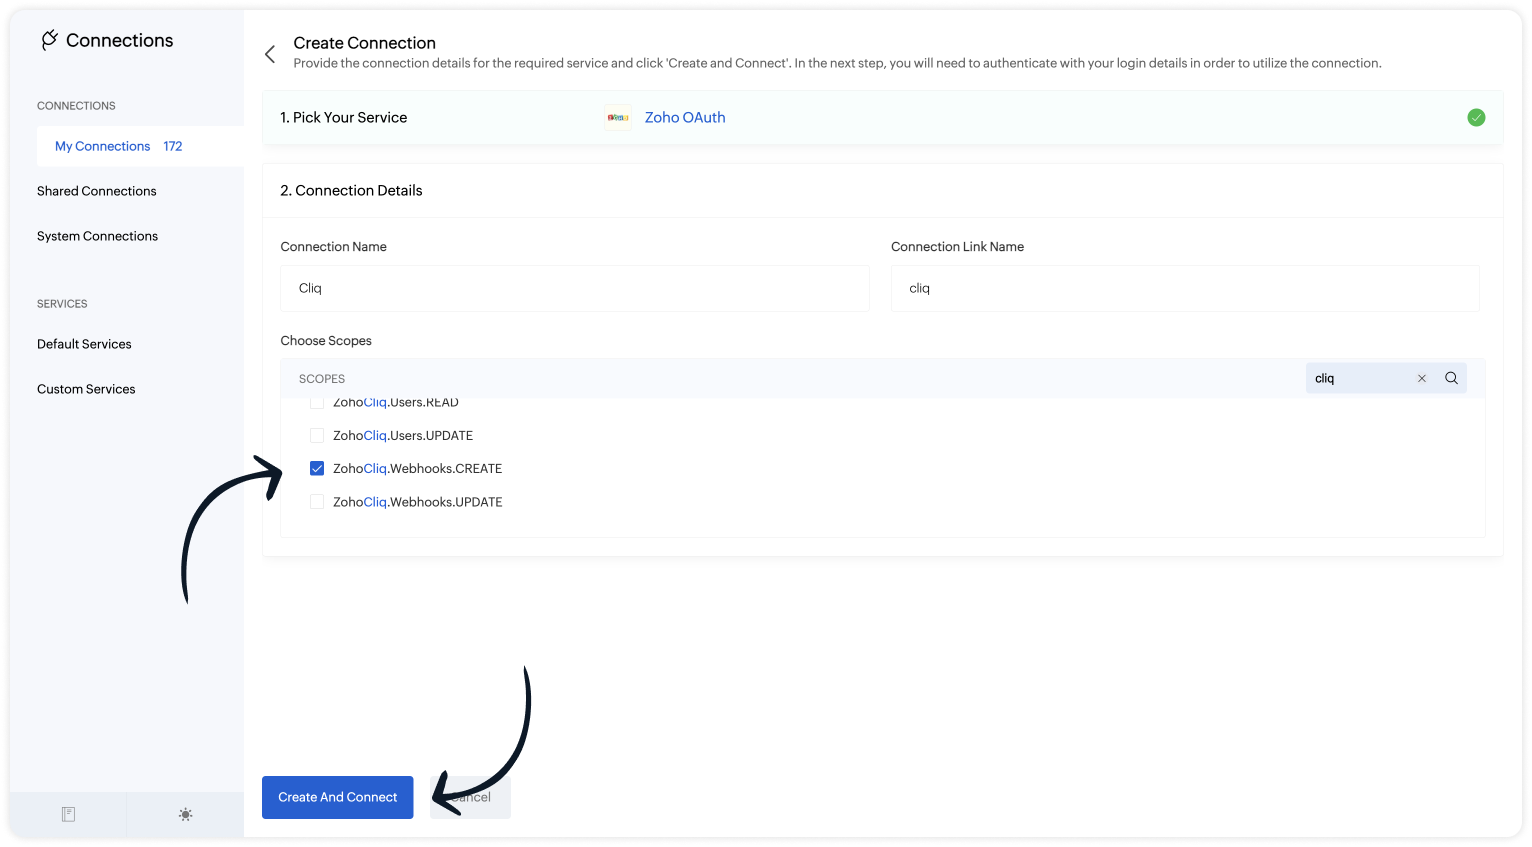

Note: The Connection Link Name will be used in the scripts to invoke URL tasks.
Upon successful authentication, Zoho SalesIQ will be connected with Zoho Cliq.
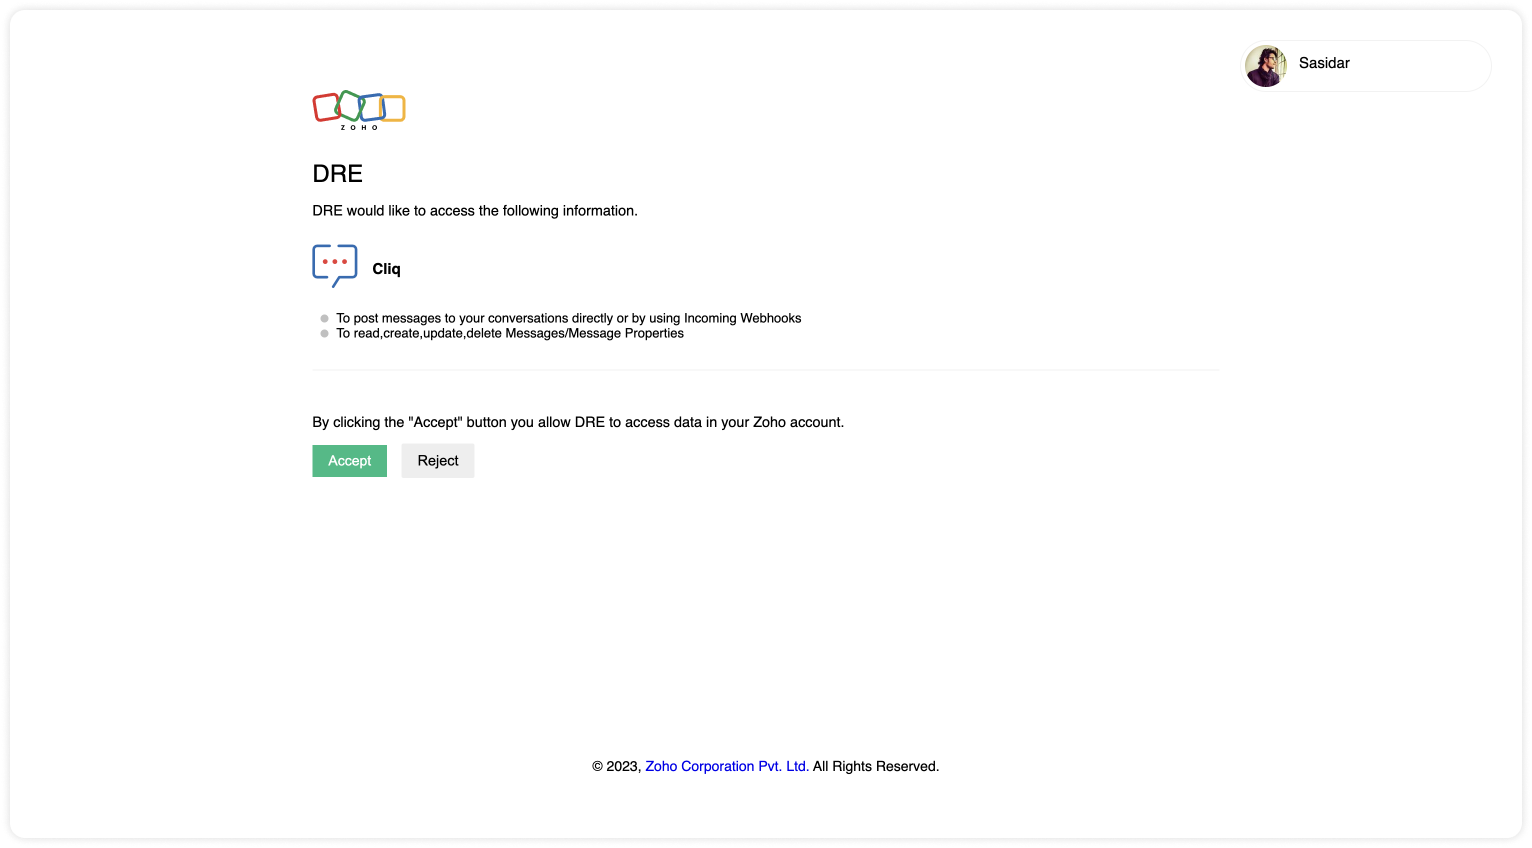
- The connection is successfully established.
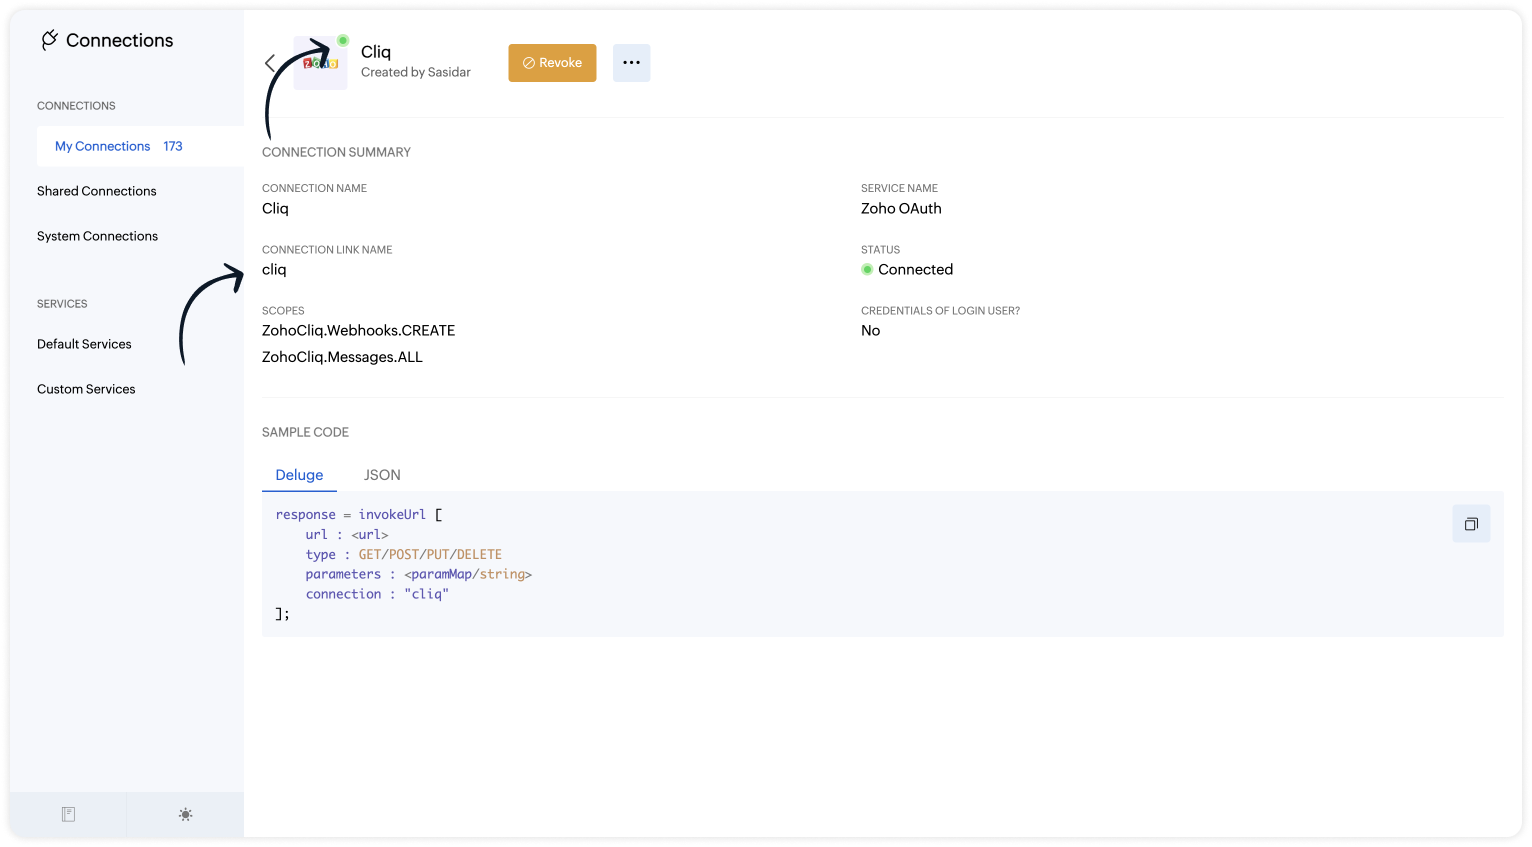
Step 2 - Build the Plug
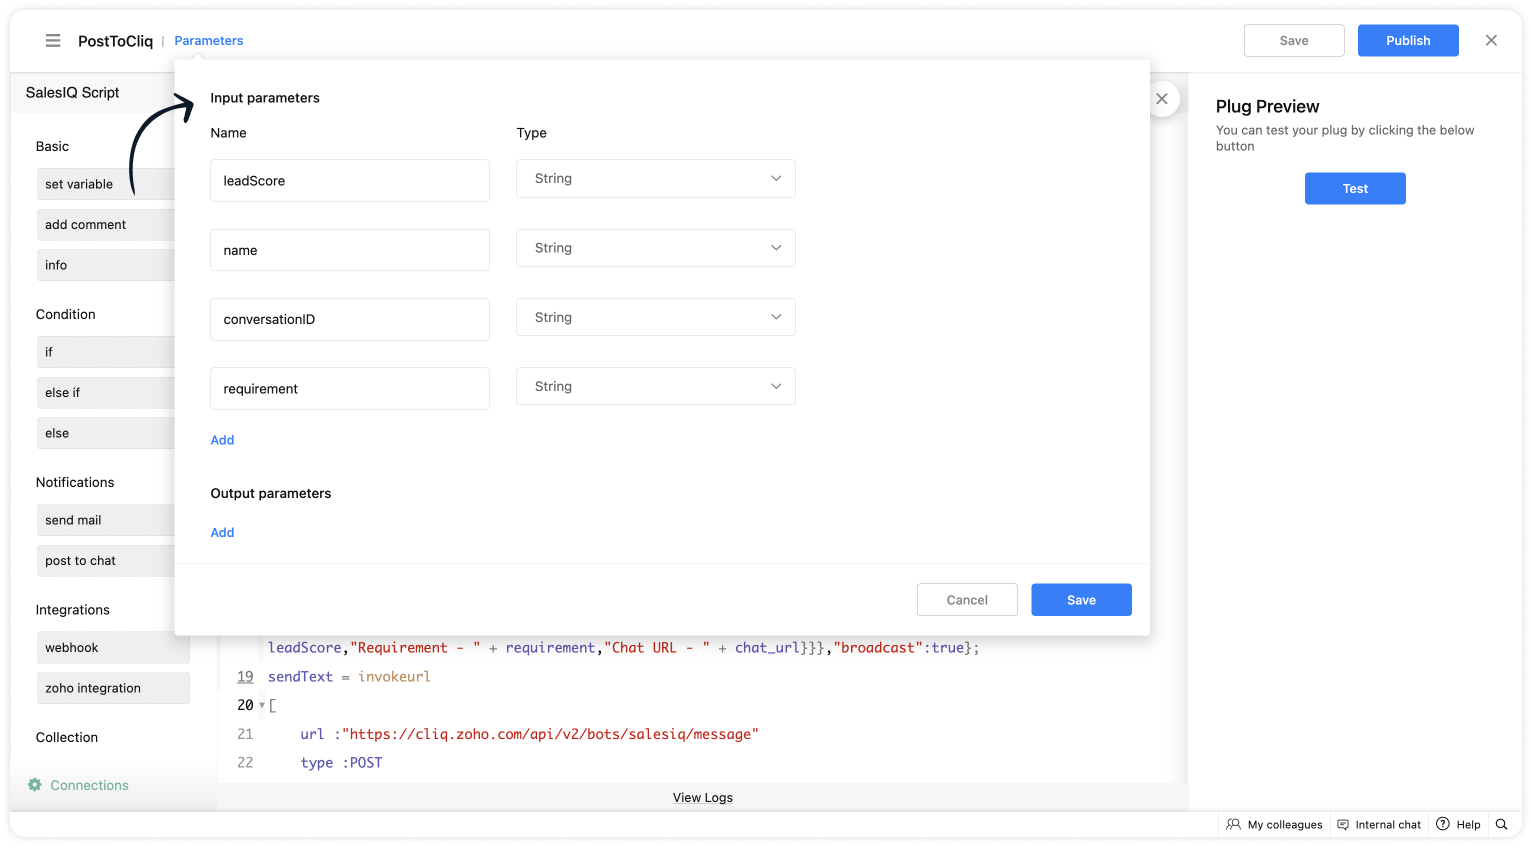
As we have created a connection between SalesIQ and Cliq successfully. It's time to build the plug. The first step in building the plug is defining the parameters. You can enter the metrics (information) which you want the SalesIQ bot to send to Cliq bot. I've taken the name, lead score, requirement (lead's interest) and conversation ID to create the chat URL.
Input Parameters
- Name : name | Type : String
- Name : leadScore | Type : String
- Name : requirement | Type : String
- Name : conversationID | Type : String
Script to notify a specific user via Cliq bot
If you want to notify (post information) to specific users in Cliq, copy the code below and paste it into your plug builder. Then, make the following changes.
- In line #16, get your portal's chat URL. For that, navigate to SalesIQ > Chats > Copy the URL except the conversation ID.
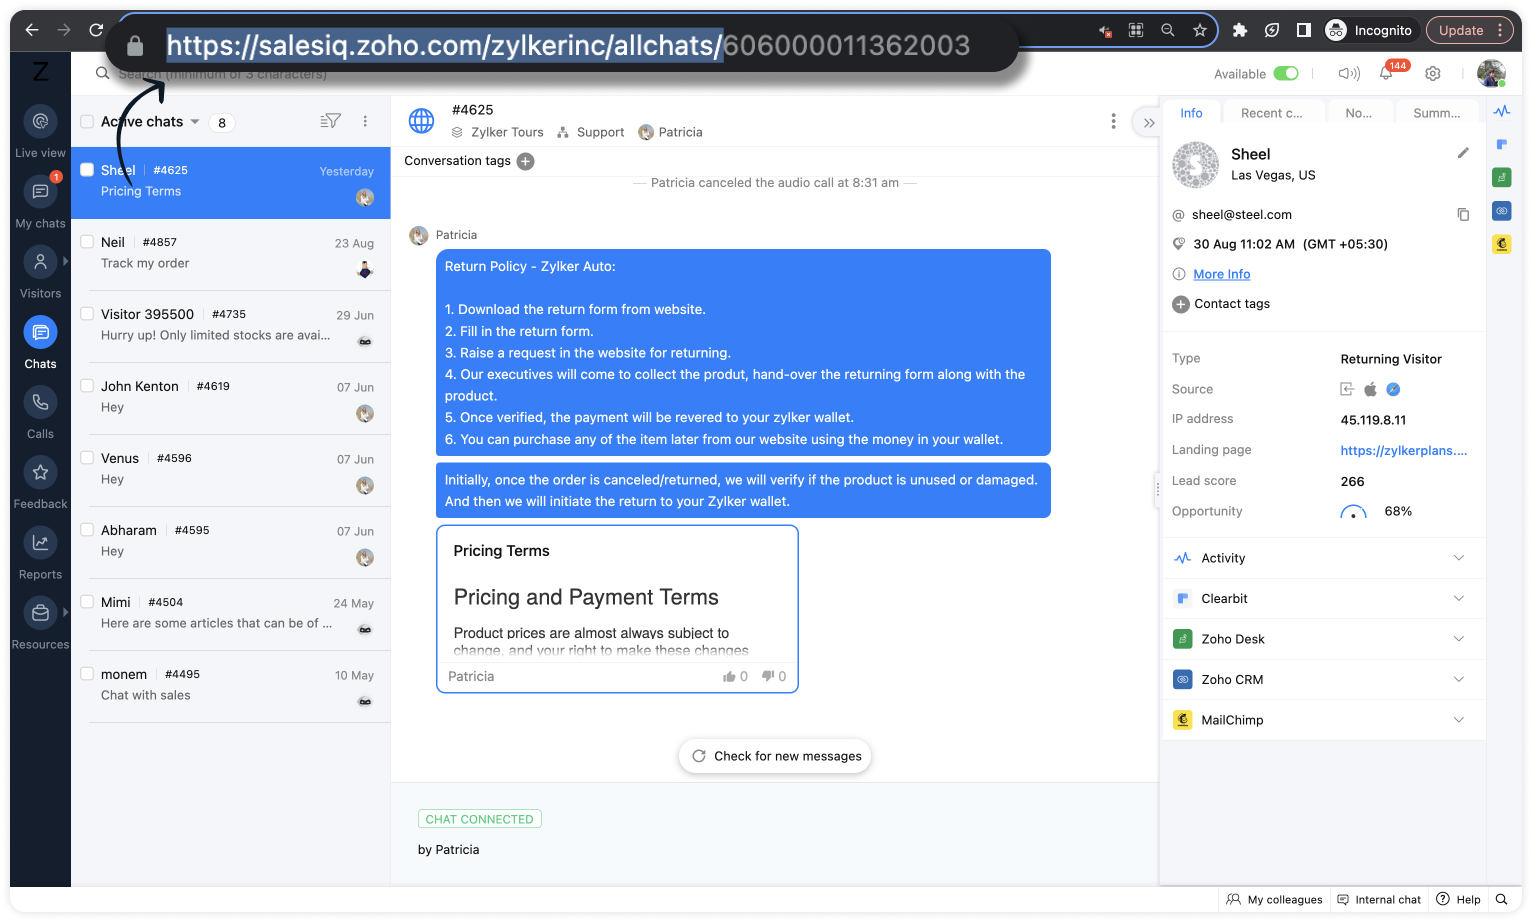
- In line #22, replace the cliq bot name in the URL. To get the bot name from your Cliq dashboard, click on your profile in the top right corner > Bots & Tools. Then, create a new bot or click on any existing bot. (All subscribers of this bot will get notified.)
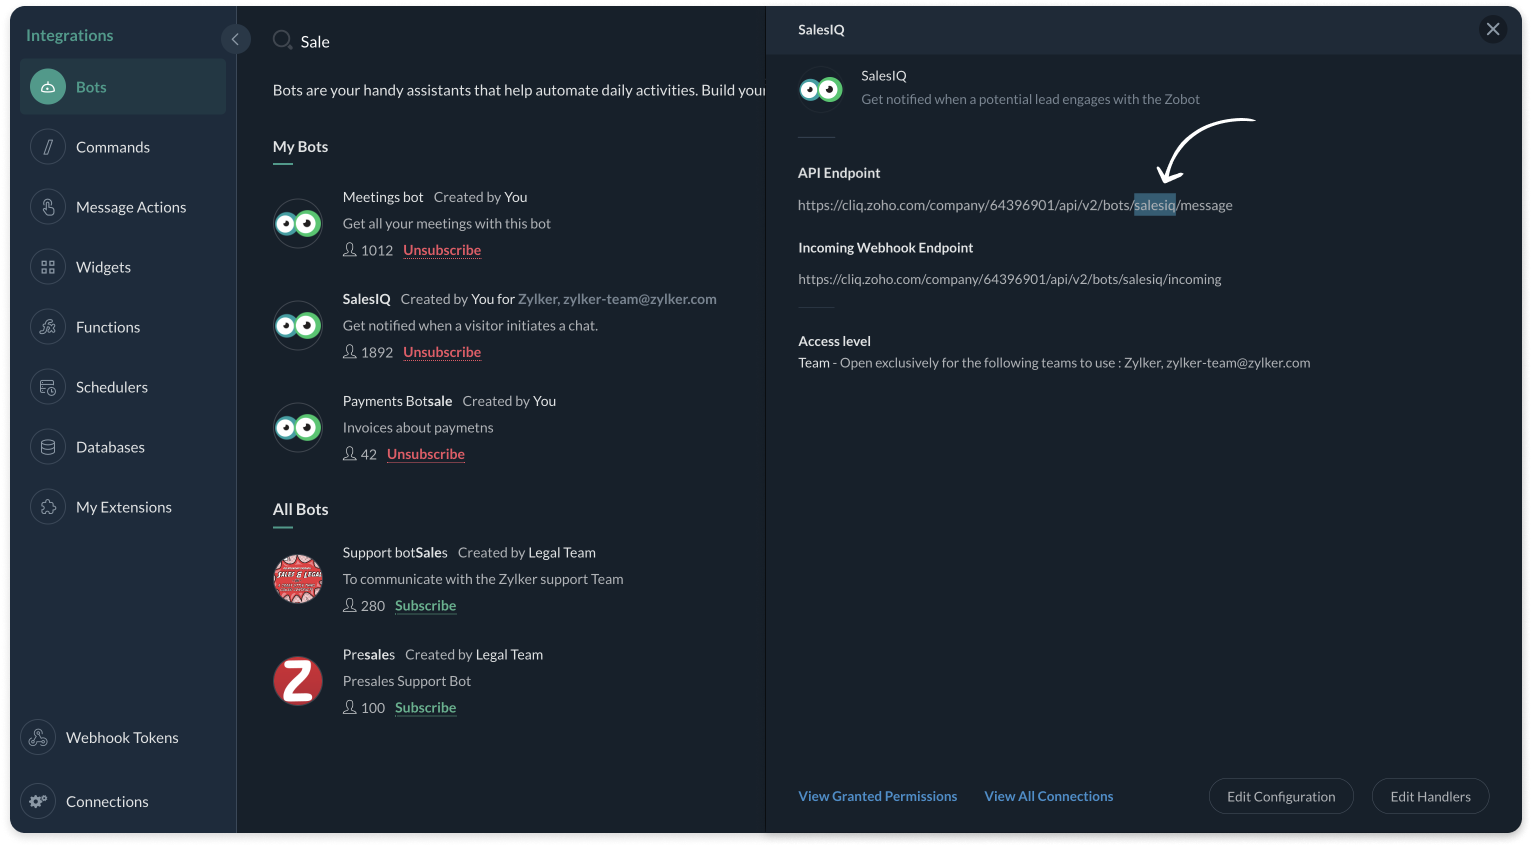
- And, make sure, the connnection line name in line #25 is same as created during creating the connection between SalesIQ and Cliq (Step 1).
Plug Script/Code
- if(session.containsKey("name"))
- {
- name = session.get("name").get("value");
- }
- if(session.containsKey("leadScore"))
- {
- leadScore = session.get("leadScore").get("value");
- }
- if(session.containsKey("requirement"))
- {
- requirement = session.get("requirement").get("value");
- }
- if(session.containsKey("conversationID"))
- {
- id = session.get("conversationID").get("value");
- chat_url = "https://salesiq.zoho.com/zylkerinc/allchats/" + id;
- }
- list_data = {"text":"Lead Infomation","slides":{{"type":"list","data":{"Name - " + name,"Lead Score - " + leadScore,"Requirement - " + requirement,"Chat URL - " + chat_url}}},"broadcast":true};
- //replace your cliq bot name (salesiq) in line #22
- sendText = invokeurl
- [
- url :"https://cliq.zoho.com/api/v2/bots/salesiq/message"
- type :POST
- parameters:list_data + ""
- connection:"cliq"
- ];
- response = Map();
- return response;
- Then, click Save, preview the plug and Publish it.

Note: API invoked in the plug is Post message to a bot
Script to notify a specific channel via Cliq bot
If you want to notify (post information) to a specific channel in Cliq, copy the code below and paste it in your plug builder. Then, make the following changes.
- In line #16, get your portal's chat URL. For that, navigate to SalesIQ > Chats > Copy the URL except the conversation ID.
- In line #22, replace the Cliq bot and channel name in the URL. To get the bot name, click on your profile in the top right corner > Bots & Tools. Then, create a new bot or click on any existing bot. To get the channel name, click on the channel properties and get the channel's Unique Name.
- And, make sure, the connnection line name in line #25 is same as created during creating the connection between SalesIQ and Cliq (Step 1).
Plug Script/Code
- if(session.containsKey("name"))
- {
- name = session.get("name").get("value");
- }
- if(session.containsKey("leadScore"))
- {
- leadScore = session.get("leadScore").get("value");
- }
- if(session.containsKey("requirement"))
- {
- requirement = session.get("requirement").get("value");
- }
- if(session.containsKey("conversationID"))
- {
- id = session.get("conversationID").get("value");
- chat_url = "https://salesiq.zoho.com/zylkerinc/allchats/" + id;
- }
- list_data = {"text":"Lead Infomation","slides":{{"type":"list","data":{"Name - " + name,"Lead Score - " + leadScore,"Requirement - " + requirement,"Chat URL - " + chat_url}}}};
- //replace your cliq channel (leadsfromzobot) and bot name (salesiq) in line #22
- sendText = invokeurl
- [
- url :"https://cliq.zoho.com/api/v2/channelsbyname/leadsfromzobot/message?bot_unique_name=salesiq"
- type :POST
- parameters:list_data + ""
- connection:"cliq"
- ];
- response = Map();
- return response;
- Then, click Save, preview the plug and Publish it.

Note: API invoked in the plug is Post message in a channel
Step 3 - Adding the plug to the Codeless bot builder
- Navigate to Settings > Bot > Add, provide the necessary information, and select Codeless Bot Builder as a bot platform or open an existing bot.
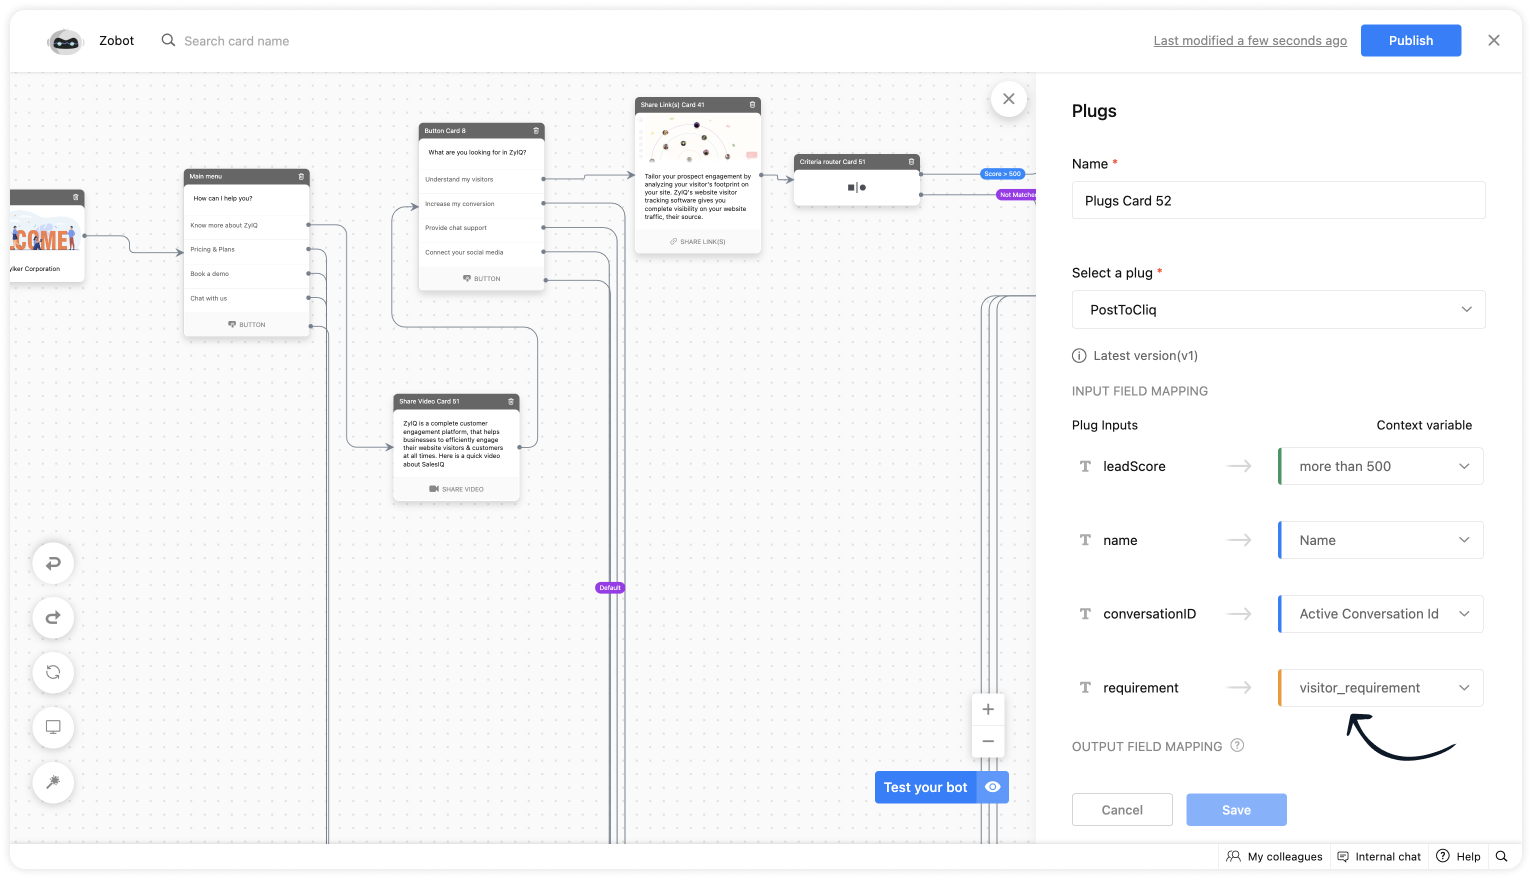
- To notify in Cliq, click on Plugs under Action cards, select the plug you have created and provide the input values for the parameters defined in the plug builder.
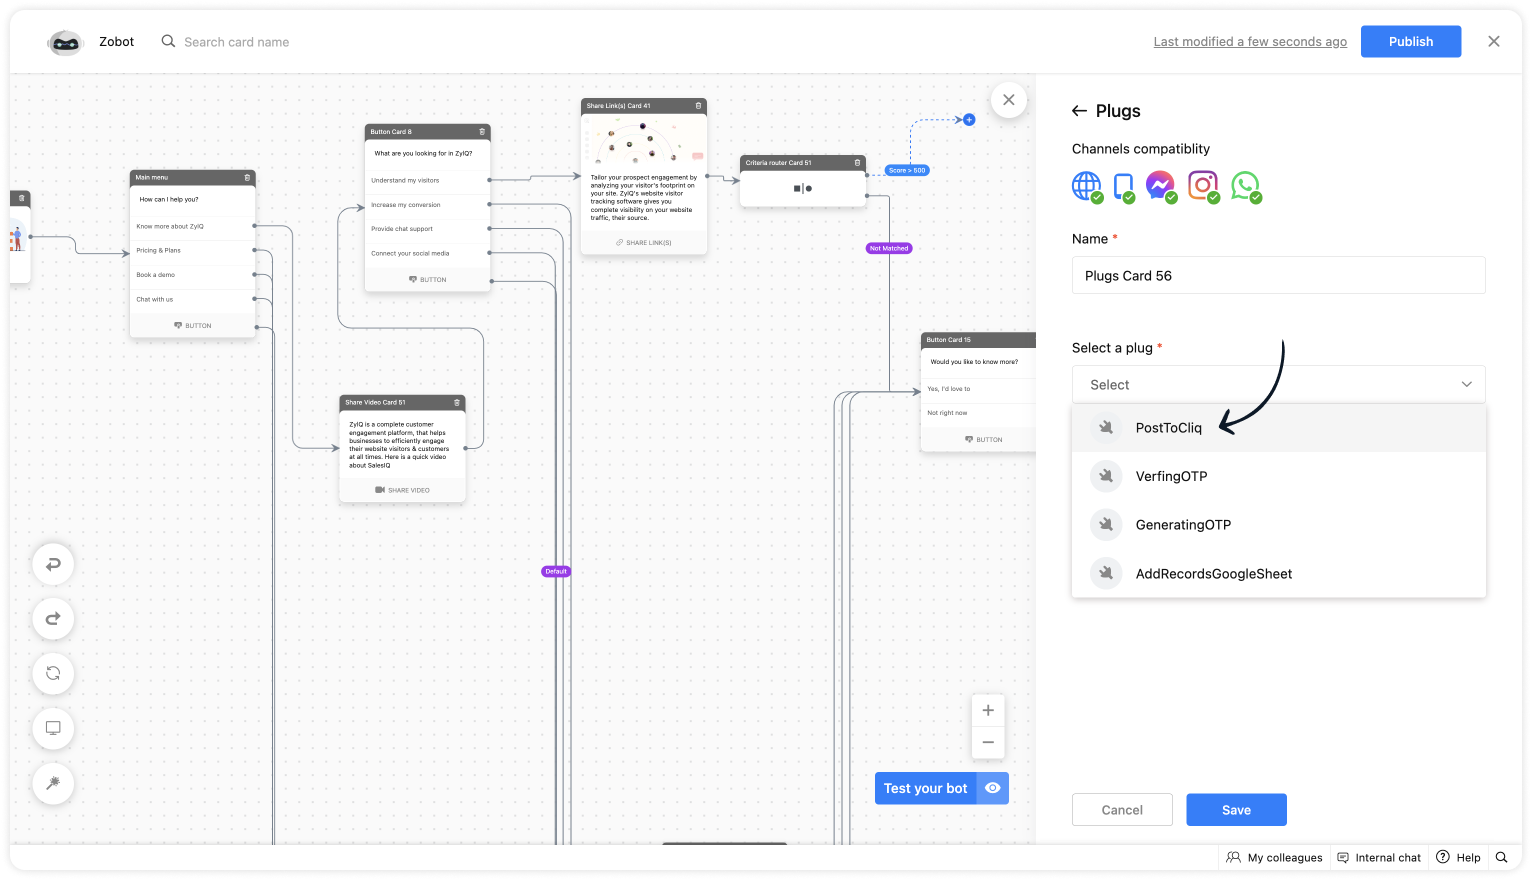
- As we want to notify only the visitors whose lead score is more than 500. Use the Criteria router card and set up a rule.
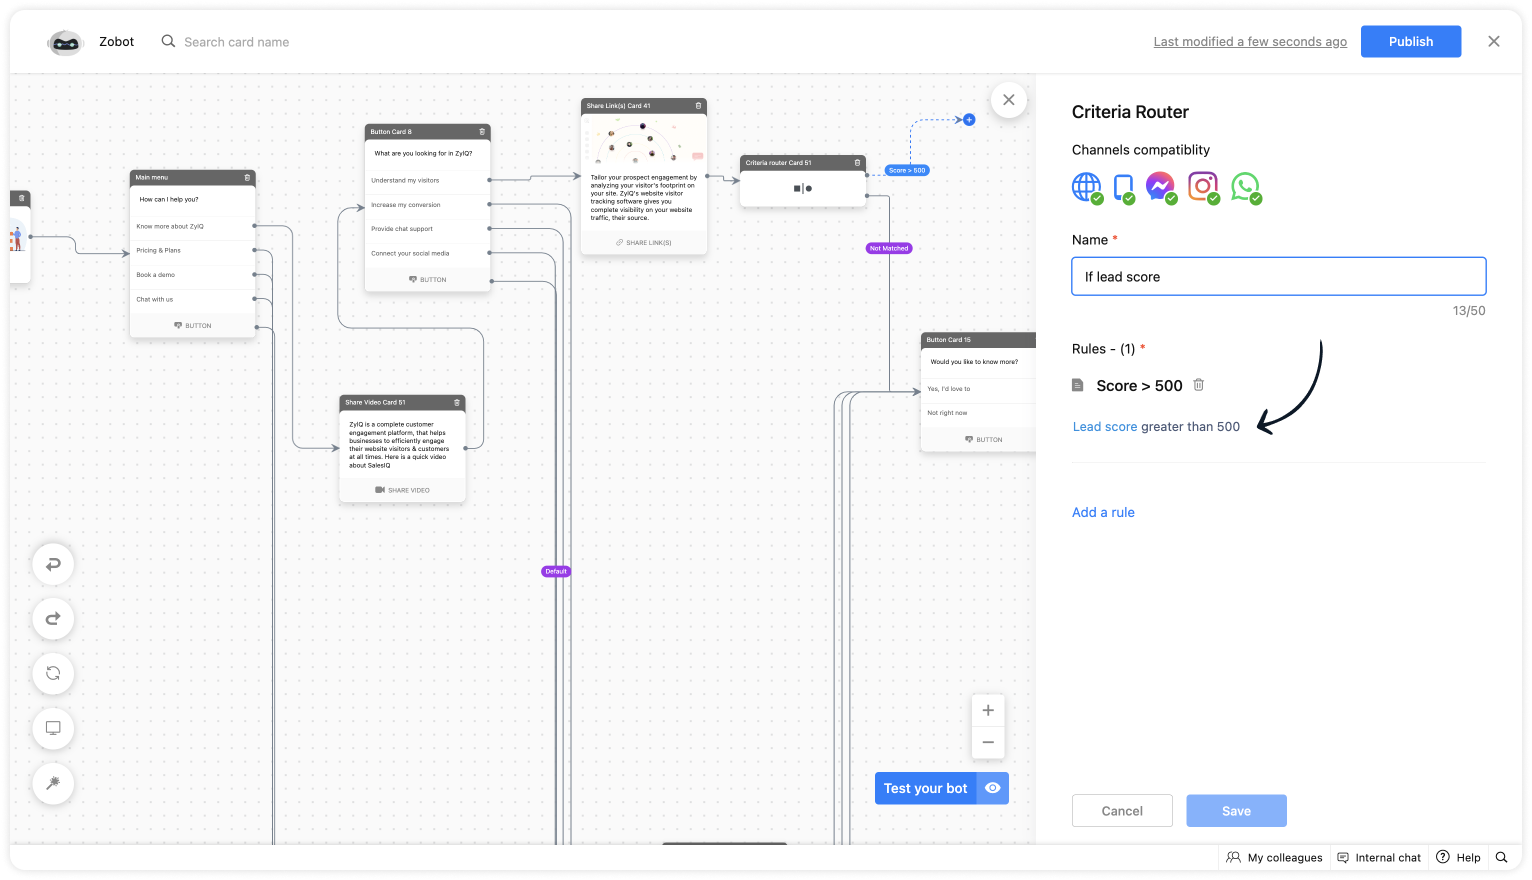
- For lead score, provide the value "more than 500".
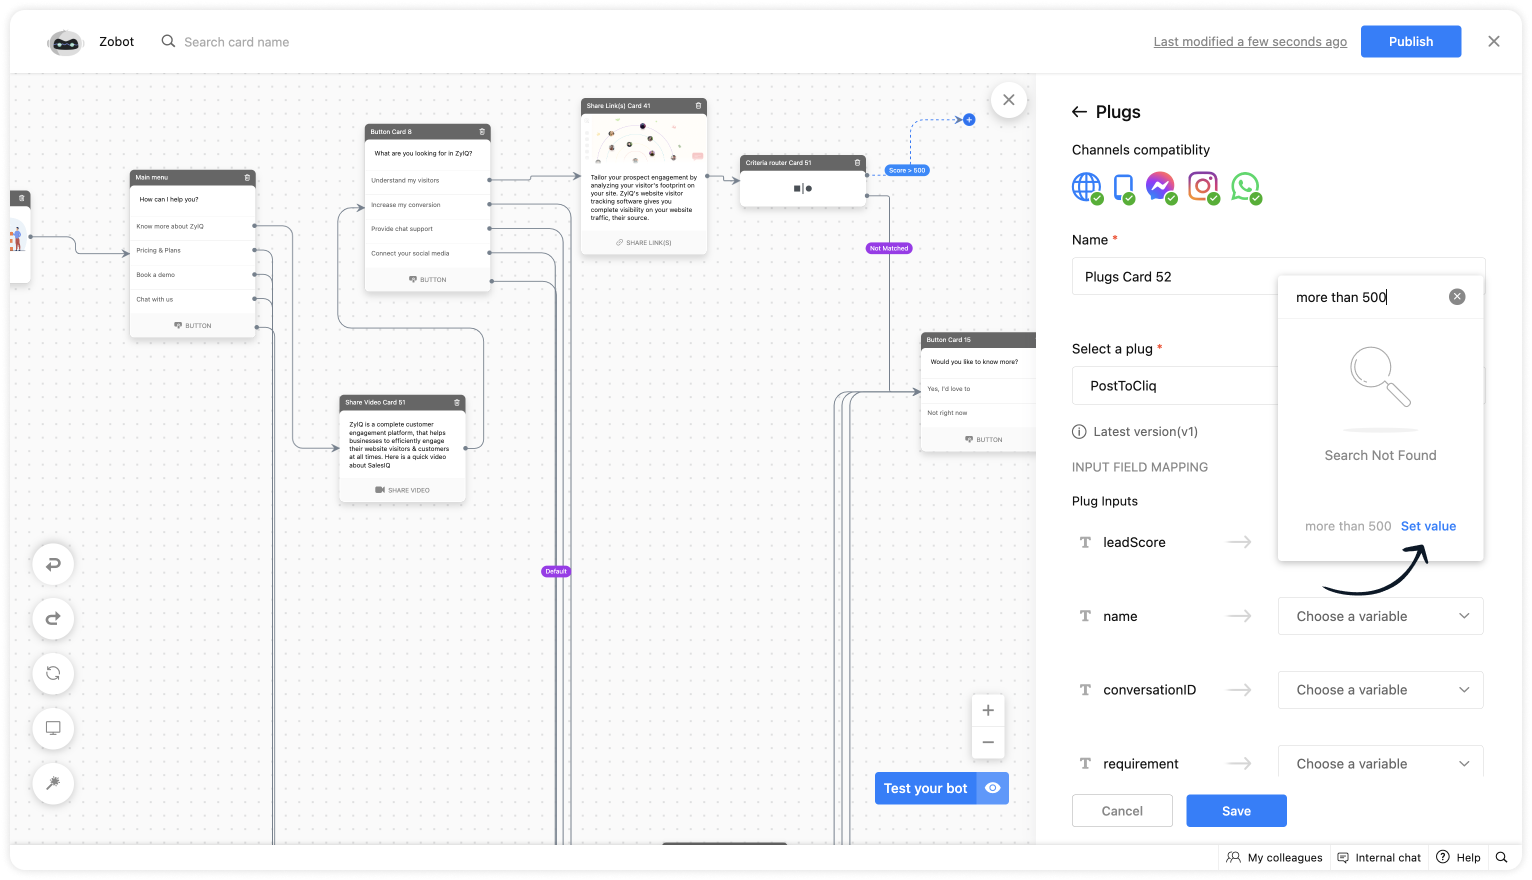
- Choose the %visitor.name% variable for the name.
- Select the %Active conversation id% to get the conversation ID for the chat URL.
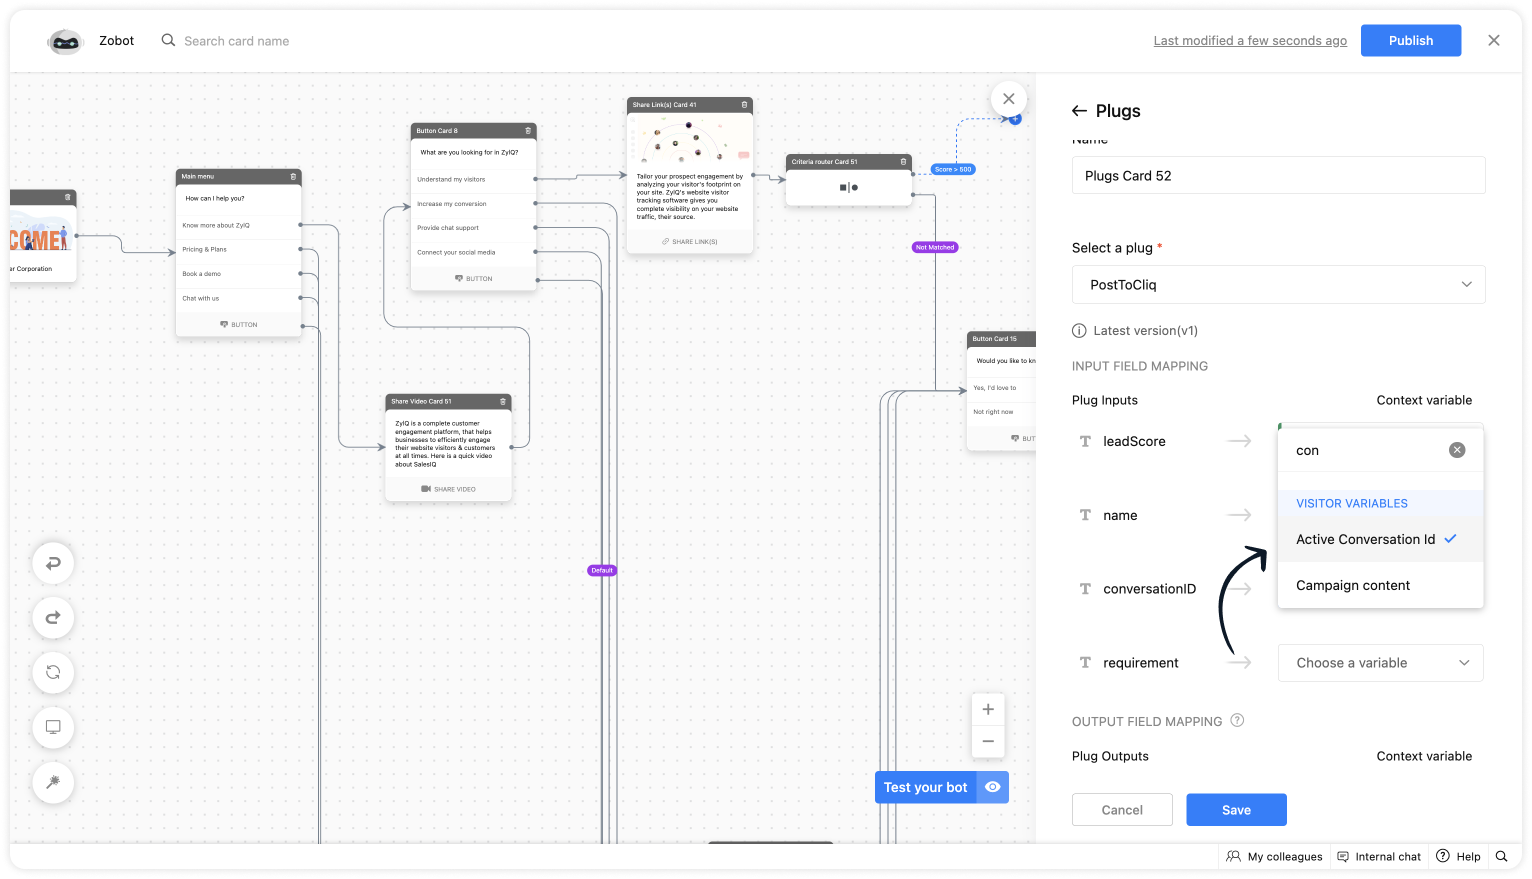
- Get the requirement before using any input card, save it in the context variable and select the variable here.
Plug Output
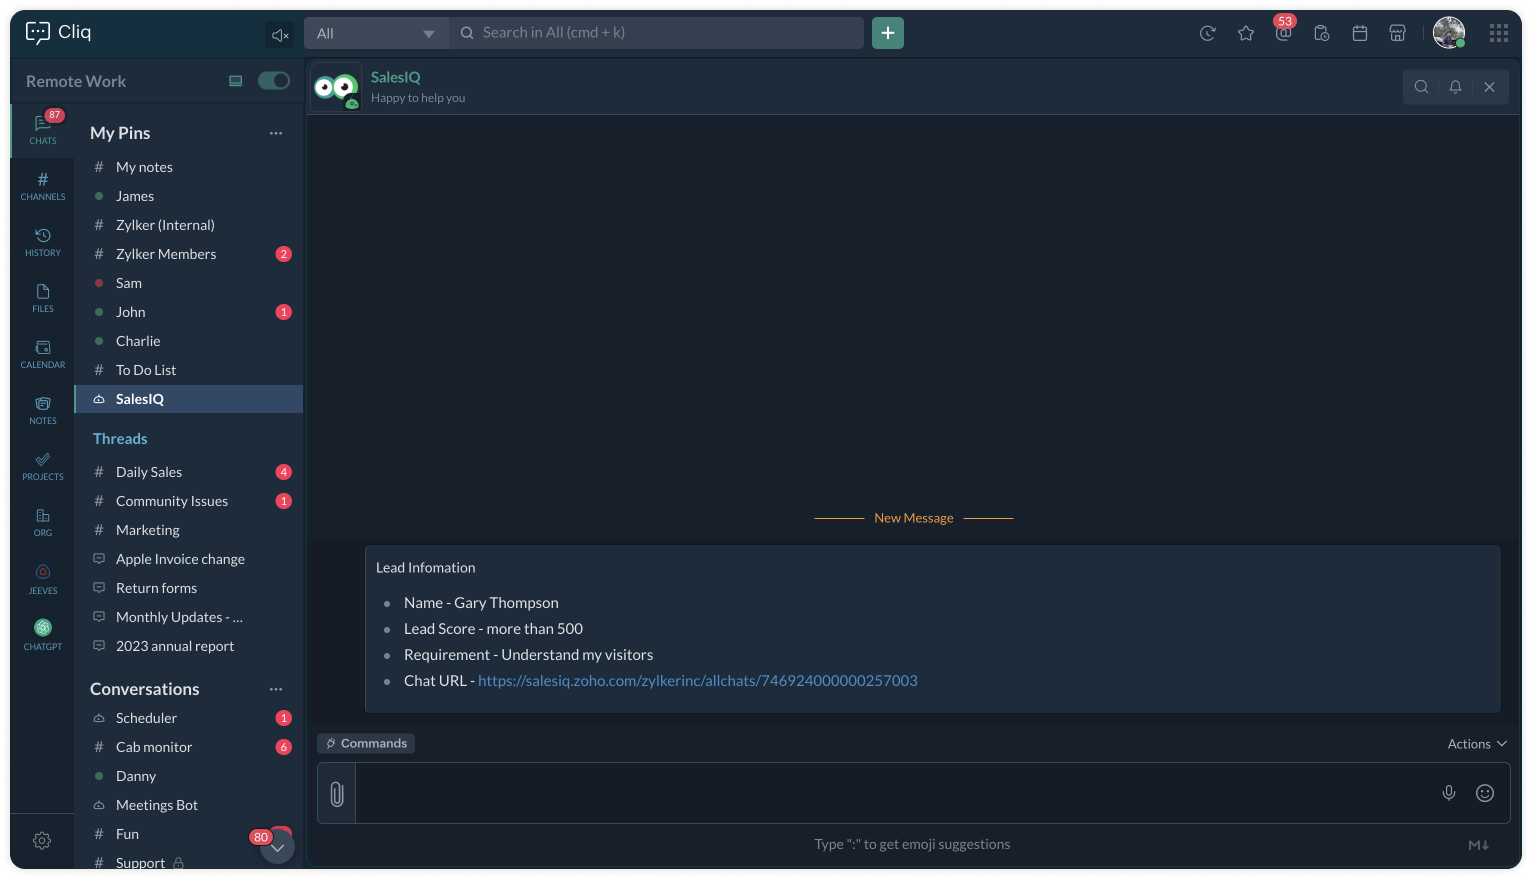
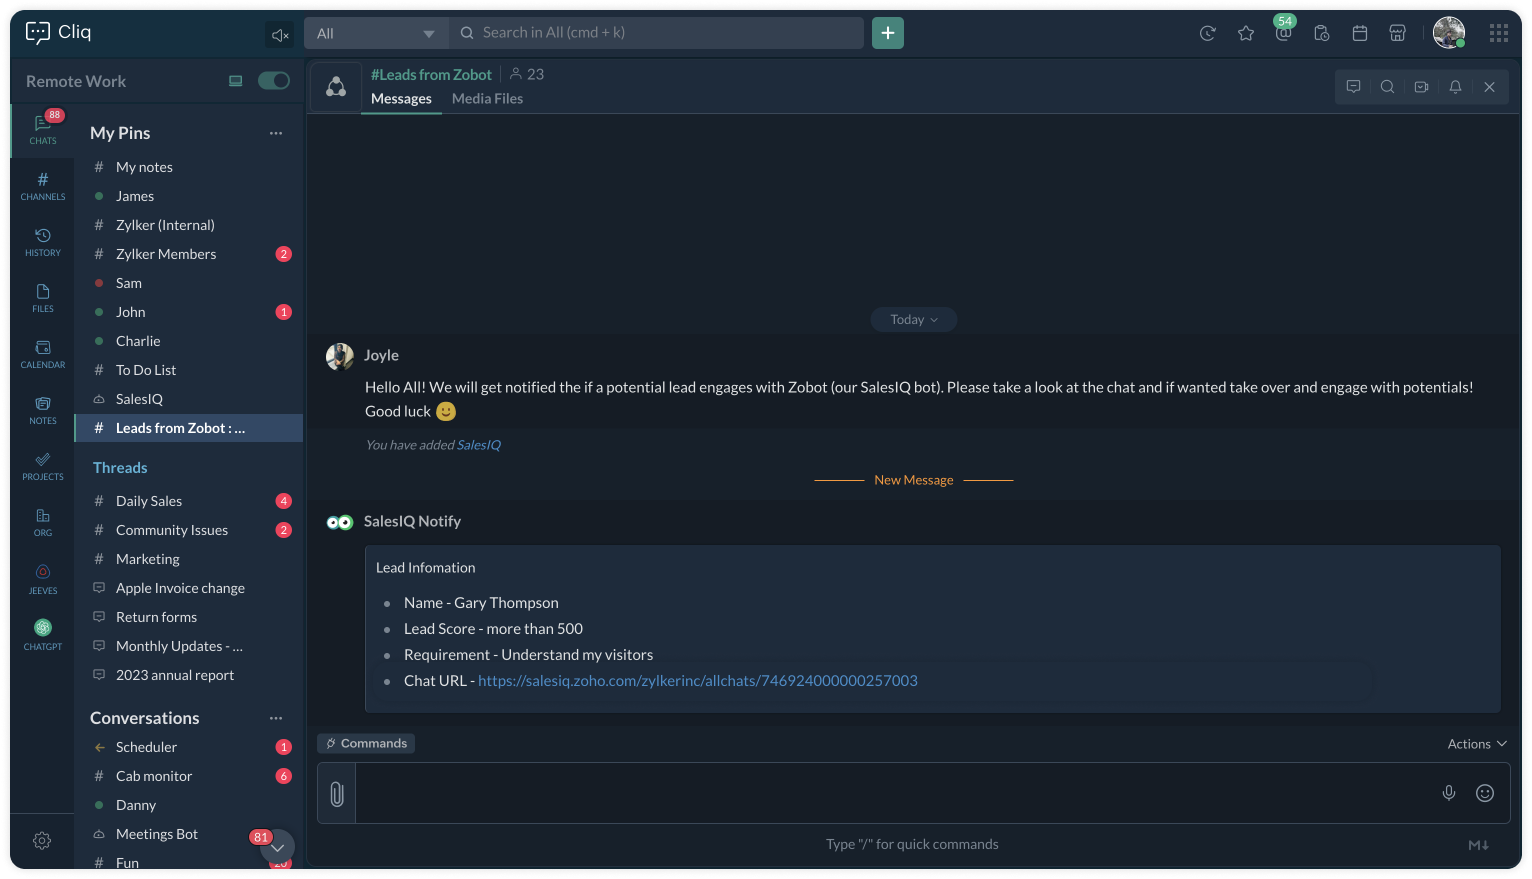
This is how the Cliq users will be notified.
To a specific user
To a specific channel
Upon clicking the chat URL, you will be redirected to the ongoing bot chat, where you can monitor and take the chat if required.
Related links:
- Plug guides
- Codeless bot guide
- Plugs for OTP verification.
- Plug to create a lead in Zoho CRM.
- Plug for getting the status of the ticket in Zoho Desk
- Plug to schedule appointments in Zoho Bookings
- Plug to read and write data in Google Sheet
- Plug to integrate bot with OpenAI
- Plug to track ecommerce orders from Zoho Commerce
- Zobot troubleshooting page
To know more about the features of Zobot, kindly visit our Resources Section. I hope this was helpful. Please feel free to comment if you have any questions. I'll be happy to help you.
See you again with another efficient plug sample :)
Best regards
Sasidar Thandapani
Topic Participants
Sasidar Thandapani
Vincent MAUREAU
Kevin Wooten
Sticky Posts
Big Things Just Dropped in the SalesIQ Universe: Top Upgrades You’ll Love in Nova’25
Nova'25 has landed, and it’s packed with meaningful upgrades to help you engage smarter, work faster, and scale with ease. Whether you're into proactive messaging, smarter automation, or better admin control, there's something here for everyone. Here'sYour bot just got smarter: AI-Powered routing that reads between the lines
What if your bot could tell the difference? Between a visitor who just needs a quick answer, someone actively comparing options, and a frustrated customer one click away from leaving? Most bots can't. They deliver the same response to everyone, missingAlert: Audio Call Support to be discontinued for Old Live Chat Widget from December 31, 2025
Action Required: Upgrade to the New SalesIQ Live Chat Widget We're reaching out with an important update regarding the SalesIQ Live Chat Widget that requires your immediate attention. Effective December 31, 2025, audio call functionality will no longerPlug Sample #10 - Simplify Ticket Management (Zoho Desk) with Chatbots
Hi everyone! We're here with another simple yet effective plug for your chatbot to integrate with Zoho Desk. When a customer reports an issue/request during chat, it's logged as a ticket on Desk. When they return for updates, you end up searching throughOpenAI Alert! Plug Sample #11 - Next-generation chatbots, Zobot + ChatGPT Assistant
Hi Everyone! We have great news for all AI enthusiasts and ChatGPT users! The much anticipated Zobot integration with ChatGPT Assistant is now available with Plugs. Note: SalesIQ offers native integration with OpenAI, supporting several ChatGPT models,
Recent Topics
Unable to remove the “Automatically Assigned” territory from existing records
Hello Zoho Community Team, We are currently using Territory Management in Zoho CRM and have encountered an issue with automatically assigned territories on Account records. Once any account is created the territory is assigned automatically, the AutomaticallyTrack online, in-office, and client location meetings separately with the new meeting venue option
Hello everyone! We’re excited to announce meeting enhancements in Zoho CRM that bring more clarity and structure to how meetings are categorized. You can now specify the meeting venue to clearly indicate whether a meeting is being held online, at theGoogle Fonts Integration in Pagesense Popup Editor
Hello Zoho Pagesense Team, We hope you're doing well. We’d like to submit a feature request to enhance Zoho Pagesense’s popup editor with Google Fonts support. Current Limitation: Currently, Pagesense offers a limited set of default fonts. Google FontsImproved Contact Sync flow in Google Integration with Zoho CRM
Hello Everyone, Your contact sync in Google integration just got revamped! We have redesigned the sync process to give users more control over what data flows into Google and ensure that this data flows effortlessly between Zoho CRM and Google. With thisPro Lite Upgrade - Quick Access Tray
Hello, I was going to upgrade to Pro Lite but the Quick Access Tray feature isn't available for Windows. Of the four features not available for Windows, the QAT is what I'm most interested in. Are there plans to add this feature for Windows anytime soon?Custom Fonts in Zoho CRM Template Builder
Hi, I am currently creating a new template for our quotes using the Zoho CRM template builder. However, I noticed that there is no option to add custom fonts to the template builder. It would greatly enhance the flexibility and branding capabilities ifImproved Functionality PO Bill SO Invoice
Hello, I need to enter over 100 items, it's frustrating to scroll a few item rows and wait for more to load, then scroll again. It would be nice to have buttons that scroll to the top or bottom with one click. Furthermore, these items I'm adding are VATWishes for 2026
Hello, and a happy new year 2026! Let's hope it's better for everyone. I'd like to share some thoughts on Zoho One and what could be useful in the short, medium, and long term. Some things are already there, but not applied to Zoho One. Others seem likeHow to Integrate Zoho Books with Xero (No Native Connection Available)
Hi everyone, I’m currently facing an issue with integrating Zoho Books invoices with Xero, as I’ve noticed Zoho does not provide a native integration with Xero at this time. I would like to ask: What are the common or recommended solutions for syncingHow to install Widget in inventory module
Hi, I am trying to install a app into Sales Order Module related list, however there is no button allow me to do that. May I ask how to install widget to inventory module related list?Add specific field value to URL
Hi Everyone. I have the following code which is set to run from a subform when the user selects a value from a lookup field "Plant_Key" the URL opens a report but i want the report to be filtered on the matching field/value. so in the report there iserror while listing mails
I can't access email in any of my folders: Oops, an error occurred - retry produces the second error response: error while listing mails (cannot parse null string). I've signed in and out of Zoho, restarted my iMac.Unlocking New Levels: Zoho Payroll's Journey in 2025
Every year brings its own set of challenges and opportunities to rethink how payroll works across regulations and teams. In 2025, Zoho Payroll continued to evolve with one clear focus: giving businesses more flexibility, clarity, and control as they grow.Introducing Connected Records to bring business context to every aspect of your work in Zoho CRM for Everyone
Hello Everyone, We are excited to unveil phase one of a powerful enhancement to CRM for Everyone - Connected Records, available only in CRM's Nextgen UI. With CRM for Everyone, businesses can onboard all customer-facing teams onto the CRM platform toSend Supervisor Rule Emails Within Ticket Context in Zoho Desk
Dear Zoho Desk Team, I hope this message finds you well. Currently, emails sent via Supervisor Rules in Zoho Desk are sent outside of the ticket context. As a result, if a client replies to such emails, their response creates a new ticket instead of appendingform data load issue when saving as duplicate record is made
Hello. I have a form with a lookup when a value is selected the data from the corresponding record is filled into all of the fields in the form. But the form is loaded in such a state that if any value is changed it will take all of the values pre loadedCRM project association via deluge
I have created a workflow in my Zoho CRM for closing a deal. Part of this workflow leverages a deluge script to create a project for our delivery team. Creating the project works great however, after or during the project creation, I would like to associateZoho Browser??
hai guys, this sounds awkward but can v get a ZOHO BROWSER same as zoho writer, etc. where i can browse websites @ home and continue browsing the same websites @ my office, as v have the option in Firefox, once i save and close the browser and again when i open it i will be getting the same sites. If u people r not clear with my explanation, plz let me know. Thanks, SandeepWhere can we specify custom CSS in Zoho Forms custom theme ?
I'm using a form with a dark theme. The OTP popup window is unreadable, because for some reason, the OTP popup background fixes color to white, but still takes the font color specified in the custom theme. This ends up as white on white for me, renderingMCP no longer works with Claude
Anyone else notice Zoho MCP no longer works with Claude? I'm unable to turn this on in the claude chat. When I try to toggle it on, it just does nothing at all. I've tried in incognito, new browsers, etc. - nothing seems to work.Enable History Tracking for Picklist Values Not Available
When I create a custom picklist field in Deals, the "Enable History Tracking for Picklist Values" option is not available in the Edit Properties area of the picklist. When I create a picklist in any other Module, that option is available. Is there a specific reason why this isn't available for fields in the Deals Module?The reason I switched away from Zoho Notebook
My main reason for switching to Zoho was driven by three core principles: moving away from US-based products, keeping my data within India as much as possible, and supporting Indian companies. With that intent, I’ve been actively de-Googling my digitalAdd RTL and Hebrew Support for Candidate Portal (and Other Zoho Recruit Portals)
Dear Zoho Recruit Team, I hope you're doing well. We would like to request the ability to set the Candidate Portal to be Right-to-Left (RTL) and in Hebrew, similar to the existing functionality for the Career Site. Currently, when we set the Career SiteAbility to Edit YouTube Video Title, Description & Thumbnail After Publishing
Hi Zoho Social Team, How are you? We would like to request an enhancement to Zoho Social that enables users to edit YouTube video details after the video has already been published. Your team confirmed that while Zoho Social currently allows editing theFree Webinar : Unlock AI driven business insights with Zoho Inventory + Zoho Analytics
Are you tired of switching between apps and exporting data to build customized reports? Say hello to smarter & streamlined insights! Join us for this exclusive webinar where we explore the power of the Zoho Inventory–Zoho Analytics integration. LearnCritical Issue: Tickets Opened for Zoho Support via the Zoho Help Portal Were Not Processed
Hi everyone, We want to bring to your attention a serious issue we’ve experienced with the Zoho support Help Portal. For more than a week, tickets submitted directly via the Help Portal were not being handled at all. At the same time no alert was postedHide/Show Subform Fields On User Input
Hello, Are there any future updates in Hide/Show Subform Fields "On User Input"?Cloning Item With Images Or The Option With Images
Hello, when I clone an item, I expect the images to carry over to the cloned item, however this is not the case in Inventory. Please make it possible for the images to get cloned or at least can we get a pop up asking if we want to clone the images asArchiving Contacts
How do I archive a list of contacts, or individual contacts?WorkDrive and CRM not in sync
1/ There is a CRM file upload field with WorkDrive file set as the source: 2/ Then the file is renamed in WorkDrive (outside CRM): 3/ The File in CRM is not synced after the change in WorkDrive; the file name (reference) in CRM record is not updated (hereCustom validation in CRM schema
Validation rules in CRM layouts work nicely, good docs by @Kiran Karthik P https://help.zoho.com/portal/en/kb/crm/customize-crm-account/validation-rules/articles/create-validation-rules I'd prefer validating data input 'closer to the schema'Adding Default Module Image into mail merge field
As with most people finding their way to these forums i have a specific requirement that doesn't seem to be supported by Zoho I have created 2 custom modules to suit my purpose 1 is an inventory type module that lists aluminium extrusions, and all relevantSync Data from MA to CRM
Currently, it's a one-way sync of data from the CRM to MA. I believe we should have the ability to select fields to sync from MA to the CRM. The lead score is a perfect example of this. In an ideal world we would be able to impact the lead score of aIs it possible to roll up all Contact emails to the Account view?
Is there a way to track all emails associated with an Account in one single view? Currently, email history is visible when opening an individual Contact record. However, since multiple Contacts are often associated with a single Account, it would be beneficialUpdate CRM record action
Currently, MA only offers a "Push Data" action to push data to a CRM module. This action is built to cover the need to both create a new record and update an existing record. Because it has been implemented this way all required fields on the CRM moduleNotes badge as a quick action in the list view
Hello all, We are introducing the Notes badge in the list view of all modules as a quick action you can perform for each record, in addition to the existing Activity badge. With this enhancement, users will have quick visibility into the notes associatedWhat's new in Zoho One 2025
Greetings! We hope you have all had a chance by now to get hands-on with the new features and updates released as part of ZO25. Yes, we understand that you may have questions and feedback. To ensure you gain a comprehensive understanding of these updates,Good news! Calendar in Zoho CRM gets a face lift
Dear Customers, We are delighted to unveil the revamped calendar UI in Zoho CRM. With a complete visual overhaul aligned with CRM for Everyone, the calendar now offers a more intuitive and flexible scheduling experience. What’s new? Distinguish activitiesAdd deluge function to shorten URLs
Zoho Social contains a nice feature to shorten URLs using zurl.co. It would be really helpful to have similar functionality in a Deluge call please, either as an inbuilt function or a standard integration. My Creator app sends an email with a personalisedEdit default "We are here to help you" text in chat SalesIQ widget
Does anyone know how this text can be edited? I can't find it anywhere in settings. Thanks!Next Page