Automation#35 : Auto-Add Comments under the Owner's Name in Tickets via Macros

Hello Everyone,
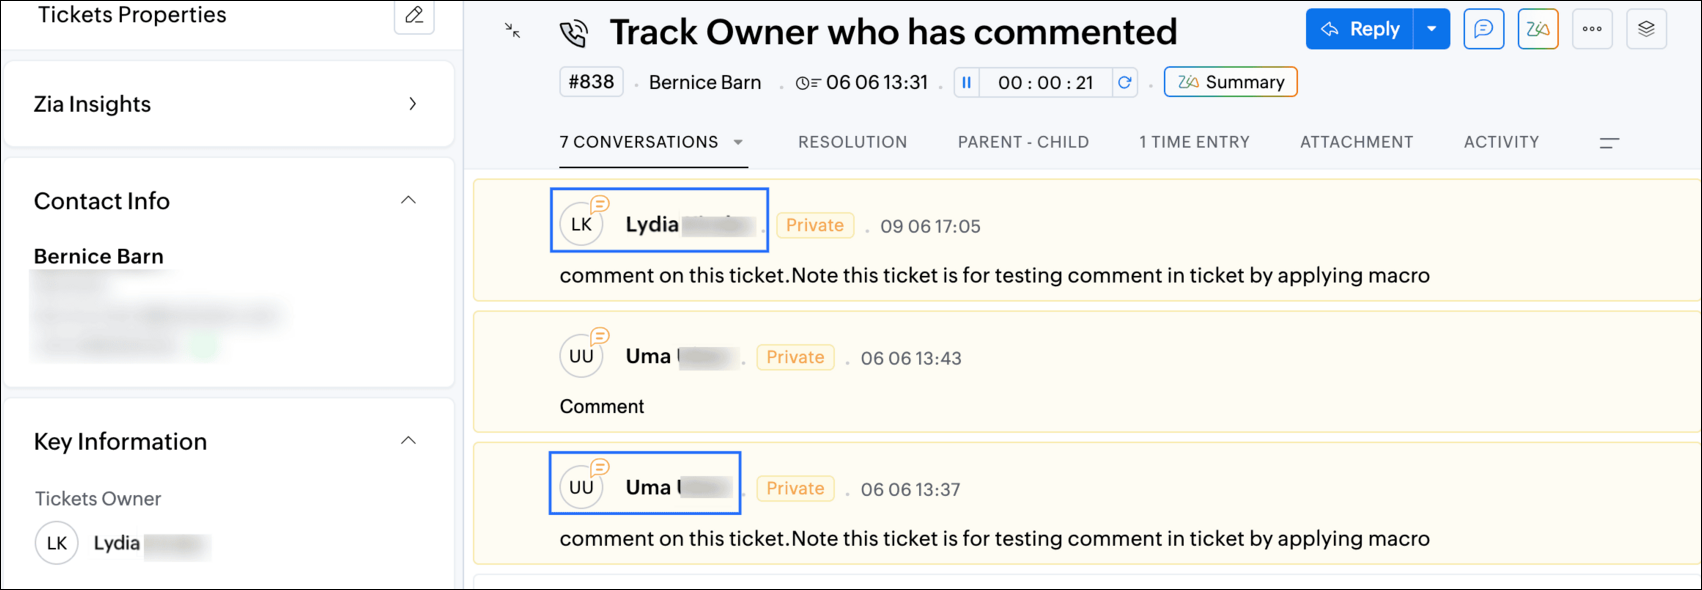
This week's custom function provides simple steps to configure a Macro for adding comments to tickets with the name of the Comment owner.
When managing tickets, you can use the Comment feature to communicate internally with your team and keep everyone updated. If you select Comment(Private), the information will only be visible internally within your Zoho Desk. If you choose Comment(Public), the comment will be visible to your customers on the Help Center.
While automating comments using Macros, it can be challenging to track progress or identify the comment owner if no agent is attributed to the automated entry. This custom function ensures that the comment will appear under the name of the agent who applied it, rather than the person who configured the Macro.
Additionally, this Macro allows you to include a standardized comment to save time for frequently repeated updates.
For example, Zylker Techfix collaborated across multiple departments and often required detailed customer information before transferring tickets between teams. They used comments to inform colleagues about the ticket status. To streamline this process, they automated a frequently used comment: "Awaiting additional information from the customer to proceed further." This clearly communicated to team members why a ticket was on hold. Additionally, this custom function allowed them to track which agent who applied the Macro.
To configure this within your Macros, please follow the steps below.
To configure this within your Macros, please follow the steps below.
Create a connection
1.1 Go to Setup(S) and choose Connections under Developer Space.
1.2 Click Create Connection.
1.3 Select Zoho Desk under Default Services.
1.4 Set the connection name as deskconnection.
1.2 Click Create Connection.
1.3 Select Zoho Desk under Default Services.
1.4 Set the connection name as deskconnection.
1.5 Under Choose Scopes, choose the below scope values:
Desk.basic.READ
Desk.settings.READDesk.tickets.UPDATE
1.6 Click Create and Connect.
1.7 Click Connect.
1.8 Choose the Desk's organization to connect with Deluge, and click Submit.
1.9 Click Accept.
1.7 Click Connect.
1.8 Choose the Desk's organization to connect with Deluge, and click Submit.
1.9 Click Accept.
Connection is created successfully.
Configure Custom Function within the Workflow Rule
1. Go to Setup, choose Macros under Automation.
2. Under Macros, click Create Rule.
3. Check if the right department is selected
4. Under Basic Information, give a Rule Name and Description.
5. Under Availability, select All agents/Specific Agents based on your requirement. If you choose Specific Agents, select the agents for whom you want to make this Macro available. Click Next.
6. Under Actions, click on the drop-down in the + icon and select Custom Functions >> New.
6.1 Under Basic Information, enter Name and Description. Choose Tickets under Module.
6.1 Under Basic Information, enter Name and Description. Choose Tickets under Module.
6.2 Under Argument Mapping, give a desired Method Name. Map the arguments as below:
6.2.1 In the Argument Name field, type ticketId and select Ticket Id in the Tickets Section.
6.2.1 In the Argument Name field, type ticketId and select Ticket Id in the Tickets Section.
7. In the script window, insert the Custom Function given below:
- // ----<<<< User Inputs >>>>----
- // --- Replace ".com" with appropriate domain extension based on customer's location/DC ---
- deskURL = "https://desk.zoho.com";
- commentContent = "<<Your_comment_content>>";
- // ----<<<< Initial Configs >>>>----
- logs = Map();
- ticketCommentParam = Map();
- loginUserEmail = zoho.loginuserid;
- logs.insert("ticketId": ticketId);
- logs.insert("loginUserEmail": loginUserEmail);
- //---------------------------
- try {
- // ---- start your logic from here ----
- agentDetailsResponse = invokeurl
- [
- url :deskURL + "/api/v1/agents/email/" + loginUserEmail
- type :GET
- connection:"deskconnection"
- ];
- logs.insert("agentDetailsResponse":agentDetailsResponse);
- if(agentDetailsResponse != null && agentDetailsResponse != "" && agentDetailsResponse.size() > 0 && agentDetailsResponse.containKey("id"))
- {
- agentId = agentDetailsResponse.get("id");
- ticketCommentParam.insert("commenterId":agentId);
- }
- // ---- Add comment in the ticket ----
- ticketCommentParam.insert("content":commentContent);
- ticketCommentParam.insert("isPublic":"false");
- ticketCommentParam.insert("contentType":"html");
- logs.insert("ticketCommentParam":ticketCommentParam);
- commentAddResponse = invokeurl
- [
- url :deskURL + "/api/v1/tickets/" + ticketId + "/comments"
- type :POST
- parameters:ticketCommentParam.toString()
- connection:"deskconnection"
- ];
- logs.insert("commentAddResponse":commentAddResponse);
- }
- catch(errorInfo) {
- logs.insert("errorInfo": errorInfo);
- }
- info "logs: \n" + logs;
- if(logs.containKey("errorInfo"))
- {
- throws "Error happen in the CF execution";
- }

Note
a. In Line 3, replace .com in the address with .in/.eu/.ca based on your DC.
b.In Line 4, enter the text which you would like to include as a ticket.
8. Click Save to save the custom function.
9. Click Save again to save the Macros.
9. Click Save again to save the Macros.
We hope this custom function helps streamline your team's communication and enhances your ticket management process. If you have any questions or need further assistance, feel free to reach out to us at support@zohodesk.com .
Regards,
Lydia | Zoho Desk