Bidirectional sync between Zoho Bookings and Zoho CRM - Part 1
Hey, community members!
The default integration between Zoho CRM and Zoho Bookings is unidirectional, which means that any appointments booked, rescheduled, or deleted in Zoho Bookings will be reflected in Zoho CRM. However, any modifications made to events in Zoho CRM that originated from Zoho Bookings will not be reflected back in Zoho Bookings. Hence, as we're announcing in this community post, we've made the sync bidirectional.
This community post will cover the process of configuring appointment bookings from Zoho CRM in Zoho Bookings, as well as managing appointment statuses such as Canceled, No Show and Completed. We have addressed the rescheduling action in a separate post. To view it, please click on the following link: Reschedule Action
This community post will be beneficial for active Zoho CRM users who handle all their meetings within Zoho CRM. Additionally, you can use this community post as a reference to explore various automation possibilities tailored to your business requirements. For instance, with this post's guidance, when you update a booking's status field to "Completed" in Zoho CRM, it will automatically sync with Zoho Bookings and trigger an automated "Mark as completed" email to customers. This enhancement will improve your Zoho Bookings and Zoho CRM synchronization experience, making appointment management easier.
Prerequisites of bidirectional sync:
- Zoho Bookings Premium subscription
- Zoho CRM paid subscription
- Enable Zoho CRM integration within Zoho Bookings
The purpose of enabling the Zoho CRM integration within Zoho Bookings is to transfer booking details from Zoho Bookings to Zoho CRM. In this configuration, the mandatory field is the Booking ID, which is passed from Zoho Bookings to Zoho CRM through the integration. Whenever an appointment is booked, customer details will be sent to the designated CRM module, and a corresponding record will be created in the Meetings module within Zoho CRM, which will help in automating the workflow.
Here's the complete demo video that covers all the configurations discussed in the community post below:
Timestamps for your reference:
0:35 - Purpose of this community post
Here's the complete demo video that covers all the configurations discussed in the community post below:
Timestamps for your reference:
0:35 - Purpose of this community post
1:26 - Zoho CRM plugin installation
4:43 - Custom field creation
7:20 - Function creation
9:22 - Connection creation
10:24 - Configuring arguments
11:06 - Workflow creation
13:33 - Argument mapping
14:41 - Output verification
17:41 - Conclusion
How we're approaching this bidirectional sync
1. Booking an appointment from Zoho CRM
Install the Zoho Bookings for Zoho CRM plugin within your Zoho CRM application. This plugin enables the creation of a "New Appointment" button within the Zoho CRM Leads and Contacts module, which enables you to select the desired booking page you wish to open. You can choose from various workspace, service, or staff booking pages. After configuration, you can initiate the process of scheduling bookings directly from within your Zoho CRM account.
- Guide on Zoho Bookings and Zoho CRM plugin installation: Booking page selection for Zoho CRM plugin
2. Booking status: Completed or No Show
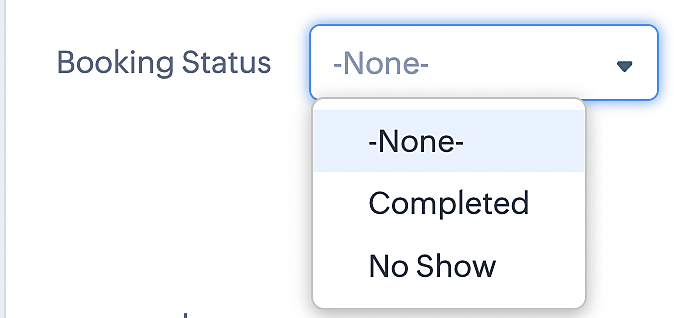
To update a booking's status (Completed or No Show), we've added a new picklist properties field named "Booking Status" in the Meetings module and configured it with two options: "completed" and "no show". Depending on the booking status chosen, the corresponding booking in Zoho Bookings will be updated.
- Details on how to add a custom field to the Meetings module : Customizing modules
- Here's a video that demonstrates how to add a field to a module in Zoho CRM: Adding fields
Reference:

3. Booking status: Canceled
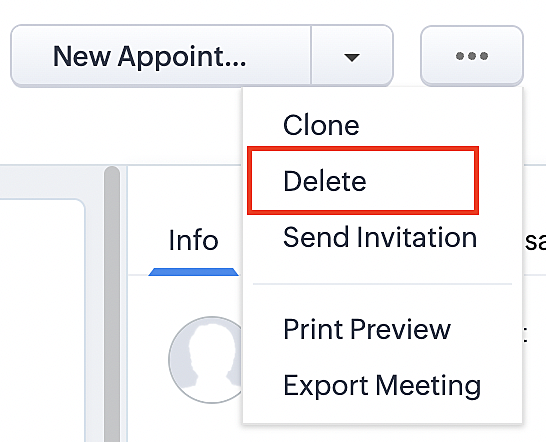
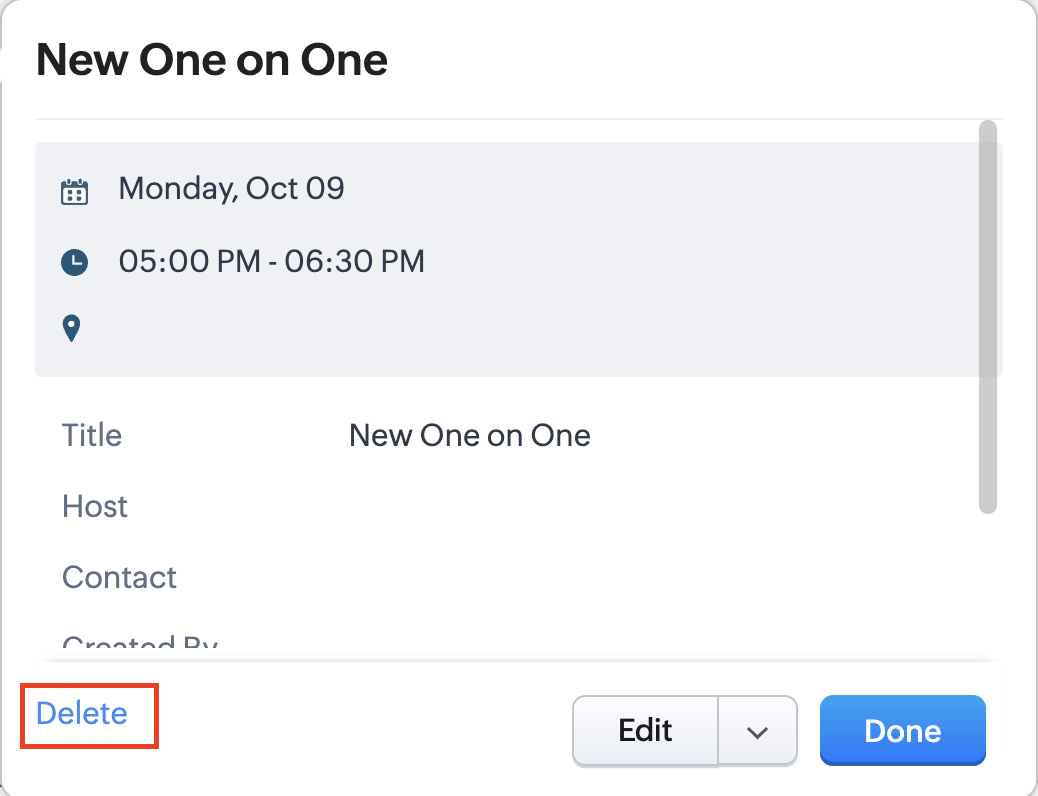
Whenever a meeting is deleted from the Meetings module, the corresponding booking in the Zoho Bookings app will also be canceled automatically. The meeting can be deleted either from the Meetings module or directly from the calendar.
To enable bidirectional sync between Zoho CRM and Zoho Bookings
Complete these steps in Zoho CRM.
Step 1: Creating connections
You first need to establish a connection between Zoho CRM and Zoho Bookings. Zoho Bookings is listed as one of the default connections in Zoho CRM, making it simple to set up. Select the Zoho Bookings connection, define the connection name and scope, and you'll be all set. This connection will enable you to link both applications and facilitate the seamless transfer of data.
Read here for more details on how to create connection in Zoho CRM: Connections
Step 2: Creating functions
In this context, we'll be creating three functions: one for marking appointments as completed, another for canceling appointments, a third for marking appointments as no shows, and a fourth for rescheduling appointments. For each function, we must also configure arguments, which pass values or data into a function when making a call. Here, we'll pass the booking ID to the function as an argument to update the necessary booking status.
i. To create a function for marking appointments as completed:
1. Go to Setup > Developer Space > Functions.
2. In the Functions page, click + Create New Function.

3. Configure the function name, display name, and description.
4. Set the category as automation.
This opens the Deluge script page.
5. Next, configure the function's arguments:
A. Click on Edit Arguments on the Deluge script page.

B. Set the Parameter Name as bookingID. (Please note that the "bookingID" value is case sensitive and must match
the term used in the code).
C. Set the type as string.
Reference:
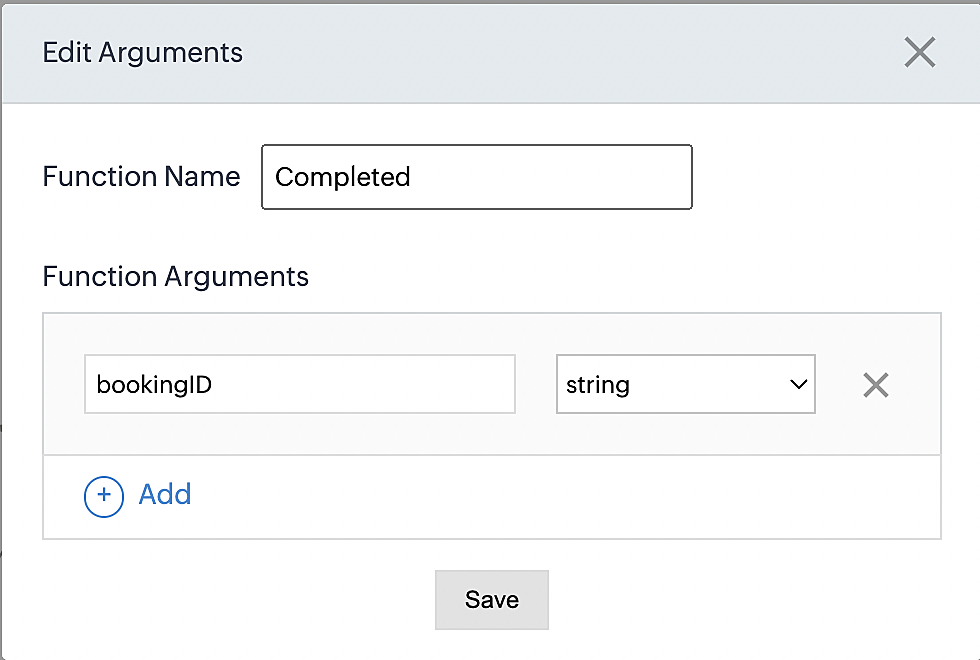
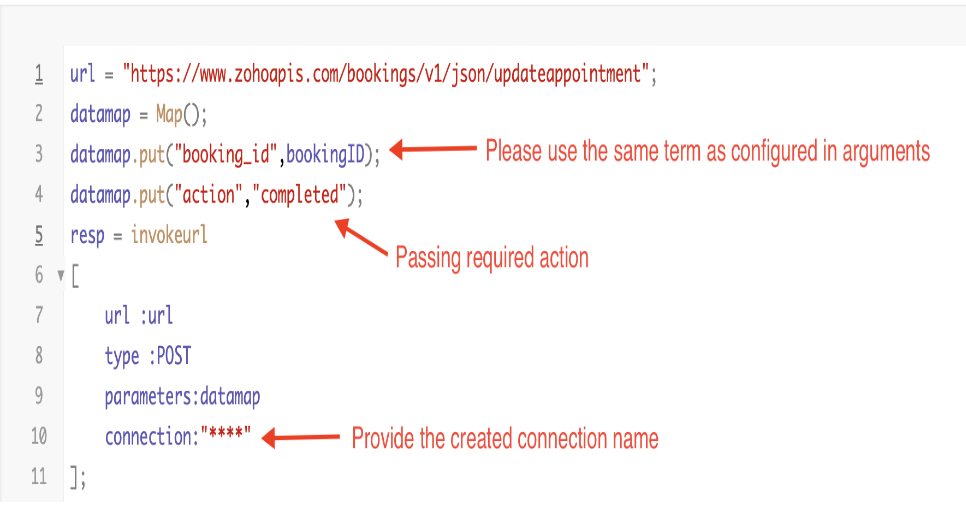
Please configure the below code in the Deluge script page.
By completing these steps, we've configured a function that will mark appointments as completed.
ii. To create a function for marking appointments as no shows
1. Go to Setup > Developer Space > Functions.
2. In the Functions page, click + Create New Function.

3. Configure the function name, display name, and description.
4. Set the category as automation.
This opens the Deluge script page.
5. Next, configure the function's arguments:
A. Click on Edit Arguments on the Deluge script page.

B. Set the Parameter Name as bookingID. (Please note that the "bookingID" value is case sensitive and must match
the term used in the code).
C. Set the type as string.
Reference:
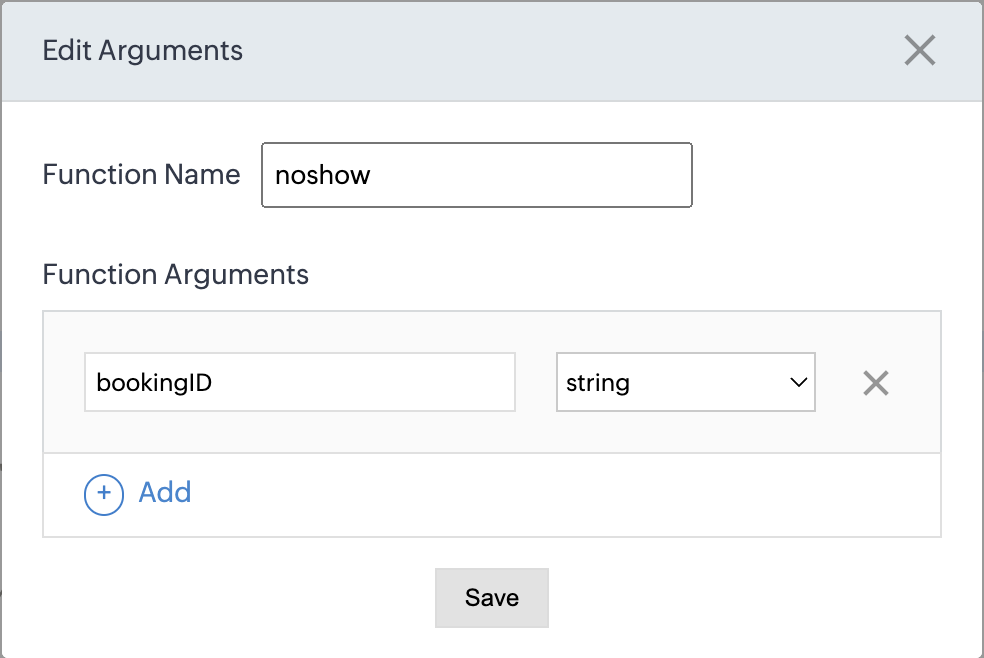
Please configure the below code on the Deluge script page.
Code link: No show

By completing these steps, we've configured a function that marks appointments as no shows.
iii. To create a function for marking appointments as canceled
1. Go to Setup > Developer Space > Functions.
2. In the Functions page, click + Create New Function.

3. Configure the function name, display name, and description.
4. Set the category as automation.
This opens the Deluge script page.
5. Next, configure the function's arguments:
A. Click on Edit Arguments on the Deluge script page.

B. Set the Parameter Name as bookingID. (Please note that the "bookingID" value is case sensitive and must match
the term used in the code).
C. Set the type as string.
Reference
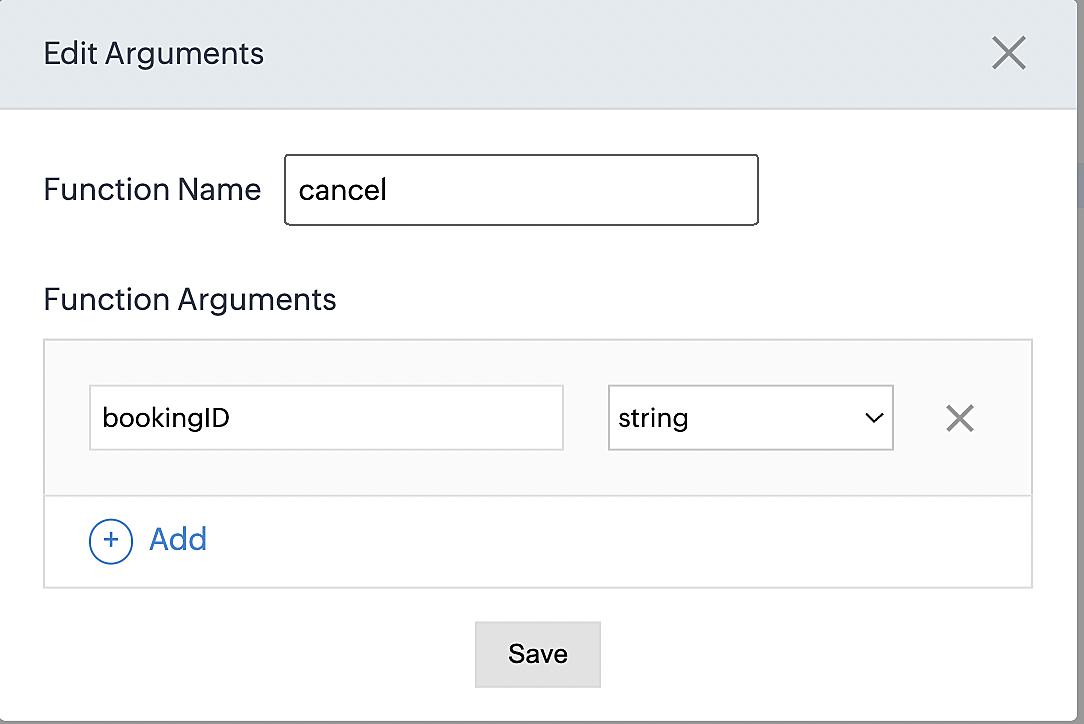

Please configure the below code on the Deluge script page.

By completing these steps, we've configured a function that marks appointments as canceled.
Code explanation
Below is an explanation of the code that covers all the configurations present in the three functions mentioned above (cancel, mark as completed, and mark as no show).
Line 1: Based on the Zoho Bookings account's data center, we're setting up the API endpoint URL configuration.
Lines 2 - 4: To update appointments, we utilize the Zoho Bookings API. Within the update appointment API, there are two mandatory fields that need to be included: BookingID and action (completed/cancel/noshow).
Lines 5 - 10: We use the invokeURL task for API calls. To learn more about the invokeURL task, please refer to the following document: InvokeURL task for API calls
Now, let's proceed and learn about the process of creating a workflow and linking the established functions to it. This will enable us to automate the entire appointment status updating process.
Step 3: Creating a workflow
Workflow rules are sets of actions (email notifications, tasks and field updates) that are executed when specified conditions are met. Here, we'll generate workflow rules for each action to activate the respective function, thereby automating the appointment status updating process.
i. Creating a workflow for "canceling" appointments in Zoho Bookings when a meeting is deleted in Zoho CRM
Part 1: Creating the rule
1. Go to Setup > Automation > Workflow Rules.
2. In the Workflow Rules page, click Create Rule.

3. Select "Meetings" under Module and configure rule name and description as required.
More details: Create Rule
Reference:
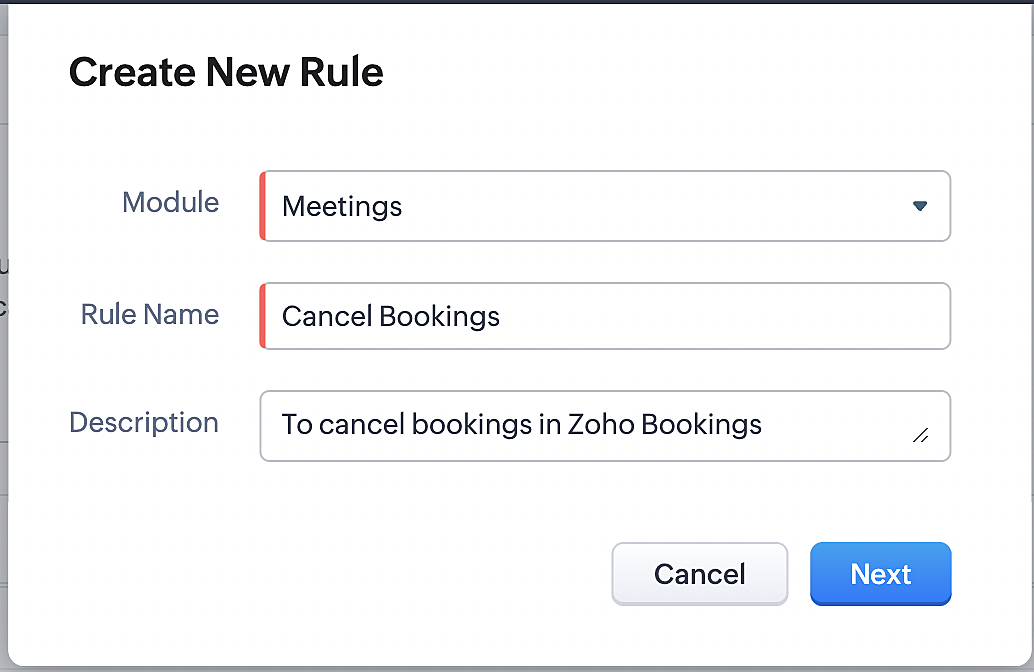
1. Select Record Action > Delete > Done to execute the rule when meetings are deleted.
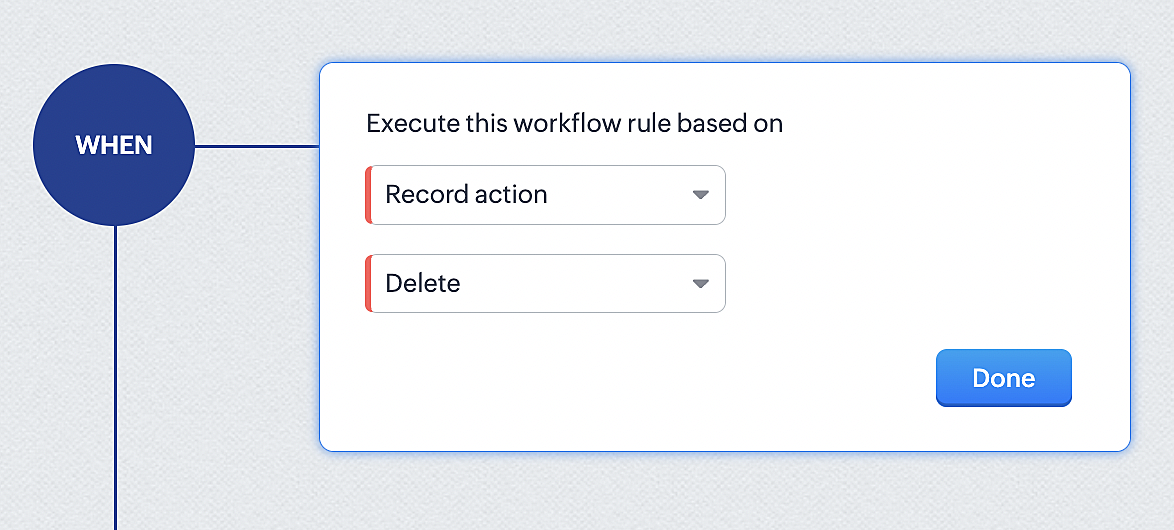
2. Configure condition > All Meetings.

3. Instant Actions > Function.
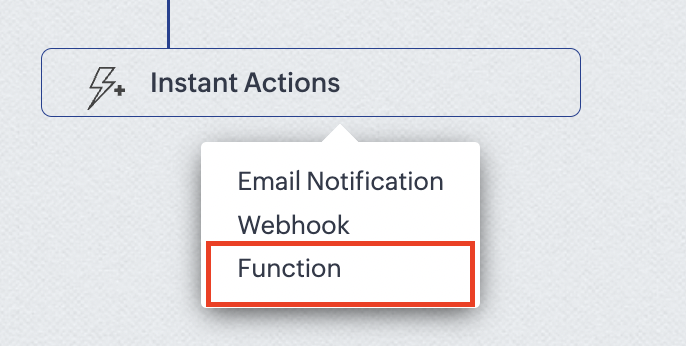
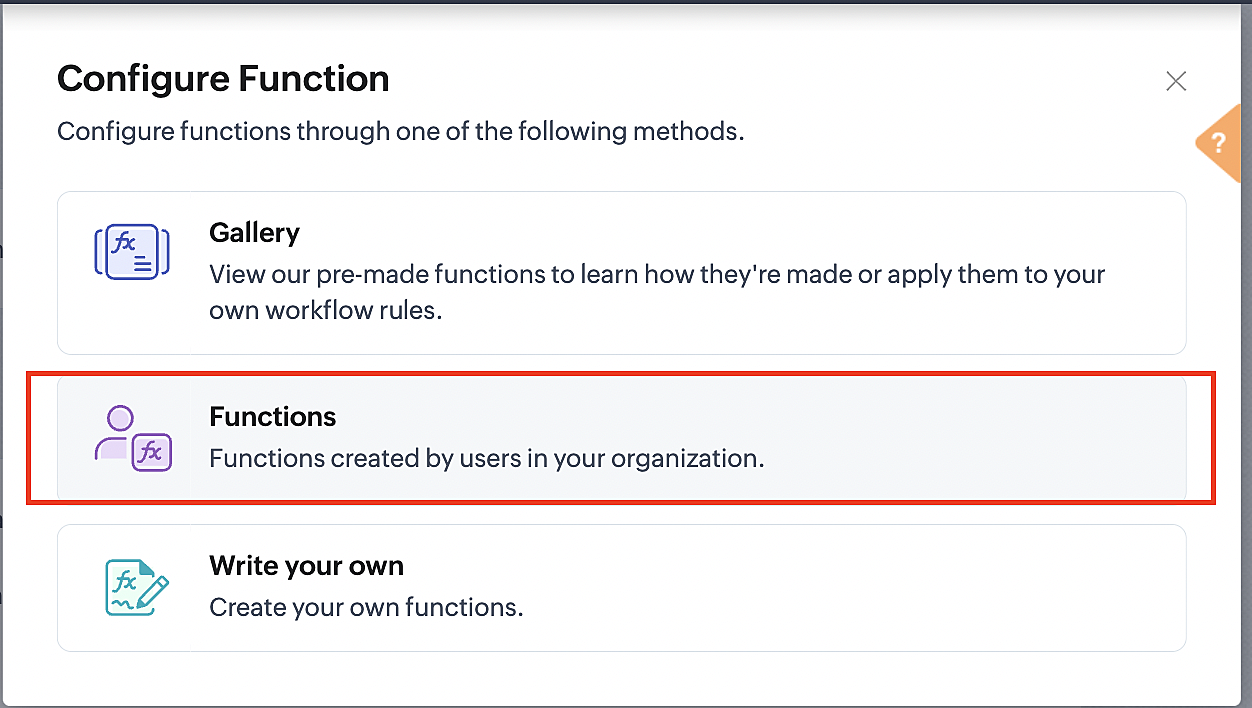
4. Click the New Function button.

5. In the Configure custom function page, select the "cancel" function you created from among the functions users in your organization have created.
Part 3: Argument mapping
1. Press # to choose an argument value.
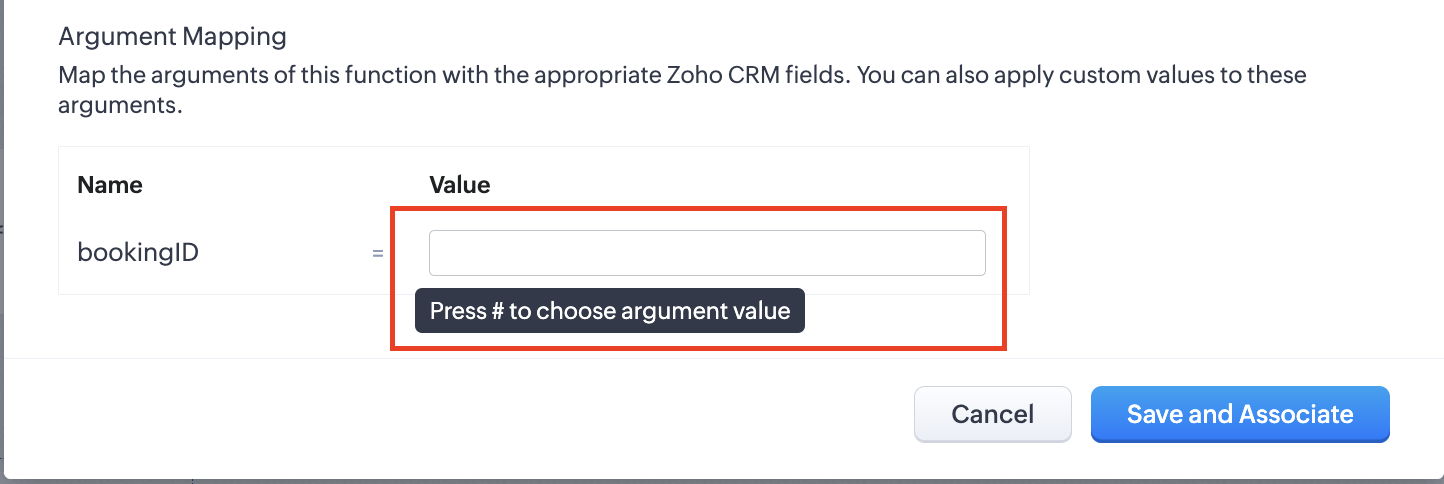
2. Select Meetings under Module and BookingId in the field.
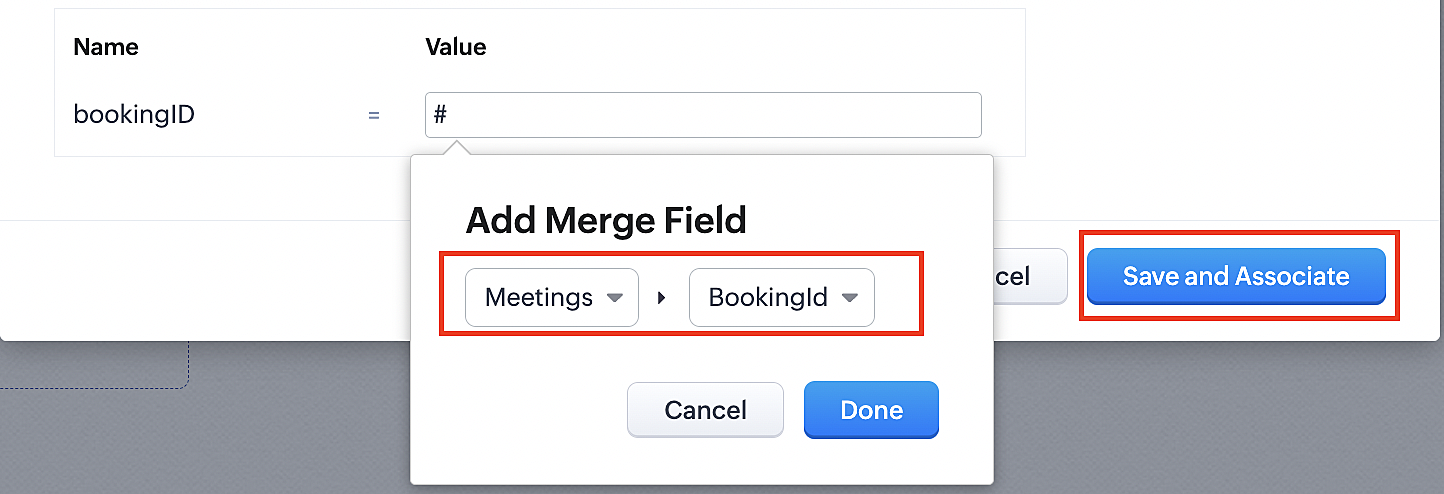
3. Click the Save and Associate button.
Reference:
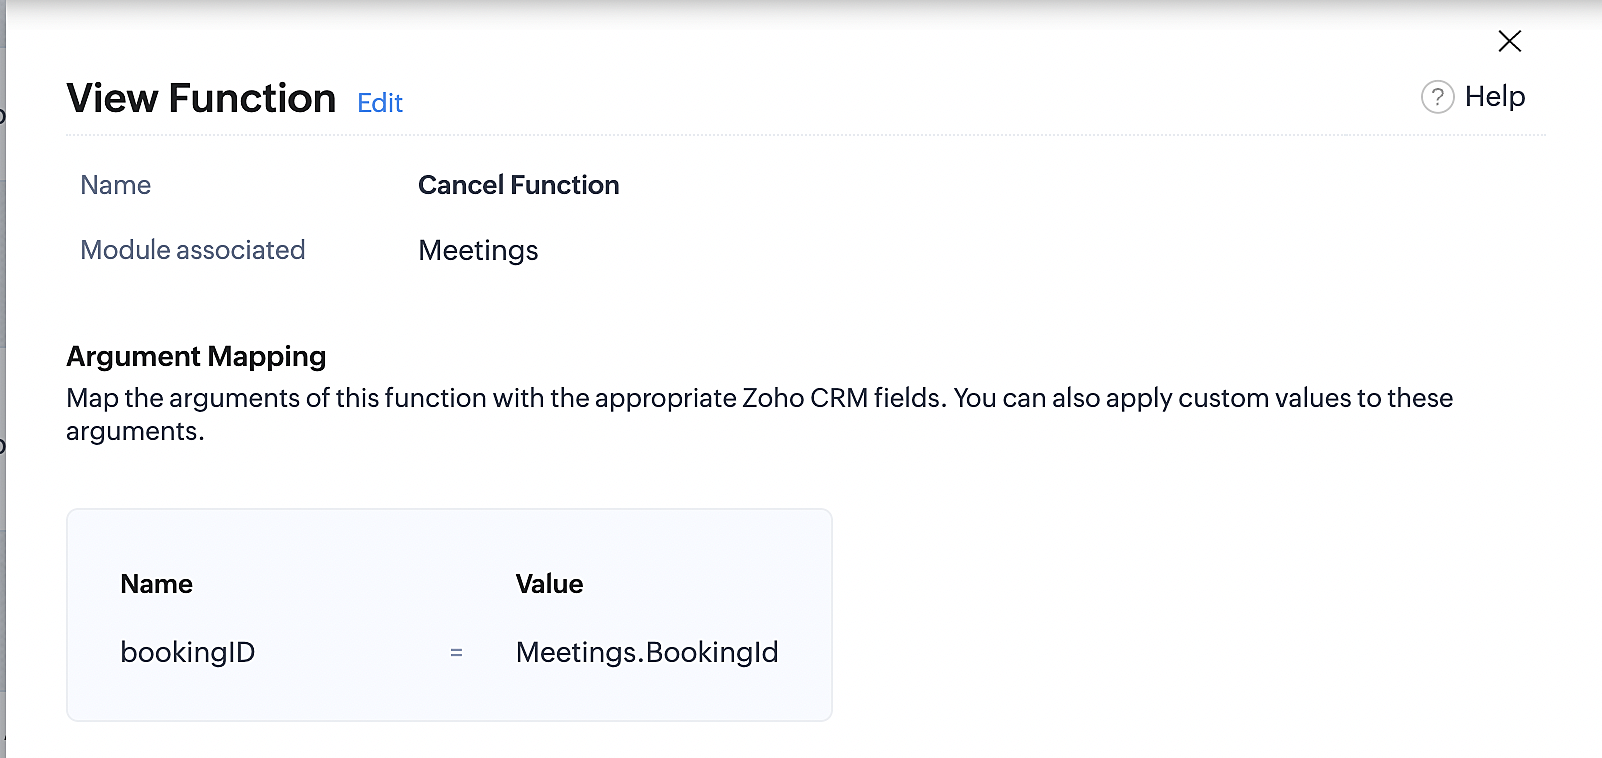
Below is the final flow of the cancel booking workflow:
At the end of Part 3, we will have created a workflow that will be executed automatically when meetings are deleted in Zoho CRM. Simultaneously, the bookings associated with the meeting will also be canceled in Zoho Booking.
ii. Creating workflow for updating an appointment's status as "no show" in Zoho Bookings when the meeting's booking status is marked as no show in Zoho CRM
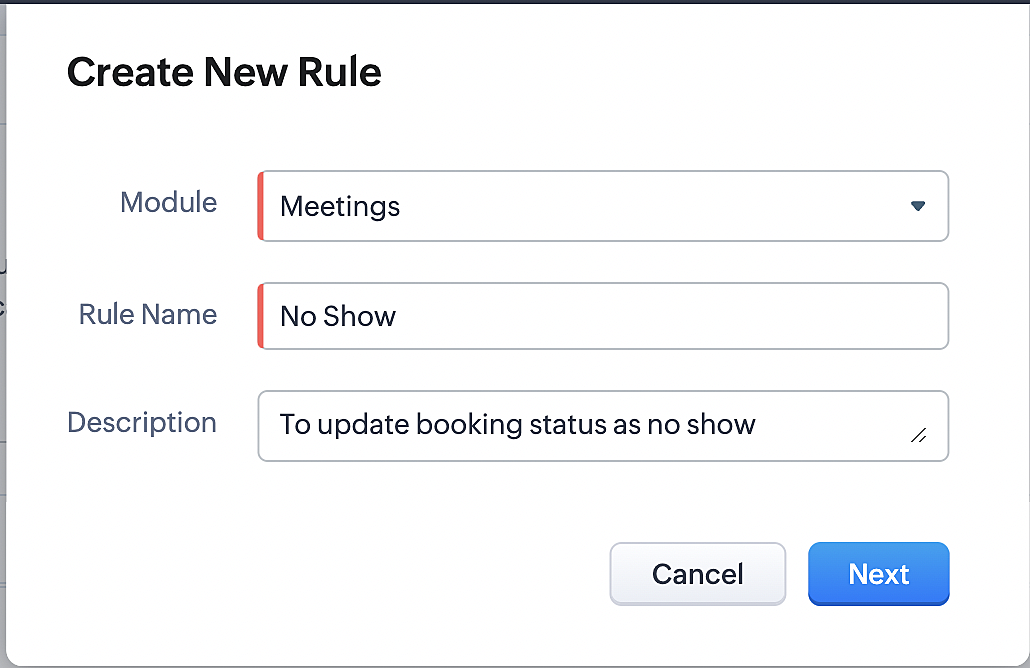
Part 4: Creating the rule
1. Go to Setup > Automation > Workflow Rules.
2. In the Workflow Rules page, click Create Rule.

3. Select Meetings under Module and configure the rule name and description as required.
Reference:

Part 5: Specifying the rule trigger
If you encounter difficulties while navigating through the steps mentioned below, please refer to Part 2 above, where we have provided step-by-step screenshots for clarification.
1. Record Action > Edit.

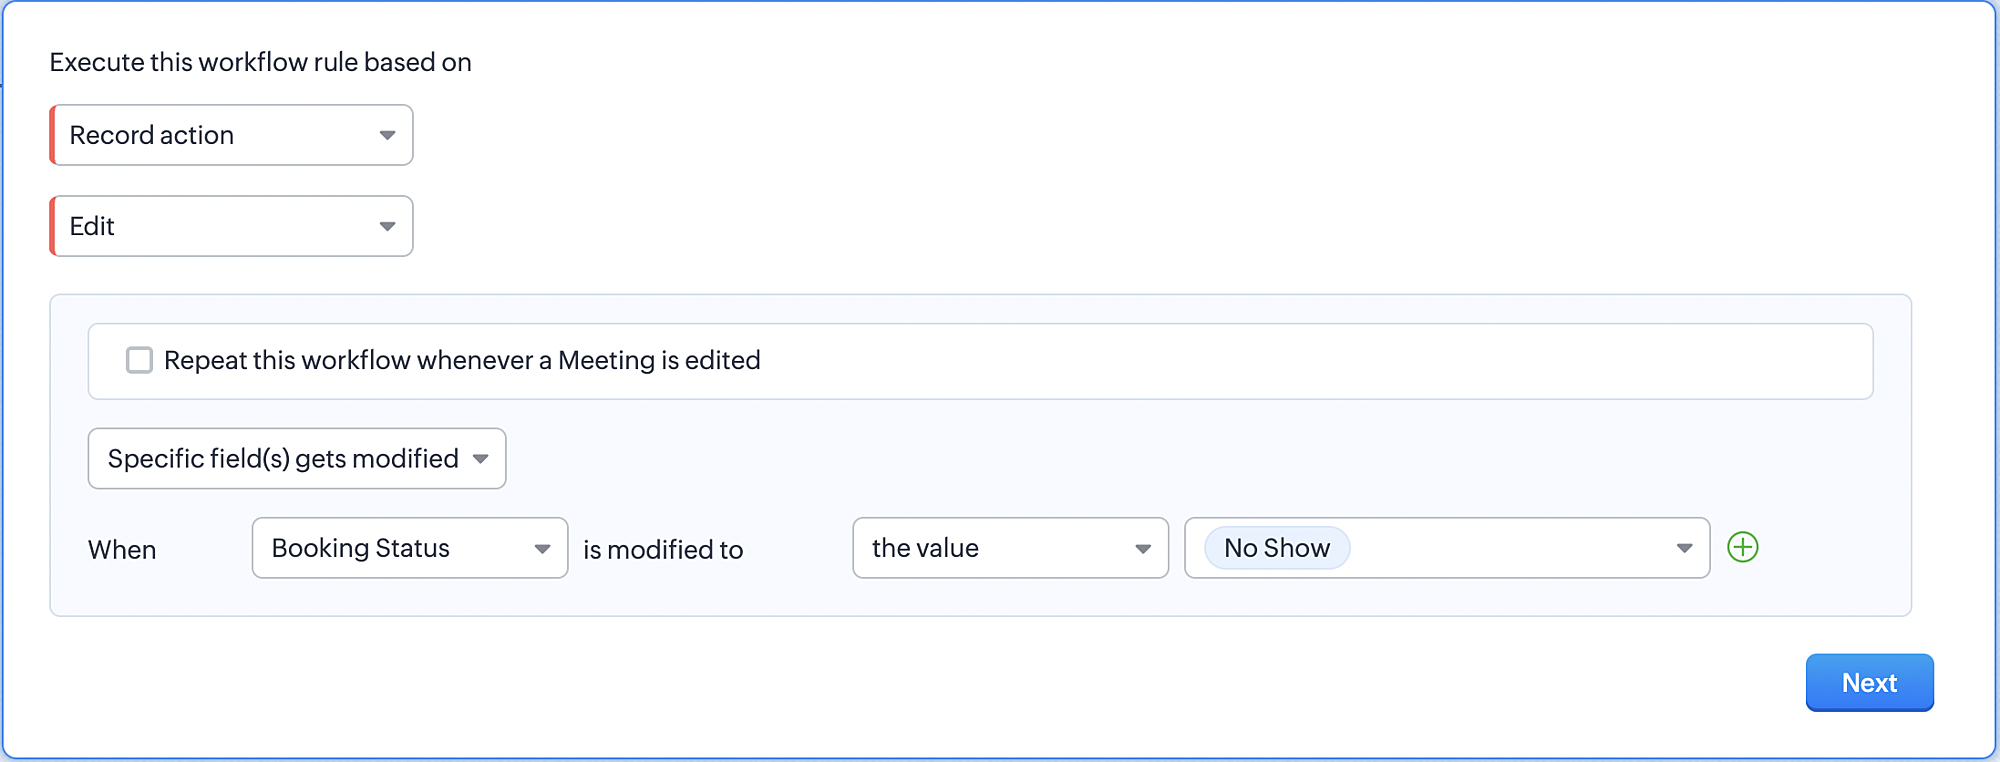
2. Enable the Specific field(s) gets modified and configure it per the screenshot below.
a. This is to ensure that the workflow is executed only when the booking status under the meeting module is
updated to "No Show".
updated to "No Show".
3. Configure condition > All Meetings.
4. Instant Actions > Function > New Function.
5. In the Configure custom function page, select the "no show" function you created from among the functions
users in your organization have created.
users in your organization have created.
Part 6: Argument mapping:
If you encounter difficulties while navigating through the steps mentioned below, please refer to Part 3 above, where we have provided step-by-step screenshots for clarification.
1. Press # to choose an argument value.
2. Select Meetings under Module and configure the field as "BookingId".
3. Click Save and Associate button.
Reference:
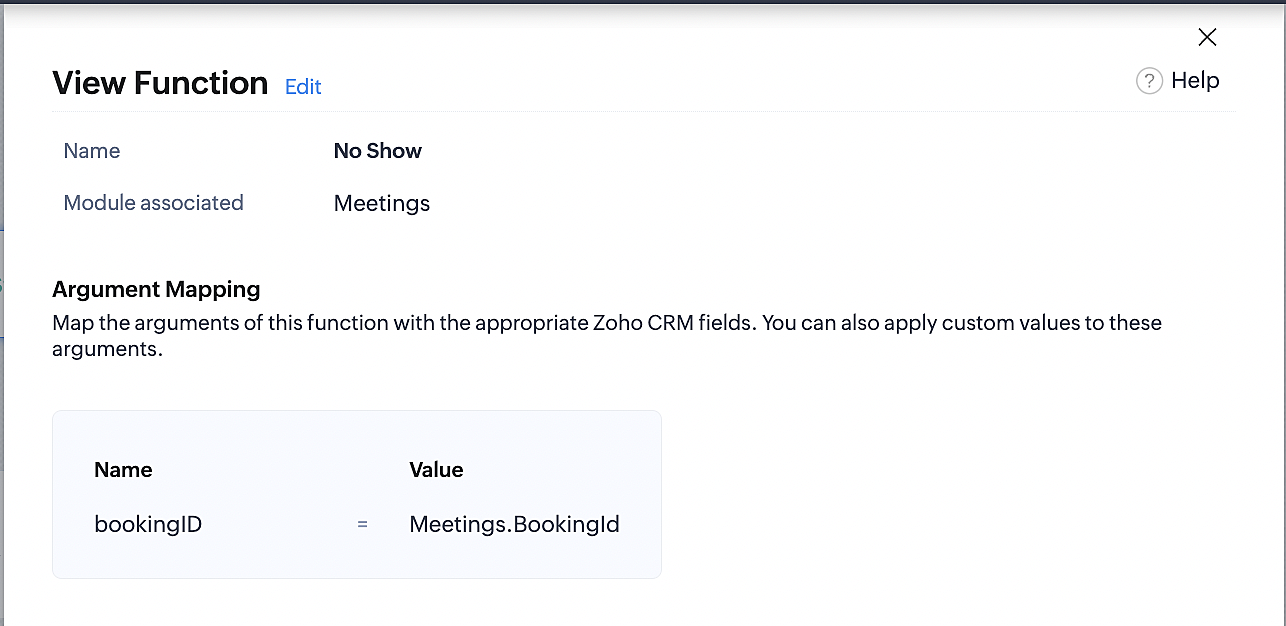
Below is the final flow of the "No Show" booking status workflow:
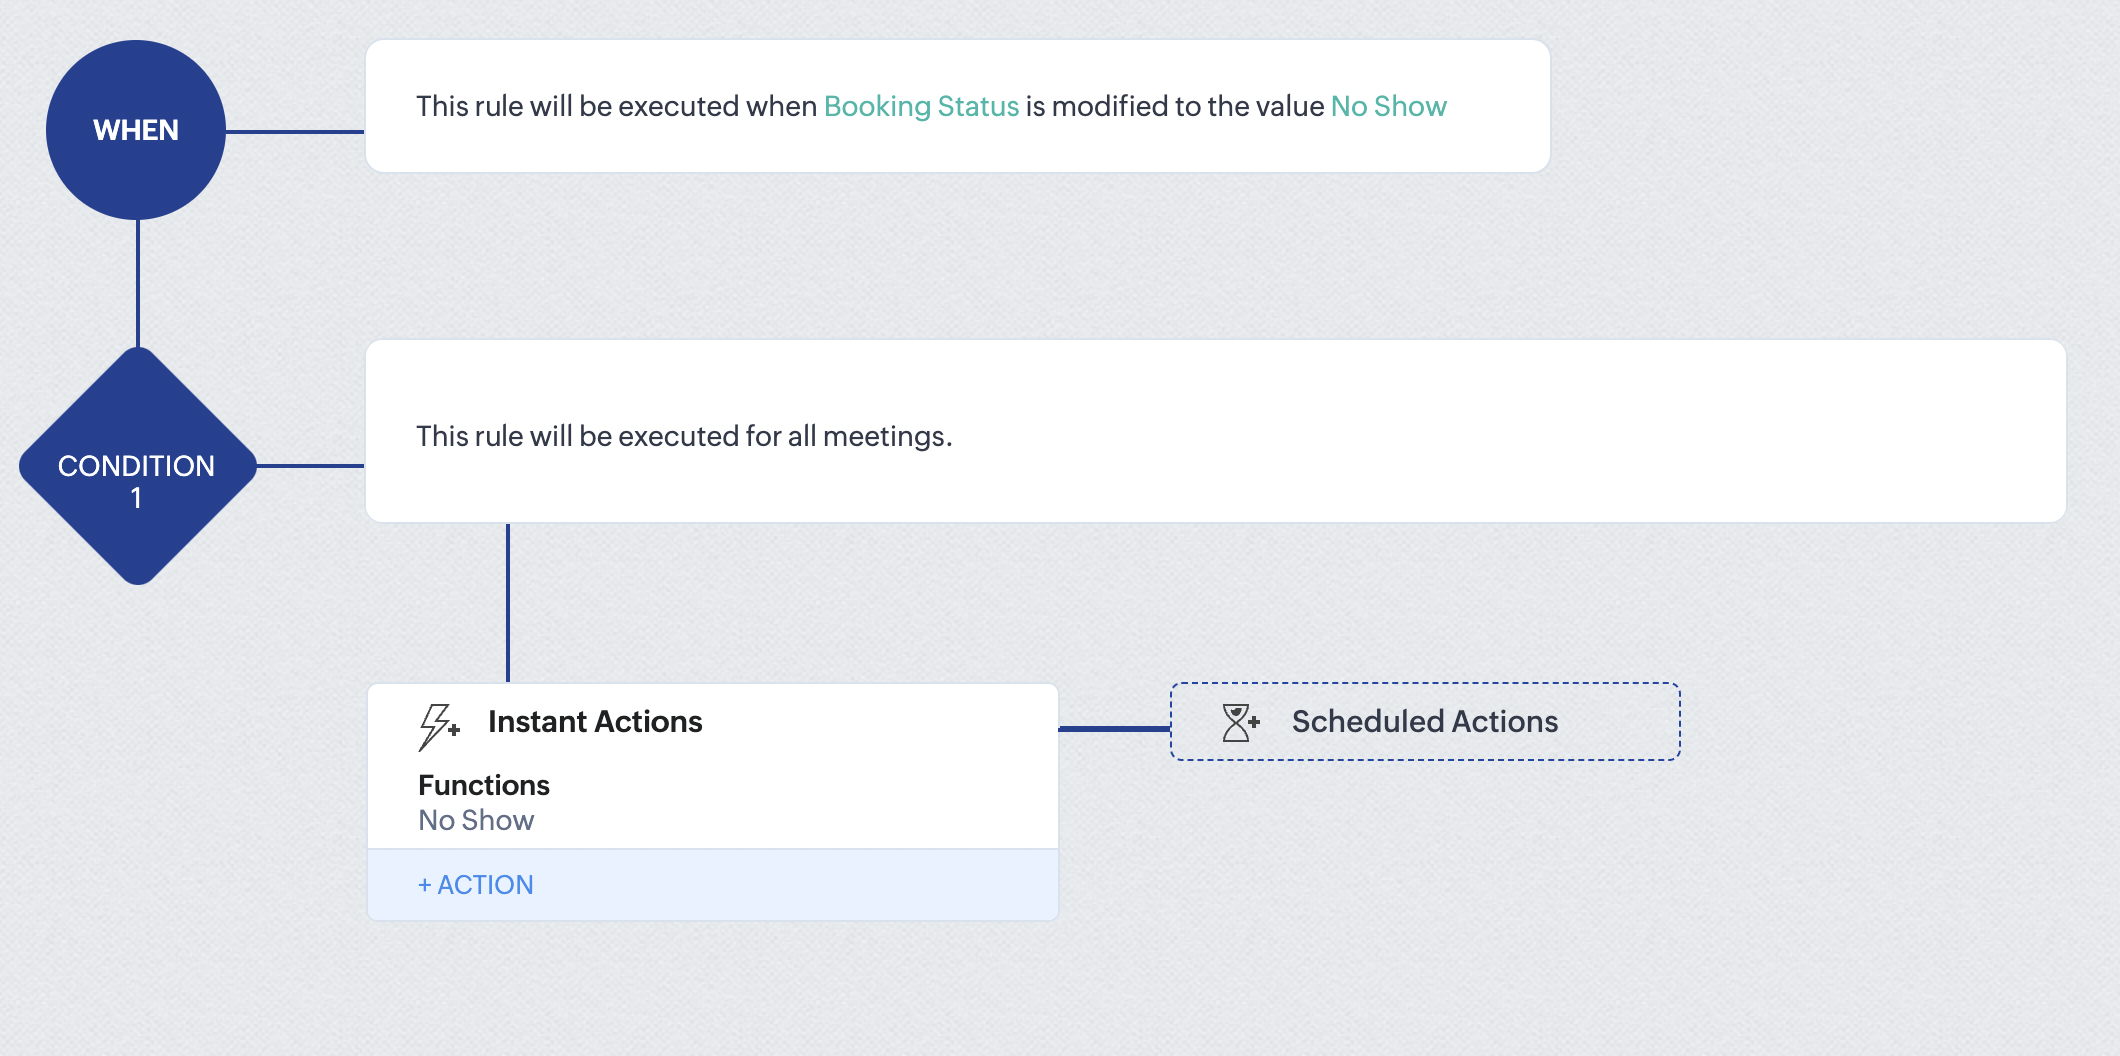
At the end of part 6, we will have created a workflow that automatically executes when the booking status field within the Zoho CRM Meetings module is updated to "No Show." This action will result in the associated bookings for that meeting also being marked as "No Show" in Zoho Bookings.
iii. Creating workflow for updating appointment status as "Completed" in Zoho Bookings when the booking status field of the meeting is marked as completed in Zoho CRM.
Part 7: Creating the rule
1. Go to Setup > Automation > Workflow Rules.
2. In the Workflow Rules page, click Create Rule.

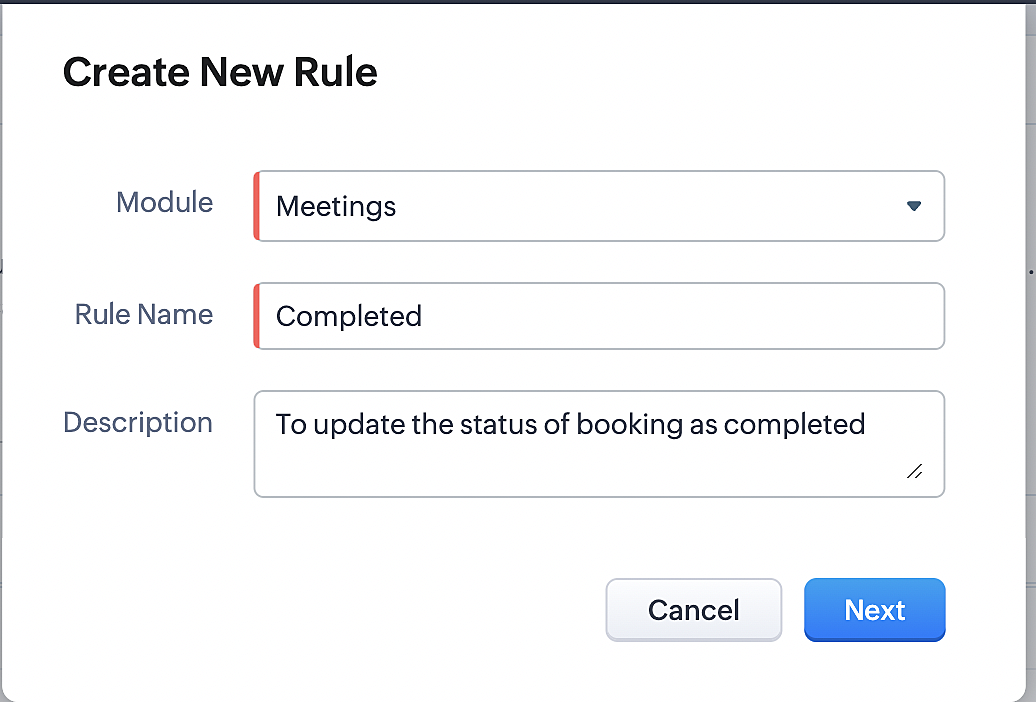
3. Select Meetings under Module and configure rule name and description as required.
Reference:
Part 8: Specifying the rule trigger
If you encounter difficulties while navigating through the steps mentioned below, please refer to Part 2 above, where we have provided step-by-step screenshots for clarification.
1. Record Action > Edit.

2. Enable the Specific field(s) gets modified setting and configure it per the screenshot below.
a. This serves to ensure that the workflow is executed only when the booking status under the Meetings module is
updated to "Completed".
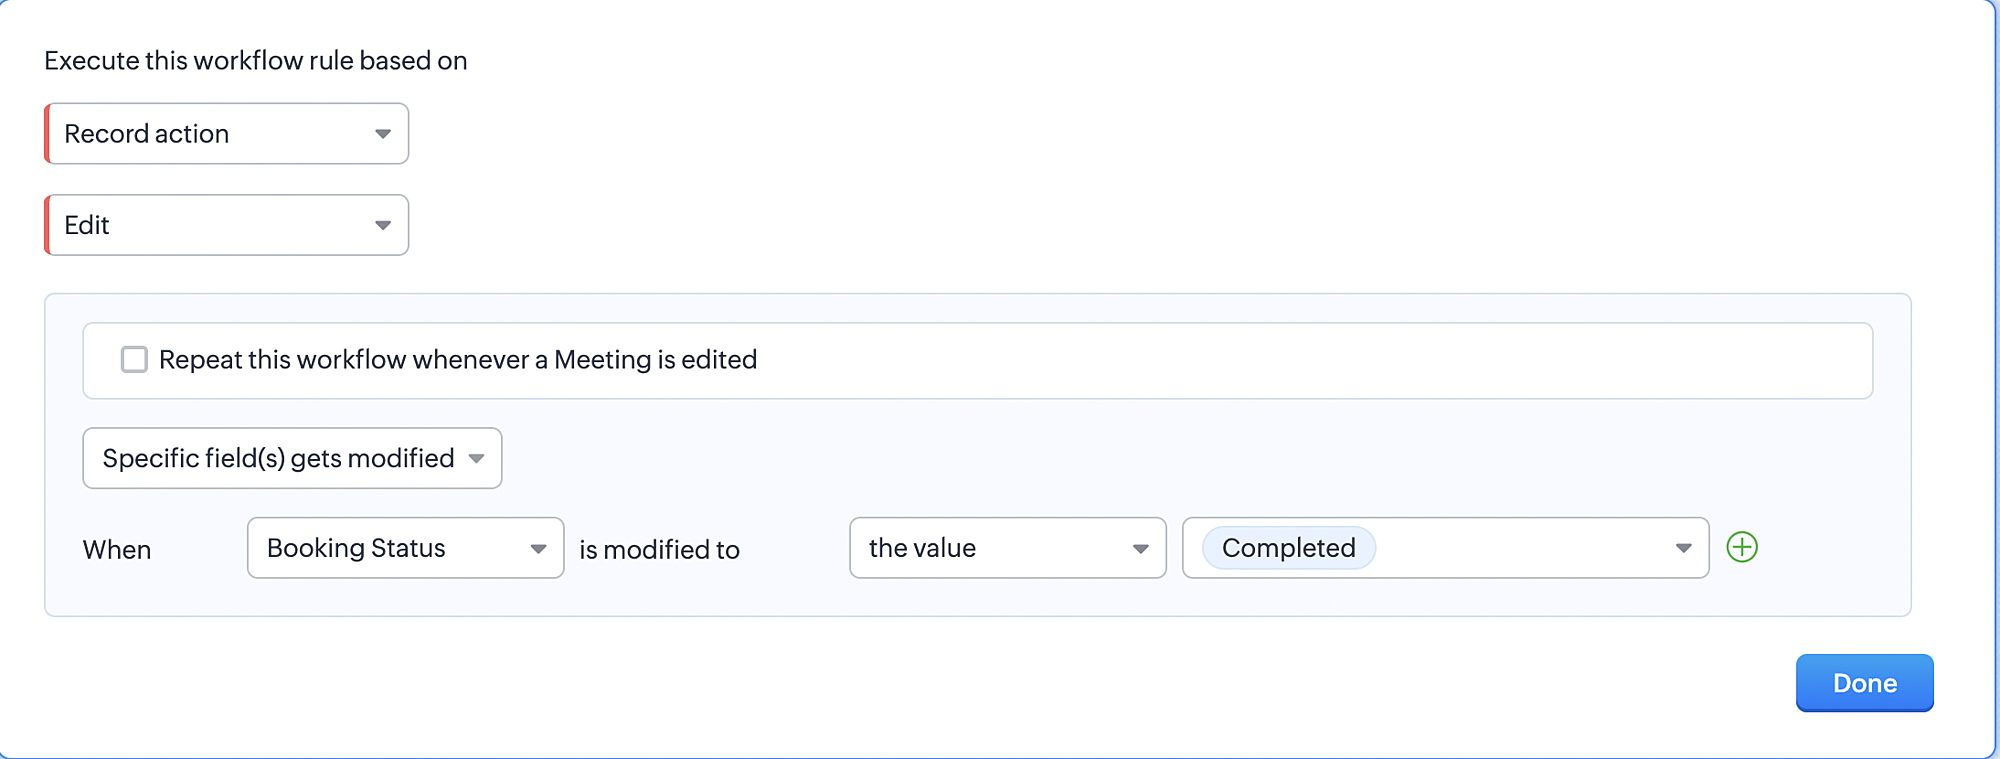
3. Configure condition > All Meetings.
4. Instant Actions > Function > New Function.
5. In the Configure custom function page, select the "completed" function you created from among the functions users
in your organization have created.
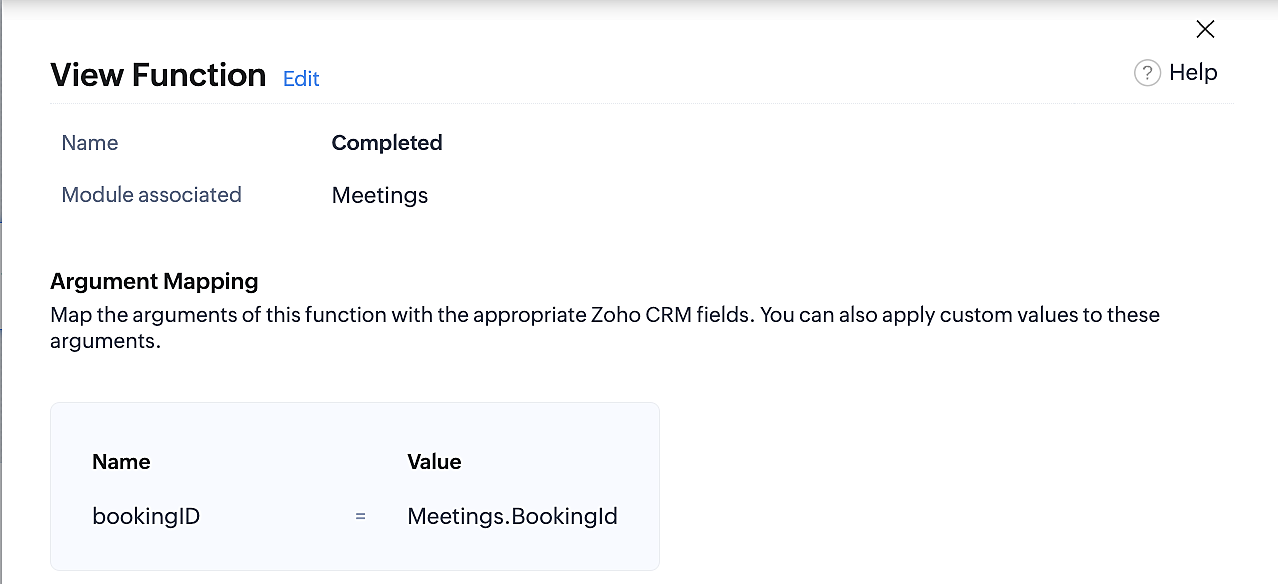
Part 9: Argument mapping:
If you encounter difficulties while navigating through the steps mentioned below, please refer to Part 3 above, where we have provided step-by-step screenshots for clarification.
1. Press # to choose an argument value.
2. Select Meetings under Module and configure the field as "BookingId".
3. Click Save and Associate button.
Reference:
Below is the final flow of the "Completed" booking status workflow:
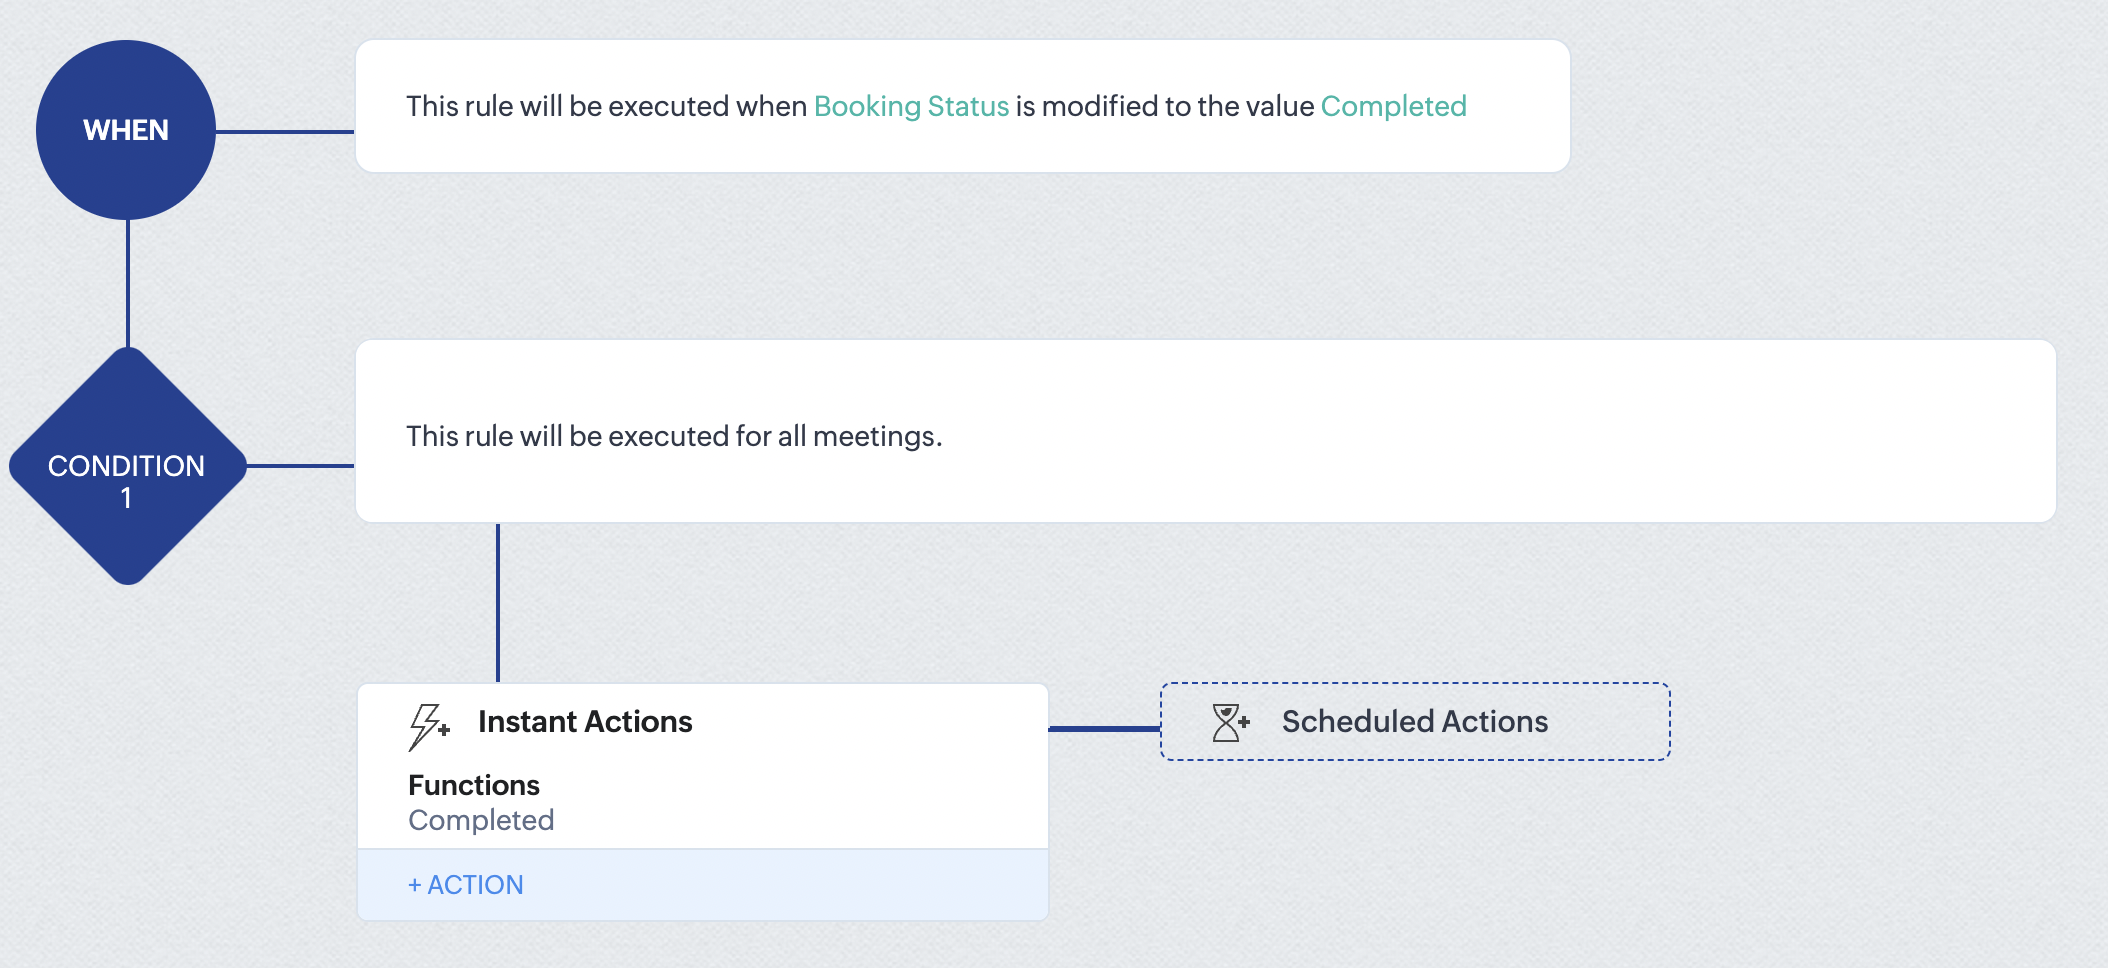
At the end of part 9, we will have created a workflow that is automatically executed when the booking status field within the Zoho CRM Meetings module is updated to "Completed." As a result, the associated bookings for that meeting will also be marked as "Completed" in Zoho Bookings.
Conclusion
We've reached the end of this community post. With the integration mentioned above in place, you'll be able to book, cancel, and update the status of appointments in Zoho Bookings directly from your Zoho CRM application. This will help you effectively manage your appointments in one place. As mentioned above, we've covered the rescheduling action in a separate post, which you can access by clicking on the following link: Reschedule Action
Furthermore, we've outlined a method for automating appointment statuses in detail. You can use this document as a reference to explore the various possibilities that suit your needs.
If you have any questions or need assistance with your configuration, please email us at hello@zohobookings.com or support@zohobookings.com.
New to Zoho Recruit?
Zoho Campaigns Resources
Topic Participants
Kaushik S
bruce
Ishwarya SG
PrismaNote Support
Sticky Posts
Introducing Multiple Sandbox Types and Support for Module's Data Population
Register here for the upcoming Focus Group webinar on Multiple Sandbox | Help documentation to learn more about the new enhancements Hello everyone, Sandbox in CRM is a testing environment for users to create and test new configurations like workflowGood news! Calendar in Zoho CRM gets a face lift
Dear Customers, We are delighted to unveil the revamped calendar UI in Zoho CRM. With a complete visual overhaul aligned with CRM for Everyone, the calendar now offers a more intuitive and flexible scheduling experience. What’s new? Distinguish activitiesVoC in Zoho CRM is now data savvy: Explore response drilldown, summary components and participation in CRM criteria
VoC has all the goods when it comes to customer intelligence—which is why we're constantly enhancing it. We recently added the following: A customer drilldown component that shows you the list of prospects and customers behind a chart's attribute ExpandedWrapping up 2025 on a high note: CRM Release Highlights of the year
Dear Customers, 2025 was an eventful year for us at Zoho CRM. We’ve had releases of all sizes and impact, and we are excited to look back, break it down, and rediscover them with you! Before we rewind—we’d like to take a minute and sincerely thank youPresenting ABM for Zoho CRM: Expand and retain your customers with precision
Picture this scenario: You're a growing SaaS company ready to launch a powerful business suite, and are looking to gain traction and momentum. But as a business with a tight budget, you know acquiring new customers is slow, expensive, and often delivers
Zoho CRM Plus Resources
Zoho Books Resources
Zoho Subscriptions Resources
Zoho Projects Resources
Zoho Sprints Resources
Zoho Orchestly Resources
Zoho Creator Resources
Zoho WorkDrive Resources
Zoho CRM Resources
Get Started. Write Away!
Writer is a powerful online word processor, designed for collaborative work.
Zoho CRM コンテンツ
-
オンラインヘルプ
-
Webセミナー
-
機能活用動画
-
よくある質問
-
Ebook
-
-
Zoho Campaigns
- Zoho サービスのWebセミナー
その他のサービス コンテンツ
ご検討中の方
Recent Topics
Can't edit Segments
Happening with 2 different Zoho One environments, in different browsers. Please fix.Zoho Sheet for Desktop
Does Zoho plans to develop a Desktop version of Sheet that installs on the computer like was done with Writer?From Zoho CRM to Paper : Design & Print Data Directly using Canvas Print View
Hello Everyone, We are excited to announce a new addition to your Canvas in Zoho CRM - Print View. Canvas print view helps you transform your custom CRM layouts into print-ready documents, so you can bring your digital data to the physical world withTransfer ownership of files and folders in My Folders
People work together as a team to achieve organizational goals and objectives. In an organization, there may be situations when someone leaves unexpectedly or is no longer available. This can put their team in a difficult position, especially if thereConsumer Financing
Does Zoho currently have a payment gateway (such as Stripe, Square, etc) which offers financing for customers? So, let's say the estimate we give the customer is greater than what they can afford at the time, but we can sell the service now, letting themHow can Data Enrichment be automatically triggered when a new Lead is created in Zoho CRM?
Hi, I have a pipeline where a Lead is created automatically through the Zoho API and I've been trying to look for a way to automatically apply Data Enrichment on this created lead. 1) I did not find any way to do this through the Zoho API; it seems likevalidation rules doesn't work in Blueprint when it is validated using function?
I have tried to create a validation rule in the deal module. it works if I try to create a deal manually or if I try to update the empty field inside a deal. but when I try to update the field via the blueprint mandatory field, it seems the validationSubform edits don't appear in parent record timeline?
Is it possible to have subform edits (like add row/delete row) appear in the Timeline for parent records? A user can edit a record, only edit the subform, and it doesn't appear in the timeline. Is there a workaround or way that we can show when a userZoho CRM - Option to create Follow-Up Task
When completing a Zoho CRM Task, it would be very helpful if there was an option to "Complete and Create Follow-Up Task" in the pop-up which appears. It could clone the task you are closing and then show it on the screen in edit mode, all the user wouldMandatory Field - but only at conversion
Hello! We use Zoho CRM and there are times where the "Lead Created Date & Time" field isn't populated into a "Contractor" (Account is the default phrase i believe). Most of my lead tracking is based on reading the Lead Created field above, so it's importantZoho CRM for Everyone's NextGen UI Gets an Upgrade
Hello Everyone We've made improvements to Zoho CRM for Everyone's Nextgen UI. These changes are the result of valuable feedback from you where we’ve focused on improving usability, providing wider screen space, and making navigation smoother so everythingFile Upload field automatically replaces spaces with underscores – support experience
Hi everyone, I want to share my recent experience regarding the File Upload field behavior in Zoho Creator and my interaction with the Zoho support team. When a user uploads a file, the system automatically renames the document by replacing spaces inDeluge function to copy parent record file upload field to child record file upload field
I'm stuck trying to write a deluge function that is triggered via automation in child record "Appointments," confirms if a file is in file upload "Report" field of parent "Contacts" record via Contacts lookup field "Contact_Name". If no file is in parentZoho Books Sandbox environment
Hello. Is there a free sandbox environment for the developers using Zoho Books API? I am working on the Zoho Books add-on and currently not ready to buy a premium service - maybe later when my add-on will start to bring money. Right now I just need aMake panel configuration interface wider
Hi there, The same way you changed the custom function editor's interface wider, it would be nice to be able to edit panels in pages using the full width of the screen rather than the currently max-width: 1368px. Is there a reason for having the configuration panel not taking the full width? Its impossible at this width to edit panels that have a lot of elements. Please change it to 100% so we can better edit the layouts. Thanks! B.Image Compression Options
Much better if we have level of options to compress the image [20%, 40%...] We are dealing with service reports daily that has before and after photos (image field)- the file size too large and one thing, the current limit is 10mb or 15mb for reportCannot get code to work with v2.mergeAndStore!
Please can someone help me pass subform items into a repeating mail merge table row using v2.mergeAndStore? I have a mail merge template created in Writer and stored in Workdrive. This template is referenced by a custom CRM function which merges all ofHow to hide or archive a blog post temporarily in Zoho commerce website builder?
I would like to temporarily hide or archive a blog post in zoho commerce website builder so that it doesnt appear on my website till I enable it again. I tried to look for this option but could not find it. It only allows me to permanently delete a blogFounders using Zoho — are you leveraging Zoho Campaigns + Zoho Social for thought leadership… or just sending emails?
I’ve noticed something interesting in the Zoho ecosystem. Many founders use Zoho Campaigns and Zoho Social for basic marketing—newsletters, scheduled posts, and announcements. But very few are using these tools strategically to: • Position themselvesWATERFALL CHART IN ZOHO ANALYTICS
Hi Team, I would like to know whether Zoho Analytics currently supports a Waterfall Chart as a built-in visualization type. If yes, could you please share the steps to create one? If not, is there any workaround or recommended method to build a WaterfallHow to mix different types of inputs (such as dropdown list and textbox)
Hi, I'm creating a form called "Room Reservations" for a company. I created a "table" using "Matrix Choice". I created "Room 1", "Room 2" and "Room 3" with the "Questions". I would then like to create two columns with the "Answers", one called "Department"Full Context of Zoho CRM Records for Zia in Zoho Desk for efficient AI Usage
Hello everyone, I have a question regarding the use of Zia in Zoho Desk in combination with CRM data. Is it possible to automatically feed the complete context of a CRM record into Zia, so that it can generate automated and highly accurate responses forAbility to assign Invoice Ownership through Deluge in FSM
Hi, As part of our process, when a service appointment is completed, we automated the creation of the invoice based on a specific business logic using Deluge. When we do that, the "Owner" of the invoice in Zoho FSM is defaulted to the SuperAdmin. ThisReply to Email for SO/PO
Hello, We are new to Zoho Books and running into an issue. Our support@ email is our integration user. When our team is sending out PO/SO's we are updating the sender email, but for some reason many of our responses are coming back to our support@ emailHow to Convert NSF to PST Format Effortlessly? - SYSessential
It is highly recommended to obtain the error-free solution of the SYSessential NSF to PST converter to convert NSF files from Lotus Notes. Using this professional software, it becomes easier to convert all NSF database items, including emails, journals,Zoho Commerce - Poor Features Set for Blogging
Hi Zoho Commerce team, I'm sure you will have noticed that I have been asking many questions about the Blogs feature in Commerce. I thought that it would be useful if I share my feedback in a constructive way, to highlight the areas which I feel needPass shipping info to payment gateway Zoho Books to Authorize.net
For some reason the integration from Zoho books to Authorize.net does not pass the shipping address. Authorize.net is ready to receive it, but zoho books does not send itMassive Zoho Books failure
We have not received any communication or notification from Zoho, but we have detected that Zoho Books is not working for all our users. We cannot access or use Zoho Books. This is critical. We are trying to contact Zoho on the Spain telephone number,Does the Customer “Company Name” field appear anywhere in the Zoho Books UI outside of PDFs?
Hi everyone, I’m trying to understand how the Company Name field is actually used in Zoho Books. There is a Company Name field on the customer record, but when viewing transactions like a Sales Order in the normal UI (non-PDF view), that field doesn’tEmail outbox is now available in the sandbox
Hello all! Testing emails without visibility has always been a blind spot in the sandbox. With the new Outbox, that gap is closed. You can now view and verify every email triggered from your sandbox, whether it’s through workflows, approvals, or massZoho Desk blank screen
opened a ticket from my email, zoho desk comes up blank, nothing loads. our receptionist also gets the same thing under her login on her computer. our sales rep also gets same thing on zoho desk at his home on a different computer. I tried clearing cache/history/cookies,Looking For Recruit Developer
Hi everyone, I am looking for a Zoho Certified Developer to assist with a development project for MetalXpert. We are building a software system designed to bridge the gap between a candidate mobile app and an employer web portal using Zoho Recruit assales IQ issue on website
i integrated the zoho sales IQ code on the website but it is comming in distroted form i am sharing the screenshot below the website is bulit in wix platformMulti-currency and Products
One of the main reasons I have gone down the Zoho route is because I need multi-currency support. However, I find that products can only be priced in the home currency, We sell to the US and UK. However, we maintain different price lists for each. ThereDeprecation of the Zoho OAuth connector
Hello everyone, At Zoho, we continuously evaluate our integrations to ensure they meet the highest standards of security, reliability, and compliance. As part of these ongoing efforts, we've made the decision to deprecate the Zoho OAuth default connectorI need to know the IP address of ZOHO CRM.
The link below is the IP address for Analytics, do you have CRM's? IP address for Analytics I would like to know the IP address of ZOHO CRM to allow communication as the API server I am developing is also run from CRM. Moderation Update: The post belowImportant Update: Google Ads & YouTube Ads API Migration
To maintain platform performance and align with Google's newest requirements, we are updating the Google Ads and YouTube Ads integrations by migrating from API v19 to the newer v22, before the official deprecation of v19 on February 11, 2026. Reference:Importing into the 'file upload' field
Can you import attachments into the file upload field. I would expect it to work the same way as attachments do, But can't seem to get it to work.Zoho recruit's blueprint configuration is not functioning as mapped
Current Status: Zoho Blueprint is not functioning as configured. Issue: We are moving a Candidate status in Zoho Recruit "for active file" but we encountered: "Status cannot be changed for records involved in Blueprint." This happens to various clientSuper Admin Logging in as another User
How can a Super Admin login as another user. For example, I have a sales rep that is having issues with their Accounts and I want to view their Zoho Account with out having to do a GTM and sharing screens. Moderation Update (8th Aug 2025): We are workingNext Page
